
In this reading, Don Norman emphasizes the importance of a good design: discoverability and understandability. Is a design really good if users can’t comprehend it? Let’s imagine a swinging door; it has no signs to indicate whether users should push or pull and has big large handles. This creates frustration for the users as they have no idea whether they should push or pull them. Thus, they are not able to discover was actions should be used leading to a lack of understanding of what to do with the door. However, a good design would have a sign clearly indicating whether users should push or pull, helping them discover the action they should take, and leading to them understanding whether they should push or pull. This is also true for light switches. If a room has multiple complex light switches users could be confused and frustrated as to which switch corresponds to which light. Designers should focus on the psychological needs of humans when building something to decrease frustration and increase satisfaction. There are five psychological concepts: Affordances(cues that users can pick up), Signifiers (determine where the action will take place), Mapping (grouping and proximity), Feedback, and Constraints (Limitations). Conceptual Models are simplified explanations of how something works in users’ minds. We recall this information when interacting with different things. Overall, I agree with what Don Norman is stating in this text. Although a good design should look good it doesn’t only rely on that. A good design means that users can comprehend it easily making life easier for them. I’d rather have a simple easy object than a complex-looking object with a lack of clarity
Category: Fall 2022 – Shiloh
OOP project
Concept:
For object oriented programming my initial idea was to create a circle within a circle, something like this https://dribbble.com/shots/13450284-Creative-Coding-Tusi-Couple. I ran into some problems with the addition of line and dots when the mouse was clicked.
Reflections and improvements:
I would like to improve skills in interactivity between user and program, how to incorporate simple methods and have a successful outcome.
Water Drops
I tried creating flower objects. To do that I would need to to arrange a few circles around a radius and to do that I followed the instructions here, I also tried to change the transparency of the petals for each instance and used this function
self.squareColor = color(clr);

self.squareColor.setAlpha(flwr_opacity)
I thought that it might be interesting to try to create flowers with rectangles that are rotated around its origin, but I realized that I would need to translate the shape to make sure that it stayed in place. I used 2 rectangles to create the “flowers” and then used the rotation code to make the “flower rotate. when I created more “flowers” I experiment with values in the rotation script but wasn’t able to make the other ones rotate in place. (update, after the class about translation I know why this is happening, push and pop would probably help here) for some reason, the shapes moved in circles rather than rotate around themselves like I wanted, however, it looked interesting and kind of resembled a roller coaster.
I ended up only having 1 on the screen but continuously increase the size. and once it reaches a certain size a new color starts to expand.
but I wanted the previous colors to continue expanding when new colors are added so I experiment with loops.
this kind of worked but constantly rebuilt all the elements in the array which made it slow. But it reminded me of clouds or cotton candy.
I also wanted to explore cases where it would be useful to create instances of an object multiple times and decided to create an interaction where when the user clicks the canvas a water drop is created and the canvas fills up with water.
some of the challenges I faces in included:
I wanted to create a water drop class that would have the properties of a single drop (speed, direction …) and a water class that created instances of the drop object. However, I had trouble displayed the water drop as it fill (it would instantly appeared at the bottom. I assume that this might have to do with the fact that the water function was called in the draw(which keeps updating) and the drop.display was called in the water class in a method that didn’t update for every y change.
I also wanted to inverse the background and water colors once the canvas filled up (so that the screen can be filled up with drops of a different color) but had trouble with that.
Aisha – OOP
Usually, when I physically paint, my go-to painting is the night sky. So I wanted to replicate that idea in this assignment. I created 4 classes: Rain, Moon, Sun, and Grass. The Rain class is the one I’m most proud of. With the help of the coding train, I displayed many drops falling from the sky using a fall function and a draw function at different x and y positions as well as different speeds. Here is the code:
class Rain {
  constructor(yspeed) {
    //random so drops dont fall in the same position/speed
    this.x = random(400);
    this.y = random(-500, -50);
    this.yspeed = random(5, 7); //how fast it falls
  }

  // function for raindrops
  fall() {
    this.y = this.y + this.yspeed;

    //ensures that rain is constantly falling
    if (this.y > height) {
      this.y = random(-200, -100);

    }
  }

  //shows raindrop
  draw() {
    stroke(255, 255, 255);
    line(this.x, this.y, this.x, this.y + 10);
  }
}
After this, I developed the moon and grass class. I then created a sun class that displays when the mouse is pressed. Furthermore, when the mouse is pressed it makes it turns from nighttime to daytime and stops the rain. I also created two people to stand there and look at each other. I attempted to make a tree however after a few hours it still wasn’t working so I ended up just putting an image of a tree in the art to add more details.
This is my sketch:
Future Improvements:
- I would like to build my own tree rather than upload an image from the internet.
- I would like to animate the two people to make it seem like they are hugging/kissing
- I’d also like to make the rain look more realistic (maybe have rain closer to the screen look bigger and rain in the back look smaller and splashes on the grass).
Assignment #3 (OOP) – Sugar cube!
Concept:
Coffee is undoubtedly my favorite go-to drink, especially as a sleep-deprived college student. Everything about coffee is wonderful – whether it be the scent of the coffee beans, the warm, inviting atmosphere of cafes, or even its bitter aftertaste. So, naturally, I wanted to dedicate at least one of my projects to create an animation with coffee, although I wasn’t entirely sure what and how. Then an idea of having a coffee cup and a sugar cube being dropped inside it came randomly to me, so I decided to try and recreate that. It was perfect because it incorporated movement, which was something I wanted to try since day 1! Initially I wanted to create a kettle and have coffee pour out from it, but I quickly decided against it when I realized my skills weren’t that advanced enough to recreate that. Instead, I decided to create a simple clock to fill the empty space on the canvas.
Process/Coding:
I wanted my background to have a vintage vibe to it, so I decided to go with a slightly darker orange. Then I created the coffee cup, which took a while because I was still trying out and adjusting the position, length, etc. of the shapes. Eventually I was able to put the different shapes and lines together to create a mug with coffee inside, but then I had some trouble trying to empty the space between the handle and the mug’s body; because I colored the entire arc with white, it wasn’t letting me discolor the smaller arc space within it.
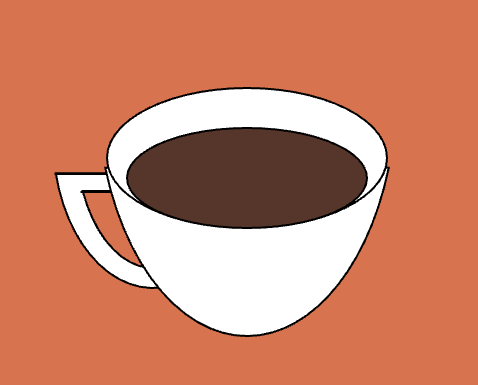 (it was this tiny space between the handle and the body of the mug.)
So in order to color that part as the same orange shade as the background, I simply decided to create an arc that will fit perfectly in that space and color it orange. Here’s the coding that I’ve used:
fill(230, 109, 69);
arc(93, 240, 77, 130, radians(37), radians(143), CHORD);
Once that was done, I moved onto creating the clock, which I initially visioned to also have a bit of animation in it because I wanted to move the clock’s hands. However, when I tried to animate the clock hands only, it instead hid most of my coffee cup’s body, which is an error/mistake that I’m still trying to figure out. So, unfortunately, the clock hands are fixed and frozen for now.
Now, the true challenge was creating a “class,” because I had no clue where to begin or what it would do. Thankfully, one of our Intro to IM upperclassman was kind enough to teach me the basics – once I understood that a “class” was simply a cookie cutter (using Professor Shiloh’s metaphor from class), it was a little easier to plug in the characteristics of whatever object that I wanted to create in the “class.”
I decided to name my class “Sugarcube,” true to the image and the role of the little white square that I was dropping into the coffee via animation. Here are all the codes that I used to create sugarcube:
let yPos = 30;
let sc1;

class Sugarcube {
  constructor() {
    this.yPos = 30;
    this.ySpeed = 2;
  }

  move() {
    if (this.yPos < 250) {
      this.yPos = this.yPos + 2;
    }
  }

  draw() {
    fill(255);
    square(120, this.yPos, 30);
  }
}
Then, in order to move it, all I had to do is plug in the below:
sc1.move();
sc1.draw();
And voilà, here’s the final product:
Reflection:
Although this was a pretty challenging assignment that I started off with very little knowledge in the function “class,” it definitely pushed me out of my comfort zone and learn new efficient skills! I realized just how convenient this function can be if it is used correctly, because all I need to do is plug in (variable name) move(); or (variable name) draw(); in order to reproduce the exact same variable.
Assignment 3: OOP-Based Art
Concept
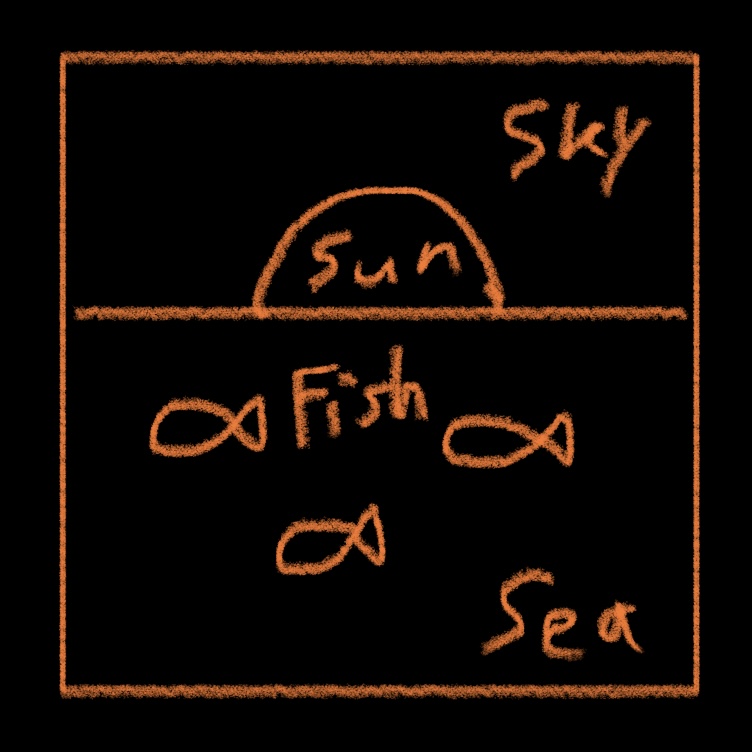
Based on the ability to create multiple objects with ease using OOP and arrays, I envisioned colorful schools of fish swimming in the sea for my third assignment. One that looked something like:
Coding Highlights
I first wanted to create a still picture before adding in the movement. Before coding in the fish, I sought to paint in the scenery they would soon inhabit. A highlight here was managing to give the sky and sea a nice gradient, which I achieved with the following code:
//Canvas size is 600 by 600.
//Sunset Sky
for (let i = 0; i < 200; i = i + 2){
  fill(255, 170 - i/1.5, 85);
  rect(0, i, 600, 5);
}
//Sea
for (let i = 0; i < 400; i = i + 4){
  fill(100 - i/4, 130 - i/4, 255);
  rect(0, i + 200, 600, 5);
}
//Sun
fill(255, 190, 40);
arc(300, 200, 200, 200, radians(180), radians(0));
Using two for() loops (one for the sky and the other for the sea), I painted in thin rectangles that slightly darken with each iteration of the loop, giving off the impression of a gradient. Upon the sunset sky, I drew in the setting sun using a simple arc function. Thus the scenery was complete, waiting for the fish to move in. Time to make these schools of fish an actual class.
//Create Class for Fish
class Fish{
  constructor(){
    this.xPos = random(0, 600);
    this.yPos = random(230, 600);
  }
  //Function for Drawing Fish
  draw(){
    fill(240, 145, 40);
    //Body
    ellipse(this.xPos, this.yPos, 60, 30);
    //Tail
    triangle(this.xPos + 10, this.yPos, this.xPos + 40, this.yPos - 15, this.xPos + 40, this.yPos + 15);
    //Eye
    fill(0);
    ellipse(this.xPos - 20, this.yPos - 4, 5);
    //Smile
    arc(this.xPos - 30, this.yPos, 15, 7, radians(0), radians(90));
  }
}
With this class established, I could now make objects that could call upon the draw() function described in the class to draw in fish at random locations. I churned out these objects by creating an array, generating multiple values—and in turn objects—within the array using a for() loop in the setup() function, and then calling upon said objects with another for() loop in the draw() function:
//Only Included Code Pertaining to Fish Creation
//Create Array for Fish
let fish = [];

function setup() {
  createCanvas(600, 600);
  noStroke();
  //Generate Multiple Values in Array for Fish
  for (let i = 0; i < 10; i++){
    fish[i] = new Fish();
  }
}

function draw() {
  //Draw In Fish
  for (let i = 0; i < 10; i++){
    fish[i].draw();
  }
}
With these ingredients, the still-picture draft was done!
A school of 10 nice fish. This assignment was going swimmingly.
Now, to make the fish move. This meant that I would have to add a new function into the Fish() class. I did so by creating and using two new variables, this.xSpeed and this.ySpeed, for which I assigned random values to make the fish swim at different speeds.
//Only Included Movement Part of the Class

//Create Class for Fish
class Fish{
  constructor(){
    this.xPos = random(0, 600);
    this.yPos = random(230, 580);
    //New Variables for Fish Movement
    this.xSpeed = random(-5, -1);
    this.ySpeed = random(-2, 2);
  }
  //New Function for Fish Movement
  move(){
    this.xPos += this.xSpeed;
    //Check to Stop Fish from Leaving Water
    if (this.yPos > 230){
      this.yPos += this.ySpeed;
    }
    else {
      this.ySpeed = random(0, 1);
      this.yPos += this.ySpeed;
    }
    //Check to Stop Fish from Staying Below Frame
    if(this.yPos < 610){
      this.yPos += this.ySpeed;
    }
    else {
      this.ySpeed = random(-1, 0);
      this.yPos += this.ySpeed;
      }
    }
}
As described in the comments, this code continually moves the position of the fish and stops them from moving out of the water by checking for their y positions and adjusting their vertical “speed” as necessary.
To spice things up, I also decided to randomize the RGB values of the fish by making three new variables (for each value) within the constructor(), setting each of them to random(255), and incorporating them within the draw() function of the Fish() class.
All I needed now was one more function in the Fish() class, one that resets the position of the fish, to make them loop around back into the canvas:
//This function is within the Fish() class.

//Function for Resetting + Rerolling Values of Fish Out of Frame
reset(){
  if(this.xPos < -50){
    this.xPos = 650;
    this.yPos = random(230, 580);
    this.xSpeed = random(-5, -1);
    this.ySpeed = random(-2, 2);
    this.rValue = random(255);
    this.gValue = random(255);
    this.bValue = random(255);
  }
This code resets the x positions of the fish to the right of the canvas and ensures that they keep swimming within view. Their horizontal and vertical speeds, along with their RGB values, are also rerolled to keep things fresh. The fish were ready to swim.
There they go. You can click on the canvas to see them move smoothly!
And so they swam.
Reflections
Yet another fun assignment to work on! The thrill of watching your code work the way you intended never gets old. It really does feel like solving a puzzle that I’ve presented for myself, one that yields tangible results when solved.
If I had more time, I would have liked to make the fish stay within the water in a more natural way rather than bouncing off the surface boundary as they are now. The key here would be to devise a block of code that simulates acceleration/deceleration, a challenge to tackle at a later date for sure.
By working on this piece, I feel like I’ve gotten a better sense of OOP and a taste of what classes can do when paired with arrays. I eagerly look forward to the next step in our coding journey!
Self-portrait
Concept
my self-portrait was based on me playing football. this is the first coding assignment that i have done and has been challenging. i used the diffrent shapes that we have been learning to come up with something that doesn’t really resemble me but, it kind of does what i would be doing on the weekends. i used diffrent things we learned in class to come up with the design.
Code.
I used the fill command to find the diffrent colors that i wanted for my kit and shoes. and used the arc command for my hair. i used the loop function to make the ball move looking like i kicked it.
Lab Three- The Sun
Concept
My initial idea was to create this one with the hydrogen that is in a different color bouncing around. I enjoy the writing the code I had some challenges with adding the number of bouncing balls that I wanted inside of the ellipses since I would run into the problem of them being stuck either at the top or the bottom. I came up with this idea since in class only worked with a random bouncing ball bouncing around the screen, I initially wanted to look at it if it’s trapped in a certain area. this idea then developed and to thinking what artwork would work with this and I came up with the idea of this sun. the piece itself is interactive so if you click on the background it changes from day to night.
initial design
this evolved to my idea of the sun
Code
I used the mouse background that we learned in class to change the background between day and night. I added an ellipse to form the sun and created a class for the bouncing balls to randomly bounce around the ellipse. I added array to control the amount of hydrogen that I wanted inside the sun
let ball= [];
 let ball2

function setup() {
  createCanvas(400, 400);
  for (let i= 0; i< 3; i++){
    ball[i] = new BouncingBall(i+1, 2);
  }
   ball1 = new BouncingBall(2, 2);
  ball2 = new BouncingBall(8, 10);
}

function draw() {
  if (mouseIsPressed ) {
    background(color(54));
  } else {
    background(color("#33A1FD"));
  }
 // background("#33A1FD");
  fill("#F79824")
  ellipse (width/2, height/2, 200, 200)
  noFill()
  fill("#FDCA40")
  for (let i= 0; i< 3; i++){
  ball[i].move();
  ball[i].collision();
  ball[i].draw();
  }
  ball2.move();
  ball2.collision();
  ball2.draw();
}


class BouncingBall {
  constructor() {
    this.xPos = width / 2;
    this.yPos = random(100, 300);
    this.xSpeed = 4;
    this.ySpeed = 7;

  }

  move() {
    this.xPos += this.xSpeed;
    this.yPos += this.ySpeed;
  }

  collision() {
    if (this.xPos <= 150 || this.xPos >= (width - 150)) {
      this.xSpeed = -this.xSpeed;
    }
    if (this.yPos <= 150 || this.yPos >= (height - 150)) {
      this.ySpeed = -this.ySpeed;
    }
  }

  draw() {
    circle(this.xPos, this.yPos, 30);
  }
}
What i could improve
I am happy with my work since my first-time coding, I feel like it’s something I wouldn’t have been able to achieve prior to this class. However, I would have liked the night sky to have some stars and I would have added lines to the sun to make it look more realistic. since hydrogen is usually arc shaped rather than balls that would have made it look more realistic and better.
assignment 3 oop – starlight
Exploring object oriented programming was fun and challenging. I struggled to find ideas on the artwork I want to do so I just started exploring with different shapes and playing with their movement using OOP. I started with small dots all around the screen jittering and thought of making them as stars. Then an idea of shining one of the stars’ light onto the ground sounded like a nice idea so I started playing with lines and their movement. I wanted to explore arrays and tried to incorporate that into the code which made the star light look nicer.
I wanted to incorporate a recursive tree and started exploring some codes online but I struggled to have something solid.
//star light movement
class movingLines1 {
  constructor() {
    this.x = random(width - width / 2);
    this.y = random(height - height / 2);
    this.z = 100;
    this.w = 100;
    this.speed = 2;
  }

  move() {
    this.x += this.speed;
    this.y += this.speed;
  }

  display() {
    stroke("#fff5dd");
    line(this.x, this.y, this.z, this.w);
  }
}
I am most proud of the star light as it took so much experimenting to get to the result I wanted. For future improvements, I would want to see how recursive trees work and incorporate that into the artwork.
Assignment 3 Object-Oriented Programming
Concept
I have yet to break through my creative side and struggled to think of something to create that was outside the box, literally. I ended up looking up examples of generative art on Google. Most of the examples ended up scaring me with their complexity, so I revised my search by adding the word “simple” in the end and saw the image below. I thought it would be relatively easy considering I’d only use square() , but I knew that to make it interesting I’d have to figure out how to use color to make less simple. For the first time I felt confident on the coding part, but little did I know that I was going to struggle with color and it was going to be yet again, another very simple art piece. After going over the class lecture notes and watching numerous The Coding Train Videos I began creating my artwork using the object-oriented programming we had learned.
Code
Below is the the class portion of the code. It is pretty straight forward, I have a constructor, a display function, and a sizeChange function for the squares. As explained in my comment, I failed to successfully have the color of the squares change gradually. The more I looked at videos from The Coding Train and random examples online, the more I confused myself so I decided it was best to accept that I am understanding object-oriented programming, but not yet how to implement colors and cool variations of them.
class Square {
  constructor() {
    // width x,y
    this.w = 10;
    this.x = random(0, width);
    this.y = random(0, height);
  }

  sizeChange() {
    this.w *= 1.01; //makes the square one percent bigger
    if (this.w > height / 2) {
      this.w = height / 2;
    } // if it reaches a certain w, it stops there
  }

  // I wanted to have the color slowly change to different colors in each square, but the more I tried, the squares would either be all white or I would get an error code. I forgot and didnt' save any that code but I stopped trying and just used one color instead

  display() {
    rectMode(CENTER);
    fill("#32a6a8"); // used color picker on google
    square(this.x, this.y, this.w);
  }
}
Final Image
Future Improvements
In future assignments, I’d like to teach myself more about how I can incorporate color in my work. I believe it would make a simple piece of art with a simple piece of code more intriguing and eye-catching regardless of its simplicity. I did like that I took my time in trying to understand the code itself, though simple, it was the first time I was confident that it would work before I ran it. Though I do think I should run it regardless and accept failure as part of the process as well.