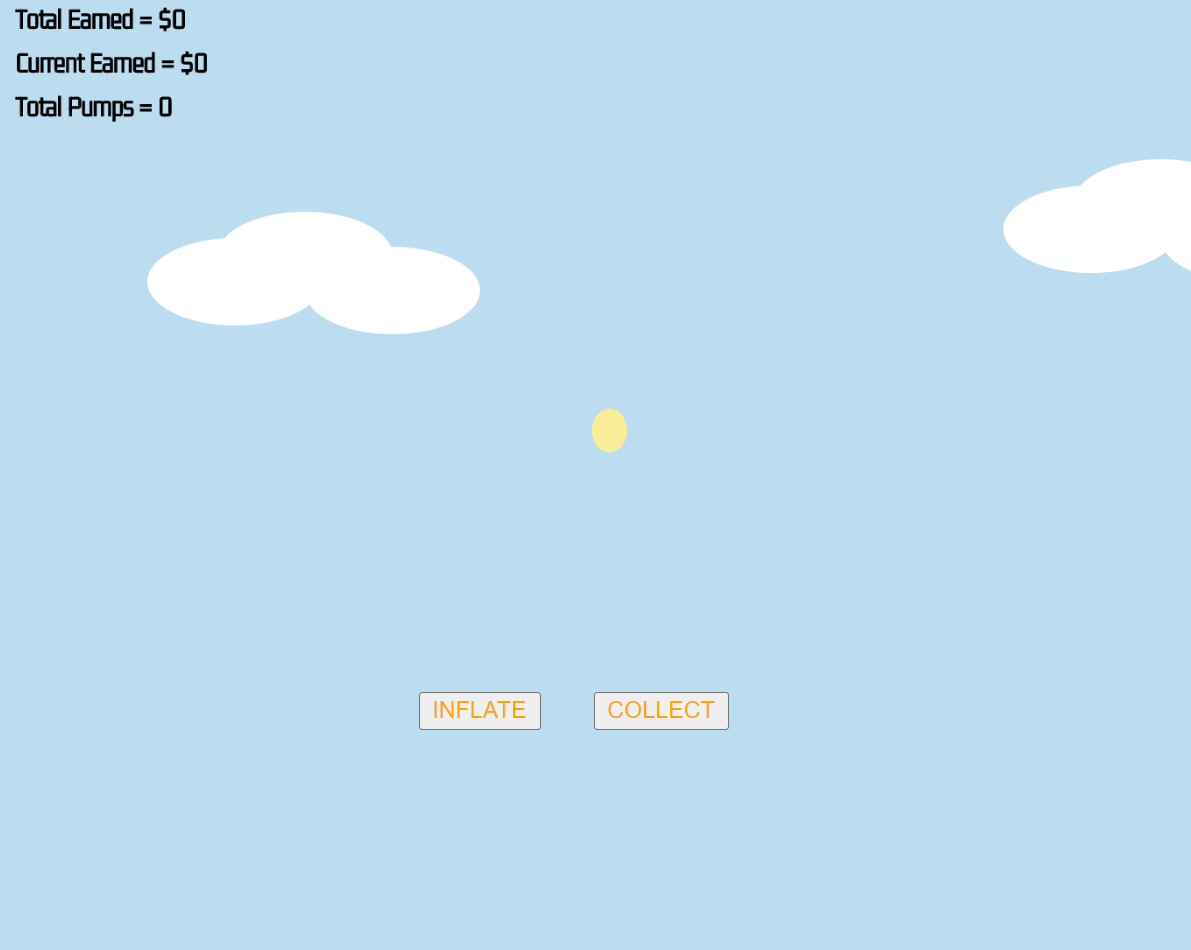
A balloon inflation game that assesses risk-taking abilities through a series of 8 rounds. The one-player game starts with a small balloon to be pumped as many times as they wish. The more you inflate, the more money you earn. At each point, you may bank the sum earned and move to the next balloon. However, if the balloon is pumped too much and the balloon pops, all that round’s money is lost. This is inspired by the famous Pymetrics balloon game. A player who manages to collect all the balloons but earns very low sums is classified as cautious, whereas a player who tends to pop a lot of balloons but gain higher sums is considered a risk-taker and adventurous.
The game starts with an instructions page, explaining the different buttons and game idea to the player. As soon as the player is ready to proceed, a click on the screen takes them to the main game page. The game page has an inflatable balloon and 2 buttons, “inflate” which increases the balloon size, and “collect” which banks the money at any stage. It also presents information on the number of pumps and current earned in every round, and updates the total earned. After 8 rounds, the game ends and the score is displayed.
Challenges
It was a bit confusing working with different pages for the game. For regular shapes and text, it was relatively simple to figure out. The thing I struggled with the most is working with buttons in the separate pages. I figured that they don’t work like the shapes, rather they’re a separate element that are not actually on a ‘canvas’. The solution was to use the show() and hide() features.
Design Choices
Since it’s a balloon game, I immediately thought of making it a kid’s game. So, the theme I went for is light and plain but also child friendly. I used object-oriented programming for the main game page (moving clouds), and a garden image in the end page.
Future Direction
I would love to make the balloons pop at different planned rates and not random based on their colors. This game could be used for investment banking tests to analyze candidates risk-taking and learning abilities.
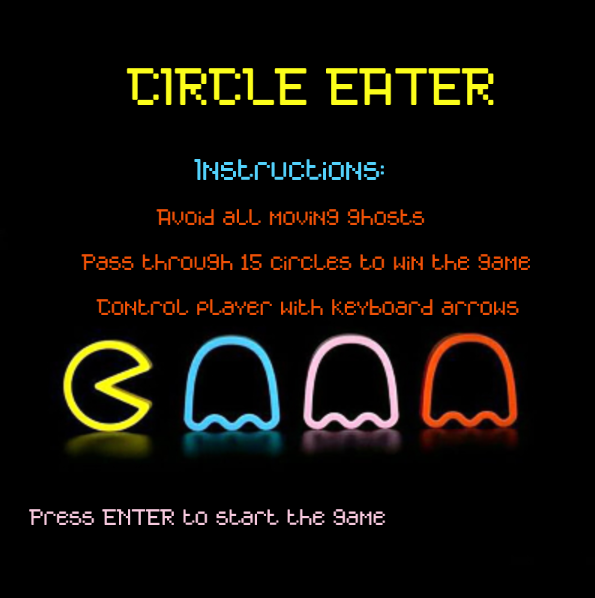
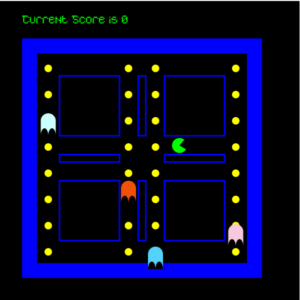
I decided for the midterm project to design a game that is very similar to the maze action video game, Pacman. Therefore, the main concept of my game is that there is a main character that looks like a green arc who tries to avoid the ghost enemies and eat circles, the more circles the character eats the more points he gets. The player will win the game if he or she can eat fifteen circles before bumping into one of the ghosts. On the other hand, if one of these ghosts catches the player before reaching a score of 15 circles eaten, then the player will lose the game.
I decided to create a game with this concept because I enjoyed playing Pacman as a kid and wanted to explore if I might be able to make a game that is very similar to my favorite childhood game. To make this project even more interesting, I decided to change some of the instructions of the normal Pacman game. If the main player eats a circle, the circle should change colors from yellow to red. Moreover, the main player can eat a circle more than one time. These new rules are what made this game even more exciting to play.
Project Implementation
To implement this project, I created four different scenes. I also used game state variables to transfer between scenes. These scenes are mainly the main menu scene represented by the start state, the game scene represented by the playing state, the winning scene, and the closing scene which are represented by the winning and losing states respectively. You can find an image of the instruction page and game scenes attached below. To play the full game and see the code press here: https://editor.p5js.org/AhmadFraij/sketches/7QkOMfogm
Instruction Page of the Game
Game Design & Technical Decisions
In the main menu scene, I loaded an image of Pacman and three ghosts and made it the background of my main menu screen. On top of this background, I added the title of the game along with the instructions using the text function in p5.js and preloaded a special font type into the game. The game should receive input from the user which is pressing the enter button to move to the game scene.
Game Scene
To create the game scene, I designed a maze using different sizes of rectangles. Then, I used object-oriented programming to come up with the main player. Therefore, I created the main player class and defined a constructor with all the necessary variables, and added other functions inside the class that controls the motion of the main player and check if the player hits any of the rectangles inside the maze.
Most importantly, I created some circles around the maze and added a function that determines whether the main player is eating a circle. If this condition is met, then I increment the score until I reach the value needed to win the game. Furthermore, I created a class for the enemy ghosts, and whenever one of these ghosts’ positions equals the position of the main player then the user loses the game.
I was proud of how I linked the different scenes in the game by using a game state method that I understood from Professor Mang’s code. Furthermore, I am proud of how I was able to apply the score counter. To make the score counter work, I kept track of the previous counter and only incremented the previous counter after the current counter is incremented, in this way I made sure that the score only increments by 1 because when I first did the scoring algorithm I used to have the issue of having the counter increasing more than one unit.
While developing this game I also faced so many issues. It was so difficult for me to determine when a moving ghost hit a moving main player. However, after trying different ways I realized with the help of the professor that the best way to do this is by creating a class for the ghosts and a class for the main player and having a function in the ghosts class that takes the x and y positions of the main player and compares them with current x and y positions of every ghost.
Furthermore, figuring out how to check whether the main player eats one of the circles took so much time and I implemented it using so many if statements. Therefore some future improvements to this game would be to create a separate class for the yellow circles and have a function inside these classes that determines whether the main player hits a circle or not. Finally, I added some sound effects to the game to make it more interesting
Asteroids is a classic video game that has captivated players for decades. As a child, I was drawn to the game’s simple yet challenging gameplay and the excitement of blasting asteroids into tiny pieces. When I heard that I had the option to choose my own midterm project, I immediately knew that I wanted to create my own version of the Asteroids game. One of the reasons I chose to create an Asteroids game is because it is a fun and engaging project. The game’s simple premise and mechanics make it easy to understand and play, but it also offers a challenge for players to master. I enjoy games that are easy to pick up but difficult to master, and Asteroids fits that description perfectly. Another reason I chose to create an Asteroids game is because it reminds me of my childhood. I have fond memories of playing Asteroids at the arcade with my friends, and I wanted to recreate that experience for myself and others. By creating my own version of the game, I can relive those memories and share them with others.
Reflections and improvements:
Creating an Asteroids game in p5.js was a challenging and rewarding experience. This required a lot of experimentation and trial and error, but I found the process to be enjoyable and educational. Challenge I faced was making the game visually appealing. In the original Asteroids game, the graphics were simple but effective, with clean lines and geometric shapes. I wanted to recreate this aesthetic in my game, so I spent a lot of time experimenting with different design choices to find the right look. I also had to figure out how to make the game run smoothly, so that the movement and shooting would feel responsive and satisfying to the player. In the end, I was able to create a functional and visually appealing version of the Asteroids game in p5.js. I was proud of the work I had done, and I received positive feedback from my peers and instructors. Overall, the experience of creating an Asteroids game in p5.js was challenging but rewarding, and I learned a lot about game development and programming in the process.
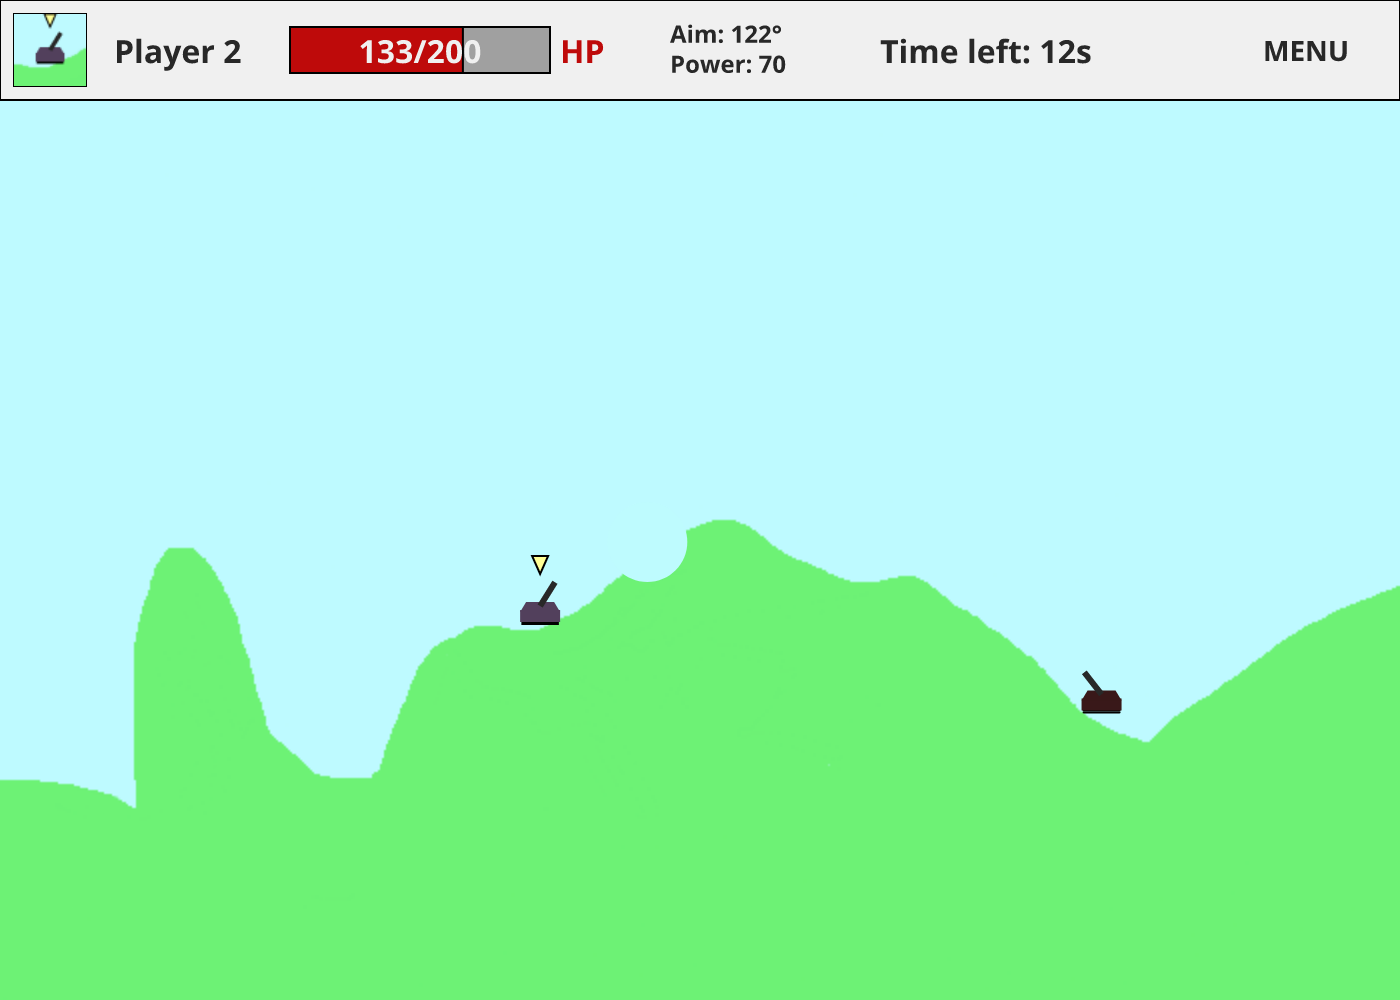
This game is inspired by Tanks, a game which user(s) can control tanks to destroy enemy tanks. To play this game, each player needs to apply basic geometry and trigonometry to target and hit enemy tanks.
My version of Tanks has similar mechanics with some differences. The game will rotate turns between players, limiting each turns to take no more than 20 seconds. During their turns, players can adjust launch angle, launch power, position, and launch shells to attack opponent(s) using a keyboard. Launched shells will follow a simple physics law and eventually land on either the landscape or an opponent tank, permanently changing the landscape or damaging the opponent tank. While the game is running, there will be a dashboard which indicate which player is playing, how much HP (life) is remaining, what angle the tank is aiming, how strong the launching power will be, and how much time left before the turn ends. The match/game ends when there is one or zero (there can be a tie!) players on the map with some health.
On browser that blocks canvas-based fingerprinting, the game may not work as intended.
When I started working on this project, I tried to implement a lot of features. And later, I realized that I again underestimated the work I need to do to write this game. The below is the list of canceled/partially implemented features of this game due to limitations of reality.
Adjustable number of players
Customizable tank colors
Map generator (users can draw their own map)
More sound effects
However, there are also many features that are implemented successfully.
Interactable instructions page
In-game menu for pause, restart, and exit the game.
Multiplayer (hardcoded 2)
Image-based maps (drawn on mspaint.exe)
Interactable modifications on the map
Tanks and their controllable features
Turns, player indicator (the yellow arrow) and time limits
Functioning dashboard
Physics of launched shells
Some sound effects
Etc.
Among those, I am especially proud of 4 and 5. Below, I will spend some time explaining how they are done.
function preload() {
  for (let i=1;i<=5;i++) {
    append(gameMaps, loadImage("maps/map_"+i+".png"));
  }
  ...
}
First, images of maps needs to be loaded before the game starts. To be used as maps, they need to at least satisfy two things. First, the pixel color for air must be similar to [190, 251, 254, 255]. Second, there must be enough non-air pixels for tanks to land on when the game starts. If these two are satisfied, pretty much any image can be used as a playable map. Once the maps are loaded, Tank objects and Shell objects can interact with air and non-air pixels.
function compareColors(a, b) {
  // used to compare colors
  if (!a || !b) {
    return false;
  } // if one of them is null, false
  if (a.length != b.length) {
    return false;
  } // if length differs, false
  for (let i = 0; i < a.length; i++) {
    if (abs(a[i] - b[i]) > 7) {
      return false;
    } // difference may be negligible
  }
  return true;
}

// Partial code from class Shell
...
if (this.y>0&&!compareColors(get(this.x, this.y), c.ac)) {
  this.explode();
}
if (this.y > height) {
  this.explode();
}
...
The above code uses a get() function to check whether a launched shell is in the air or overlapped with non-air pixels (ground, map boundaries, and tanks) and decide if it will explode or not. If it chooses to explode, it will trigger the below code.
It records where the explosion happened and the size of the explosion. The recorded explosions are later used in the below code so the pixels affected by the explosions are “erased” or filled with air color.
modifyMap() {
  push();
  noStroke();
  fill(this.ac);
  for (let i = 0; i < this.explosions.length; i++) {
    let tmp = this.explosions[i];
    circle(tmp[0], tmp[1], tmp[2]);
  }
  pop();
}
Of course, there were(and still are) a lot of difficulties when writing this game, and below are the major ones.
Object overlapping
Because the map is modifiable, positions of all objects are relative to their surroundings, and in some cases, tanks can overlap each other and show unintended behavior. There seems no easy fix for this.
Continuous sound effect
When tried to use sound effects for continuous events (such as tanks moving, aim adjusting, etc.), it results in undesirable sound. This may be solvable by finding a good sound file that has matching start and end tone, but I could not find those. So I removed those sound effects.
Uphill/Downhill movement
Similar to object overlapping, tanks moving uphill and downhill causes them to stutter.
Interaction failure with air and non-air pixels
In the early stage of coding this game, tanks could stop in the air or indefinitely fall down into the ground. This is mainly due to pixels being meshed together when pixel density is not 1, but it is fixed by having threshold on color differences.
Simultaneous keyboard control
There were times when multiple keys were pressed, only one (the latest) one will be recognized, and this key will remain recognized unless all keys are released or a new key is pressed. Fixed this issue by using keyIsDown() in draw() instead of keyPressed().
There may be other major issues that I have encountered, but I cannot remember them at this point.
From this project, I learned that even a simple-looking feature can be long and complex to implement. For the later projects, I will try not to focus on implementing multiple features; I will instead focus on making small features more reliable and smooth.
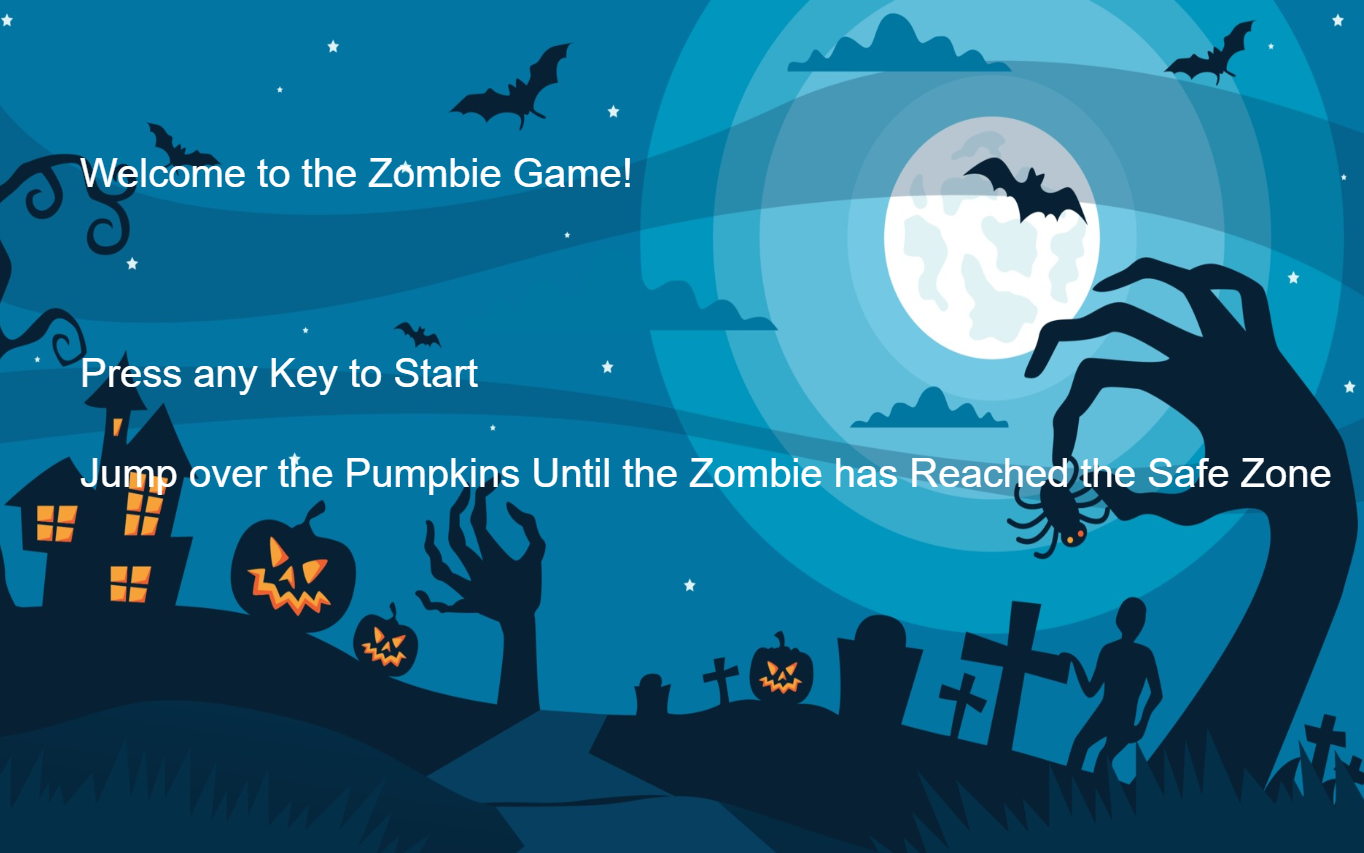
For my midterm, I decided to recreate the google dinosaur game that pops up whenever you try to go on a google web browser without a connection to the internet. In the dinosaur game, there is a dinosaur, cacti, and a simple background containing moving clouds. The game prompts the player to use their keyboard keys to make the dinosaur jump over the cacti as the cacti randomly enter the canvas. If the player does not press the key or presses it at the wrong time, the dinosaur will collide with the cacti and the game ends. To goal of the game is to avoid as many cacti as you can. To keep the player intrigued with the game, the game displays the player’s score and their high score.
I find that it is a very simple but engaging game. The purpose of it is very user-oriented since it allows the player to do something while they wait for their internet to connect again. I also decided to go with this concept because it looked simple and achievable for me. In the beginning I was exploring other games that I used to play when I was a kid, but I thought dress-up and restaurant games would be too complicated. To make it my own, I decided to go with a Halloween theme since we are in October, I love Halloween, and I am going to miss the Halloween decoration from home. I did change a few things as I was creating the game in terms of the narrative and how the player would win. Instead of having a high score, I made it so that the player has to reach a certain number of jumps in order to save the zombie from a pumpkin attack.
Technical Decisions & Game Design
It is important to note that I took inspiration from Dan from The Coding Train on YouTube. He made a video replicating the dinosaur game with his own twist that included different images and controlling the character using the player’s voice. I decided to omit the voice control portion, but used his code as my base code. I knew I still needed to add other parts to meet the midterm requirements such as on-screen text, sound, the start screen, and a way to restart the game without restarting the program.
The start screen with instructions
My Zombie game includes the start screen, the game scene, and two different end screens depending on whether the player saves the Zombie from a pumpkin attack or lets him die (again). Using Dan’s code as my base code, I also had to change a few things. For example, his game used noLoop() to stop his sketch completely. He also continuously drew the pumpkins because he had no need to restart the game. I used the class sample code by Professor Mang that showed how to restart the game and implemented it into my code. I found out that because I did this, I also had to change how the pumpkins would show up in the game. To do this I created a pumpkin array and an if statement that said if the gameState == “playing” is true and the chance of adding a new pumpkin is random is also true, then a new pumpkin is created. I was proud that I was able to integrate the code into a base code that I changed, it really forced me to go through the code and understand every single part in order to figure out what parts go together. It was almost as if I was solving a puzzle.
I also wanted to end the game in a certain way instead of having the player make the Zombie jump as many times as they can. To do this I decided to create a storyline. In this game, the player is trying to save the Zombie from getting attacked and killed (again) by the pumpkins. In order to do this, the Zombie needs to avoid (jump over) the randomly generated pumpkins 10 times. I chose this number randomly.
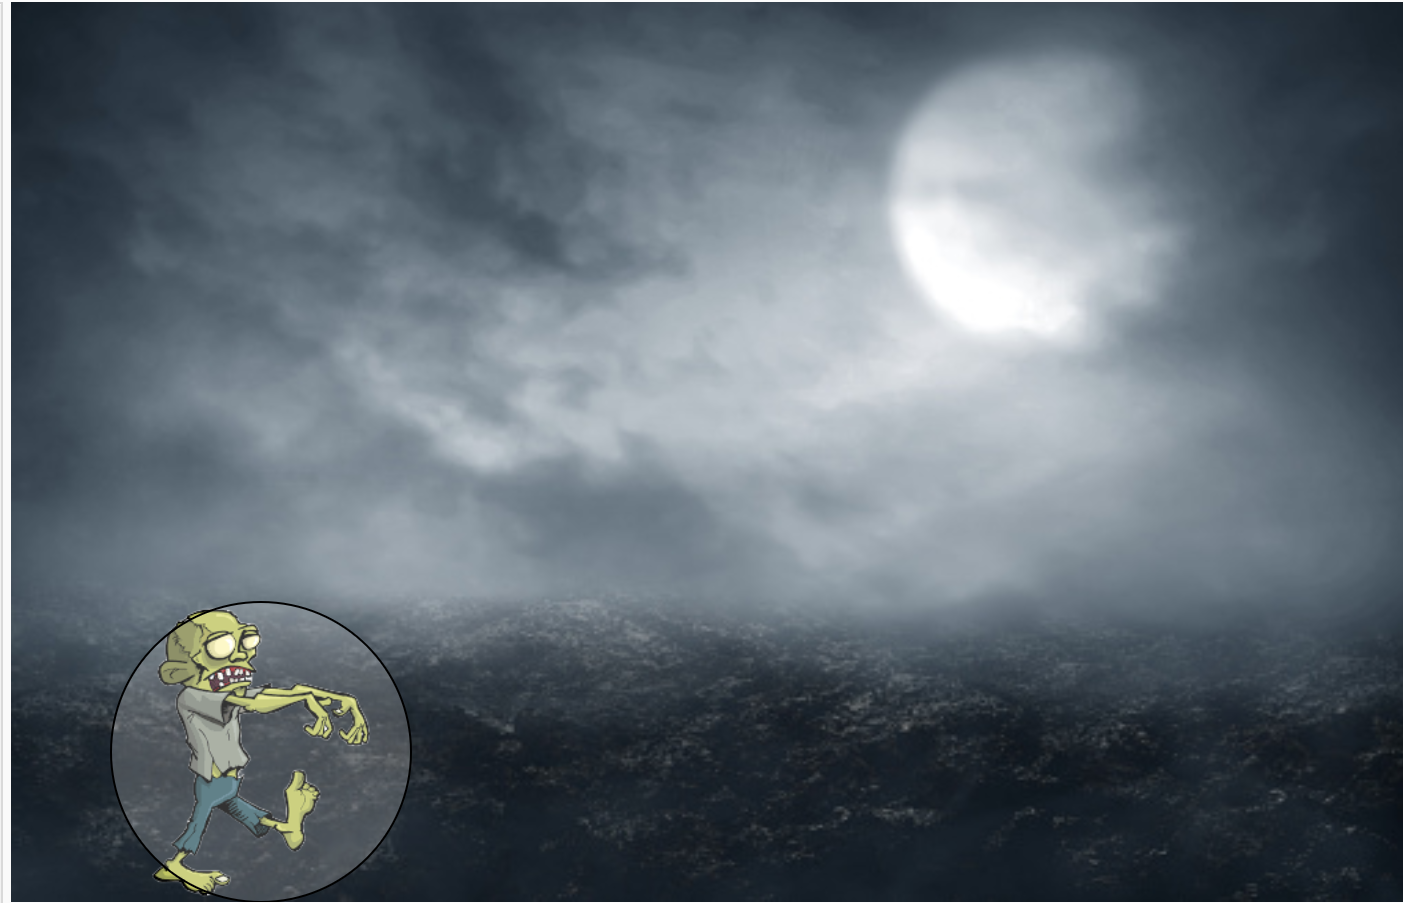
Walking zombie with a cheat circle
Problems I Ran Into & Improvements
Even though I used a base code, I ran into so many tedious issues. I appreciate what coding does and admire everyone who is able to think like a coder, however I think I find it almost as scary as some aspects of Halloween. I mentioned in my second part of my documentation that I had trouble with just loading an image, I think that issue was probably the issue I took the longest on. It was not the correct path and I simply replaced the Zombie image with one that was not in a sprite sheet. I also struggled in integrating new code in an already existing code, mainly because I obviously did not make it and I had to take time to really familiarize myself with it in order to put the puzzle pieces together. Once I did familiarize myself with it though, I was able to figure out where everything else is supposed to go.
Another issue I had was that at first I did not include circles on top of the character images. However, that made the user experience difficult because even though the Zombie itself would not touch the pumpkin, I am guessing the background of the image did. This would cause the game to end even though the player didn’t know that the images touched since you visually couldn’t see that. To solve this I decided to add circles over the images to clearly define the borders and help the player better calculate when to press the space bar. I call it the cheat circle since it makes it really useful to jump at the right time and save the Zombie. Overall, I am glad I was able to combine what we have learned so far into a simple version of the dinosaur game that represents one of my favorite holidays.
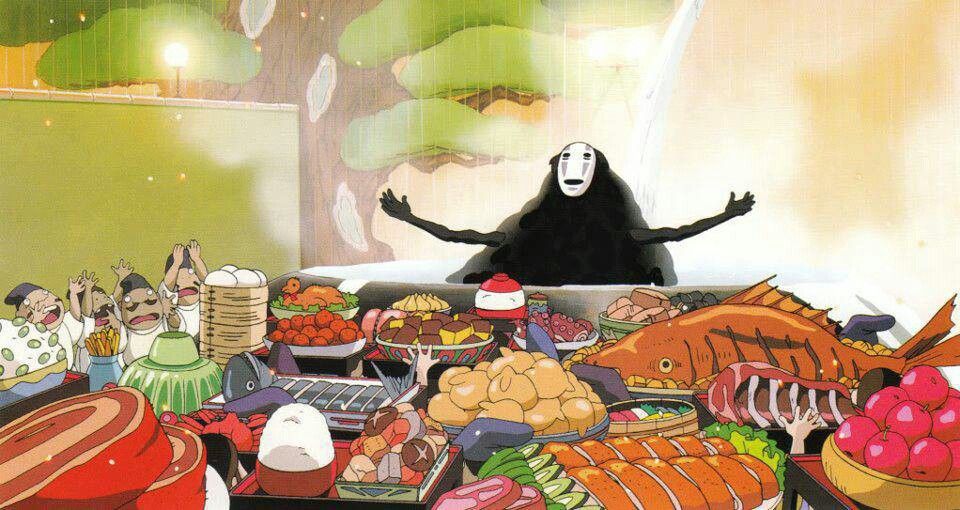
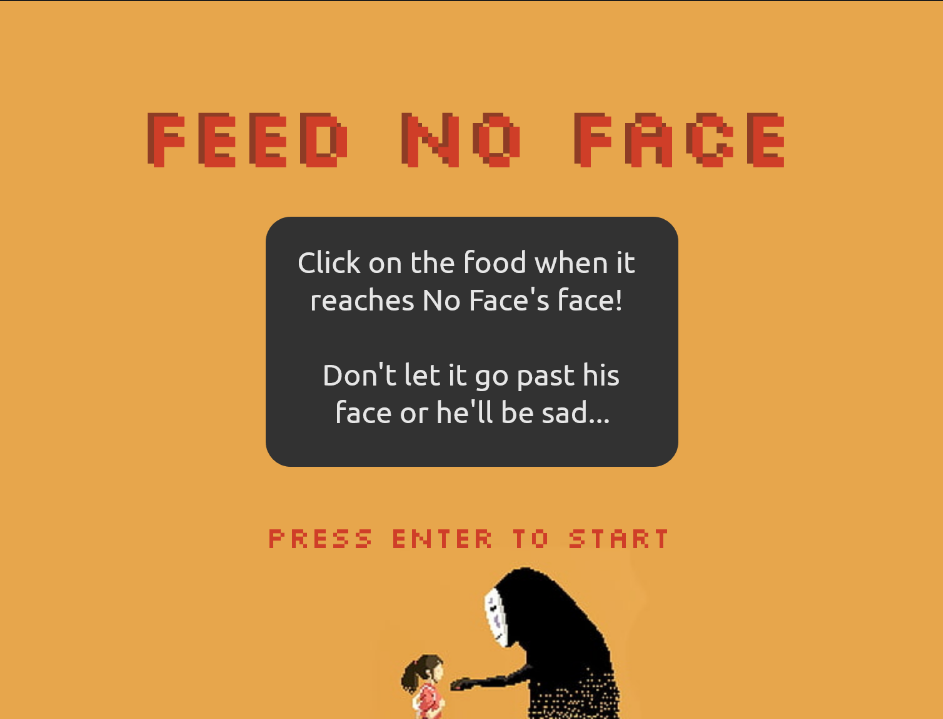
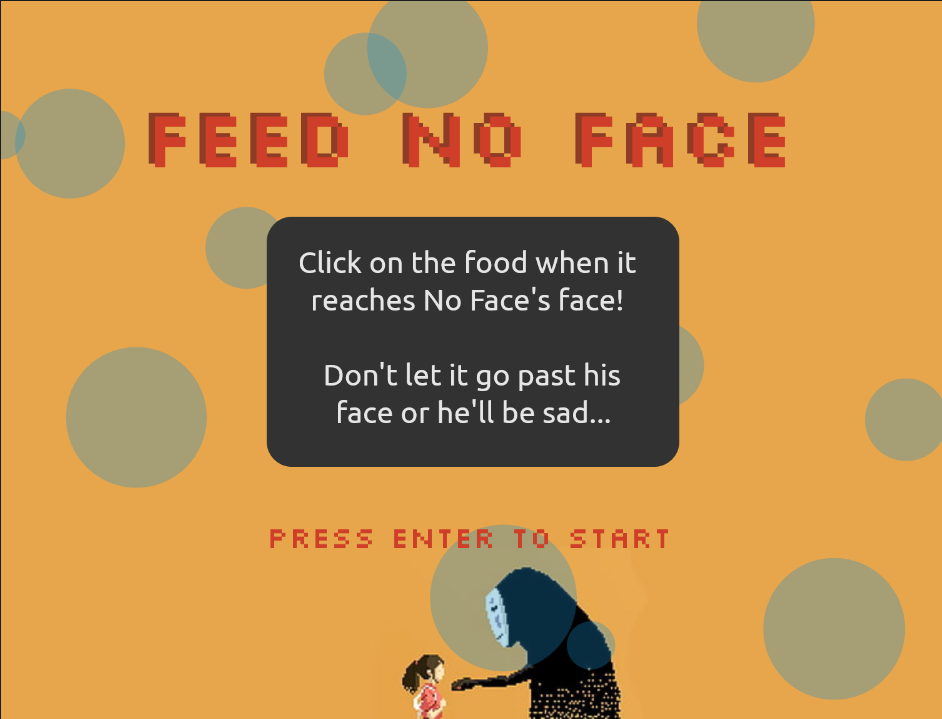
My midterm project concept is based on a Studio Ghibli film called Spirited Away. The movie is about a girl named Chihiro who enters an abandoned amusement park because she lost her parents in the midst of moving homes, only to find her parents turned into pigs. There was one particular scene in the movie where No Face, a spirit side character, is fed by the workers, so I decided to use this scene as inspiration for my game.
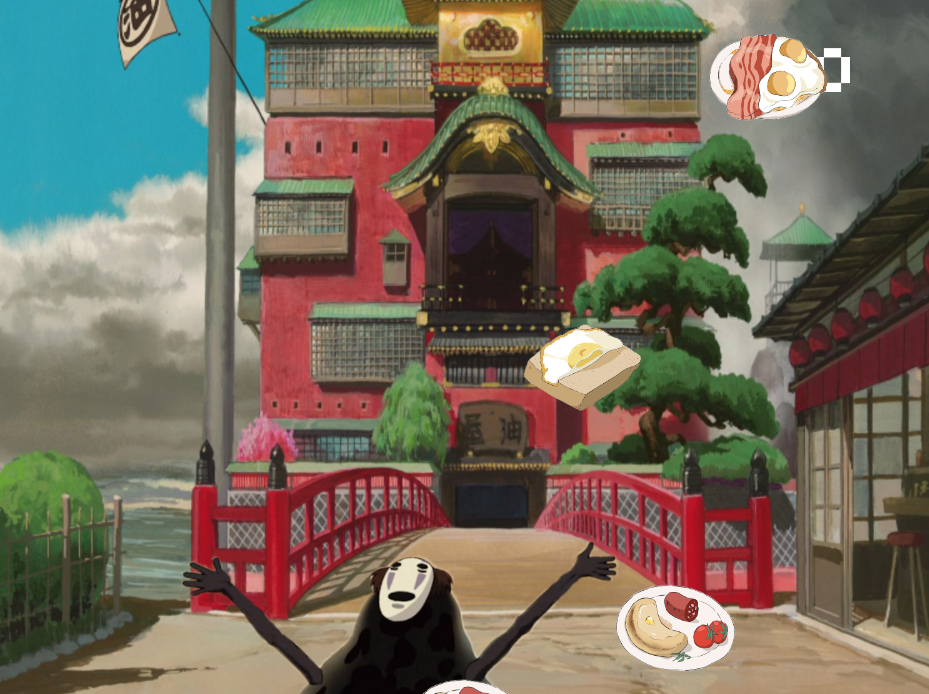
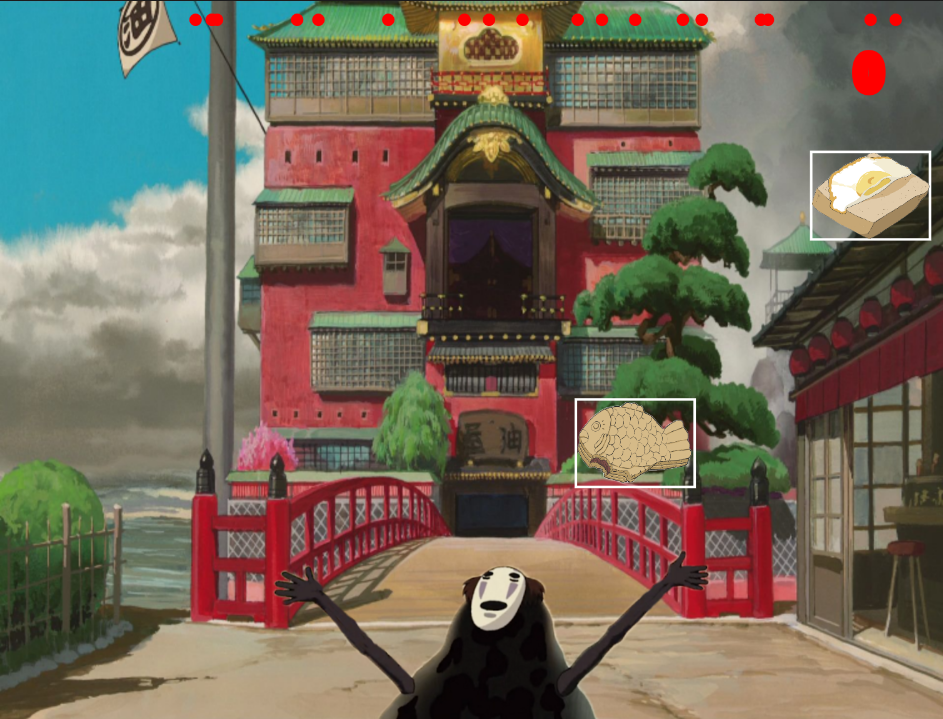
No Face feasting
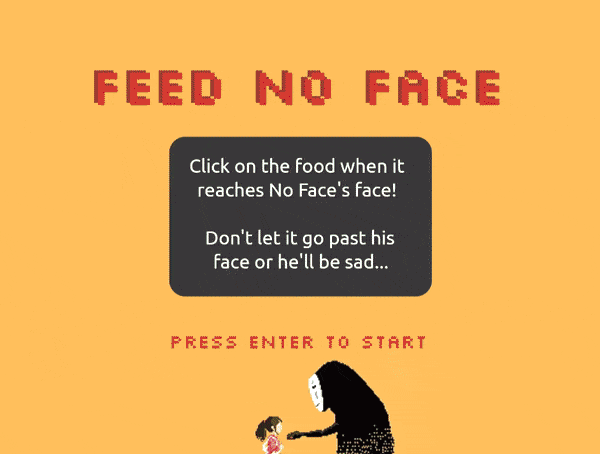
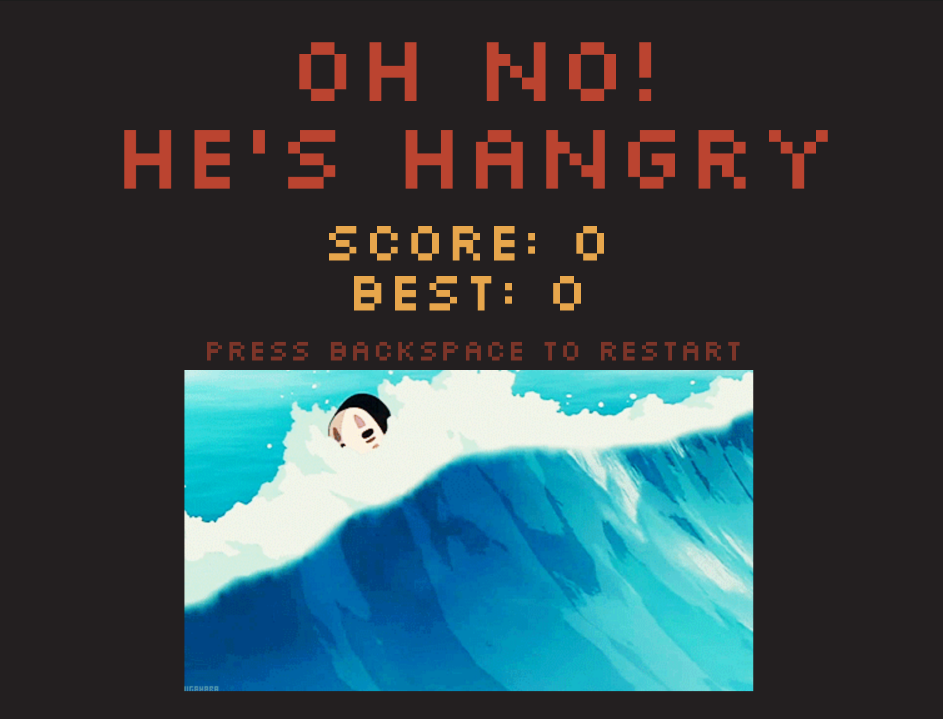
The concept is a game where you, as the character No Face from Spirited Away, have to eat all the food that appears on the screen. The trick is that you can only eat it when it reaches the height of the character, so clicking above will not count. If one food reaches the bottom of the canvas and you fail to click it, the game will end. Below are the three states of the game: the start/instruction screen, the actual game, and the game over screen.
How it Works
class Food {
  constructor() {
    this.xPos = random(50, width - 80);
    this.yPos = -20;
    this.xSize = 95;
    this.ySize = 70;
    this.xCenter = this.xPos + (this.xSize/2); // Midpoint formula
    this.yCenter = this.yPos + (this.ySize/2);
    this.food = random(foods);
    this.speed = random(2,4);
  }

  rainingFood() {
    this.yPos += this.speed;
    this.yCenter += this.speed; // Since the y-position is moving down the screen, the center position also has to move in order for the distance to be accurate
  }

  // Mouse Interactions with Objects (The Coding Train):
  // https://www.youtube.com/watch?v=TaN5At5RWH8
  checkFoodEatenAt(mousePosX, mousePosY) {

    // Finds the distance between the mouse position and center of the food
    let d = dist(mousePosX, mousePosY, this.xCenter, this.yCenter);
    d = round(d);

    if(this.yPos >= 440) { // Can only eat when the food reaches the height of the character
      if(d < this.xSize/2 || d < this.ySize/2) {
        eatSound.play();
        return true;
      }
    } else {
      return false;
    }
  }

  missedFood() {
    if(this.yPos > height) { // If it goes off the screen it's game over
      gameState = "end";
    }
  }

  show() {
    image(this.food, this.xPos, this.yPos, this.xSize, this.ySize);

    // For debugging the food click
    // noFill();
    // stroke(255);
    // strokeWeight(2);
    // rect(this.xPos, this.yPos, 95, 70);
    // stroke("Red");
    // strokeWeight(10);
    // point(this.xCenter, this.yCenter);
  }
}
The main part of the game is clicking on the food, essentially eating it. The food appearing and disappearing is done in a class called Food, which is assigned to an array. A new food is pushed into the array based on the frameCount remainder. The falling effect is done simply by adding to the y-position of the food with a speed variable.
The tricky part was figuring out how to remove the food and check if the mouse clicked on the food. Professor Shiloh suggested that I use a method that is specifically made for removing elements in an array, which I had not thought of at first. That got me thinking, so I searched for the method, which wonderfully enough, The Coding Train had videos on how to remove items in an array as well as how to check if the mouse clicked on an object.
Before watching the video, I knew I had to use dist() to figure out if the cursor is within the object, but I struggled a lot with that. It also didn’t help that since I scaled the images, the x and y position was all scaled as well (I put it in push() and pop(), but the numbers were still in the thousands). The Coding Train example used a circle to figure out the distance, but for my code I used a rectangle.
To walk through the whole process of figuring out the distance, I first drew a rectangle that was roughly the same size as the foods. I tried using the sizes to get the center of the rectangle, and to get that point I needed to use the midpoint formula. If I know the size, I only need one x-y point for the formula. After getting the center point, I can use dist() and do the if condition.
The first issue was the scaling, which I mentioned earlier. This made the x-y position insanely large, because I was multiplying it to account for the scale. So I ended up removing the scale and hard coded the size of the food. While I was lucky that the image didn’t get distorted, I feel like this isn’t really the best approach, but it works better than scaling.
The next issue I encountered was that even though my code should technically work, when I clicked on the food it didn’t disappear. So I drew a point at the center of the food “rectangles” to get a clearer picture. Lo and behold, turns out the points were just being drawn at the top and they don’t move down. This seemed like such a silly error because of course I should have realized that if the y-position is changing then I need to change the y-position of the center point as well.
All the center points (red) just stay at the top because I’m not adding the speed variable to it as well.
After figuring out how to click and remove the food, completing the rest of my project was mostly smooth sailing. All that was left was fine tuning the instruction and game over screens and implementing sound. I did, however, have another laughable problem while creating my instruction screen: basically, I wanted to create random ellipses in the background so it didn’t seem as empty. Since random changes constantly, I put noLoop() in my for loop, but I also surround it with a push() and pop() thinking that it would only noLoop() the for loop. So after finishing the instruction screen, I tested out the game, but realized that it no longer goes to the play mode. I spent a while trying to figure out why it wouldn’t go to the next screen anymore even though it registered me pressing “Enter”. I did eventually have a eureka moment and realized it was the noLoop(), which was a very trivial error that could have been avoid.
The ellipses that ended my program and made me confused for 30 minutes
Conclusion – What I’m Proud of and Future Directions
On a brighter note, I am quite proud of how the game turned out. My biggest struggle is honestly what I’m most proud of because I managed to make it work. I also really like how the play mode and game over screens turned out in terms of design (the instruction screen could still use some work). I actually took the No Face image in the play mode from an image that had a background, so I had to Photoshop it. For the food images it was all one image with a white background, so I also had to remove the background for that and crop into each food image. As for the music choices, Studio Ghibli films always have great music, but honestly the soundtrack for Spirited Away weren’t “game” material. So I decided to go for 8bit sounding music, even though the game isn’t 8bit, but I feel like it makes it sound more like a game soundtrack. Also a side note: the sound effect when you click on a food is basically the only sound No Face makes in the movie.
I did a few user tests and the main issue I ran into was people not reading the instructions. One of them has never played games, so she was very confused with what to do. The other user tester thought it was catching the food by moving the character, not clicking on the food. These are a few things that I need to consider if I continue to work on this in the future. Additionally, other things I want to work on in the future are fixing the instruction screen and adding lives instead of ending it at just one food missed.
Overall, I really love how my project turned out and it was super fun to create. Print() everything and drawing every detail is your best friend when it comes to debugging (but it’ll cause the program to lag if you do too much)! And finally, I highly recommend watching Spirited Away, if you haven’t already : ).
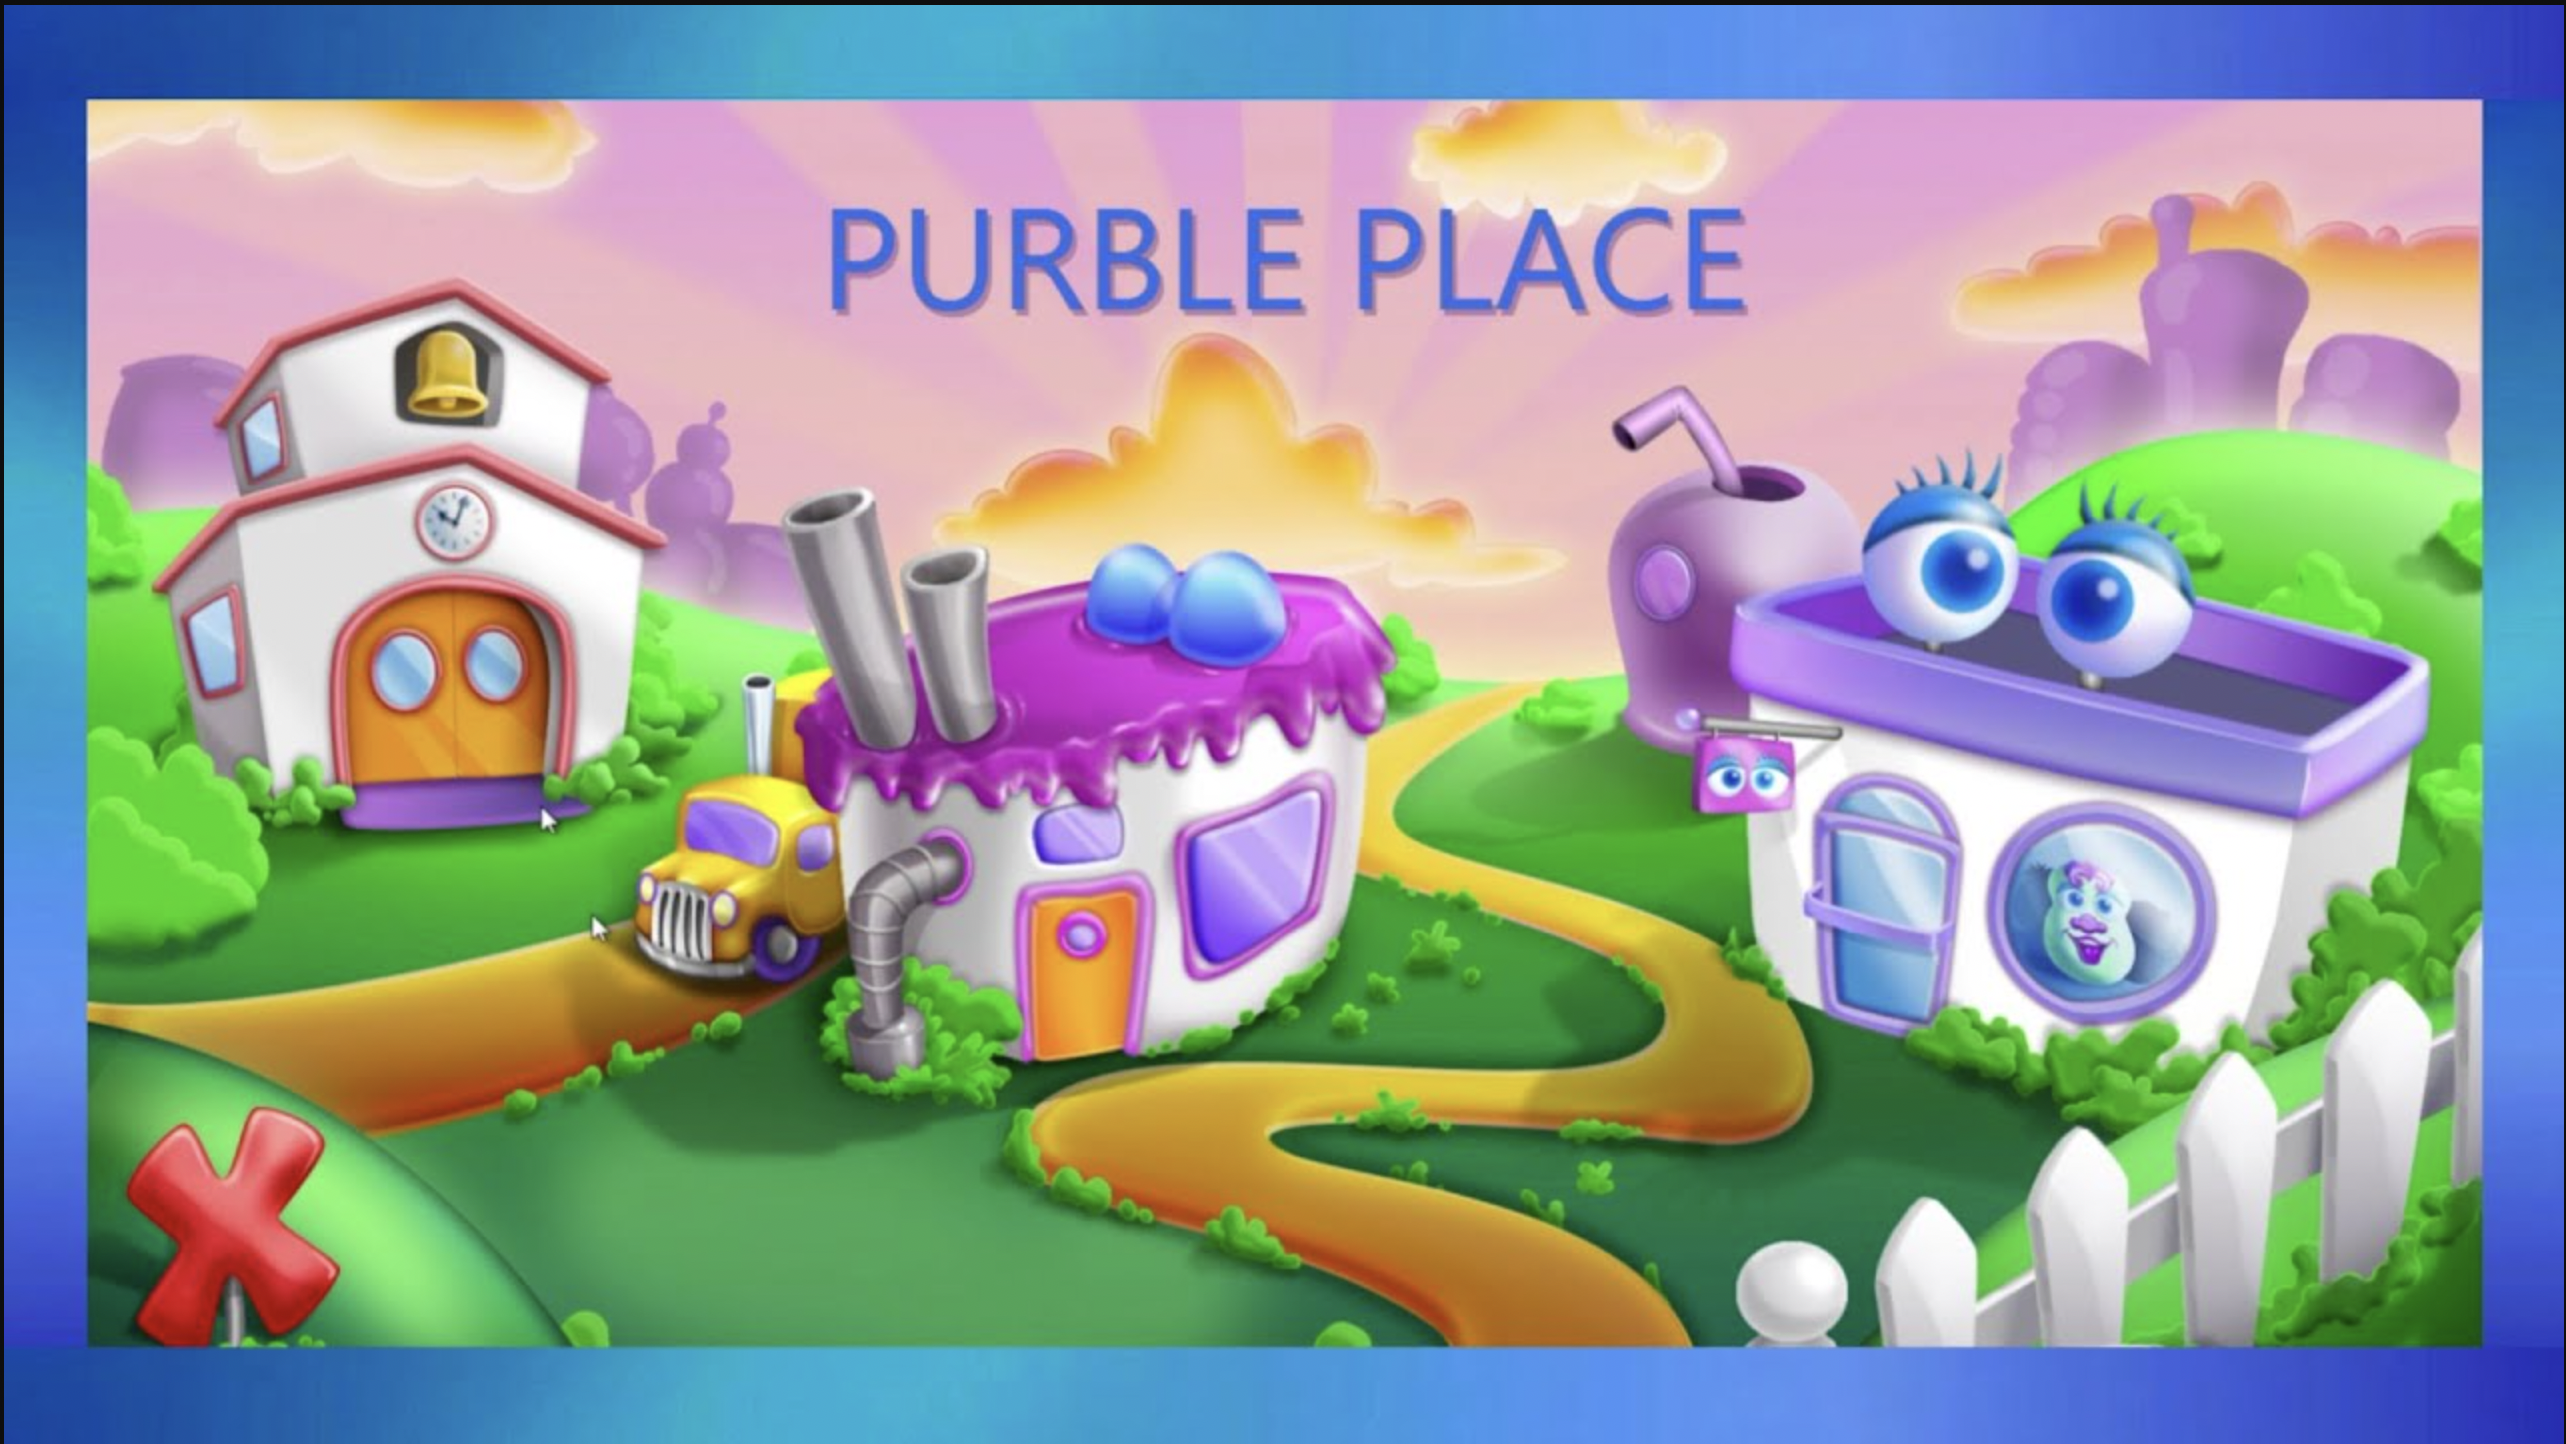
For our midterm project I wanted to recreate a game that I used to play as a kid. The game is called Purble Place and it has three game options within it.
I decided to recreate this one. The goal of the game is recreate the cake displayed in the small window at the top left. I believe that you have a maximum number of times you get the game wrong before you lose.
I started by brain storming the aspects of the game that I wanted to recreate and the classes I would use (I’m not sure why the images are blurry, could be because they are screenshots)
I then started to implement the game in p5js. I wanted to keep track of the functionalities that each draft of the game has and maybe what are the issues and what is to be done next. This would make it easier to remember what each draft does incase I need to go back and use something from it. To do this I added comments at the top of each draft outlining those things.
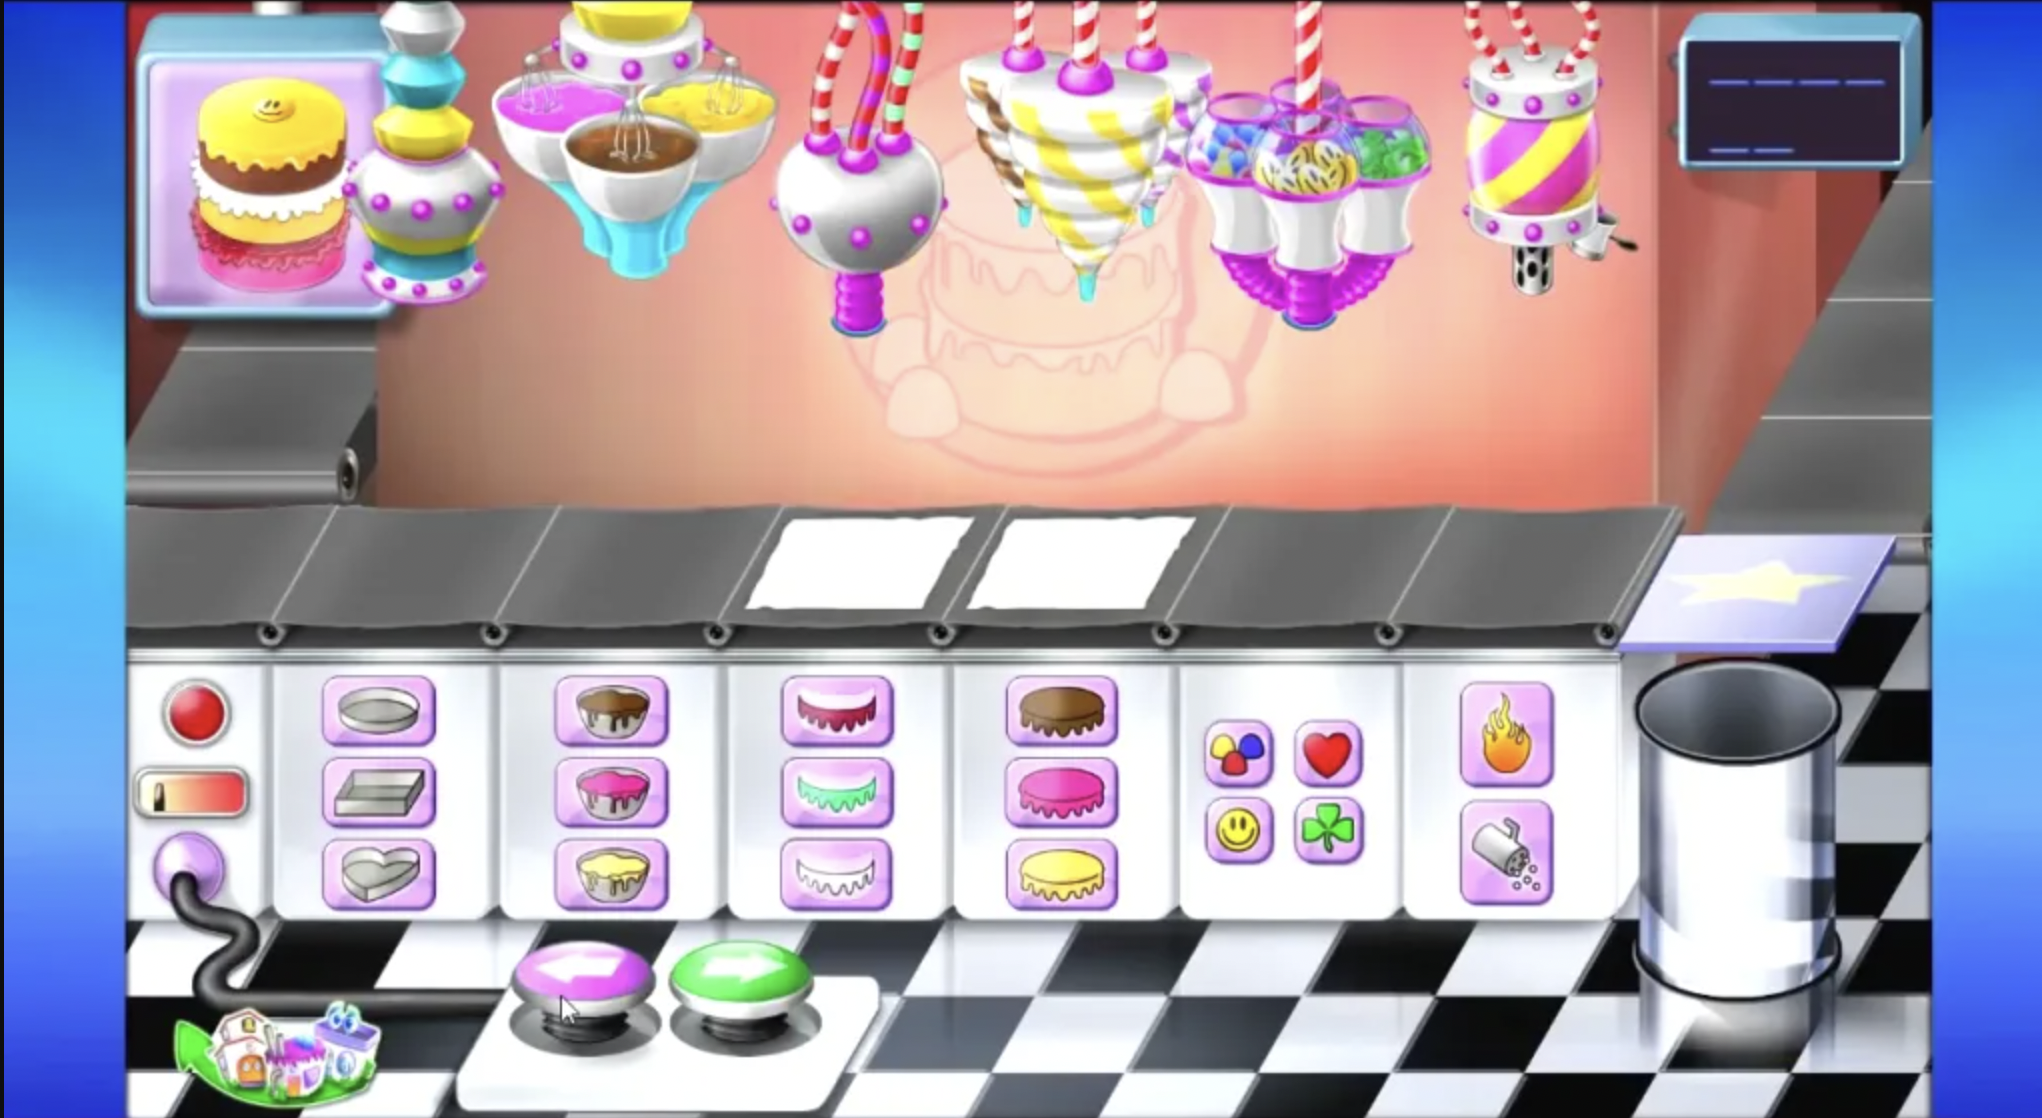
In the first draft I drew the cake(created a cake class to do this) and tried to add each aspect by clicking within a certain range.
In the second draft I tried to move the cake
In the third draft I made a class that creates new cakes after the current one leaves the window
In the forth draft I added graphics and implement the button clicking within the class. I also added the score at the top left
In the forth I added a conveyer belt.
to do:
remove placeholder graphics and add actual graphics
add more options for each aspect of the cake (more colors…)
display the expected cake(the cake that the user needs to try and mimic)
add audio
keep track of how many cakes were produced
figure out when to stop and start the game (timer?)
i wanted to keep going with the idea of being trapped. so i decided to make a text that signifies that. The point of the project that i made was it being a cry for help that only shows for flashes of time as if the ball is trying to tell people its message but it’s not that clear so can only see it if you focus. it is clearly in prison since we can see the prison bars around it.
Process
I made a code creating diffrent variables for mu prisoner ( the ball) and the x and y.
I then used the pre load to input the font i wanted to use which i downloaded for the web
I then imputed the text to the code.
I used my past project in order to create the prison cell .
I then created a class for my bouncing ball.
let myBouncingBall;
let x= 0
let y=0
let spacing = 20;

function preload() {
  font = loadFont("3D.TTF");
}


function setup() {
  createCanvas(400, 400);
  myBouncingBall = new BouncingBall();
  text ("FREE ME PLEASE!!!", 30,100)

}


function draw() {
  background(54);
   textFont(font);
  textSize(50);
  noStroke();
  text("FREE ME PLEASE!!!", 30, 100)
   stroke(56);
  if (random(7) < 0.9) {
    noStroke();
    (x, y, random(8, 12));
    fill(random(255), random(0), random(170));
  } else {
    stroke('#6cd8eb');
    line(x + spacing, y + spacing, x, y);
  }
  x = x + spacing;
  if (x > width) {
    x = 0;
    y = y + spacing;
  }
   for (let lineX = 0; lineX <= 600; lineX += 9) {
    line(lineX, 0, lineX, height);
  }
  ellipse (width/2, height/2, 154, 154)
  myBouncingBall.move();
  myBouncingBall.collision();
  myBouncingBall.draw();


}


class BouncingBall {
  constructor() {
    this.xPos = width / 2;
    this.yPos = random(100, 300);
    this.xSpeed = 4;
    this.ySpeed = 7;
  }

  move() {
    this.xPos += this.xSpeed;
    this.yPos += this.ySpeed;
  }
  collision() {
    if (this.xPos <= 150 || this.xPos >= (width - 150)) {
      this.xSpeed = -this.xSpeed;
    }
    if (this.yPos <= 150 || this.yPos >= (height - 150)) {
      this.ySpeed = -this.ySpeed;
    }
  }
  draw() {
    circle(this.xPos, this.yPos, 30);

  }
}
Improvements
this project could have been easier on the eyes since it kind of hurts if you look at it for a long period of time. i would have liked the ball not to lag when you click it sometimes.
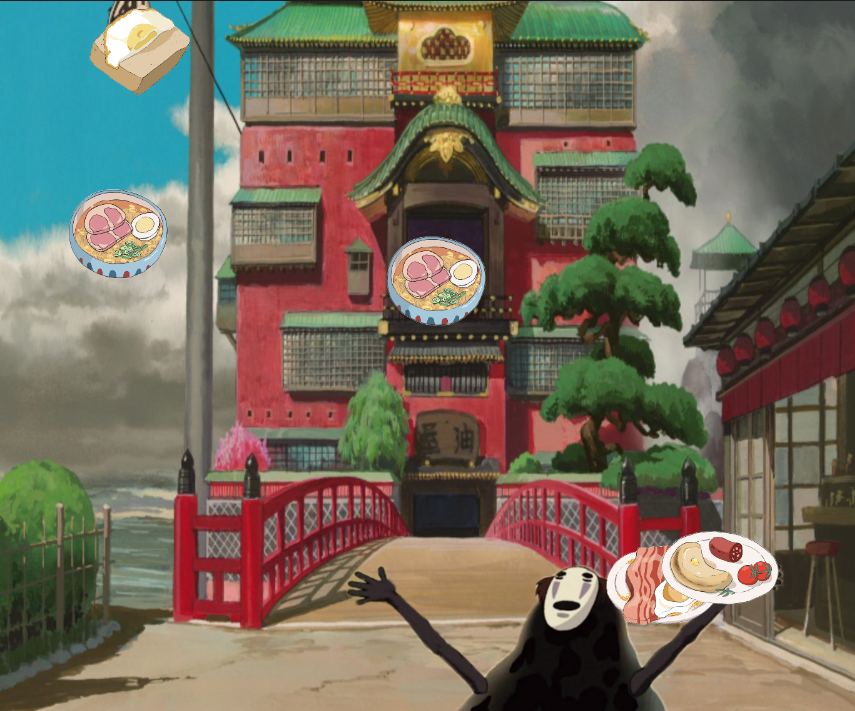
Originally, I was going to do a game similar to i-Spy, but I wasn’t happy with that idea. So I decided to stick to a Studio Ghibli theme and do something like related to the movie Spirited Away. In the movie, there is a character called No Face who goes to the bathhouse and eats a lot of food. So I thought it would be a fun idea to recreate that by making it rain food and have the player try to catch the raining food by controlling No Face. The things I need to for this game to work are:
Mouse click to catch the food and make it disappear
A counter to keep track of the score
Game states (title screen, game playing, and game over)
Restart and exit game buttons
Food “raining”
The character No Face for the player to control
Adding sound effects and background music
There might be more things I need to add, but this is the general idea. So far I have playing mode, the character, and the food raining. I still need to work on how No Face will catch the food, the counter, and the different states of the game.
Code Highlight
// From The Coding Train Flappy Bird Coding Challenge:
// https://editor.p5js.org/codingtrain/sketches/FtBc2BhHM
for(let i = addFoods.length - 1; i >= 0; i--) {
  addFoods[i].rainingFood();
  addFoods[i].show();
}

// A new food is pushed every time the frameCount is divisible by 50 or 100
if(frameCount % 50 == 0) {
   addFoods.push(new Food());
} else if(frameCount % 100 == 0) {
  addFoods.push(new Food());
}

// print(frameCount);
I used Object Oriented Programming for the food so I can add food images to the canvas based on the frame count. This code snippet I got from a Coding Train video, which was super helpful for my game.
for (let i = 0; i < 5; i++) {
    foods[i] = loadImage("Assets/food" + i + ".png")
}
Another part that I want to highlight is this chunk of code, which is my favorite hack. It’s such a smart and efficient idea to loop through the images by using the same name for the food images.
Future Directions
Since this is a progress check, I still have a lot to work on. For instance, making this an actual game where the food can be eaten and there’s an end. It will be a challenge, but hopefully I can figure it out. I was thinking of adding another object that can injure the character and take away points or lives, but I’m going to stick with figuring out how to catch the food first.
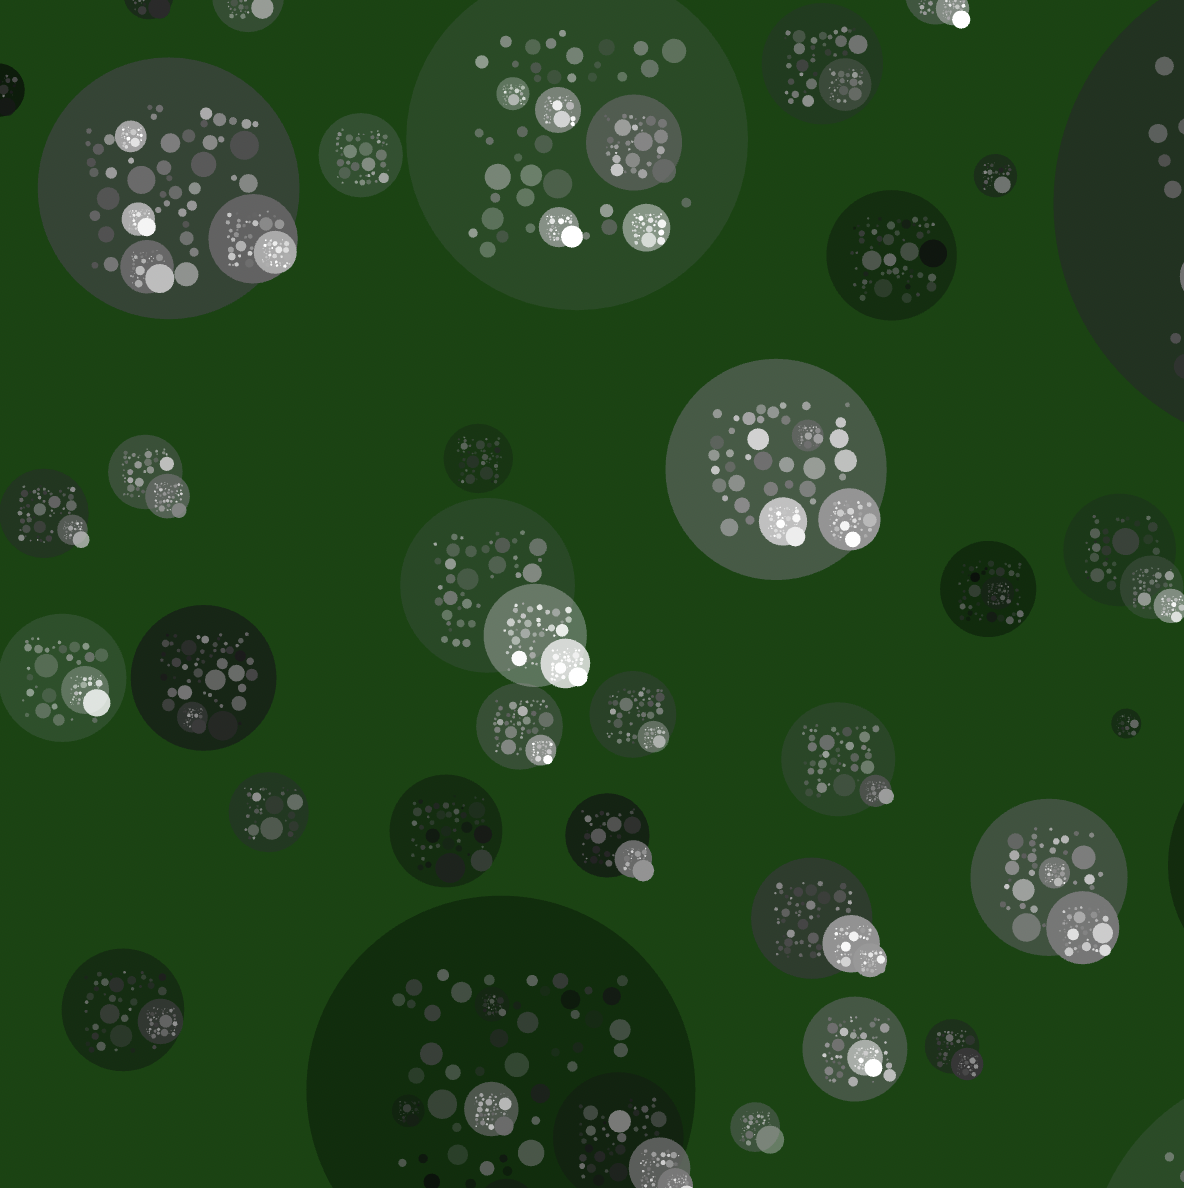
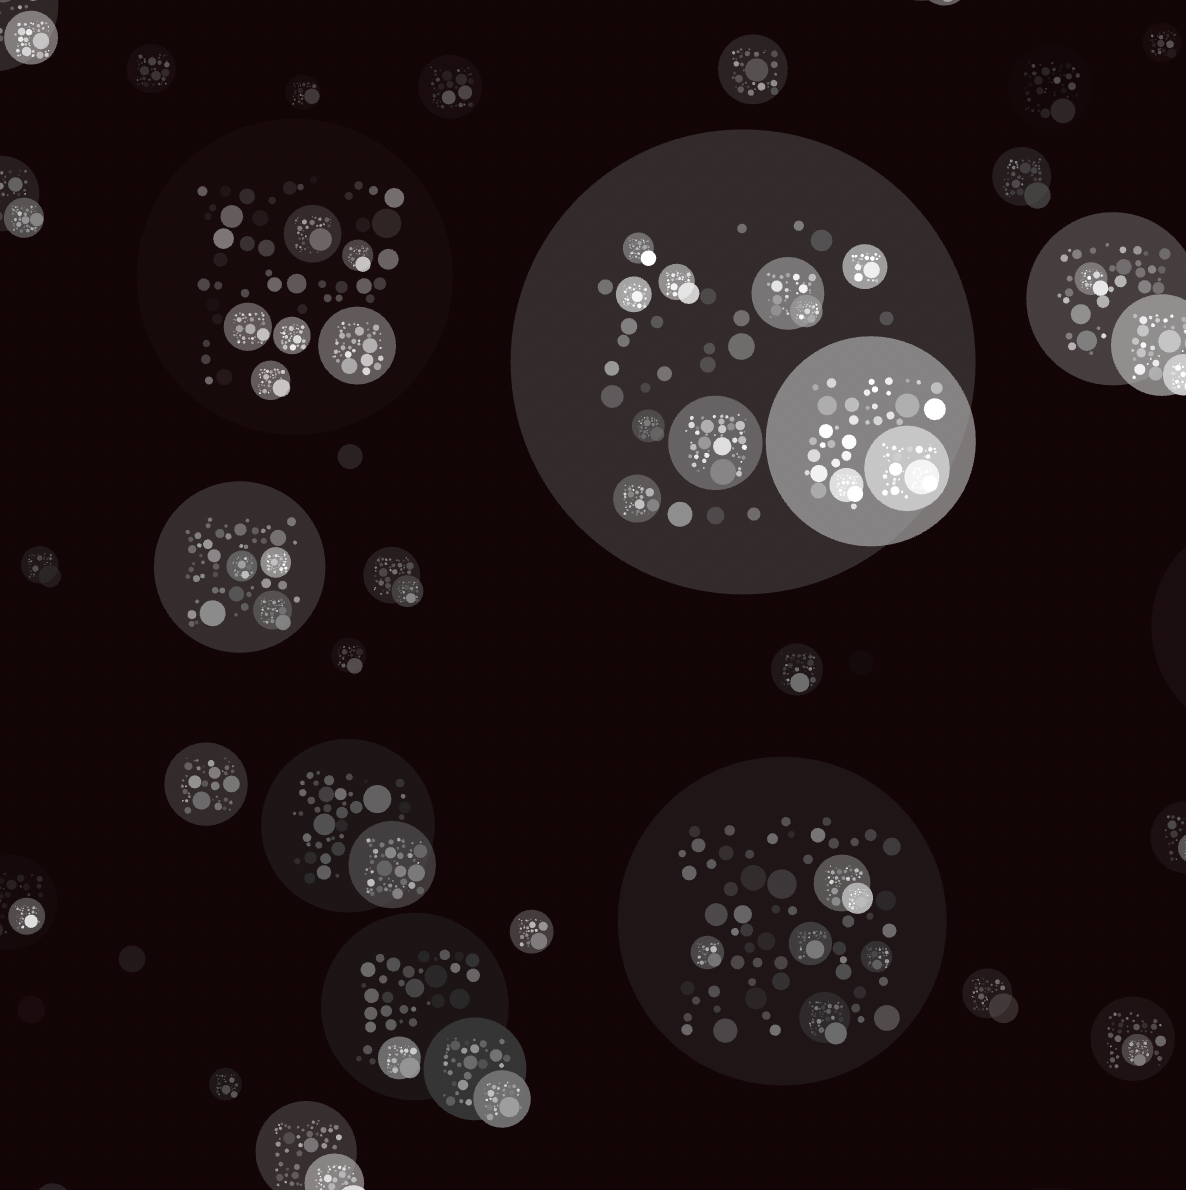
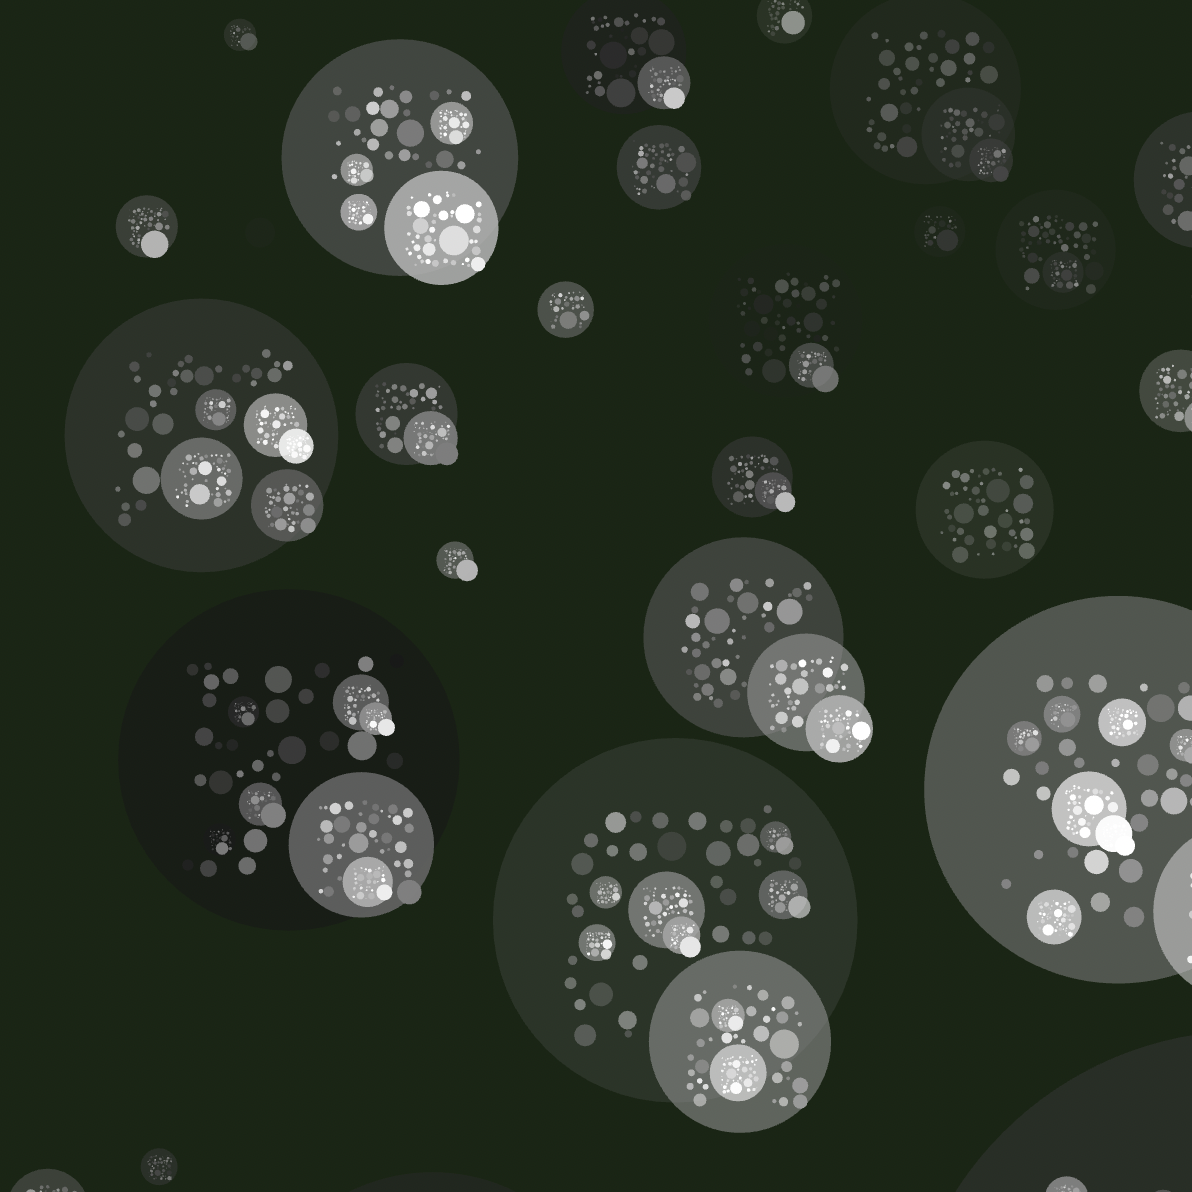
This week’s assignment required us to implement the notion of object-oriented programming, which includes utilizing classes and arrays. Given how beneficial and ambitious it could be, I was excited to delve into this coding section. My intention was to focus on implementing the concept more than forcing my usual out-of-the-box idea that might jeopardize my understanding of it. I decided to present an art-motivated sketch representing faded COVID-like cells (green shades) all over the canvas representing how this prominent virus has been a part of our lives and will slowly fade away.
code:
//initiate variables
var circ;

function setup() {
  createCanvas(600, 600);

  //setup a circle with attributes with color range randomness (greenish)
  circ = new Circ(width, width, 0, 0, [random(35), random(110), random(35)], 0);

  noLoop();
}

function draw() {
  background(circ.color);

  //translate origin of canvas
  translate(width / 4, height / 4);

  circ.createChildren();
  circ.show();
}

class Circ {
  //set constructors and default positioning
  constructor(circW, circWPar, circXPar, circYPar, color, circNo) {
    this.circNo = circNo;
    this.circW = circW;
    this.circXPar = circXPar;
    this.circYPar = circYPar;
    if (circNo == 1) {
      this.x = random(-width + circW, width);
      this.y = random(-height + circW, height);
    } else {
      this.x = random(-circWPar / 3 + circW, circWPar / 3, -circW);
      this.y = random(-circWPar / 3 + circW, circWPar / 3, -circW);
    }

    this.color = color;

    this.children = [];
  }

  createChildren() {
    //set amount of circles and how recursive
    if (this.circW > 15) {
      for (var i = 0; i < 2000; i++) {
        var color = [this.color[0] + random(110), this.color[1] + random(120)];
        var circ = new Circ(
          this.circW * random(0.02, 0.6),
          this.circW,
          this.x,
          this.y,
          color,
          this.circNo + 1
        );

        if (i == 0) {
          this.children.push(circ);
        } else {
          for (var j = 0; j < this.children.length; j++) {
            //keep values + using absuloute function
            if (
              abs(circ.x - this.children[j].x) <
                circ.circW / 2 + this.children[j].circW / 2 &&
              abs(circ.y - this.children[j].y) <
                circ.circW / 2 + this.children[j].circW / 2
            ) {
              break;
            } else if (j === this.children.length - 1) {
              this.children.push(circ);
            }
          }
        }
      }
    }
  }
  show() {
    noStroke();
    fill(this.color);
    translate(this.circXPar, this.circYPar);
    circle(this.x, this.y, this.circW, this.circW, this.circW / 20);

    for (var i = 0; i < this.children.length; i++) {
      push();

      this.children[i].createChildren();
      this.children[i].show();

      pop();
    }
  }
}
method:
It was essential to find a way to take advantage of how beneficial the functionality of classes and arrays are, so I ended up classifying circles and assigning constructors to particular colors, sizes, and recurrences. I proceeded by saving the outcomes on the array, which was beneficial to have different results on each sketch run.
sketch:
The following pictures preview different art sketch runs from the program, all possessing a green tint with various shades:
future improvements:
Presenting an animation, perhaps a pulsing effect would be fun, indicating how ‘alive’ the cells are. Maybe also making them interactive with the user’s mouse.

 In-game display