Coding using OOP was more difficult than I expected it to be, but with practice it ended up being as easy as the rest of the concepts. Learning OOP from scratch with no background in coding generally confused me a little because it was completely different and included many new functions and concepts, but doing this assignment helped me understand it; OOP felt very simple by the end of the assignment.
The concept of this program is simple, it is yet another artwork. I intended to make something that was visually pleasing and coordinated, and OOP helped me do that.
Using different creative names helps keep the code entertaining, for example when I used circir, that helped me store the different names and parts of the code in my head without being bored.
A problem I ran into was getting the constructors to work, my code kept crashing and the website would lag and I’d have to repeat the entire process again. After redoing the code though, I finally understood that my problem was with the syntax and I fixed it.
I just started learning about loops and how to use them recently, and so, once I realized how they work and how I can make the most appealing projects with them, I started playing with the code and making different shapes and colors. In this project, I created art using shapes that are not really identifiable, but the way I did it was, I created circles that increased and decreases in size constantly, which resulted in the shape that came out.
I felt really proud after doing this following part of the code. As I’ve previously mentioned, I have not worked with loops or conditionals before, so getting this done and getting it to work was really a milestone for me and I am really proud ofit
while (x <= windowWidth) {
let r = random(255);
let g = 0;
let b = random(255);
fill(r, g, b);
ellipse(x, y, wed, hei);
wed += widinc;
hei += heiinc;
if (wed > 200 || wed < 100) {
widinc *= -1;
}
if (hei < 100 || hei > 200) {
heiinc *= -1;
Moving on, I feel very confident after this assignment that I will be able to implement concepts and ideas like this in bigger projects like the midterm. Mastering the art of loops and conditional statements opens the doors to many different creative opportunities and projects.
The idea from this game came from my love of music and rock songs, as well as me not being able to code that well to implement sprites. I made a trivia game for guessing songs as I sometimes enjoy guessing them when listening to them from a distance.
game phase
The game is a quiz style game, where a song will play for 5 to 10 seconds, and you choose one of the 4 album covers on screen. Wether you choose the right or wrong one, you will proceed to the next round. If you get a wrong answer you will see it on the strike section on the top-right side of the screen. If you get 3 strikes, you loose and have the end-screen, where it tells you the score a hint to getting the game’s surprise at the end.
I used the random function for the length of the song array and based on that pulled a song and the album cover from the arrays. The positions for the correct answer and the other images were confusing to find, but I found a way around it, generating the correct answer over one of the other pictures.
The game ends after 10 rounds or if you get 3 wrong answers, afterwards you will see the end screen, or if you get the 10 answers correctly, a special surprise.
challenges
The biggest challenge was making the album covers and songs be random, as it took a while to figure out an efficient way to make it work, specially for the positions. It took days to figure out but felt very rewarding at the end.
The other challenge was making the game flow, as I used a noLoop() without noticing it. The noLoop() made my code not work as it stopped all the draw functions to stop working as intended. I fixed it by making my code be function oriented. Instead of fitting everything into 1 function, I spread it around many different ones.
The last challenge was more of a tedious one, as the songs took some time to collect and write the code correctly, I think it could have been done in a much more efficient way, but I do enjoy the end result.
code
The code was based on game states, similar to the example of class:
function draw() {
  background(220);

//   Taken from gameState code in class, makes the game work cohesively
   if (gameState == 'start') {
    drawInstructions();

  } else if (gameState == 'playing') {
    drawGame();

  } else if (gameState == 'end') {
    drawEndScreen();
  }

}
The draw parts of the game I tried to make them the most basic as possible, while adding custom functions to it.
function drawGame(){
  background('pink')

//Based on having a random result from a string
  image(album_covers[wSong1], img1X, img1Y)
  image(album_covers[wSong2], img2X, img2Y)
  image(album_covers [wSong3], img3X, img3Y)
  image(album_covers [wSong4], img4X, img4Y)

// Strikes and strike counter
  push()
  strokeWeight (5)
  textSize(20)
  text('Strikes: ' + strike, 300, 30)
  stroke(255,0,0)
  pop()

//Correct song randomly placed over another picture
  image(album_covers[currentSong], goodX, goodY);

  //Text for round and score
  text('Round ' + counter, 25, 25)
  text('Score: '+ score + '/10', 25, 40)
}
The way I transitioned from screens to the game itself, was by the mouse click function and adding more and more custom functions to it:
function mouseClicked(){
  console.log("gamestate is: ", gameState);
  if (gameState == 'start'){
//   Makes it so that the game can be looped and work properly when multiple games are played
    gameState = 'playing';
    randomize(); //the songs are randomized and in theory, don't loop
    counter++ // round increase
  }else if (gameState == 'playing'){
   if (mouse_is_over()) {
    score ++ // whem you get an answer your socre increases
     nextRound() // refreshes the game
   }else{
    strike ++
    console.log('strike');
    console.log(strike)
    nextRound()
    }
   }else if(gameState == 'end'){
    gameRestart() // game begins again and values reset
   }
}


function mouse_is_over(){
  // console.log (mouseX, goodX, mouseY, goodY) // This was for debugging

//   Makes it so that mouse is relative to the corredct answer
   if ((mouseX>= goodX && mouseX < goodX + imgSize) && (mouseY >= goodY && mouseY <goodY + imgSize)) {
     return true
   }else {
     return false
   }
}

// Game ends if 10+ rounds are reached
function rounds(){
  if(counter == 11){
   songs[currentSong].stop()
    rickRoll()
    gameState = 'end'
    // drawEndScreen()
  }
}

// makes the next round happen,randoized again
function nextRound(){
   songs[currentSong].stop()
    previousSongs.push(currentSong)
  counter++
  rounds ()
  randomize()
    gameOver()
}

// makes it so songs don;t repeat
function noRepeat(){
  while (currentSong == previousSongs){
    currentSong = int(random(songs.length))
  }
}

// functions and values reset
function gameRestart(){
  print('Resetting game state');
  strike = 0
  score = 0
  counter = 0
  previousSongs = [];
  gameState = 'start'
}

// Makes it so the right song is in one of the 4 possible combinations
function currentSongPosition(){
  goodX = random(positionX)
  goodY = random(positionY)

}

//Game ends if you get 3 wrong answers
function gameOver(){
  if (strike > 3){
    gameState = 'end'
  }
}

//makes it so the album pictures don't repeat as much by using while statements
function randomize(){
    currentSong = int(random(songs.length))
  while(currentSong in previousSongs){
    currentSong = int(random(songs.length))
  }
  wSong1 = int(random(songs.length));
    while(wSong1 == currentSong){
    wSong1 = int(random(songs.length));
  }
  wSong2 = int(random(songs.length));
  while(wSong2 == currentSong || wSong2 == wSong1){
    wSong2 = int(random(songs.length));
  }
  wSong3 = int(random(songs.length));
    while(wSong3 == currentSong || wSong3 == wSong2 || wSong3 == currentSong){
    wSong3 = int(random(songs.length));
    }
  wSong4 = int(random(songs.length));
    while(wSong4 == currentSong || wSong4 == wSong3 || wSong4 == wSong2 || wSong4 == wSong1){
      wSong4 = int(random(songs.length))
    }
    songs[currentSong].play();

  currentSongPosition()
}

// special surprise
function rickRoll(){
  if (score == 10){
    gameState = 'end'
    window.open("https://www.youtube.com/watch?v=dQw4w9WgXcQ")
  }
}
future improvements
I would have liked to add the names of each song under the pictures, but wasn’t able to figure it out.
Another thing I would have liked to iron out would have been the issue of songs repeating after they are played one round, however I was never able to figure it out, same for the album covers and their positions, I feel it could’ve been more practical and simple than the way I did it.
Also, being able to show the songs that played at the end of the game, or after each round would have been good, in order for the player to look them up if they liked them.
reflection
It was very interesting and fun doing a project like this as it allowed me to get a lot of practice by challenging myself. Overall, I wish I could make more improvements like using hears instead of X’s, but it was very good.
I came up with the theme of my game when I was looking for different sprite sheets, as I really wanted to learn how to animate sprites during the development of my game. I came across “My Little Pony” sprite sheets, and thought it would be fun and colorful to work with ponies. Initially, I wanted to create a platform jumping game, but due to some challenges(listed below), I changed the concept of my game to a jumping pony game resembling the Chrome Dino Game.
Game Phase:
PinkiePie one of the characters in the cartoon is running away from the small dragon, that’s why she has to jump over it. Each successful jump adds one point. Also, when Pinkie Pie collects the star, she also gets one more point. Some funny phrases from the actual cartoon play, when she collects a star. When she hits Draco, the game is over and a funny cartoon phrase plays.
Challenges:
Unfortunately, while I was trying to create platform classes, place them randomly, jump over them and check for collisions, my program did not work, and I could not figure out the solution. That’s why I decided to stick to the game without platforms. It led to the alterations of the whole project and the assets of the game.
Also, one of the biggest challenges was the animation of the sprite, therefore I am really happy with the result that my pony is running. However, I couldn’t do two consecutive animations. For example, when a pony is jumping do jumping animation, and then change to running animation immediately.
Even though I had a lot of challenges when I was making the game and my initial concept was changed, I am really happy with my result. I learned a lot during this process of mistakes. Also, I learned that breaking the problem into small problems is really great way of development. I started the code with primitive shapes and then started adding my assets and animation, point system and etc. I was checking the animation code separately and added it only when it was finally moving.
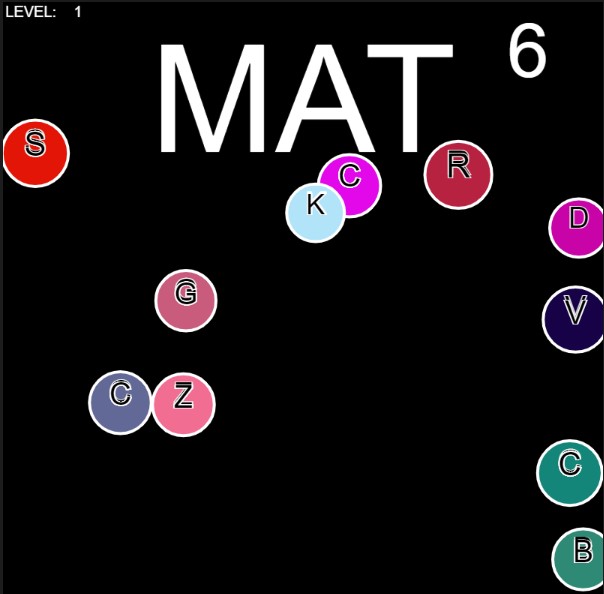
BUBBLE POPPER – AN EDUCATIONAL APPROACH TO BUBBLE POPPING:)
Concept
The project is an educational game for children learning how to spell. The letters fall down from the top and the user (child in this case) can select the letters to make up the word that shows up on the screen.
The game was inspired by this small toy that my father bought for me when I was 5 years old. It had a small screen and the letters would drop down slowly.
The game is also just meant to be satisfying. During midterm season, I would just sit in the library and just pop the bubbles in the game just to relieve stress.
Description
The game works by creating circles with a letter associated with the circle. The circle is derived as a object of the droppedShape class. The objects populate an array that deletes them after the shapes or circles exit the screen. This was done as to not use up too much memory. The object also has access to the letter it hold. This letter is therefore, when clicked, on added to a new string that checks in every iteration if the target word had been made up.
The surrounding functions help display text and display the level/score. These variables are all globally stored. Which is conventionally a bad practice but help access the variable and manipulate in many different functions uniquely.
I’m particularly happy about the droppedShape class as it has been a running template for me to learn OOP. Outside of the project, I’ve tried to implement different things to this class and its nice to see it working well in the project.
//declare global variables
let s;
let bubbleArr = [];
let numShapes = 10;
let howmanycircles = 10;
let deletedcircles = 0;
let rr = 0;
let bb = 0;
let gg = 0;
let img;
let timer = 5;
let newLetter;
var word;
var newword="";
let flag=true;
var new_wordSound;
var bpopped_sound;
let level=1;
let menu =0;
let gOverimage;
let bpop;

//alphabet array
const texts1 = ["A", "B", "C", "D", "E", "F", "G", "H", "I", "J", "K", "L", "M", "N", "O", "P", "Q", "R", "S", "T", "U", "V", "W", "X", "Y", "Z" ];

//letter concentration
let texts = ["A", "B", "C", "D", "E", "F", "G", "T", "T","U","H","R"];

//word bank

const words= ["CAT", "BAT", "HAT", "RAT", "MAT", "CAN", "JAM", "RAN"];

function preload(){
  img=loadImage("cat.webp");
  //loadSound('assets/new word sound.mp3');
  gOverimage=loadImage("game_over.gif");
  bpop = loadSound('sfx-pop.mp3');
}

//function for detecting the mouse press
function mousePressed(){
  for(let i = 0; i < bubbleArr.length; i++){
    bubbleArr[i].clicked(mouseX,mouseY,i);

  }
}

//text on top
class topText{
  constructor(){
    this.word=random(words);

  }
  disp(){
    if (flag==false){
      fill("red");
      for(let i=0;i<3;i++){
         while (newLetter==this.word[i]){
         textAlign(CENTER);
         text(this.word[i],50,200);
      }

    }
    }
    fill("white");
    //stroke("black");
    //strokeWeight(2);

    for(let i=0;i<3;i++){
      textSize(100);
      textAlign(CENTER);
      text(this.word[i],50,200);
    }


  }
  success(){
              if(newLetter==this.word[1]&&newLetter==this.word[2]&&newLetter==this.word[3]){
      flag=false;
      disp();

    }
    if(newLetter==this.word[1]||newLetter==this.word[2]||newLetter==this.word[3]){

    }
  }

}

//Shape being dropped
class droppedCircle{
  constructor() {
    this.x = random(width);
    this.y = 0;
    this.width = random(38, 45);
    this.speed = random(0.5,3);
    this.r = random(250);
    this.g = random(250);
    this.b = random(250);
    this.text= texts[Math.floor(Math.random() * texts.length)]
  }
   move() {
    this.y += this.speed;
  }

  display() {
    fill(this.r,this.g,this.b);
    stroke(255);
    strokeWeight(2);
    ellipse(this.x, this.y, this.width, this.width);
    for (let i = 0; i < bubbleArr.length; i++){
          strokeWeight(1);
          fill("#000000");
          textAlign(CENTER);
          textSize((bubbleArr[i].width)/2);
          text(bubbleArr[i].text, bubbleArr[i].x, bubbleArr[i].y);


    }

    this.move();
  }

  clicked(px,py,index){
    let d = dist(px,py,this.x,this.y);
    if(d < this.width){
      rr = this.r;
      bb = this.b;
      gg = this.g;
      //insert sound
      bpop.play();

      bubbleArr.splice(index,1);
      numShapes--;
      newLetter=this.text;
      //console.log(newLetter);
      newword+=newLetter;


      //console.log(newword);
      if (match(newword, word)==word){
        //console.log("Success");
        word=random(words);
        level++;
        //new_wordSound.play();
        //if (new_wordSound.isPlaying()){
        //  new_wordSound.stop();
        //}
      }
    }

  }

}

function setup() {
  createCanvas(400, 400);
  s = new droppedCircle();

  for(let i = 0; i < numShapes; i++){
    bubbleArr[i] = new droppedCircle();
  }
  //m= new topText();
  //topText.disp();
  word=random(words);
}

//prints word to screen
function drawWord(Aword){
  let success = 0;
  while (success!=1){
    textSize(100);
    textAlign(CENTER);
    text(Aword,200,100);

    success=1;
  }
}

function printScore(L){
    textSize(10);
    textAlign(CENTER);
    text("LEVEL: ", 20,10);
    text(L,50,10);
}

function makeArr(arrWord){
  for (let i=0; i<length.arrWord; i++){

    append(texts,arrWord[i]);


  }
  for (let i=0;i<level;i++){
    append(texts, random(texts1));
  }
}

//HOME SCREEN
function homeScreen(){
  background(img);
  textSize(30);
  textAlign(CENTER);
  text("PWEESE PWES ENTER",200,50);
}


//GAME
function playGame(){

  background(rr,gg,bb);
  //image(img,0,0);
  smooth();
  fill("white");
  stroke(20);
  textSize(50);
  text(timer, 350, 50);
  if (frameCount % 60 == 0 && timer > 0) {
    timer --;
  }
  if (timer == 0) {
    text("GAME OVER", width/2, height*0.7);
    //noLoop();
  }

  printScore(level);
  //console.log(word);
  drawWord(word);
  makeArr(word);

  //s.display();

  for(let i = 0; i < numShapes; i++){
    bubbleArr[i].display();
    if(bubbleArr[i].y > height){
      bubbleArr.splice(i,1);
      numShapes--;
      deletedcircles++;
    }
   for(let i = 0; i < words.size; i++){
     //while ()


    }
  }


  // print("numshapes:",numShapes,howmanycircles,deletedcircles);


  let rand = int(random(0, 100));
  let rand2 = int(random(0, 100));
  if(rand % 7 == 0){
    if(rand2 % 3 == 0){
    bubbleArr[numShapes] = new droppedCircle();
    numShapes++;
      howmanycircles++;
     }
  }
  // print(numShapes,rand);
}

//EXIT SCREEN
function exitScreen(){
    background("black");
    image(gOverimage, 0, 0);
    textAlign(LEFT);
    fill("red");
    text("Press ESC", 250,300);
}

//togoling between game modes
function keyPressed(){
  if (keyCode === ENTER) {
    menu=1;
  }
  if (keyCode===' '){
    menu=1;
  }
  if (keyCode===ESCAPE){
    menu=0;
  }
}

//main function
function draw() {
  if (timer==1){
    exitScreen();


    if (menu==0){
      homeScreen();
      timer=30;
    }
  }
  else if (menu==0){
    homeScreen();
    if (keyPressed==1) { menu=1;}
  }
  else if(menu ==1){
    playGame();
  }

  //playGame();
  //console.log(timer)


}
And the following is the sketch:
Problems
A large I could not overcome was the proper implementation of the diplayedWord class, this was intended to highlight every letter of the target word in a different color when the bubble containing the letter is clicked. However, I believe my implementation of the call had a incorrect constructor not allowing the object to be properly created.
The second problem was the program slowing down significantly after the first iteration. This is probably because of the program does not reset the game mode when replaying.
The third problem was the randomization. It proves to be the fatal flaw in the program keeping in mind the purpose and the intended audience. The letters that fall are much too randomized and must have been more concentrated to have provided a better gaming/ learning experience.
For the midterm project, I decided on making a scuba diving game where the player will be encounter sea treasures and sea monsters in a continuous stream. The player will accumulate points by colliding with gold coins but when a collision is made with a sea monster, the game will end.
The game is in three states: the start, playing and game over states. The start state consist of the game name and instructions printed out on the screen. After the clicking the mouse, you enter a playing state. The task is collect as many coins as possible while avoiding contact with the sea monsters. The game will end when you collide with a sea monster. There are levels in the game which influence the speed at which the sea monsters move. The higher up you go, the faster they move. To move the next level, you must go through a series of 6 backgrounds. You change backgrounds by moving to the right now of the game window.
The diver, monster fishes and coins were implemented with sprites from the internet. The various modes have sounds attached embedded in them. There is also a game play sound the loops when you’re playing the game. The score and the level are displayed at the top left and top right positions.
To make the coins spin, I used a sprite sheet to animate them; displaying one image at a time in a suitable frame count.
Challenges:
Implementing a continuous scrolling background was a big challenge. To resolve that challenge I decided to use a set of related backgrounds and display the continuous when the player reaches the rightmost of the game window. This creates the illusion that he’s move through various scenes underwater.
Integrating the sounds and making them work with the various game modes also required a bit of smart engineering. I decided to use boolean flags that signal when to play and stop a sound.
Embedded Sketch:
`
Reflections:
I particularly happy with the current version of the game. I intend to update it further and make the diver be able to fire water shots at the monsters. I tried controlling the diver with hand gestures but the outcome hasn’t really effective, it just wasn’t right for this game. This version of the game doesn’t have a high level of interactivity aside controlling the diver but I think to has the right kind of interactivity that makes the game enjoyable. I plan to explore more ways to make it interactive.
My midterm project is an extension of the “Ivy’s Hardest Game” game, where I have incorporated additional features. Unlike the original game, my version of the game, titled “ChaseMe”, is a time-based game, where John Wick, a fictional Hollywood character, is the primary character, while other Marvel characters like Thanos, Monolith, Howard and so on are supplementary characters. Here, the main character is being chased by the secondary characters mentioned above, so the target is to help Wick survive as long as possible. In case, the secondary characters catch him, the game is over and all the progress vanishes.
Moreover, I took a tiny bit of inspiration from “Adventure Trap 2” – a game famous for its hard levels and hidden traps. In simple words, no matter what you do, no matter what the player does, the character dies in this game. Thus, I wanted to implement such features; consequently, it is relatively challenging to go beyond level 4 in this game (Good luck with this!). With this idea in mind, I have displayed the number of levels on the top-left corner.
Code
The entire project is divided into four JavaScript files for organizational purposes (character.js, game.js, keyboard_keys.js and driver_file.js). Most of the functions are present inside the “game.js” file, character.js file contains blueprints of superclass and subclasses. In the same way, “keyboard_keys.js” files contain functions that keep track of arrow keys pressed and released during the game, whereas the driver_file.js file is the driving code that consists of all the global variables as well as setup() and draw() functions.
The core feature of the game is the use of Object Oriented Programming (OOP) and related features like abstraction, encapsulation and modularity. There is a superclass titled “Character” from which two subclasses — MyCharacter and SuppCharacter — are derived.
Here, the MyCharacter consists of image dimension and collision attributes in addition to the attributes of superclass; similarly, it constitutes of five methods as mentioned below:
up_collision_check() It checks if the primary character has collided with secondary characters or not — if yes, class attributes are updated accordingly.
movement() It loops through the list of secondary characters and checks collision with them and sets attributes accordingly.
border_check()
It keeps the primary character within the canvas.
update()
It updates the location of the primary character and calls border check and movement method in the process.
display() It displays the primary character (image) and updates its position as the character moves.
Similarly, the SuppCharacter subclass initializes additional attributes (particularly, acceleration and velocity vectors) and includes three methods as mentioned below:
border_check() It makes sure secondary characters stay within the canvas — when each character reaches the border, its velocity is reversed.
update() It updates the (x, y) coordinates of the character, checks border collision and uses an algorithm so that each supplementary character follows the primary character with the help of vector methods.
display() method
This method calls the update() method and displays the image of the secondary character.
Above mentioned are the three classes of the project. The entire function is based on these classes and additional features are implemented over them to shape the project.
The fundamental phases of this game can be divided into the following game stages (or called “gamePhase”) in the code. I have made various changes and included additional features in each of these stages.
“Start” phase
“Playing” phase
“Complete” phase
In the start phase, the game’s interface is shown to the user. It displays an interface background (an image loaded into the system), shows the game instructions (how to play the game) and consists of a “Start” button, which should be clicked on to start the game.
This stage relies on “start_screen()” and “instruction_text()” functions. The “start_screen()” function displays the background image, sets up the “start” button and ensures the game progresses to the next stage when clicked on. In addition, when the cursor is brought over the button, hover effect is visible on the screen. Similarly, the “instruction_text()” function displays a set of texts on how to play the game on the right corner of the screen. Once, the “start” button is clicked, “gamePhase” changes to “playing”, thus new functions are called and the game interface changes.
The second phase is the “playing” phase, which is the most code-intensive stage of the game. This is where a player plays the game, progresses to different levels and completes the game (it can be tiring though). Once the game starts, the “game_screen()” function is called. It displays the primary character and loops through the supplementary characters’ lists and displays all the secondary characters on the screen. Inside this function, “timer()” function is called.
function timer()
{
  // Co-ordinates of timer text
  let x_pos = -160;
  let y_pos = 25;

  // Timer Functionality Text
  textAlign(CENTER, CENTER);
  stroke(5);
  textSize(25);
  fill("white");
  text("Time Remaining: " + timer_len, canvas_w + x_pos, y_pos);                                // Displaying Timer
  text("Level: " + level + " of " + num_levels, canvas_w/2 + 2.5 * x_pos, y_pos);              // Displaying Level


  // A second passed using modulus function
  // Decrease time and increase score
  if (frameCount % 60 == 0 && timer_len > 0)
  {
    timer_len--;
    score++;
  }

  // If the character has survived until the end of the level, call next_level_screen() function
  if (isGameOver == false && timer_len <= 0)
  {
    next_level_screen();
  }

}
The “timer()” function displays the timer and level of the game on the screen. The idea behind the countdown timer is to decrease the value of the “timer_len” global variable every second, which is done using the “modulus” operator — i.e. in an interval of every 60 frames, the timer_len variable’s value is decreased once. This way, it appears as if the timer is in countdown mode. Additionally, while decreasing the value of the timer_len variable, the value of the “score” variable is increased too. This function also ensures the game proceeds to the next level if the timer_len is “0” and isGameOver boolean is “false”, which implies that the game should go on — this is done by calling the “next_level_screen()” function.
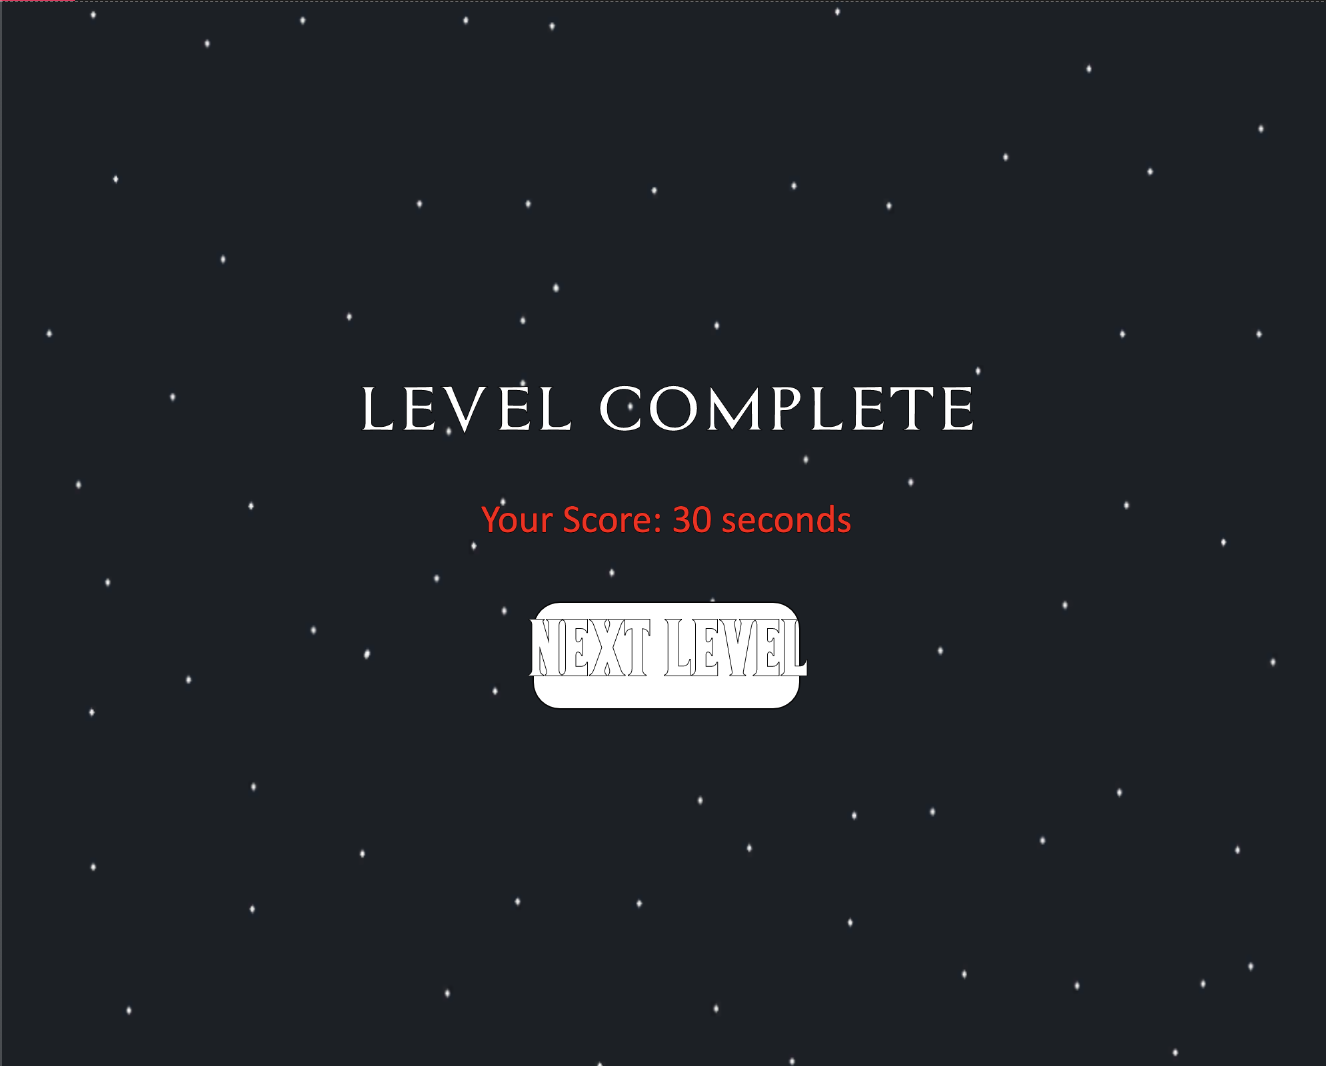
Level Up Screen
The “next_level_screen()” function depends on two helper functions “level_completion_setting()” and “next_level_settings()”. These functions update appropriate global variables like isGameOver, gamePhase and score. The next_level_settings() function adds an increasing number of normal characters to the game as it progresses. Also, a new character called “big-boss” is introduced after level 3 in the game (and two of them after level 6), which is done by the next_level_settings() function.
The next_level_screen() function checks if it’s the end of the level — if there are more levels in the game, it shows a button (which is done using the “myButton()” function described later) that can be clicked to move to the next level.
While playing the game, if the primary character collides with any other characters, the isGameOver variable changes to true and using the collision check method of the “MyCharacter” subclass, the gameOver_screen() function is invoked. This function again displays a game over the screen along with a button that can be clicked to restart the game. In order to do so, reset() function is called, which resets different global variables and lists to initial states for a fresh start.
function reset_game()
{
  // Reset isGameOver boolean and change the gamephase
  isGameOver = false;
  gamePhase = "playing";
  score = 0;
  level = 1;

  timer_len = timer_len_1;               // Reset the timer to 30 seconds
  supp_char_list = [];                  // Reset the list of secondary characters
  add_supp_char();                      // Secondary characteres added manually in reset
  textFont("calibri");                  // For Timer Font (Otherwise it changes to Assassin Font)

  add_soundtrack();

  // Placing the primary character at the middle of the canvas
  my_char.location.x = (canvas_w/2 - my_char_size/3);
  my_char.location.y = (canvas_w/2 - my_char_size*3);
}
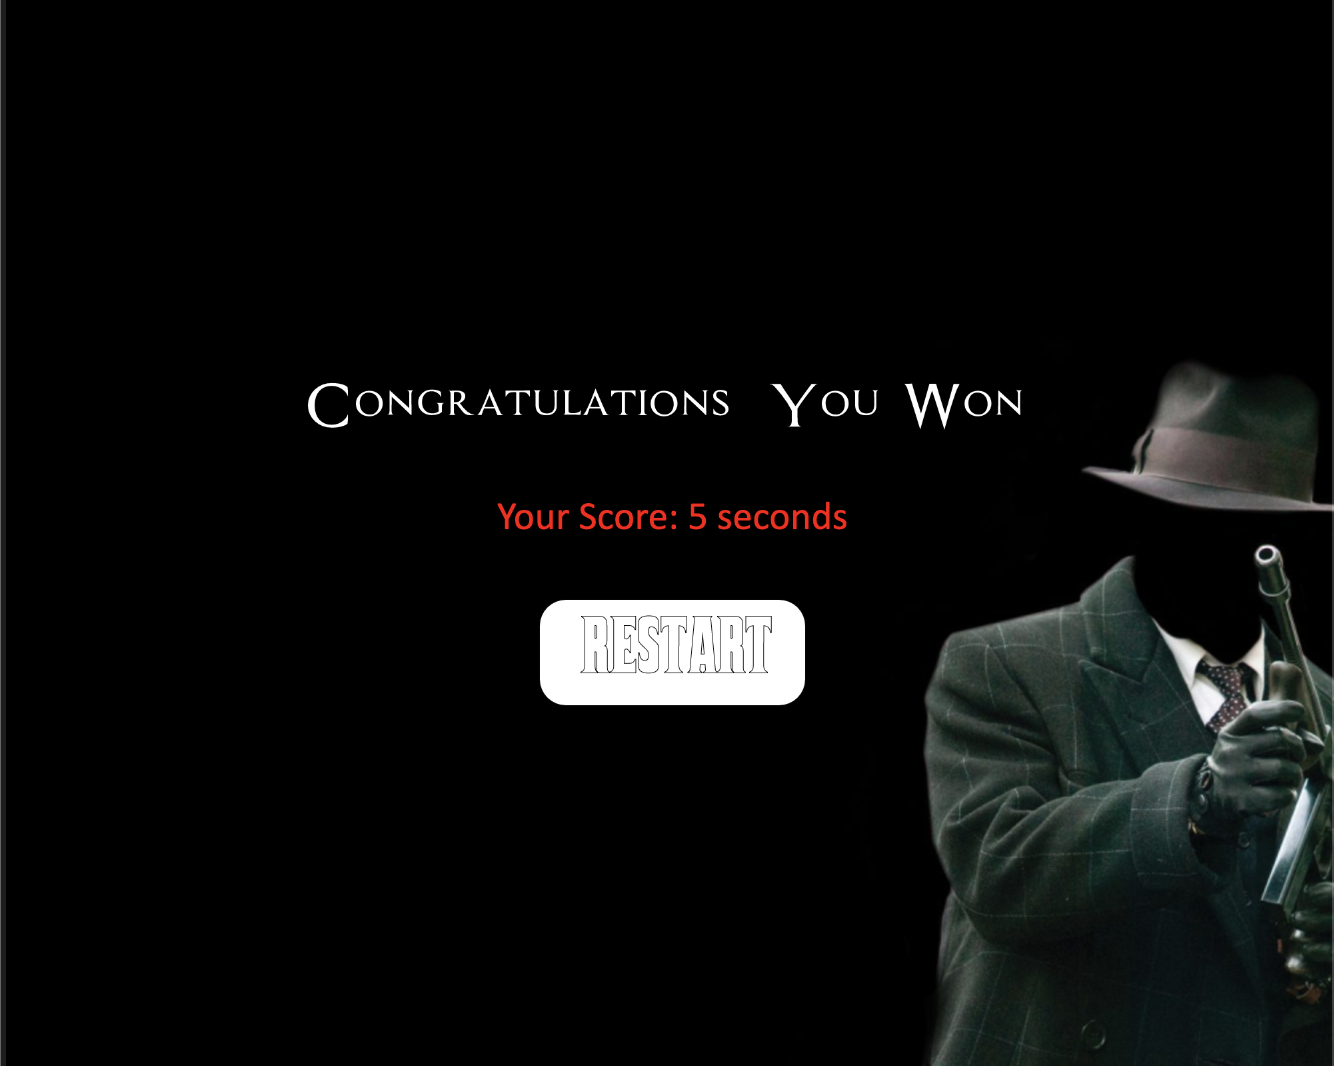
Similarly, the third phase of the game is the “complete” phase. If all the levels are completed, the “game_complete_screen()” function is called. It displays a congratulatory message and provides the player with a button to restart the game – once again, myButton() and reset() functions are used respectively to restart the game.
Game Completion Screen
Additional Functionalities
The game consists of different sound effects to aid the overall gameplay. Using the “add_soundtrack()” function, background music is added to the game, which spans for the entirety of the game (to do so, p5.js’s inbuilt loop() function is used). This function is called inside the “setup()” function as well as the “reset()” function — this way, music does not overlap and it can be stopped whenever the game over screen is to be displayed.
In the same way, a collision sound is a part of the game, which is played when secondary characters catch the primary character successfully.
I spent a significant amount of time brainstorming possible algorithms and game designs for this project. Consequently, I came up with different ideas that I am particularly proud of. For instance, the chasing feature inside the update method of the “SuppCharacter” subclass. Initially, I was planning on implementing Dijkstra’s Algorithm to find the shortest path between characters, but the concept of vector implementation seemed more reasonable. I used some ideas from this source to complete this function. The idea here is to create a vector that points to the position of the primary character. Then, the (vector) location of the chasing characters is subtracted from the vector created above. The resultant vector has a strong magnitude or pull; thus, it is mapped by a particular scale (in this case, 0.1) as a result, the movement is more realistic. Finally, the vector of the primary character is assigned to the acceleration vector, which is used to update the velocity vector; the velocity vector in turn updates the location vector. This way, it appears as if supplementary characters are chasing the primary character. Essentially, it is using basic mechanics to find the shortest path.
update()
{
  // Create location vector for main character (dynamic in nature)
  let main_vec = createVector(my_char.location.x, my_char.location.y);
  main_vec.sub(this.location);                  // Subtract location of this.location from main_vec
  main_vec.setMag(supp_char_mag);               // Set the magnitude of the vector - used as 'Pull'
  this.acc = main_vec;                          // Set acceleration to main_vec

  this.location.add(this.velocity);            // Update location
  this.velocity.add(this.acc);                 // Similary for velocity
  this.velocity.limit(supp_vel_limit);        // Set max velocity limit

  this.border_check();
}
At first, I used p5.js’ inbuilt createButton() function to take user input. However, in the later phase of game design, I manually created a myButton() function that takes certain parameters and creates a button for the user. This function displays the required message to the user (based on the message parameter), creates different buttons (based on the button_text parameter) and enables unique hover effects (based on the color parameter). This way, using one function, unique buttons are created throughout the game. Moreover, the use of the “type” parameter ensures the implementation of certain features under certain conditions only.
function myButton(img_name, rect_x, rect_y, rect_w, rect_h, message, button_text, color, type)
{
  image(img_name, 0, 0, canvas_w, canvas_h);            // Load the image based on parameter

  textSize(50);
  textFont(assassin_font);
  fill("white");
  stroke(1);
  text(message, canvas_w/2, canvas_h/2 - 100);


  // Your Score Text -- for all pages except the first one
  if (type != "start")
  {
    textSize(30);
    textFont("calibri");
    fill("red");
    text("Your Score: " + score + " seconds", canvas_w/2, canvas_h/2 - 10);
  }

  // Play Again Button
  let isWithinRectangle = (mouseX < (rect_x + rect_w) && mouseX > (rect_w) && mouseY < (rect_y + rect_h) && mouseY > (rect_y))

  // Hover Effect
  if (isWithinRectangle)
  {
    if (type != "start")
      fill(color);
    else
       fill("grey");

    text_size = 55;
  }
  else
  {
    if (type != "start")
      fill("white");
    else
      fill(143,148,123);

    text_size = 50;
  }

  // Border rectangle for Start Button
  stroke(5);
  rect(rect_x, rect_y, rect_w, rect_h, 20);

  // Font setting for start page
  if (type == "start")
  {
    textAlign(CENTER);
    textFont("Helvetica");
    fill("white");
  }
  else
    textFont(corleone_font);

  stroke(5);
  textSize(text_size);
  text(button_text, rect_x + 100, rect_y + 30);                      // Button text

  return isWithinRectangle;            // Return if cursor is within the rectangle or not
}
Similarly, I am proud of the way the overall project is organized. For instance, there are separate “add_supp_char()” and “add_big_boss()” functions in the driver_file.js file, where I have adjusted the x-coordinates of new characters so that no supplementary character overlap with the primary character. Also, this design lets me call the functions in each level separately, thus the number of supplementary characters can be increased after each level; also, big-boss characters can be added after certain levels due to this game design. Thus, I am happy with the game design.
Problems I encountered
The section that took most of my time was designing the functionality where secondary characters follow the primary character. I was trying to implement this feature without using ‘vectors’; however, it was tedious and failed in many circumstances. Thus, I switched the location, velocity and acceleration attributes of the classes mentioned above, which allowed me to track the path of the character’s movement. This way, I was able to implement this feature. Similarly, increasing the level of difficulty required a worthwhile time investment as sometimes the levels were too difficult or supremely easy. I solved this problem by introducing supp_vel_increment and supp_char_mag variables which let me increase the secondary character’s velocity and pull force manually inside different functions or methods.
Reflection
Overall, I am incredibly happy with the way the project turned out. Designing a tentative plan was definitely helpful as I could build upon different ideas. In future iterations of this project, I would love to include the following changes:
The use of Computer Vision (web camera or microphone) to control the movement of the primary character. As of now, the character’s movement is sensitive given the increasing level of difficulty, thus proper algorithms and modes of user interactivity can enhance the game.
A setting page at the beginning of the game, which lets the user select the number of levels or number of characters.
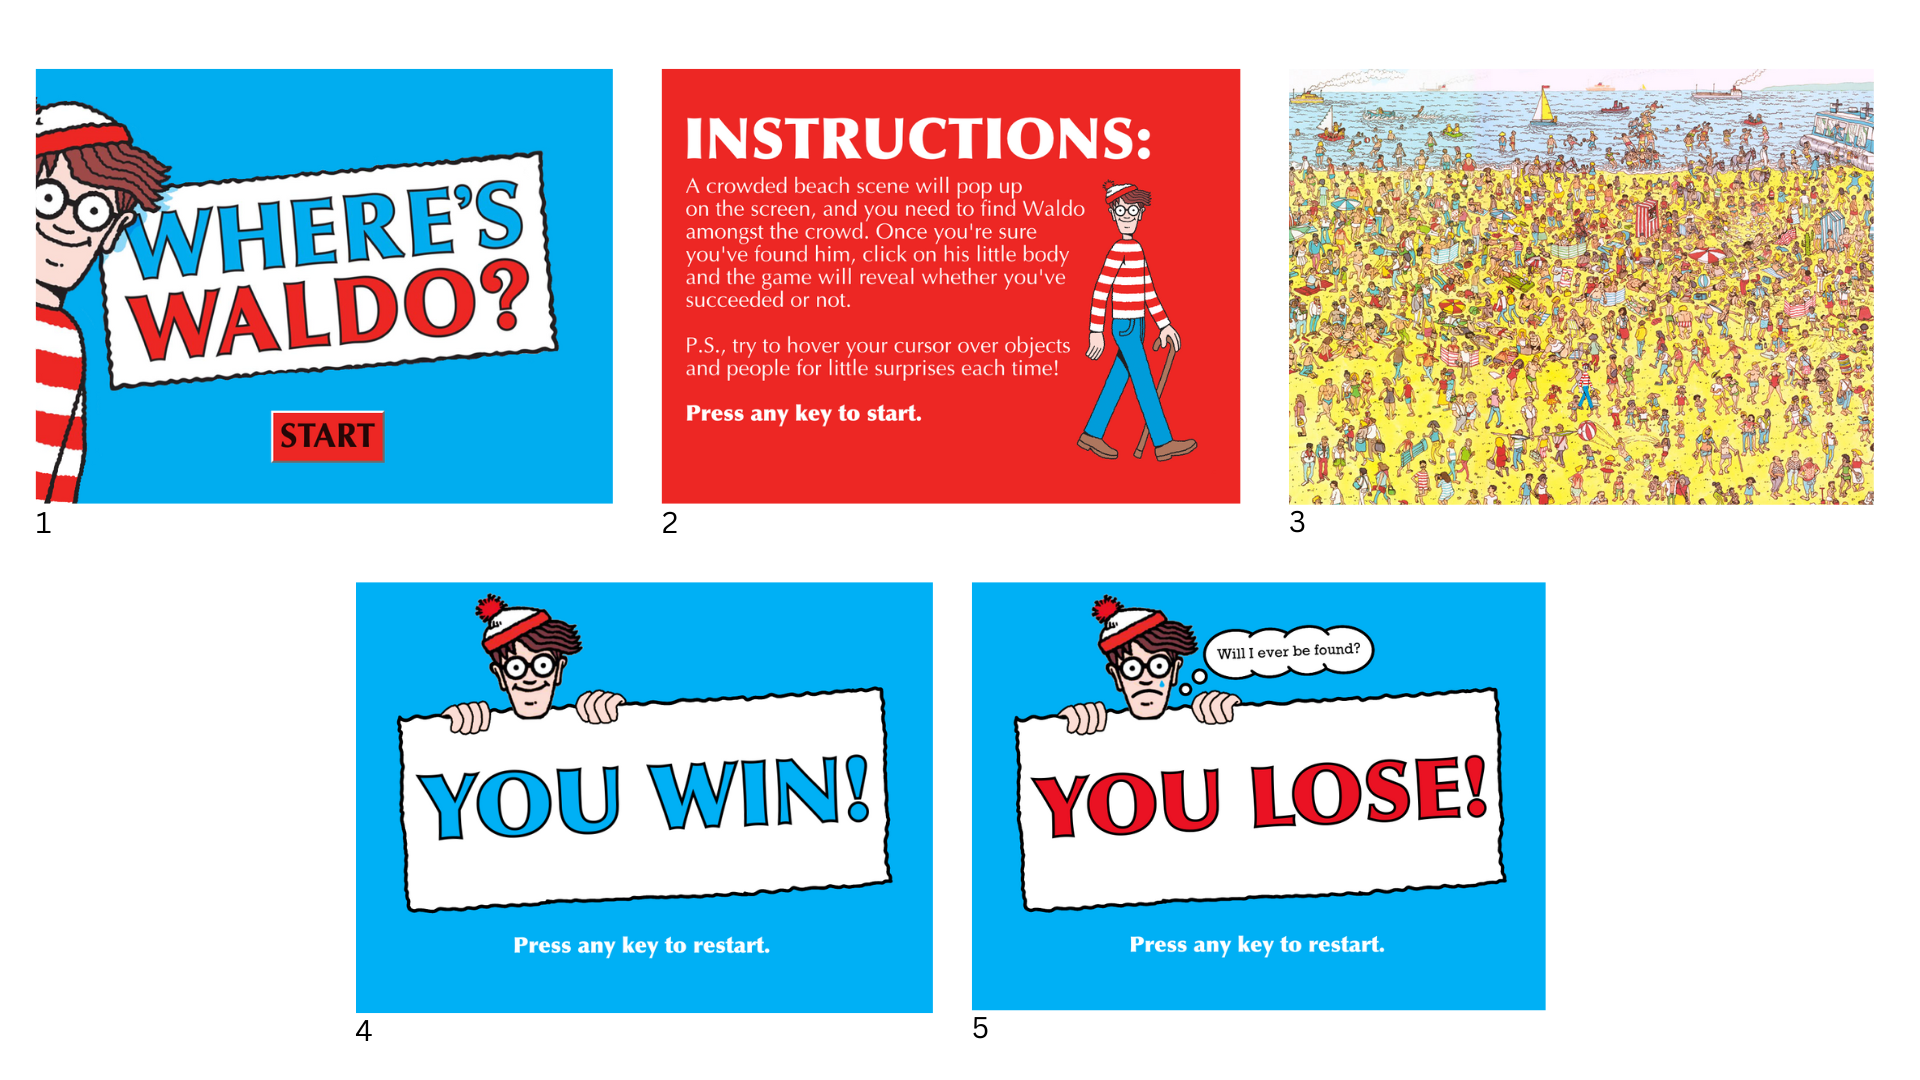
For my midterm, I made a Where’s Waldo? game where the player has to search for the Waldo character on the canvas and click on him to win. Waldo is randomly generated on the canvas every time you play, and he’s in a crowded background that you have to navigate through and look closely in order to find him. It’s relatively simple; a digital version of one of my favorite picture books from childhood.
I added sound effects that play whenever you hover over specific things or people on the canvas, which I thought added another fun dimension to my game.
For example, if you hover your cursor over the ocean part of the scene, you can hear a water splash sound effect, or if you hover your cursor over the crowd of children running, you can hear a laughter sound effect.
Embedded sketch:
My game has 5 screens: the title screen, instruction screen, gameplay screen, win screen and lose screen. They are navigated via the draw function, which keeps track of the game’s state and calls functions whenever you insert the game state somewhere.
I think adding more rounds would have definitely improved my game, but it took me a while to figure out how to sort everything out and debug my code– so much so that I didn’t have enough time to figure out how to embed another round into my sketch (and trust me, I tried).
I also would have liked the game to be more interactive in terms of key pressing and mouse clicking as a form of navigation. My game is fairly simple, as all you need to do is click on Waldo to win.
Keeping track of everything was a nightmare until the professor helped me out with the game states in function draw, and this made it easier for me to trigger certain functions without having to continuously navigate through the code and jumble things up.
Advice from my peers also really helped me configure the game as well!
Phew! That was one hell of a ride for sure. For my midterm project, I have created a shooting game, with a forestry theme. The name (Man Vs Tree) is inspired by the Netflix show (Man Vs Bee) starred by the famous Mr.Bean lol. Basically the project started off as an idea of creating a whole ecosystem of different enemies to our environment and catalysts to global warming. However as challenges grew and came in different forms, I finally decided to implement the current theme, which is simple yet meaningful. Man Vs Tree is about a player, which is an apple tree, protecting its forest against loggers by attacking them with apples. As more enemies die, they spawn power-ups as ozone health. The enemy loggers shoot dynamites and axes at the tree, and once all lives are finished, the tree dies and the game is lost.
Code
The coding for the game was indeed a great hustle. A lot of time was spent in thinking about the mechanics of different aspects such as collisions, arrays, level implementation, speed optimization, and many more concepts. Even more time was spent testing the game and making sure there were as few bugs as possible and that all the logic implemented was working as it was supposed to. Below is a snippet of the game class, showing the display method of the game class.
display_game() {
    //condition for displaying actual gameplay when game has started
    if (this.gameStarted && this.gameOver == false && this.gameWon == false) {
      image(this.bg_img, 0, 0, 600, 600);

      this.player.display();

      //loop for displaying all enemies in enemy array
      for (let i = 0; i < this.enemies.length; i++) {
        this.enemies[i].display();
      }

      //loop for displaying all projectiles in enemyprojectiles array
      for (let i = 0; i < this.enemyProjectiles.length; i++) {
        this.enemyProjectiles[i].display();

        //logic for player and enemyprojectile collision detection, player then takes damage
        if (this.enemyProjectiles[i].used == false && this.enemyProjectiles[i].collision(this.player)) {
          this.player.hit(10);
        }
      }

      //loops through enemyprojectiles array and pops any projectiles which have already collided
      for (let i = 0; i < this.enemyProjectiles.length; i++) {
        if (this.enemyProjectiles[i].used == true) {
          this.enemyProjectiles.splice(i, 1);
          break;
        }
      }

      //loops through enemy array and pops any enemies with health less than zero
      for (let i = 0; i < this.enemies.length; i++) {
        if (this.enemies[i].health <= 0) {
          this.enemies.splice(i, 1);
          break;

          //logic for score reduction if enemy reaches beyond screen height, and pops enemy from array
        } else if (this.enemies[i].y > 650) {
          this.enemies.splice(i, 1);
          this.score -= 10;
          break;
        }
      }

      //loops through playerprojectiles array and displays them
      for (let i = 0; i < this.playerProjectiles.length; i++) {
        this.playerProjectiles[i].display();

        //detects collision btn playerprojectiles and enemies, then enemy takes damage
        for (let j = 0; j < this.enemies.length; j++) {
          //Check if the projectile collides with any enemy
          if (
            this.playerProjectiles[i].used == false &&
            this.playerProjectiles[i].collision(this.enemies[j])
          ) {
            this.enemies[j].hit(10);
          }
        }
      }

      //loops through ozone powerups array, displays them, and detects collision with player
      for (let i = 0; i < this.ozone.length; i++) {
        this.ozone[i].display();
        if (
          this.ozone[i].used == false &&
          this.ozone[i].collision(this.player)
        ) {
          this.ozone[i].give_health();
        }
      }

      //pops ozone powerup from array once collected by player
      for (let i = 0; i < this.ozone.length; i++) {
        if (this.ozone[i].used == true) {
          this.ozone.splice(i, 1);
          break;
        }
      }

      this.show_score();

      //logic controlling time in the game
      if (frameCount % 60 == 0) {
        this.timer += 1;
      }
Reflections / Improvements
Overall , I am proud of myself and the general implementation of the code. However, of course there could further improvements that could be made such as having variety of enemies, more visual effects such as floods maybe or rain. Codewise, there was quite some hardcoding which could’ve been implemented more elegantly, and made the game more efficient and easy to understand. Watching that progress starting from scratch to coming across those bugs that you would spend hours, sometimes days on, and seeing the final version of the game gives me great joy, one I can not describe.
For this project, I have created an 8-bit style Tetris game. The general concept of the game is similar to the original game, but there are two additional features in this game. First, the game sometimes generates a random block that does not look like a traditional Tetris block. The block may consist of more than 5 blocks and some empty spaces. This is a challenge that this game gives to the players. Secondly, there is a bomb block that removes all blocks. If the bomb is in row n, it will clear all blocks from row n-2 to n+2, removing 5 lines total. This feature is added because randomized blocks may be too difficult for the users. For additional concepts, please refer to my previous posts.
Code
**note: I will only discuss codes that are new or different from the previous post I made on Tetris. I recommend reading the previous first and coming back.**
For update 2, I started off by fixing these one minor bug:
Block cannot be moved as soon as it reaches the bottom.
This happened because the code generates new block as soon as the block touches the ground (when block cannot go further down). In order to solve this, I added a condition which the code will wait for the new keyboard input if it cannot go further down for a specific amount of time. If no key input is given in that time range, the code will then generate the block. Bolded code shows the new lines that I have added.
if (millis() - counterBlockDown > 1000 / this.speed) {
        fixBlock = true;
        counterBlockDown = millis();
      }
      if (fixBlock) {
        //Once block cannot be moved down further, update game field
        for (let i = 0; i < 4; i++) {
          for (let j = 0; j < 4; j++) {
            if (this.shapeArr[i][j] == 1) board[this.y + i][this.x + j] = 1;
          }
        }
        //generate new block
        generateBlock = true;
        fixBlock = false;
      }
    }
Not to mention, there are tons of new features that I added in this update:
Soft drop
//soft drop
if (keyIsDown(DOWN_ARROW)) {
  if (myBlock != null) myBlock.speed = blockSpeed * 3;
} else {
  if (myBlock != null) myBlock.speed = blockSpeed;
}
When down arrow key is pressed, the block will move down with the speed that is 3 times its initial speed. Not to mention, block’s speed is in variable because initial speed will increase as level goes up.
Hard drop
When spacebar key is pressed, the block will instantly move down to the bottom. Notice that I used 32 for keyCode because spacebar is not mapped in p5js.
//Hard drop when spacebar pressed
if (keyCode == 32) {
  if (myBlock != null) {
    let yPos = myBlock.y;
    while (myBlock.validMove(0, 1, 0)) {
      myBlock.y = yPos;
      yPos++;
    }
    hardDropMusic.play();
  }
}
For this, additional calculation is done to find the lowest possible position for the block. The program will essentially start from the lowest position and see if the block can fit there. If block cannot be fitted, the block will moved 1 unit up to see if it fits there. This process repeated until the block finally fits.
Rotation
rotate() {
    for (let i = 0; i < 2; i++) {
      for (let j = i; j < 4 - i - 1; j++) {
        // Swap elements of each cycle
        // in clockwise direction
        let temp = this.shapeArr[i][j];
        this.shapeArr[i][j] = this.shapeArr[3 - j][i];
        this.shapeArr[3 - j][i] = this.shapeArr[3 - i][3 - j];
        this.shapeArr[3 - i][3 - j] = this.shapeArr[j][3 - i];
        this.shapeArr[j][3 - i] = temp;
      }
    }
  }

  //rotate block with condition check
  rotateBlock() {
    if (!this.validMove(0, 0, 1)) {
      for (let i = 0; i < 3; i++) this.rotate();
    }
  }
In order to rotate blocks, there must be additional condition that will check if the rotation is a valid movement at the given position of the block. Bolded code shows the new condition I have added to do this.
//Checks if block can be moved in a given direction
  validMove(dX, dY, dR) {
    if (dR == 0) {
      for (let i = 0; i < 4; i++) {
        for (let j = 0; j < 4; j++) { if (this.y + i >= 0 && this.x + j >= 0) {
            if (
              /*ignores all empty spaces. 1s must always be within the
            boundary of game field and must not overlap with non-empty,
            or 1s, when moved*/
              this.shapeArr[i][j] != 0 &&
              (board[this.y + i + dY][this.x + j + dX] != 0 ||
                this.y + i + dY >= boardHeight ||
                this.x + j + dX < 0 || this.x + j + dX >= boardWidth)
            ) {
              if (this.shapeArr[i][j] == 2){
                this.explode();
              }
              return false;
            }
          }
        }
      }
    } else {
      this.rotate();
      if (this.y >= 0) {
        for (let i = 0; i < 4; i++) {
          for (let j = 0; j < 4; j++) {  if ( /*ignores all empty spaces. 1s must always be within the boundary of game field and must not overlap with non-empty, or 1s, when moved*/ this.shapeArr[i][j] == 1 && (board[this.y + i][this.x + j] != 0 || this.y + i >= boardHeight ||
                this.x + j < 0 || this.x + j >= boardWidth)
            ) {
              return false;
            }
            if (this.shapeArr[i][j] == 2) return false; //bomb cannot be rotated
          }
        }
      } else return false;
    }
    return true;
  }
validMove() will first check if the block is being rotated or translated. If block is being rotated, i.e. third parameter is 1, it will first rotate the block and check if the block is not overlapped with other blocks and is within the width and height of the game field. If block satisfies all conditions, validMove() returns true. Else, it returns false. Since validMove() actually rotates block to check condition, rotateBlock() will rotate block 3 more times to reset the block status if no rotation can be made.
Random block
As level goes up, the game will start to generate random a 4 by 4 block that may contain empty spaces like such:
Each time a random block is generated, the block will have randomized shape. This feature was added to increase the difficulty of the game and make the game more interesting/different every time.
let blockType = random(0, 10);

if (blockType <= 11 - level * 0.5)
      myBlock = new block(5, -4, random(blockTypeArr), blockSpeed);
    else myBlock = new block(5, -4, random(specialTypeArr), blockSpeed);
This is a updated condition for generating block. blockType is a random number between 0 and 10. Regular blocks will be generated if blockType is less or equal to 11- level * 0.5 and random blocks or bomb (will be discussed in the next section) will be generated else. Note that the probability of getting random blocks or bomb increases as level goes up. For this reason, random block and bomb will only appear from level 3.
Bomb
Bomb is a special type of block that will remove blocks nearby. If block is at row n, it will remove all blocks from row n-2 to row n+2.
else if (_type == "bomb") {
      for (let i = 0; i < 4; i++) {
        shapeArr[3][2] = 2;
      }
    }

/*explode bomb block. if bomb is at (x,y), it will destroy every row
from x-2 to x+2*/
explode() {
  let go = true;
  for (let i = 0; i < 4; i++) {
    for (let j = 0; j < 4; j++) {
      if (this.shapeArr[i][j] == 2 && go) {
        go = false;
        for (let k = this.y + i - 2; k <= this.y + i + 2; k++) {
          if (k >= 0 && k < boardHeight) {
            for (let l = 0; l < boardWidth; l++) {
              board[k][l] = -1;
            }
          }
        }
      }
    }
  }
}
Block object now has new type called bomb. Chance of generating random block and bomb is both 50%.
Line Clearing
Every time a game field is updated, the program will look for any completed lines. If there is a completed, the game field will be updated. The update will make game field to hold value -1 instead of 1.
//Check if there is a line cleared
function lineClear() {
  for (let i = 0; i < boardHeight; i++) {
    if (board[i][0] == 1) {
      for (let j = 0; j < boardWidth; j++) {
        if (board[i][j] == 1) {
          if (j == boardWidth - 1) {
            for (let k = 0; k < boardWidth; k++) board[i][k] = "-1";
              counterLineClear = millis();
          }
        } else break;
      }
    }
  }
}
Because the game filed can now hold -1, I added new condition to make sure the game can display -1s as a grey block. Then, the game filed will start to remove grey blocks line by line at each frame. This code is shown as bold code below.
//visually display the gameboard.
function displayBoard() {
  blockImg = blockImg.get(0, 0, 20, 20);
  push();
  translate(25, 30);
  for (let i = 0; i < boardHeight; i++) {
    for (let j = 0; j < boardWidth; j++) {
      if (board[i][j] == 1) image(blockImg, blockSize * j, blockSize *
      i);
      else if (board[i][j] == -1) { image(greyBlockImg, blockSize * j,
      blockSize * i);
        removeLine(i);
      }
    }
  }
  pop();
}

function removeLine(index) { if (millis() - counterLineClear > 400) {
    for (let i = index; i > 1; i--) {
      for (let j = 0; j < boardWidth; j++) {
        board[i][j] = board[i - 1][j];
      }
    }
    lineClearMusic.play();
    lines++;
    score += scorePerLine;
    counterLineClear = millis();
  }
}
Score, level, and line cleared counting
For each line cleared, the game will update score, level, and line cleared displayed on the right side. For each line cleared, the score will increase more as level goes up. Level increases by 1 for each 10 lines cleared. As mentioned above, block speed will also increase as level goes up.
A condition that checks if game is over. If the position of non-empty block unit is below game field boundary, the game is over.
else {
  for (let i = 0; i < 4; i++) {
    for (let j = 0; j < 4; j++) {
      if (this.y + i < 0 && this.shapeArr[i][j] == 1) {
        gameOver = true;
        break;
      }
    }
  }
...
This condition is within blockDown() method of the block object.
Sound effect
Last feature that was added to this game is sound effect for background music, the block is moved and soft/hard dropped, and game over. Code will not be demonstrated because the codes for sound effect is scattered throughout the entire program.
Future Improvements
Overall, I am very satisfied with I have made for this project, but here are some things that I would love to fix in the future:
I realized when this program is played with chrome browser, the sound effect will slow down as time progresses. I found out this is the problem with the chrome itself.
Add settings page so players can change sound effects.
Due to the time limit, I failed to include a feature which shows next 2 blocks that will show up in the game. I would love to add this feature in the future.
Include hold feature so user can hold the block and use it later when needed.
The rotation of the blocks is not centered because rotation is done as if I rotating a matrix.