Concept:
After learning about the functionalities and the means of communicating between P5 and Arduino platforms, we were given the assignments to initialize various scenarios to and from p5.
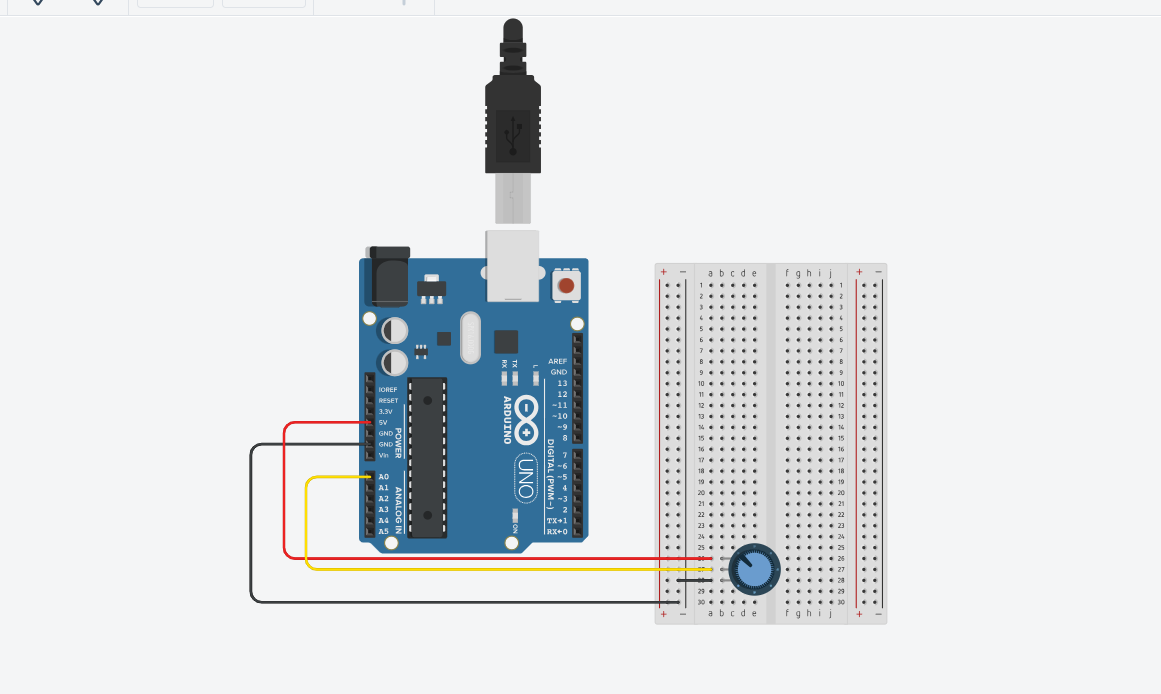
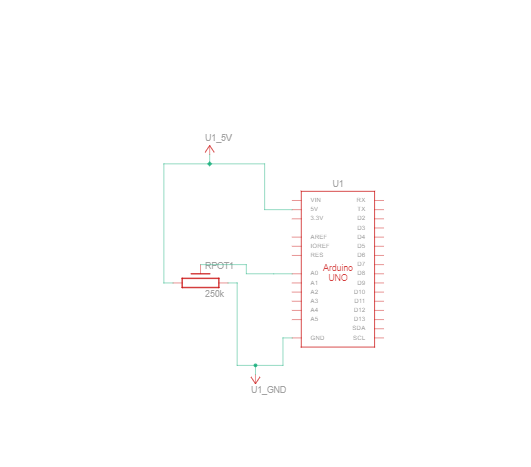
First Assignment:
In this assignment, we initialized an Arduino to p5 connection using a potentiometer to control the horizontal position of an ellipse:
Arduino code:
const int potPin = A0;  // Analog pin connected to the potentiometer

void setup() {
  Serial.begin(9600);
}

void loop() {

    int potValue = analogRead(potPin);  // Read the value from the potentiometer
      // Send the potentiometer value to p5.js
      Serial.println(potValue);
}
P5 Code:
let ellipseHorizental;

function setup() {
  createCanvas(640, 480);
  textSize(18);
  ellipseHorizental = width/2;
}

function draw() {
  background(220);

  // Draw ellipse with width based on potentiometer value
  fill(255, 0, 255);
  ellipse(ellipseHorizental, height / 2, 100, 150);

  if (!serialActive) {
    text("Press Space Bar to select Serial Port", 20, 30);
  } else {
    text("Connected", 20, 30);

    // Print the current potentiometer value
    text('Potentiometer Value = ' + str(ellipseHorizental), 20, 50);
  }
}

function keyPressed() {
  if (key == " ") {
    setUpSerial();
  }
}

function readSerial(data) {
  if (data != null) {
    // convert the string to a number using int()
    let fromArduino = split(trim(data), ",");

    // Map the potentiometer value to the ellipse width
    ellipseHorizental = map(int(fromArduino[0]), 0, 1023, 0, 640);

  }
}
Video:
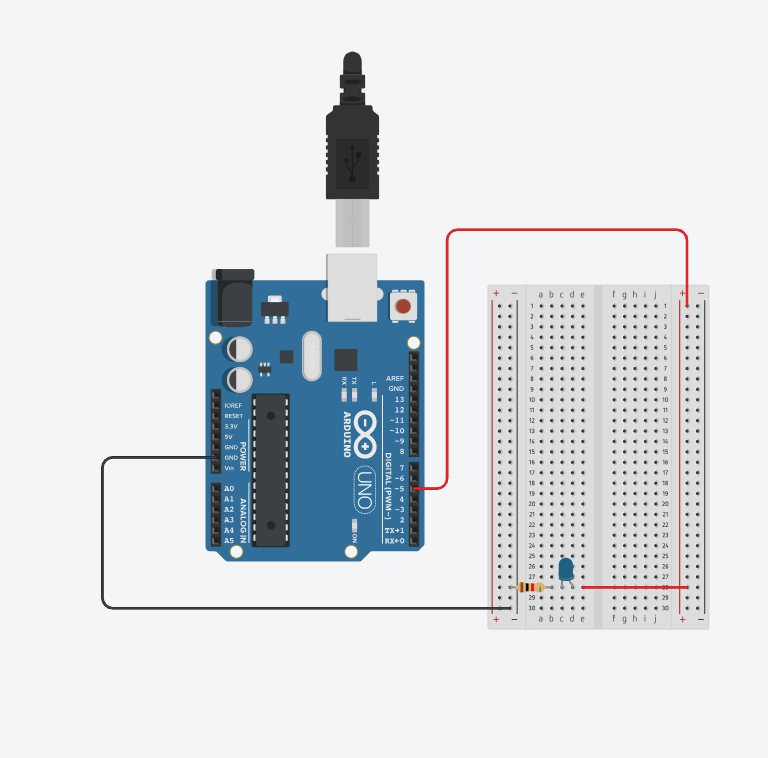
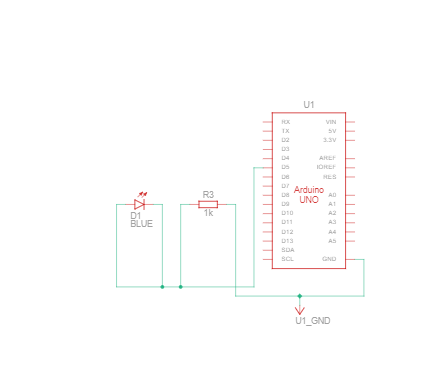
Assignment 2:
In this assignment, we initiated a p5 to Arduino response. The slider in p5 can control the brightness of an LED in Arduino.
Arduino code:
int LED = 5; // Digital pin connected to the LED

void setup() {
  Serial.begin(9600);
  pinMode(LED_BUILTIN, OUTPUT);
  pinMode(LED, OUTPUT);

  // start the handshake
  while (Serial.available() <= 0) {
    digitalWrite(LED_BUILTIN, HIGH); // on/blink while waiting for serial data
    Serial.println("0");             // send a starting message
    delay(300);                       // wait 1/3 second
    digitalWrite(LED_BUILTIN, LOW);
    delay(50);
  }
}

void loop() {
  // wait for data from p5 before doing something
  while (Serial.available()) {
    digitalWrite(LED_BUILTIN, HIGH); // led on while receiving data

    int brightnessValue = Serial.parseInt();
    if (Serial.read() == '\n') {
      delay(5);
      Serial.println(brightnessValue);
    }
    analogWrite(LED, brightnessValue);
    digitalWrite(LED_BUILTIN, LOW);
  }
}
P5 code:
let brightnessSlider;

function setup() {
  createCanvas(640, 480);
  textSize(18);

  // Create a slider
  brightnessSlider = createSlider(0, 255, 128); // Set the range and initial value
  brightnessSlider.position(20, 100); // Set the position of the slider
}

function draw() {
  background(255);

  // Draw a slider
  fill(255, 0, 0);
  rect(brightnessSlider.x, brightnessSlider.y, brightnessSlider.width, brightnessSlider.height);

  if (!serialActive) {
    text("Press Space Bar to select Serial Port", 20, 30);
  } else {
    text("Connected", 20, 30);

    // Print the current brightness value
    text('Brightness = ' + brightnessSlider.value(), 20, 50);
  }
}

function keyPressed() {
  if (key == " ") {
    setUpSerial();
  }
}
function readSerial(data) {
  if (data != null) {
    let sendToArduino = brightnessSlider.value() + "\n";
    writeSerial(sendToArduino);
    }
}
int LED = 5; // Digital pin connected to the LED

void setup() {
  Serial.begin(9600);
  pinMode(LED_BUILTIN, OUTPUT);
  pinMode(LED, OUTPUT);

  // start the handshake
  while (Serial.available() <= 0) {
    digitalWrite(LED_BUILTIN, HIGH); // on/blink while waiting for serial data
    Serial.println("0");             // send a starting message
    delay(300);                       // wait 1/3 second
    digitalWrite(LED_BUILTIN, LOW);
    delay(50);
  }
}

void loop() {
  // wait for data from p5 before doing something
  while (Serial.available()) {
    digitalWrite(LED_BUILTIN, HIGH); // led on while receiving data

    int brightnessValue = Serial.parseInt();
    if (Serial.read() == '\n') {
      delay(5);
      Serial.println(brightnessValue);
    }
    analogWrite(LED, brightnessValue);
    digitalWrite(LED_BUILTIN, LOW);
  }
}
Video:
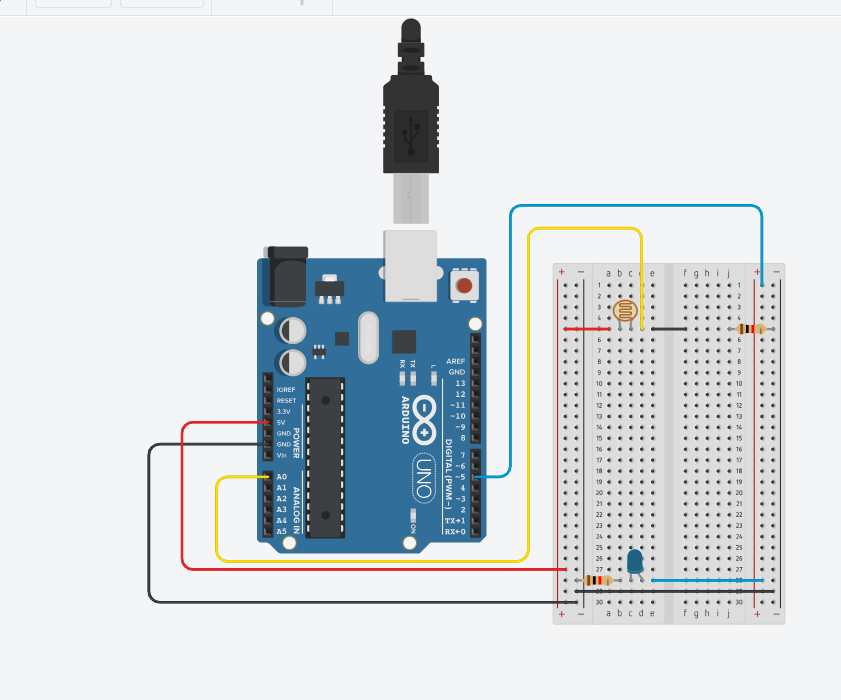
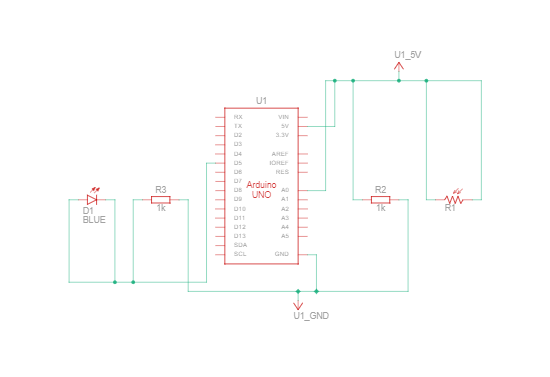
Assignment 3:
This assignment we spent an unholy and frankly embarrassing amount of time on this. We modified the code from class and figured out a way to light up both LEDs when the ball on the screen bounces. The wind speed depends on readings from the LDR, so the ball goes in different directions when the board is in light or dark conditions. At a certain light level, the ball remains stationary.
Arduino Code:
int leftLedPin = 2;
int rightLedPin = 5;
void setup() {
// Start serial communication so we can send data
// over the USB connection to our p5js sketch
Serial.begin(9600);
// We'll use the builtin LED as a status output.
// We can't use the serial monitor since the serial connection is
// used to communicate to p5js and only one application on the computer
// can use a serial port at once.
pinMode(LED_BUILTIN, OUTPUT);
// Outputs on these pins
pinMode(leftLedPin, OUTPUT);
pinMode(rightLedPin, OUTPUT);
// Blink them so we can check the wiring
digitalWrite(leftLedPin, HIGH);
digitalWrite(rightLedPin, HIGH);
delay(200);
digitalWrite(leftLedPin, LOW);
digitalWrite(rightLedPin, LOW);

// start the handshake
while (Serial.available() <= 0) {
digitalWrite(LED_BUILTIN, HIGH); // on/blink while waiting for serial
data
Serial.println("0,0"); // send a starting message
delay(300); // wait 1/3 second

digitalWrite(LED_BUILTIN, LOW);
delay(50);
}
}
void loop() {
// wait for data from p5 before doing something
while (Serial.available()) {
digitalWrite(LED_BUILTIN, HIGH); // led on while receiving data
int left = Serial.parseInt();
int right = Serial.parseInt();
if (Serial.read() == '\n') {
digitalWrite(leftLedPin, left);
digitalWrite(rightLedPin, right);
int sensor = analogRead(A0);
delay(5);
int sensor2 = analogRead(A1);
delay(5);
Serial.print(sensor);
Serial.print(',');
Serial.println(sensor2);
}
}
digitalWrite(LED_BUILTIN, LOW);
}
P5 Code:
let rVal = 0;
let velocity;
let gravity;
let position;
let acceleration;
let wind;
let drag = 0.99;
let mass = 50;
let groundFlag;
let dropFlag = false; // flag for when the spacebar is pressed and the ball should drop
let windFlag = false; // flag to start/stop wind

function setup() {
createCanvas(640, 500);
// noFill();
position = createVector(width / 2, 0);
velocity = createVector(0, 0);
acceleration = createVector(0, 0);
gravity = createVector(0, 0.5 * mass);
wind = createVector(0, 0);
groundFlag = 0;
frameRate(30);
textSize(20)
}
function draw() {
background(255);
text("rVal: "+str(rVal), 20, 55);
text("wind.x: "+str(wind.x), 20, 80);
if (!serialActive) {
text("Press Space Bar to select Serial Port", 20, 30);
} else {
text("Connected", 20, 30);
}
if (dropFlag == true) { // when spacebar is pressed, start the sketch
if (position.y == height - mass / 2) {
groundFlag = 1; // this value is sent to the LED in the Arduino end
} else {
groundFlag = 0;
}
applyForce(wind);
applyForce(gravity);
velocity.add(acceleration);
velocity.mult(drag);
position.add(velocity);
acceleration.mult(0);
ellipse(position.x, position.y, mass, mass);
if (position.y > height - mass / 2) {
velocity.y *= -0.9;
position.y = height - mass / 2;
}
if (windFlag == true) {
wind.x = map(rVal, 0, 1023, -1, 1);
}
}

}
function applyForce(force) {
let f = p5.Vector.div(force, mass);
acceleration.add(f);
}
function keyPressed() {
if (keyCode == UP_ARROW) {
windFlag = true // wind is enabled when up arrow key is pressed
}
if (keyCode == DOWN_ARROW) {
windFlag = false // wind is paused when down arrow key is pressed
wind.x = 0
}
if (key == " ") {
setUpSerial();
dropFlag = true;
}
}
function readSerial(data) {
////////////////////////////////////
//READ FROM ARDUINO HERE
////////////////////////////////////
if (data != null) {
// make sure there is actually a message
let fromArduino = split(trim(data), ","); // split the message
// if the right length, then proceed
if (fromArduino.length == 2) {
// only store values here
// do everything with those values in the main draw loop
// We take the string we get from Arduino and explicitly
// convert it to a number by using int()
// e.g. "103" becomes 103
rVal = int(fromArduino[0]);
alpha = int(fromArduino[1]);
}
//////////////////////////////////
//SEND TO ARDUINO HERE (handshake)
//////////////////////////////////

let sendToArduino = groundFlag + "," + groundFlag + "\n";
writeSerial(sendToArduino);
}
}
Video:
Reflection:
The overall exercises were a great way to comprehend further the logic behind the coding and how both platforms are intertwined. Knowing how things are operated between each other, we can now effectively work on our final projects and have so many possibilities of projects to work on.