Final Project – Stick Hero


Concept:

I was fascinated by the idea of creating a game that could be controlled using hand movements, and I successfully brought that idea to life using p5.js and Arduino. Inspired by the game ‘Stick Hero,’ I decided to recreate it with a unique twist. In this game, the player’s objective is to achieve a high score by helping their character cross platforms using a growing stick. By clenching their fist, the player can extend the stick to bridge the gap between platforms. The challenge lies in finding the perfect stick length—not too short to fall short of the other platform, and not too long to overshoot it.

p5.js:

The p5.js code represents a game where players navigate platforms by using a growing and rotating stick.

  1. Global variables are declared for images and sounds.
  2. Images and sounds are preloaded to ensure smooth gameplay.
  3. The Game class is defined, responsible for managing game objects and states.
  4. The class includes functions for start checking, score display, platform removal, game over detection, state management, platform and stick creation, and game display.
  5. The Player class represents the player character, incorporating functions for setting the destination, sticking to platforms, moving, and displaying.
  6. The Platform class represents the platforms and includes functions for movement and display.
  7. The Stick class represents the growing and rotating stick, featuring functions for growth and rotation.
  8. The setup and draw functions are defined for game initialization and updates.
  9. Event handlers for mouse clicks and releases are implemented to capture player interactions.
  10. The code also includes a callback function for reading serial data from an Arduino, enabling hand-controlled gameplay.

The code creates an engaging game where players maneuver their character across platforms using a stick, striving to reach the end without falling off. The game dynamically changes based on mouse interactions and player movements, and the score is constantly displayed during gameplay.

p5.js Code:

// Declaring the global variables
let bg_img;
let player_img;
let success;
let failure;

// prelaoding the images and sounds
function preload() {
  start_screen = loadImage("start_screen.png");
  bg_img = loadImage("bg1.jpeg");
  player_img = loadImage("sprite.png");
  success = loadSound("success-sound-effect.mp3");
  failure = loadSound("failure.mp3");
}

// Setting up the canvas and creating the game object
class Game {
// Declaring the variables
  constructor() {
    this.platforms = [];
    this.gaps = [];
    this.widths = [];
    this.stick = false;
    this.state = 0;
    this.score = 0;
    this.start_x = 217;
    this.start_y = 352;
    this.start_w = 98;
    this.start_h = 30;
// Making an array of all the possible gaps between the platforms
    for (let g = 4; g < 61; g++) {
      this.gaps.push(g * 5);
    }

// Making an array of all the possible widths of the platforms
    for (let w = 8; w < 31; w++) {
      this.widths.push(w * 5);
    }

    // Making the first three platforms
    let x = 0;
    for (let i = 0; i < 2; i++) {
      let gap = random(this.gaps);
      this.create_platform(x);
      x = x + this.platforms[this.platforms.length - 1].w + gap;
    }

    // Making the player
    this.player = new Player(
      this.platforms[0].x + this.platforms[0].w,
      this.platforms[0].y
    );
  }

  // Function to display the game
  check_start() {
    if (
      mouseX >= this.start_x &&
      mouseX <= this.start_x + this.start_w &&
      mouseY >= this.start_y &&
      mouseY <= this.start_y + this.start_h
    ) {
      this.state = 1;
    }
  }

// Function to display the start screen
  display_score() {
    textSize(20);
    noStroke();
    fill(0);
    text("Score: " + this.score, 20, 30);
  }

// remove the platform once it is out of the screen
  remove_platform() {
    if (this.platforms[0].x <= -this.platforms[0].w) {
      this.platforms.shift();
    }
  }

  // Function to check if the game is over
  check_game_over() {
    if (this.state === 8 && this.player.x === this.player.destination_x) {
      failure.play();
      this.state = 9;
    }
  }

  // Function to display the game over screen
  display_game_over() {
    background(bg_img);
    textSize(20);
    noStroke();
    fill(0);
     textSize(30);
    text("Score: " + this.score, width / 2 - 50, height / 2-50);
    text("Game Over", width / 2 - 70, height / 2);
    text("Click to restart", width / 2 - 88, height / 2 + 50);
  }

 state_manager() { // Function to manage the states of the game

    if (this.state === 0) { // State 0 displays the game instructions.
      image(start_screen,0,0);
    } else if (this.state === 2) { // State 2 detects a mouse click and grows the stick.
      this.create_stick();
      this.stick.grow();
    } else if (this.state === 3) { // State 3 detects a mouse release and rotates the stick.
      this.stick.rotate();
    } else if (this.state === 4) { // State 4 checks if the player has reached the platform after the stick has finished rotating, and transitions to state 5 or state 8 accordingly.
      this.player.set_destination();
    } else if (this.state === 5) { // State 5 moves the player towards their destination.
      this.player.move();
    } else if (this.state === 6) { // State 6 determines the new positions of the platforms and the player once the player reaches their destination platform.
      this.set_platforms_destination();
    } else if (this.state === 7) { // State 7 moves the platforms and the player towards their destination.
      for (var i = 0; i < this.platforms.length; i++) {
        this.platforms[i].move();
        this.player.stick_to_platform();
      }
      this.remove_platform(); 
    } else if (this.state === 8) { // State 8 moves the player towards the end of the stick and checks if they have reached it.
      this.player.move();
      this.check_game_over();
    } else if (this.state === 9) { // State 9 ends the game and displays the game over screen as soon as the player reaches the end of the stick that is not on the platform.
      this.display_game_over();
    }
  }

 // Function to create a new platform
 create_platform(x) {
    let w = random(this.widths);
    let y = height - 100;
    let p = new Platform(x, y, w, 100);
    this.platforms.push(p);
  }

// Function to set the destination of the platforms
  set_platforms_destination() {
    this.create_platform(width);
    this.platforms[0].destination_x = -this.platforms[0].width;
    this.platforms[1].destination_x = 0;
    this.platforms[2].destination_x = this.platforms[1].w + random(this.gaps);
    game.state = 7;
  }
    
// Function to create a new stick
  create_stick() {
    if (!this.stick) {
        this.stick = new Stick(
          this.platforms[0].x + this.platforms[0].w, this.platforms[0].y,3,0);
      }
  }

// Function to display the game
  display() {
    background(bg_img);
    this.state_manager();
    if (game.state != 9 && game.state != 0) {
      this.display_score();
      for (let j = 0; j < this.platforms.length; j++) {
        this.platforms[j].display();
        this.player.display();
        if (this.stick != false) {
          this.stick.display();
        }
      }
    }
  }
}

// class for player
class Player {
  constructor(x, y) {
    this.w = 30;
    this.h = 50;
    this.x = x - this.w;
    this.destination_x = x;
    this.v = 5;
    this.y = y - this.h;
    this.position = 0;
  }

  // Setting Destination of the player so that he moves after the stick is down
  set_destination() {
    if (
      game.stick.x_2 >= game.platforms[1].x &&
      game.stick.x_2 <= game.platforms[1].x + game.platforms[1].w
    ) {
      this.destination_x = game.platforms[1].x + game.platforms[1].w - this.w;
      game.score += 1;
      success.play();
      game.state = 5;
    } else {
      this.destination_x = game.stick.x_2;
      game.state = 8;
    }
  }

  // Setting player's x equal to the platform so it moves along with it
  stick_to_platform() {
    if (game.platforms.length === 2) {
      this.x = game.platforms[0].x + game.platforms[0].w - this.w;
      if (game.platforms[0].x === 0) {
        game.state = 1;
      }
    } else {
      this.x = game.platforms[1].x + game.platforms[1].w - this.w;
      if (game.platforms[1].x === 0) {
        game.state = 1;
      }
    }
  }

  // Function to move the player according to his destination
  move() {
    if (this.x < this.destination_x) {
      this.x += this.v;
      this.position = (this.position + 1) % 7;
    } else if (this.x > this.destination_x) {
      this.x -= this.v;
    } else if (
      this.x == this.destination_x &&
      this.x > game.platforms[0].x + game.platforms[0].w &&
      game.state === 5
    ) {
      game.stick = false;
      game.state = 6;
    }
  }

  // Display the player using the respective position from the sprite sheet
  display() {
    let c = player_img.get(this.position * 109, 0, 109, 120);
    image(c, this.x, this.y, this.w, this.h);
  }
}

// Declaring the platform class
class Platform {
  constructor(x, y, w, h) {
    this.x = x;
    this.destination_x = x;
    this.y = y;
    this.w = w;
    this.h = h;
    this.v = 5;
  }

  // Function to move the platform according to its destination
  move() {
    if (this.x != this.destination_x) {
      this.x = this.x - this.v;
    }
  }

  // Display the platform
  display() {
    noStroke();
    fill(color("#808080")); //"#6d4a3b"
    rect(this.x, this.y, this.w, this.h);
    stroke(0);
  }
}

// Declaring the Stick class
class Stick {
  constructor(x, y, w, h) {
    this.l = h;
    this.x_1 = x;
    this.y_1 = y;
    this.x_2 = x;
    this.y_2 = this.y_1 + this.l;
    this.angle = PI / 2;
  }

  // Function to grow the stick
  grow() {
    this.y_2 -= 5;
    this.l += 5;
  }

  // Rotate the Stick according when the mouse if released and check if the rotation is complete
  rotate() {
    this.angle -= PI / 64;
    this.x_2 = this.x_1 + this.l * cos(this.angle);
    this.y_2 = game.platforms[0].y - this.l * sin(this.angle);

    if (this.angle <= 0) {
      game.state = 4;
    }
  }

  // Display the stick
 display() {
  stroke("#808080"); 
  strokeWeight(2);
  line(this.x_1, this.y_1, this.x_2, this.y_2);
  strokeWeight(4);
  
}
}

function setup() {
  createCanvas(550, 450);
  game = new Game();
}

function draw() {
  clear();
  game.display();
}

// Perform functions when mouse is clicked according to the state of the game
function mousePressed() {
  if (game.state === 0) {
    game.check_start();
  } else if (game.state === 1) {
    game.state = 2;
  } else if (game.state === 9) {
    game = new Game();
    game.state = 1;
  }

}

function readSerial(data) //call back function
{
  if (data != null) //if the data received is not null
    {
      console.log(data);
      if (game.state === 0) {
    // game.check_start();
  } else if (game.state === 1 && data > 1008) {
    game.state = 2;
  } else if (game.state === 9) {
    // game = new Game();
    // game.state = 1;
  }
    else if( game.state ===2 && data < 1008)
    {
       game.state = 3;
    }
    
     
    }
  
  let redlight= 2;
  let greenlight = 1;
    if(game.state === 2) 
    {
      let sendToArduino = 1 + "\n";
      writeSerial(sendToArduino);
    }
    else if(game.state === 9) 
    {
      let sendToArduino = 2 + "\n";
      writeSerial(sendToArduino);
    }
    else
    {
      sendToArduino = 0 + "\n";
      writeSerial(sendToArduino);
    }
  
}

function keyPressed() //if any key is pressed, then set up serial
{
  setUpSerial();
}

// Shift the state when the mouse is released
function mouseReleased() {
  if (game.state === 2) {
    game.state = 3;
  }
}


Arduino:

The code reads analog input from a flex sensor connected to pin A4 and controls two LEDs (green and red) connected to pins 8 and 2, respectively.

In the `loop()` function:

– The flex sensor’s analog value is read using `analogRead()` and stored in the `value` variable.

– The analog value is printed to the serial monitor using `Serial.println()`.

– If input is available from p5.js, the code reads the value and checks for specific conditions.

– Based on the brightness value, the green and red LEDs are controlled by turning them on or off using `digitalWrite()`.

The code utilizes analog input from a flex sensor to control the brightness of two LEDs connected to pins 8 and 2, based on input received from p5.js via serial communication.

Arduino Code:

//Constants:

const int flexPin = A4; // Pin A4 to read analog input
const int ledPin = 8; // Green LED pin
const int ledPin2 = 2; // Red LED pin

// Variables:
int value; // Save analog value

void setup() {
  Serial.begin(9600); // Begin serial communication
  pinMode(ledPin, OUTPUT);
  pinMode(ledPin2, OUTPUT);
}

void loop() {
  value = analogRead(flexPin); // Read analog input from flex sensor
  Serial.println(value); // Print the analog value to the serial monitor
  delay(100); // Small delay

  // Wait for input from p5.js
  while (Serial.available()) {
    int brightness = Serial.parseInt();

    if (Serial.read() == '\n') {
      // Control the LEDs based on the received brightness value
      if (brightness == 1) {
        digitalWrite(ledPin, HIGH);
        brightness = 0;
      } else {
        digitalWrite(ledPin, LOW);
      }

      if (brightness == 2) {
        digitalWrite(ledPin2, HIGH);
        brightness = 0;
      } else {
        digitalWrite(ledPin2, LOW);
      }
    }
  }
}


User Testing:


Improvements:

Difficulty Progression: Enhance the gameplay experience by implementing a progressive difficulty system. As the player progresses, introduce challenges such as faster platform movement, shorter time limits to place the stick, or additional obstacles. This will keep players engaged and provide a sense of accomplishment as they overcome increasingly difficult levels.

Power-ups: Introduce exciting power-ups or bonuses that players can collect during gameplay. These power-ups could temporarily slow down platform movement, extend the stick’s length, grant extra lives, or introduce other unique abilities. Power-ups add depth, strategy, and an element of surprise to the game, making it more enjoyable and rewarding.


What I am proud of:

I am proud in successfully bringing my initial concept to life. Creating a game that can be controlled by hand movements is truly amazing. I also quite like the game dynamic as it is very visually appealing. It has been a joy to see the enjoyment that people experience while playing the game, as it has been positively received during testing with various individuals.

 

Week 13 – Final Project: User Testing

I successfully integrated Arduino and p5js to create most of my project. Initially, I created the game on p5js and used keyboard input. Later, I modified the program to accept input from an Arduino flex sensor, which worked seamlessly.

Moeez tested the game without any instructions from me and found it to be smooth and playable. However, he had some confusion regarding the direction to tilt the flex sensor as the value of the sensor differs for each direction. Once I provided him with the correct direction, the game felt even smoother. Although the flex sensor was not in a fixed position during testing, it will be attached to a glove in the final version. This will ensure that the sensor is always in the correct position and can only be bent in one direction (towards the user’s clenched fist).

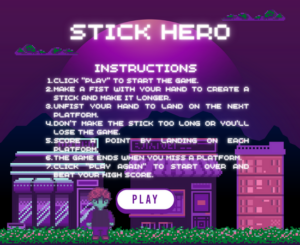
Currently, the game dynamics are working well and are quite smooth and playable. I have also designed a cover page for the as posted below:

However, I still need to add functionality that responds to feedback from p5js by using two LEDs: a green LED for successful bridge crossing and a red LED for failure. I also plan to fix the flex sensor into the glove to provide a better gaming experience.

Although I needed to provide instructions to Moeez regarding the direction to tilt the flex sensor during testing, this will be resolved once the sensor is fixed to the glove. Additionally, I have already added an instruction page to make the game easier to understand. Overall, the game is simple to play and requires minimal attention to instructions. Anyone can quickly learn to play and enjoy the game.

Week 12: Final Project Proposal

Concept

As a final project for my course, I settled on implementing the popular game Stick Hero, but with a twist. I plan to incorporate a flex sensor connected to the Arduino board to determine the length of the stick, and serial communication between p5Js and Arduino to create a unique gaming experience.

Stick Hero - Apps on Google Play

P5Js

The game will be played on the p5Js console. The user will have to press a button to start the game. A stick figure will then appear on the console, and the user will be required to build a bridge by extending the stick. The length of the stick will be determined by the flex sensor connected to the Arduino board. The user will have to extend the stick to the correct length to cross the gap successfully. If the stick is too short or too long, the stick figure will fall, and the game will end.

Arduino

The Arduino board will handle the input from the flex sensor, and the data will be sent to the p5Js console using serial communication. Arduino will also be responsible for playing sound effects. When the stick is extended correctly, a good sound will be played, while a bad sound will be played if the stick figure falls.


Assignment 8: Serial Communication – In Class Exercises

Exercise 1

During the exercise, we utilized an Arduino with an analog sensor to manipulate a feature in p5js based on the readings. We opted for an ultrasonic sensor to achieve this, where the data obtained was utilized to shift an ellipse along its horizontal axis in p5js.

Code P5js:

//declare variables for the dimensions and coordinates of ellipse
let ellipseXcord;
let ellipseYcord;
let ellipseRadius;

function setup()
{
createCanvas(500, 500); //create canvas
background(100);
textDisplay();
//set the initial ellipse to be in the centre
ellipseXcord = width/2;
ellipseYcord = height/2;
ellipseRadius = height/10;
}

//displays this text in the starting
function textDisplay()
{
text("PRESS ANY KEY TO START SERIAL PORT", width/2 - 109, height/2 - 5);
}

function draw()
{
background(220);
if (serialActive) //if the serial is active
{
ellipse(ellipseXcord, ellipseYcord, ellipseRadius, ellipseRadius); //then keep changing the coordinates of ellipse bases on ellipseXcord
}
else //if the serial is not active
{
textDisplay(); //then display the text with instructions
}
}

function readSerial(data) //call back function
{
if (data != null) //if the data received is not null
{
ellipseXcord = map(data, 300, 1500, ellipseRadius, width - ellipseRadius); //map the value of the data and then update the variable
//do it with ellipse radius because dont want half the circle off the screen
}
}

function keyPressed() //if any key is pressed, then set up serial
{
setUpSerial();
}

Code Arduino:
const int pingPin = 2; //Trigger Pin of Ultrasonic Sensor
const int echoPin = 3; //Echo Pin of Ultrasonic Sensor
long distance = 0; //will contain the distance of the object

void setup() {
//Start serial communication at 9600 baud
Serial.begin(9600);

//Set the ultrasonic sensor pins as output and input respectively
pinMode(pingPin, OUTPUT);
pinMode(echoPin, INPUT);
}

void loop() {
//Send a short low pulse
digitalWrite(pingPin, LOW);
delay(2); //delay to avoid complications
digitalWrite(pingPin, HIGH); //sends a high pulse for 10 microseconds
delay(10);
digitalWrite(pingPin, LOW); //turn off the ping pin
distance = pulseIn(echoPin, HIGH); //Measure the duration of the ultrasonic pulse and calculate the distance
Serial.println(distance); //print it in the serial (P5js)
}

Exercise 2

In this particular exercise, the primary objective was to control the LEDs on an Arduino board through p5js code. The process involved utilizing the left and right arrow keys, which functioned as input devices to alter the brightness of the bulb.

Code P5js:
let dimnessCounter = 0; //this will control the brightness and dimness of the LED

function setup()
{
createCanvas(400, 400); //create canvas
}

function textDisplay() //display text in the starting
{
text("PRESS SPACE TO START SERIAL PORT", width/2 - 109, height/2 - 5);
}

function draw()
{

background(100); //grey background

if (serialActive) //if serial is active
{
text("CONNECTED!", width/2 - 27, height/2 - 5); //tell the user that it is connected
text("PRESS RIGHT ARROW TO LOWER BRIGHTNESS!", width/2 - 130, height/2 + 15); //give instructions on how to control brightness
}
else
{
textDisplay(); //display instructions on how to start serial is not active
}
}

function keyPressed() //built in function
{
if (key == " ") //if space is pressed then
{
setUpSerial(); //setup the serial
}
else if (keyCode == LEFT_ARROW) //if left arrow pressed
{
if (dimnessCounter != 0) //check if brightness is not already at the lowest
{
dimnessCounter = dimnessCounter - 50; //if not then decrease by 50
}
}
else if (keyCode == RIGHT_ARROW) //for the right key
{
if (dimnessCounter != 250) //check if dimness not at the maximum
{
dimnessCounter = dimnessCounter + 50; //increase dimness by 50
}
}

}

//callback function
function readSerial(data)
{
let sendToArduino = dimnessCounter + "\n"; //add the next line to dimness counter
writeSerial(sendToArduino); //write serial and send to arduino
}

Code Arduino:
//declare variables
const int LED_PIN = 5;
int dimness = 0; //contains the dimness fothe LED

void setup()
{
Serial.begin(9600); // Start serial communication at 9600 baud

pinMode(LED_PIN, OUTPUT); //declare pin to be output

while (Serial.available() <= 0)
{
Serial.println("CONNECTION ESTABLISHED"); // send a starting message
}
}
void loop()
{
//wait for p5 to do something
while (Serial.available()) //when serial is available
{
dimness = Serial.parseInt(); //parse the dimness from the serial to the variable
Serial.println(dimness); //checking purposes

if (Serial.read() == '\n') //since the "\n" would be present in the serial, read that and
{
analogWrite(LED_PIN, dimness); //write it to the LED
}
}
}

Exercise 3

In this exercise, we were tasked with creating an interactive p5js program that simulates a bouncing ball, which changes direction based on a variable called ‘wind.’ The ball bounces on the floor and we needed to detect when it hit the floor, so we could turn an LED on. For the second part of this exercise, we used an analog sensor (ultrasonic sensor) to control the wind variable. We set a default value in which the ball would stay in the middle of the screen. When the sensor is moved to the right from the center, the ball would move to the right, and when moved to the left, the ball would move to the left.

Code P5js:
//declare variables
let velocity;
let gravity;
let position;
let acceleration;
let wind;
let drag = 0.99;
let mass = 50;
let LEDvalue = 1401;
let goRight = 0;
let goLeft = 0;
let first

function setup() {
createCanvas(1000, 360); //create canvas
noFill();
position = createVector(width/2, 0);
velocity = createVector(0,0);
acceleration = createVector(0,0);
gravity = createVector(0, 0.5*mass);
wind = createVector(0,0);
}

function textDisplay()
{
text("PRESS SPACE TO START SERIAL PORT", width/2 - 109, height/2 - 5); //display the appropriate text in the start
}

function draw() {
background(255);
if (serialActive) //if the serial is active
{
applyForce(wind);
applyForce(gravity);
velocity.add(acceleration);
velocity.mult(drag);
position.add(velocity);
acceleration.mult(0);
ellipse(position.x,position.y,mass,mass);
if (position.y > height-mass/2) //if the ball touches the bottom
{
velocity.y *= -0.9; // A little dampening when hitting the bottom
position.y = height-mass/2;
LEDvalue = 1401; //take LED value to be 1401 because we dont want the value (1) to be lurking in the serial and then affecting the wind values

}
else
{
LEDvalue = 1400; //when the LED is off
}

}
else
{
fill(0);
textDisplay();
}
}

function applyForce(force){
// Newton's 2nd law: F = M * A
// or A = F / M
let f = p5.Vector.div(force, mass);
acceleration.add(f);
}

function keyPressed(){
if (key==' '){ //if space is pressed, then serial is set up
setUpSerial();
}

if (keyCode == DOWN_ARROW) //if down arrow is pressed
{
//mass etc is changed
mass=random(15,80);
position.y=-mass;
velocity.mult(0);
}
}

function readSerial(data) //call back function
{
let sendToArduino = LEDvalue + "\n"; //sends value of LED to Arduino with \n added
writeSerial(sendToArduino); //write to Arduino

if (data != null) //if the data is not null and something is received
{
console.log(data);
if (data > 1450) //if the distance is greater than 1450, then
{
wind.x = 1; //the ball/wind goes right
}
else if (data < 1350) //if the distance is less than 1350
{
wind.x = -1; //the ball/wind goes left
}
}
}

Code Arduino:
//declare variables
const int LED_PIN = 4;
int LEDvalue = 0; //will contain whether or not the LED should be on or off
int distance = 0; //will contain the distance by ultrasonic sensor
const int pingPin = 2; //Trigger Pin of Ultrasonic Sensor
const int echoPin = 3; //Echo Pin of Ultrasonic Sensor

void setup()
{
Serial.begin(9600); // Start serial communication at 9600 baud

pinMode(LED_PIN, OUTPUT); //pin mode is output

//Set the ultrasonic sensor pins as output and input respectively
pinMode(pingPin, OUTPUT);
pinMode(echoPin, INPUT);

while (Serial.available() <= 0)
{
Serial.println(1400); //connection establishment. 1400 so that the wind values do not change
}
}

void loop()
{
//wait for p5js
while (Serial.available())
{
sensorReading(); //reads data from the sensor

LEDvalue = Serial.parseInt(); //parsing from the serial written data from p5js

if (LEDvalue == 1400) //if the LED value is 1400
{
digitalWrite(LED_PIN, LOW); //then turn off the LED
}
else if (LEDvalue == 1401) //if the LED value is 1401
{
digitalWrite(LED_PIN, HIGH); //then turn on the LED
}
}
}

//Function to read the ultrasonic sensor and measure distance
void sensorReading()
{
//Send a short low pulse
digitalWrite(pingPin, LOW);
delay(2); //delay to avoid complications
digitalWrite(pingPin, HIGH); //sends a high pulse for 10 microseconds
delay(10);
digitalWrite(pingPin, LOW); //turn off the ping pin
distance = pulseIn(echoPin, HIGH); //Measure the duration of the ultrasonic pulse and calculate the distance
Serial.println(distance); //print the serial from distance
}

Video:

Week 10 – Table Piano

Concept:

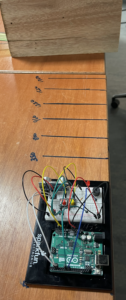
Moeez and I collaborated on a project and aimed to push our limits. Our goal was to create a table piano using an ultrasonic sensor, a sensor we had never used before. As we reminisced about our experiences with musical instruments, we recognized the hassle the school music band encountered carrying bulky and expensive pianos around. To tackle this issue, we came up with a solution: a table piano. We attached the sensor and the Arduino to the table and marked lines on the table using a scale and a marker. A fixed point was established at the end to indicate the piano’s length. We divided the piano into seven notes and utilized the Serial Monitor to determine the distance for each “Piano Key.” Afterwards, we researched online and discovered the notes that play “Jingle Bells” and assigned them to the keys in the table piano. To enhance the piano’s functionality, we included two buttons – one to switch the sensor on and off and the other to play “Jingle Bells” automatically. The first button controlled the sensor and simultaneously controlled the LED as well. This was done to allow the user to know when the sensor is on and when it is off. The second button was implemented as an auto-tune feature to enable users to listen to the tune first and then practice the keys themselves to replicate the tune. The good thing about this piano is that you can add or remove as many keys as you want and practice on specific keys too. Additionally, it is beginner-friendly and portable.

Code and Circuit:

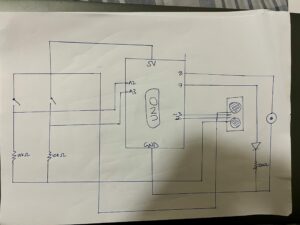
As we built-up upon previous class knowledge of how circuits and Arduino code works, we found the implementing process to be relatively easy. The code and circuit looks like this:

//Define the pins used for the ultrasonic sensor, buzzer, buttons, and LED
const int pingPin = 2; //Trigger Pin of Ultrasonic Sensor
const int echoPin = 3; //Echo Pin of Ultrasonic Sensor
const int buzzerPin = 8;
const int redButton = A3;
const int yellowButton = A2;
const int LEDbutton = 7;

//Initialize variables used in the program
int pressed = 0;
long distance = 0;
int redPosition = 0;
int yellowPosition = 0;
int redCount = 1;
int yellowCount = 1;

//Include the pitches library for generating tones
#include "pitches.h"

void setup()
{
 //Start serial communication at 9600 baud
 Serial.begin(9600);

 //Set the ultrasonic sensor pins as output and input respectively
 pinMode(pingPin, OUTPUT);
 pinMode(echoPin, INPUT);

 //Set the button pins as inputs and the LED pin as an output
 pinMode(redButton, INPUT);
 pinMode(yellowButton, INPUT);
 pinMode(LEDbutton, OUTPUT);

 //Turn off the LED initially
 digitalWrite(LEDbutton, LOW);
}

void loop() 
{
  //Read the positions of the red and yellow buttons
  redPosition = digitalRead(redButton);
  delay(100); //add delay to avoid double reading accidentally
  yellowPosition = digitalRead(yellowButton);
  delay(100);

  //Increment the appropriate button count if a button is pressed
  if (redPosition == HIGH)
  {
    redCount++;
  }

  if (yellowPosition == HIGH)
  {
    yellowCount++;
  }

  //Play Jingle Bells and turn off the LED if both button counts are even (both buttons pressed)
  if (redCount % 2 == 0 && yellowCount % 2 == 0)
  {
    digitalWrite(LEDbutton, LOW); //LED turned off to tell that sensor turned off
    jingleBells();
  }
  else if (redCount % 2 == 0) //if only the red button is pressed and the count is even
  {
    sensorReading(); //then start the sensor
    digitalWrite(LEDbutton, HIGH); //turn on LED to indicate the sensor is on
  }
  else if (yellowCount % 2 == 0) //if yellow button is pressed and is even
  {
    jingleBells(); //play Jingle Bells
    digitalWrite(LEDbutton, LOW); //turn off LED to indicate sensor is off
  }
  else
  {
    digitalWrite(LEDbutton, LOW); //if none of the buttons were pressed and no counter was even
    noTone(8); //play nothing
  }
}

//Function to read the ultrasonic sensor and play a tone based on the distance measured
void sensorReading()
{
  //Send a short low pulse
  digitalWrite(pingPin, LOW);
  delay(2); //delay to avoid complications
  digitalWrite(pingPin, HIGH); //sends a high pulse for 10 microseconds
  delay(10);
  digitalWrite(pingPin, LOW);
  distance = pulseIn(echoPin, HIGH); //Measure the duration of the ultrasonic pulse and calculate the distance
  distanceNotes(distance); //play the notes based on the distance
  delay(408);
}

//function that plays jingle bells automatically
void jingleBells()
{
  tone(buzzerPin, NOTE_E4, 400);
  delay(408);
  tone(buzzerPin, NOTE_E4, 400);
  delay(408);
  tone(buzzerPin, NOTE_E4, 400);
  delay(408);
  tone(buzzerPin, NOTE_E4, 400);
  delay(408);
  tone(buzzerPin, NOTE_E4, 400);
  delay(408);
  tone(buzzerPin, NOTE_E4, 400);
  delay(408);
  tone(buzzerPin, NOTE_E4, 400);
  delay(408);
  tone(buzzerPin, NOTE_G4, 400);
  delay(408);
  tone(buzzerPin, NOTE_C4, 400);
  delay(408);
  tone(buzzerPin, NOTE_D4, 400);
  delay(408);
  tone(buzzerPin, NOTE_E4, 400);
  delay(408);
  tone(buzzerPin, NOTE_F4, 400);
  delay(408);
  tone(buzzerPin, NOTE_F4, 400);
  delay(408);
  tone(buzzerPin, NOTE_F4, 400);
  delay(408);
  tone(buzzerPin, NOTE_F4, 400);
  delay(408);
  tone(buzzerPin, NOTE_F4, 400);
  delay(408);
  tone(buzzerPin, NOTE_F4, 400);
  delay(408);
  tone(buzzerPin, NOTE_E4, 400);
  delay(408);
  tone(buzzerPin, NOTE_E4, 400);
  delay(408);
  tone(buzzerPin, NOTE_E4, 400);
  delay(408);
  tone(buzzerPin, NOTE_E4, 400);
  delay(408);
  tone(buzzerPin, NOTE_D4, 400);
  delay(408);
  tone(buzzerPin, NOTE_D4, 400);
  delay(408);
  tone(buzzerPin, NOTE_E4, 400);
  delay(408);
  tone(buzzerPin, NOTE_D4, 400);
  delay(408);
  tone(buzzerPin, NOTE_G4, 400);
  delay(408);
  yellowCount++; //yellow count increments to stop the tune from playing again (not on loop)
}

void distanceNotes(long distance) 
{
  if (distance >= 1750) //if the distance is greater than 1750
  {
    noTone(8); //then dont play anything
    pressed = 0; //reinitialize the key pressed variable to 0 so other keys can be pressed
  }
  else if (distance >= 1520 && pressed == 0) //for each distance, there is a specific note
  {
    tone(buzzerPin, NOTE_E4, 400);
    pressed = 1; //do this to avoid the same note being played repeatedly 
  }
  else if (distance >= 1220 && pressed == 0)
  {
    tone(buzzerPin, NOTE_G4, 400);
    pressed = 1;
  }
  else if (distance >= 960 && pressed == 0)
  {
    tone(buzzerPin, NOTE_C4, 400);
    pressed = 1;
  }
  else if (distance >= 800 && pressed == 0)
  {
    tone(buzzerPin, NOTE_D4, 400);
    pressed = 1;
  }
  else if (distance >= 350 && pressed == 0)
  {
    tone(buzzerPin, NOTE_F4, 400);
    pressed = 1;
  }
  else if (distance < 350 && pressed == 0)
  {
    tone(buzzerPin, NOTE_B0, 400);
    pressed = 1;
  }
}

Final Product:

The final circuit and implementation looks like this:

Future Improvements:

For the future, we would want to get better ranged sensors to increase the length of the piano. Moreover, an idea that came to our minds a bit too late was allowing the user to press a button and then record what they have played. Then pressing another button would play the tune they have played for them to fully analyze their progress. In the future, we would want to add other tunes that the user could access using different buttons for practice. Additionally, the user accessing different preset keys could also be a possible improvement. Apart from all of this, the Jingle Bells function could have been implemented better using an array and a for-loop.

Fade In and Out – Digital Input

Concept

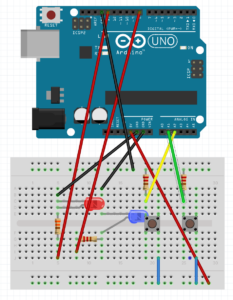
Imagine you’re in a dark room, and you have two switches in front of you. Each switch corresponds to a color: red and blue. You flip the switch for the red LED, and suddenly, the room is bathed in a warm, red glow. But then you start to wonder: what would happen if you flipped the blue switch too? Would the room turn purple? Would the colors clash or blend together in harmony?

That’s where this code comes in. With just a few lines of code, you can experiment with different combinations of red and blue light and create a range of beautiful color schemes. The code uses analogWrite() to control the brightness of the LEDs, allowing you to create smooth transitions between different levels of light intensity.

But it’s not just about the colors themselves. The code also uses if statements to detect when both switches are flipped at the same time, triggering a unique effect where both LEDs fade in and out together. This creates a mesmerizing effect that can be calming, energizing, or just plain fun to watch.

This code offers a simple and fun way to experiment with LED lighting effects and can be easily customized to create new and unique patterns. For example, you could add more LEDs and switches, or modify the fade amount and brightness values to create different effects. The possibilities are endless!

Circuit

Code

// Define the pin numbers for the red and blue LEDs
int redLedPin = 9;
int blueLedPin = 11;

// Define the fade amount and initial brightness for the LEDs
int fadeAmount = 50;
int redBrightness = 0;
int blueBrightness = 0;

void setup() {
  // Set the pin modes for the switches and LEDs
  pinMode(A1, INPUT);
  pinMode(A2, INPUT);
  pinMode(redLedPin, OUTPUT);
  pinMode(blueLedPin, OUTPUT);
}

void loop() {
  // Read the digital input values of the switches
  int switchPositionRed = digitalRead(A2);
  int switchPositionBlue = digitalRead(A1);

  // If the switch for the red LED is pressed, turn on the red LED and turn off the blue LED
  if (switchPositionRed == HIGH) {
    digitalWrite(redLedPin, HIGH);
    digitalWrite(blueLedPin, LOW);
  }
  // If the switch for the blue LED is pressed, turn on the blue LED and turn off the red LED
  else if (switchPositionBlue == HIGH) {
    digitalWrite(redLedPin, LOW);
    digitalWrite(blueLedPin, HIGH);
  }
  // If neither switch is pressed, turn off both LEDs
  else {
    digitalWrite(redLedPin, LOW);
    digitalWrite(blueLedPin, LOW);
  }

  // If both switches are pressed, fade both LEDs in and out
  if (switchPositionRed == HIGH && switchPositionBlue == HIGH){
    // Set the brightness of the red LED and increase/decrease it by the fade amount
    analogWrite(redLedPin, redBrightness);
    redBrightness += fadeAmount;
    if (redBrightness == 0 || redBrightness == 255) {
      // Reverse the fade direction when the brightness reaches 0 or 255
      fadeAmount = -fadeAmount;
    }

    // Set the brightness of the blue LED and increase/decrease it by the fade amount
    analogWrite(blueLedPin, blueBrightness);
    blueBrightness += fadeAmount;
    if (blueBrightness == 0 || blueBrightness == 255) {
      // Reverse the fade direction when the brightness reaches 0 or 255
      fadeAmount = -fadeAmount;
    }
    // Delay for a short amount of time to create the fading effect
  delay(800);
  }

  
}

Video Demonstration


Lock and Key – Unusual Switch

Concept

I recently decided to embark on a fun and useful project – creating a switch that would only complete the circuit when the key is inserted into the lock of my drawer. Not only does this switch serve a practical purpose by indicating when the key is in the lock, but it’s also a fun addition to my space that sparks conversation and adds a touch of personality.

Method

To create my unique switch, I utilized a simple but effective technique – taping one end of the wire to the lock and the other end to the key. By doing so, when the key is inserted into the lock, the circuit is completed, and the LED bulb lights up.

The use of tape not only makes this project accessible and easy to create, but it also provides a certain level of flexibility. By adjusting the position of the tape and wire, I was able to ensure that the circuit would only be completed when the key is fully inserted into the lock.

Reflection

Overall, I’m really proud of my Arduino-powered switch. It’s a unique and creative way to add some personality to my space while also serving a useful function. And because it’s powered by an Arduino, I can always modify it or integrate it with other devices in the future. I’m excited to see what other projects I can come up with using this Arduino.


Mid-Term Project – Snakes and Ladders

Snakes and Ladders

Concept

My project is a digital adaptation of the classic board game, Snakes and Ladders, which holds a special place in my heart due to fond childhood memories of playing it with my sister. I created this game as a way to relive those memories with her whenever we are apart. I made this to play the game with her whenever I am back home.

Upon opening the game, players are presented with a visually appealing cover page that offers the option to access instructions or dive right into the game play. The game features a soothing soundtrack that helps to enhance concentration and enjoyment. Two players can participate, each with a randomly assigned token represented by an ellipse in a unique color. The game board is comprised of four snakes and ladders each, with the placement randomized for each playthrough. These snakes and ladders can either hinder or assist the players, respectively, in reaching the goal of 100. As a luck-based game, there are no guarantees, but players who land on ladders can quickly ascend to the finish line, while those who land on snakes must descend to their tails. Upon completion, players can easily restart the game by simply pressing any key, returning them to the cover page for another round of fun.

Code

new p5();// Initialize the p5.js library as it random function was not working without this

// Define some constants for the game
const rows = 10;
const cols = 10;
const cellSize = 60;

// Define some global variables for game elements
let boardImage;
let startTime = 0;
let startTimeSnake = millis()*2;
let startTimeLadder = millis()*2;
let diceResult;
let dice1;
let dice2;
let dice3;
let dice4;
let dice5;
let dice6;
let cover;
let back;
let restart;
let instructions;
let bg_music;
let dice_sound;

// Define ladders
const ladders = [
  { start: 2, end: 22},
  { start: 16, end: 37},
  { start: 36, end: 74},
  { start: 58, end: 85}
];

// Define snakes
const snakes = [
  { start: 99, end: 1 },
  { start: 90, end: 61 },
  { start: 50, end: 23 },
  { start: 39, end: 17 }
];
// Preload all the game assets
function preload()
{
  boardImage = loadImage("boardImage.png");
  dice1 = loadImage("1.png");
  dice2 = loadImage("2.png");
  dice3 = loadImage("3.png");
  dice4 = loadImage("4.png");
  dice5 = loadImage("5.png");
  dice6 = loadImage("6.png");
  cover = loadImage("cover.png");
  back = loadImage("back.png");
  instructions = loadImage("instructions.png");
  restart = loadImage("restart.png");
  bg_music = loadSound("bgmusic.mp3");
}
// Set up the canvas
function setup()
{
  createCanvas(cellSize * cols, cellSize * rows);
}

function draw()
{ // Start playing background music if it's not already playing
  if (!bg_music.isPlaying()) 
  {
    bg_music.play();
  }
  board.display();
  
  //handling mouse click events
  handledMouseEvent = false;
  if ((millis() - startTime < 2000) && board.gameState == "start")
  {
    diceDisplay();
  }
  
  if ((millis() - startTimeSnake < 2000) && board.gameState == "start" && frameCount > 180)
  {
    board.snakeText();
  }
  
  if ((millis() - startTimeLadder < 2000) && board.gameState == "start" && frameCount > 180)
  {
    board.ladderText();
  }
  
  
}
// Roll the dice and return the result
function getDiceRoll() 
{
  startTime = millis();
  diceResult = floor(random(1, 7));
  return diceResult;
}
// Display the dice image based on the result out of the 6 images 
function diceDisplay()
{
  let diceWidth = 100;
  let diceHeight = 100;
  let diceX = 250;
  let diceY = 250;
  if (diceResult == 1)
  {
    dice1.resize(diceWidth, diceHeight);
    image(dice1, diceX, diceY);
  }
  else if (diceResult == 2)
  {
    dice2.resize(diceWidth, diceHeight);
    image(dice2, diceX, diceY);
  }
  else if (diceResult == 3)
  {
    dice3.resize(diceWidth, diceHeight);
    image(dice3, diceX, diceY);
  }
  else if (diceResult == 4)
  {
    dice4.resize(diceWidth, diceHeight);
    image(dice4, diceX, diceY);
  }
  else if (diceResult == 5)
  {
    dice5.resize(diceWidth, diceHeight);
    image(dice5, diceX, diceY);
  }
  else if (diceResult == 6)
  {
    dice6.resize(diceWidth, diceHeight);
    image(dice6, diceX, diceY);
  }
}

class Board
{
  constructor() //initializes various game-related variables, including the player array and the game state
  {
    startTime  = 0;
    this.playerArray = [];
    this.playerNum = 2;
    this.counter = 0;
    this.playerIndex = 0;
    this.encounter = false;
    this.gameState = "cover";
    for (let i = 0; i < this.playerNum; i++)
    {
      this.playerArray[i] = new Player();
    }
  }
  
  display() //displays different images depending on the game state, including the game board, cover page, instructions, and restart page.
  {
    if (this.gameState == "cover")
    {
      image(cover, 0, 0);
      if (mouseX >= 170 && mouseX <= 405 && mouseY >= 385 && mouseY <= 460)
      {
        noStroke();
        fill(255, 0, 0, 100);
        rect(170, 385, 235, 80);
      }
      
      if (mouseX >= 20 && mouseX <= 580 && mouseY >= 490 && mouseY <= 570)
      {
        noStroke();
        fill(255, 0, 0, 100);
        rect(20, 488, 560, 83);
      }
    }
    else if (this.gameState == "start")
    {
      image(boardImage, 0, 0);
      for (let i = 0; i < this.playerNum; i++)
      {
        this.playerArray[i].display();
      }
    }
    else if (this.gameState == "instructions")
    {
      image(instructions, 0, 0);
      image(back, 10, 10);
    }
    else if (this.gameState == "restart")
    {
      image(restart, 0, 0);
    }
  }
  //called whenever it is the player's turn to move, and it moves the player based on the number they rolled on the dice
  playing()
  {
    this.playerIndex = this.counter % this.playerNum;
    this.playerArray[this.playerIndex].movement(getDiceRoll());
    let newPos = this.checkForSnakeAndLadder(this.playerArray[this.playerIndex].player_position);
    let oldPos = this.playerArray[this.playerIndex].player_position;
    
    let movingPos = newPos - oldPos;
    
    this.playerArray[this.playerIndex].movement(movingPos);
      
    this.counter = this.counter + 1;
    this.checkForWin();
  }
  //method checks whether any player has reached the end of the board and sets the game state to restart if so.
  checkForWin()
  {
    for (let i = 0; i < this.playerNum; i++)
    {
      if (this.playerArray[i].player_position > 99)
      {
        this.gameState = "restart";
      }
    }
  }
  //checks whether the player has landed on a snake or ladder and returns the new position accordingly
  checkForSnakeAndLadder(position)
  {
    for (let ladder of ladders)
    {
      if (ladder.start == position)
      {
        startTimeLadder = millis();
        return ladder.end;
      }
    }
    
    for (let snake of snakes)
    {
      if (snake.start == position)
      {
        startTimeSnake = millis();
        return snake.end;
      }
    }
    
    return position;
  }
  
  snakeText()
  {
    textSize(30);
    fill(0, 0, 0);
    rect(200, 400, 200, 50);
    fill(255, 255, 255);
    text("SNAKE!", 240, 435);
  }
  
  ladderText()
  {
    textSize(30);
    fill(0, 0, 0);
    rect(200, 400, 200, 50);
    fill(255, 255, 255);
    text("LADDER", 240, 435);
  }
}

class Player
{
  constructor(player_color) //initializes the player's position and color, and the movement method moves the player on the board
  {
    this.player_position = 0;
    this.player_color = player_color;
    this.player_x = cellSize/2;
    this.player_y = cellSize/2;
    this.red = random(255);
    this.green = random(255);
    this.blue = random(255);
    this.opacity = 225;
  }
  
  movement(dice_roll)  // movement dependent on dice roll as an arguement
  {
    this.player_position = this.player_position + dice_roll;
    this.player_x = (this.player_position % cols) * cellSize + (cellSize/2);
    this.player_y = floor(this.player_position / cols) * cellSize + (cellSize/2);
  }
  
  display() //displays the player's avatar on the board.
  {
    fill(this.red, this.green, this.blue, this.opacity);
    ellipse(this.player_x, this.player_y, cellSize/2, cellSize/2);
  }
}

let board = new Board();

// Use a flag to indicate if the mouse click event has been handled
let handledMouseEvent = false;

function mouseClicked() // handles mouse clicks during the game, allowing the player to roll the dice and move accordingly
{
  if (board.gameState == "start")
  {
    // Check if the event has already been handled
    if (!handledMouseEvent) {
      board.playing();
      handledMouseEvent = true;
    }
  }
  else if (board.gameState == "cover")
  {
    handledMouseEvent = true;
    if (mouseX >= 170 && mouseX <= 405 && mouseY >= 385 && mouseY <= 460)
    {
      board.gameState = "start";
    }
    if (mouseX >= 20 && mouseX <= 580 && mouseY >= 490 && mouseY <= 570)
    {
      handledMouseEvent = true;
      board.gameState = "instructions";
    }
    
  }
  else if (board.gameState == "instructions")
  {
    if (mouseX >= 30 && mouseX <= 90 && mouseY >= 30 && mouseY <= 90)
    {
      board.gameState = "cover";
    }
  }
 
}

function keyPressed() //allows the player to restart the game if they win.
{
  if (board.gameState == "restart")
  {
    board = new Board();
  }
}
remove();


Overview

The game begins with a cover page that offers the player two options: to start playing or to read the instructions. Once the player begins the game, they roll a dice to determine the number of moves they can make on the board. The board is a 10×10 grid that features both snakes and ladders in specific cells. If the player lands on a ladder’s bottom cell, they climb up to the ladder’s top cell. If they land on a snake’s head cell, they slide down to the snake’s tail cell. Before the game begins, the program initializes various constants, global variables, ladders, and snakes. It also preloads all the game assets, sets up the canvas, and defines several functions to handle mouse clicks, retrieve the dice roll value, display the corresponding dice image, and show different images based on the game state. The game employs a Board class, which initializes various game-related variables, such as the player array and the game state. The class offers methods to display different images based on the game state, update the player’s position on the board, and display text when the player lands on a snake or ladder cell.

The cover page is the first thing that the player sees, and it sets the tone for the entire game. The font and background theme of the snake design create a sense of excitement and anticipation, drawing the player into the game before it even begins. Creating the board game that you played as a child was a significant accomplishment that speaks to your creativity and resourcefulness. It likely required a lot of time and effort to design and produce, but the end result is something that you can be truly proud of.

Future Improvements

To add more interactive features to the game, there are a few different directions that could be explored. One option is to introduce different levels of difficulty, which could be achieved by changing the layout of the board or adding new challenges for the player to overcome. For example, some cells on the board could be marked as “obstacle” cells, where the player has to complete a mini-game or answer a trivia question to progress.

Another way to make the game more engaging is to introduce power-ups or special abilities that the player can use to gain an advantage. For instance, the player could collect “snake repellent” items that allow them to skip over snake cells or “ladder boosters” that let them climb higher on ladder cells. These power-ups could be randomly placed on the board or awarded to the player for completing certain challenges.

Moreover, bonus points or rewards could be given to the player for landing on specific cells on the board. For example, landing on a cell with a picture of a golden apple could give the player bonus points, while landing on a cell with a picture of a bomb could subtract points from their score. This would add an element of strategy to the game, as players would have to decide whether to take risks and aim for high-reward cells or play it safe and avoid the high-risk ones. In terms of graphics and user interface, there are many ways to enhance the visual appeal and immersion of the game. For example, the background could be animated to show a moving snake or ladders climbing up and down the sides of the board. The game could also have different themes or environments, such as a jungle or a castle, with corresponding graphics and sound effects. This for me was very hard to try implementing but I still tried and could not.

Midterm Progress – Snakes and Ladders

Concept

I wanted to create a game that represented my childhood and so I could share it with my sibling to create a feeling of nostalgia and hopefully play it when we meet. So, I decided to create Snakes and Ladders which was my go-to board game.

The code defines the size and spacing of the board, the layout of the board using an array, and the position of the ladders and snakes. It also defines the current player and their position on the board. The code draws the board, ladders, snakes, players, and dice roll. The drawBoard() function creates a grid of rectangles that represent the cells on the board, with each cell numbered from 1 to the total number of cells. The drawLadders() and drawSnakes() functions draw lines connecting the start and end points of each ladder and snake on the board. The drawPlayers() function draws a circle for each player at their current position on the board. The drawDice() function draws a rectangle to represent the dice and displays the result of the roll. The checkForWin() function checks if the current player has reached the last cell on the board, in which case it displays a message indicating the winner.

Future Improvements

I have the basic implementation for the game, I just have to make it more user friendly and add animations such as a dice showing the number which the player is moving. I also have to add a sound element for the game to make it more engaging e.g., a sound when u climb the ladder and a sound of the snake when the snake bites you. There is still a lot to do but the basic game is this which will be evolved into a much a better visually appealing game. I am also still designing the cover for the game, which will also have the instructions as well as the play button and have a nice background sound that goes with the theme.

The most frightening part

The problem I ran into was that I created functions for everything and did not use OOP which is why I will have to convert my code to fix this issue. This is stressful for me as I do not know object-oriented programming as such. I will have to work on this and figure it out. As a result, I must refactor my code to incorporate OOP and resolve this issue. However, this task is daunting for me as I am not well-versed in OOP, and it is causing me some stress. Nonetheless, I hope it will work out in the end.

Generative Text – Week 4

Concept

This code defines a sketch that displays the letters “Zaid” in a random and animated way on a black background. The code is creating a canvas and for manipulating visual elements on the canvas. The code defines a font named “Courier New” and arrays for holding the letters to be displayed and the colors of those letters. It also creates a slider to adjust the speed of the animation. In the setup function, the canvas is created, the background color is set to black, and the font and text size are set.

The draw function is where the animation of the letters takes place. It starts by setting a slightly transparent black background. Then, it gets the value of the speed slider and iterates through the letters array. For each letter, it randomly changes its position, rotation, and size based on noise functions and the current frame count. It then uses the fill function to set the color of the letter based on the corresponding color in the colors array, and finally draws the letter using the text function. Overall, the code creates a dynamic and visually interesting display my name “Zaid” that changes in real-time based on the slider value.

Code

// Define the font to be used
let font = "Courier New";

// Define arrays for the letters and colors
let letters = [];
let colors = [];

// Define an array with the letters to display
let zaidLetters = ["Z", "a", "i", "d"];

// Define a variable to hold a slider for adjusting the speed
let speedSlider;

// Set up the canvas and other variables
function setup() {
  createCanvas(400, 400); // create a canvas with a size of 400x400 pixels
  background(0); // set the background color to black
  textFont(font); // set the font to the one defined earlier
  textSize(120); // set the text size to 120
  textAlign(CENTER, CENTER); // center the text alignment
  for (let i = 0; i < zaidLetters.length; i++) {
    letters.push(zaidLetters[i]); // add the letter to the letters array
    colors.push(color(random(255), random(255), random(255))); // add a random color to the colors array
  }
  speedSlider = createSlider(1, 10, 5); // create a slider for controlling the speed with a default value of 5
  speedSlider.position(10, 10); // set the position of the slider
}

// Draw the letters and animate them
function draw() {
  background(0, 20); // set the background color to a slightly transparent black
  let speed = speedSlider.value(); // get the value of the speed slider
  for (let i = 0; i < letters.length; i++) {
    // Randomly change the position and rotation of each letter
    let x = map(noise(i + frameCount / (50 * speed)), 0, 1, 0, width);
    let y = map(noise(i + 1000 + frameCount / (50 * speed)), 0, 1, 0, height);
    let angle = noise(i + 2000 + frameCount / (100 * speed)) * TWO_PI;
    let size = map(sin(i + frameCount / (30 * speed)), -1, 1, 90, 120);

    push();
    translate(x, y);
    rotate(angle);
    fill(colors[i]);
    textSize(size);
    text(letters[i], 0, 0);
    pop();
  }
}

Reflection / Future Improvements

This code is a fun and creative way to display text in a dynamic and animated way. It uses a combination of noise functions and various mapping techniques to generate the position, rotation, and size of each letter, resulting in a unique display with each run of the sketch.

One possible improvement for this code could be to add user interactivity by allowing the user to input their own text and select their own color palette. This could make the sketch more engaging for the user and allow for a wider range of creative possibilities. Another possible improvement could be to add more animation effects, such as scaling, fading, or moving the letters in different directions. This could add more visual interest and complexity to the sketch, making it even more dynamic and engaging. With some additional improvements and modifications, it could be further developed into a fully-featured text animation tool. The project was very fun to work with but it took time to get the hang of how to use text in a rather creative and artistic way.