Source Code Available Here
Previously in:
- Week 11 – Final Project Proposal – Introduction to Interactive Media
- Week 12 – Progress On The Final Project – Introduction to Interactive Media
- Week 13 – User Testing – Introduction to Interactive Media
ContentS
1. Project Concept
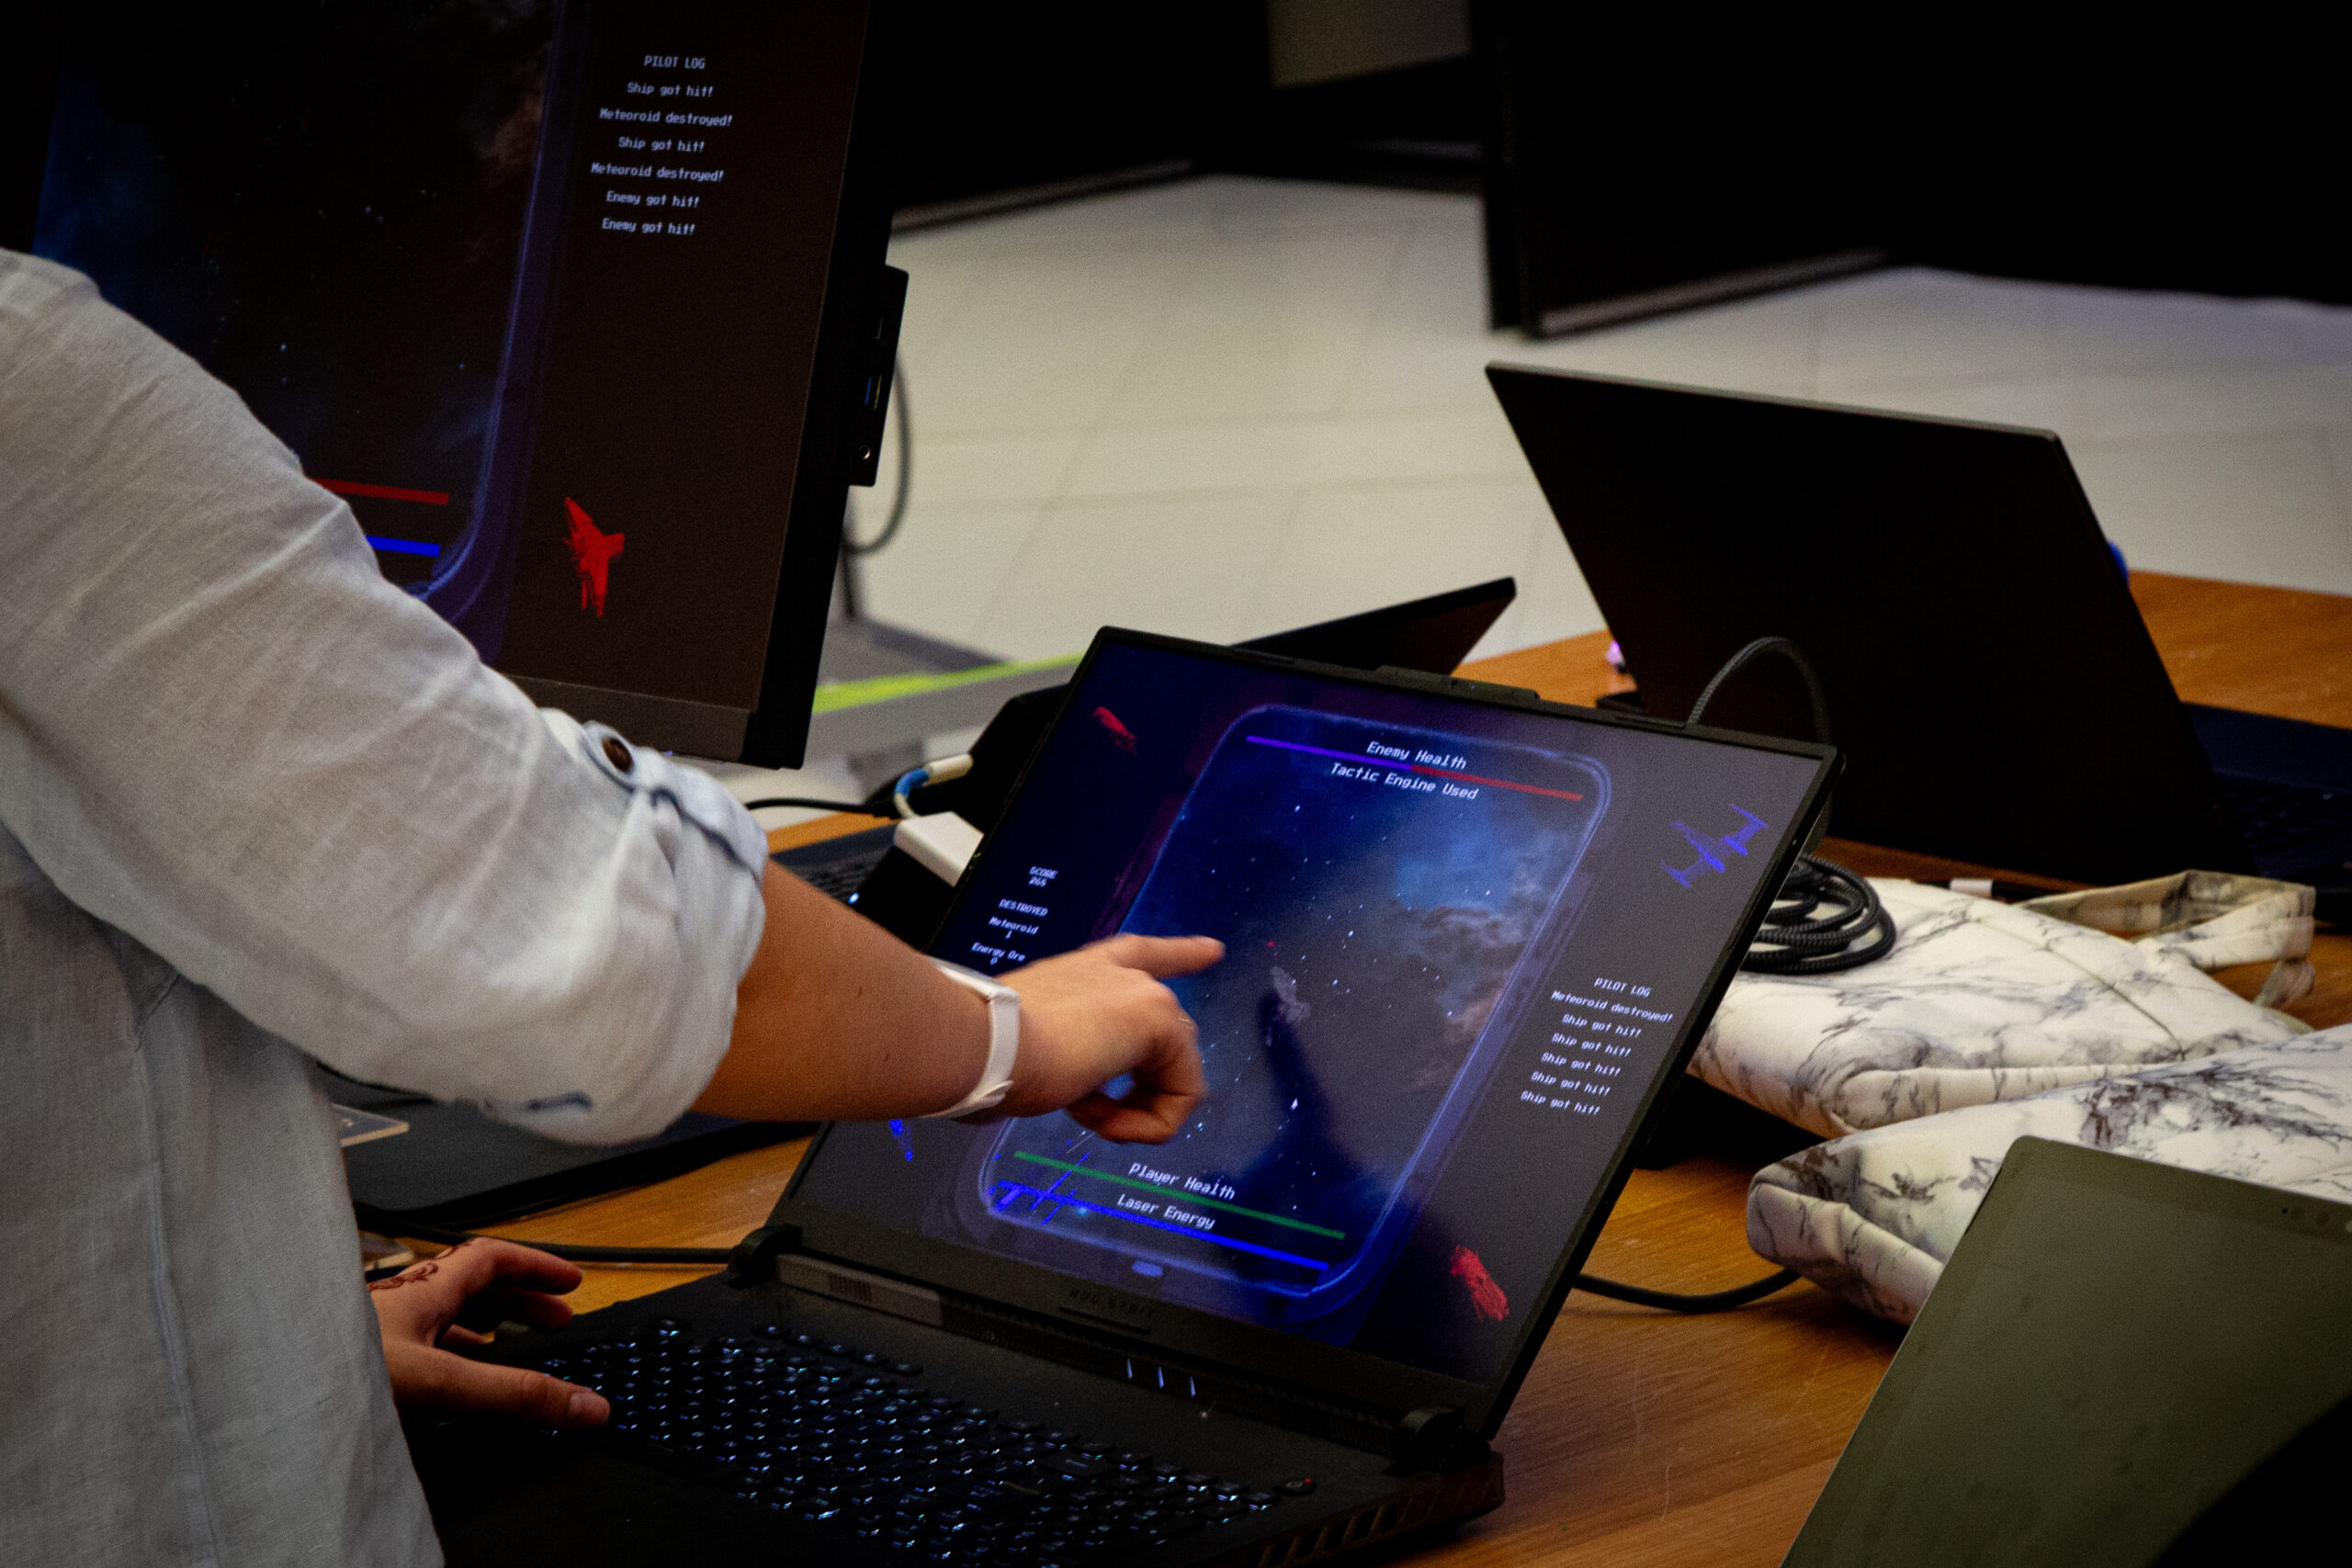
The initial idea of my final is to transform my midterm project from an offline PvE game into an engaging online PvP experience. Building upon the PvP framework, I realized in the first weeks working on the final that the latest concept incorporates a physical robot to seemingly operate one of the players within the game. This dual-player setup creates a dynamic competition between a human-controlled player and a robot-controlled player, leveraging the newly established online PvP mechanism. As the physical installation is actually an illusion, the project also serves as a mind experiment to observe to what extent users will discover the installation during the experience.
2. Project Demonstration
3. Implementation Details
Interaction Design
The key components include:
- Game Logic (p5.js): Manages game states, player actions, and AI behaviors.
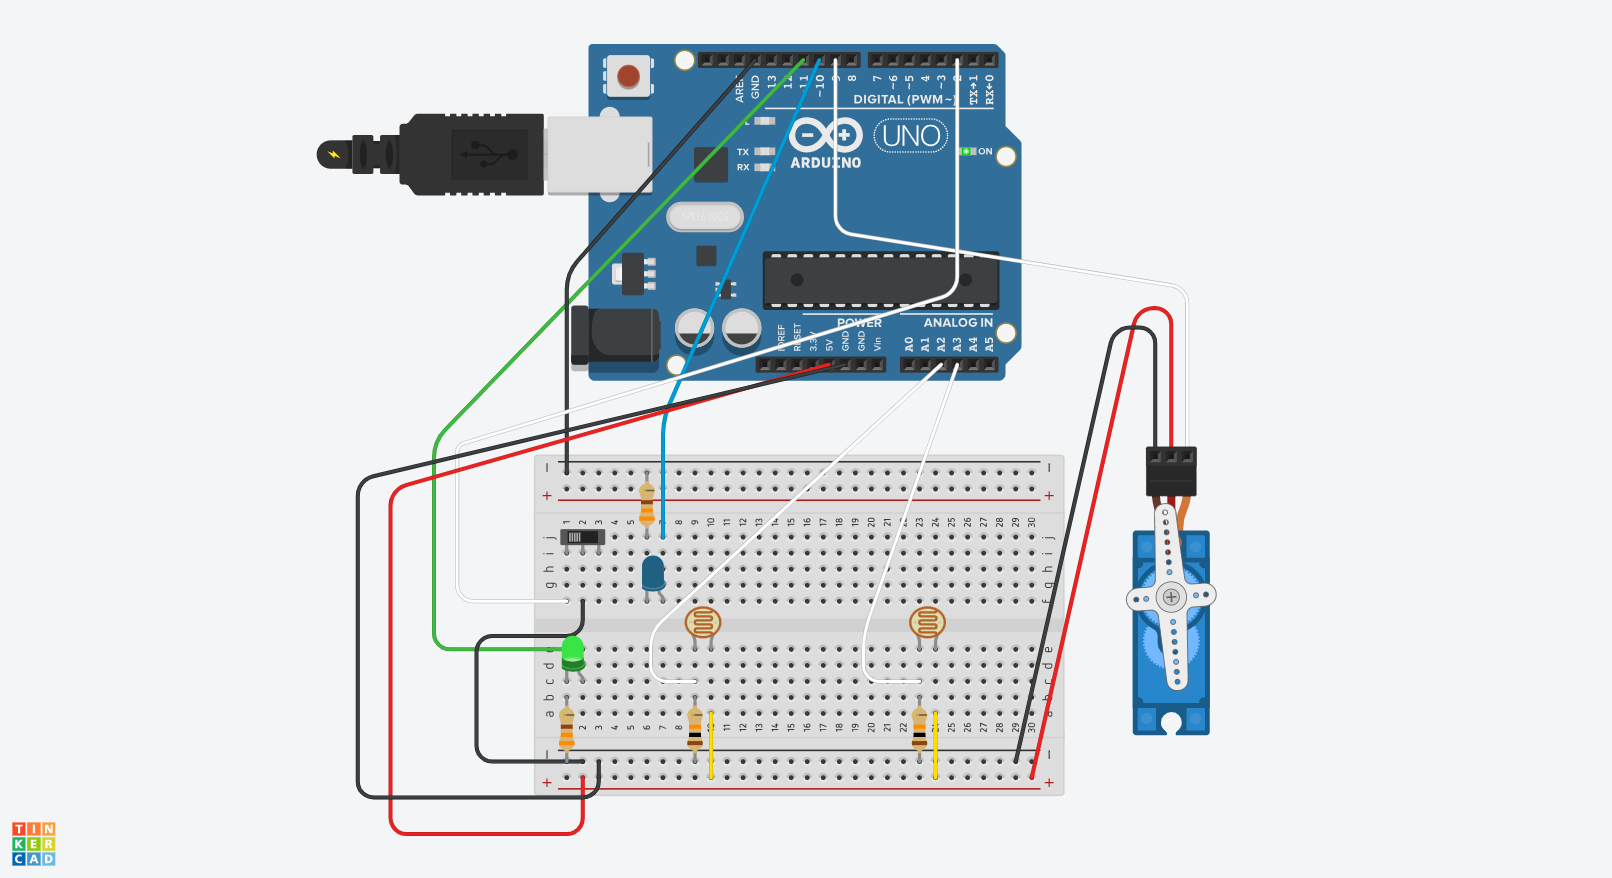
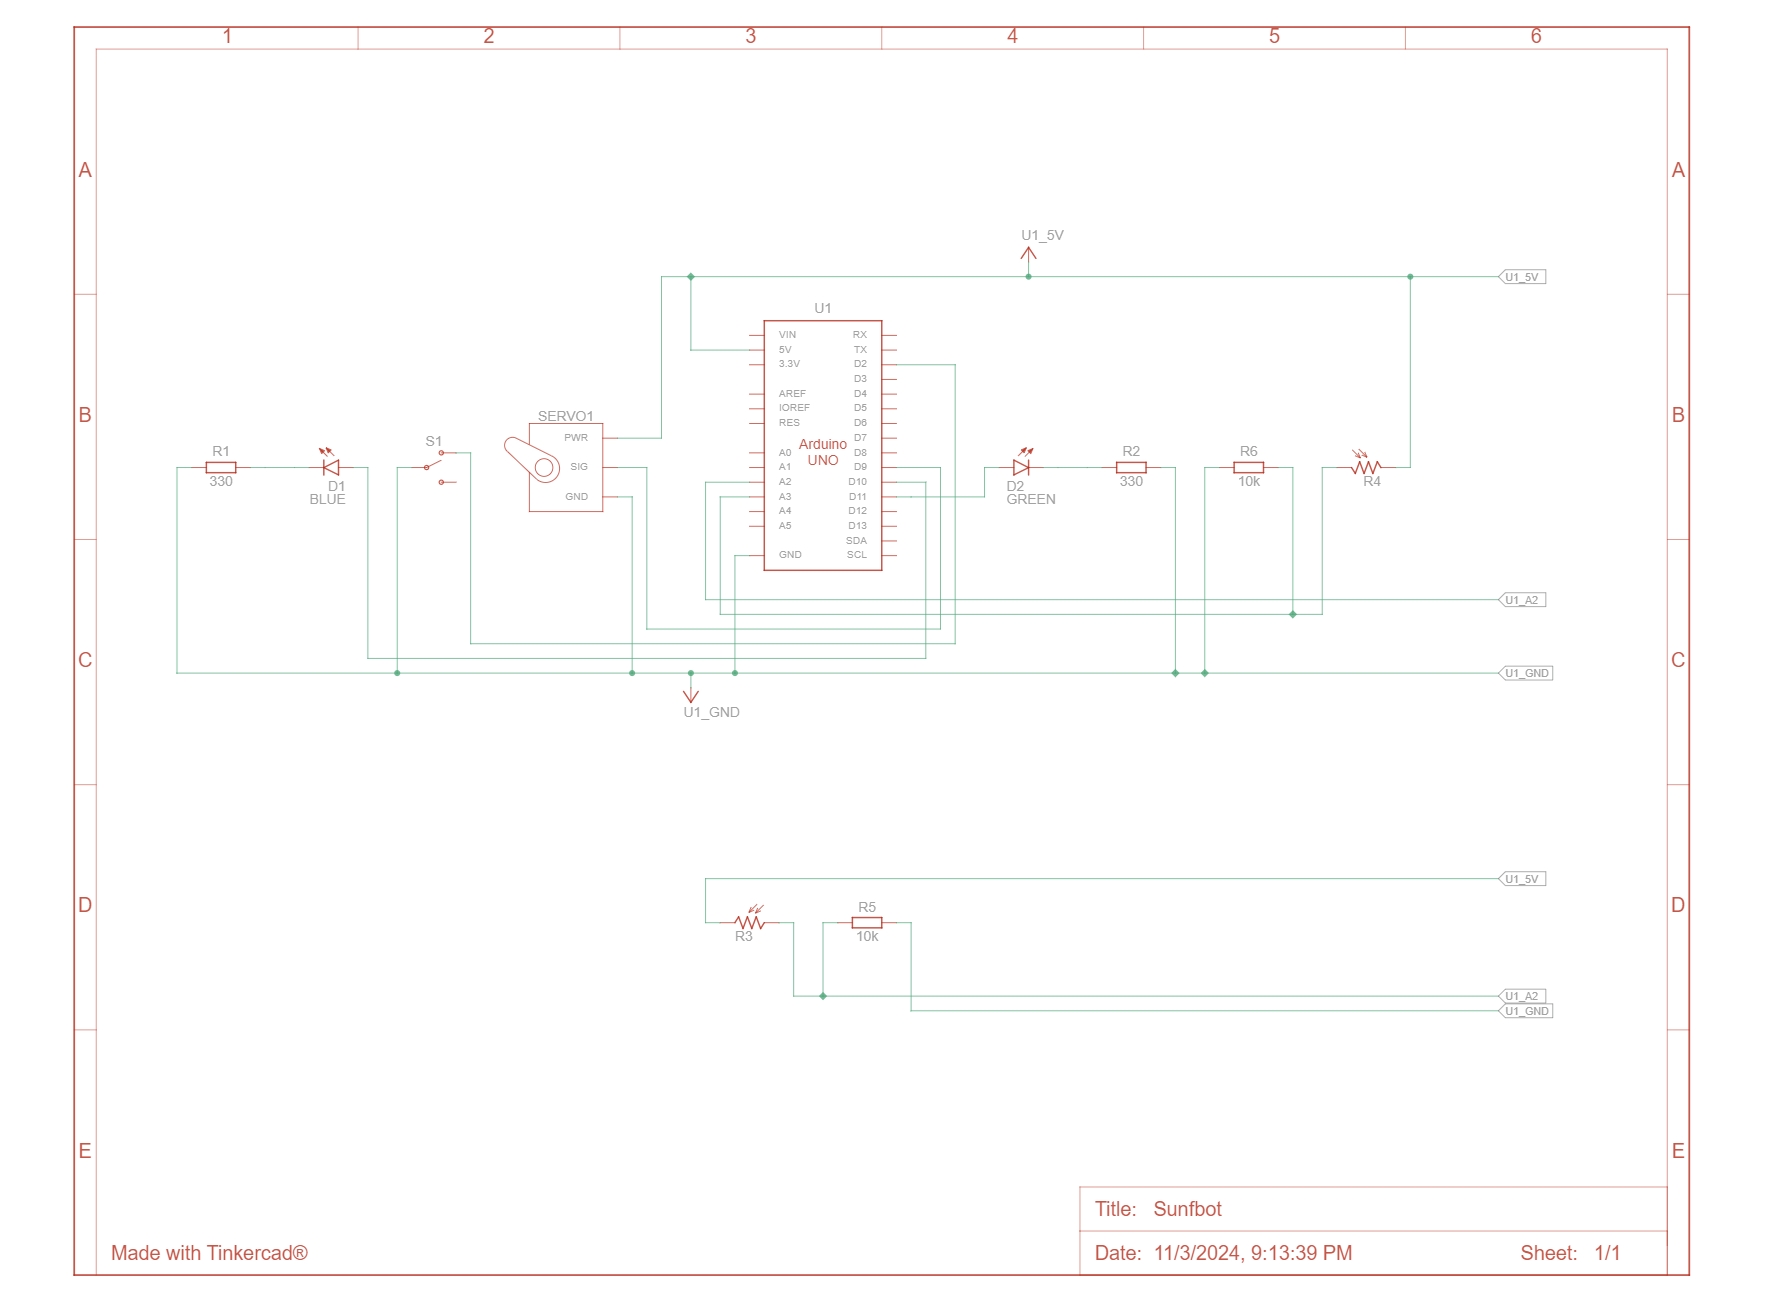
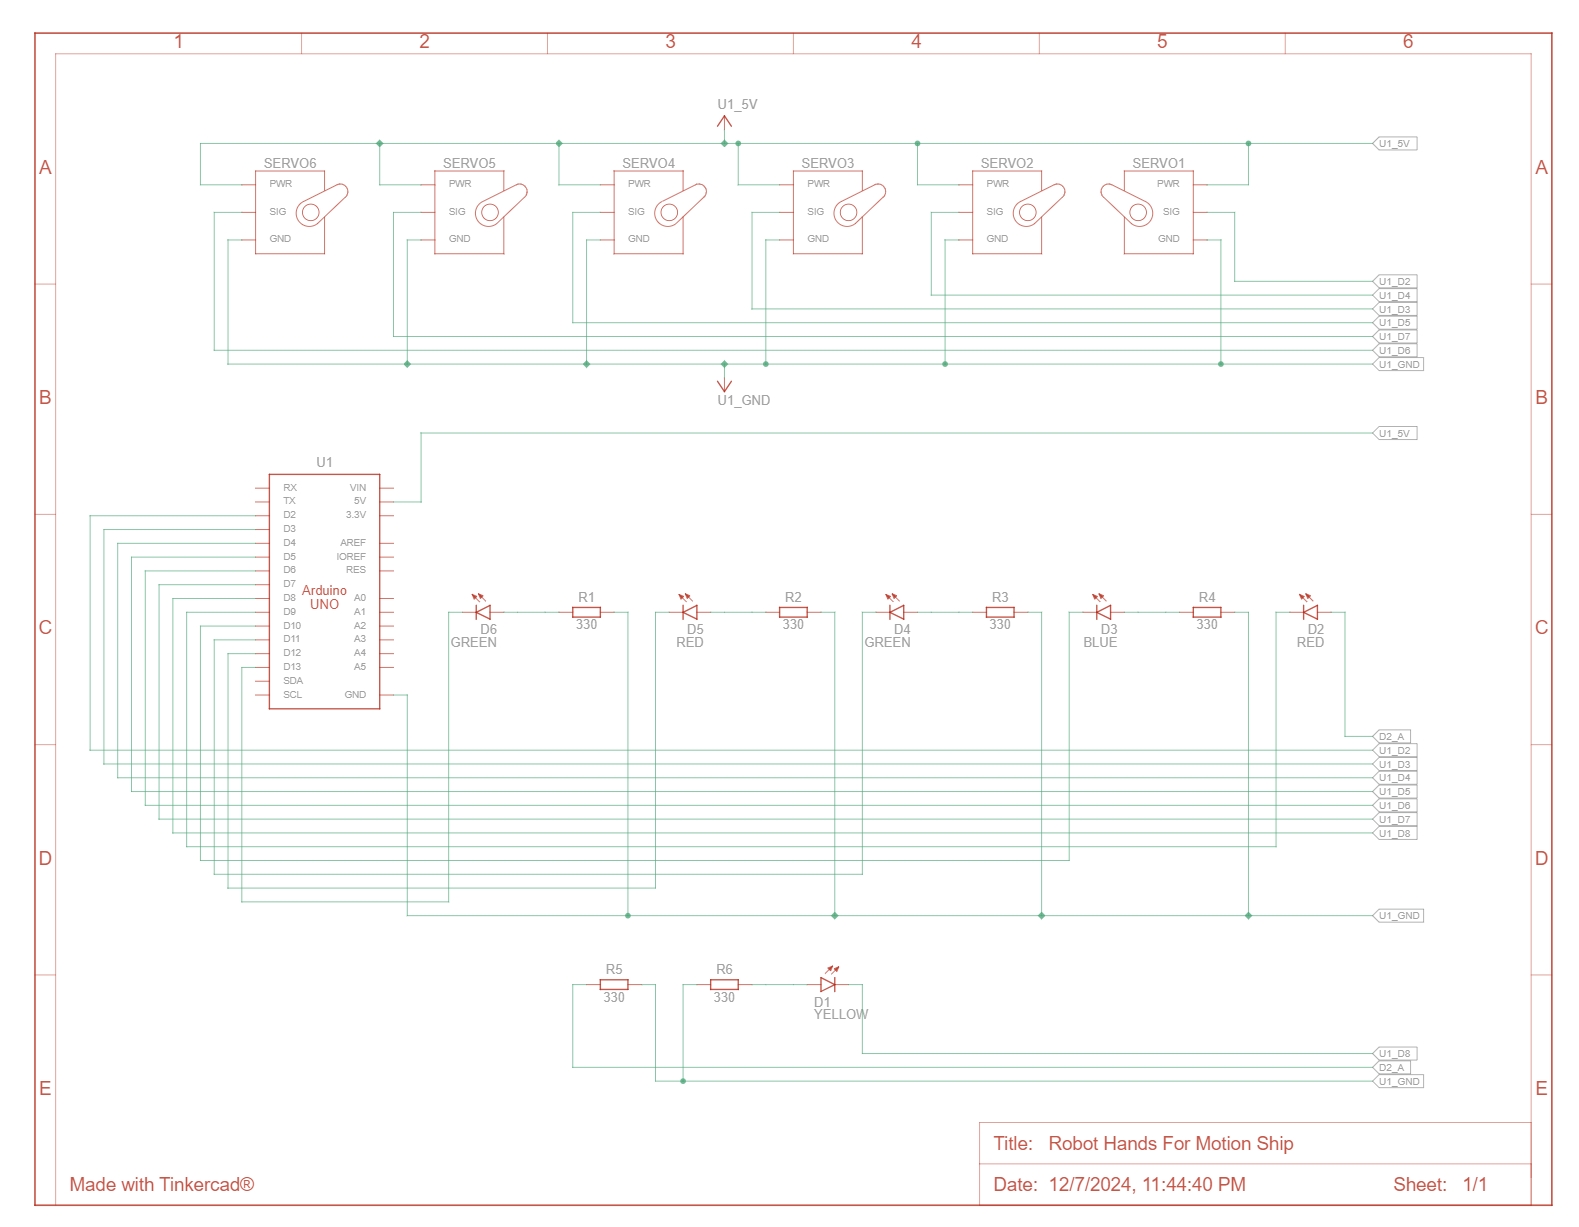
- Robot Hand (Arduino): Translates game commands into physical movements by controlling servos that simulate key presses.
- Serial Communication: Facilitates real-time data exchange between the p5.js application and the Arduino-controlled robot hand, ensuring synchronized actions.
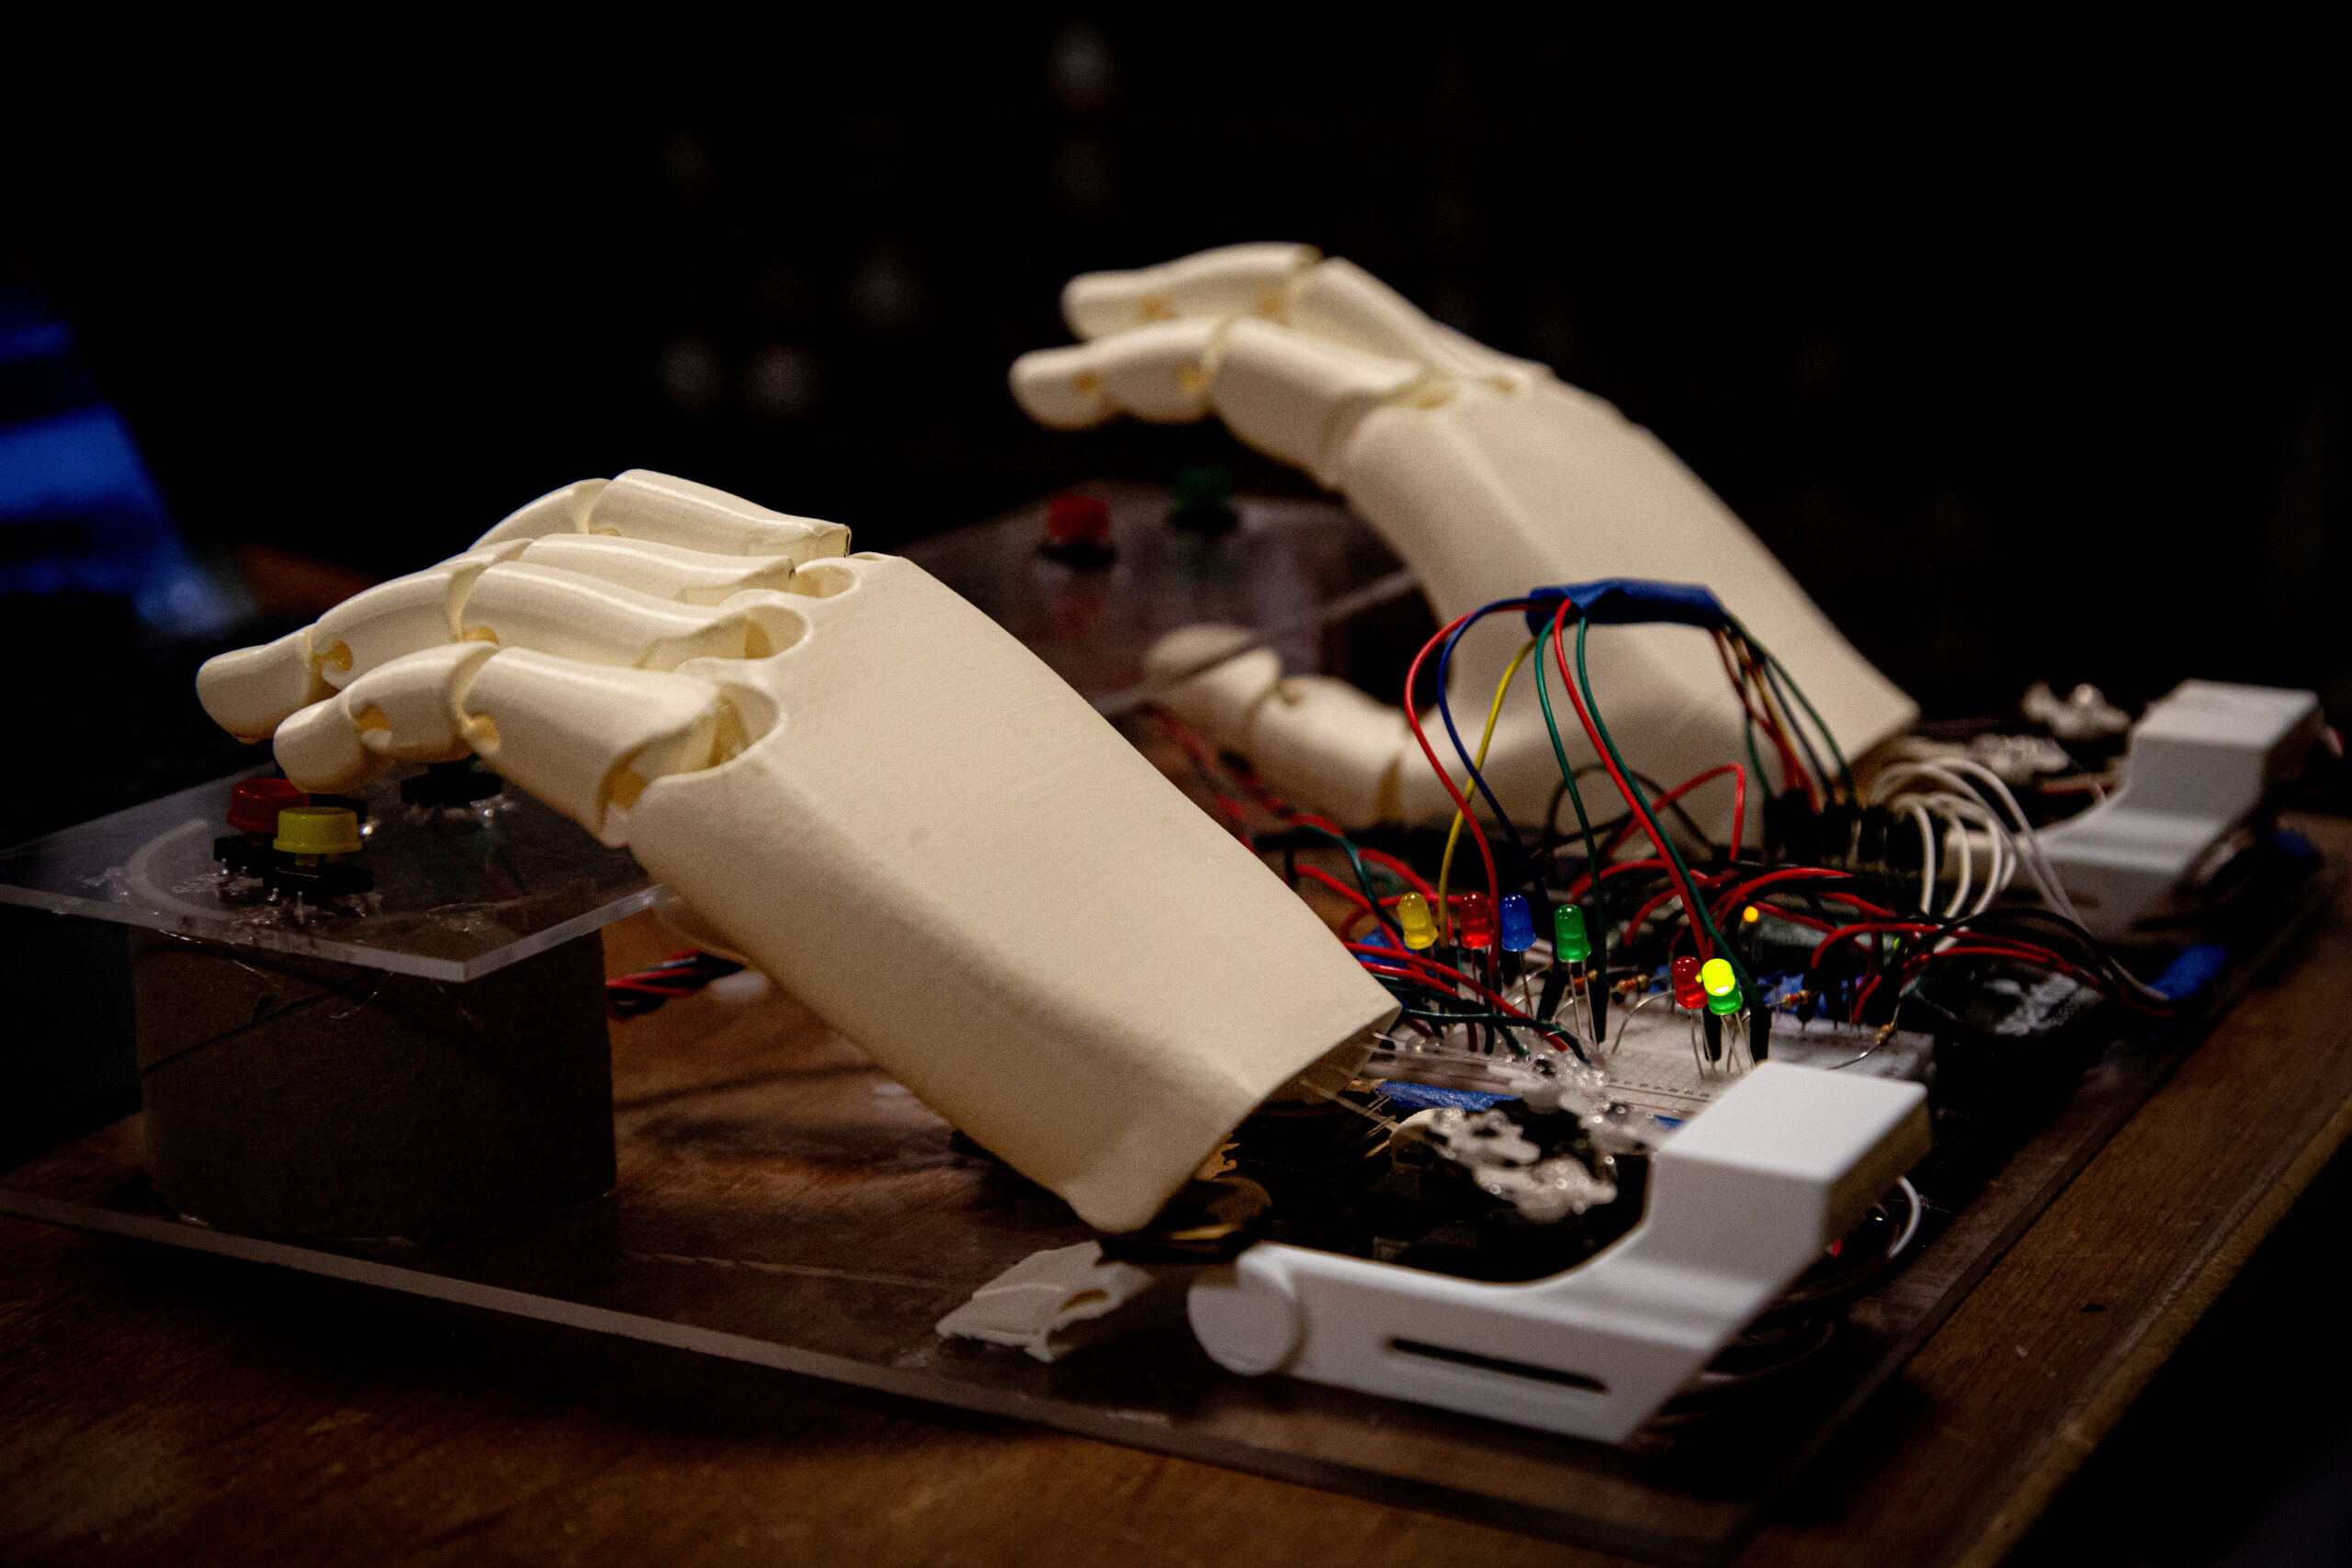
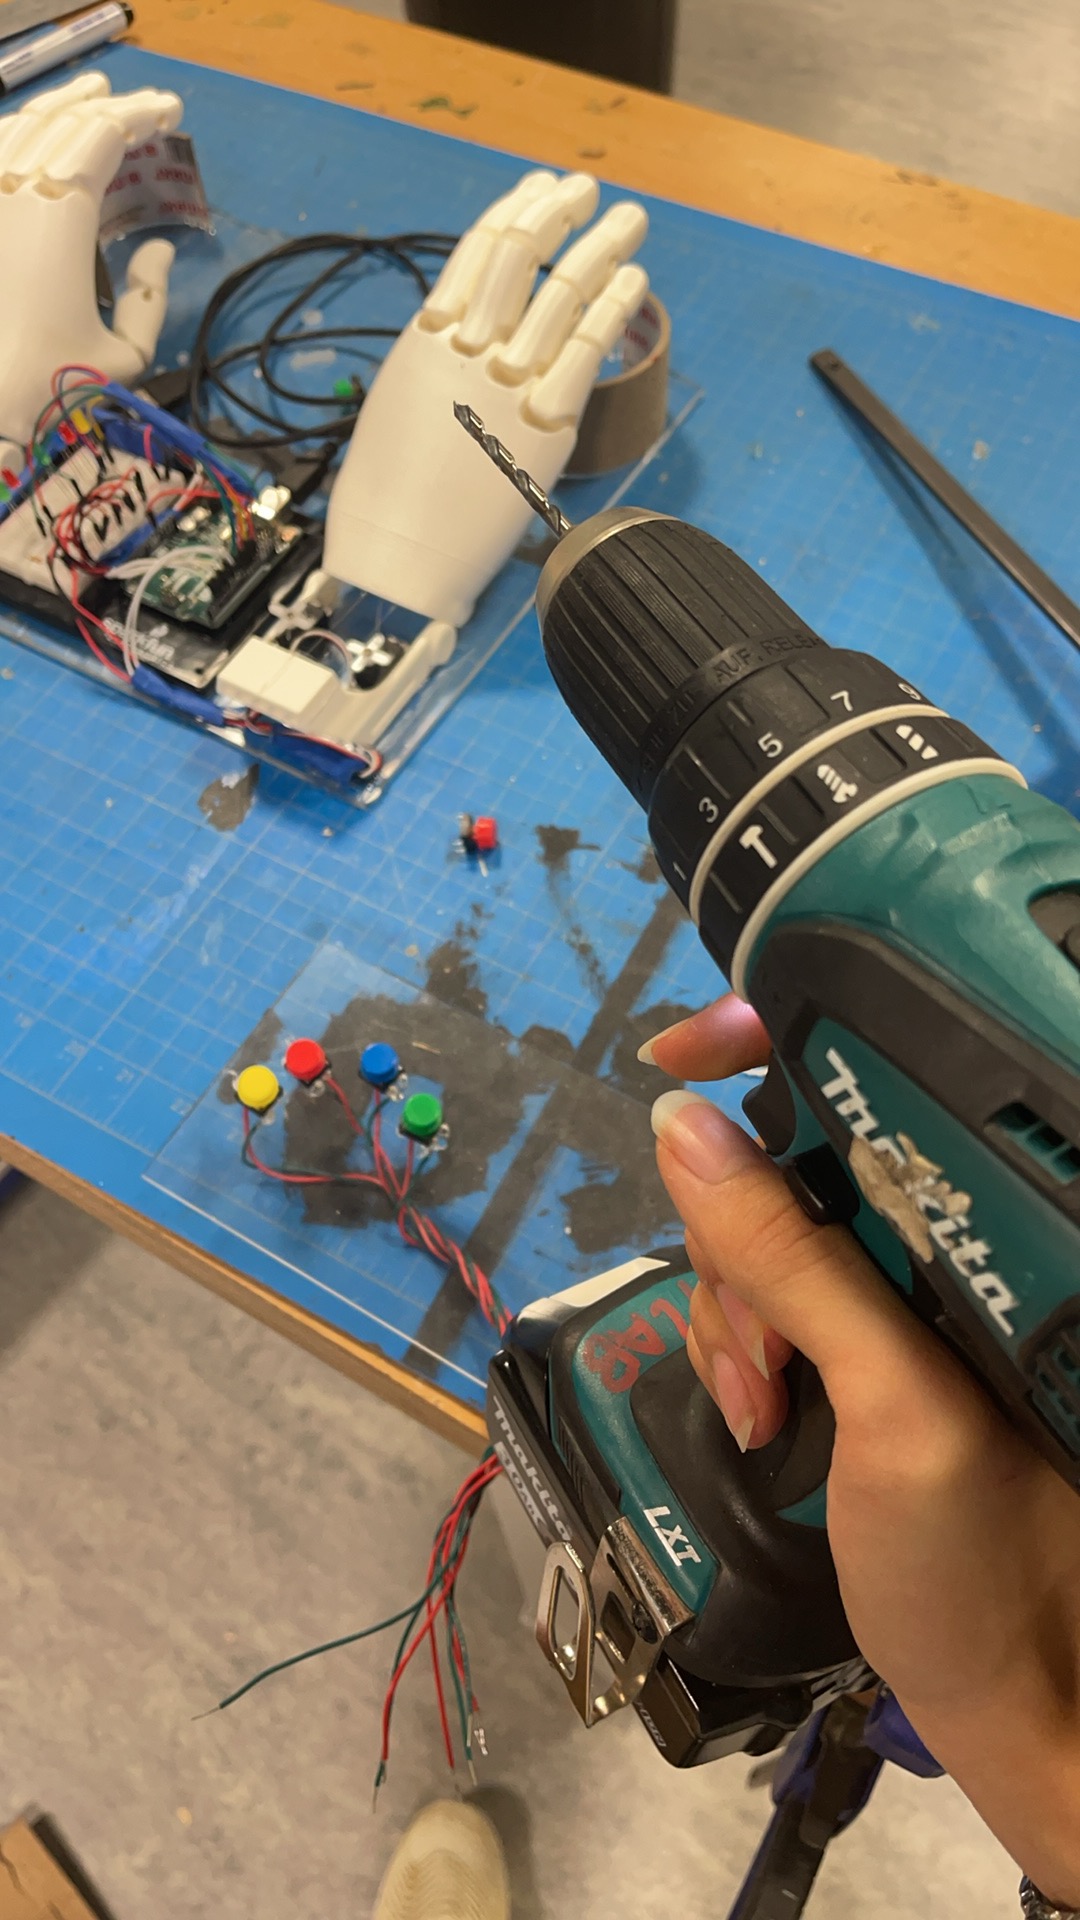
Physical Installation and Arduino Integration
- 3D Printing:
- Materials: PLA filaments
- Process:
Experimental Print
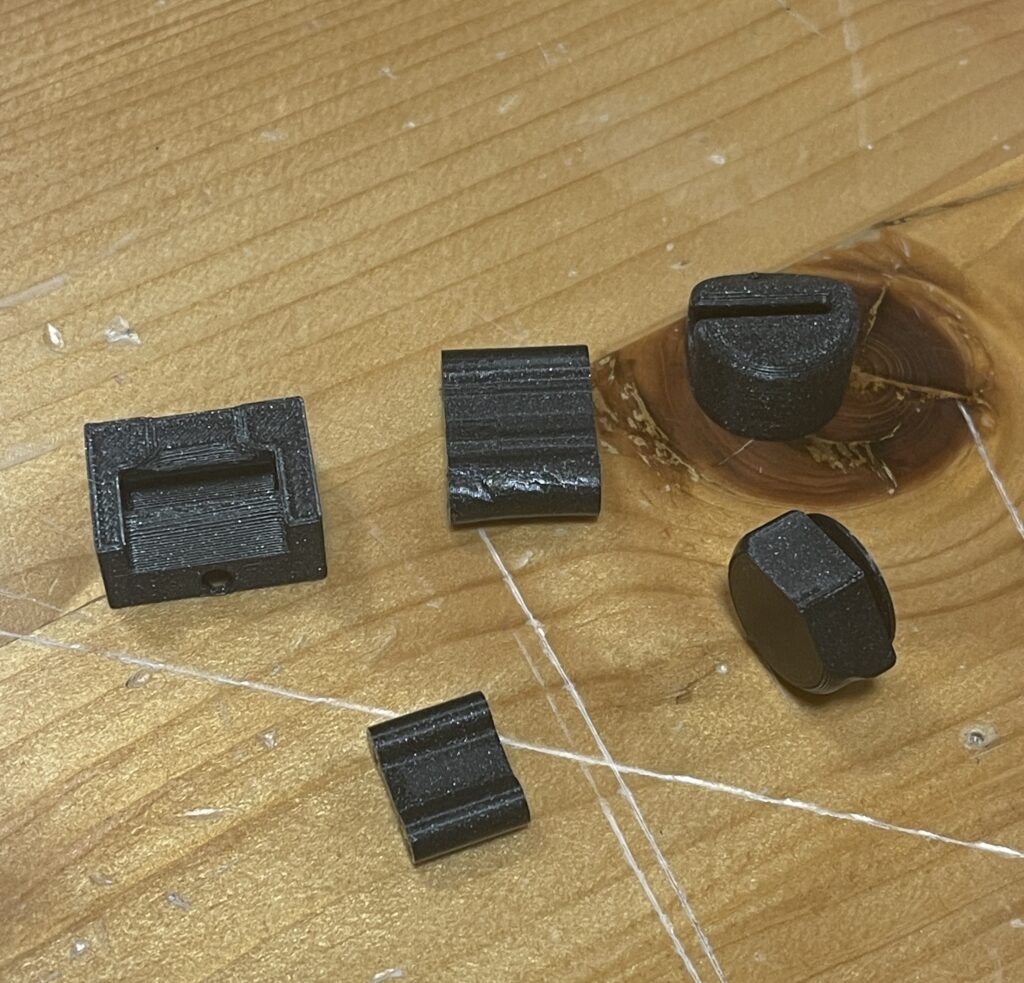
Separate Print Of Joints and Body
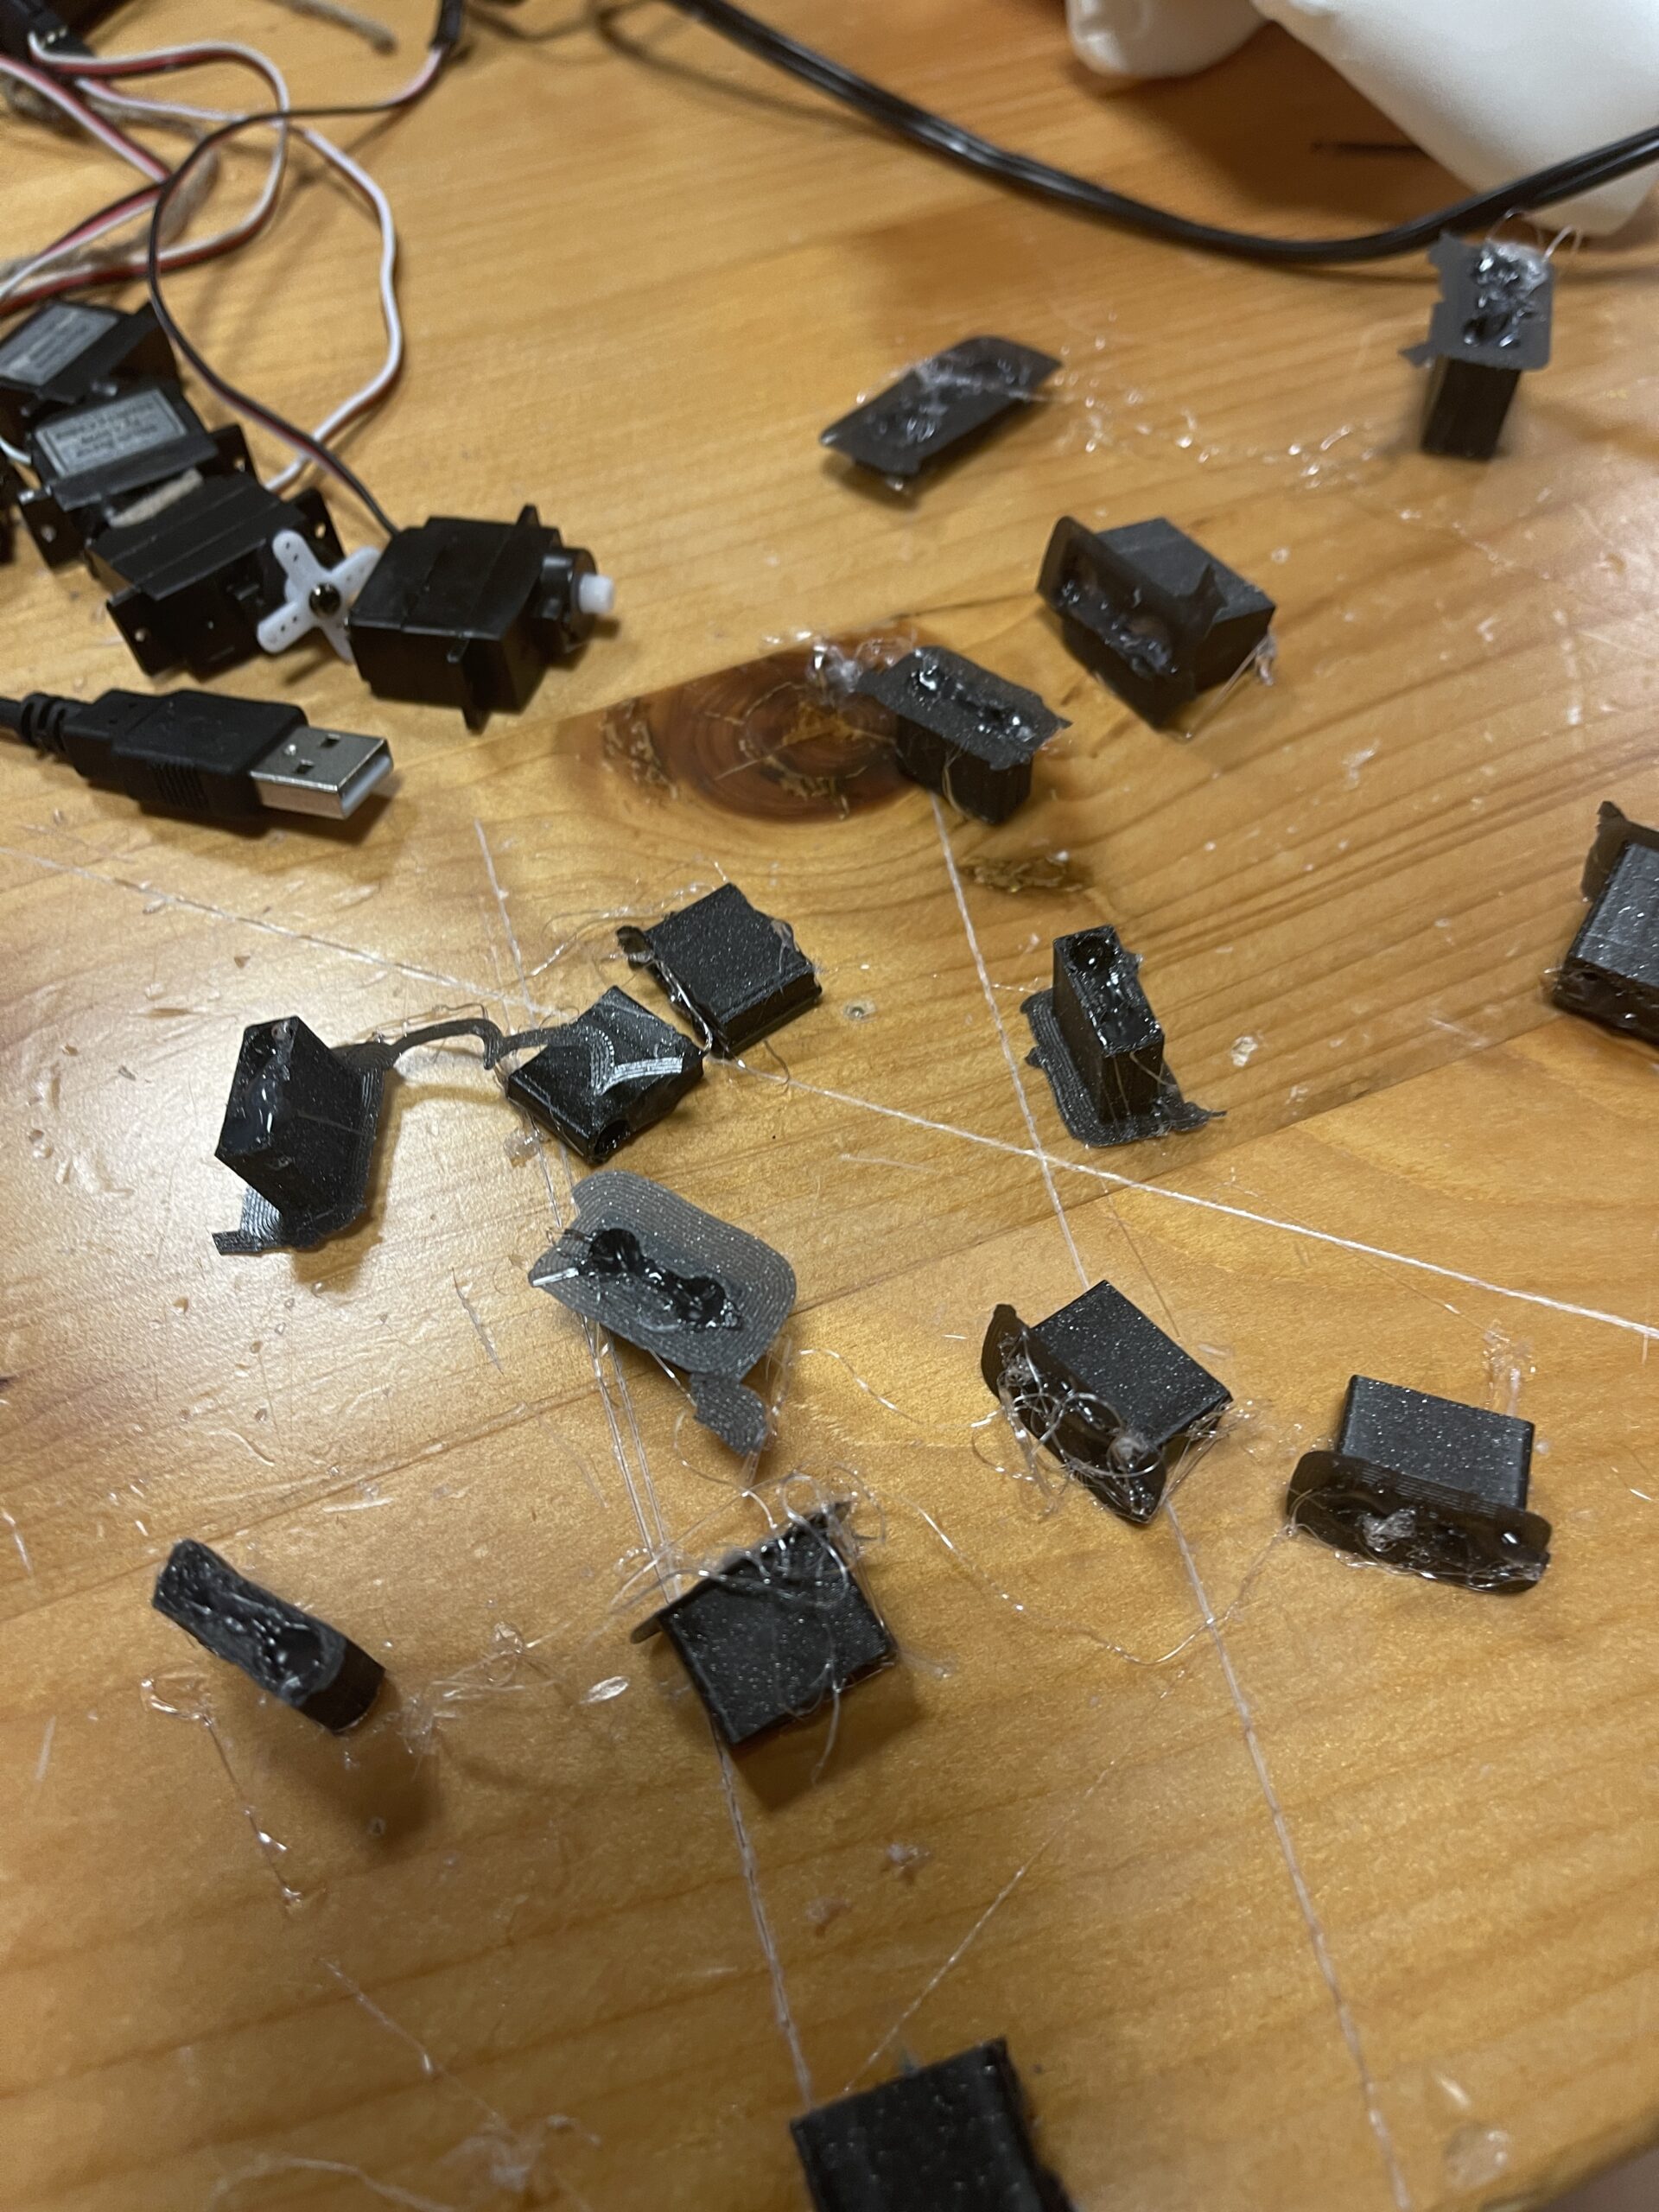
- Hinges Construction:
- Materials: 3D-printed molds and hot glue gun.
- Purpose: Form sturdy and flexible hinges for finger movements.
- Process: Injected hot glue into the molds and install the hinges between the joints.

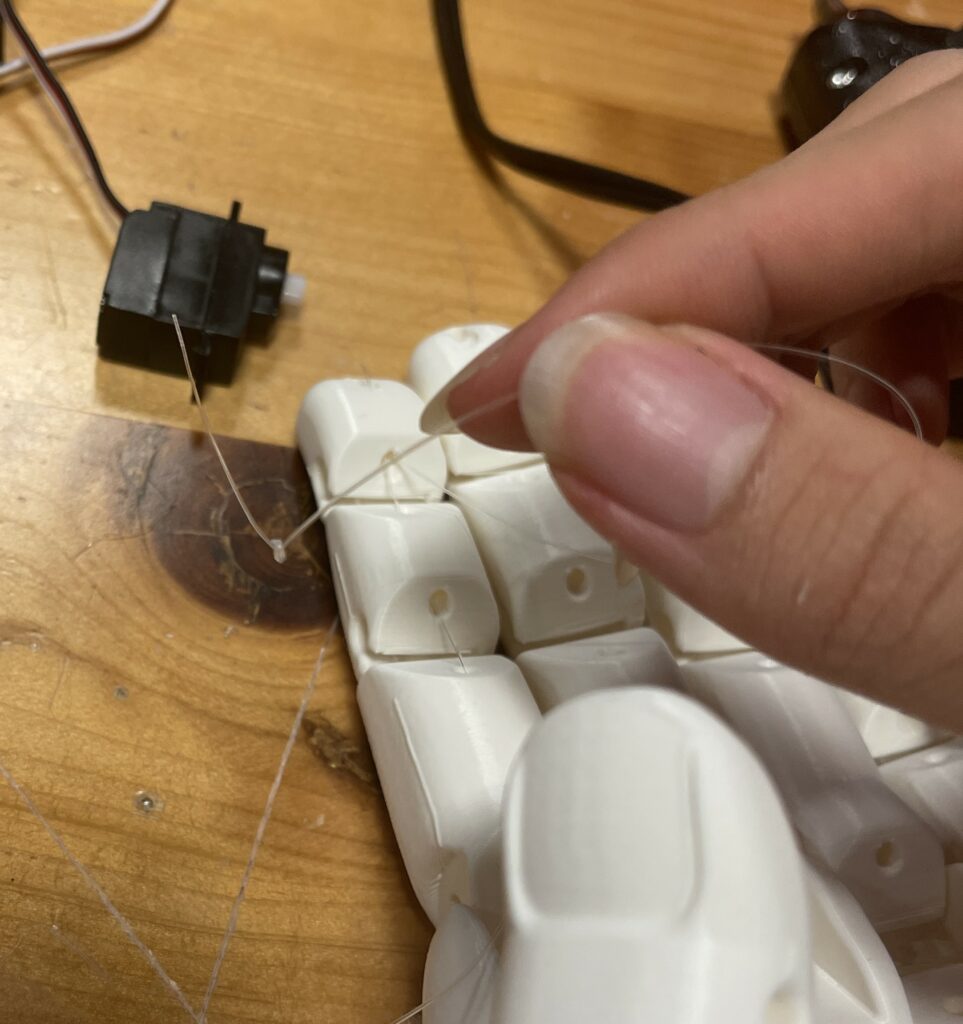
- Tendon Implementation:
- Materials: Fishing lines.
- Purpose: Act as tendons to control finger movements.
- Process: Attached fishing lines to servos and the tips of the fingers.
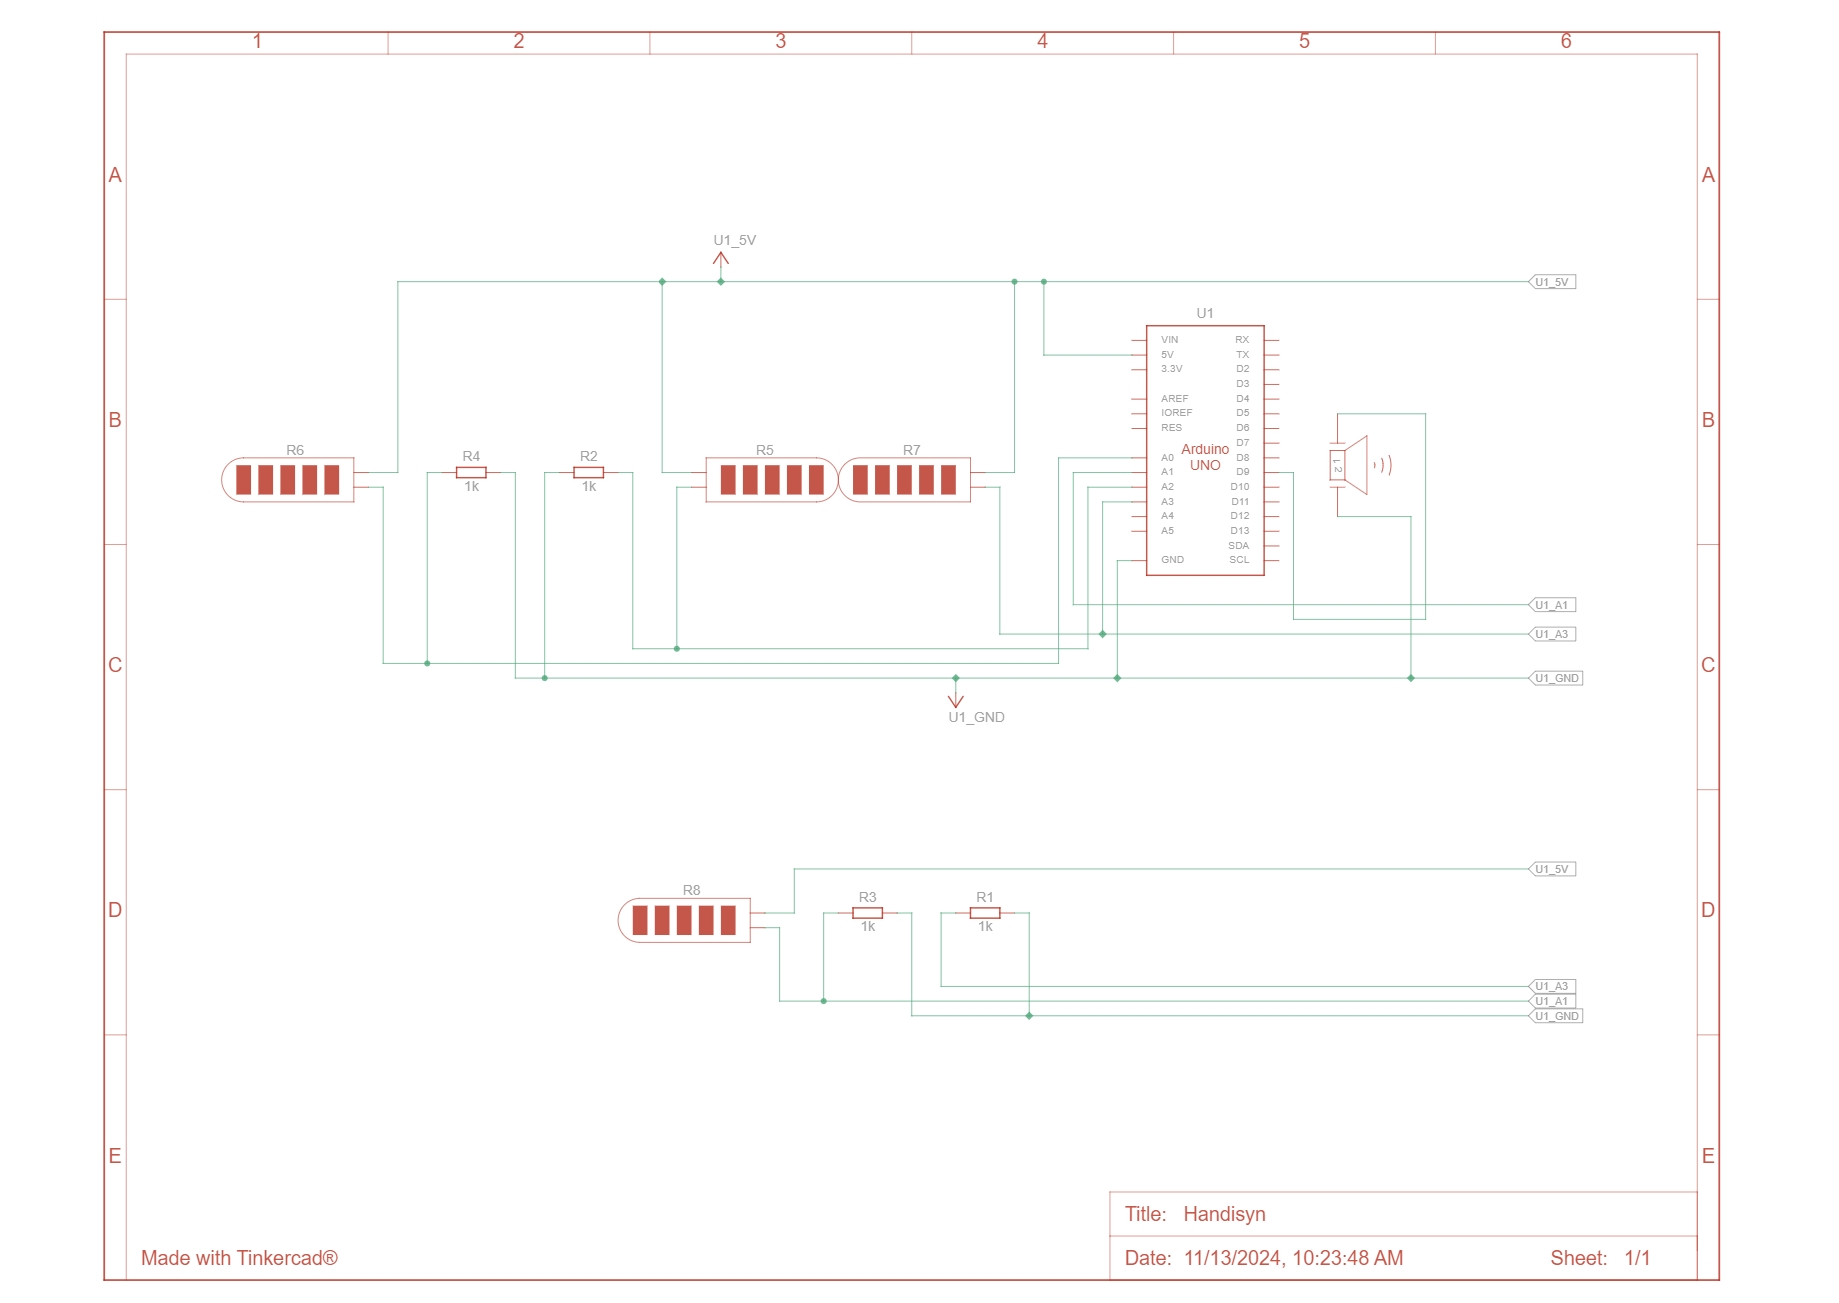
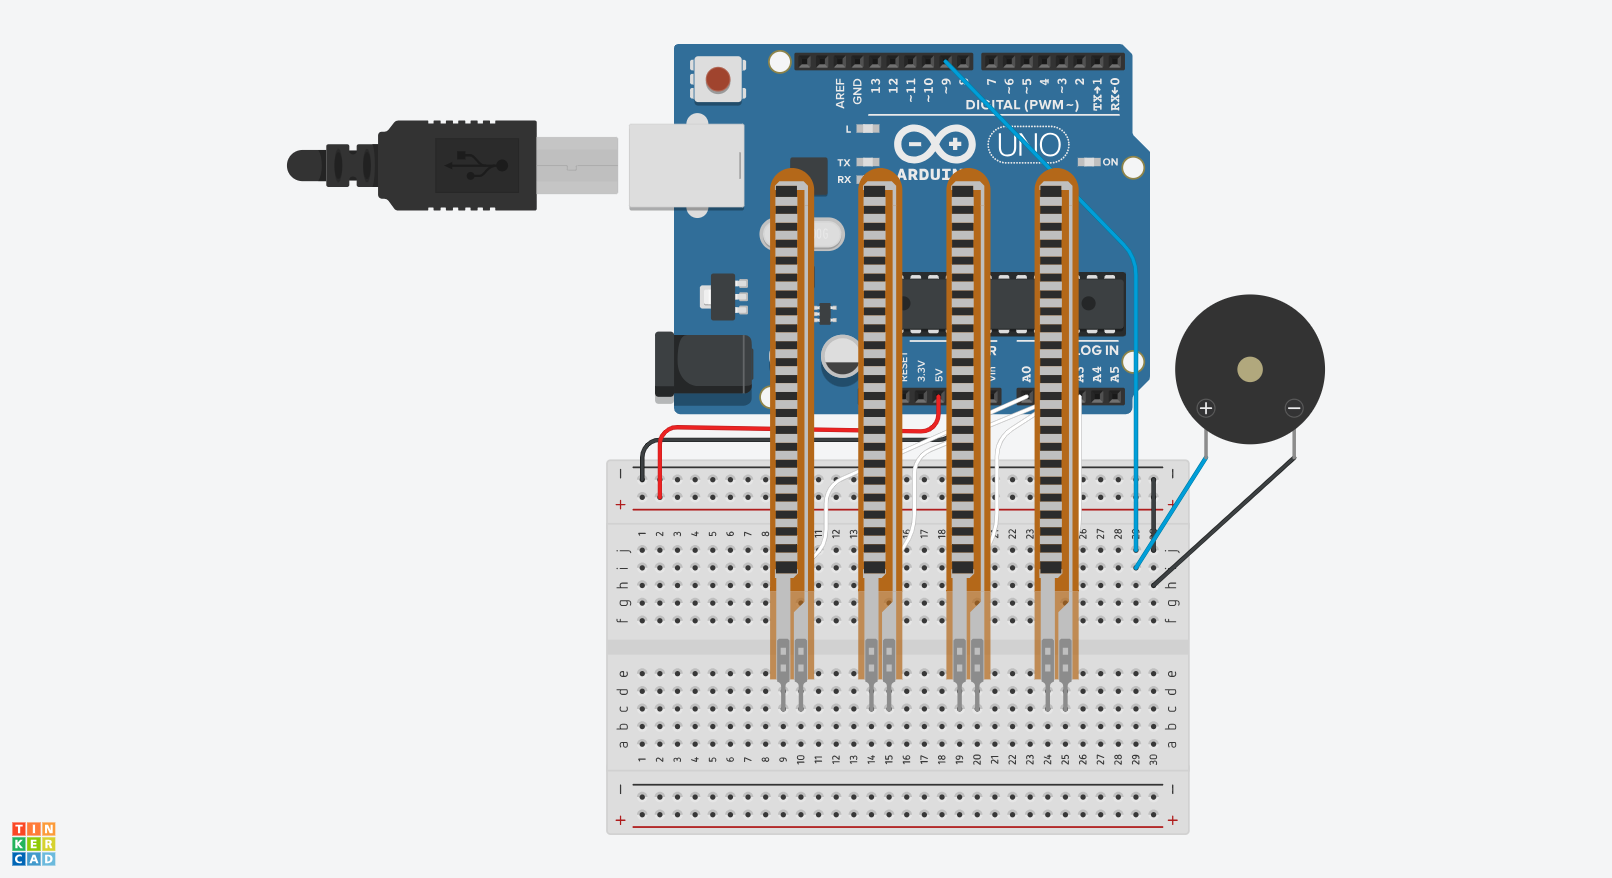
- Servo Control:
-
-
- Components: 6 9g servo motors.
- Control Mechanism: Driven by serial commands from the Arduino, allowing the robot hand to mimic key presses (`w`, `a`, `s`, `d`, `space`, `x`) by turning to specific angles
-
-
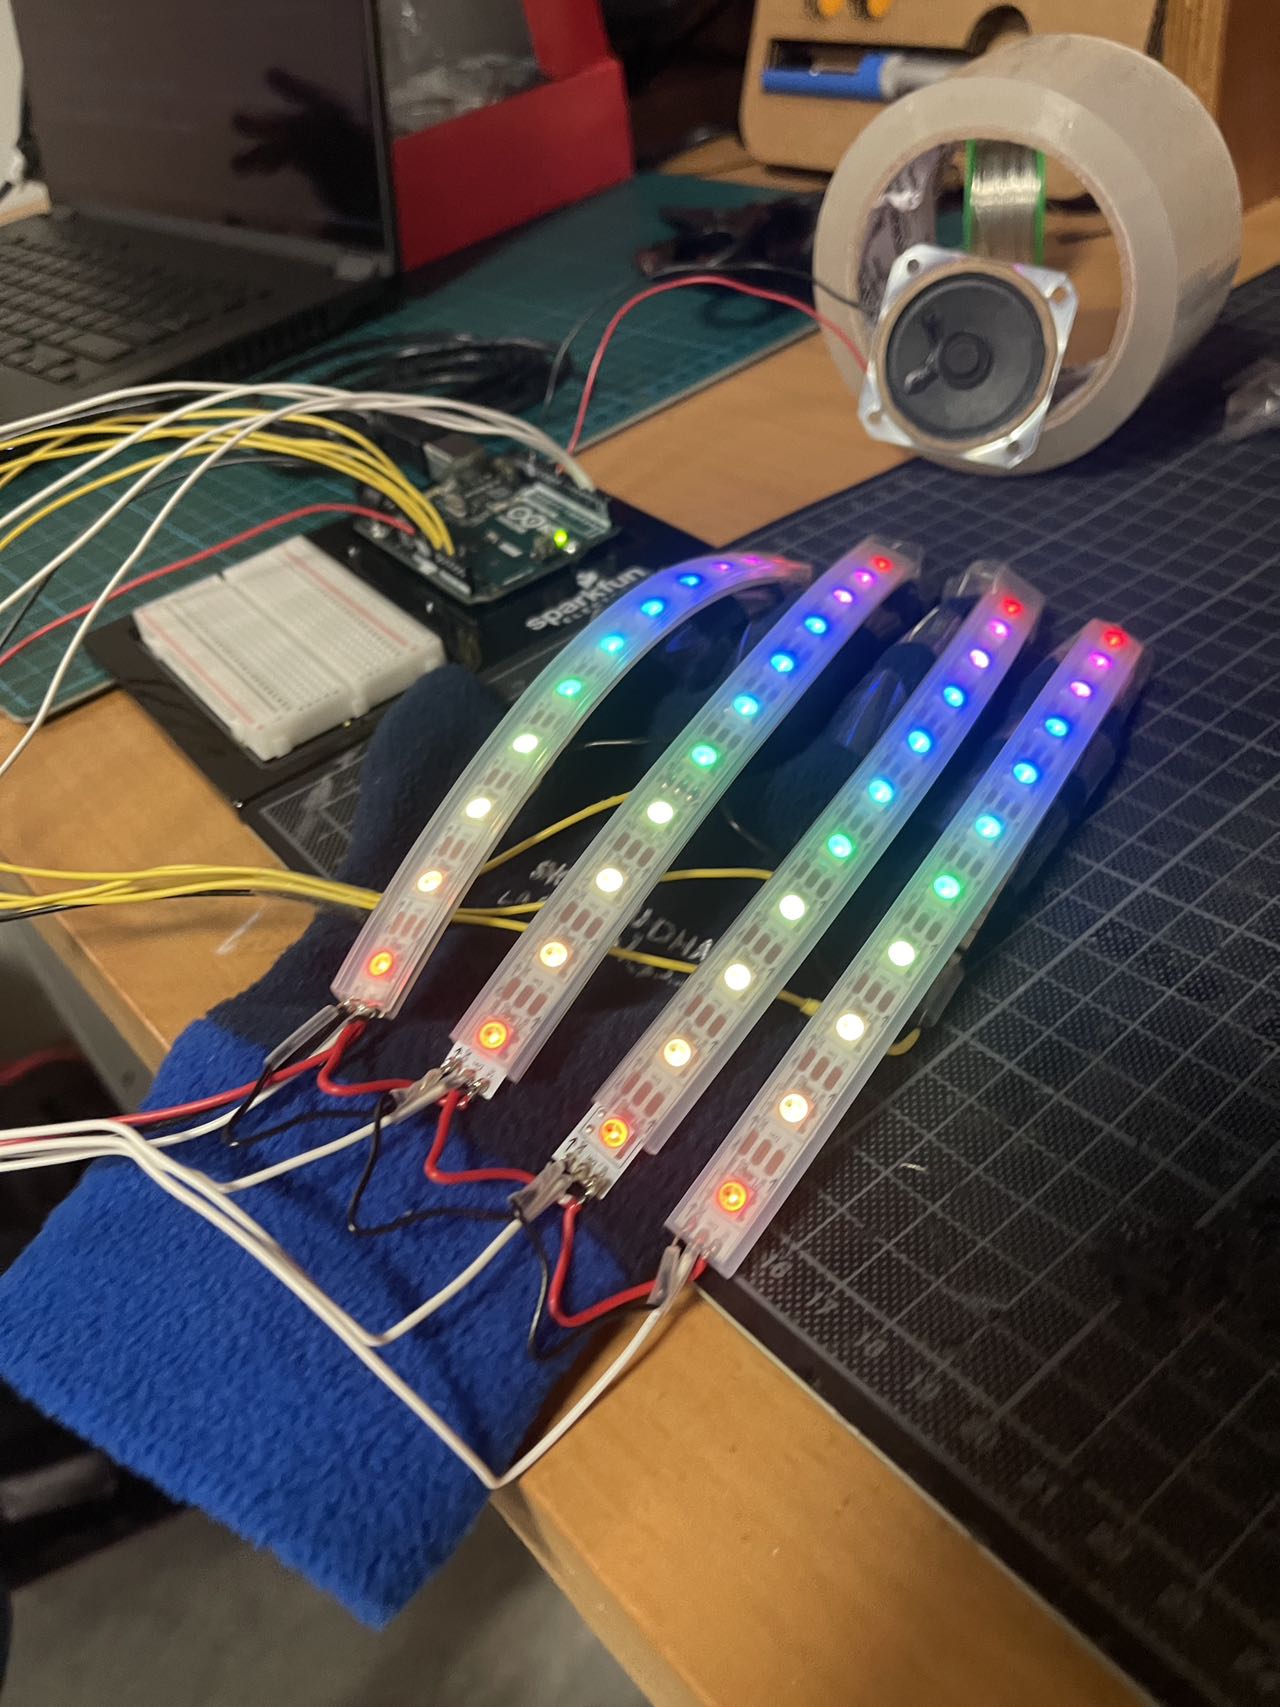
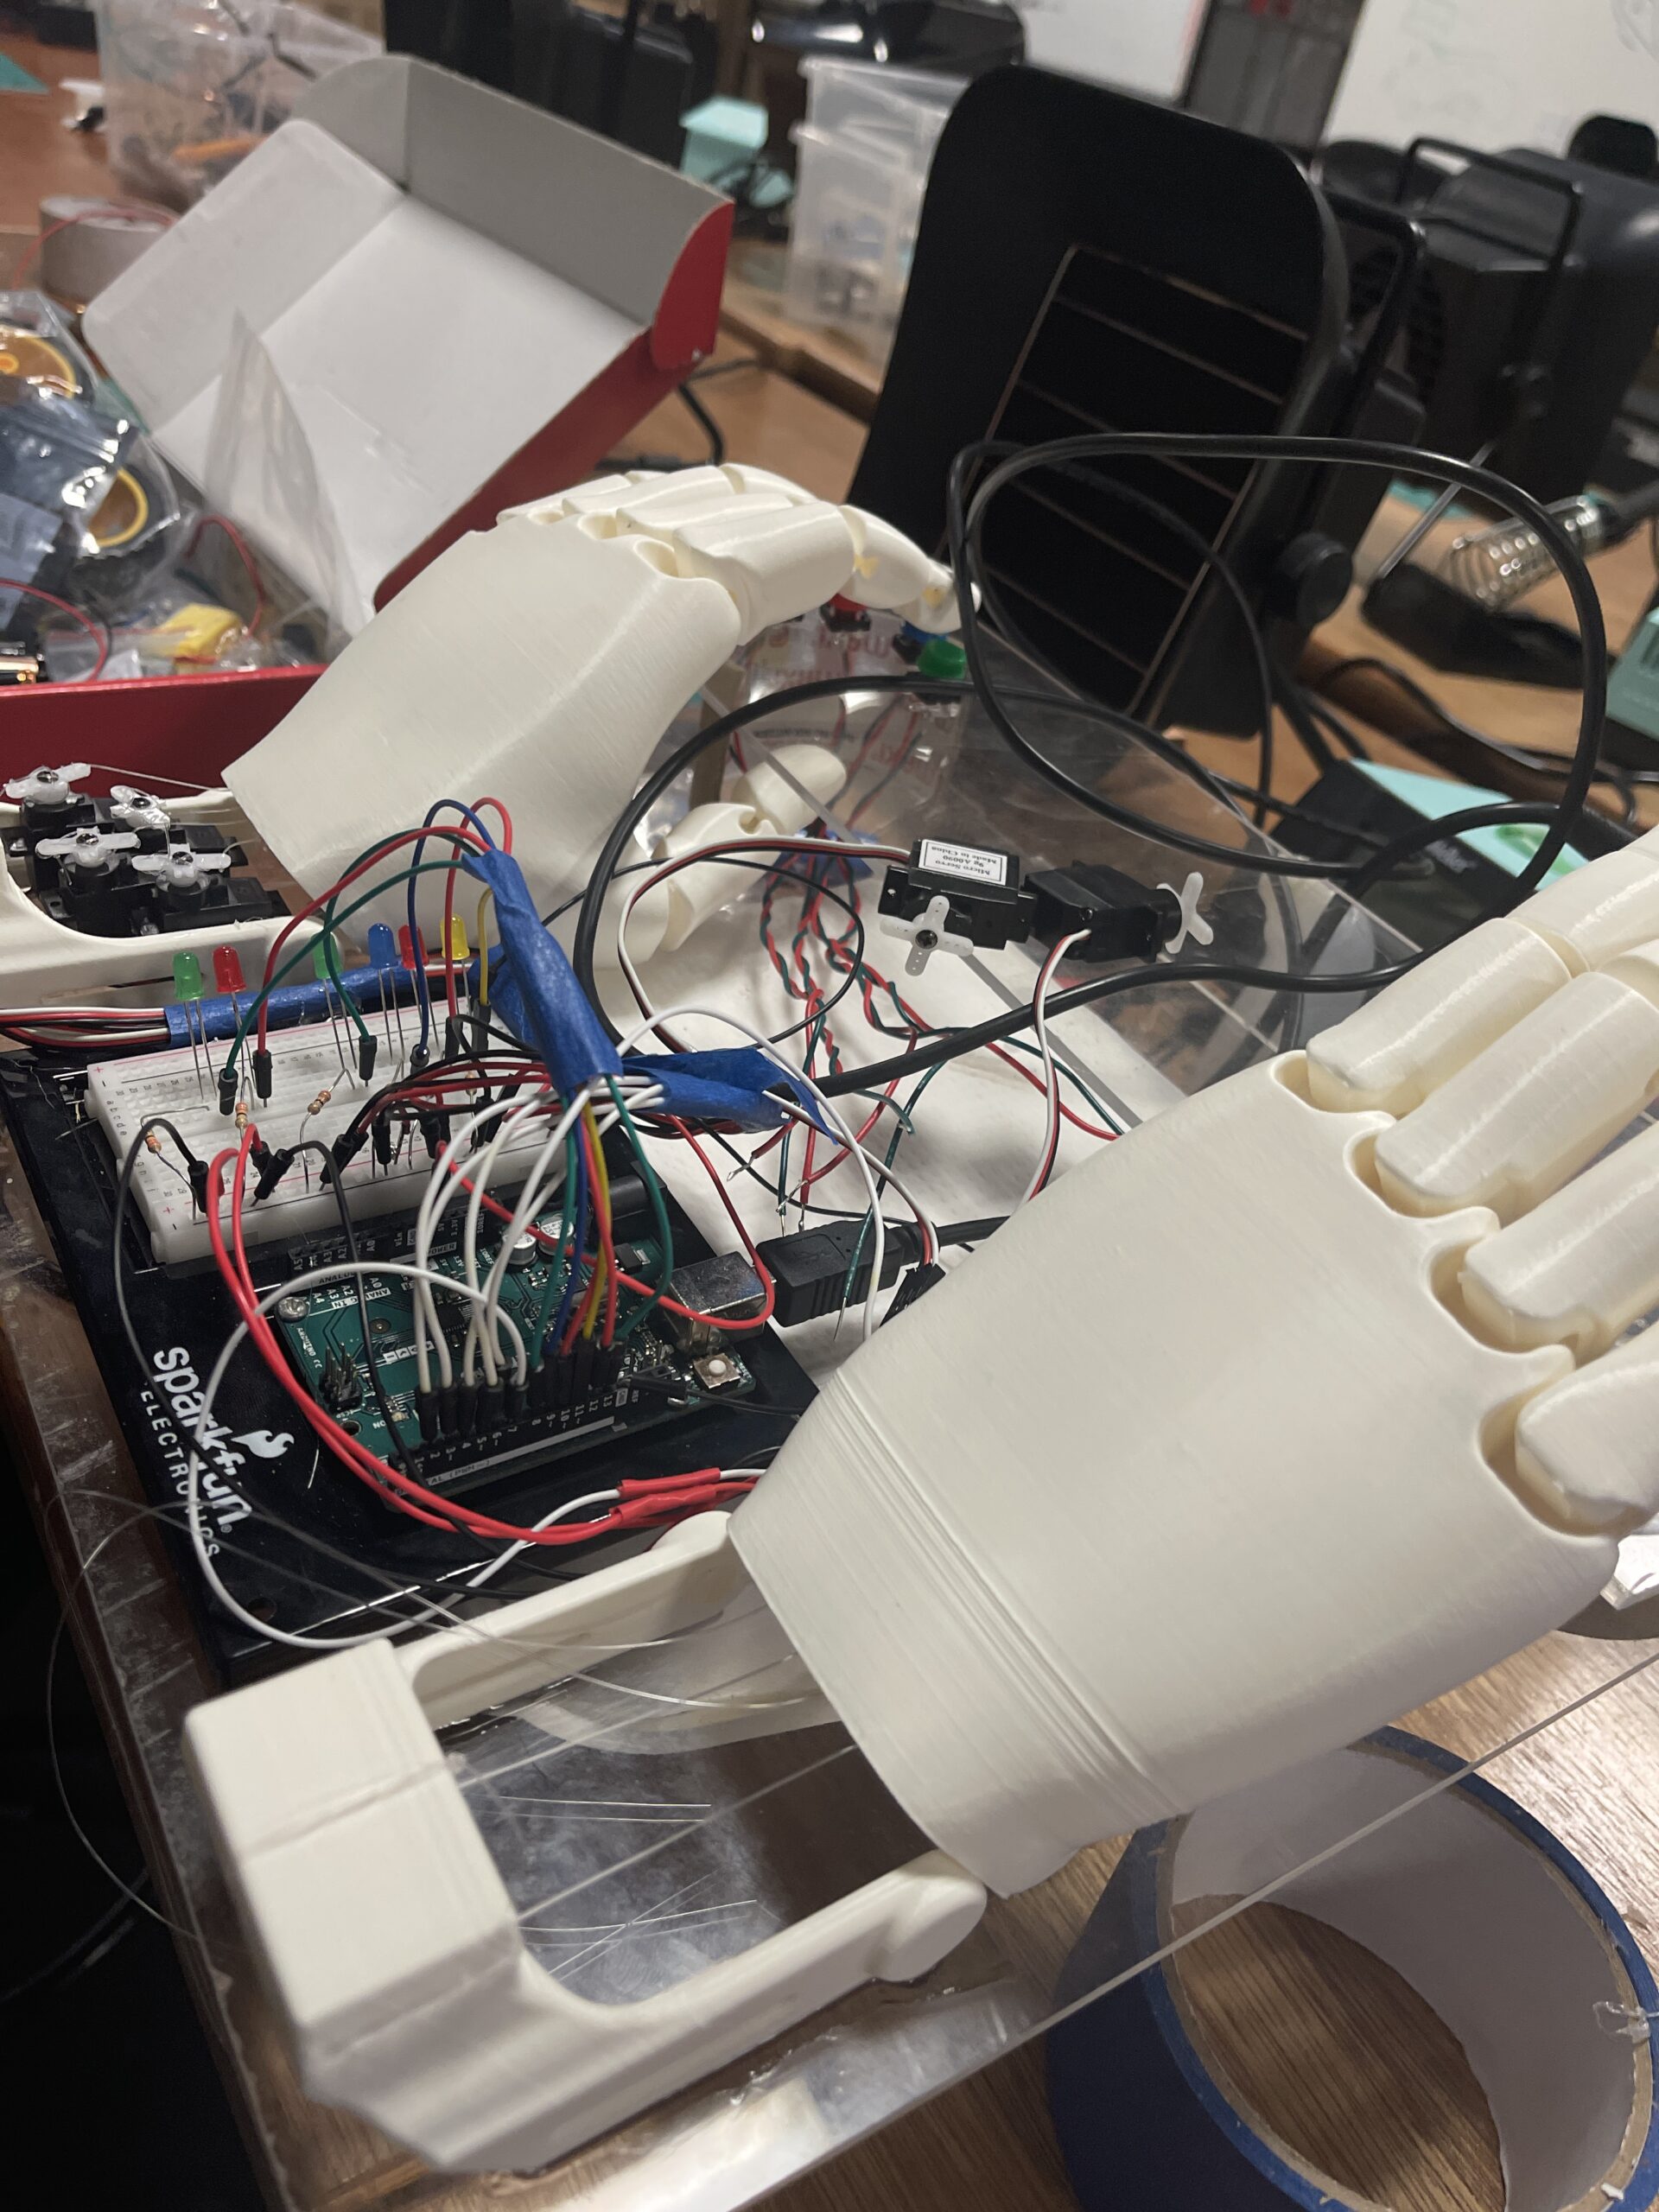
- Assembly of the Installation
-
- Components: All listed above, LEDs, jump wires, acrylic plates
- Process:
Acrylic assembly


-


#include <Servo.h>

unsigned long previousMillis = 0; // Store the last time the LED was updated
const long interval = 250; // Interval to wait (2 seconds)

// Define servo objects for each finger
Servo indexServo;
Servo middleServo;
Servo ringServo;
Servo pinkyServo;
Servo indexServo2;
Servo ringServo2;

// Define servo pins
const int indexPin = 2;
const int middlePin = 3;
const int ringPin = 4;
const int pinkyPin = 5;
const int indexPin2 = 6;
const int ringPin2 = 7;

// Define LED pins
const int LEDPins[] = {8, 9, 10, 11, 12, 13};
// indexLEDPin, middleLEDPin, ringLEDPin, pinkyLEDPin, indexLEDPin2, ringLEDPin2

// Array to hold servo objects for easy access
Servo servos[6];

// Blink LED while waiting for serial data
const int ledPin = LED_BUILTIN;

// Array to hold default angles
const int fingerDefaultAngles[] = {0, 15, 20, 20, 60, 30};

void setup() {
  // Initialize serial communication
  Serial.begin(9600);

  // Attach servos to their respective pins
  servos[0].attach(indexPin);
  servos[1].attach(middlePin);
  servos[2].attach(ringPin);
  servos[3].attach(pinkyPin);
  servos[4].attach(indexPin2);
  servos[5].attach(ringPin2);

  // Set LED pins to output mode
  pinMode(8, OUTPUT);
  pinMode(9, OUTPUT);
  pinMode(10, OUTPUT);
  pinMode(11, OUTPUT);
  pinMode(12, OUTPUT);
  pinMode(13, OUTPUT);

  // Initialize all servos to 0 degrees (open position)
  for(int i = 0; i < 6; i++) {
    servos[i].write(0);
    delay(100);
  }

  // Initialize LED pin
  pinMode(ledPin, OUTPUT);

  // Handshake: Wait for p5.js to send initial data
  while (Serial.available() <= 0) {
    digitalWrite(ledPin, HIGH); // LED on while waiting
    Serial.println("0,0,0,0,0,0"); // Send initial positions
    delay(300);
    digitalWrite(ledPin, LOW);
    delay(50);
  }
}

void loop() {
  // Check if data is available from p5.js
  while (Serial.available()) {
    // digitalWrite(ledPin, HIGH); // LED on while receiving data

    // Read the incoming line
    String data = Serial.readStringUntil('\n');
    data.trim(); // Remove any trailing whitespace

    // Split the data by commas
    int angles[6];
    int currentIndex = 0;
    int lastComma = -1;
    for(int i = 0; i < data.length(); i++) {
      if(data[i] == ',') {
        angles[currentIndex++] = data.substring(lastComma + 1, i).toInt();
        lastComma = i;
      }
    }
    // Last value after the final comma
    angles[currentIndex] = data.substring(lastComma + 1).toInt();

    // Get the current time
    unsigned long currentMillis = millis();

    // Check if the interval has passed
    if (currentMillis - previousMillis >= interval) {
      // Save the last time the LED was updated
      previousMillis = currentMillis;

        // Update servo positions
      for(int i = 0; i < 6; i++) {
        servos[i].write(angles[i]); // Set servo to desired angle
      }
    }

    for(int i = 0; i < 6; i++) {
      digitalWrite(LEDPins[i], angles[i] != fingerDefaultAngles[i]? HIGH : LOW); // Light the LED accordingly
    }
    // Echo back the angles
    Serial.print(angles[0]);
    for(int i = 1; i < 6; i++) {
      Serial.print(",");
      Serial.print(angles[i]);
    }
    Serial.println();
    // digitalWrite(ledPin, LOW); // Turn off LED after processing
  }
}
p5.js
semi collapsed Project structure
project-root/
├── certs/
├── node_modules/
├── pics/
├── public/
│   ├── gameAssets/
│   ├── src/
│   │   ├── components/
│   │   ├── controllers/
│   │   └── utilities/
│   │   ├── index.html
│   │   ├── ml5.js
│   │   ├── p5.js
│   │   ├── p5.sound.min.js
│   │   ├── p5.web-server.js
│   │   ├── sketch.js
│   │   └── style.css
├── robot_hand_test/
├── install_dependencies.bat
├── LICENSE.txt
├── package-lock.json
├── package.json
├── README.md
├── run_local_server.bat
└── server.js
Online Game Setup
- Node.js and Socket.io:
- Purpose: Establish real-time, bi-directional communication between clients.
- Implementation: Set up a local server using Node.js and integrated Socket.io to handle event-based communication for synchronizing game states.
- Local Server for Data Communication:
- Function: Manages user connections, broadcasts game state updates, and ensures consistency across all clients.
- Synchronized Game State:
- Outcome: Ensures that both players have an up-to-date and consistent view of the game, enabling fair and competitive interactions.
// server.js

/* Install socket.io and config server
npm init -y
npm install express socket.io
node server.js
*/

/* Install mkcert and generate CERT for https
choco install mkcert
mkcert -install
mkcert <your_local_IP> localhost 127.0.0.1 ::1
mv <localIP>+2.pem server.pem
mv <localIP>+2-key.pem server-key.pem
mkdir certs
mv server.pem certs/
mv server-key.pem certs/
*/

const express = require('express');
const https = require('https');
const socketIo = require('socket.io');
const path = require('path');
const fs = require('fs'); // Required for reading directory contents

const app = express();

// Path to SSL certificates
const sslOptions = {
  key: fs.readFileSync(path.join(__dirname, 'certs', 'server-key.pem')),
  cert: fs.readFileSync(path.join(__dirname, 'certs', 'server.pem')),
};

// Create HTTPS server
const httpsServer = https.createServer(sslOptions, app);
// Initialize Socket.io
const io = socketIo(httpsServer);

// Serve static files from the 'public' directory
app.use(express.static('public'));

// Handle client connections
io.on('connection', (socket) => {
  console.log(`New client connected: ${socket.id}`);

  // Listen for broadcast messages from clients
  socket.on('broadcast', (data) => {
    // console.log(`Broadcast from ${socket.id}:`, data);
    // Emit the data to all other connected clients
    socket.broadcast.emit('broadcast', data);
  });

  // Handle client disconnections
  socket.on('disconnect', () => {
    console.log(`Client disconnected: ${socket.id}`);
  });
});

// Start HTTPS server
const PORT = 3000; // Use desired port
httpsServer.listen(PORT, () => {
  console.log(`HTTPS Server listening on port ${PORT}`);
});
Computer Player Algorithm
The computer player, controlled by AI within p5.js, employs sophisticated algorithms to simulate human-like behaviors, including:
- Threat Detection and Evasion:
- Mechanism: Continuously scans for incoming threats (e.g., enemy lasers, objects) and calculates optimal evasion paths to avoid collisions.
- Strategic Movement and Firing:
- Behavior: Moves toward or away from the enemy and fires lasers when within range, balancing offensive and defensive strategies based on current game states.
- Tactic Engine Activation:
- Function: Activates special abilities (e.g., infinite health or energy) when certain conditions are met, enhancing strategic depth and competitiveness.
// ComputerPlayer.js

class ComputerPlayer extends Player {
    constructor(model, texture, difficulty = 1, behaviorPriority = 'attack') {
      super(model, texture);
      this.difficulty = difficulty; // Higher values mean smarter AI
      this.behaviorPriority = behaviorPriority; // 'survival' or 'attack'
      this.enemy = game.enemy;
      this.lastActionTime = millis();
      this.actionCooldown = map(this.difficulty, 1, 10, 500, 50); // in milliseconds
      this.actionQueue = []; // Queue of actions to perform
      this.currentAction = null;
      this.firingRange = 100; // Define firing range threshold
      this.bornTime = millis();
      this.difficultyTime = frameCount;
    }

    updateAI() {
      // Set local enemy target
      this.enemy = game.enemy;

      // Count in frame, 1200 = 20s, to increase AI difficulty
      if (frameCount - this.difficultyTime > 1200) {
        this.difficulty ++;
      }

      if (currentTime - this.lastActionTime > this.actionCooldown) {
        console.log(`[AI][${this.behaviorPriority.toUpperCase()}] Deciding next action...`);
        this.decideNextAction();
        this.lastActionTime = currentTime;
      }

      // Execute actions from the queue
      this.executeActions();
    }

    decideNextAction() {
      // Determine behavior based on priority
      if (this.behaviorPriority === 'survival') {
        this.decideSurvivalActions();
      } else if (this.behaviorPriority === 'attack') {
        this.decideAttackActions();
      } else {
        // Default behavior
        this.decideAttackActions();
      }
    }

    decideSurvivalActions() {
      // Abandoned method, will not be used
      // (unless another behavior mode 'Survival' is to be used)
    }

    decideAttackActions() {
      console.log(`[AI][DECIDE] Assessing attack strategies...`);

      // 1. Detect and handle threats
      let threats = this.detectThreats();
      if (threats.hasThreats) {
        console.log(`[AI][DECIDE] Threats detected: ${threats.allThreats.length} threats.`);

        if (threats.hasCriticalObjectThreat && this.energy >= 30) {
          console.log(`[AI][DECIDE] Critical object threat detected. Attempting to destroy it.`);
          for (let j = 0; j < 3; j++) {
            this.queueAction('fireAt', threats.criticalObject);
          }
        }

        // Evade all detected threats
        let evadeDirection = this.calculateEvasionDirection(threats.allThreats);
        console.log(`[AI][EVADE] Evasion direction: ${JSON.stringify(evadeDirection)}`);
        this.queueMovement(evadeDirection);

      } else {
        console.log(`[AI][DECIDE] No immediate threats detected.`);
        // 2. No immediate threats
        if ((this.energy < 40) && (this.enemy.health > 15)) {
          console.log(`[AI][DECIDE] Energy low (${this.energy.toFixed(2)}).`);

          if (30 <= this.energy) {
            console.log(`[AI][DECIDE] Energy low. Wait for replenish.`);
          } else {
            // Move towards the closest energyOre to gain energy
            let closestEnergyOre = this.findClosestEnergyOre();
            if (closestEnergyOre) {
                console.log(`[AI][DECIDE] Closest energy ore at (${closestEnergyOre.x}, ${closestEnergyOre.y}). Moving towards it.`);

                this.moveTowardsObject(closestEnergyOre);
                for (let j = 0; j < 3; j++) {
                this.queueAction('fireAt', closestEnergyOre); // Attempt to destroy it to collect energy
                }
            } else {
                console.log(`[AI][DECIDE] No energy ore found. Proceeding to attack.`);

                // Move towards the enemy and attack
                this.moveTowardsEnemy();
                for (let j = 0; j < 3; j++) {
                this.queueAction('fireAt', this.enemy);
                }
            }
          }
        } else {
          console.log(`[AI][DECIDE] Energy healthy (${this.energy.toFixed(2)}). Moving towards enemy to attack.`);

          // Move towards the enemy and attack
          this.moveTowardsEnemy();
          for (let j = 0; j < 3; j++) {
            this.queueAction('fireAt', this.enemy);
          }
        }
      }

      // 3. Utilize tactic engine if advantageous
      if (this.shouldUseTacticEngineAttack()) {
        console.log(`[AI][DECIDE] Activating tactic engine.`);
        this.difficulty ++;
        this.queueAction('activateTacticEngine');
      }
    }

    executeActions() {
      while (this.actionQueue.length > 0) {
        this.currentAction = this.actionQueue.shift();
        switch (this.currentAction.type) {
          case 'move':
            this.simulateMovement(this.currentAction.direction, this.currentAction.duration);
            break;
          case 'fireAt':
            this.simulateFireAt(this.currentAction.target);
            break;
          case 'activateTacticEngine':
            this.simulateTacticEngine();
            break;
          default:
            break;
        }
      }
    }

    simulateMovement(direction, duration = 500) {
      // Log the movement simulation
      console.log(`[AI][MOVE] Simulating movement directions: ${JSON.stringify(direction)} for ${duration}ms.`);

      // Direction is an object { up: bool, down: bool, left: bool, right: bool }
      // Duration is in milliseconds; map duration to number of frames based on difficulty
      const frames = Math.max(Math.floor((duration / 1000) * 60 / (11 - this.difficulty)), 1); // Higher difficulty, fewer frames
      console.log(`[AI][MOVE] Calculated frames for movement: ${frames}`);

      for (let i = 0; i < frames; i++) {
        if (direction.up) game.aiKeysPressed.w = true;
        if (direction.down) game.aiKeysPressed.s = true;
        if (direction.left) game.aiKeysPressed.a = true;
        if (direction.right) game.aiKeysPressed.d = true;
      }
    }

    simulateFire() {
      let currentTime = millis();
      if (currentTime - this.bornTime > stateBufferTime) {
        console.log(`[AI][FIRE] Simulating space key press for firing laser.`);
        // Simulate pressing the space key
        game.aiKeysPressed.space = true;
      } else {
        console.log(`[AI][CEASEFIRE] AI Waiting For Game Loading.`);
      }
    }

    simulateFireAt(target) {
      // Calculate distance to target before deciding to fire
      let distance = dist(this.x, this.y, target.x, target.y);
      console.log(`[AI][FIRE_AT] Distance to target (${target.type}): ${distance.toFixed(2)}.`);

      if (distance <= this.firingRange) {
        console.log(`[AI][FIRE_AT] Target within firing range (${this.firingRange}). Firing laser.`);
        // Target is close enough; simulate firing
        this.simulateFire();
      } else {
        console.log(`[AI][FIRE_AT] Target out of firing range (${this.firingRange}). Skipping fire.`);
        // Optional: Implement alternative actions if target is out of range
      }
    }

    simulateTacticEngine() {
      console.log(`[AI][TACTIC_ENGINE] Simulating 'x' key press for tactic engine activation.`);
      // Simulate pressing the 'x' key
      game.aiKeysPressed.x = true;
    }

    queueMovement(direction) {
      // console.log(`[AI][QUEUE] Queuing movement: ${JSON.stringify(direction)}.`);
      this.actionQueue.push({ type: 'move', direction: direction, duration: 500 });
    }

    queueAction(actionType, target = null) {
      if (actionType === 'fireAt' && target) {
        // console.log(`[AI][QUEUE] Queuing fireAt action for target: ${target.type} at (${target.x}, ${target.y}).`);
        this.actionQueue.push({ type: actionType, target: target });
      } else {
        // console.log(`[AI][QUEUE] Queuing action: ${actionType}.`);
        this.actionQueue.push({ type: actionType });
      }
    }

    detectThreats() {
      let threatsFound = false;
      let criticalObjectThreat = null;
      let allThreats = [];

      const laserThreatRange = 5 * this.difficulty; // Adjustable based on difficulty
      const objectThreatRange = 25 * this.difficulty; // Larger range for objects

      // Detect laser threats
      for (let laser of game.enemyLaser) {
        let distance = dist(this.x, this.y, laser.x, laser.y);
        if (distance < laserThreatRange) {
          threatsFound = true;
          allThreats.push(laser);
          // console.log(`[AI][DETECT] Laser threat detected at (${laser.x}, ${laser.y}) within range ${laserThreatRange}.`);
        }
      }

      // Detect object threats
      for (let obj of game.objects) {
        let distance = dist(this.x, this.y, obj.x, obj.y);
        if (distance < objectThreatRange) {
          // Additionally check z-axis proximity
          if ((obj.z - this.z) < 200) { // Threshold for z-axis proximity
            threatsFound = true;
            criticalObjectThreat = obj;
            allThreats.push(obj);
            // console.log(`[AI][DETECT] Critical object threat detected: ${obj.type} at (${obj.x}, ${obj.y}) within range ${objectThreatRange} and z-proximity.`);
          } else {
            threatsFound = true;
            allThreats.push(obj);
            // console.log(`[AI][DETECT] Object threat detected: ${obj.type} at (${obj.x}, ${obj.y}) within range ${objectThreatRange}.`);
          }
        }
      }

      return {
        hasThreats: threatsFound,
        hasCriticalObjectThreat: criticalObjectThreat !== null,
        criticalObject: criticalObjectThreat,
        allThreats: allThreats
      };
    }

    calculateEvasionDirection(threats) {
      // Determine evasion direction based on all threats
      let moveX = 0;
      let moveY = 0;

      for (let threat of threats) {
        if (threat.z > -2000) {
          let angle = atan2(this.y - threat.y, this.x - threat.x);
          moveX += cos(angle);
          moveY += sin(angle);
          console.log(`[AI][EVADE] Calculating evasion for threat at (${threat.x}, ${threat.y}).
                        Angle: ${angle.toFixed(2)} radians.`);
        }
      }

      // Normalize and determine direction
      if (moveX > 0.5) moveX = 1;
      else if (moveX < -0.5) moveX = -1;
      else moveX = 0;

      if (moveY > 0.5) moveY = 1;
      else if (moveY < -0.5) moveY = -1;
      else moveY = 0;

      return {
        up: moveY === 1,
        down: moveY === -1,
        left: moveX === -1,
        right: moveX === 1
      };
    }

    findClosestEnergyOre() {
      let energyOres = game.objects.filter(obj => obj.type === 'energyOre'); // Assuming objects have a 'type' property
      if (energyOres.length === 0) {
        console.log(`[AI][ENERGY] No energy ore available to collect.`);
        return null;
      }

      let closest = energyOres[0];
      let minDistance = dist(this.x, this.y, closest.x, closest.y);

      for (let ore of energyOres) {
        let distance = dist(this.x, this.y, ore.x, ore.y);
        if (distance < minDistance) {
          closest = ore;
          minDistance = distance;
        }
      }

      console.log(`[AI][ENERGY] Closest energy ore found at (${closest.x}, ${closest.y}) with distance ${minDistance.toFixed(2)}.`);
      return closest;
    }

    moveTowardsObject(target) {
      // Determine direction towards the target object
      let dx = target.x - this.x;
      let dy = target.y - this.y;

      let direction = {
        up: dy < 20,
        down: dy > -20,
        left: dx < -20,
        right: dx > 20
      };

      console.log(`[AI][MOVE_TO_OBJECT] Moving towards ${target.type} at (${target.x}, ${target.y}). Direction: ${JSON.stringify(direction)}.`);
      this.queueMovement(direction);
    }

    moveTowardsEnemy() {
      // Determine direction towards the enemy
      let dx = this.enemy.x - this.x;
      let dy = this.enemy.y - this.y;

      let direction = {
        up: dy < 20,
        down: dy > -20,
        left: dx < -20,
        right: dx > 20
      };

      console.log(`[AI][MOVE_TO_ENEMY] Moving towards enemy at (${this.enemy.x}, ${this.enemy.y}). Direction: ${JSON.stringify(direction)}.`);
      this.queueMovement(direction);
    }

    shouldUseTacticEngineSurvival() {
      // Abandoned method
    }

    shouldUseTacticEngineAttack() {
      // Decide whether to activate tactic engine based on attack advantage
      if (!this.tacticEngineUsed) {
        if (this.health < 30) {
          console.log(`[AI][TACTIC_ENGINE] Conditions met for tactic engine activation (Health: ${this.health}, Energy: ${this.energy}).`);
          return true;
        }
        if (this.model === assets.models.playerShip2) {
          // Additional condition: If enemy health is low and need more energy to destroy it
          if (game.enemy.health < 30 && this.energy < 50) {
            console.log(`[AI][TACTIC_ENGINE] Condition met for playerShip2: Enemy health is low (${game.enemy.health}).`);
            return true;
          }
        }
      }
      return false;
    }

    render() {
      // Add indicators or different visuals for ComputerPlayer
      super.render();
      // Draw AI status
      push();
      fill(255);
      textFont(assets.fonts.ps2p);
      textSize(12);
      textAlign(LEFT, TOP);
      text(`X: ${this.x.toFixed(1)}`+`Y: ${this.y.toFixed(1)}`, this.x - 50, this.y - 75);
      text(`AI Difficulty: ${this.difficulty}`, this.x - 50, this.y - 60);
      if (this.currentAction != null) {
        text(`Behavior: ${this.currentAction.type}`, this.x - 50, this.y - 45);
      }
      pop();
    }
  }
Servo Motion Control
Commands from the AI are translated into servo movements to control the robot hand:
- Command Translation:
- Process: Maps AI decisions to corresponding servo angles, ensuring accurate physical representations of game inputs.
- Async Update:
- Outcome: Ensures that physical actions performed by the robot hand are crowded out by serial communication while keeping in sync with the game’s digital state.
class RobotHandController {
    constructor() {
      this.lastUpdateTime = millis();
    }

    init() {
      //
    }

    update() {
      // Update finger bends to Arduino
      this.updateFingerAngles();
    }

    // Update Fingers according to the virtual keys
    updateFingerAngles() {
      // Stop function if no serial connections
      if (!serialActive) return;

      let currentTime = millis();

      const keys = ['w', 'a', 's', 'd', 'space', 'x'];
      const angles = [30, 50, 50, 60, 75, 70]; // Different angles for each key

      for (let i = 0; i < 6; i++) {
        if (game.aiKeysPressed[keys[i]] === true) {
          if (fingerAngles[i] != angles[i]) {
            fingerAngles[i] = angles[i];
          }
        }
      }

      // Send data every second
      if (frameCount % 120 === 0) {
        this.sendAngles(fingerAngles);

        // Schedule Release
        setTimeout(() => {
          console.log('reached')
          this.sendAngles(fingerDefaultAngles);
        }, 2000 / 2);
      }

      this.lastUpdateTime = currentTime;

    }

    // Send Current Angles to Arduino via Serial
    sendAngles(angles) {
      if (serialActive) {
        let message = angles.join(",") + "\n";
        writeSerial(message);
        console.log("Sent to Arduino:", message.trim());
      }
    }
}

/*
function readSerial(data) {
  // Handle incoming data from Arduino
  // For this project, we primarily send data to Arduino
}
  */
4. Project Highlights
Network Communication
- Real-Time Synchronization: Successfully implemented real-time data exchange between clients using Node.js and Socket.io.
- Robust Server Setup: Developed a stable local server that handles multiple connections.
Physical Installation
- Robot Hand Fabrication: Crafted a functional robot hand using 3D printing, hot-glued hinges, and fishing line tendons.
- Servo Integration: Connected and controlled multiple servos via Arduino to simulate human key presses.
AI Player Algorithm
- Dynamic Threat Handling: Developed an AI that intelligently detects and responds to multiple simultaneous threats, prioritizing evasion and strategic attacks based on predefined behavior modes.
5. Future Improvements
Strengthening the Robot Hand
- Enhanced Strength: Upgrade materials and servo to increase the robot hand’s strength and responsiveness, realizing actual control over the physical buttons.
Network Communication Structure
- Peer-to-Peer Networking: Transition from a broadcast-based communication model to a peer-to-peer (P2P) architecture, facilitating support for more than two players and reducing server dependencies.