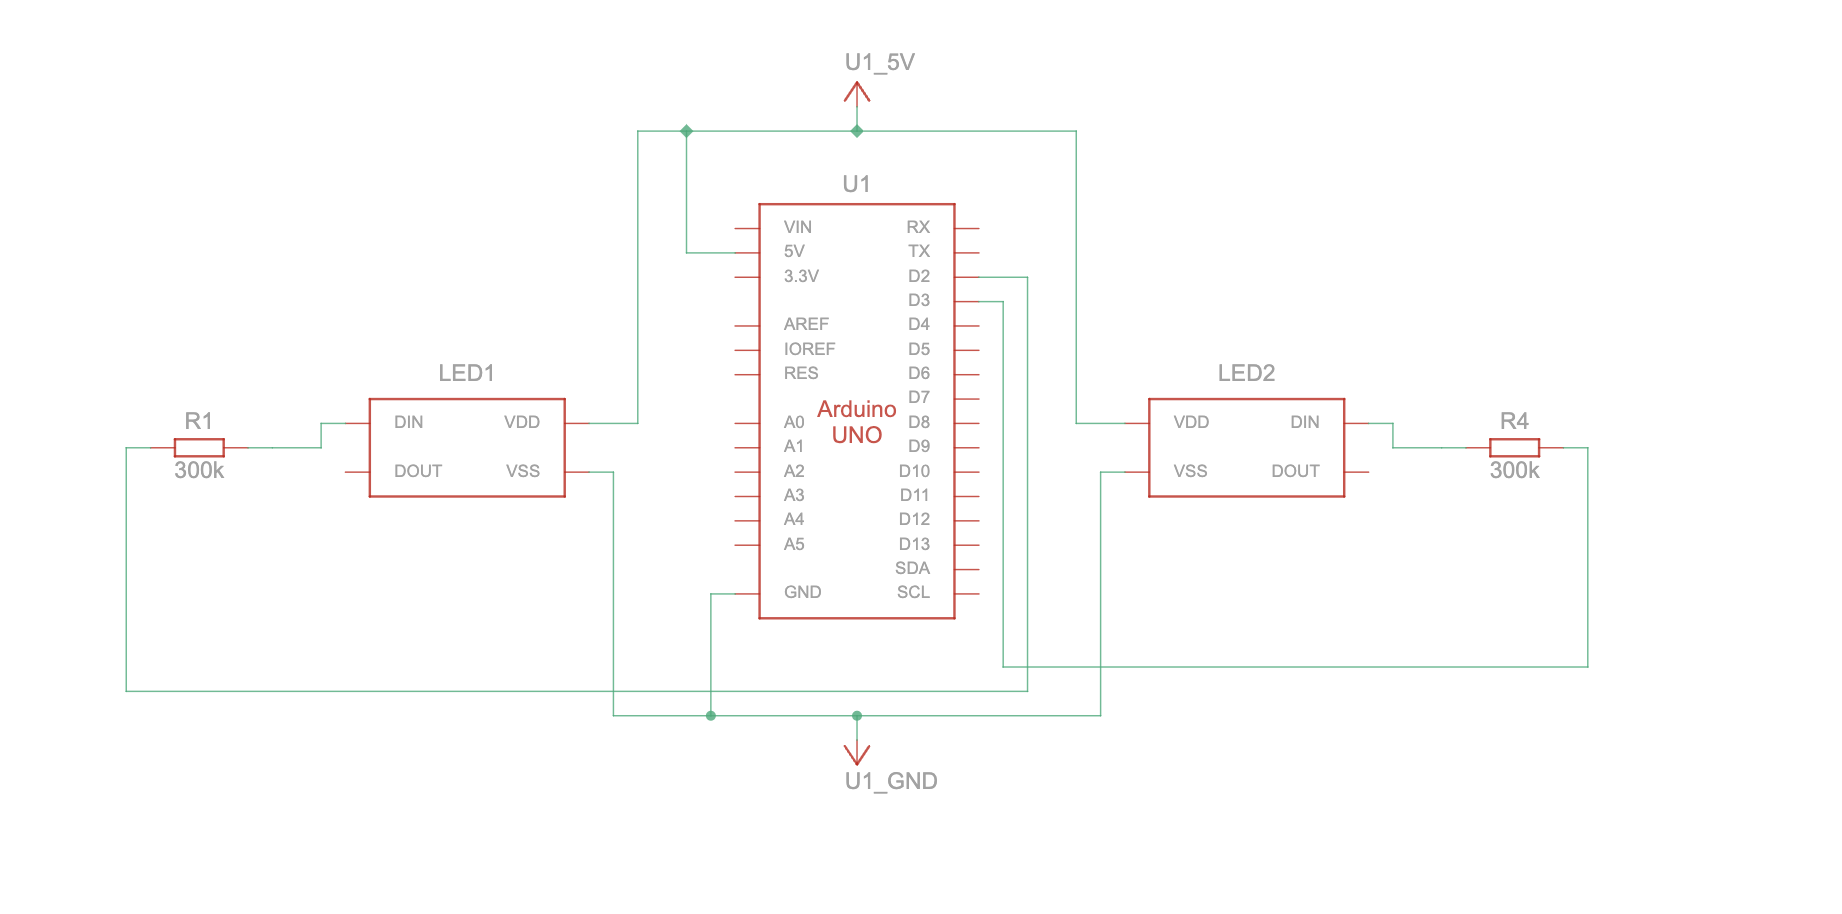
EXERCISE 01: ARDUINO TO P5 COMMUNICATION
Make something that uses only one sensor on arduino and makes the ellipse in p5 move on the horizontal axis, in the middle of the screen, and nothing on arduino is controlled by p5.
The ball moves to the left when it’s dark; to the right when it’s bright.

- Please find the demonstration video here
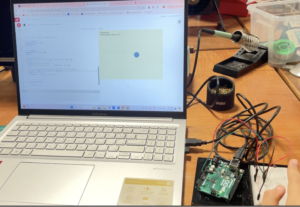
Exercise 1
- Please find the p5.js sketch here
let port, reader, writer;
let serialActive = false;
async function getPort(baud = 9600) {
let port = await navigator.serial.requestPort();
await port.open({ baudRate: baud });
// create read & write streams
textDecoder = new TextDecoderStream();
textEncoder = new TextEncoderStream();
readableStreamClosed = port.readable.pipeTo(textDecoder.writable);
writableStreamClosed = textEncoder.readable.pipeTo(port.writable);
reader = textDecoder.readable
.pipeThrough(new TransformStream(new LineBreakTransformer()))
.getReader();
writer = textEncoder.writable.getWriter();
return { port, reader, writer };
}
class LineBreakTransformer {
constructor() {
this.chunks = "";
}
transform(chunk, controller) {
this.chunks += chunk;
const lines = this.chunks.split("\r\n");
this.chunks = lines.pop();
lines.forEach((line) => controller.enqueue(line));
}
flush(controller) {
controller.enqueue(this.chunks);
}
}
async function setUpSerial() {
noLoop();
({ port, reader, writer } = await getPort());
serialActive = true;
runSerial();
loop();
}
async function runSerial() {
try {
while (true) {
const { value, done } = await reader.read();
if (done) {
reader.releaseLock();
break;
}
readSerial(value);
}
} catch (e) {
console.error(e);
}
}
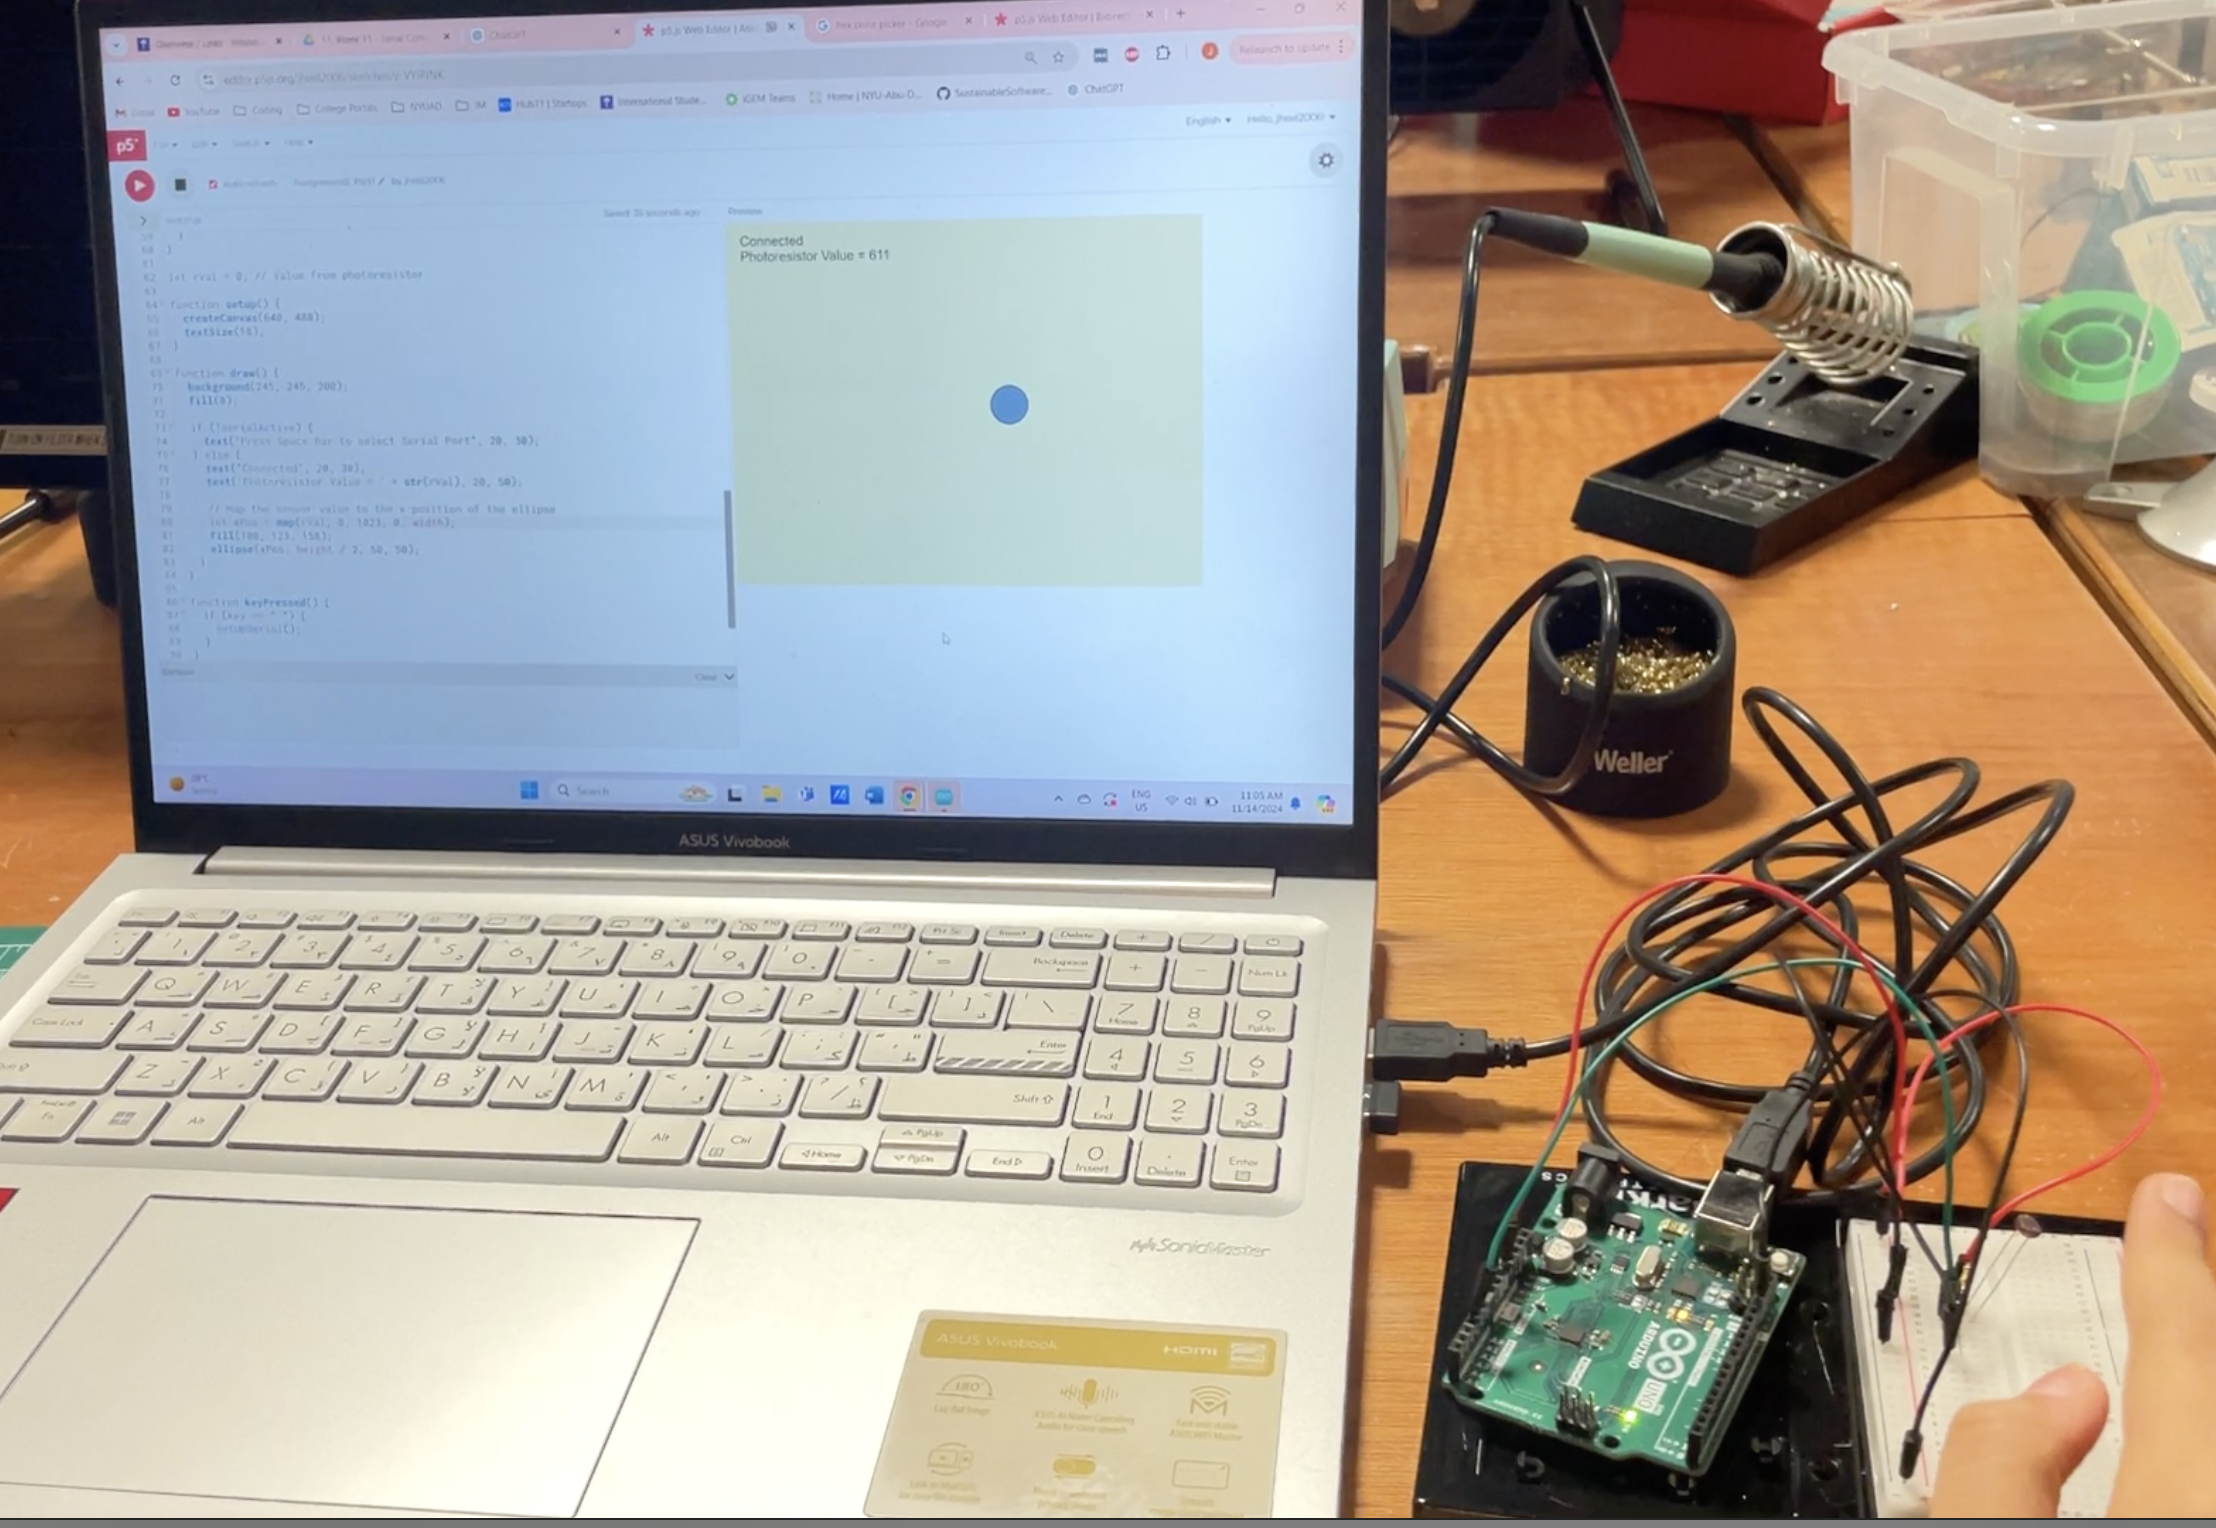
let rVal = 0; // Value from photoresistor
function setup() {
createCanvas(640, 480);
textSize(18);
}
function draw() {
background(245, 245, 200);
fill(0);
if (!serialActive) {
text("Press Space Bar to select Serial Port", 20, 30);
} else {
text("Connected", 20, 30);
text('Photoresistor Value = ' + str(rVal), 20, 50);
// Map the sensor value to the x-position of the ellipse
let xPos = map(rVal, 0, 1023, 0, width);
fill(100, 123, 158);
ellipse(xPos, height / 2, 50, 50);
}
}
function keyPressed() {
if (key == " ") {
setUpSerial();
}
}
function readSerial(data) {
if (data != null) {
let fromArduino = trim(data); // Remove any whitespace
rVal = int(fromArduino); // Convert the string to an integer
}
}
void setup() {
  // put your setup code here, to run once:
  Serial.begin(9600);
}


void loop() {
  // put your main code here, to run repeatedly:
  int sensorValue = analogRead (A2);
  Serial.println (sensorValue);
  Serial.write(sensorValue);
  delay (1);
}
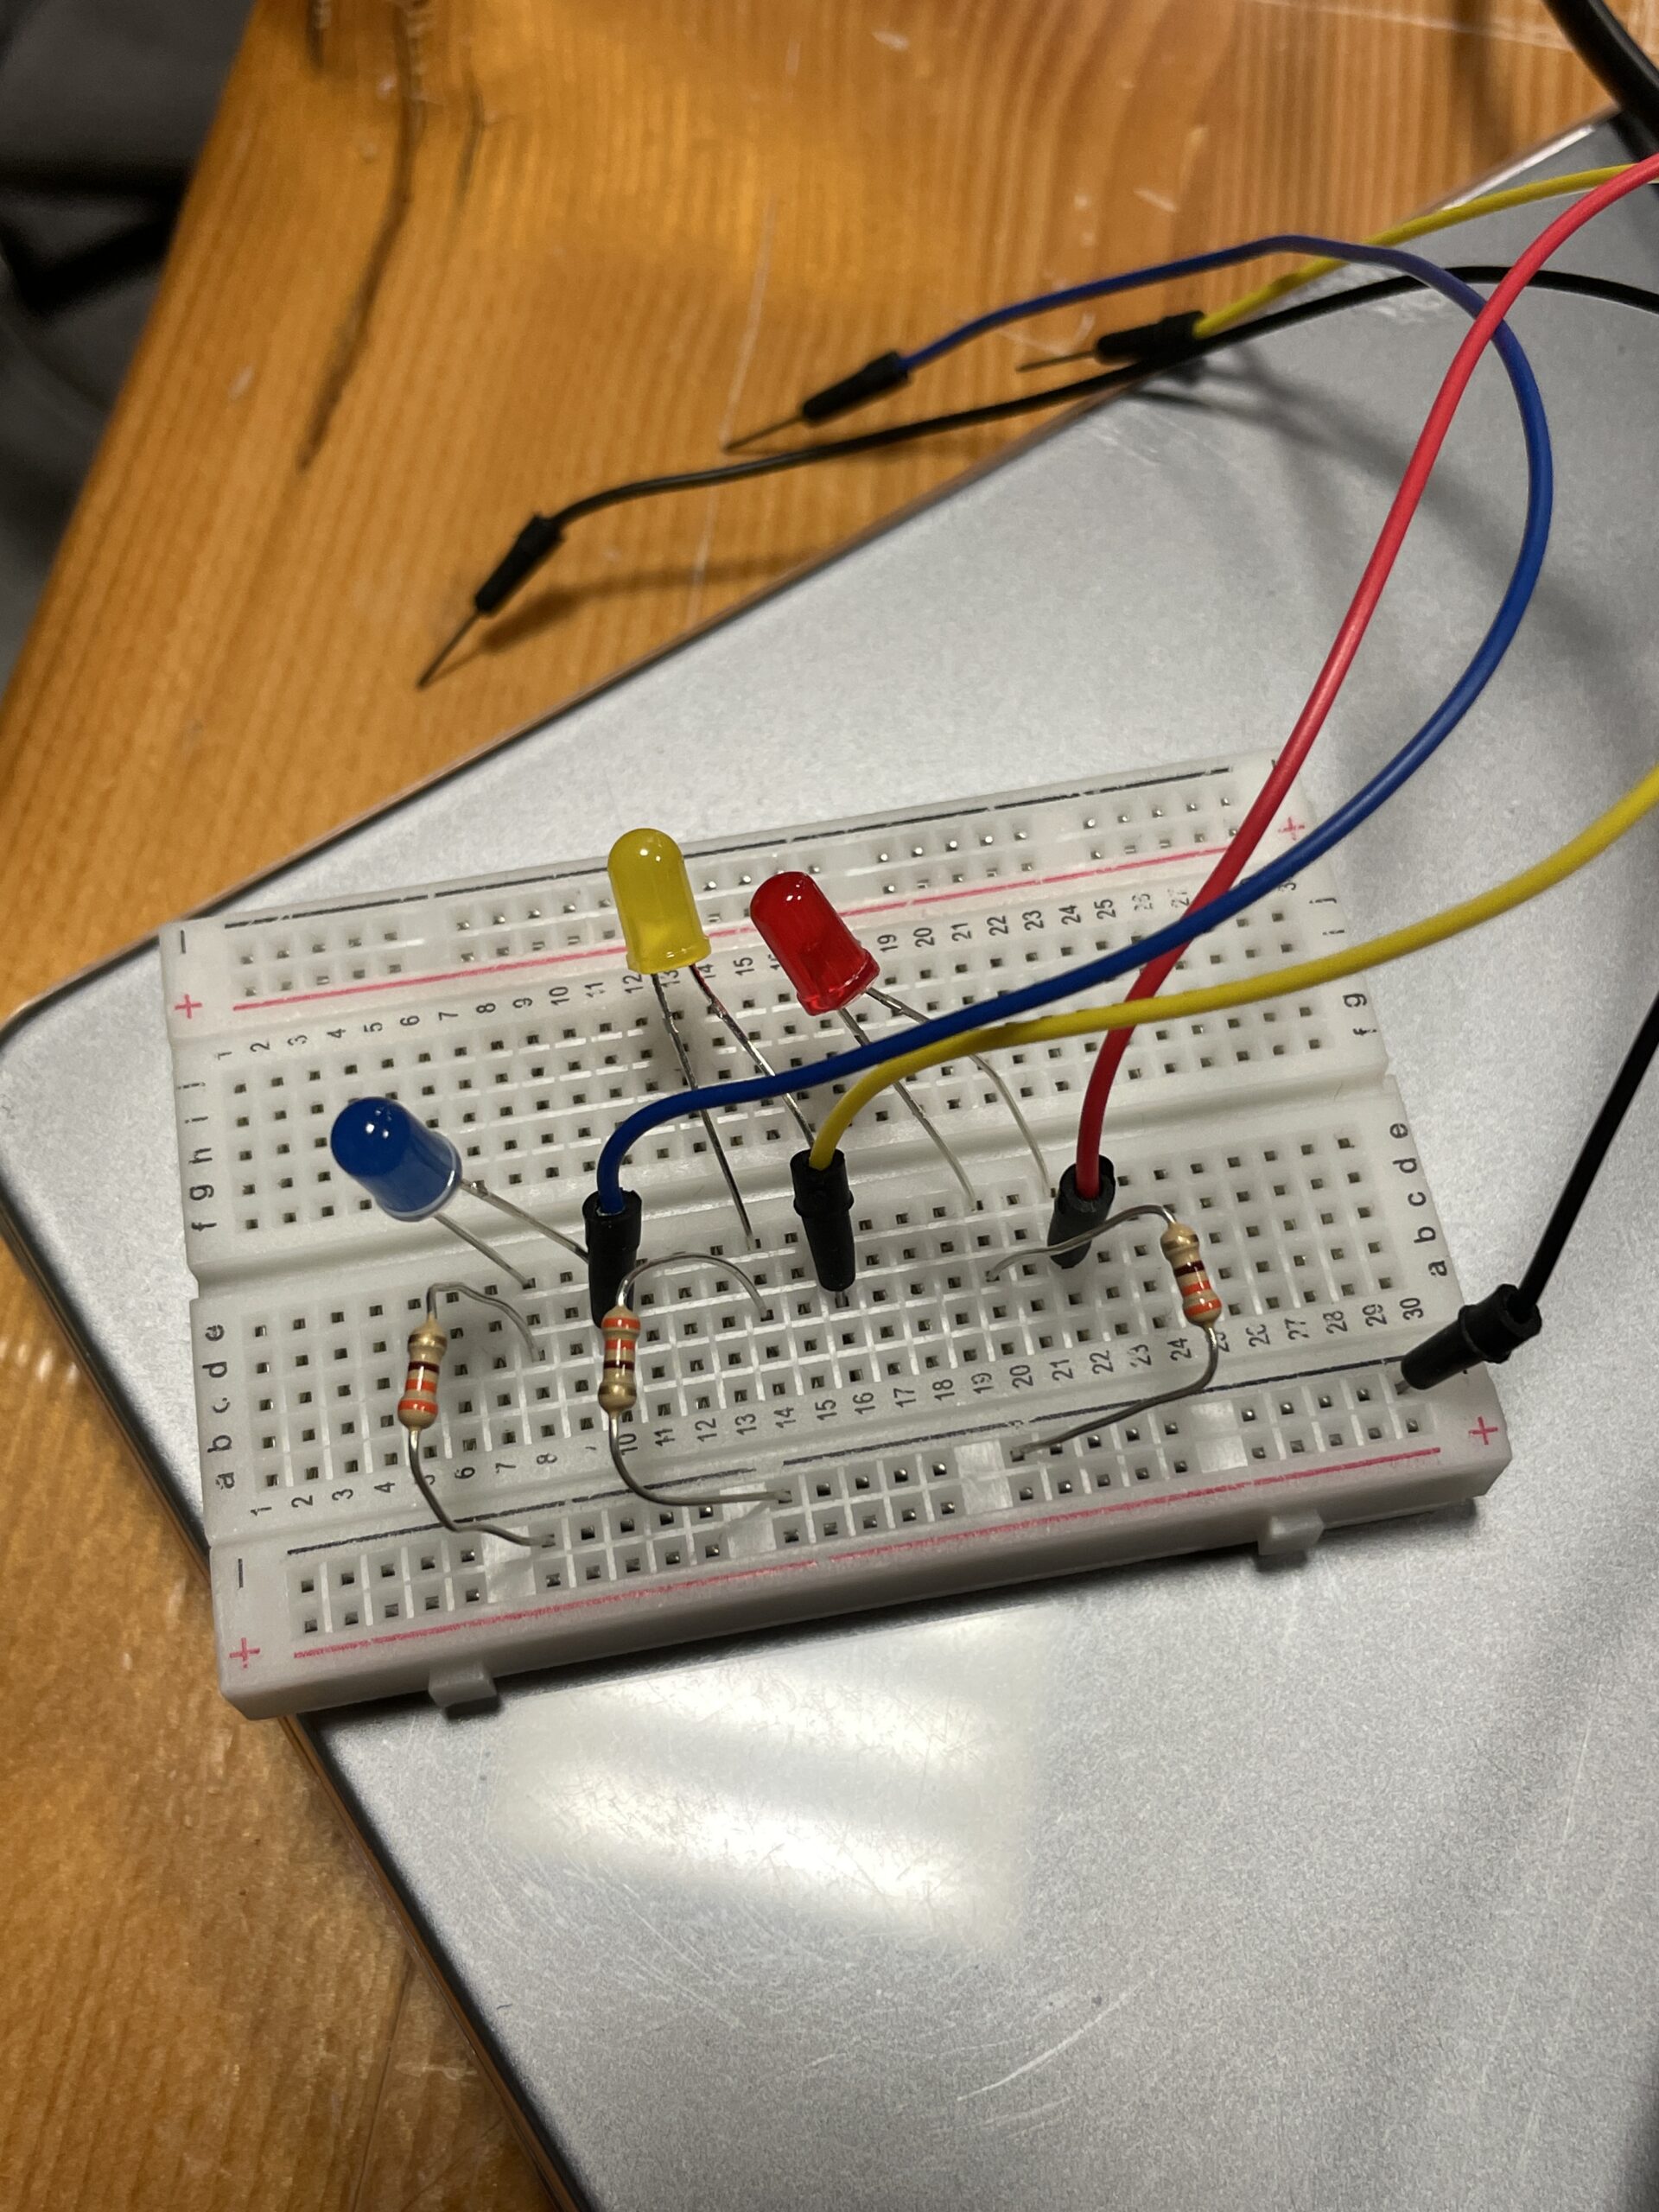
EXERCISE 02: P5 TO ARDUINO COMMUNICATION
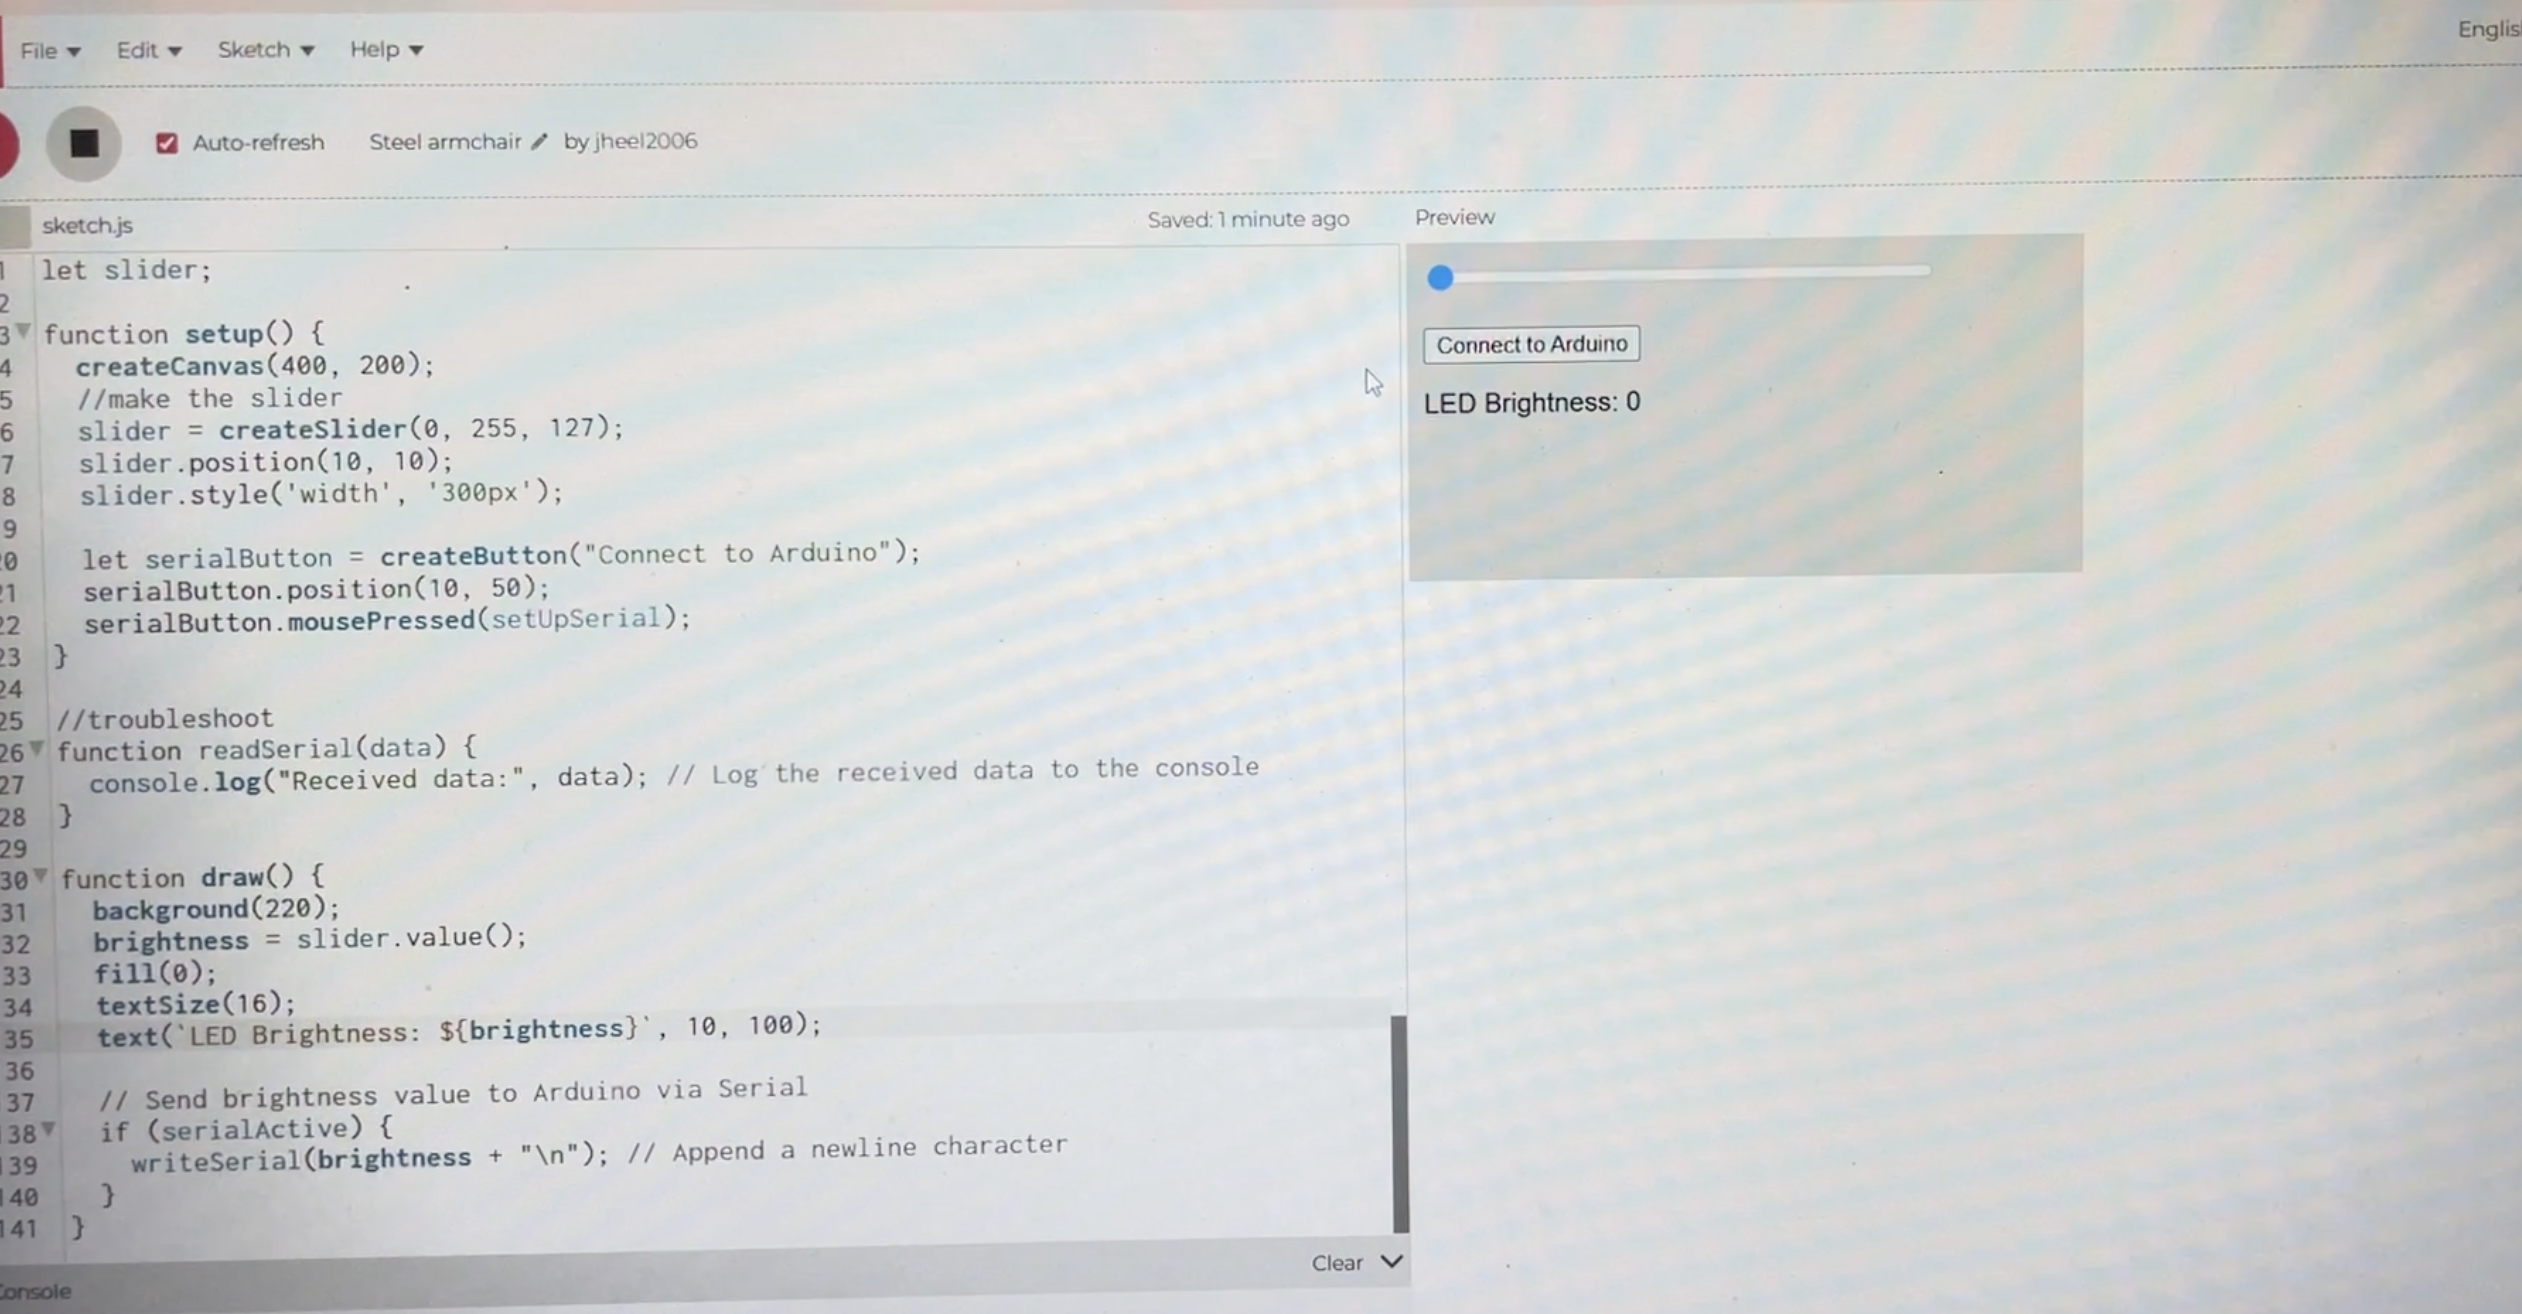
Make something that controls the LED brightness from p5.
- LED brightness changes according to the slider.
- Please find the demonstration video here
Exercise 2
- Please find the p5.js sketch here
let brightness = 0;
let slider;

function setup() {
  createCanvas(400, 200);
  //make the slider
  slider = createSlider(0, 255, 127);
  slider.position(10, 10);
  slider.style('width', '300px');

  let serialButton = createButton("Connect to Arduino");
  serialButton.position(10, 50);
  serialButton.mousePressed(setUpSerial);
}

//troubleshoot
function readSerial(data) {
  console.log("Received data:", data); // Log the received data to the console
}

function draw() {
  background(220);
  brightness = slider.value();
  fill(0);
  textSize(16);
  text(`LED Brightness: ${brightness}`, 10, 100);

  // Send brightness value to Arduino via Serial
  if (serialActive) {
    writeSerial(brightness + "\n"); // Append a newline character
  }
}
int ledPin = 9; // PWM pin connected to LED

void setup() {
  Serial.begin(9600);
  pinMode(ledPin, OUTPUT);
}

void loop() {
  int bright;

  if (Serial.available() > 0) {
    bright = Serial.parseInt();
    analogWrite(ledPin, bright);
  }
}
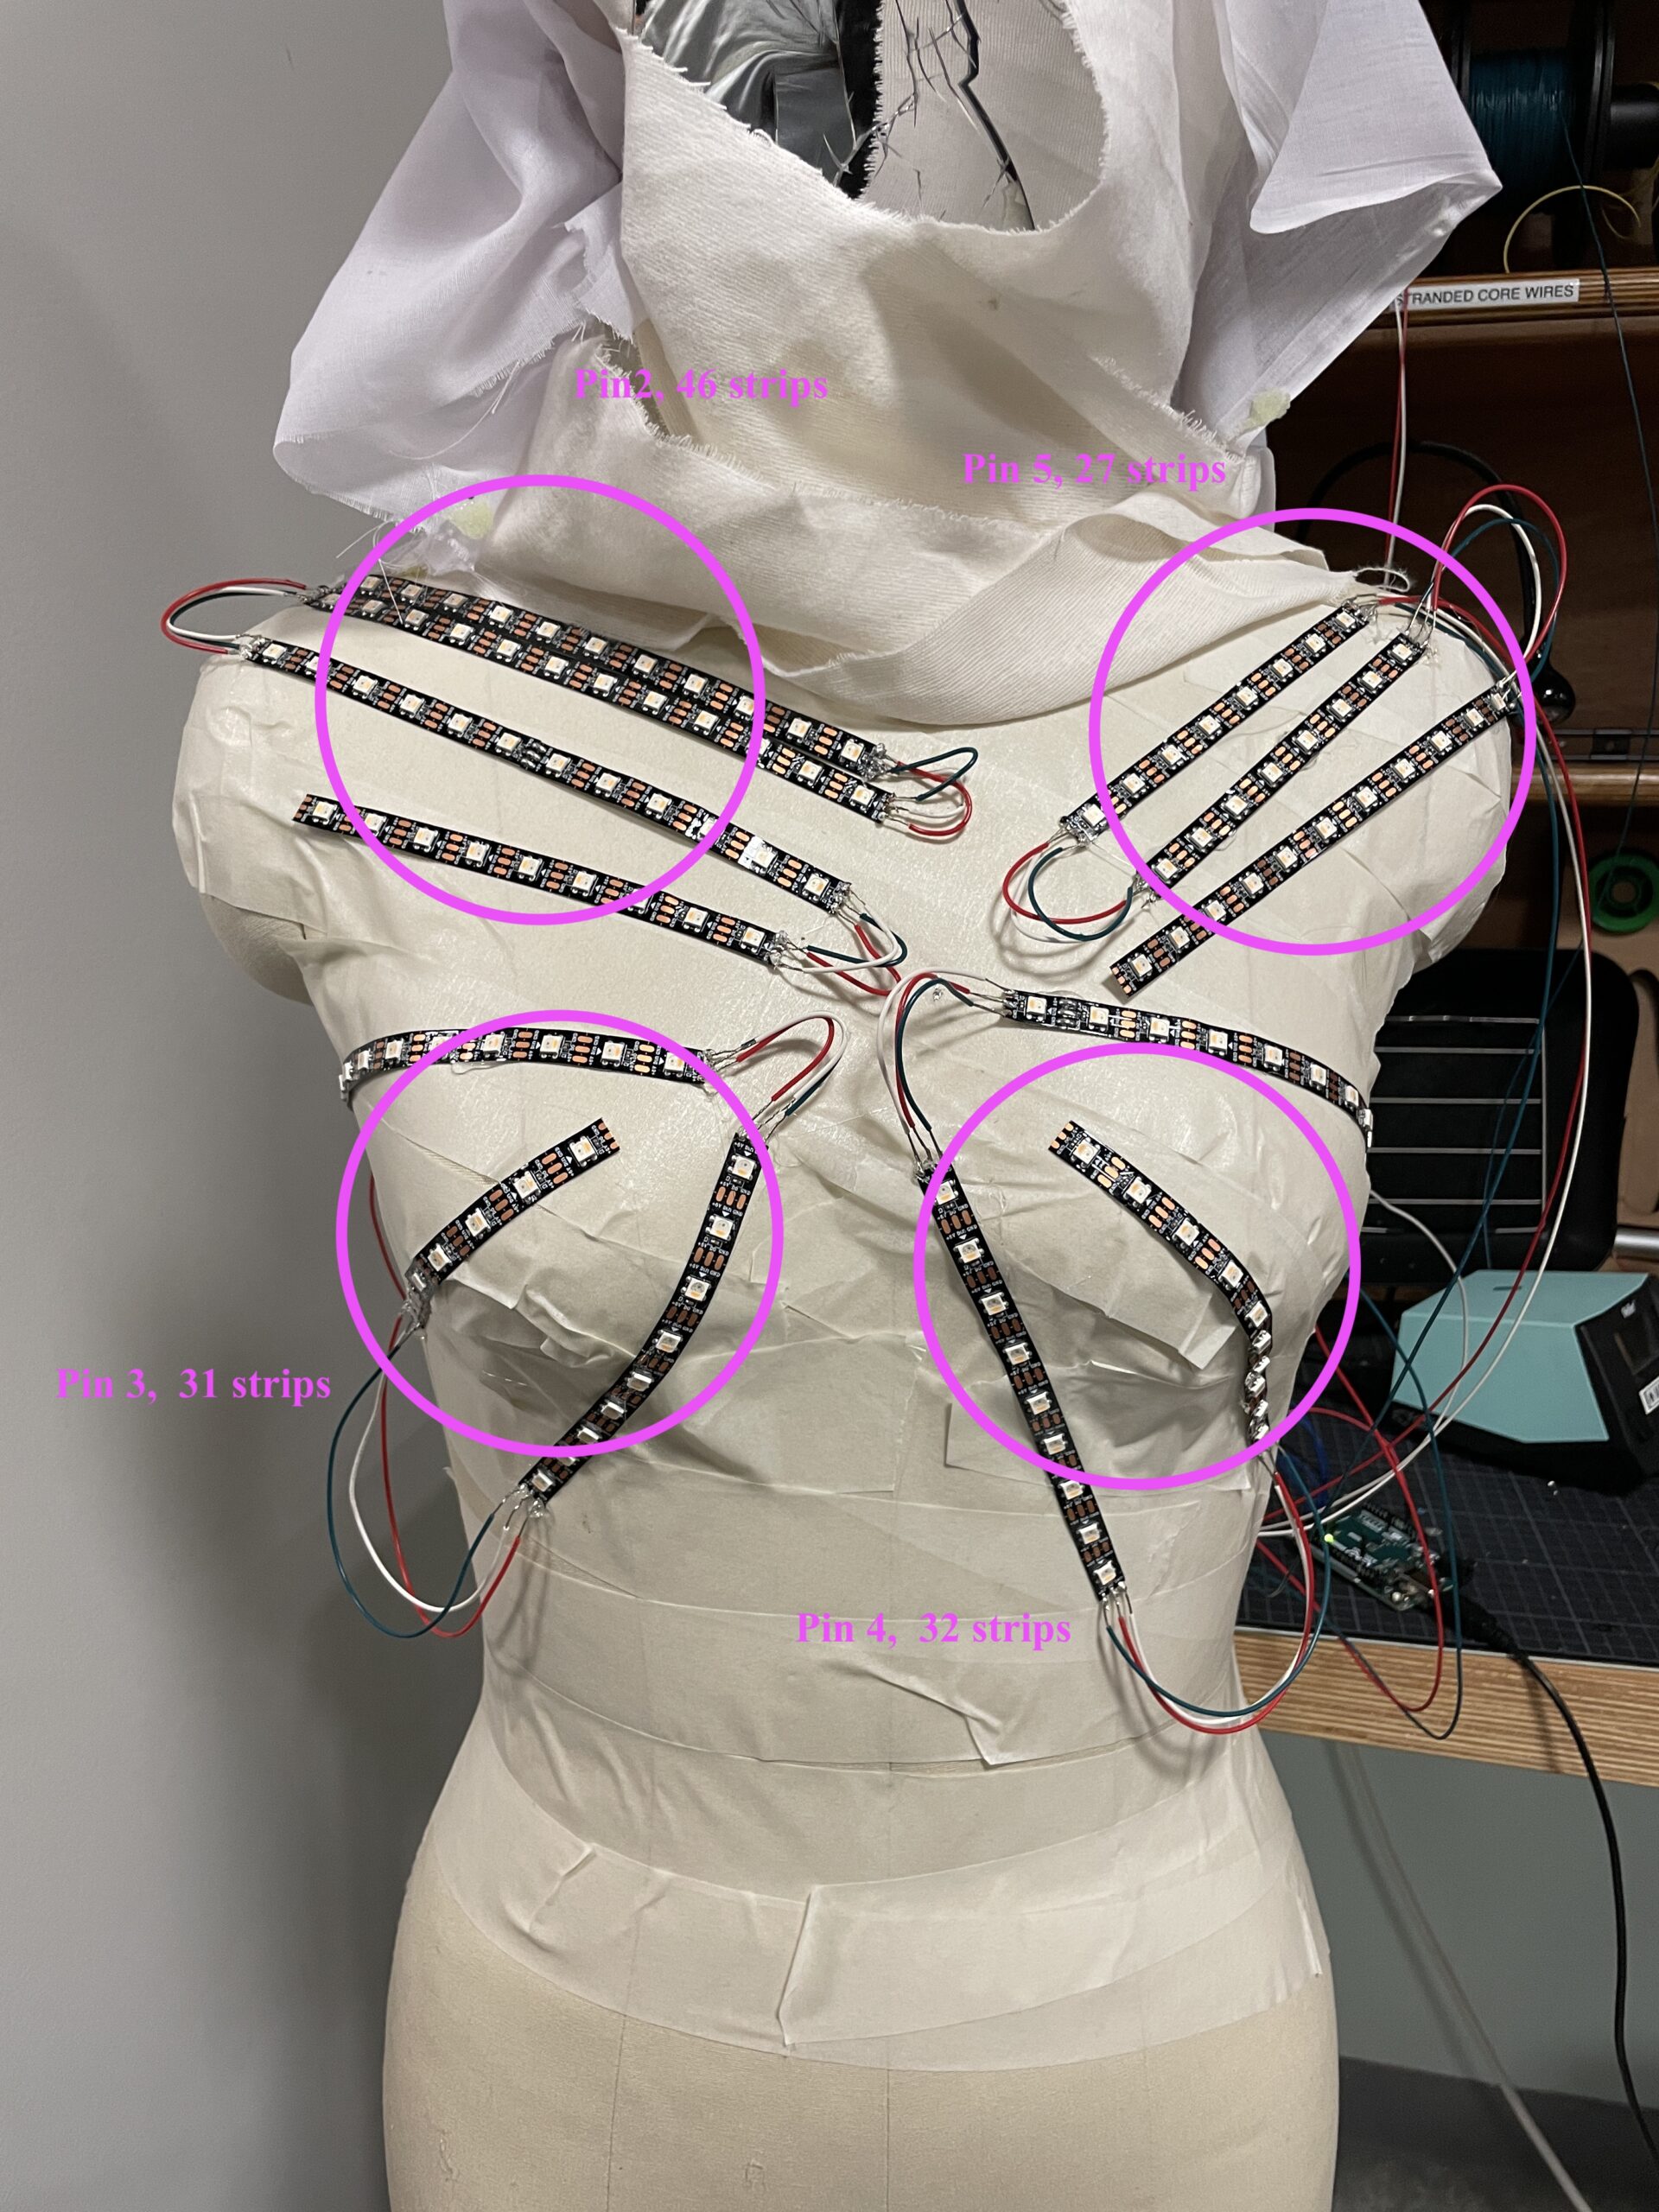
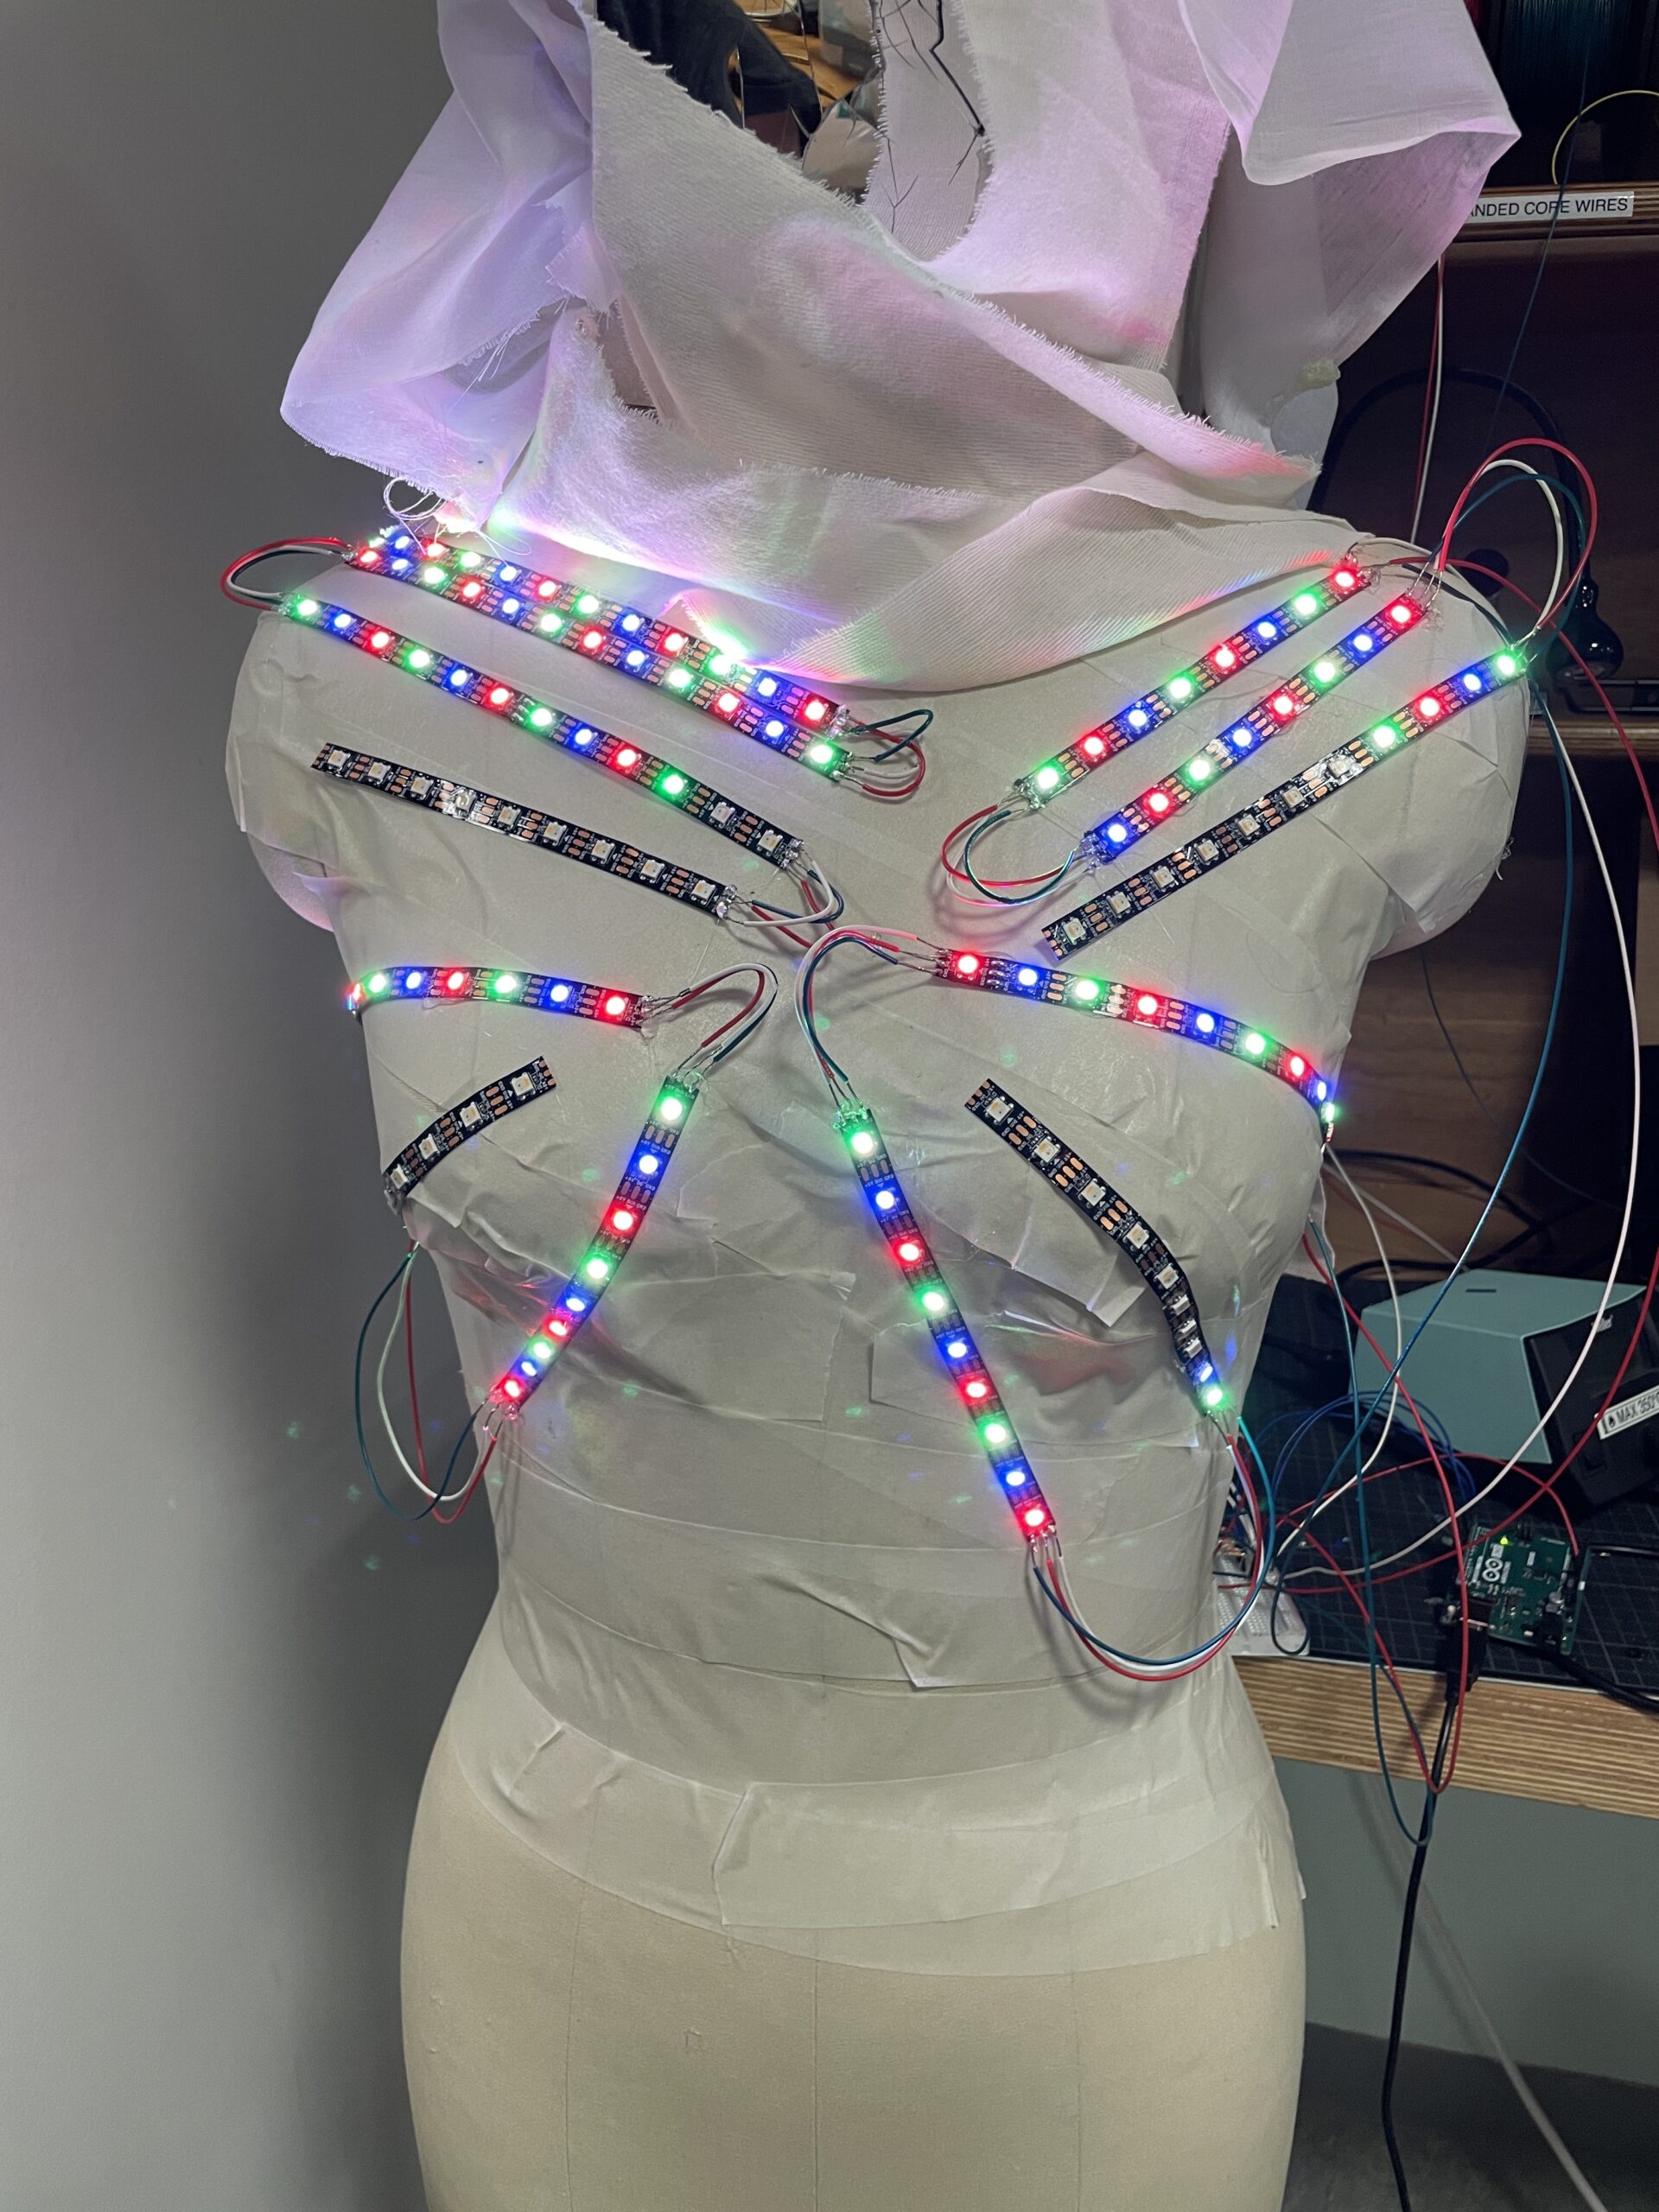
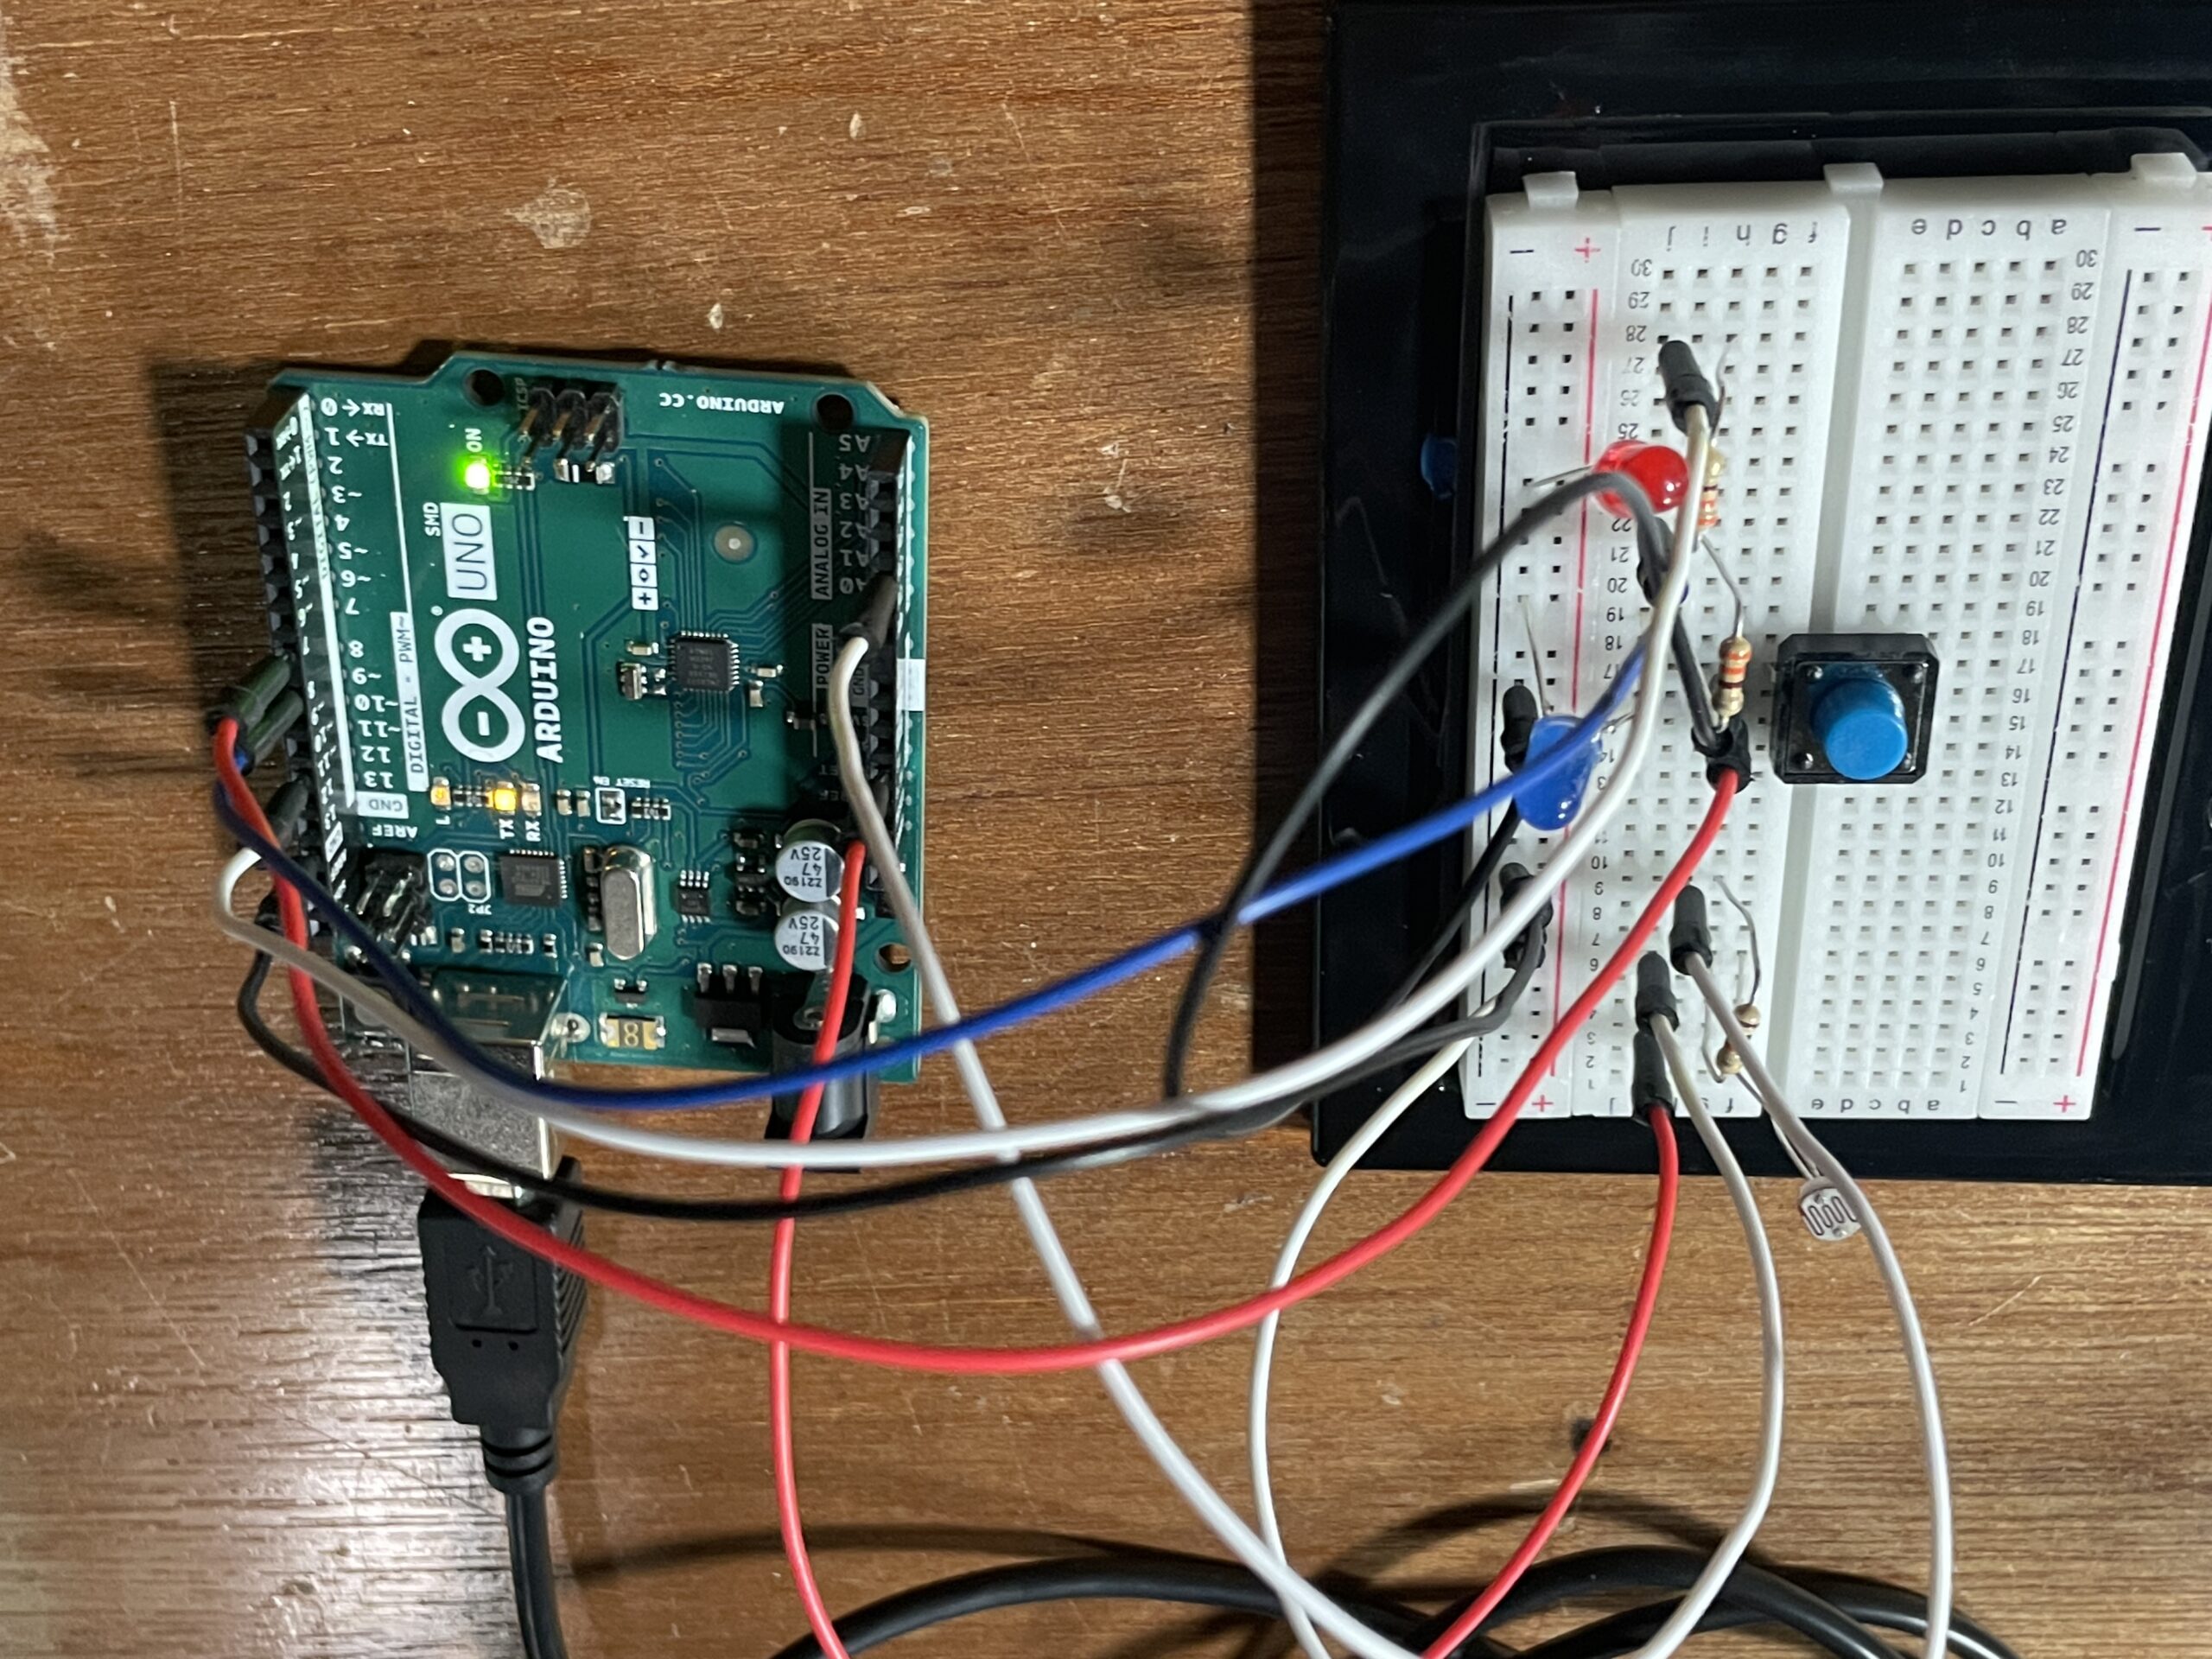
EXERCISE 03: BI-DIRECTIONAL COMMUNICATION
Every time the ball bounces one led lights up and then turns off, and you can control the wind from one analog sensor
Please find the demonstration video here
Please find the p5
let port, reader, writer;
let serialActive = false;

async function getPort(baud = 9600) {
  let port = await navigator.serial.requestPort();
  await port.open({ baudRate: baud });

  // create read & write streams
  textDecoder = new TextDecoderStream();
  textEncoder = new TextEncoderStream();
  readableStreamClosed = port.readable.pipeTo(textDecoder.writable);
  writableStreamClosed = textEncoder.readable.pipeTo(port.writable);

  reader = textDecoder.readable
    .pipeThrough(new TransformStream(new LineBreakTransformer()))
    .getReader();
  writer = textEncoder.writable.getWriter();

  return { port, reader, writer };
}

class LineBreakTransformer {
  constructor() {
    this.chunks = "";
  }

  transform(chunk, controller) {
    this.chunks += chunk;
    const lines = this.chunks.split("\r\n");
    this.chunks = lines.pop();
    lines.forEach((line) => controller.enqueue(line));
  }

  flush(controller) {
    controller.enqueue(this.chunks);
  }
}

async function setupSerial() {
  noLoop();
  ({ port, reader, writer } = await getPort());
  serialActive = true;
  runSerial();
  loop();
}

async function runSerial() {
  try {
    while (true) {
      const { value, done } = await reader.read();
      if (done) {
        reader.releaseLock();
        break;
      }
      readSerial(value);
    }
  } catch (e) {
    console.error(e);
  }
}


////////////////////////////////////////////////////////////

let velocity;
let gravity;
let position;
let acceleration;
let wind;
let drag = 0.99;
let mass = 50;
let windSpeed;


function setup() {
  createCanvas(640, 360);
  noFill();
  position = createVector(width / 2, 0);
  velocity = createVector(0, 0);
  acceleration = createVector(0, 0);
  gravity = createVector(0, 0.5 * mass);
  wind = createVector(0, 0);
  textSize(16);
}

function draw() {
  background(0);

  if (serialActive){
    wind.x = map(windSpeed, 0, 1023, -1, 1);
  }
  applyForce(wind);
  applyForce(gravity);
  velocity.add(acceleration);
  velocity.mult(drag);
  position.add(velocity);
  acceleration.mult(0);
  ellipse(position.x, position.y, mass, mass);
  console.log("Wind Speed: " + windSpeed); // For debugging

  if (position.y > height - mass / 2) {
    velocity.y *= -0.9; // A little dampening when hitting the bottom
    position.y = height - mass / 2;

    // Send signal to Arduino on bounce
    if (serialActive) {
      sendBounceSignal();
    }
  }

  if (!serialActive) {
    fill(255);
    text("Press SPACE to connect to Serial Port", 20, 30);
  } else {
    fill(0, 255, 0);
    text("Connected to Serial Port", 20, 30);
  }
}

function applyForce(force) {
  // Newton's 2nd law: F = M * A or A = F / M
  let f = p5.Vector.div(force, mass);
  acceleration.add(f);
}

function keyPressed() {
  if (keyCode == LEFT_ARROW) {
    wind.x = -1;
  }
  if (keyCode == RIGHT_ARROW) {
    wind.x = 1;
  }
  if (key == " ") {
    if (!serialActive) {
      setupSerial();
    } else {
      mass = 50;
      position.y = -mass;
      velocity.mult(0);
    }
  }
}

async function setupSerial() {
  try {
    noLoop();
    // ({ port, reader, writer } = await getPort());

    port = await navigator.serial.requestPort();
    await port.open({ baudRate: 9600 });


    // Create a TextDecoderStream to decode incoming bytes to text
    const textDecoder = new TextDecoderStream();
    const readableStreamClosed = port.readable.pipeTo(textDecoder.writable);

    // Create the reader to read from the decoded text stream
    reader = textDecoder.readable
    .pipeThrough(new TransformStream(new LineBreakTransformer())) // Optional: split data by lines
    .getReader();

    writer = port.writable.getWriter();
    serialActive = true;
    // Start reading data after successfully opening the port
    runSerial();
    loop();
  } catch (err) {
    console.error("Serial connection failed:", err);
    serialActive = false;
  }
}

function readSerial(data) {
  if (data != null) {
    let fromArduino = trim(data); // Remove any whitespace
    console.log(data);
    if (fromArduino !== "") {
      fromArduino = parseInt(fromArduino, 10);
      windSpeed = int(fromArduino); // Convert the string to an integer

    }
  }
}


async function sendBounceSignal() {
  try {
    if (writer) {
      await writer.write(new TextEncoder().encode("bounce\n"));
    }
  } catch (err) {
    console.error("Failed to send bounce signal:", err);
  }
}
Please find the Arduino
let brightness = 0;
let slider;

function setup() {
  createCanvas(400, 200);
  //make the slider
  slider = createSlider(0, 255, 127);
  slider.position(10, 10);
  slider.style('width', '300px');

  let serialButton = createButton("Connect to Arduino");
  serialButton.position(10, 50);
  serialButton.mousePressed(setUpSerial);
}

//troubleshoot
function readSerial(data) {
  console.log("Received data:", data); // Log the received data to the console
}

function draw() {
  background(220);
  brightness = slider.value();
  fill(0);
  textSize(16);
  text(`LED Brightness: ${brightness}`, 10, 100);

  // Send brightness value to Arduino via Serial
  if (serialActive) {
    writeSerial(brightness + "\n"); // Append a newline character
  }
}