Object-oriented artwork

Concept –

I recently watched a documentary called Trainwreck: Woodstock ‘99 on Netflix about how the 1999 Woodstock recreation completely backfired in comparison to the iconic 1969 concert, and I heard a song from the documentary called Woodstock by the band Matthews’ Southern Comfort. This inspired me to create some randomly generated ‘peace & love’ themed artworks using object-oriented programming.

I created 3 pieces. 2 that randomly generate images and shapes every time you click the play button, and 1 that constantly adds images on a loop without stopping.

Code highlight –

function setup() {
  createCanvas(400, 400);
  background(255);
  for (let i = 0; i < 1000; i = i + 1) {
    // designates spots for random circles and images being generated (repetition); i is 0, it has to be less than 1000, it will move by 1 coordinate each time a shape is generated

    image(green2, random(width), random(height), 50, 50);
    image(blue1, random(width), random(height), 50, 50);
    image(smile, random(width), random(height), 50, 50);
    image(pink2, random(width), random(height), 50, 50);
  }
}

Embedded sketches–

Randomly generated artworks:

(every time you click the play button it will randomly generate a new piece)

(this one is my favorite)

I managed to maintain warmer hues for this artwork because I inputed the ‘i’ value into the fill for the ellipses.

Loop artwork:

Reflection and improvements –

  • I struggled mostly with the loop artwork, because every time an image was plotted, it was placed within a designated proximity of another image, and I couldn’t figure out how to change that to be more random. I even inputted the push and pop feature I learned from The Coding Train but that didn’t seem to change anything.
  • Trying to slow down the speed in which the images appeared in the loop artwork.
  • I feel that I need to figure out how to make more advanced pieces, but I don’t have enough knowledge to be able to execute what I imagine.
  • I’d also like to make something beyond randomization.
  • All the pieces I’ve made so far feel very 2D, I’d love to learn more about how to make my work feel more 3-dimensional.
  • Although The Coding Train videos do help, I feel that I need way more time and practice to learn how to code proficiently— or at least to the level of my peers. I don’t fully understand coding language yet— and trust me, I’M TRYING!

Michael Gary Scott on Twitter: "Whatever. I'm not gonna cry about it. I already did that in my car on the way home." / Twitter

Generative Art using Loops

My concept

I really love the randomizing feature on p5js, just because it means I don’t have to tediously designate a color for each shape when I make a creative piece and I enjoy the unpredictable aspect of it. I decided to create a repetitive grid-like piece with randomized colors that change every frame; no frame is similar to the last because the colors are randomly generated every time. I called my piece Aquatic Disco Ball because of the repetitive square shapes that are only colored with hues generated from the blue and green values, with the red value being on 0 the entire time.

Code highlight

Big shoutout to The Coding Train on YouTube. If you’re seeing this, I wouldn’t have been able to code loops without your tutorials :’)

// restrictions of the bigger squares -- loops
// horizontal: X1
for (var X1 = 8; X1 <= width; X1 += 32){ // variable X1 starts at point 8 (out of 400) on the x-axis; it cannot get exceed the width of the canvas; it adds 32 to the space between each square
// vertical: Y1
for (var Y1 = 8; Y1 <= height; Y1 += 32){ // variable Y1 starts at point 8 (out of 400) on the y-axis; it cannot get exceed the height of the canvas; it adds 32 to the space between each square
  
// restrictions of the smaller squares 
// horizontal: X2
for (var X2 = 8; X2 <= width; X2 += 32){ // variable X1 starts at point 8 (out of 400) on the x-axis; it cannot get exceed the width of the canvas; it adds 32 to the space between each square
// vertical: Y2
for (var Y2 = 8; Y2 <= height; Y2 += 32){ // variable Y1 starts at point 8 (out of 400) on the y-axis; it cannot get exceed the height of the canvas; it adds 32 to the space between each square

Embedded Sketch

Reflection and ideas for future work or improvements

  • When I was designing my pattern, the overlaying smaller squares made my browser lag trying to process all the newly added information. This is because I had to input more ‘for’ and ‘var’ codes for the smaller squares to achieve this design— but that meant it would take up more of my browser’s energy even if it was a relatively simple code and there weren’t too many lines overall.
  • I also struggled with trying to figure out how to use ‘for’ loops and ‘var’ but The Coding Train videos helped me out. Don’t be fooled though, I’m still not fully competent…
  • I feel that in order for me to improve, I need to familiarize myself with the ‘for’ and ‘var’ features more, just because I’m still not confident in my ability to execute my intended design using loops in my code.
  • I also feel that I need to branch out and try generating different shapes other than squares, circles, and triangles, but that of course requires more practice.

Self-Portrait

Concept—

Outline:

For my first assignment, I utilized the coding information we learned about in class to use simple shapes to create a self-portrait. I used ellipses, circles, squares, rectangles, lines, arcs, and triangles to create an image that looks like a cartoonish version of myself, while also recoloring specific parts, modifying the stroke weight, and removing the stroke completely for some elements of my portrait.

Inspiration:

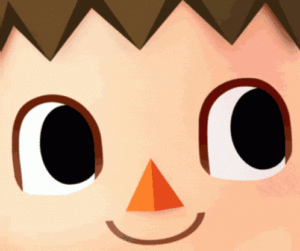
The inspiration for my self-portrait was based on the animated characters from the game Animal Crossing. I borrowed elements from the human characters’ physical appearance, notably the reddish-orange triangle-shaped nose, the white glimmer in the pupils, and the circular blush under the eyes for a ‘cutesy’ effect:

Here’s a cute gif of my inspo for the sketch, the final product can be found below

Code highlight—

I made sure to section the different elements of my portrait in order to easily locate them in case I wanted to tweak something specific in one of the features. My favorite lines of code were the ones I used to make the eyes because I made them look cartoonish using the white glimmer + they were a bit more detailed in comparison to the other elements of my portrait as I added a code for the eye movement:

// movement of eyes -- used this tutorial to figure it out https://youtu.be/dcxmJtioamg?t=1033
// right and left
let e_x1 = map(mouseX, 0, 200, 148, 150)
let e_x2 = map(mouseX, 0, 200, 248, 250)
let e_x3 = map(mouseX, 0, 200, 148, 150)
let e_x4 = map(mouseX, 0, 200, 248, 250)
// up and down
let e_y1 = map(mouseX, 0, 200, 183, 185)
let e_y2 = map(mouseX, 0, 200, 183, 185)
let e_y3 = map(mouseX, 0, 200, 183, 185)
let e_y4 = map(mouseX, 0, 200, 183, 185)

// eyes
ellipseMode(CENTER);
stroke (200) // color of white eyes' outline
strokeWeight (2)
fill (255, 255, 255)
ellipse(150, 185, 40, 40) // (x1, y1, width, height) 
ellipse(250,185, 40, 40)
fill (122, 65, 44)
stroke (110, 60, 42) // colour of brown pupils' outline
strokeWeight (2)
ellipse(e_x3, e_y3, 20, 20) // colored right pupil
ellipse(e_x4,e_y4, 20, 20) // colored left pupil
fill (0, 0, 0)
stroke(0) // color of stroke/ outline (color of glasses)
strokeWeight (2)
ellipse(e_x1, e_y1, 8, 8) // right pupil
ellipse(e_x2,e_y2, 8, 8) // left pupil
stroke (180) // color of white eyes' outline
strokeWeight (2)
fill (255, 255, 255)
ellipse(158, 180, 6, 6) // right white glow
ellipse(258, 180, 6, 6) // left white glow
// x: right or left, y: up or down

Embedded sketch—

(p.s. the pupils move with a very limited range of movement)

Reflections and improvements—

I struggled with a few things when trying to design my portrait. This includes:

  • Trying to get the noStroke effect to work without removing the strokes on every shape. I tried to remove the strokes off of every shape in my image except the glasses and eyebrows, but even after I put the noStroke code after where I wrote the code for the eyebrows and glasses, it still removed their stroke. I realized later that I had to specify the stroke color as well as the strokeWeight for the glasses and eyebrows before I could put the noStroke effect for anything underneath. I then realized I liked the strokes surrounding the shapes, just not in black—hence why most of the features in my portrait are outlined with a darker shade of their respective color rather than black.
  • Forgetting to center the rectangle shapes for the glasses—which made it take much longer because I had to figure out where to plot the coordinates. This also caused a domino effect because if I had to type another code for a rectangle element below the code for the glasses and tried to center it, it would also center the glasses and mess up their coordinates completely.
  • Not having many shapes to work with. I felt very limited by the shapes, and in some cases, I wanted a semi-circle (like for the mouth), but I didn’t know the code for it. I had to look up a video on how to draw an arc, and this solved my problem—until I realized a 180° arc doesn’t have an outline on top. This meant that I had to place an outlined ellipse underneath the arc to make the mouth look complete and fully outlined (ref. to mouth section of code).
  • Trying to figure out how to give the pupils a full range of movement. I only figured out how to move them diagonally through a YouTube video.