Art-Work using Loops

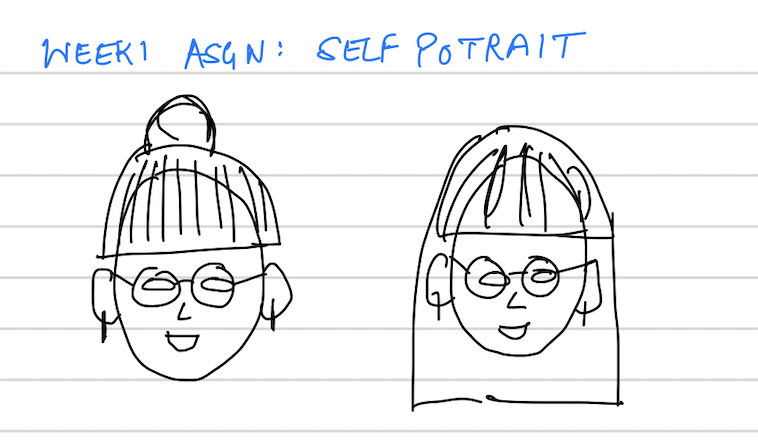
INSPIRATION AND EXECUTION

My second week’s project was to create an artwork using loops. Although this sounded very exciting to me initially and I was all charged up to work for it, it took me a long time to think about what I actually wanted to make. Art is relative. There is nothing fixed nor definite. It is one’s imagination driven by creativity and inspiration. I could do anything; the topic was so open-ended that it was difficult to come up with an idea.

I read through some old computer art magazines and was very fascinated by the following picture from the book Computer_Graphics_and_Art_May1976  (p. 6):

“Random Squares” by Herbert Franke

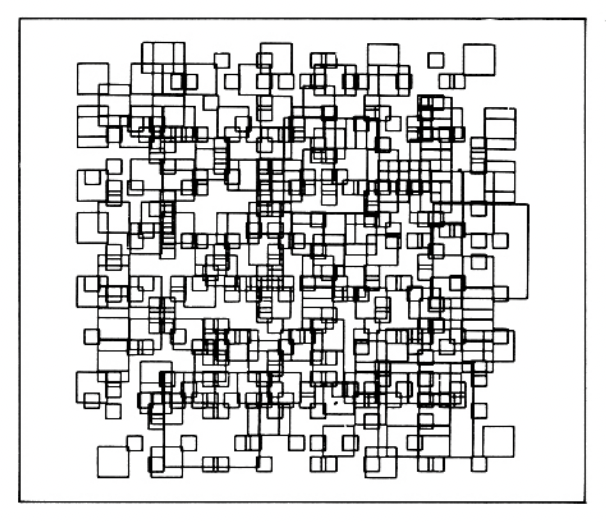
This picture, though simple, conveys the beauty of different blocks co-existing and still being peaceful in chaos. I wanted to create something similar in my art piece which could evoke such a feeling. Thus I started playing with squares on my canvas. To give an effect of chaos, I decided to have squares of different sizes to begin with and then make them move somehow, or rather change their size, to depict the different sizes as seen in the picture above. There was a little problem when I first coded this (see below). Since my width of the rectangle was dependent on frame count, it seemed like the rectangles were growing and shrinking faster and faster with each iteration which created a sense of panic or anxiety rather than calmness.

I solved this using the sine function which gave me a value between 1 and -1 and hence made it easier to reverse direction without affecting the speed (prof. Aaron Sherwood helped me with this). The consistency looked much better and pleasing. It also gave a smooth transition for changing direction. I then decided to add colors in the shades of blue and red to give a bright, happening, yet calming effect (not choosing pastel colors because the sense of chaos and happening still had to be maintained).

However, I still wasn’t fully satisfied with what I was seeing. The white spaces left a void that I wanted to cover. So, I started playing with background colors. In doing so, I accidentally removed the background altogether and what I saw, very well captured the emotion I was trying to bring about. The colors from different origins, each being startling and bright, having their own individuality, growing and shrinking in size, blended with each other so beautifully, producing a soothing effect in its dynamism. I then just tweaked the speed and colors a bit after that to make it look just right.

This is how my final art piece has turned out!

DIFFICULTIES

Besides facing difficulties controlling the speed of my moving boxes, I faced some difficulties initially when coding my boxes. It took me some time to understand how to use loops to code this project. What I was missing was the understanding that whichever loop I use inside my draw() function, would be an additional loop to the draw() loop which is an infinite loop. So, the way to go about it was thinking of it as ‘nested loops’ and exploiting the draw() loop to base the movement of my boxes on it. I first used nested for() loop to position my boxes on the canvas. Then, to move the boxes, I based the rectangle width on the frame count of the draw() loop. It took me sometime to understand that the transition should be based on the draw() loop count because I am not used to thinking of functions as loops and thus initially, I wasn’t using the draw() loop at all to code my assignment.

CODE

float h, w; //to rename height and width
float rectW; //size of square -- changes throught the exxecution
float rectW0; //initial square size
int numBox; //number of boxes

void setup()
{
  background(150);
  size(600, 600);
  h = height;
  w = width;

  rectMode(CENTER);
  rectW = 100;
  rectW0 = rectW;
  numBox = int(w/rectW0);
  //noLoop();
}

void draw()
{
  noFill();
  strokeWeight(0.3);

  int k=0;
  for (int i=0; i<numBox; i++)
  {
    for (int j=0; j<numBox; j++)
    {
      stroke(250-(i+j)*30, (0*i+j)*30, (i+j)*20);
      rect(rectW0/2+rectW0*i, rectW0/2+rectW0*j, rectW-k, rectW-k);
      k=k-1;
    } //close inner for
  } //close outer for
  
  rectW = sin(frameCount*.008)*width/2.2; 
}

Sketch a Self-Portrait

PROJECT DESCRIPTION

My task was to sketch a self-portrait using basic 2-D shapes available to me in Processing. Building upon the short exercise we did in class, I played more with the different shapes and colors to try and make my portrait as close as possible to a real person than the stick figure it was looking like initially. I focused on the smallest of the details, from lines in the bangs to reflection in the eyes; each and every element in the portrait contributing towards the overall look of the sketch. My sketch mostly uses the following drawing features:

      • line
      • ellipse
      • circle
      • rectangle
      • arc

PROCESS

I first started out with sketching a basic idea of what I wanted my sketch to look like (see below).

I chose the second look as I wear my hair more often like that.

The next step was to start coding it using Processing. I started with the basic things or the ones that were most important first and then kept on building upon it, adding more features as and when required. The poster below outlines my step-by-step process:


collageAs per my vision, I first created an outline for my sketch, which included adding a face and hair. I wanted to make the layout first and then focus on details, so I coded the clothes, hands, and gave the round neck effect. Then came the detailing on the face which was quite difficult initially, keeping the proportions in mind. It really challenged the mathematician in me but was very fun to accomplish. Using the arc function was particularly hard as its parameters were confusing to understand and implement initially. Next came adding accessories like ears, earrings, blush lines, and design on clothes.

I then fine-tuned a few things here and there (like increasing the hand width, rounding the shoulders more, adjusting the lines in the bangs, adding eyebrows, etc.) to make the drawing more proportionate. I decided against adding the specs as my drawing was looking crowded and was taking away from the aesthetics.

After I was happy with how my portrait was looking, I added a little pattern in the background to make it more appealing. This is the final version of my sketch:


CODE

//decleration of variables
float x0, y0; //center coordinates of face i.e. point of reference
float h, w; //stores width and height of canvas
float faceL, faceW; //stores dimensions of the face so that it is easier to position other elements

void setup() {
  size(640, 480);

  //initialization of the variable
  h = height;
  w = width;
  x0 = w/2; //sketch to be positioned at the center
  y0 = h/2;
  faceL = h*0.5;
  faceW = faceL*0.8; //so that face dimensions are preserved irrespective of canvas size
}

void draw() {

  background(254, 249, 131);
  
  //pattern
  strokeWeight(5);
  //stroke(252, 247, 79);
  //stroke(255, 224, 102);
  stroke(252, 245, 54);
  //stroke(255, 255, 179);
  line(0,h,w,0);
  line(0,0,w,h);
  line(0,2*h/10,2*w/10,0);
  line(2*w/10,0,w,8*h/10);
  line(0,4*h/10,4*w/10,0);
  line(4*w/10,0,w,6*h/10);
  line(0,6*h/10,6*w/10,0);
  line(6*w/10,0,w,4*h/10);
  line(0,8*h/10,8*w/10,0);
  line(8*w/10,0,w,2*h/10);
  //second half
  line(0,2*h/10,8*w/10,h);
  line(2*w/10,h,w,2*h/10);
  line(0,4*h/10,6*w/10,h);
  line(4*w/10,h,w,4*h/10);
  line(0,6*h/10,4*w/10,h);
  line(6*w/10,h,w,6*h/10);
  line(0,8*h/10,2*w/10,h);
  line(8*w/10,h,w,8*h/10);
  //line(0,2*h/10,8*w/10,h);
  
  stroke(0);
  strokeWeight(1);

  //background hair
  fill(53, 40, 30);
  rect(x0-faceW*1.15/2, y0-faceL*0.1, faceW*1.15, faceL*0.7);

  //neck
  fill(246, 211, 189);
  rect(x0-faceW*0.2, y0-faceL*0.1, faceW*0.4, faceL*0.7);

  //ears
  ellipse(x0-faceW*0.5, y0+faceL*0.05, faceW*0.15, faceL*0.2);
  ellipse(x0+faceW*0.5, y0+faceL*0.05, faceW*0.15, faceL*0.2);
  //earrings
  fill(78, 102, 238);
  noStroke();
  circle(x0-faceW*0.51, y0+faceL*0.15, faceW*0.1);
  circle(x0+faceW*0.51, y0+faceL*0.15, faceW*0.1);
  stroke(0);

  //face
  fill(246, 211, 189);
  ellipse(x0, y0, faceW, faceL);

  //hair
  fill(53, 40, 30);
  arc(x0, y0-faceL*0.1, faceW*1.15, faceL*0.9, PI, 2*PI, PIE);
  //lines on the bangs
  strokeWeight(1.3);
  line(x0, y0-faceL*0.1, x0, y0-faceL*0.32);
  line(x0-faceW*0.1, y0-faceL*0.1, x0-faceW*0.1, y0-faceL*0.32);
  line(x0+faceW*0.1, y0-faceL*0.1, x0+faceW*0.1, y0-faceL*0.32);
  line(x0-faceW*0.2, y0-faceL*0.1, x0-faceW*0.19, y0-faceL*0.3);
  line(x0+faceW*0.2, y0-faceL*0.1, x0+faceW*0.19, y0-faceL*0.3);
  line(x0-faceW*0.3, y0-faceL*0.1, x0-faceW*0.28, y0-faceL*0.28);
  line(x0+faceW*0.3, y0-faceL*0.1, x0+faceW*0.28, y0-faceL*0.28);
  line(x0-faceW*0.4, y0-faceL*0.1, x0-faceW*0.37, y0-faceL*0.27);
  line(x0+faceW*0.4, y0-faceL*0.1, x0+faceW*0.37, y0-faceL*0.27);
  strokeWeight(1);

  //hands
  fill(246, 211, 189);
  rect(x0-faceW*1.63/2, y0+faceL*0.62, faceW*1.63, faceL*0.48, 48, 48, 0, 0);

  //clothes
  fill(87, 190, 241);
  rect(x0-faceW*1.2/2, y0+faceL*0.6, faceW*1.2, faceL*0.5, 5, 5, 0, 0);
  //round neck
  fill(246, 211, 189);
  arc(x0, y0+faceL*0.6, faceW*0.6, faceW*0.35, 0, PI);
  //design
  fill(78, 102, 238);
  noStroke();
  rect(x0+faceW*0.1, y0+faceL*0.83, faceW*0.5, faceL*0.27);
  rect(x0-faceW*0.6, y0+faceL*0.83, faceW*0.5, faceL*0.27);
  //rect(x0-faceW*0.4, y0+faceL*0.8, faceW*0.1, faceL*0.5);
  stroke(0);

  //eyes
  fill(255); 
  ellipse(x0-faceW*0.22, y0+faceL*0.05, faceW*0.18, faceW*0.12);
  ellipse(x0+faceW*0.22, y0+faceL*0.05, faceW*0.18, faceW*0.12);
  noStroke();
  fill(69, 46, 44);
  circle(x0-faceW*0.22, y0+faceL*0.05, faceW*0.12);
  circle(x0+faceW*0.22, y0+faceL*0.05, faceW*0.12);
  fill(0);
  circle(x0-faceW*0.22, y0+faceL*0.05, faceW*0.05);
  circle(x0+faceW*0.22, y0+faceL*0.05, faceW*0.05);
  fill(255);
  circle(x0-faceW*0.22+faceW*0.03, y0+faceL*0.05-faceL*0.02, faceW*0.025);
  circle(x0+faceW*0.22+faceW*0.03, y0+faceL*0.05-faceL*0.02, faceW*0.025);
  stroke(0);

  //eyebrows
  noFill();
  stroke(53, 40, 30);
  strokeWeight(2);
  //fill(246, 211, 189);
  arc(x0-faceW*0.22, y0+faceL*0.01, faceW*0.25, faceW*0.1, 1.2*PI, 1.8*PI);
  arc(x0+faceW*0.22, y0+faceL*0.01, faceW*0.25, faceW*0.1, 1.2*PI, 1.8*PI);
  strokeWeight(1);
  stroke(0);

  //specs
  //noFill(); 
  //stroke(170,169,173);
  //strokeWeight(2);
  //ellipse(x0-faceW*0.22, y0+faceL*0.05, faceW*0.3, faceW*0.25);
  //ellipse(x0+faceW*0.22, y0+faceL*0.05, faceW*0.3, faceW*0.25);
  //strokeWeight(1);

  //nose
  line(x0, y0+faceL*0.1, x0, y0+faceL*0.23);
  line(x0, y0+faceL*0.26, x0+faceW*0.06, y0+faceL*0.24);
  line(x0, y0+faceL*0.26, x0-faceW*0.06, y0+faceL*0.24);

  //mouth
  stroke(220, 55, 83);
  strokeWeight(2);
  fill(229, 109, 126);
  arc(x0, y0+faceL*0.33, faceW*0.2, faceW*0.17, 0, PI, CHORD);
  stroke(0);
  strokeWeight(1);

  //blush
  strokeWeight(2);
  stroke(242, 193, 162);
  line(x0+faceW*0.3, y0+faceL*0.26-faceL*0.1, x0+faceW*0.08+faceW*0.3, y0+faceL*0.24-faceL*0.1);
  line(x0+faceW*0.32, y0+faceL*0.26-faceL*0.08, x0+faceW*0.08+faceW*0.32, y0+faceL*0.24-faceL*0.08);
  line(x0-faceW*0.3, y0+faceL*0.26-faceL*0.1, x0-faceW*0.08-faceW*0.3, y0+faceL*0.24-faceL*0.1);
  line(x0-faceW*0.32, y0+faceL*0.26-faceL*0.08, x0-faceW*0.08-faceW*0.32, y0+faceL*0.24-faceL*0.08);
  stroke(0);
  strokeWeight(1);
}


The key element of my code is that my portrait is dynamic with respect to the canvas. I have not hardcoded any of the values required to build my sketch. Every position, length, width mentioned in the code is in reference to the canvas size chosen. The reference point for the portrait (x0, y0 in the code) is the middle of the canvas and the portrait remains in the center irrespective of the canvas size. In fact, one can change the coordinates of x0 and y0 to make the reference point of the figure higher up/ down, a little left/right, and the entire portrait shifts (video attached later). It does not get disproportionate at all. For sketching the girl, I used face length (faceL) and face width (faceW) which are in proportion to the canvas size as standard measures to draw the other elements. This ensures my portrait does not disfigure.

Softcoding my program also made it easier for me to fine-tune, edit, and change aspects in my code as I did not have to calculate a number and put it, calculate again, and put it. I was just using variables which values and I had to adjust those values.

Commenting out the code and breaking it into blocks made it easier for me to go back and edit it.

Below you can see a short video of how my portrait behaves when a few reference points are changed: