
Author: Aaron
Daito Manabe
-
muscle(smiles): https://www.youtube.com/watch?v=YxdlYFCp5Ic
-
teeth led: https://www.youtube.com/watch?v=QsWc58zmBKI
-
11 play box projection: https://www.youtube.com/watch?time_continue=1&v=H_eAkJ_o-pk
-
dynamic vr display view dependent tracking: https://www.youtube.com/watch?time_continue=24&v=G7ZQ4KiX1JE
-
-
Nosaj Thing: https://www.youtube.com/watch?v=_woNBiIyOKI
-
Phosphere: https://www.youtube.com/watch?v=El82ewNJdNs
P5js – Web Serial – Handshake
Gravity Wind Serial
Motors
Slide deck
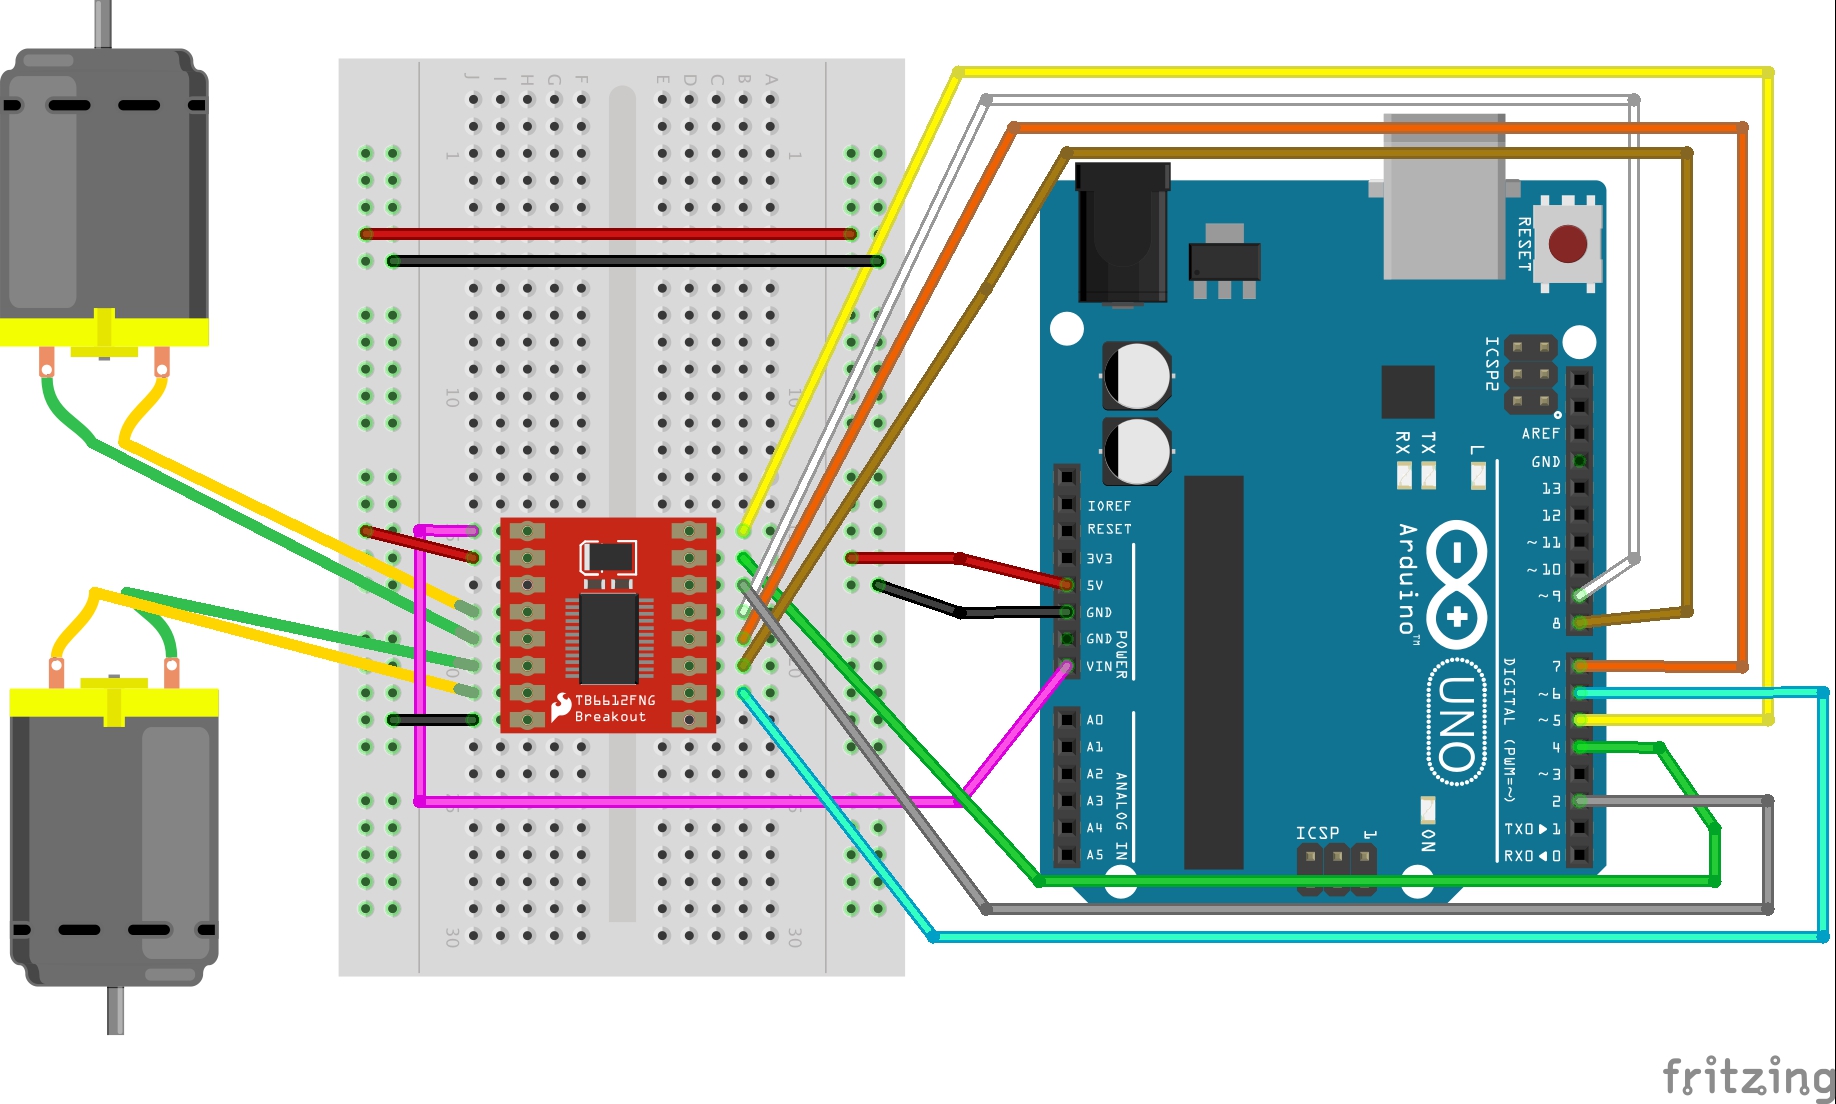
Motorshield
Link for Motor Shield tutorial: https://learn.sparkfun.com/tutorials/tb6612fng-hookup-guide?_ga=2.227433246.2072068385.1551701674-349683115.1523944725
Download the library here: TB6612FNG ARDUINO LIBRARY, or grab the latest version from Sparkfun’s GitHub repository. Once the library is installed, open the example code included in the Library through the Arduino IDE’s examples.
Transistor/diode
You would use the same set up with a diode and transistor for a solenoid as well.
With Smaller Transistor (P2N2222A or a BC337):
![]()
With Tip120:
![]()
Week 11 – Serial Communication – P5js
You will need the P5 Serial App: https://github.com/p5-serial/p5.serialcontrol/releases
Arduino wiring: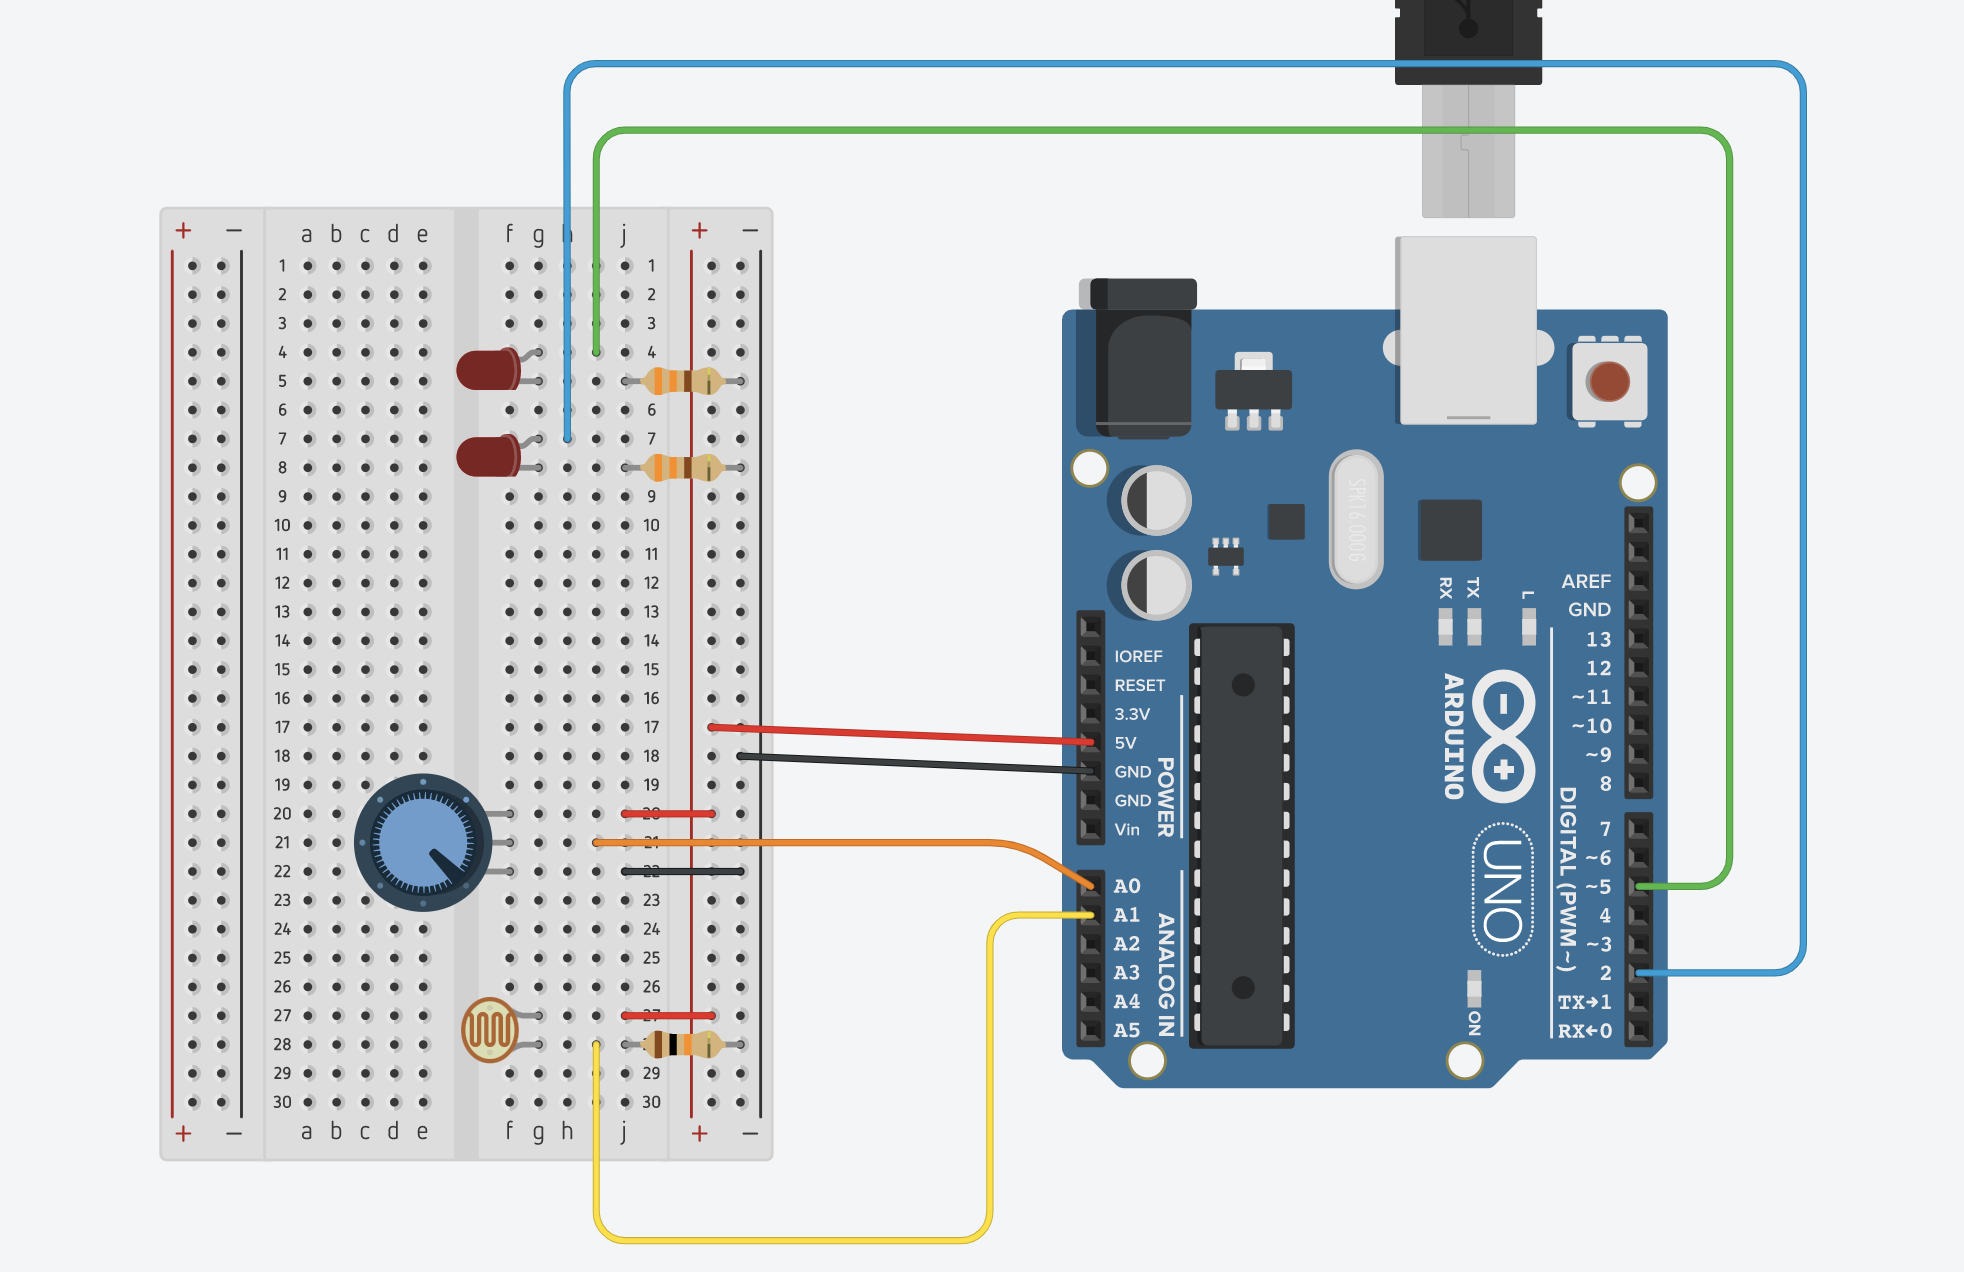
Arduino Code:
void setup() {
  Serial.begin(9600);
  pinMode(2, OUTPUT);
  pinMode(5, OUTPUT);
  while (Serial.available() <= 0) {
    Serial.println("0,0"); // send a starting message
    delay(300);              // wait 1/3 second
  }
}

void loop() {
  while (Serial.available() > 0) {
    // read the incoming byte:
   int inByte = Serial.read();
    switch (inByte) {
      case 0:
        digitalWrite(2, LOW);
        digitalWrite(5, LOW);
        break;
      case 1:
        digitalWrite(2, HIGH);
        break;
      case 2:
        digitalWrite(5, HIGH);
        break;
    }

    int sensorValue = analogRead(A0);
    Serial.print(sensorValue);
    Serial.print(",");
    sensorValue = analogRead(A1);
    Serial.print(sensorValue);
    Serial.println();
  }
}
P5js – Editor Code
Exercises:
- make something that uses only one sensor on arduino and makes the ellipse in processing move on the horizontal axis, in the middle of the screen, and nothing on arduino is controlled by processing
-
make something that controls the LED brightness from processing
-
take the gravity wind example below and make it so every time the ball bounces one led lights up and then turns off, and you can control the wind from one analog sensor
Gravity Wind (press space bar for new ball drop)
More Resources: https://itp.nyu.edu/physcomp/labs/#Asynchronous_Serial
Musical Instrument Examples
- peter vogel https://vimeo.com/19780802
- field: jacks performance: https://vimeo.com/149364292
- giant instrument: https://vimeo.com/95706212
- nyc subway: https://www.youtube.com/watch?v=QjwxE_kI5wA
- interface example: https://www.youtube.com/watch?v=5B-0zGBwMx4
- me robospiel: https://vimeo.com/50586230
- servo drum machine: https://www.youtube.com/watch?v=EXgQfelajZc
- servo harp: https://www.youtube.com/watch?v=CtvZJb9VMkE
- block example: https://www.youtube.com/watch?v=0HobOt06gOI
- chordocentric: http://loisliow.netii.net/project2.html
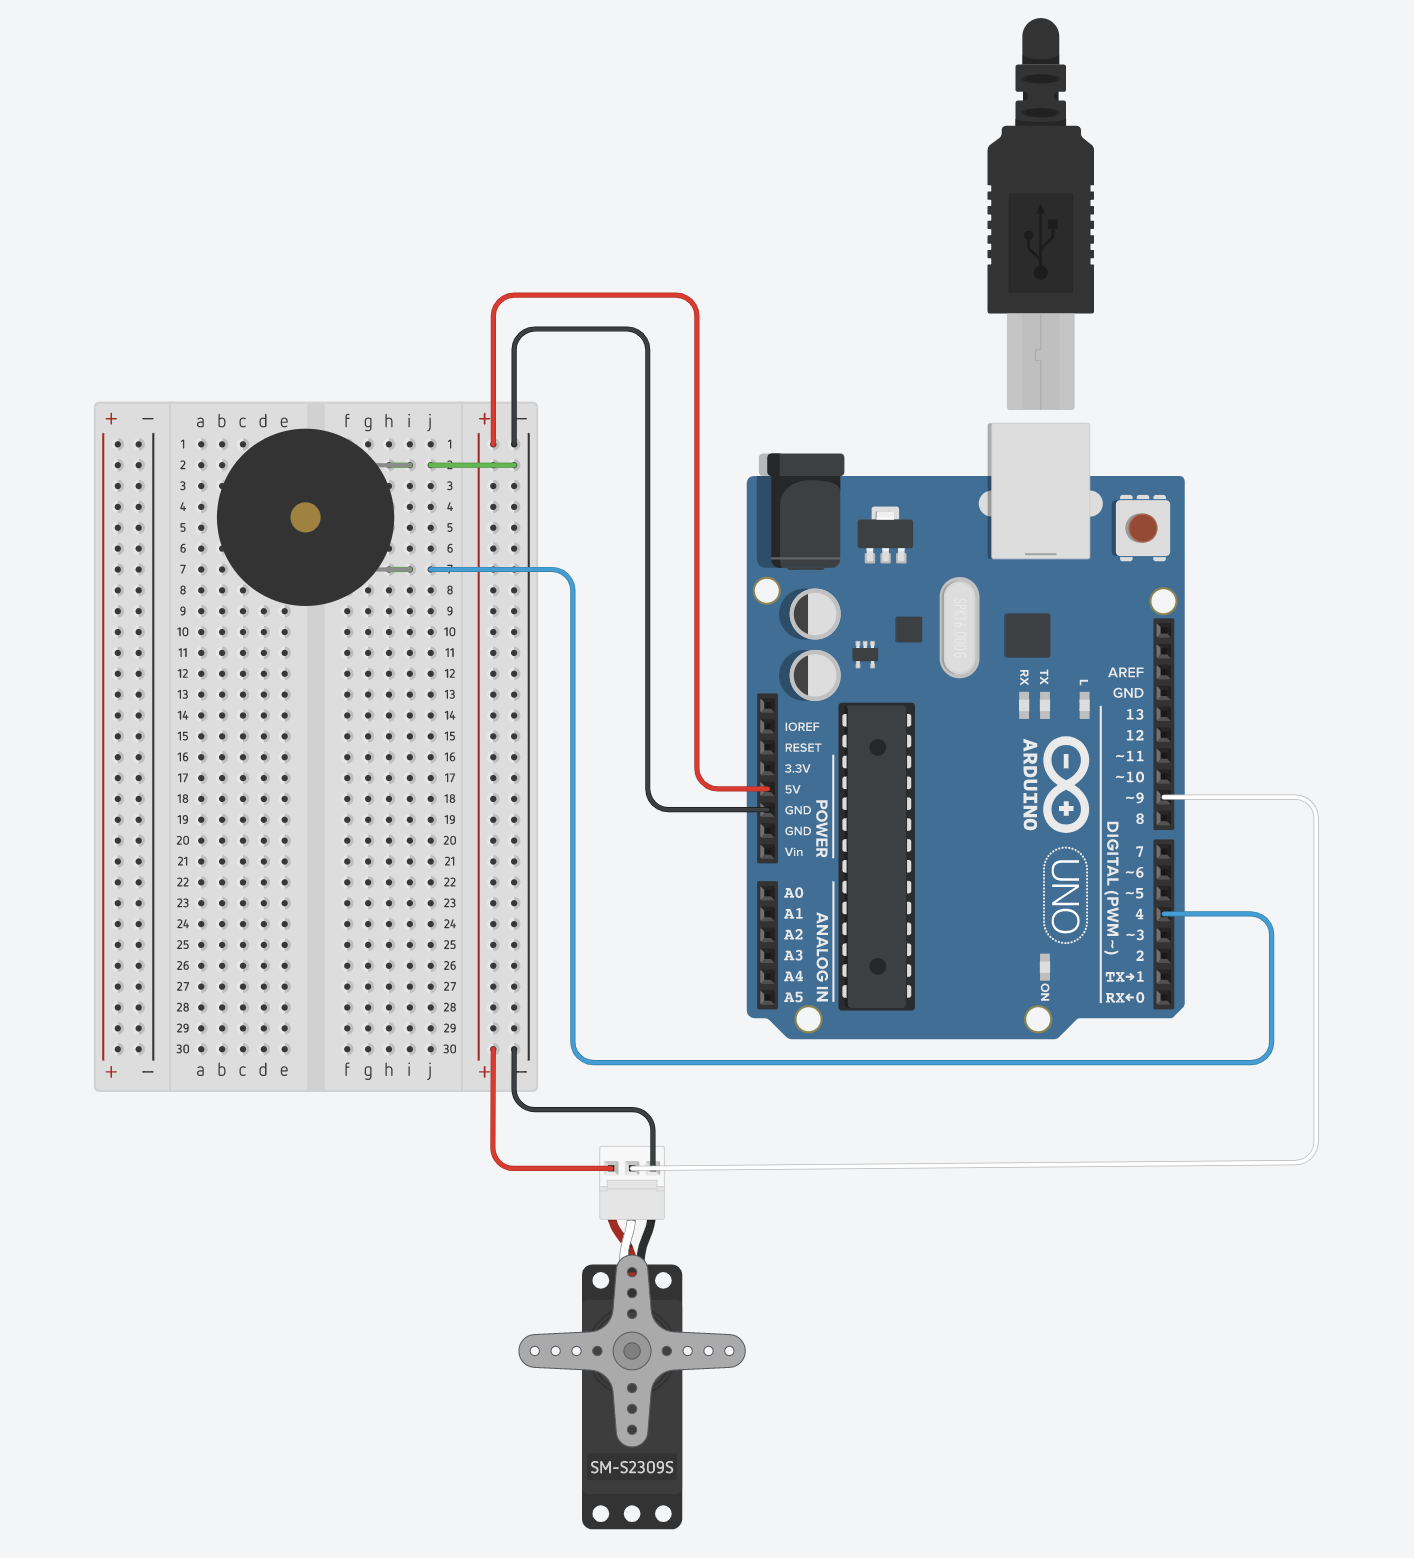
Week 10 – Servo and Tone
pitches.h:
/*************************************************
 * Public Constants
 *************************************************/
#define NOTE_B0  31
#define NOTE_C1  33
#define NOTE_CS1 35
#define NOTE_D1  37
#define NOTE_DS1 39
#define NOTE_E1  41
#define NOTE_F1  44
#define NOTE_FS1 46
#define NOTE_G1  49
#define NOTE_GS1 52
#define NOTE_A1  55
#define NOTE_AS1 58
#define NOTE_B1  62
#define NOTE_C2  65
#define NOTE_CS2 69
#define NOTE_D2  73
#define NOTE_DS2 78
#define NOTE_E2  82
#define NOTE_F2  87
#define NOTE_FS2 93
#define NOTE_G2  98
#define NOTE_GS2 104
#define NOTE_A2  110
#define NOTE_AS2 117
#define NOTE_B2  123
#define NOTE_C3  131
#define NOTE_CS3 139
#define NOTE_D3  147
#define NOTE_DS3 156
#define NOTE_E3  165
#define NOTE_F3  175
#define NOTE_FS3 185
#define NOTE_G3  196
#define NOTE_GS3 208
#define NOTE_A3  220
#define NOTE_AS3 233
#define NOTE_B3  247
#define NOTE_C4  262
#define NOTE_CS4 277
#define NOTE_D4  294
#define NOTE_DS4 311
#define NOTE_E4  330
#define NOTE_F4  349
#define NOTE_FS4 370
#define NOTE_G4  392
#define NOTE_GS4 415
#define NOTE_A4  440
#define NOTE_AS4 466
#define NOTE_B4  494
#define NOTE_C5  523
#define NOTE_CS5 554
#define NOTE_D5  587
#define NOTE_DS5 622
#define NOTE_E5  659
#define NOTE_F5  698
#define NOTE_FS5 740
#define NOTE_G5  784
#define NOTE_GS5 831
#define NOTE_A5  880
#define NOTE_AS5 932
#define NOTE_B5  988
#define NOTE_C6  1047
#define NOTE_CS6 1109
#define NOTE_D6  1175
#define NOTE_DS6 1245
#define NOTE_E6  1319
#define NOTE_F6  1397
#define NOTE_FS6 1480
#define NOTE_G6  1568
#define NOTE_GS6 1661
#define NOTE_A6  1760
#define NOTE_AS6 1865
#define NOTE_B6  1976
#define NOTE_C7  2093
#define NOTE_CS7 2217
#define NOTE_D7  2349
#define NOTE_DS7 2489
#define NOTE_E7  2637
#define NOTE_F7  2794
#define NOTE_FS7 2960
#define NOTE_G7  3136
#define NOTE_GS7 3322
#define NOTE_A7  3520
#define NOTE_AS7 3729
#define NOTE_B7  3951
#define NOTE_C8  4186
#define NOTE_CS8 4435
#define NOTE_D8  4699
#define NOTE_DS8 4978
#include <Servo.h>
#include "pitches.h"

Servo servo;
int servoPos = 100;
int whichNote = 0;
int notes[10] = {NOTE_C4, NOTE_D4, NOTE_E4, NOTE_F4, NOTE_G4, NOTE_A4, NOTE_B4, NOTE_C5, NOTE_D5, NOTE_E5};
int durations[10];

void setup() {
  servo.attach(9);
  pinMode(4, OUTPUT);
  Serial.begin(9600);

  // set the durations with a random coinflip
  for (int i = 0; i < 10; i++) {
    int coinFlip = random(2);
    if (coinFlip == 0)
      durations[i] = 8;
    else
      durations[i] = 4;
  }
}

void loop() {
  int val = analogRead(A0);

  // the rate is 1 second divided by the duration of the note
  int rate = 1000 / durations[whichNote];

  // get the current time
  unsigned long currentTime = millis();

  // trigger a note
  if (currentTime % rate == 0  ) {
    tone(4, notes[whichNote], random(100, 400));
    whichNote = random(10);
    delay(1);
  }

  // do the servo at half speed
  if (currentTime % (rate * 2) == 0  ) {
    servoPos = 50;
    servo.write(servoPos);
  }

  // else if not triggereing the servo, then every 10 milliseconds move the servo arm back a little bit
  // can't do it every frame as that is too fast for the servo
  else if (currentTime % 10 == 0) {
    servoPos -= 1;
    servo.write(servoPos);
  }
}
- Timer0 – used for millis(), micros(), delay() and PWM on pins 5 & 6
- Timer1 – used for Servos, the WaveHC library and PWM on pins 9 & 10
- Timer2 – used by Tone and PWM on pins 3 & 11
Week 9b – Analog Input & Output
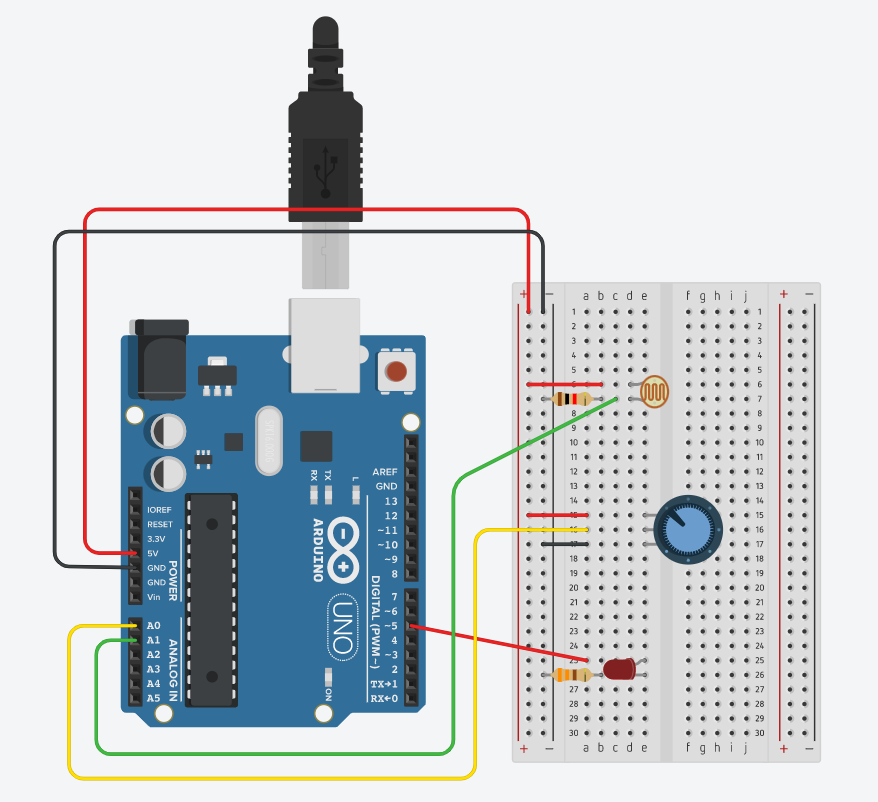
// NOTE: to make a voltage divider for the photo resistor (which you need)
// use a 10k ohm resistor

void setup() {
  // begin the serial connection at 9600 bits per second
  // (the baud rate)
  Serial.begin(9600);
  // for analog output connect to any of the PWM pins
  // these all have a tilda beside the pin number (~)
  pinMode(5, OUTPUT);
}

void loop() {
  // read the potentiometer on analog input pin A0
  int potValue = analogRead(A0); // analog read gives values in a maximum range of 0-1023
  // map the values from the potentiometer from 0-1023
  // into the range of an analog write (0-255)
  int mappedPotValue = map(potValue, 0, 1023, 0, 255);

  // read the photocell on analog input pin A1
  int lightValue = analogRead(A1);

  // print out the light value so we know the range
  Serial.println(lightValue);

  // based on the lowest and the highest numbers from the sensor,
  // map those to the analogWrite range
  // for example, if the lowest number is 500 nd the highest is 900
  // then do:
  int mappedLightValue = map(lightValue, 500, 900, 0, 255);

  // sometimes the numbers might go lower or higher than 500 or 900
  // it's important to constrain the mapped value
  //to never go lower than 0 and never higher than 255
  int constrainedValue = constrain(mappedLightValue, 0, 255);

  // finally, take the number from the photocell, that was mapped,
  // and then constrained, and use that for the call to analogWrite
  analogWrite(5, constrainedValue);//0-255
}
Week 9a Digital Input and Output
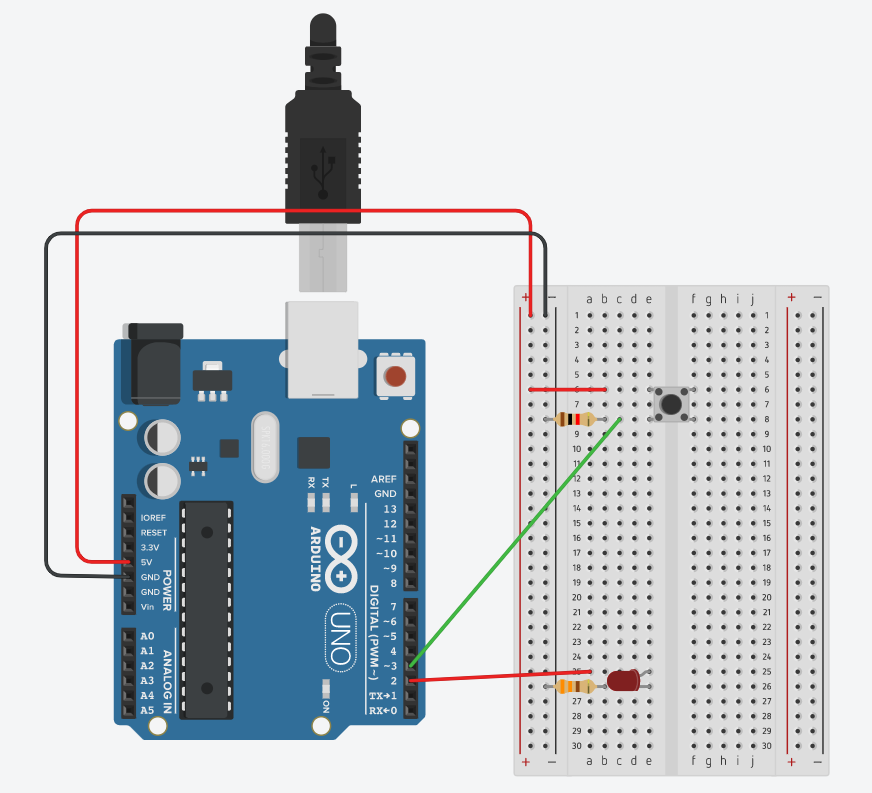
const int ledPin = 2;
const int buttonPin = 3;
unsigned long timer = 0;
bool onOff = LOW;
byte prevButtonState = LOW;
bool blinking = false;

void setup() {
  // put your setup code here, to run once:
  pinMode(ledPin, OUTPUT);
  pinMode(buttonPin, INPUT);
  Serial.begin(9600);
}

void loop() {
  // read the button pin
  // store that in a local variable
  byte buttonState  = digitalRead(buttonPin);

  // print out the state of the button stored in the variable
  Serial.println(buttonState);

  // check to see if the button is pressed and last time it wasn't
  // only do something if that is the case
  if (buttonState == HIGH && prevButtonState == LOW) {
    // change blinking to not blinking
    blinking = !blinking;
  }

  // record the current button state for use next time through loop
  prevButtonState = buttonState;

  // if blinkkng is true, do the blinking stuff
  if (blinking == true) {
    // check to see if the current time (millis) is greater than the timer we recorded
    if (millis() > timer) {
      // flip the boolean
      onOff = !onOff;
      // record a new time to check against
      timer = millis() + 250;
      // turn the led on and off
      digitalWrite(ledPin, onOff);
    }
    / otherwise turn the LED off
  } else {
    digitalWrite(ledPin, LOW);
  }
}