In interactive art, I feel like the artist plays the dual role of artist and curator. When creating an interactive piece, you’re also responsible for “setting the stage” and guiding the viewer’s movement–however, this is where the challenge lies because as the author suggests, you can’t dictate these movements and interactions too much. It can be difficult to draw the line between the interactive piece and the viewer when designing interactions. What components of an interactive piece should be dictated by the artist, and which ones should be a result of the interaction? How do you “set the stage” without guiding the viewer too much on how they should act within it? The author seems to claim that the artist is only responsible for creating the work, and the rest should be left to the viewer’s discoveries and senses. However, this can raise issues about the importance of interaction clarity as well (clarity of indicators, affordances, etc.). In creating an interactive piece, you have to let go of your own interpretations, objectives, and agendas. Instead, you should leave the interpretation to the viewer, as the meaning of the piece is not solely related to the “physical” product, but rather the reactions and conversations it attracts.
I think this blog post perfectly captures the dilemma many of us face before a project deadline and helps us come to terms with the fact that many of the things we create have been created before in one form or another, which is not always a bad thing. Having an idea of something that has been made before allows us to reappropriate it and introduce new features and new perspectives. I’ve found that assembling something that has been done before is a great way of processing the way it works, the way it is made, and how you can make similar things using the same logic, especially with regards to the field of physical computing where you learn more from a hands-on application rather than theory.
As someone who is new to physical computing, I’ve found that regenerating old ideas not only helps me apply what I’m learning from said ideas, but also works as somewhat of a starting point from which I can then go on to explore my own ideas, and create works that align with my own interests using themes that have been explored and experimented with by many others before.
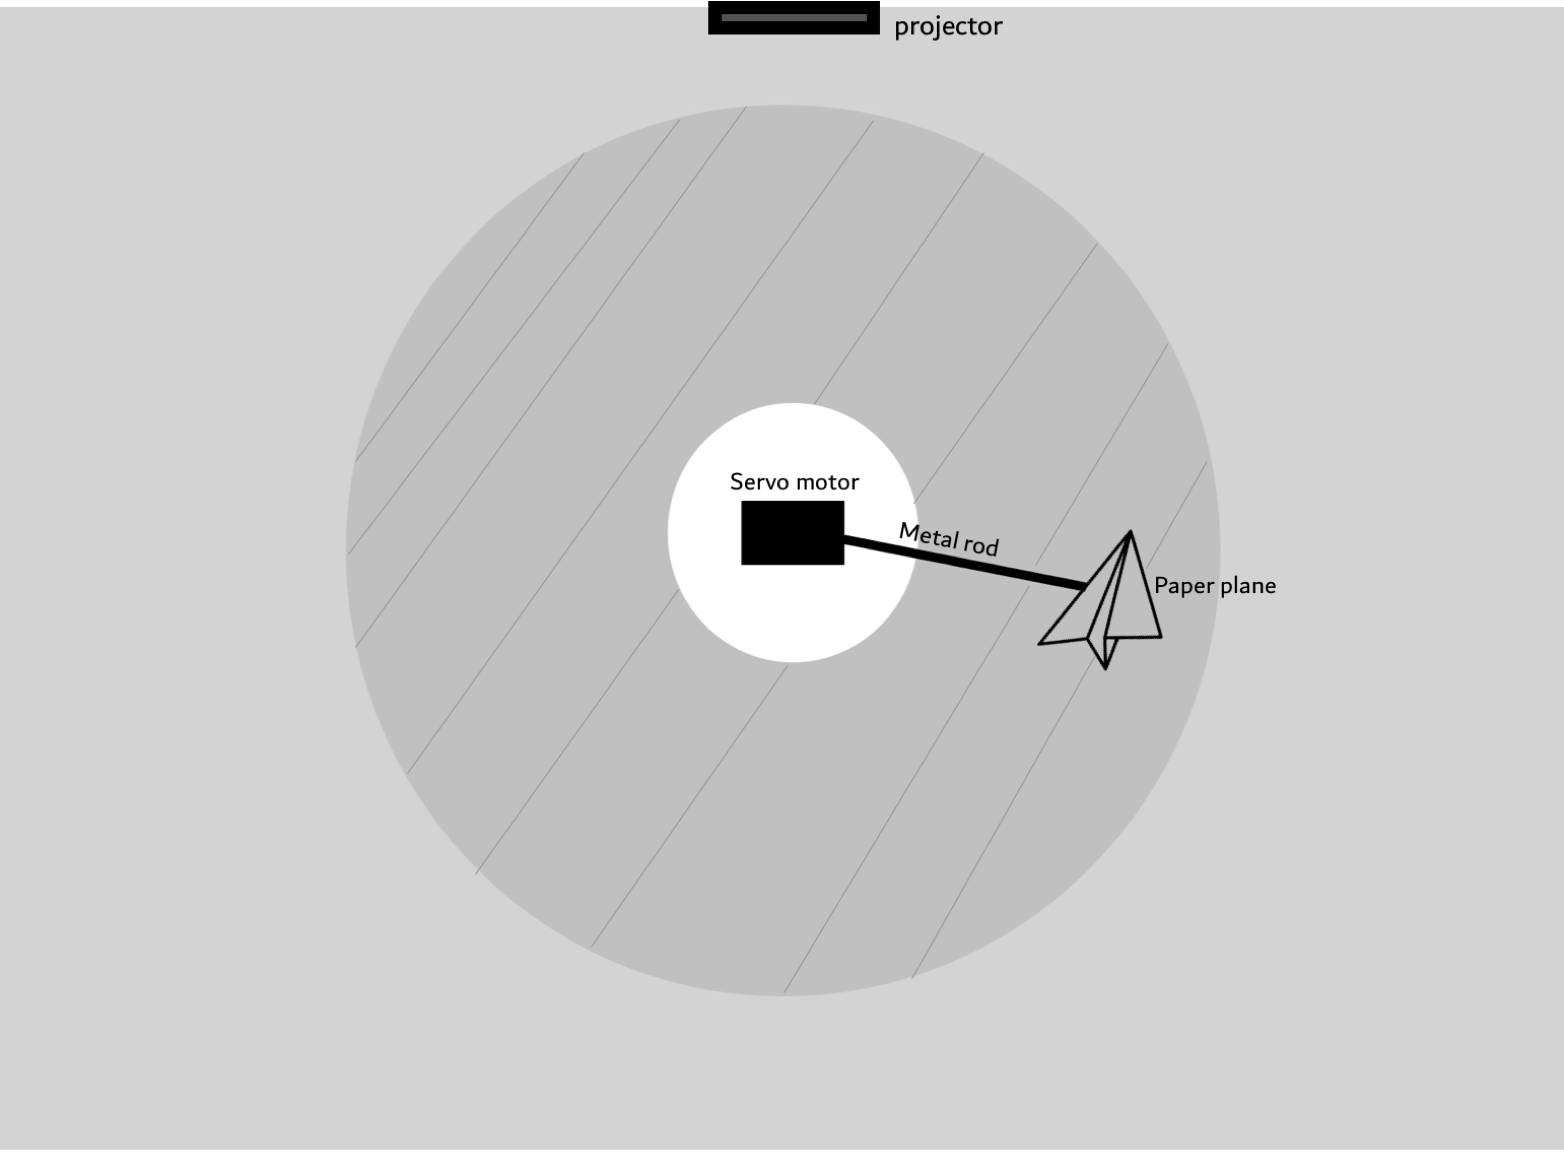
For my midterm project, I was thinking of creating an art piece using projection and servo motors. At the moment, in its conceptual stage, I’m imagining a projector pointing downwards towards a space (floor, table?) with a motor attached to a metal rod moving around in circles, carrying a paper plane that will take us on a trip through Abu Dhabi from dawn to night in a loop, using film projections and sound.
I will be attaching the paper plane to a metal rod, which will be connected to the servo motor in the center. Here’s a rough sketch:
The shaded area is where the video footage is going to appear, and the paper kite will be rotating around the circle in a loop, powered by the Servo in the center.
Now, I have two challenges with regards to this project. First, I’d like to incorporate an ‘interactive’ aspect to it, where it’s not just a narrative using video, sound and the paper plane. I’d like some element of it to be controlled by the viewer, and so I may add pressure sensors or buttons, for the user to be able to “control” the paper plane’s direction, in a way turning the installation into a mini-game. The other challenge would be manipulating film footage of aerial and city views of Abu Dhabi to fit into a circular/donut-shaped form surrounding the motor.
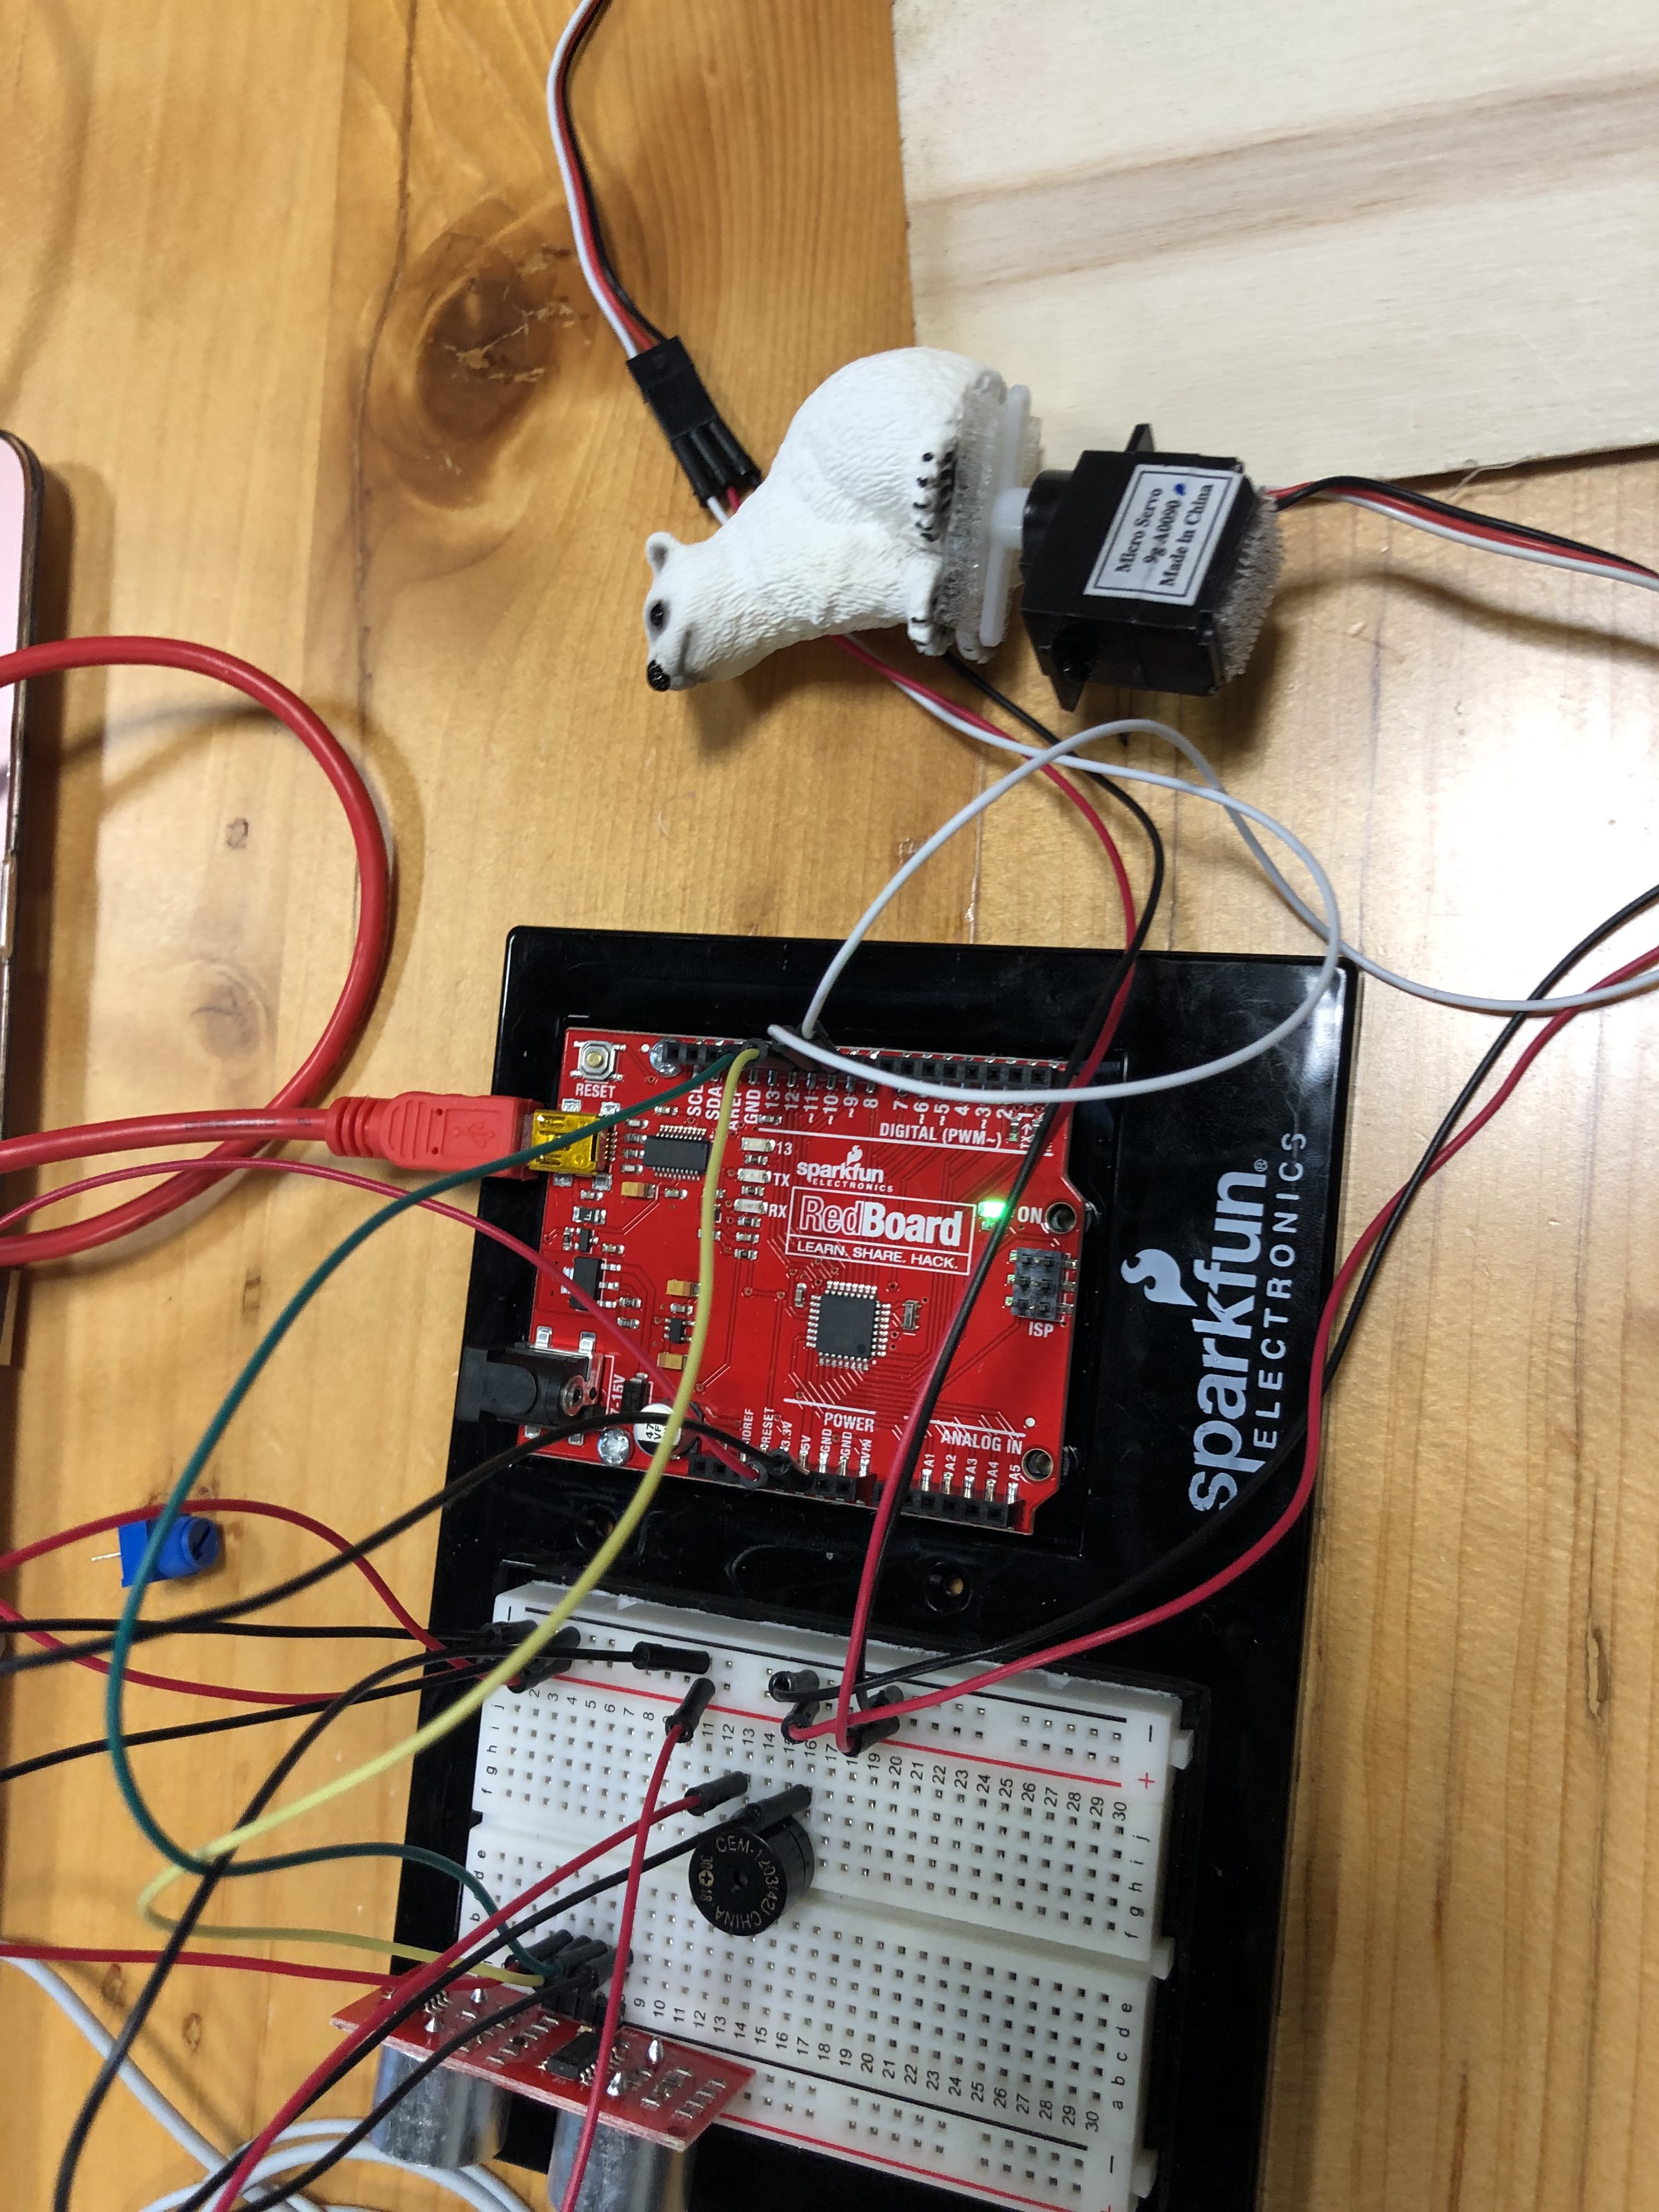
The materials we used on our Arduino are as follows:
two servo motors (one for the rotating figurine, one for the lid opener)
one buzzer (for tone)
a potentiometer (to switch the music box on)
a wooden box
a small figurine
First, we stuck the servo boxes using velcro into the box, and then we added the buzzer. One servo was to just open the box and the other one was to turn the figurine around.
The building process:
Our Code:
#include <Servo.h>

Servo servo;
Servo servo2;

//PINS
int speakerPin = 8;
int servoPin = 10;
int servo2Pin = 9;
int potentioPin = A2;
int length = 15; // the number of notes
char notes[] = "ccggaagffeeddc "; // a space represents a rest
int beats[] = { 1, 1, 1, 1, 1, 1, 2, 1, 1, 1, 1, 1, 1, 2, 4 };
int tempo = 300;


//FOR SERVO
const int MAX_DISTANCE = 160;
//const int MED_DISTANCE = 90;
const int MIN_DISTANCE = 20;
int degree = 10;
int pos = 50;
int pos2;

//FOR POTENTIOMETER
int potentioValue = 0;

int i = 0;

void setup() {
  Serial.begin(9600);
  servo.attach(servoPin);
  servo2.attach(servo2Pin);
  pinMode(speakerPin, OUTPUT);
  servo2.write(20);
  servo.write(20);
}

void playTone(int tone, int duration) {
  for (long i = 0; i < duration * 1000L; i += tone * 2) {
    digitalWrite(speakerPin, HIGH);
    delayMicroseconds(tone);
    digitalWrite(speakerPin, LOW);
    delayMicroseconds(tone);
  }
}

void playNote(char note, int duration) {
  char names[] = { 'c', 'd', 'e', 'f', 'g', 'a', 'b', 'C' };
  int tones[] = { 1915, 1700, 1519, 1432, 1275, 1136, 1014, 956 };

  // play the tone corresponding to the note name
  for (int i = 0; i < 8; i++) {
    if (names[i] == note) {
      playTone(tones[i], duration);
    }
  }

   pinMode(speakerPin, OUTPUT);
}

void loop() {

  potentioValue = analogRead(potentioPin);
  Serial.println(potentioValue);
  delay(1000);

  pos2 = map(potentioValue, 0, 1023, 50, 180);
  servo.write(pos2);
  //delay(1000);

  if (pos2 < 90)
  {

    pos = pos + degree;

    if (pos < MIN_DISTANCE || pos > MAX_DISTANCE)
    {
      degree = -degree;
    }

    servo2.write(pos);

    if (notes[i] == ' ') {
      delay(beats[i] * tempo); // rest
    } else {
      playNote(notes[i], beats[i] * tempo);
    }

    i++;555;

    if (i > length)
    {
      i = 0;
    }
    // pause between notes
    delay(tempo / 2);
  }
  else
  {
    pos = 50;
    servo2.write(pos);
    //no tone
  }
}
Despite how it appears to the culture at large, technology doesn’t just happen. It doesn’t emerge spontaneously, pulling us helplessly toward some inevitable destiny.
In his Brief Rant on the Future of Interaction Design, Bret Victor urges people to move away from extrapolation of previous models of technology design, namely the “Pictures Under Glass” model which most of our hand-held devices and computers are structured around. He proposes that we should instead move towards a future that does not, in his words, ignore our hands. Most of us have a similar vague idea of what future technology is going to look like, and this is aided by what we see in different media such as popular futuristic films, or infomercial-style clips of technological breakthroughs. A lot of it is just a regurgitation of the technology we already have, recreated to fit other surfaces. Victor believes that we should instead create models that exceed our limited knowledge of human capability, but also models that fit right within the knowledge we currently have, which is that our hands are massively tactile and the visual component of our interactions with the world is minimal in comparison. More and more of our interactions with technology are becoming visual, and in a world where everything else we engage with is three-dimensional, this creates a gap between our sensory capabilities and the capabilities of the technology we’re designing. I must admit, this is something I have never really thought of- which is ultimately just proof of how seamlessly the culture of “pictures under glass” has become integrated into our lives.
Victor’s responses to some of the comments people left underneath his rant post were amusing, my favorite comment was “Yeah! iPhone bad! iPad bad!”, because his response to it really put things into perspective. He goes on to say how iPads are good -for now- because they are truly revolutionary for our time. What’s bad is that if in twenty years we still had the same model of the iPad with a few new functions and perhaps a new surface. I wholeheartedly agree with this statement, especially when looking back at the history of most technologies we use today. Many things started out as revolutionary but that did not stop people from searching beyond that. What’s truly great is that we have control over our future, and as Victor said, it “doesn’t emerge spontaneously, pulling us helplessly toward some inevitable destiny”. Through visions, research, multiple trials, and errors- we are able to control that destiny (at least for the most part). Therefore, I hope that our technology will soon evolve to encompass a wider range of our human capabilities, enhancing our lives in ways that were not previously possible.
In this chapter, Norman introduces principles of design using examples of unsuccessful everyday objects. He looks at these objects mostly from a conceptual viewpoint and attributes the most important characteristics of good design to understandability and discoverability. He then explains the different parts of design functionality using principles of interaction such as affordances, signifiers, mapping, and feedback.
I think the main challenge he presents in this chapter is the extent to which we could (and should) incorporate human-centered design (HCD) into devices. There are many different factors governing the process of design, such as functionality, profitability in the market, and usability. One ever-present challenge in designing devices is the human-machine interaction and our ability to reconcile the binarity or limitations of computers that run these devices with the complexities of humans that use them, especially when technology is exceeding at a faster speed than design.
However, I think he exaggerates the extent to which these everyday objects “complicate” our lives, as well as the extent to which designers should rely on the human aspect. Bad design is indeed harmful, especially when there are ways that we could make devices more efficient and easy to use, but in the same way that we attribute the faults of design to the designer, we could also attribute the faults of understandability to the user. Yes, Norman proposes that “human errors” are just excuses for poor design, but to what degree are we willing to extract the user’s effort from the process, and why? People are becoming increasingly critical of bad design, and that is an issue that Norman expresses clearly in the chapter, however, aside from pointing out the faults of such devices as the wristwatch or the refrigerator, for example–– he does not propose any useful solutions. That is not to disregard the importance of the frameworks he sets for designers as those are useful conceptual structures we can immensely benefit from in the field of design.
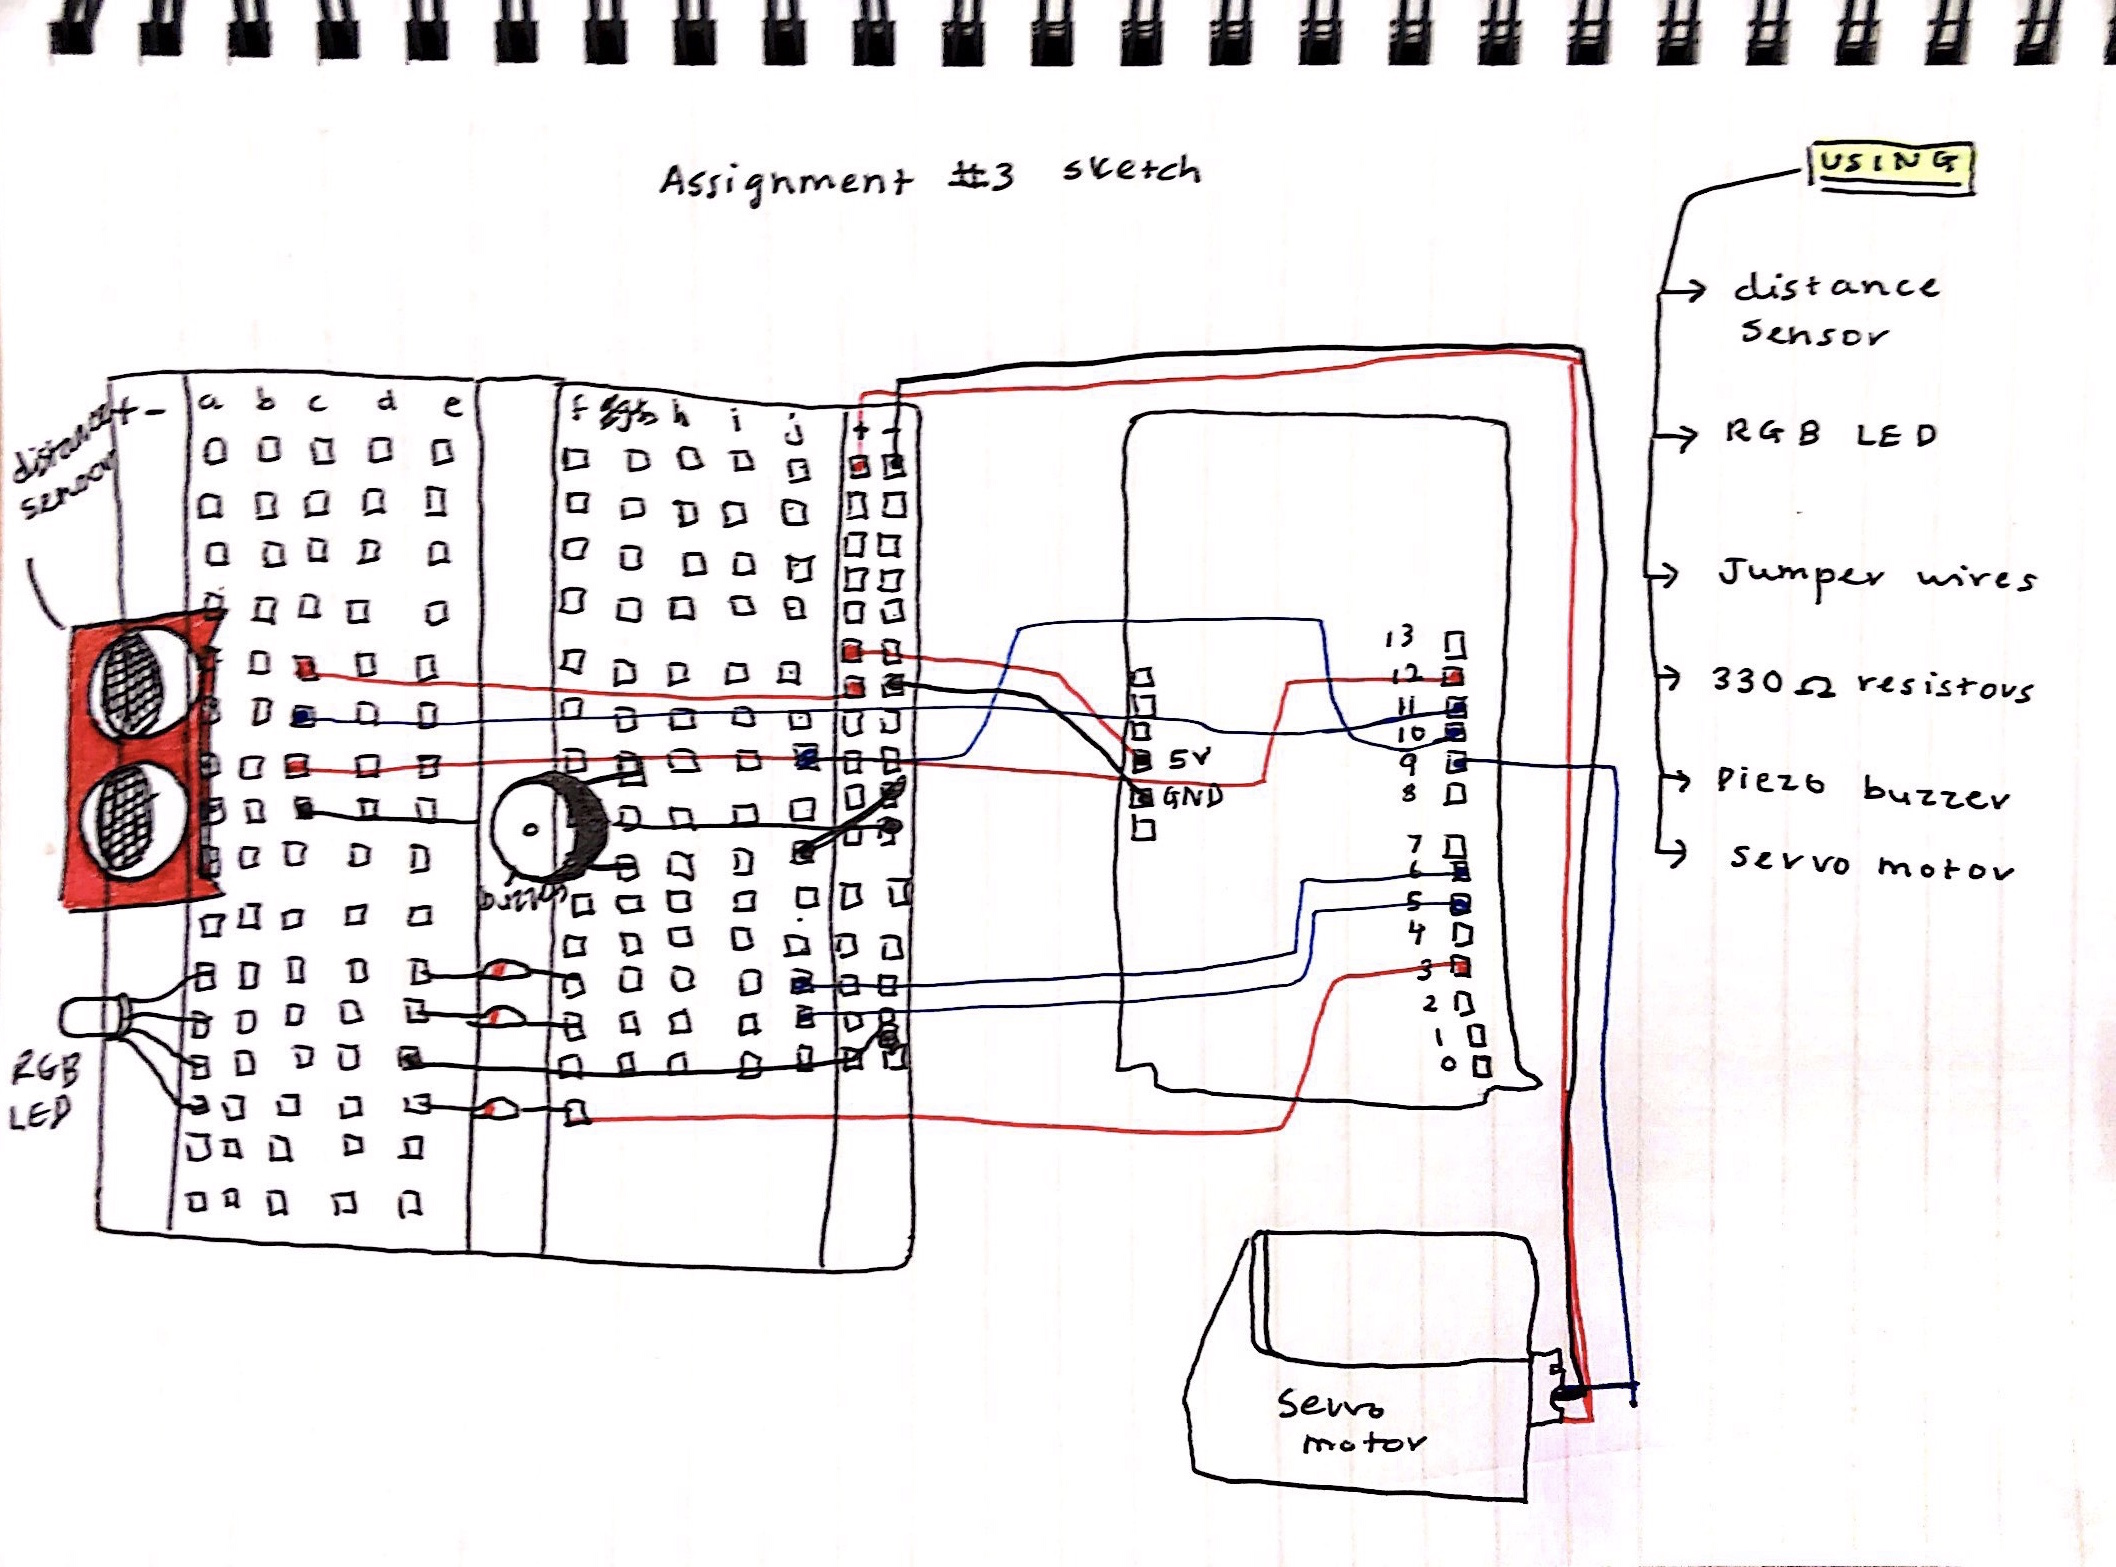
For this assignment, we were asked to control an LED in an “unexpected” way using information from an analog sensor. Going off of this prompt, I created a ‘Safeguard’ using a motion sensor, a servo motor, a buzzer, and an RGB LED light. Here is a rough circuit sketch:
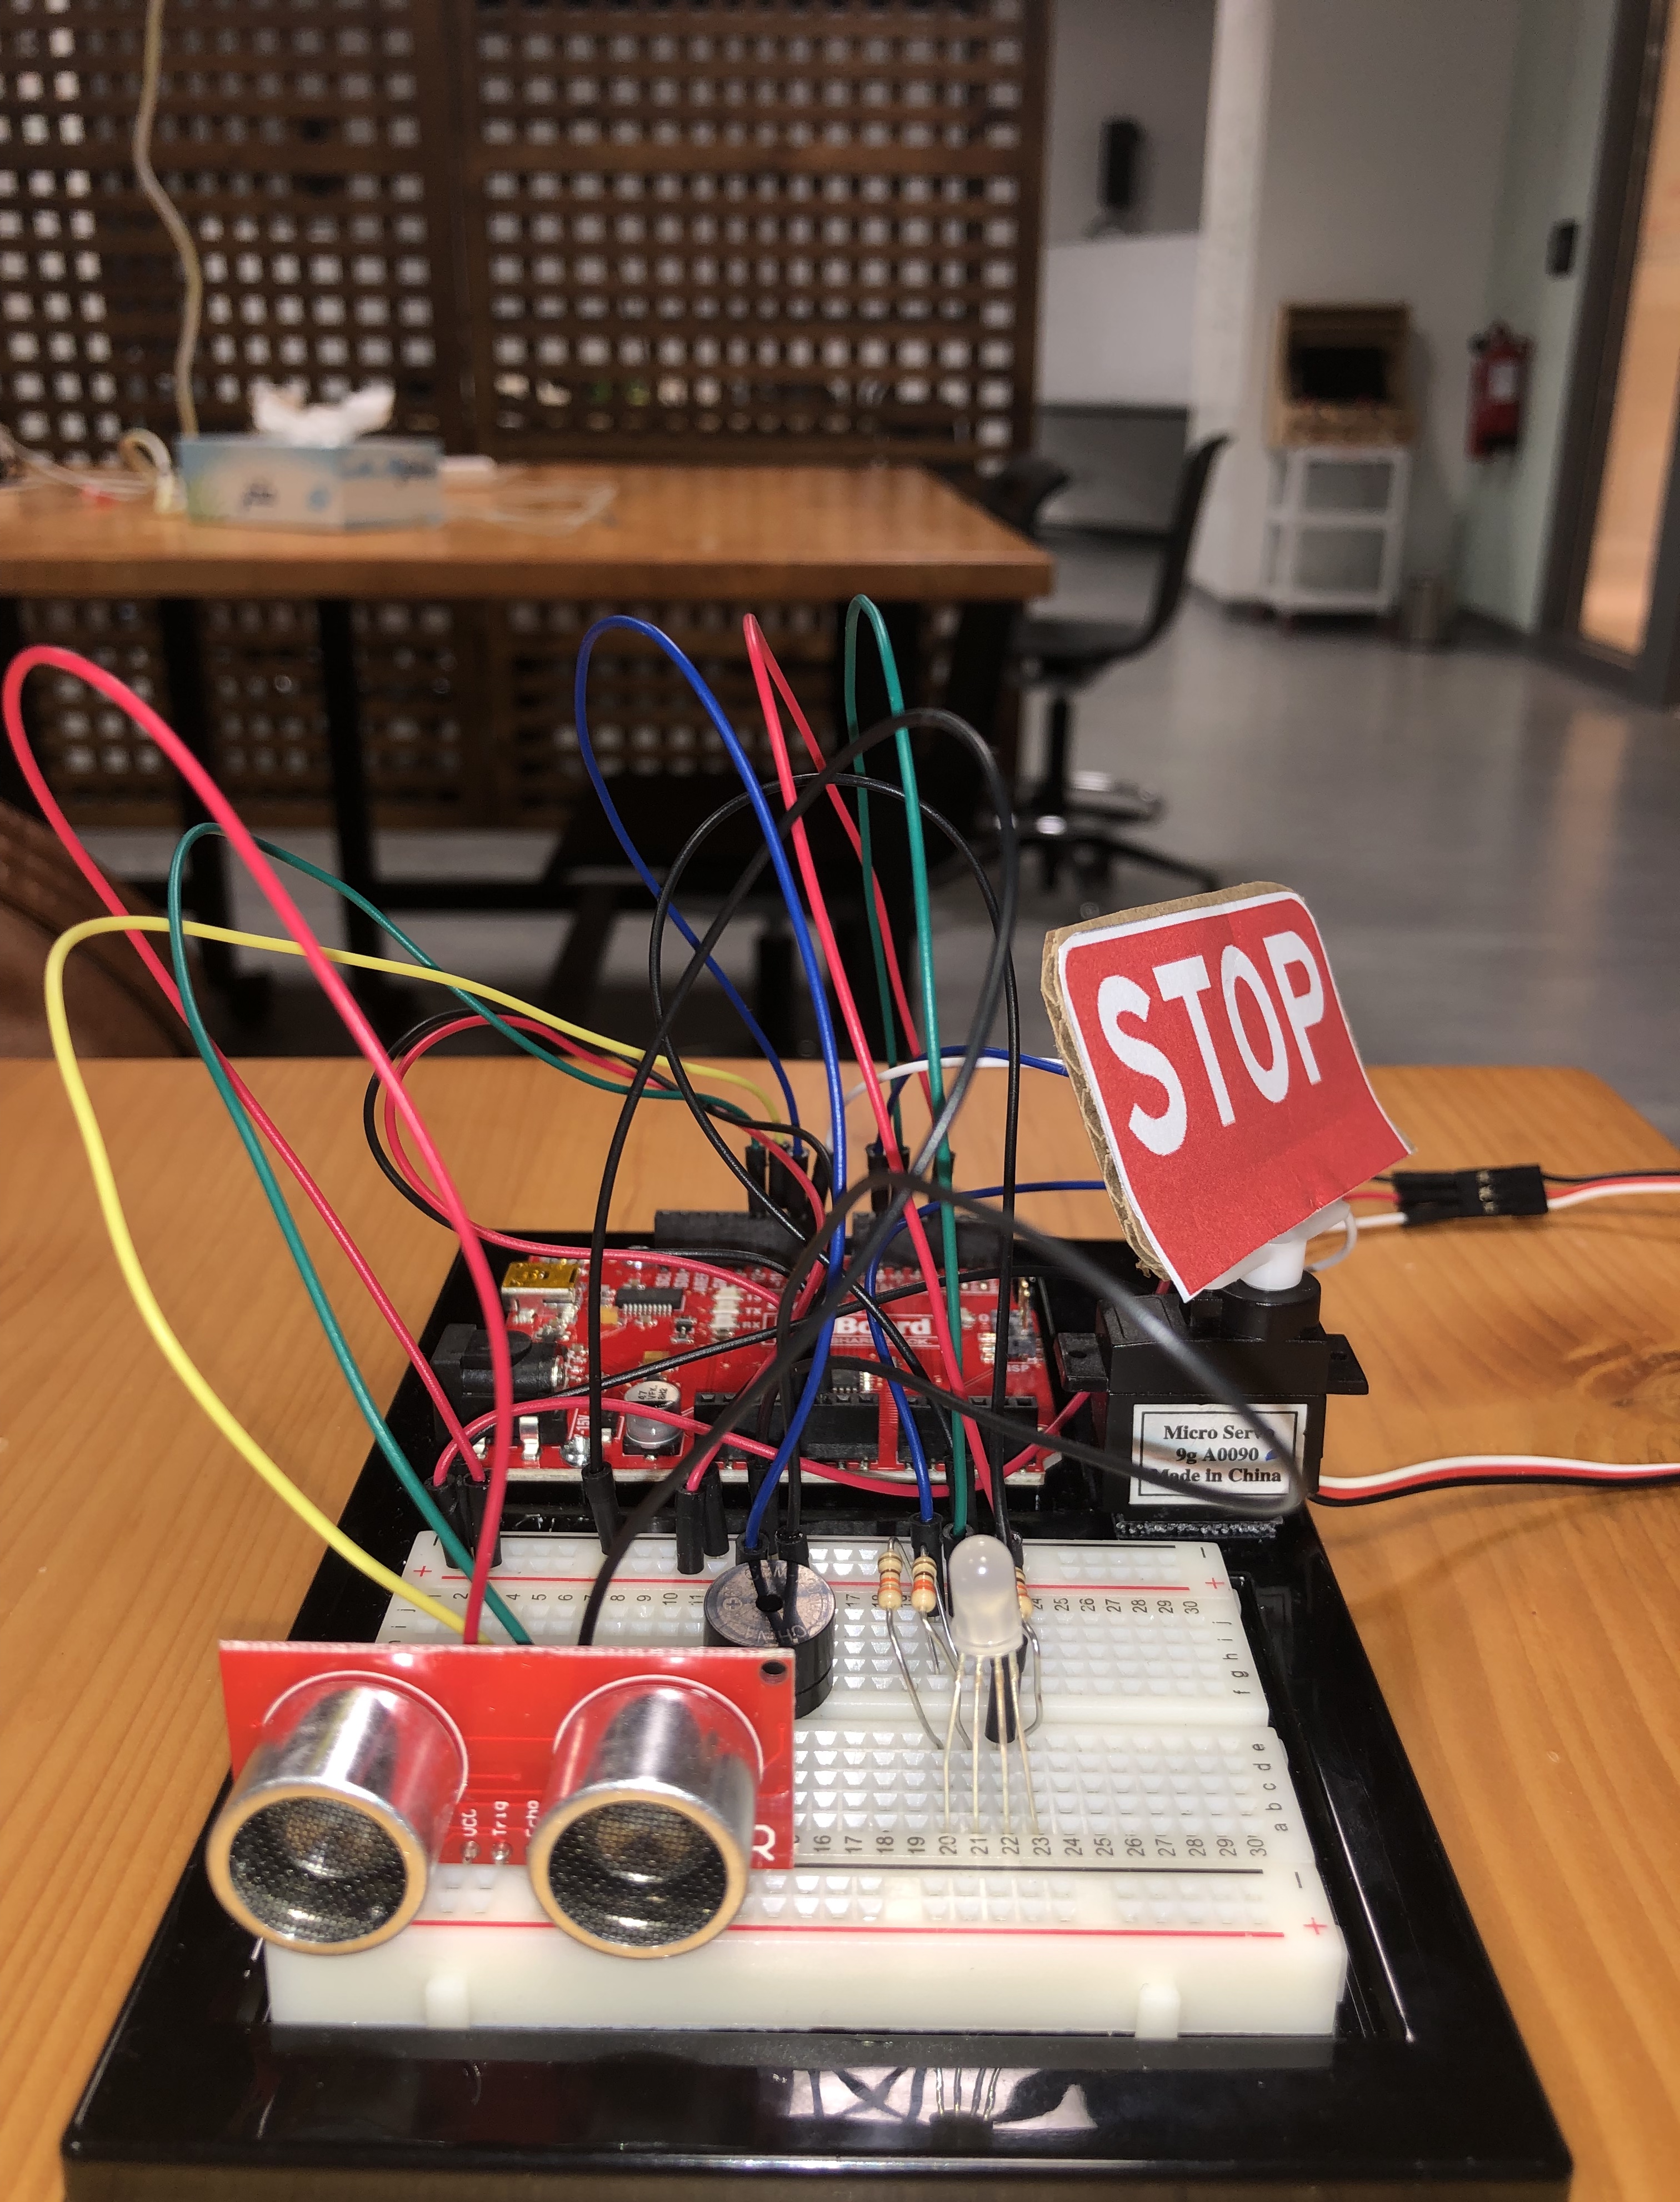
The LED lights up based on readings from the motion sensor about the object’s proximity; so if the object or person is at a safe distance, the LED turns green. At a medium distance, it turns yellow. When the object gets too close to the sensor, the LED turns red and triggers sound from the buzzer along with a movement from the servo motor. Although the stop sign kind of hints at the outcome, there is a sense of ‘surprise’ in that you don’t know how or when it is triggered unless you interact with the sensor. Here is an image of the circuit:
One of the challenges I faced while making this was that I wanted the stop sign to be part of the circuit, rather than a mere cardboard cutout. However, I realized that using a servo to move the sign around reconciles that. If I were to improve this project, I would incorporate an LCD screen to use instead of the cardboard sign.
Here is a final video demonstration:
And here, you can find the code I used to make it work:
    #include <Servo.h>
    const int trigPin = 11;
    const int echoPin = 12;

    const int redPin = 3;
    const int greenPin = 5;
    const int bluePin = 6;

    const int buzzerPin = 10;

    float distance = 0;

    Servo myservo;

    void setup()
    {
      Serial.begin (9600);

      pinMode(trigPin, OUTPUT);
      pinMode(echoPin, INPUT);

      //set the RGB LED pins to output
      pinMode(redPin, OUTPUT);
      pinMode(greenPin, OUTPUT);
      pinMode(bluePin, OUTPUT);

      pinMode(buzzerPin, OUTPUT);

      myservo.attach(9);

    }

    void loop() {
      distance = getDistance();

      Serial.print(distance);
      Serial.println(" in");

      if(distance <= 10){            //close distance

        //make the RGB LED red
        analogWrite(redPin, 255);
        analogWrite(greenPin, 0);
        analogWrite(bluePin, 0);

        //this code moves the servo and triggers the buzzer
        tone(buzzerPin, 272);         //turn buzzer on
        myservo.write(60);            //move servo to 45 degrees
        delay(100);

        noTone(buzzerPin);            //turn buzzer off
        myservo.write(150);           //move servo to 135 degrees
        delay(100);


      } else if(10 < distance && distance < 20){  //medium distance

        //make the RGB LED yellow
        analogWrite(redPin, 255);
        analogWrite(greenPin, 50);
        analogWrite(bluePin, 0);

      } else{                                     //far distance

        //make the RGB LED green
        analogWrite(redPin, 0);
        analogWrite(greenPin, 255);
        analogWrite(bluePin, 0);
      }

      delay(50);      //delay 50ms between each reading
    }


    float getDistance()
    {
      float echoTime;
      float calculatedDistance;

      digitalWrite(trigPin, HIGH);
      delayMicroseconds(10);
      digitalWrite(trigPin, LOW);

      echoTime = pulseIn(echoPin, HIGH);


      calculatedDistance = echoTime / 148.0;
      return calculatedDistance;

    }


  //credits: SparkFun Electronics.
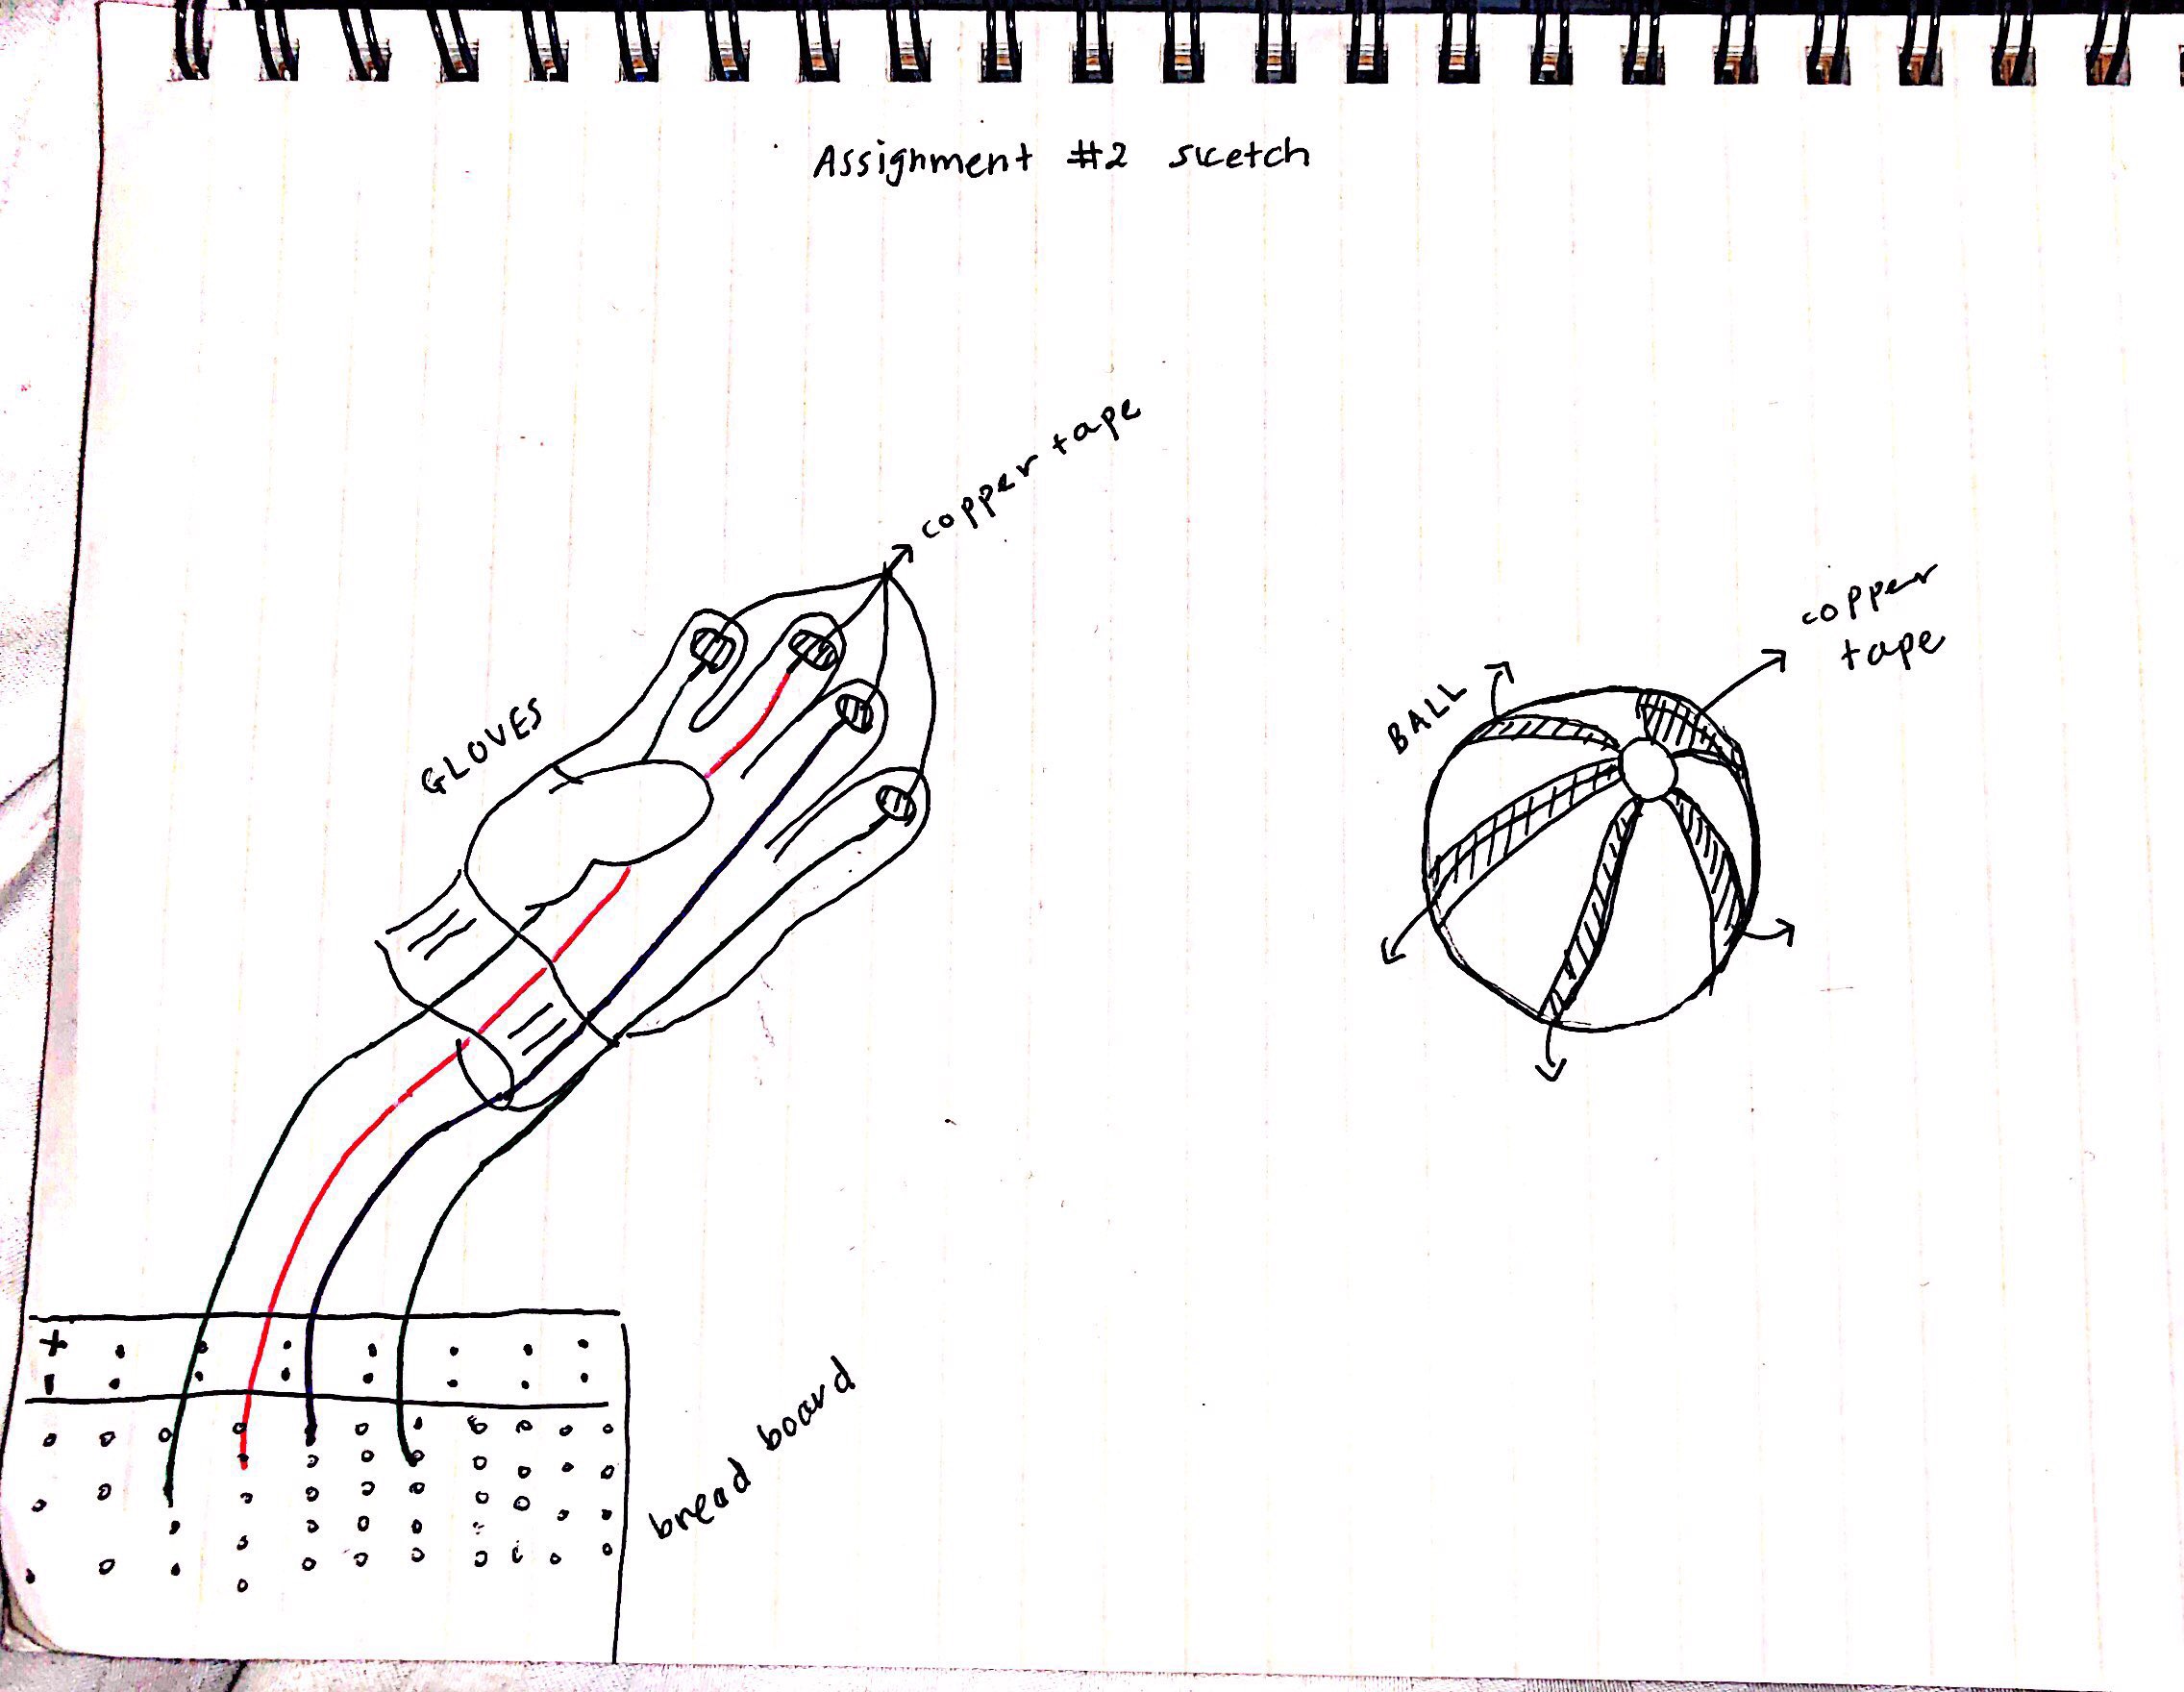
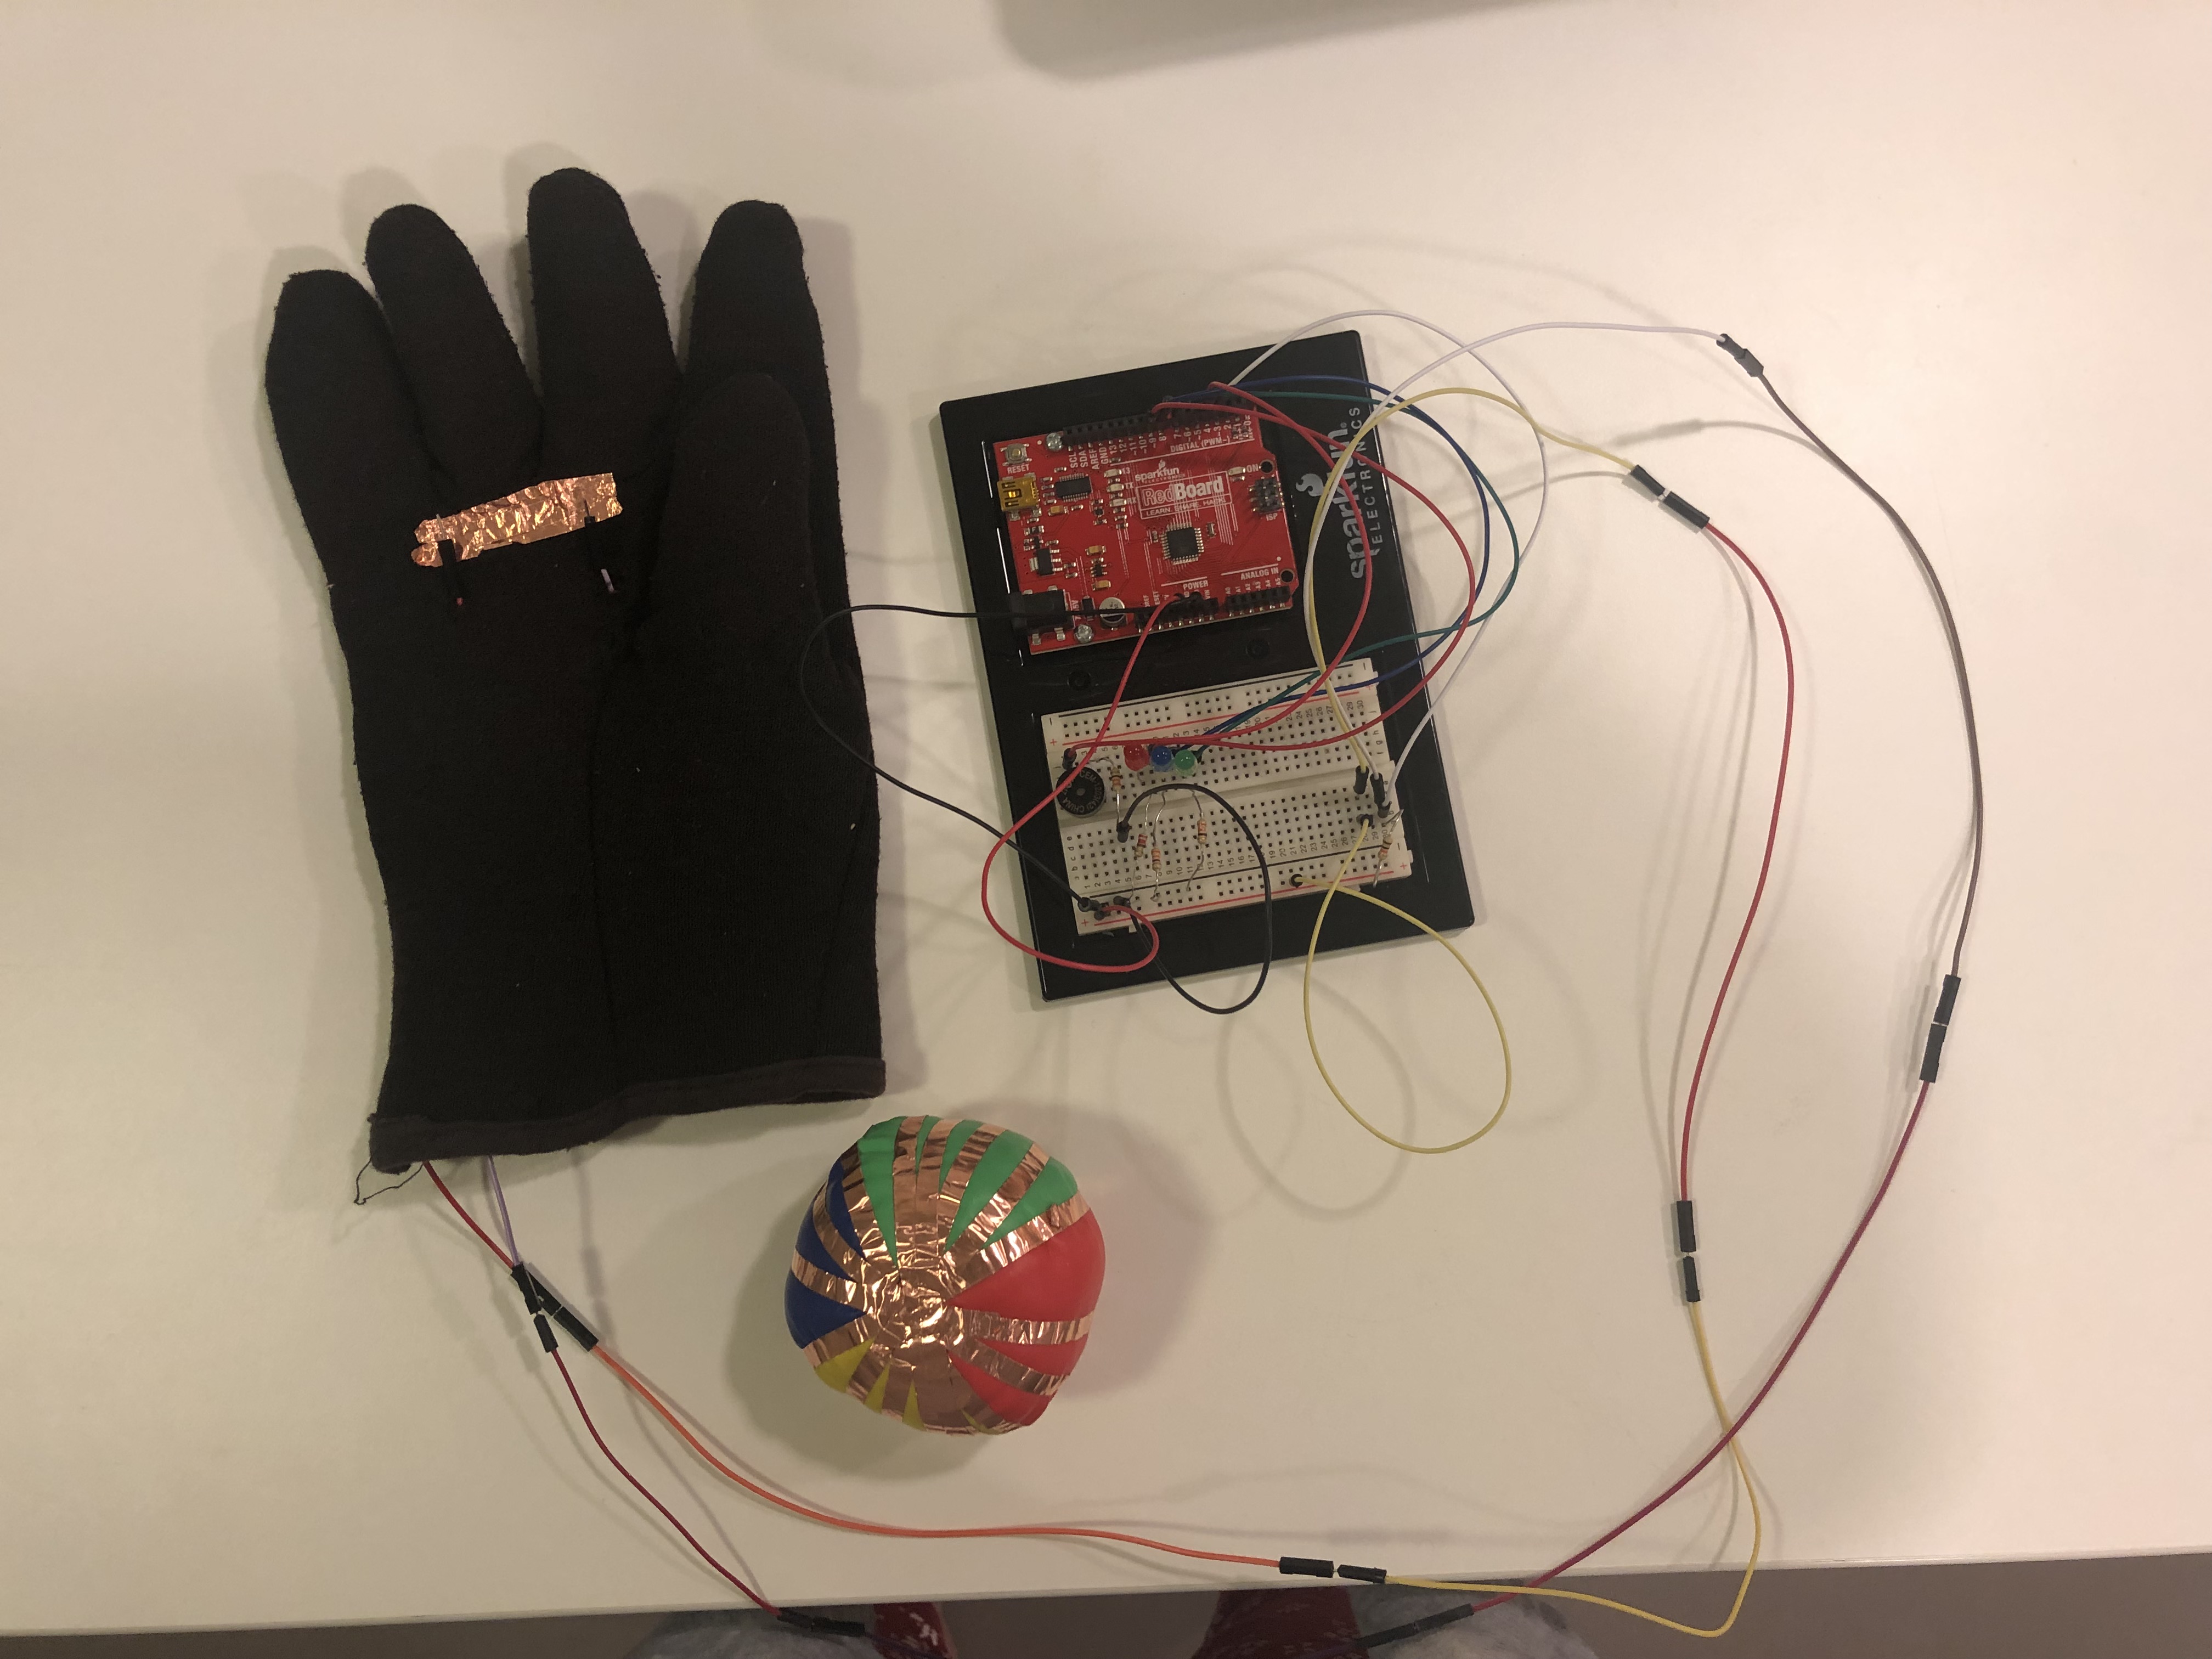
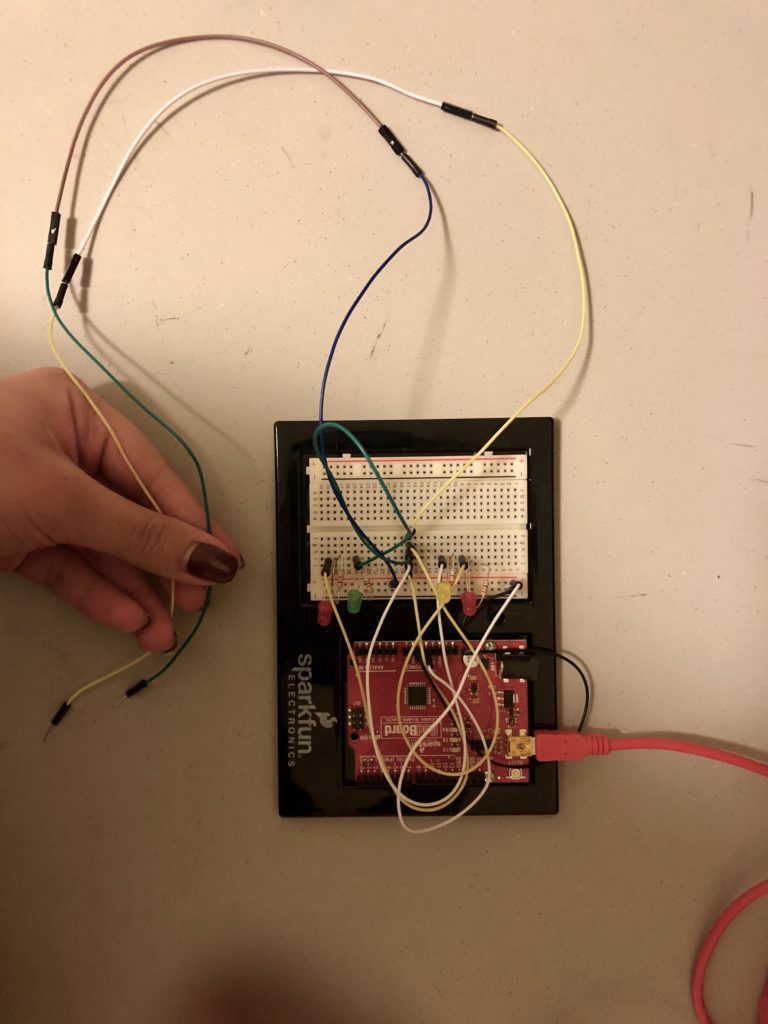
For this assignment, we were asked to make a switch which combines our knowledge of Arduino digital input and output programming. Based on that, I created a switch that connects two long wires through openings on a glove to a series of three blinking LEDs and a 12mm round speaker. To complete the circuit, you’d have to catch a ball which is plastered with copper tape–– thus switching on the LEDs and playing the short tune from the speaker. This project sort of plays on the idea of carnival games which use bright lights and catchy tunes, and I wanted to create something which I can both play with and learn from.
Initially, I had intended for the copper to be on the ball as well as the glove’s fingertips. Here’s a rough sketch of that thought:
However, I realized it would be better to have some copper tape between the wires in the center of the glove instead. This was so I could expand the conductive surface, and also have it all placed in one central position. In the end, this is how my glove and ball looked like:
Here’s a video demonstration of the final result:
When I started programming this on Arduino, I was able to figure out how to make the blinking LEDs work using knowledge from our previous class (and some extra help), but getting the speakers to work was challenging since I’ve never worked with music and code, so I resorted to some Arduino built-in examples which are credited below. Here’s my final code:
#define NOTE_G3  196
#define NOTE_A3  220
#define NOTE_B3  247
#define NOTE_C4  262


int redLed = 9;
int blueLed = 8;
int greenLed = 7;
int button = 3;

int melody[] = {
  NOTE_C4, NOTE_G3, NOTE_G3, NOTE_A3, NOTE_G3, 0, NOTE_B3, NOTE_C4
};

// note durations: 4 = quarter note, 8 = eighth note, etc.:
int noteDurations[] = {
  4, 8, 8, 4, 4, 4, 4, 4
};

// the setup routine runs once when you press reset:
void setup() {
  // initialize the digital pin as an output.
  pinMode(redLed, OUTPUT);
  pinMode(blueLed, OUTPUT);
  pinMode(greenLed, OUTPUT);
  pinMode(button, INPUT);
  Serial.begin(9600);
}

// the loop routine runs over and over again forever:
void loop() {
  int buttonState = digitalRead(button);

  if (buttonState == HIGH) {

    digitalWrite(redLed, HIGH);
    delay(80);
    digitalWrite(redLed, LOW);
    digitalWrite(blueLed, HIGH);
    delay(80);
    digitalWrite(blueLed, LOW);
    digitalWrite(greenLed, HIGH);
    delay(80);
    digitalWrite(greenLed, LOW);

    for (int thisNote = 0; thisNote < 8; thisNote++) {

      // to calculate the note duration, take one second divided by the note type.
      //e.g. quarter note = 1000 / 4, eighth note = 1000/8, etc.
      int noteDuration = 1000 / noteDurations[thisNote];
      tone(4, melody[thisNote], noteDuration);

      // to distinguish the notes, set a minimum time between them.
      // the note's duration + 30% seems to work well:
      int pauseBetweenNotes = noteDuration * 1.30;
      delay(pauseBetweenNotes);
      // stop the tone playing:
    }
  }
}

//credits: toneMelody Arduino built-in examples.
“Is interactivity utterly subjective?” I thought this was a compelling question, especially with regards to our conversation about interactivity in class.
Crawford suggests that interactivity could possibly be one of a few “objective truths”, however also still not completely objective- as he goes on to prove how we can use personal subjectivity to measure the degrees of interactivity within an object. Here, he offers the example of Boolean properties, and how we tend to think of interactivity as a Boolean–it either exists or it doesn’t. Crawford proposes that we should instead view interactivity as a “continuous variable with relative measures”. An example of this would be to rate or measure interactivity from high to low, or strong to weak. This leaves some level of subjectivity, in that each person may rate an interaction differently on the scale.
I appreciate Crawford’s efforts in reaching a middle ground. He does not completely dismiss the objectivity nor the subjectivity of interactions, and instead constructs a means of using both concepts in our understanding of what is interactive, and what is not.
As for Crawford’s review question “come up with your own damn definition of interactivity!”– that is a question I hope to revisit and answer by the end of this course.
For this assignment, we were asked to create a simple circuit that functions without the use of hands. I completed my circuit using a “skirt” made of aluminum foil. The reason I chose a skirt was because I wanted to experiment with a wearable object. To do this, I added two long wires and connected them to four LED lights. Then, I placed the two opposing wires on the chair, in order to light up the LEDs (and complete the circuit) as soon as my skirt touched the wires. Here is an image of my circuit:
The skirt was a bit too tight, but it worked. Here is a video demonstration: