Week 9: Unusual Switch

Overview

In this assignment, I was tasked with designing a unique switch that doesn’t use hands for activation. I embraced the challenge with creativity, creating two distinct switches: a water detection switch and a bicep flexion switch.

Switch 1: Water Detection System with Visual Indicator

Concept

The concept behind this water detection system is rooted in the fundamental principle of electrical conductivity in water. Utilizing a simple circuit design with an Arduino, the project aims to detect the presence or absence of water through basic electronic components. When water connects two strategically placed wires, it completes a circuit, allowing current to flow, which the Arduino interprets to trigger a visual signal.

Inspiration

The inspiration for this project came from the need to monitor water levels or detect water presence in various situations, such as checking if a plant needs watering or preventing overflow in tanks.

Image

Components Used

  1.  Arduino Uno
  2. Green LED
  3. Red LED
  4. 330Ω Resistors (2)
  5. Jumper Wires
  6. Breadboard

How It Works

  • I connected the anode of each LED (green and red) through a 330Ω resistor to digital pins 13 and 12 on the Arduino, respectively. The cathodes were connected to the ground (GND).
  • I prepared two wires as water sensors by stripping a small section of insulation off each end. One wire was connected to digital pin 2 on the Arduino, and the other wire was connected to GND. These wires were then placed close to each other but not touching, ready to be submerged in water.
  • I wrote and uploaded the code to the Arduino that checks the electrical connection between the sensor wires. If water is present (completing the circuit), the green LED turns on. If the circuit is open (no water detected), the red LED illuminates.

Video

Switch 2: Bicep Switch

Concept

The goal was to create a device that could detect muscle flexion, particularly of the bicep, and provide immediate visual feedback.

The circuit setup and the code used are the same as the water detection switch.

Image

Components Used

  1.  Arduino Uno
  2. Green LED
  3. Red LED
  4. 330Ω Resistors (2)
  5. Jumper Wires
  6. Breadboard
  7. Cardboard Pieces
  8. Copper Tape

How It Works

When the bicep is flexed, the circuit completes, and the green LED lights up, indicating muscle activity. Conversely, when the muscle relaxes, the circuit breaks and the red LED turns on, indicating that the muscle is at rest.

Video

Week 8a: Reading Response

RESPONSE: Her Code Got Humans on the Moon—And Invented Software Itself

It is indeed reassuring to read about Hamilton’s journey and her crucial part in a momentous occasion in human history when one considers the strength of perseverance and innovation. It also draws attention to the structural obstacles that women in STEM areas have encountered and still face. This was even highlighted in the article, “It was 1960, not a time when women were encouraged to seek out high-powered technical work.” This article reminded me of the contributions of women to the first computer Electronic Numerical Integrator and Computer, ENIAC.

In the case of the ENIAC, it was programmed by six women: Kay McNulty, Betty Jennings, Betty Snyder, Marlyn Meltzer, Fran Bilas, and Ruth Lichterman. These women were integral to the operation and programming of the ENIAC, performing complex calculations and programming tasks that were critical to the computer’s success. Women’s entry into the industry was perceived as a means of freeing up males for more “skilled” work, as the field was not considered prestigious. Despite their essential roles and substantial technical accomplishments, their contributions were not widely recognized during their lifetimes, and the narrative of computing history often sidelined their efforts.

Question: What mechanisms are present today that either hinder or promote diversity and inclusion in tech and engineering?

RESPONSE: Emotion & Design: Attractive things work better

The theme that I could connect with was “the pleasure of use. As someone deeply invested in the intersection of design and user experience, I’ve always been captivated by products that deliver not just functionality but also the pleasure of use. Take, for example, the tactile feedback of a high-quality mechanical keyboard. Each keystroke produces a satisfying click, transforming the mundane task of typing into an enjoyable experience. It’s not just about the act of typing; it’s about how the device makes me feel while I’m using it.

true beauty in product design is multi-dimensional, integrating functionality, ease of use, and pleasure

Question: How can designers balance usability and aesthetics in product design, ensuring that neither aspect is compromised?

Midterm Project: Dungeon Maze

Concept

This dungeon-based maze game’s premise centers on an exciting and dynamic challenge where players are sent into several mazes that are produced by an algorithm, each with its own layout and set of coins and teleporters.

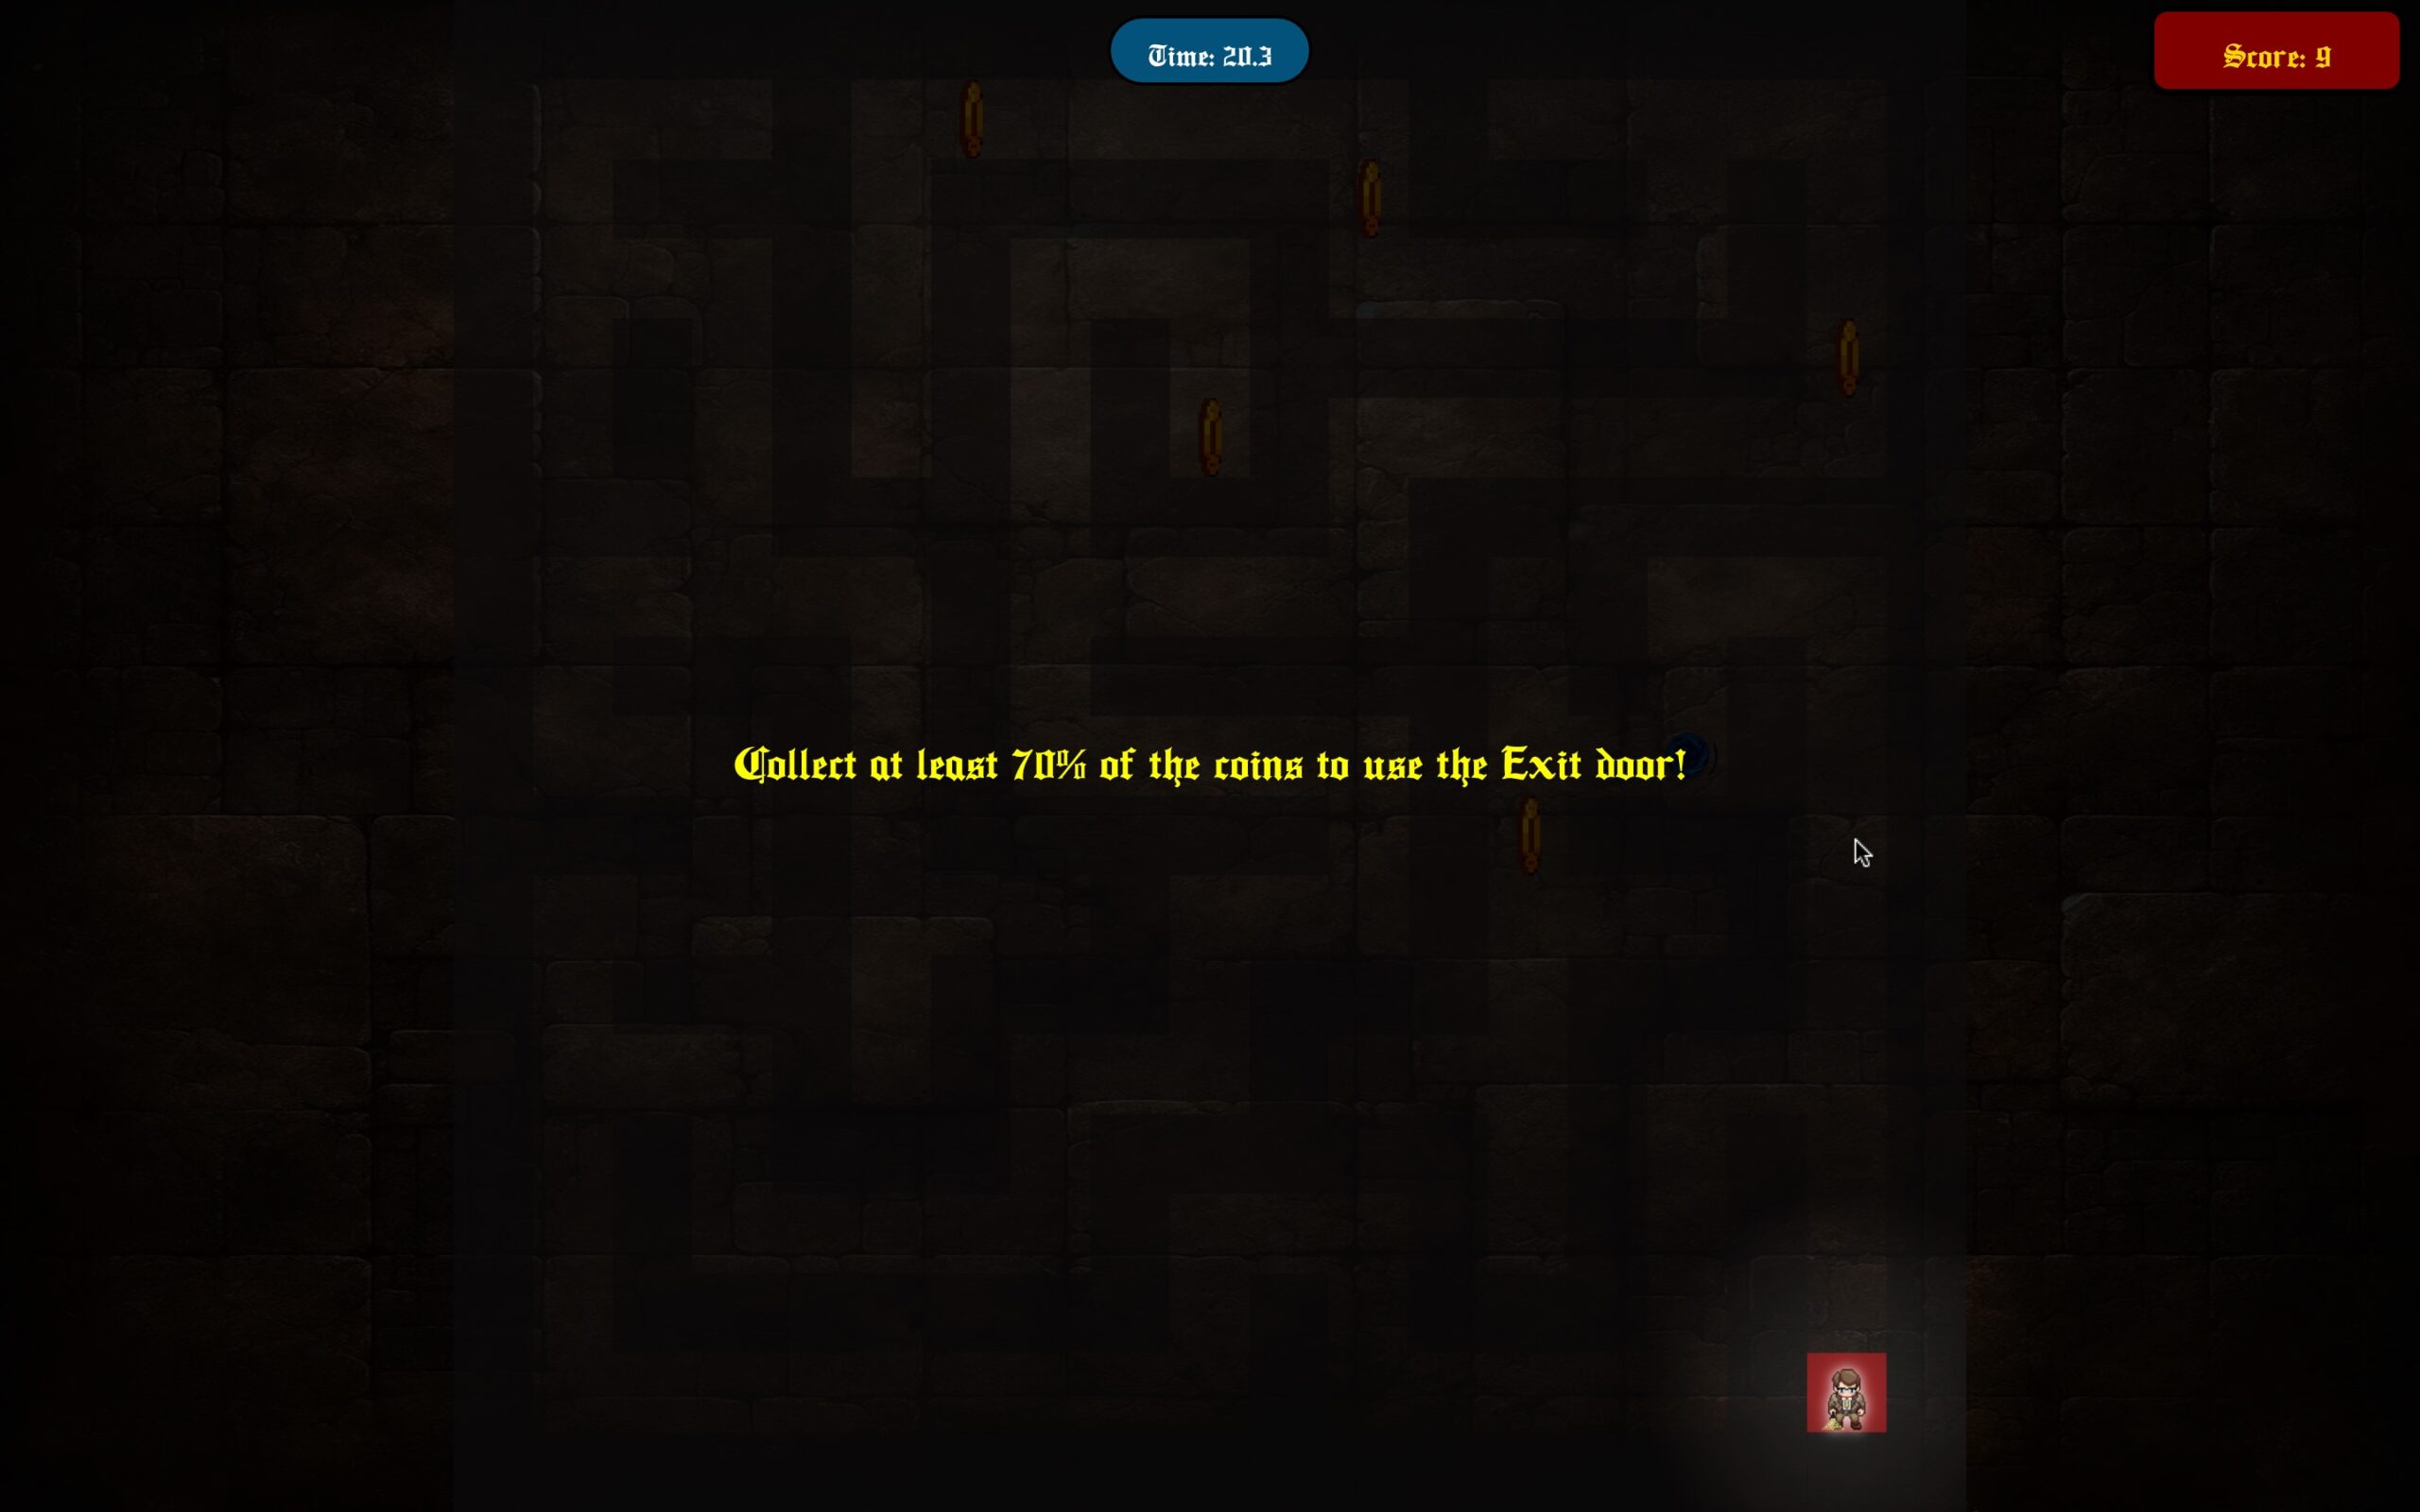
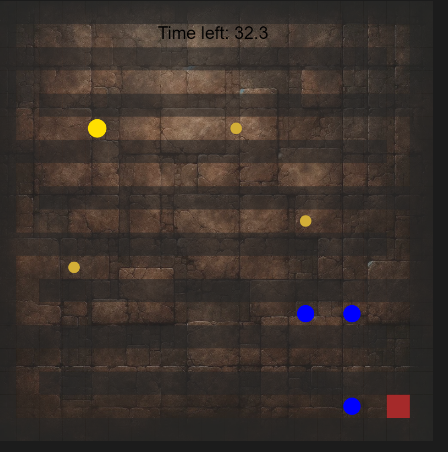
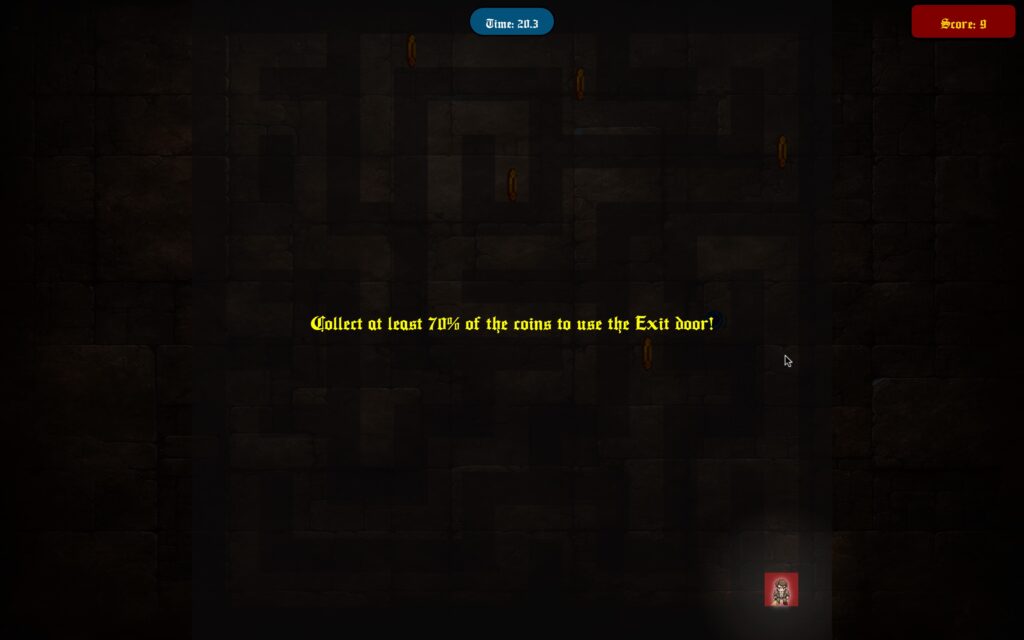
The game’s main goal, set against an engrossing dungeon backdrop, requires players to maneuver tactically through the maze, collecting gold coins while racing against the clock to locate the exit. The game uses teleporters as a game-changing element to enhance depth and complexity. Players can quickly go to different mazes, which resets the maze’s layout and offers unexpected twists. This makes the ‘Dungeon Master’ change their strategy.

In addition, an interesting limited vision feature simulates the real difficulty of traversing a dimly lit dungeon by preventing players from seeing beyond their immediate surroundings and forcing them to depend solely on memory and spatial awareness in order to advance. A fascinating and unpredictable journey that tests players’ intelligence and flexibility through the mix of random maze creation and other mechanisms like timers and limited vision, making every playthrough a unique experience.

Sketch

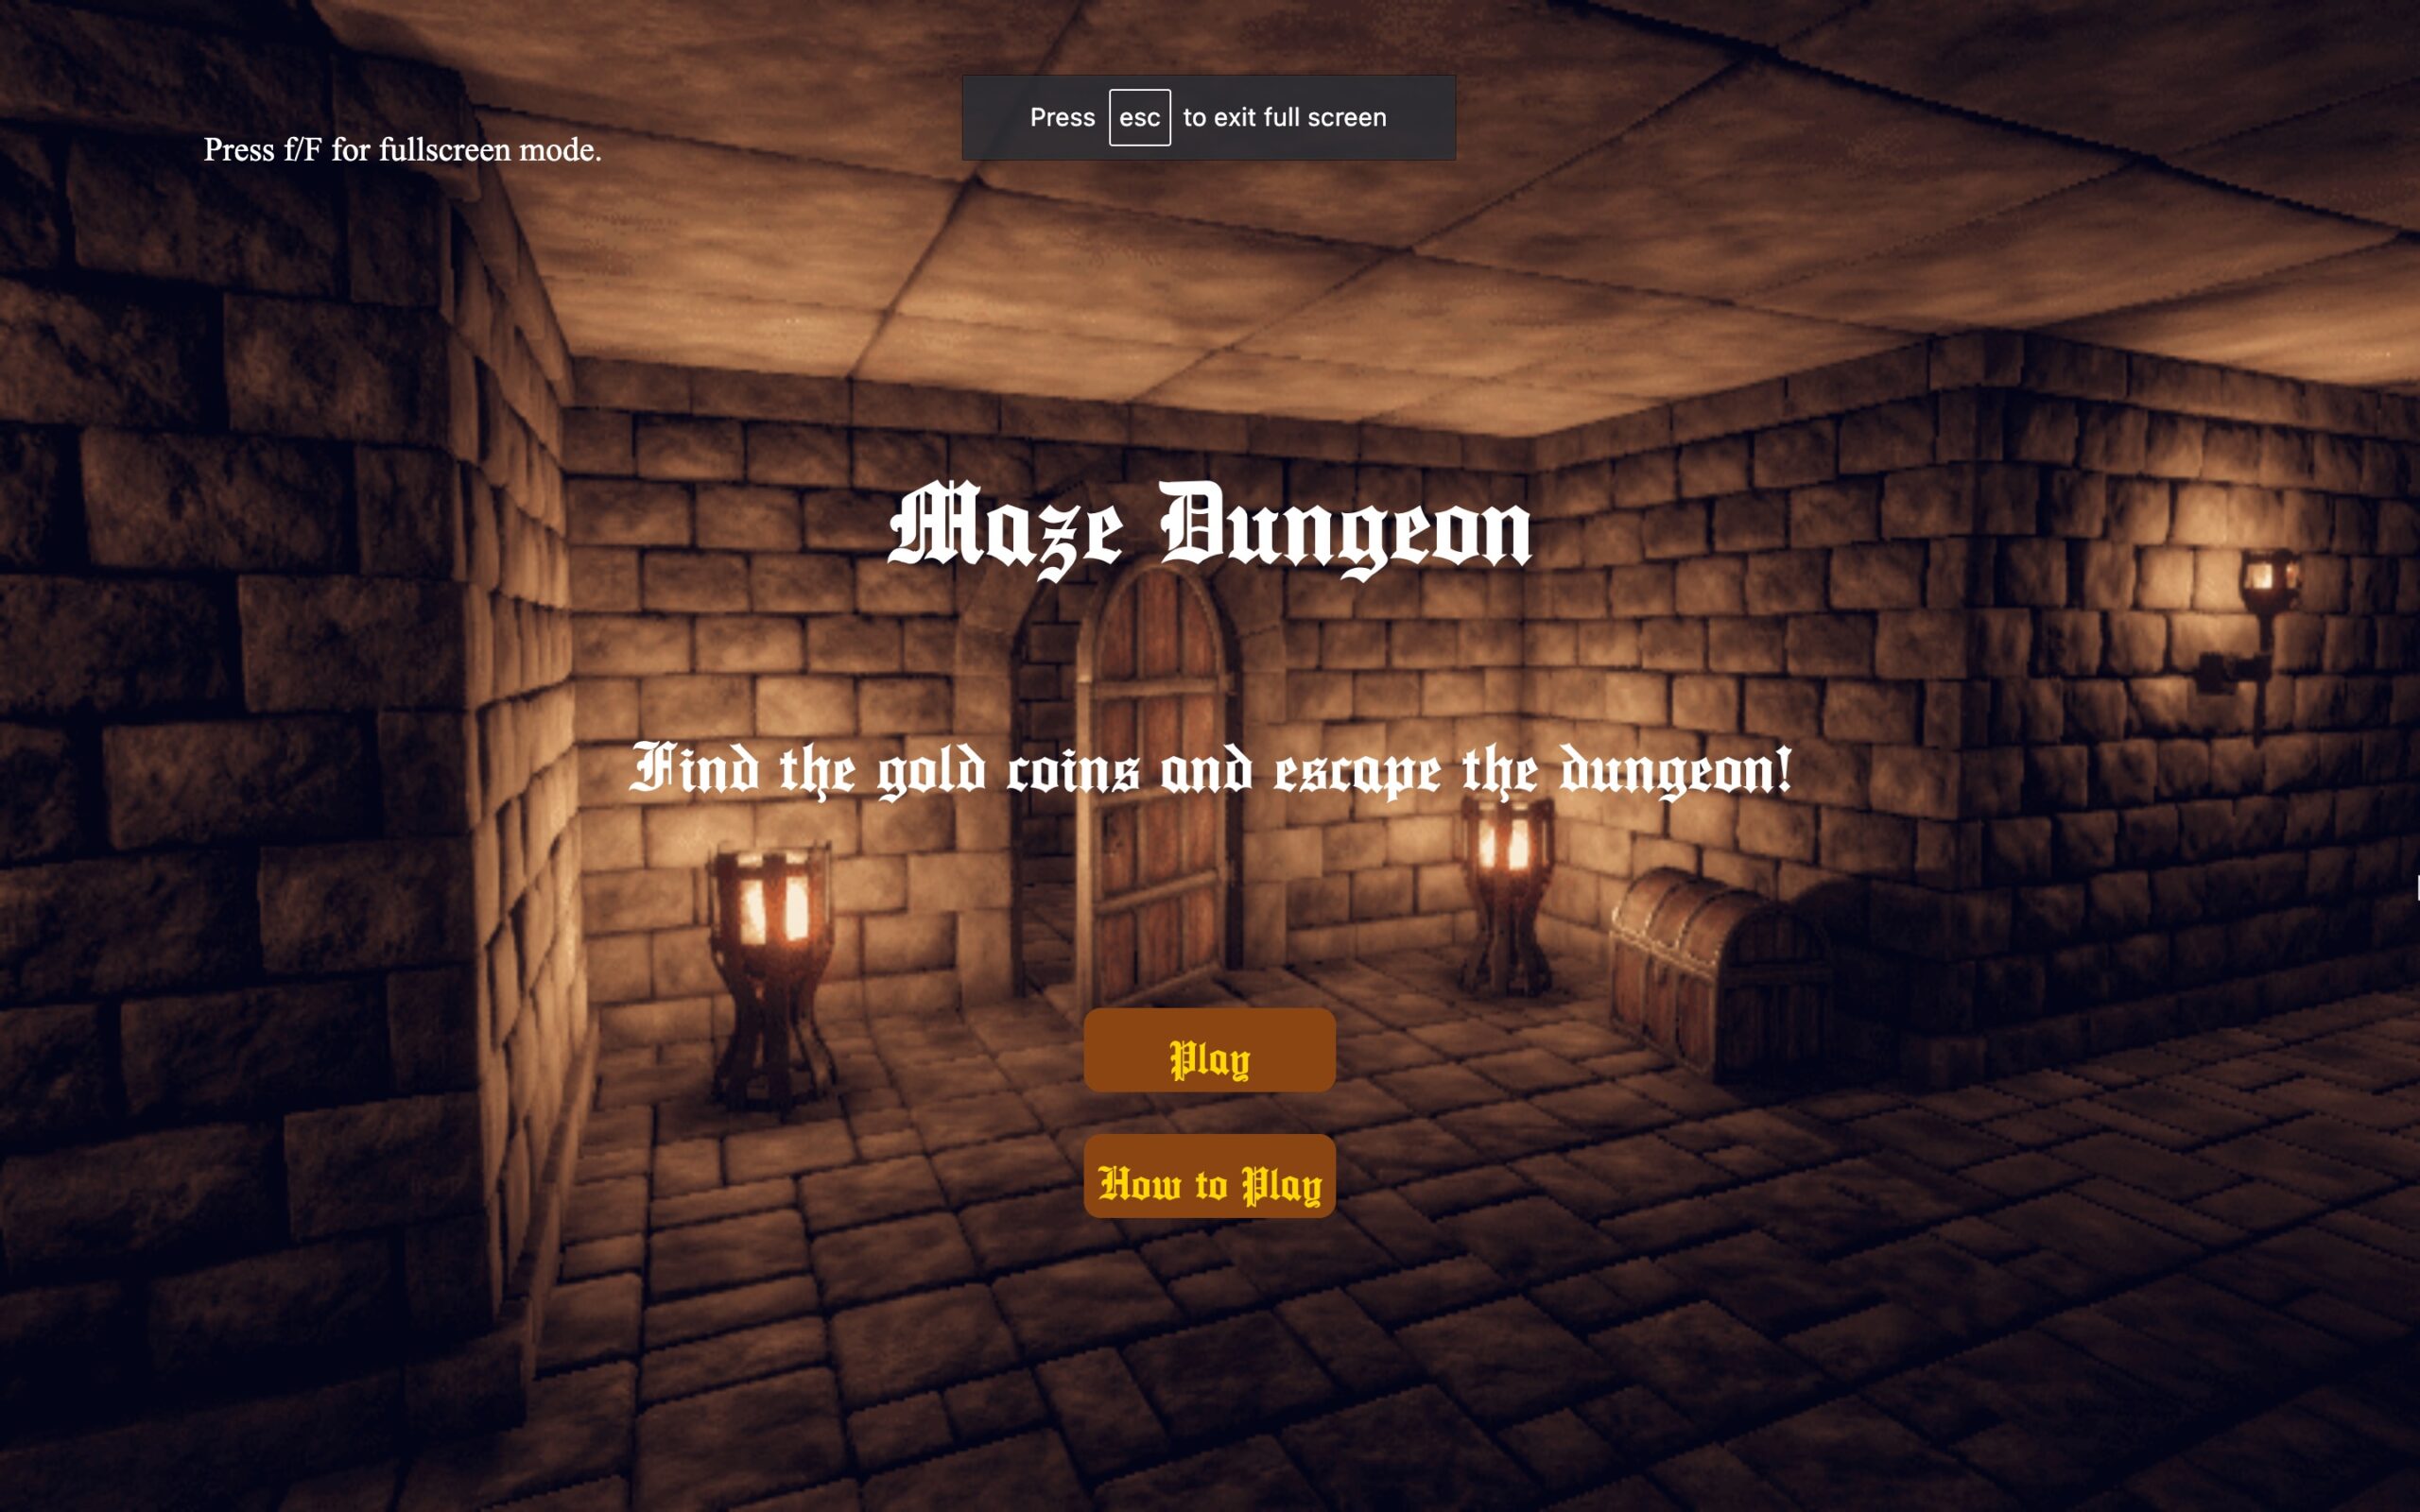
Snapshots of the Game

Elements of Pride

The choices made in the design of features like the drawLimitedVision effect, the generateRandomMaze function, and the adaptive design for fullscreen and windowed modes are a demonstration of good game designs and good technical decisions.

generateRandomMaze() {
    let maze = new Array(this.rows);
    for (let y = 0; y < this.rows; y++) {
      maze[y] = new Array(this.cols).fill('#');
    }
    const carvePath = (x, y) => {
      const directions = [[1, 0], [-1, 0], [0, 1], [0, -1]];
      this.shuffle(directions);

      directions.forEach(([dx, dy]) => {
        const nx = x + 2 * dx, ny = y + 2 * dy;
        if (nx > 0 && nx < this.cols - 1 && ny > 0 && ny < this.rows - 1 && maze[ny][nx] === '#') {
          maze[ny][nx] = ' ';
          maze[y + dy][x + dx] = ' ';
          carvePath(nx, ny);
        }
      });
    };

    const startX = 2 * Math.floor(Math.random() * Math.floor((this.cols - 2) / 4)) + 1;
    const startY = 2 * Math.floor(Math.random() * Math.floor((this.rows - 2) / 4)) + 1;
    maze[startY][startX] = ' ';
    carvePath(startX, startY);
    let coinCount = Math.floor(Math.random() * (12 - 8 + 1)) + 8; // 8 to 12 coins
    let teleporterCount = Math.floor(Math.random() * (2 - 1 + 1)) + 1; // 1 to 2 teleporters
    maze[this.rows - 2][this.cols - 2] = 'E';
    this.addRandomItems(maze, 'C', coinCount);
    this.addRandomItems(maze, 'T', teleporterCount);

    return maze;
  }

The generateRandomMaze function is a cornerstone of the game’s dynamic environment, creating a new, solvable maze for each session or level. The function uses a recursive backtracking algorithm, it selects a random starting point within the maze and carves out paths. This is done by moving two cells at a time in a chosen direction (to avoid creating isolated cells) and removing walls between cells to create a path. This process repeats recursively for each new cell reached that has all its surrounding cells intact.

Once the maze is generated, the function strategically places coins (‘C’) and teleporters (‘T’) within the maze. Coins act as collectibles, and teleporters serve as transport points to new mazes. An exit (‘E’) is placed at a predefined location, typically far from the start, ensuring that players must navigate through the maze to find it.

function drawLimitedVision(playerX,playerY,visibilityRadius) {

  // Draw a radial gradient from transparent to dark
  let radialGradient = drawingContext.createRadialGradient(playerX, playerY, 0, playerX, playerY, visibilityRadius);
  radialGradient.addColorStop(0, 'rgba(0,0,0,0)'); // Completely transparent at the center
  radialGradient.addColorStop(1, 'rgba(0,0,0,0.8)'); // More opaque towards the edges

  drawingContext.fillStyle = radialGradient;
  drawingContext.fillRect(0, 0, width, height);
}

The drawLimitedVision function enhances the game’s atmosphere by simulating a limited field of vision for the player, similar to carrying a light source in a dark dungeon. The function creates a radial gradient centered on the player’s current position. This gradient transitions from transparent (at the center) to opaque (at the edges) obscures parts of the maze not immediately near the player.

function calculateCellSize() {
  cellSize = min(width, height) / max(mazeColumns, mazeRows);
}

function windowResized() {
  resizeCanvas(windowWidth, windowHeight);
  calculateCellSize();
}

The code includes mechanisms to adapt to fullscreen and windowed modes. The calculateCellSize function dynamically calculates the size of each maze cell based on the current dimensions of the game window. This ensures that the maze scales correctly when switching between fullscreen and windowed modes, maintaining consistent gameplay and visual quality. The windowResized function listens for changes in the window size (including toggling fullscreen mode) and adjusts the canvas size accordingly.

Difficulties

One of the trickier parts of developing the game was actually implementing the limited vision functionality. Developing a smooth, radial-gradient of light that would dynamically follow the player’s motions and provide vision around them while keeping the remainder of the maze in complete darkness was the challenge. It took several tries to get this effect just right so that it seemed natural and didn’t interfere with gameplay by being too dark or changing too quickly.

There were further difficulties when trying to get the game to smoothly switch between fullscreen and regular window modes. Flexible design was necessary to make sure that the maze, player character, and user interface (UI) components all scaled and remained proportionate across a range of screen sizes and aspect ratios. This flexibility was essential to maintaining the game’s playability and graphic quality in any viewing mode.

Improvements

A possible area for enhancement is the visual design and user interface. For example, adding more complex visuals to the player’s character, treasures, and maze walls might greatly improve the game’s visual attractiveness. Furthermore, adding more variation to the maze layouts and obstacles—like traps or enemies—could add new and unique difficulties and amplify the action.

The project could also benefit from a more advanced level progression system, where the difficulty gradually increases through levels, possibly by enlarging the maze, decreasing the time limit, or increasing the required percentage of coins to collect before exiting.


Full Code

Midterm Project Progress (The Dungeon Maze)

MAZE GAME

Concept

The idea behind the game is that player must make their way through a sequence of difficult mazes using mathematical algorithms, each one generated randomly to provide a different challenge with each maze. The main objective of the game is for the player to navigate from the beginning point to the maze’s exit.

Gold coins are scattered throughout the maze and act as collectibles for players to find. This helps them to finish the game if they collect a certain number of gold coins. Also, 90% of the gold coins spawned on the maze must be collected for the player to exit the maze. However, they can use the teleporter without this condition.

There are teleporters placed in the maze that serve as an interesting twist to the game. Stepping upon a teleporter transports the player to a whole new maze, which changes the difficulty and forces them to adjust their approach on the fly.

Every maze in the game has a timer built into it, which creates a sense of urgency and tests the player’s ability to think quickly and make decisions under pressure. Also, the player has limited vision which makes it difficult for the player to plan their next move. This forces them to memorize their path to complete the maze.

Design 

The visual and thematic components of this maze game are designed to put the player in the shoes of a dungeon master.

The image is used for the background of the maze.

This is a snippet of the maze. The design is a work in progress as I am focusing on getting the basic functionality to work first. Currently, the big yellow is the player, the small bronze-colored circles are the gold coins, the blue circles are the teleporters, and the red square is the exit. I planning on replacing these with some avatars or icons.

Frightening Part

The most frightening part when I started to code was the main functionality of the game, The Maze. I wanted to have random mazes being generated every time the user plays the game or is teleported. So that it invokes a new sense of challenge.

The use of randomness and the cyclical structure of the path-carving process is what gives the procedure its complexity. Recursive functions include function calls that repeat back on themselves, they can be challenging to study and comprehend. I have

The code below shows how I tackled this issue:

function generateRandomMaze(rows, cols) {
  let maze = new Array(rows);
  for (let y = 0; y < rows; y++) {
    maze[y] = new Array(cols).fill('#');
  }

  function carvePath(x, y) {
    const directions = [[1, 0], [-1, 0], [0, 1], [0, -1]];
    // Shuffle directions to ensure randomness
    shuffle(directions); 

    directions.forEach(([dx, dy]) => {
      const nx = x + 2 * dx, ny = y + 2 * dy;

      if (nx > 0 && nx < cols - 1 && ny > 0 && ny < rows - 1 && maze[ny][nx] === '#') {
        maze[ny][nx] = ' ';
        // Carve path to the new cell
        maze[y + dy][x + dx] = ' '; 
        carvePath(nx, ny);
      }
    });
  }

  // Randomize the starting point a bit more conservatively
  const startX = 2 * Math.floor(Math.random() * Math.floor((cols - 2) / 4)) + 1;
  const startY = 2 * Math.floor(Math.random() * Math.floor((rows - 2) / 4)) + 1;

  // Ensure starting point is open
  maze[startY][startX] = ' '; 
  carvePath(startX, startY);

  // Set exit
  maze[rows - 2][cols - 2] = 'E';

  // Place teleporters and coins after maze generation to avoid overwriting
  addRandomItems(maze, 'T', 3);
  addRandomItems(maze, 'C', 5);

  return maze;
}

function shuffle(array) {
  for (let i = array.length - 1; i > 0; i--) {
    const j = Math.floor(Math.random() * (i + 1));
    [array[i], array[j]] = [array[j], array[i]];
  }
}

The generateRandomMaze() function creates a random intricate maze by first populating it with walls and then utilizing the depth-first search algorithm to recursively find pathways. To ensure variation in the pathways formed, it shuffles possible directions (up, down, left, and right) starting from a randomly selected point. It improves the gameplay experience by slicing through the grid, placing an exit, and dispersing interactive features like coins and teleporters at random. The carvePath function’s use of recursion and randomness is essential to creating a maze that embodies the spirit of maze exploration and strategy and is both difficult and unique each time the game is played.


NOTE: I have used a lot of functions rather than classes. The functionality of the game is 80% achieved and from here on now I will change the functions to classes and complete 100% of the game/gameplay.

Reading Response: Computer Vision

I was interested in the Detecting Motion 9code listing 1) concept in this week’s reading. Frame differencing is a simple technique that may be used to detect and quantify motions of humans (or other objects) within a video frame.

The reading emphasizes how computer vision algorithms are not naturally capable of comprehending the subtleties of various physical surroundings, despite their advanced capacity to process and analyze visual input. The physical environments in which these algorithms function can greatly increase or decrease their effectiveness. The use of surface treatments like high contrast paints or controlled illumination like backlighting, for instance, is discussed in the reading as ways to enhance algorithmic resilience and performance. This suggests that the software and the real environment need to have a symbiotic connection in which they are both designed to enhance one another.

This concept reminded me of The Rain Room. In my opinion, this installation has motion sensors that act like computer vision that allow people to move through a space where it is raining everywhere but where they are standing. The computer vision system’s exact calibration with the actual environment is crucial to the immersive experience’s success because it allows the sensors to recognize human movement and stop the rain from falling on the people.

Reading Response: Design Principles in Everyday Objects

Don Norman’s refrigerator example from “The Design of Everyday Things” is a significant example that highlights several important design, user experience, and cognitive processes related to human-machine interaction concerns. The idea of cognitive dissonance in design, which occurs when users’ expectations and reality are distinct which causes annoyance and inefficiency, is embodied by the refrigerator’s confused controls. In my opinion, this example is a smaller issue of a much larger issue in the fields of design and technology.

The controls on the refrigerator expose a basic breakdown in the way designers and consumers communicate. The designers have a high in-depth knowledge of how the product works, but they often neglect what information users need to comprehend and utilize the product as intended. The belief that consumers will “figure it out” might result in designs that make sense to the designer but seem complex to the user.

After reading about the refrigerator it reminded me of “Computer Space” by Nolan Bushnell. This was one of the first arcade games which was made and did not conquer the market as the controls on the machine were way too complicated/complex for the user to comprehend. Although the vision of the game was intuitive, no one would want to read instructions to play a video game so the controls for the game became very hard for the users.

All of this made me wonder, how does the design of everyday objects influence our behavior and interactions with technology?


Assignment 4: Generative Text Output

Concept

The concept I aimed to replicate the captivating streams of 1s and 0s that are frequently shown in movies or GIFs, which represent the fundamentals of digital computing and communication. I wanted to achieve something similar to seeing a complex dance of binary digits, therefore I represented these streams with random characters.

Inspiration 

Sketch


Code

function draw() {
  background(0); 
  
  // Display and animate characters
  for (let x = 0; x < cols; x++) {
    for (let y = 0; y < rows; y++) {
      let yOffset = (millis() * speed + x * 50 + y * 50) % (height + 200) - 100;
      
      if (grid[x][y].bright) {
        // Set bright neon blue color for highlighted characters
        fill(0, 255, 255); 
      } else {
        // Set light neon blue color for other characters
        fill(0, 150, 255); 
      }
      
      text(grid[x][y].char, x * charSize, y * charSize + yOffset);
    }
  }
}

In the draw() method, I have a nested loop that iterates over each cell of the 2D grid array. The location of the characters are calculated and its appearance based on its coordinates and a time-based offset (yOffset). This offset is computed given the cell coordinates, a predetermined speed value, and the current value of millis(), which indicates the milliseconds since the sketch began operating.

if (grid[x][y].bright) {
        // Set bright neon blue color for highlighted characters
        fill(0, 255, 255); 
      } else {
        // Set light neon blue color for other characters
        fill(0, 150, 255); 
      }

Each character’s color is chosen according to the entry that corresponds to it in the grid array. fill() method applies a bright neon blue color to a cell if its bright attribute is set to true. Otherwise, ordinary characters are shown in a lighter neon blue hue.

Full Code

// 2D array to display the characters
let grid;
// the font size of the characters
let charSize = 20;
// columns and rows for the 2D array (grid)
let cols, rows;
// speed of the characters falling
let speed = 0.2;

function setup() {
  print(windowWidth,windowHeight)
  createCanvas(windowWidth, windowHeight);
  
  //creating the 2D array
  cols = floor(width / charSize);
  rows = floor(height / charSize);
  
  grid = create2DArray(cols, rows);
  //  initializing the characters font size 
  textSize(charSize);
  
  // Initialize grid with random characters
  for (let x = 0; x < cols; x++) {
    for (let y = 0; y < rows; y++) {
      grid[x][y] = {
        // calling the characters randomly      
        char: randomChar(),
        // Randomly determine if the character should be brighter or not
        bright: random(1) > 0.8 
      };
    }
  }
}

function draw() {
  background(0); 
  
  // Display and animate characters
  for (let x = 0; x < cols; x++) {
    for (let y = 0; y < rows; y++) {
      let yOffset = (millis() * speed + x * 50 + y * 50) % (height + 200) - 100;
      
      if (grid[x][y].bright) {
        // Set bright neon blue color for highlighted characters
        fill(0, 255, 255); 
      } else {
        // Set light neon blue color for other characters
        fill(0, 150, 255); 
      }
      
      text(grid[x][y].char, x * charSize, y * charSize + yOffset);
    }
  }
}

function windowResized() {
  resizeCanvas(windowWidth, windowHeight);
  cols = floor(width / charSize);
  rows = floor(height / charSize);
  
  grid = create2DArray(cols, rows);
  
  // Reinitialize grid with random characters
  for (let x = 0; x < cols; x++) {
    for (let y = 0; y < rows; y++) {
      grid[x][y] = {
        char: randomChar(),
        // Randomly determine if the character should be brighter or not
        bright: random(1) > 0.8 
      };
    }
  }
}

// function to create the 2D array grid
function create2DArray(cols, rows) {
  let arr = new Array(cols);
  for (let i = 0; i < arr.length; i++) {
    arr[i] = new Array(rows);
  }
  return arr;
}

// function to generate a random character
function randomChar() {
  return String.fromCharCode(floor(random(65, 91)));
}


Challenges

The significant challenge was how to keep the characters’ animation in a fluid and synced motion along with the shifting grid placements while maintaining readability and visual consistency.

Another challenge was assigning different brightness levels to different characters. This required careful coordination to make sure the highlighted characters shone out without overshadowing other characters or creating visual clutter.

Improvements

There is one improvement that I would like to implement in the future. I would want to improve the animation algorithm’s efficiency that may result in more fluid and flawless visual transitions, particularly when working with bigger grids or faster animation rates.

Another improvement could be the inclusion of user interactivity. The user could disrupt the falling characters using mouse hover and the characters trying to get back into the original stream.

Assignment 3: State of Mind

Concept

The goal of this week’s assignment was to create a unique work of art through imagination and creativity. The original idea was to create a dynamic screensaver with a range of shapes that had different colors and speeds and interacted with the canvas and each other when they collided. However, this concept was disregarded because a more abstract art piece was needed.

So I used the original code as the template, and the project developed into a complex particle-mimicking display of forms. These particles used the idea of flow fields to mimic more organic and natural motions, leaving behind a vibrant trail as they moved. The chaos of these trails of particles is a representation of my “State of Mind” while thinking of ideas for the assignment.

Sketches


Code

The particles’ motion is directed by a grid of vectors called the flow field. Perlin noise is used in its generation to provide a fluid, flowing transition between the grid’s vectors.

for (let i = 0; i < cols; i++) {
    for (let j = 0; j < rows; j++) {
      let index = i + j * cols;
      let angle = noise(i * 0.1, j * 0.1, zoff) * TWO_PI * 4;
      flowField[index] = p5.Vector.fromAngle(angle);
    }
  }

The snippet is in the draw() loop that creates the flow field. It simulates a natural flow by using Perlin noise to generate vectors with smoothly shifting angles.

The shapes follow the flow field vectors, which guide their movement. This interaction is encapsulated in the follow() method of the BaseShape class.

follow(flowField) {
  let x = floor(this.pos.x / resolution);
  let y = floor(this.pos.y / resolution);
  let index = x + y * cols;
  let force = flowField[index];
  this.vel.add(force);
  this.vel.limit(2);
}

The shape’s position (this.pos) is used to determine its current cell in the flow field grid by dividing by the resolution. The index in the flowField array corresponding to the shape’s current cell is calculated using x + y * cols.
The vector (force) at this index is retrieved from the flowField array and added to the shape’s velocity (this.vel), steering it in the direction of the flow. this.vel.limit(2) ensures that the shape’s velocity does not exceed a certain speed, maintaining smooth, natural movement.

The trail effect is created by not fully clearing the canvas on each frame, instead drawing a semi-transparent background over the previous frame. This technique allows shapes to leave a fading trail as they move.

background(0, 0.3);

The purpose of the resetAnimation() method is to reset the animation setup and clean the canvas. To restart the flow field pattern, it first uses clear() to remove any existing shapes from the canvas, resets the shapes array to its initial state, initializeShapes() method to add a new set of randomly placed shapes, and resets the zoff variable for flow field noise.

function resetAnimation() {
  clear();
  // Clear existing shapes
  shapes = []; 
  // Repopulate with new shapes
  initializeShapes(); 
  // Reset the z-offset for flow field noise
  zoff = 0; 
 
}

The resetAnimation() method is called when the frameCount has reached 500 frames. This helps to see how the flow field changes every time it restarts.

Full Code

// array for shapes
let shapes = [];
// declare flow field variable
let flowField;
let resolution = 20;
// 2d grid for flow field
let cols, rows;
// noise increment variable
let zoff = 0;
// make the sketch again after this value
let resetFrameCount = 500;


function setup() {
  createCanvas(800, 600);
  colorMode(HSB, 255);
  blendMode(ADD);
  cols = floor(width / resolution);
  rows = floor(height / resolution);
  flowField = new Array(cols * rows);
  initializeShapes(); 
}

function draw() {
  
  if (frameCount % resetFrameCount === 0) {
    resetAnimation();
  } else {
    background(0, 0.3); 
  }

  // Flow field based on Perlin noise
  for (let i = 0; i < cols; i++) {
    for (let j = 0; j < rows; j++) {
      let index = i + j * cols;
      let angle = noise(i * 0.1, j * 0.1, zoff) * TWO_PI * 4;
      flowField[index] = p5.Vector.fromAngle(angle);
    }
  }
  
  // Increment zoff for the next frame's noise
  zoff += 0.01; 

  // Update and display each shape
  // For each shape in the array, updates its position according to the flow field, moves it, displays its trail, and display it on the canvas.
  shapes.forEach(shape => {
    shape.follow(flowField);
    shape.update();
    shape.displayTrail();
    shape.display();
    shape.particleReset();
    shape.finish();
  });

}

function resetAnimation() {
  clear();
  // Clear existing shapes
  shapes = []; 
  // Repopulate with new shapes
  initializeShapes(); 
  // Reset the z-offset for flow field noise
  zoff = 0; 
 
}

// Initialized 30 number of shapes in random and at random positions
function initializeShapes() {
  for (let i = 0; i < 30; i++) {
    let x = random(width);
    let y = random(height);
    // Randomly choose between Circle, Square, or Triangle
    let type = floor(random(3)); 
    if (type === 0) shapes.push(new CircleShape(x, y));
    else if (type === 1) shapes.push(new SquareShape(x, y));
    else shapes.push(new TriangleShape(x, y));
  }
}

class BaseShape {
  constructor(x, y) {
    this.pos = createVector(x, y);
    this.vel = p5.Vector.random2D();
    this.size = random(10, 20);
    this.rotationSpeed = random(-0.05, 0.05);
    this.rotation = random(TWO_PI);
    this.color = color(random(255), 255, 255, 50);
    this.prevPos = this.pos.copy();
  }

  follow(flowField) {
    let x = floor(this.pos.x / resolution);
    let y = floor(this.pos.y / resolution);
    let index = x + y * cols;
    let force = flowField[index];
    this.vel.add(force);
    // Smoother movement so velocity is limited
    this.vel.limit(2);  
  }

  update() {
    this.pos.add(this.vel);
    this.rotation += this.rotationSpeed;
  }

  display() {
    // Saves the current drawing state
    push();
    // Translates the drawing context to the shape's current position
    translate(this.pos.x, this.pos.y);
    // Rotates the shape's current rotation angle    
    rotate(this.rotation);
    fill(this.color);
    noStroke();
  }

  displayTrail() {
    strokeWeight(1);
    // Creates a semi-transparent color for the trail. It uses the HSB 
    let trailColor = color(hue(this.color), saturation(this.color), brightness(this.color), 20);
    stroke(trailColor);
    // Draws a line from the shape's current position to its previous position
    line(this.pos.x, this.pos.y, this.prevPos.x, this.prevPos.y);
  }

  finish() {
    this.updatePrev();
    pop();
  }

  updatePrev() {
    this.prevPos.x = this.pos.x;
    this.prevPos.y = this.pos.y;
  }

  particleReset() {
    if (this.pos.x > width) this.pos.x = 0;
    if (this.pos.x < 0) this.pos.x = width;
    if (this.pos.y > height) this.pos.y = 0;
    if (this.pos.y < 0) this.pos.y = height;
    this.updatePrev();
  }
}

class CircleShape extends BaseShape {
  display() {
    super.display();
    ellipse(0, 0, this.size);
    super.finish();
  }
}

class SquareShape extends BaseShape {
  display() {
    super.display();
    square(-this.size / 2, -this.size / 2, this.size);
    super.finish();
  }
}

class TriangleShape extends BaseShape {
  display() {
    super.display();
    triangle(
      -this.size / 2, this.size / 2,
      this.size / 2, this.size / 2,
      0, -this.size / 2
    );
    super.finish();
  }
}

Challenges

I spent a lot of time getting a grasp of noise functions and how to use them to mimic natural movements for my shapes and implement the flow field using Perlin noise. There was considerable time spent adjusting the noise-generating settings to produce a smooth, organic flow that seemed natural.

There was a small challenge to clear the canvas after a certain amount of frames. The logic of the code was fine however the previous shapes were not removed.

Reflections and Improvements

The overall experience was quite helpful. I learned to handle the different functions and classes using object-oriented programming concepts. It made it possible to use a modular. It even helped me to add more features to my code as I was creating my art piece.

I believe that there is one area of development where I could explore various noise offsets and scales to create even more varied flow fields. Playing around with these parameters might result in more complex and eye-catching visual effects.

References

I learned about flow fields through the resources provided to us. I discovered a YouTube channel, “The Coding Train“.

Assignment 2: “Structure” by Z.Sykora

Concept

My initial concept revolved around a static canvas featuring a variety of monochromatic circles and semicircles. This art was similar to “Structure” by Z.Sykora. Once I could achieve randomness in this static art piece by having different sizes of circles and semi-circles, the concept underwent substantial changes. The idea was a dynamic, living piece of art in which various circles, each unique in size, color, and placement, vibrate across the canvas depending on the mouse’s motion. This art piece also uses mapping (map) and linear interpolation (lerp) methods.

Inspiration

Initial Sketch

Final Sketch

The interactive drawing portrays balls as circles with different sizes and colors, similar to the colorful spheres in a ball pit. In this art,  the color and size changes mimic the visually stimulating atmosphere of an actual ball pit.

Code

The circle colors will be interpolated using lerpValue, whose starting value is set to 0. The color is randomly assigned.

fill(lerpColor(circle.color, color(random(255), random(255), random(255)), circle.lerpValue));
ellipse(circle.x, circle.y, circle.radius * 2);

The fill function applies a color transition between the current color and a new random color by using lerpColor to set the color of the circle. The lerpValue function controls the transition; it gradually increases to provide the impression of a progressive color change, similar to the varying reflections in a ball pit.

let newMaxSize = map(mouseX, 0, width, minSize, maxSize);
circle.radius = lerp(circle.radius, targetRadius, 0.1);

The mouseMoved function uses the mouse’s x-coordinate to change the circle sizes. It converts the x-coordinate to a new circle maximum size. The size of each circle is then progressively adjusted toward this new goal size using the Lerp function. Here, abrupt changes in size are avoided and the interaction is smoothed down by using the lerp function to interpolate between the existing size and the new size. The interpolation factor that controls the transition’s pace is the third parameter (0.1 value). This indicates that the circle’s radius will only move 10% closer to the desired radius with each call to mouseMoved. This prevents a sudden shift in size and instead produces a gradual resizing effect as the mouse goes.

let circles = [];
let maxSize = 80; // Maximum size for the circles
let minSize = 20; // Minimum size for the circles

function setup() {
    createCanvas(800, 800);
    background(0);
    noLoop(); 

    // Initialize circles with random positions, sizes, and colors
    for (let i = 0; i < 100; i++) {
        let circle = {
            x: random(width),
            y: random(height),
            radius: random(minSize, maxSize), // Random radius for variety
            color: color(random(255), random(255), random(255)), // Random fill color
            lerpValue: 0 // To keep track of color interpolation
        };
        circles.push(circle);
    }
}

function draw() {
    // Clear the background without changing its color
    clear();
    background(0);

    for (let circle of circles) {
        // Interpolate to the next color
        if (circle.lerpValue >= 1) {
            circle.color = color(random(255), random(255), random(255));
            circle.lerpValue = 0;
        }

        // Draw each circle
        fill(lerpColor(circle.color, color(random(255), random(255), random(255)), circle.lerpValue));
        noStroke();
        ellipse(circle.x, circle.y, circle.radius * 2);
        
        // Slowly increment the lerp value
        circle.lerpValue += 0.005;
    }
}
function mouseMoved() {
    // Use mouse X position to scale the radius of each circle
    let newMaxSize = map(mouseX, 0, width, minSize, maxSize);
    for (let circle of circles) {
        // Smoothly interpolate the radius
        let targetRadius = random(minSize, newMaxSize);
        circle.radius = lerp(circle.radius, targetRadius, 0.1); // 0.1 is the lerp amount for smoothing
    }
    redraw(); // Redraw the canvas with new sizes
}

Challenges

The “vibration” effect of the circles relied on linear interpolation(Lerp). The difficult part turned out that adjusting the Lerp factor required careful balancing; if it was set too high, the animation’s smoothness would be disrupted by the circles changing size too quickly. If it’s too low, the changes won’t be noticeable and won’t portray the vibrant engagement that’s intended. Finding the optimal value where the interpolation produced the ideal pace of size variations was the difficult part.

Reflections and Improvements 

The assignment was a great learning experience. This week’s reading response was on chance operations by Casey Raes. That talk made me ponder if I can do something similar where the steps of an algorithm have controlled randomness to produce an art piece. My making the art piece above made me realize the main motive behind Casey Raes’ talk.

In my opinion, there is still some room for improvement in the art piece. I might modify this art piece to vibrate and transition into different shapes smoothly. That would be an effective effect yet calming.

Week 2: Reading Response

Overall Reflections

After watching the video of Casey Raes it made me wonder about the difference between a traditional artist who draws by hand and a digital artist who generates art using code (algorithm). When making art with hand, the strokes in every painting show that this art/concept belongs to this artist. Whereas the algorithmically generated art can be of different styles by the same artist. So does digital art generated by ordered randomness broaden the artist’s capabilities and style of work? Or does it limit the artist’s personal touch? 

Intriguing Piece 

The art piece that was intriguing to me was when art was integrated with coding and fashion. I was surprised by how modern digital art can have an impact on other fields. The design of the dresses was very unique and appealing. I feel like this integration will give fashion designers a new spectrum of ideas. 

Takeaway

What I initially thought was that the message of the artist may be compromised by digital art’s unpredictability. The art generated is through ordered randomness. The artist is the one who has control over the code and sets the order of the algorithm. However, the art is unpredictable due to random variables. So to check my theory I dedicated this week’s assignment to the theme of ordered randomness. I got to know that the artist has control over their art piece based on how systematic the algorithm is and how often randomness is given control. I even realized how famous artist Jackson Pollock embraced the concept of chance in the art pieces where he made his pieces by splattering and pouring paint over canvases while depending on chance.