Week 3 – Generative Art with OOP

Concept

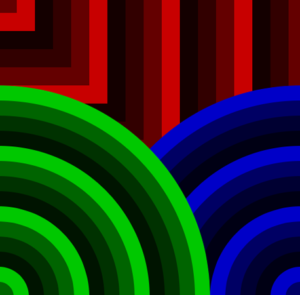
As we talked about chaos and order in class, I felt inspired to incorporate these themes in my next art piece. I was also inspired by the rotating hypercubes we looked at in class and wanted to add cubes to my art. Combining these elements, I came up with a streak of cubes exuding from a sphere. An array of cube objects are created and they are translated along the canvas. My love for randomness really influenced this project as this streak of cubes randomly moved around with the sphere while each individual cube rotated as well. Also, the cubes and the sphere are assigned random colors. These rotations and the translations, have a certain order to them, but when the mouse is pressed, the canvas becomes more chaotic! The translations are random within a range of values allowing for a very random and pretty streak of cubes that rotate and rapidly change positions on the screen. There is also a random shooting star that appears and floats on the screen when the mouse is pressed. Also, pressing the mouse also changes the stroke colors and shape colors to shades of grey further enhancing a chaotic effect – it gives a warping effect such as that when space or time is warped by a black hole.

Art and Code

Here is the artwork:

Here is my code:

//define some global variables
gnumOfCubes=80;
gboxWidth = 10; 
gboxHeight = 10;
gboxDepth= 10;
tx=20; //translation along x axis
ty=10; //translation along y axis

//to draw a bunch of cubes
let gCubeArray =[];

function setup() {
  createCanvas(400, 400, WEBGL);
  background(20);
}
function rotateElement()
{
  rotateX(frameCount * 0.01);
  rotateY(frameCount * 0.01);
}
function draw() {
  
  //refresh background so that previously drawn cubes disappear
  background(20);
  
  //for rotation of the elements
  rotateElement();
  
  //when mouse pressed
  if (mouseIsPressed) {
    // a star appears and randomly moves across the screen 
    star = new shootingStar(mouseX,mouseY,50,50,4,7);
    star.update();
    star.display();
    
    //also, color and stroke should become shades of grey when mouse pressed
    fill(random(255));
    stroke(random(255));
  }
  else
    {
      //if not pressed, keep all colors and stroke is black
      stroke(0);
      fill(random(255),random(255),random(255));
    }
  
  //draw a sphere in the center
  sphere(30);
  
  //draw cubes that exude out of the center of the canvas and from a streak by repeatedly translating them 
  drawCubes(gCubeArray,-tx,-ty);
  
  //if mouse is pressed, choose random values for translation along x and y to create a chaotic effect and then draw cubes
 if (mouseIsPressed)
   {
     tx=random(-10,10);
     ty=random(-10,10);
     drawCubes(gCubeArray,-tx,-ty);
   }
  
  //draw a circle to accompany the tip of the streak of cubes
  fill('white');
  ellipse(0,0,50,50);
}

//class for cubes
class Cube{
   constructor(width, height, depth, size){
     this.width = width;
     this.height = height;
     this.depth = depth;
     this.size = size;
   }
  display(){
    rotateElement();
    if (mouseIsPressed)
    {
      fill(random(255));
    }
    else
    {
      fill(random(255),random(255),random(255));
    }
    //use box from WEBGL mode to create the cubes
    box(this.width, this.height, this.depth, this.size);
  }
}

//a shooting star that appears when mouse is pressed and randomly moves around
class shootingStar{
  constructor(x,y, width,height, xSpeed, ySpeed){
    this.x=x;
    this.y=y;
    this.width=width;
    this.height =height; 
    this.xSpeed=xSpeed;
    this.ySpeed=ySpeed;
  }
  
  display(){
    fill('white');
    ellipse(this.x, this.y, this.width,this.height);
  }
  //update position of the store to create motion
  update(){
    this.x += this.xSpeed;
    this.y += this.ySpeed;
  }
}

//function to draw the streak of cubes by pushing cubes onto the cube array and translating them
function drawCubes(gCubeArray,tx,ty)
{
   for (let i=0; i < gnumOfCubes; i++){
    gCubeArray.push(
    new Cube(gboxWidth,gboxHeight,gboxDepth,4)
    )
    gCubeArray[i].display();
    translate(tx,ty);
  }  
}

I used functions, arrays, and object-oriented programming to create this artwork.

Reflection and future improvements

I immensely enjoyed making this art piece. While I had the purpose of creating cubes and having them rotate, I experimented with the transformations and the WebGL mode to finally come up with this work. It was after a lot of experimentation that this work was created and this is the most exciting part of this course – forming a new, different creative piece that you might not have envisioned in the beginning.

In the future, I want to use more classes and functions to further enhance this piece or other works. For example, an entire galaxy of stars could be created in the backdrop while I only created one so that can be added. Moreover, music can be added as well and I also want to experiment with sine and cosine functions in the future.

Week 2 – Artwork using Loops

Concept 

For this artwork, I wanted to create layers on top of each other that merge to form a piece of art. Each layer was developed using repeating shapes with a for or while loop. This was inspired by some geometric artworks I found online. While most of them had one repeating element such as a circle or square, I thought why not make several layers and merge them to form a different art piece? Some work that inspired me is:

Interactivity
Moreover, I wanted to create a monochromatic art piece with a pop of color that the user can add. So, the entire piece is shades of black and white and these colors blink/alternate. Moreover, the user can press the mouse to add colored circles throughout the canvas however, these disappear when the mouse is released. But a glimpse of them can be seen in the back through the spaces in the previous layers. This way, the users’ interactions bring a pop of color to the otherwise monochrome canvas.
Another form of interaction I added was a slider that allows the user to change how fast or slow the artwork blinks by changing the frame rate.

My Artwork


Code

Code I am particularly proud of is the following:

function getCircles(posX,posY,circleWidth) {

//alternate color of each circle between black and a random value between black and white
colorBlack = true;
noStroke();

//loop 20 times, each time increasing the width of the circle centered at x and y
for (let i = 20; i>0; i--) {
//alternating colors
if (colorBlack == true)
{
colorBlack=false;
fill(random(10),random(15),random(15));
}
else {
colorBlack = true; 
fill(random(255));
}
//making the ellipse
ellipse(posX,posY, circleWidth*i, circleWidth*i);
}
}
//draw a flower at x and y using rotating ellipses
function drawFlower(posX,posY){
  
  noStroke();

  for (let i = 0; i < 10; i ++) {
    fill(0,127);
    
    ellipse(posX,posY,10, 60);
    rotate(PI/5);
  }
}

//helper function to draw a flower 
function drawFlowers(posX,posY)
{
  translate(posX,posY);
  drawFlower(0,0);
}

//function to create a bunch of flowers in bottom-left
function getFlowers(){
  drawFlowers(50, 350);
  drawFlowers(30, 30);
  drawFlowers(-60, 10);
  drawFlowers(0, -80);
}

With these functions, I used loops to create blinking circles and flowers using rotate and translate as well. As a whole, the assignment turned out to be very fun to make.

Reflection and future improvements

I found this assignment to be exciting as I got to play around with loops – which is something I really enjoyed doing in the first assignment too. Also, it allowed me to express my creativity and further enhance my artwork using interactivity. Some aspects I can improve in the future include optimizing my code further to use loops to position the flowers and the sets of circles on the canvas. For now, I hard-coded the positions but in the future, I want to make the canvas more responsive by using values that are in terms of the width and height variables. Further, I want to learn how to use make the number of elements on the canvas increase/change with time.

Week 1 – Self Portrait

Self-Portrait
For the first assignment, we were asked to make a self-portrait using p5js. For this, I wanted to create a drawing that reflects my personality. I am usually bright and cheerful and tend to get excited about little things – so I wanted to represent this in my self-portrait. With this assignment, I also aimed to familiarize myself with as many p5js features and tools as possible.


Process
For this, I first went through the p5js reference to learn about the colors and different shape tools (ellipse, triangle, quad, bezier, curves, etc.) and practiced them to get a grip on how to draw lines and shapes. Then, I used a bottom-up approach by starting with the most minor facial features and building them up to the whole face, hair, and then the background and interactivity. I used ellipse to draw the eyes, quad for the nose and neck, and then arcs for the lips. Then I used bezier and quad for the hair and so on. With the face, I felt like I could not get as intricate because it would have required a lot more lines/shadows, etc and I found the process tiring. However, the next part was my favorite – it was the background, borders, and interactivity. For this, I got to use for-loops and experiment with different backgrounds and color schemes before I landed on one that I liked best. I initially tried multi-colored quads in the background, then a check background made with a for loop, and finally the pastel-colored stripes.

Interactivity
Something I really wanted to add was an element of randomness in my design – hence the moving circles in the background that randomly change positions when the mouse is pressed. Moreover, their concentration varies relative to the position of the mouse. As you slide the mouse toward the top-right corner, the circles become more saturated and as you move further along the x and y axis, they grow further apart.

I also added other interactions when the mouse is pressed and moved. One is the moving circles. On top of that, the face also smiles bigger, the eyebrows rise, the pupils dilate, and the cheeks become pinker when the mouse is pressed displaying the excitement the avatar feels when seeing the moving circles. Also, some strokes appear as well.

Code

function setup() {
  createCanvas(500, 500);
}

function draw() {
  
  
  let faceX = 250, faceY=210, faceWidth = 180, faceHeight=220;
  background('#C8C7D7');
  
  //background stripes
  noStroke();
  let b = true;
  for(let i=0; i<500; i+=10){
    for (let y=0; y<500; y+=10){
      if(b==true)
      {fill('#EDECF2')
      b=false;}
    else{
      b=true; 
      fill('#C8C7D7');}
    rect(i,y,10,10)
    }
  }
  let c=true;
  for(let i=0; i<500; i+=20){
    for (let y=0; y<500; y+=20){
      if(c==true)
      {fill('#C8C7D7')
      c=false;}
    else{
      b=true; 
      fill('#EDECF2');}
    rect(i,y,10,10)
    }
  }
 
  //background circles when mouse is pressed
  if(mouseIsPressed){
    stroke(205)
  for(let i = 0; i<100; i++)
   {
     fill('#A89DBD')
     num1= random(5);
     num2 = random(5);
     ellipse(mouseX*num1,mouseY*num2, 15, 15);
   }
}
  
  //hair 
  fill("#4d2511");
  quad(150, 150, 350, 150, 400, 400, 100, 400);
  fill(255, 213, 173);
  quad(200, 230, 300, 230, 320, 280, 180, 280);
  
  //face
  noFill()
  noStroke()
  arc(250, 350, 100, 80, 0, PI);
  stroke(0)
  fill(252, 210, 155);
  ellipse(faceX,faceY,faceWidth,faceHeight); 
  fill(252, 210, 155);
  
  //neck
  noStroke()
  quad(220, 280, 280, 280, 300, 360, 200, 360);
  
  //eyes
  fill(255)
  ellipse(215,190, 35,30 )
  ellipse(285,190, 35,30)
  fill(0);
  ellipse(215,190, 20,25);
  ellipse(285,190, 20,25);
  fill(255);
  
  //eye balls
  ellipse(219,193, 8,8);
  ellipse(289,193, 8,8);
  
  //eye balls dilate when mouse is pressed
  if(mouseIsPressed)
    {
    ellipse(219,193, 10,10);
    ellipse(289,193, 10,10);
    }

  //nose
  fill(250, 188, 130);
  quad(260,250, 240,250, 250,210, 260,250);
  line(260,250, 250, 210);
  line(240,250, 250, 210);
  line(240,250, 260,250);
  
   
  //eyebrows
  //eyebrows raised if mouse is pressed
  if (mouseIsPressed){
    fill('rgb(146,63,8)')
    rect(200,150, 30,8)
  rect(270,150, 30,8)
  }
  else{
  fill('#4A2500')
  rect(200,160, 30,8)
  rect(270,160, 30,8)}
  
  //hair
  noStroke()
  fill("#4A2500");
  bezier(250,100, 50, 100, 180, 250, 100,400);
  bezier(250,100, 450, 100, 320, 250, 400,400);
  
  //lips
  fill('darkred')
  noFill();

  //lips get bigger/smile when mouse is pressed
  if (mouseIsPressed){
    fill(180, 13, 61);
    arc(250, 265, 50, 50, 0, PI);
  }
  else{
  fill(180, 13, 61);
  arc(250, 270, 50, 30, 0, PI);
  }
 
  
  //blush when mouse is pressed
  if (mouseIsPressed){
    fill('rgb(250,187,129)');
  ellipse(200,250,25,15);
  ellipse(300,250,25,15);
  }
  noStroke(); 
  
  if(mouseIsPressed)
    { stroke(240); }
  
  x=10
  for(let i =0;i<20;i++){
  fill('#D8E2EB')
  ellipse(x,20,40,60);
  ellipse(x,480,40,60);
  ellipse(0,x,60,40);
  ellipse(500,x,60,40);
  x=x+30;
  }
  //bow on head
  fill('#A89DBD')
  quad(140,130, 190,170, 190,130, 140,170)
  
  fill(120);
  text('Press and move the cursor...', 10, 485);
}


Reflection
Overall, the process was very insightful and allowed me to practice a range of p5js features. When I started out, I felt the process is boring but as I delved more into the programming concepts such as using for loops or random, and when I played around with the features, especially to create interactivity, it actually became very interesting and fun!

In the future, I want to improve further by using other features. For example, I came across Blendmode which I found very interesting but I could not learn much about it in the scope of this project. Thus, I want to learn about it and its other features later.