Project ‘Pakistani Moseeqi’ (translates to Pakistani music)
Description: A Sound Visualizing Musical Instrument
Concept and corresponding elements
A sound visualization instrument that allows you to:
-
- mix and play sounds to make your own unique music and
- visualize it on the p5js screen
An ode to Pakistani music
This project pays tribute to Pakistani music by incorporating sounds from instruments that are unique to Pakistani music such as the tabla, bansuri, sitar, and veena among others. This way, I wanted to expose the NYUAD community, who will use my project, to Pakistani music while also paying tribute to my culture.
Accessibility
With buttons, this instrument gives one the opportunity to make their own music. To make it accessible to people who are blind/visually impaired, I used a simple design with an easy-to-use interface that does not require many instructions to read. This way, someone who cannot see can still enjoy it and make their music.
Additionally, to make it accessible to people who cannot hear, I added the sound visualization element so that they can see a unique visualization of each sound and hence, enjoy the instrument in a different way – as a visualization tool.
Interaction design, feedback, and implementation
-
- 4 momentary LED-Buttons to play 4 different sounds when pressed

- 4 momentary LED-Buttons to play 4 different sounds when pressed


- Each button has an LED light that turns off when the button is pressed to indicate to the user that it is working
- Each button plays a different sound when pressed.
- When pressed, button sends a signal to the p5js to display the animation/visualization associated with that button and sound
- More than one button can be pressed simultaneously.
- Turned on/off indicator led light
- The blue ‘power’ LED on the bottom left is an indicator. When the instrument is in use, it is turned on. When not, it is off. This way, it provides indication to the user when the instrument is working and when it is not.
- Arduino/physical elements – contained within a cardboard box
- 5th non momentary button/switch – this button is not momentary – it, when pressed, plays a background music. The user can then add more sound effects on top of this music. When pressed again, the button stops the music. And this can be repeated.
P5js elements:
-
- Start page – this page displays the cover and brief instructions to keep everything simple and easy to use
- The play button leads to the music creation and sound visualization page – here, whenever a physical button is pressed, a visualization associated with the sound appears while the button is pressed
- A slider to control volume of the sound effects from the momentary buttons (not the background music – so that the user controls the volume of the sound they “add” to the background music.
- Inspiration: https://patatap.com/
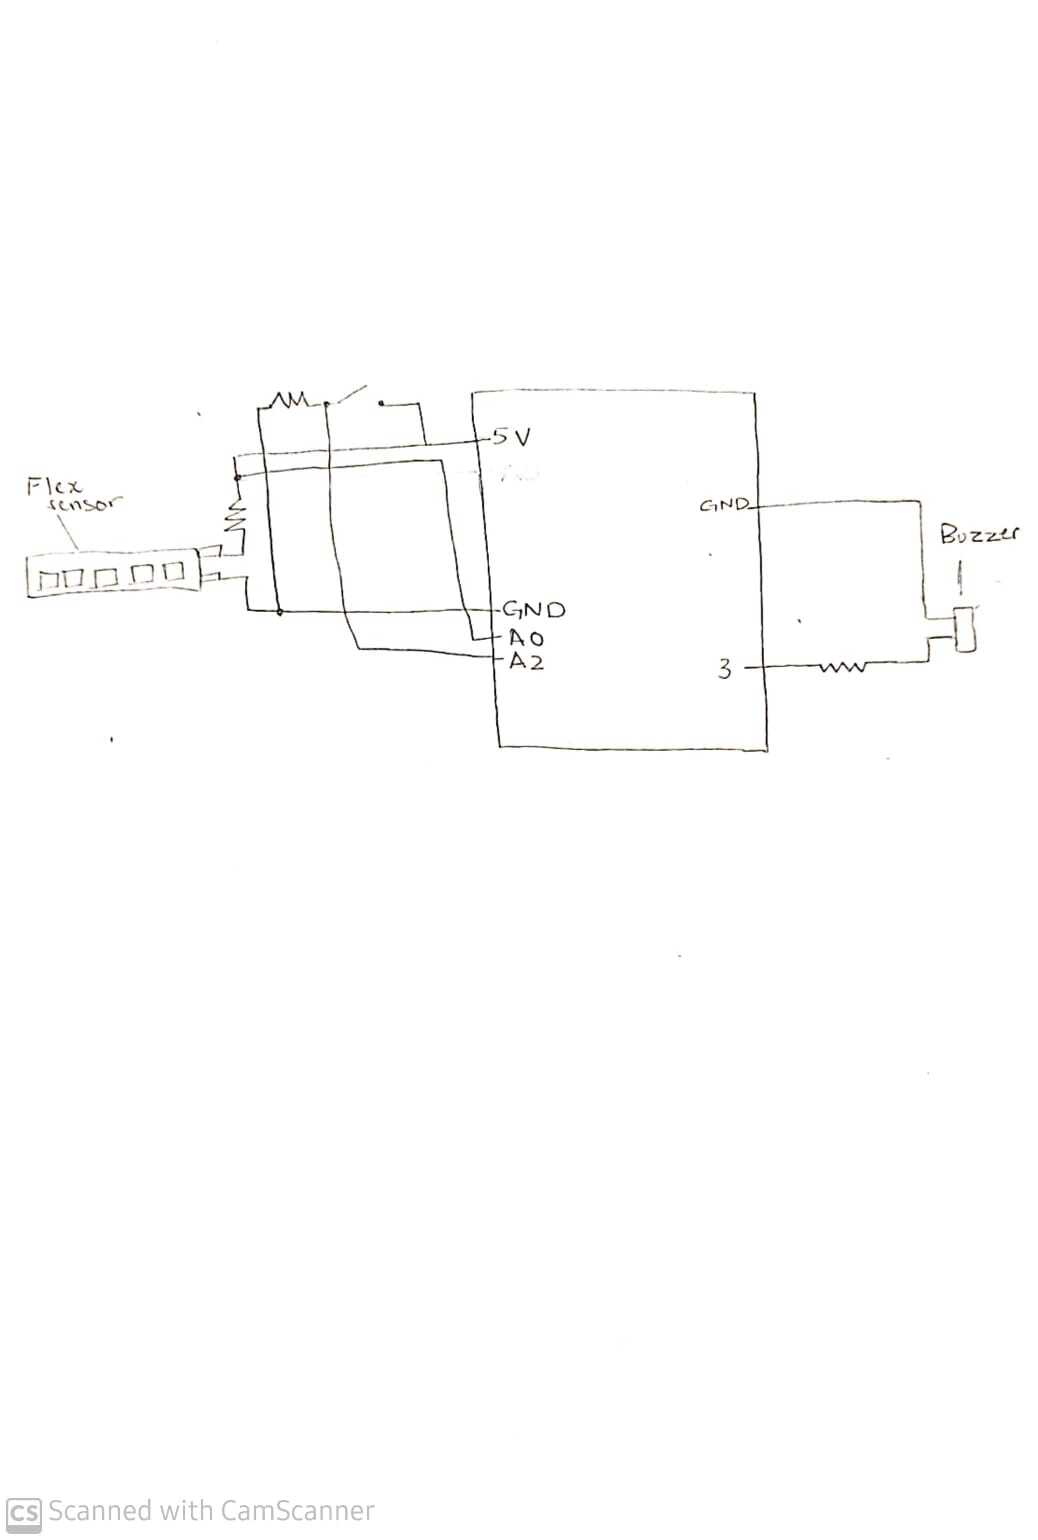
Arduino Code
For the Arduino end, as mentioned, buttons and LEDs are arranged in a box.
Inputs and Outputs:
-
- From LED buttons to Arduino, which process and send information to p5
From P5:
-
- Indication if instrument turned on/off: power LED on/off
- LEDs to indicate if instrument is on or if any button is pressed (feedback)
const int redButtonPin = A2;
const int greenButtonPin = A1;
const int yellowButtonPin = A3;
const int blueButtonPin = A4;
const int ledPin = 8;
const int songButtonPin = 7;

void setup() {
  // put your setup code here, to run once:
  Serial.begin(19200);
  //pinMode(blueLedPin, OUTPUT);
  pinMode(redButtonPin, INPUT);
  pinMode(greenButtonPin,INPUT);
  pinMode(yellowButtonPin,INPUT);
  pinMode(blueButtonPin,INPUT);
  pinMode(ledPin, OUTPUT);
  pinMode(songButtonPin, INPUT);

   // start the handshake
  while (Serial.available() <= 0) {
    digitalWrite(LED_BUILTIN, HIGH); // on/blink while waiting for serial data
    Serial.println("0,0"); // send a starting message
    delay(300);            // wait 1/3 second
    digitalWrite(LED_BUILTIN, LOW);
    delay(50);
    digitalWrite(ledPin, LOW);
  }
}

void loop()
{
  // put your main code here, to run repeatedly:
  while (Serial.available())
  {
    digitalWrite(LED_BUILTIN, HIGH);
    //if red button pushed

    int redButton = digitalRead(redButtonPin);
    int greenButton = digitalRead(greenButtonPin);
    int yellowButton = digitalRead(yellowButtonPin);
    int blueButton = digitalRead(blueButtonPin);
    int songButton = digitalRead(songButtonPin);
    Serial.print(redButton);
    Serial.print(",");
    Serial.print(greenButton);
    Serial.print(",");
    Serial.print(yellowButton);
    Serial.print(",");
    Serial.print(blueButton);
    Serial.print(",");
    Serial.println(songButton);
    //delay(100);


    int light = Serial.parseInt();
    if (light == 1)
    {
      digitalWrite(ledPin, HIGH);
    }
    if (light == 0)
    {
      digitalWrite(ledPin, LOW);
    }

  }
}
P5 Sketch and Code
The P5 screen will first present very brief instructions on how to use the instrument. Once the experience begins, the screen will show a visualization of the music created using input from the sensors.
Inputs and outputs:
-
- Use inputs from buttons that Arduino sends to draw shapes/patterns on the screen
- Display details such as volume/start instruction on the screen
let incrementCircle = true;
let greenB=true;
let blueB=true;
let yellowB=true;
let playBg1 = true;
let playStart = true;
let start = true;
let numOfCircles = 0;
let circleX = [];
let circleY = [];
let circleWidth = []
let s = 0;
let alt = true;
let mode = 'pause';
let drum, flute, sitar, veena;
let volumeSlider;
let vol;
function setup() {
  startSound = loadSound('audio/bubbles.mp3');
  starting = loadSound('audio/start.mp3');
  volumeSlider = createSlider(0,100);
  volumeSlider.position(650, 20);
  drum = loadSound('audio/tabla.mp3');
  flute = loadSound('audio/bansuri.mp3');
  sitar = loadSound('audio/strike.mp3');
  veena = loadSound('audio/spiral.mp3');
  bgMusic = loadSound('audio/calmBg.mp3');
  //drumA=createAudio('audio/drum.wav');
  startImg = loadImage('images/pak music.png');
  displayImg = loadImage('images/display.png');
  startMusic = loadSound('audio/clay.mp3');
  createCanvas(800, 800);

  angleMode(DEGREES);
  rectMode(CENTER);


}

function draw() {

  vol = volumeSlider.value();
  drum.setVolume(vol);
  flute.setVolume(vol);
  veena.setVolume(vol);
  sitar.setVolume(vol);

  if (mode == 'pause')
  {
    startPage();

  }


  if (mode == 'play')
    {
      background(0);
      for (i = 0; i < 10; i++)
      {
      fill('#F44336A5');
      //CAN DRAW PERMANENT CIRCLES
      noStroke();
      ellipse(width/2, height/2, s+15*i, s+15*i);
      fill('rgb(126,9,9)');
      ellipse(width/2, height/2, s-i*10, s-i*10);
      }
      s = s+10;
      if (playStart == true){
           startSound.play();
        playStart = false;
      }

    }
    if (mode == 'drums')
    { //if button pressed, random circles
      if (incrementCircle == false)
      {
        playDrums();
      }
      else
      {
        drawCircles();
      }
    }


    if (mode == 'sitar')
      {
         if (blueB == false )
          {
            background(0);
          }
        else if (blueB == true)
          {
            playSitar();
          }
      }

      if (mode == 'flute')
       {
         console.log(mode);
         console.log(greenB);
        if (greenB == false)
          {
            background(0);
            playFlute();

          }
        else if (greenB == true)
          {
            console.log('calling playFlute')
            playFlute();
          }
      }
      if (mode == 'veena')
      {
        if (yellowB == false)
        {
          background(0);
        }
        else if (yellowB==true)
        {
          playVeena();
        }
      }

  textSize(12);
      if (!serialActive)
      {
        text("Press Space Bar to select Serial Port", 20, 30);
      } else
      {
        text("Connected", 20, 30);
        let volumeLabel = "Volume: " + vol;
        text(volumeLabel, 600, 20 );
        //everything else goes here

      }

}

function readSerial(data) {
    ////////////////////////////////////
    //READ FROM ARDUINO HERE
    ////////////////////////////////////
     if (data != null)
     {
      //console.log("data:");
       console.log(data);
       // make sure there is actually a message
       let fromArduino = split(trim(data), ",");
       // if the right length, then proceed
       if (fromArduino.length == 5)
       {
         let redButton = int(fromArduino[0]);
         if (redButton == 1)
         {
           mode = 'drums';
           if (incrementCircle == true)
           {
             numOfCircles = numOfCircles + 1;
             circleX[numOfCircles] = random(width);
             circleY[numOfCircles] = random(height);
             circleWidth[numOfCircles] = random(100);
             incrementCircle = false;
             drum.play();
           }
         }
         else if (redButton == 0)
           {
             incrementCircle = true;
           }

         let greenButton = int(fromArduino[1]);

         if (greenButton == 1)
         {
           mode = 'flute';
           if(greenB==true)
           {
             console.log("greenb set to false");
             flute.play();
             greenB = false;
           }
         }
        else if (greenButton == 0)
        {
            greenB = true;
            console.log("greenb set to true");
        }

         let yellowButton = int(fromArduino[2]);
          if (yellowButton == 1)
         {
           mode = 'sitar';
           if (yellowB == true)
           {
             sitar.play();
             yellowB=false;
           }
         }
         else if (yellowButton == 0)
           {
             yellowB = true;
           }

         let blueButton = int(fromArduino[3]);
           if (blueButton == 1)
         {
           mode = 'veena';
           if (blueB == true)
           {
             veena.play();
             blueB=false;
           }
         }
         else if (blueButton == 0)
           {
             blueB = true;
           }

         let songButton = int(fromArduino[4]);
         if (songButton ==1)
           {
             console.log('here');
             if (playBg1 == true && mode == 'play')
               {
                 console.log('here1');
                 bgMusic.play();
                 playBg1 = false;
               }
           }
          else if (bgMusic.isPlaying() == true && mode == 'play' && songButton == 0)
               {
                 console.log('here2');
                 bgMusic.stop();
                 playBg1 = true;
               }


    if (greenButton == 0 && blueButton ==0 && yellowButton == 0 && redButton == 0 && mode != 'pause')

      {
        mode = "play";
      }

  // if (playBg1==true && mode == 'play')
  //   {
  //     startMusic.play();
  //     playBg1 = false;
  //   }
  // else {
  //   //calmBg.stop();
  // }
         /////////////////////////////////////////////////////////
/////////////////////////////////////////////////////////
       }
          //////////////////////////////////
          //SEND TO ARDUINO HERE (handshake)
          //////////////////////////////////
       let light;
      if (mode != 'pause')
      {
        light = 1;
      }
       else if (mode =='pause')
         {
           light =0;
         }
        let sendToArduino = light + "\n";
        writeSerial(sendToArduino);
     }
}

function startPage()
{

  //background('white');
  image(startImg, 0, 0, width, height);
  //fill(255);
  // textSize(64);
  // text("موسیقی",60,120);
  // textSize(20);
  // fill(0);
  // rect(width/3-10,height-50,200,60);

  fill(255);
  let x = mouseX;
  let y = mouseY;
  let t = x+','+y;
  text(t, mouseX, mouseY);
  //text("Press 's' to play your own music", width/3-230, height-10);
  textSize(14);
      textStyle(NORMAL);
      text("Play, mix, and visualize Pakistani music by pressing the buttons", width/4, 3*height/4+50);
  if (mouseX >= 242 && mouseX <=558 && mouseY >=679 && mouseY <= 764)
    {
      noStroke();
      fill('#503418')
      ellipse(390,720,120,75);
      fill(255);
      textSize(38);
      //fontWeight(200);
      textStyle(BOLD);
      text("PLAY",335,734);

      if (mouseIsPressed)
        {
          mode='play';
        }
    }

}

function keyPressed()
{
  if (key == " ")
  {
    // important to have in order to start the serial connection!!
    setUpSerial();

    if (playStart==true && mode == "play")
    {
      startMusic.play();
      playStart = false;
    }

    startMusic.play();
  }
  if (key == 's')
  {
    mode = "play";
  }
//   if (key =='d')
//     {
//       mode = 'drums'
//       incrementCircle = false;
//       drum.play();
//     }
// if (key == 'f')
//     {
//       mode = 'flute';
//       flute.play();
//     }
//   if (key == 'g')
//     {
//       mode = 'sitar';
//       sitar.play();
//     }
//   if (key == 'v')
//     {
//       mode = 'veena';
//       veena.play();
//     }


}

function drawCircles()
{
  noStroke();
  //fill(random(255));
  fill(240);
  for (i =0; i < numOfCircles; i++)
    {
      circle(circleX[i], circleY[i], circleWidth[i]);
    }
}

function playDrums()
{
  if (alt== true)
    {alt = false}
  else
  {alt =true;}

   background('black');
  for (i = 23; i > 0; i--)
    {
      noStroke();
      if (alt == true)
      {
        if(i%2 == 0)
        {
          fill('white');
        }
        else
        {
          fill('black');
        }
      }
      else
        {
          if(i%2 == 0)
        {
          fill('black');
        }
        else
        {
          fill('white');
        }
        }
      ellipse(width/2, height/2, random(50*i));
    }
   fill(0);
  //ellipse(width/2,height/2,40)
}

function playFlute()
{
  console.log("here ");
  background(0);
  noFill();
  push();
  translate(width/2, height/2);
  for (let i =0; i < 200; i++)
  {
    push();
    rotate(sin(frameCount+i)*100);

      let r = map(sin(frameCount), -1,1,50,255);
      let g = map(cos(frameCount/2),-1,1,50,255);
      let b = map(sin(frameCount/4),-1,1,50,255);
    noFill();
    stroke(r,g,b);

    rect(0,0,800-i*2,300-i);

    pop();
  }
  pop();
}

function playSitar()
{
  noStroke();
  for (i =30; i>0; i--)
 {
   if (i%2==0)
   {
     fill(0);
   }
   else
    {
     fill(255,150,0);
    }
   square(width/2, height/2, random(50*i));
 }
}
let direction = 1;

function playVeena()
{
  background(0);
  noStroke();
  let x=random(width);
  let y=0;
  direction = random(-1,1);
    //random(0,width);

  //y=random(0,height);
  for (i =0; i < 3*width;i++)
    {
      x=x+direction;
      y=y+1;
      fill(random(x,x+30),random(y-20,y+10),random(y-30,y+20));
      circle(x,y,30);
    }
}

function displayScreen()
{
  image(displayImg, 0,0, width, height);
}
User testing
For the most part, the design was simple to understand for the users. The simple instruction to use buttons to play music for users to understand how to begin. Then, as they pressed each, they easily saw its connection to sound and the visualization on the p5 and used this information to improvise and process the information.
Things that can be improved:
The slider for volume is not as visible or clear so we can replace it with clearer labels in the future.
More buttons can be added to create an array of different sounds.
More western music can ALSO be integrated to add a cultural diversity angle to the project.
Bigger box can be used so wires and Arduino can easily be places inside
The 5th red button was, in a way, ignored by the user due to its small size and because it looked small and unimportant alongside all the led lights and buttons. This button can be replaced with something better.
What I am proud of:
I am particularly proud of my sound visualizations. They add a dynamism and motion to the project that makes listening to each sound even more fun and interesting. The visualizations are very appealing to the eye. I am also proud that I attempted to make the instrument more accessible as this reinforced the importance of keeping accessibility in mind when designing things.