Week 8: Reading Responses

Her Code Got Humans on the Moon

The reading on Hamilton’s journey and the early days of computer programming highlights some important points about physical computing. The reading shows how important the software was in the Apollo mission and the project was  very complex and expensive. Therefore the designed software was to be very accurate  leaving no room for errors as they would be extremely expensive and could  even cause the entire mission to fail. As I look forward to the second half of this course, where we’ll work on physical programming, I plan to approach my projects with similar care, knowing there’s little room for errors. I hope to use strategies to avoid mistakes, like how the Apollo mission used simulations to test things before putting designs into the project.

Norman,“Emotion & Design: Attractive things work better”

The reading caught my attention with its focus on how emotions, aesthetics, and usability affect designs. The idea that “attractive products are not just nice to look at; they also work better because they make people feel good” really stood out to me. It reminded me that when I create my own designs, I should encourage people to explore them.  One approach could be adding elements that spark curiosity  and  raise questions like “How does it work?” while offering hints for exploration.

The idea that, when people feel good, they are often more flexible and creative, leading to better interactions with products,  made me think about how designing attractive designs can also boost user engagement and functionality. Based on this for my upcoming projects, I hope to create designs that mix good looks and usability to build a stronger connection with users, making the experience more enjoyable and improving overall satisfaction.

Week 8: Switch – Healthy Screen Distance

Concept

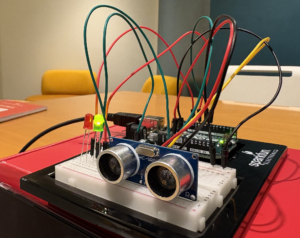
For this week’s assignment, I designed a simple switch to be positioned in front of a screen, like a laptop. This switch uses an HC-SR04 distance sensor and an Arduino board to control either a red or green LED. When the user is at a healthy distance from the screen—set to 50 cm or more—the green LED lights up. If the user gets too close, the red LED turns on as a warning to move back. This setup helps promote good screen-distance habits to protect eye health.


To implement the logic, I modified an example code for Sensors from the Arduino IDE. Below is a demonstration video for my switch.

Code
void setup() 
{
  // initialize serial communication:
  Serial.begin(9600);
  pinMode(trigPin,OUTPUT);
  pinMode(echoPin,INPUT);
  pinMode(GreenLED, OUTPUT);
  pinMode(RedLED, OUTPUT);
  
}
void loop() 
{
  long duration, inches, cm;
  digitalWrite(trigPin, LOW);
  delayMicroseconds(2);
  digitalWrite(trigPin, HIGH);
  delayMicroseconds(10);
  digitalWrite(trigPin, LOW);
  duration = pulseIn(echoPin, HIGH);
  cm = microsecondsToCentimeters(duration);
  Serial.print(cm);
  Serial.print("cm");
  Serial.println();
  // Controlling LEDs from Distances
  if(cm<50 )
  {
     digitalWrite(GreenLED, LOW);
     digitalWrite(RedLED, HIGH);
  }else
  {
   digitalWrite(GreenLED, HIGH);
  digitalWrite(RedLED, LOW);
  }
  delay(100);
}

long microsecondsToInches(long microseconds) 
{
  return microseconds / 74 / 2;
}

long microsecondsToCentimeters(long microseconds) 
{
  return microseconds / 29 / 2;
}


Reflection for future works

I have gained knowledge on how Simple switches are fundamental devices used to control the flow of current in a circuit.  It was also interesting to use the HC-SR04  sensor and see how it works. Going forward, I hope to use switches in combination with other logics to design complex and interesting projects.

Mid Term Project: Animal Sounds Trivia

CONCEPT

The game “Animal Sounds Trivia” is an interactive trivia game designed to educate players about animals. My goal is to help people identify animals by their sounds. The idea came from the realisation that, while walking in a jungle, the ability to recognise an animal by its sound could help determine whether the animal is dangerous or not.

The Game play.

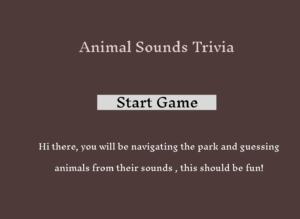
The game begins with a screen containing instructions and that allow user to start the Game. The starting screen can be seen below:
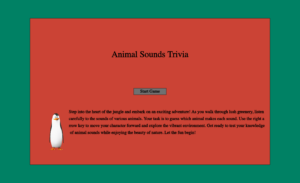
From the main menu, when the player clicks a button to begin playing, the game starts. The player controls a character who walks through a forest. As the character moves forward, the distance to a destination gradually decreases (Also indicated in the progress bar).  At specific intervals (based on the distance), the player hears different animal sounds, triggering a trivia question. A pop-up window appears with multiple-choice options for identifying the animal that made the sound. The player selects an answer, and if correct, they earn 10 points for the animal. After answering, the player can continue their journey. The cycle of walking, hearing an animal sound, and answering trivia repeats until the player reaches the destination and completes the trivia challenge. Throughout the game, the background scrolls to simulate movement, and the character’s walking animation plays, giving the illusion of progress. At the end the Player is presented with their total score and can choose to restart the game.

Interesting Piece of Code

In my implementation, I added a function that type message on the screen. I find the code for the function definition interesting because of the experience it adds to the game. By typing words for instructions it adds a sense of activeness of the game.

// Function to display a typed message with a typing effect
   displayTypedMessage(x, y)
  {
    let typingSpeed = 50;  
    let lineHeight = 32;  
    let margin = 10;  
    let currentTime = millis();

    if (currentTime - lastCharTime > typingSpeed && currentCharIndex < this.instructionText.length) 
    {
      currentCharIndex++; 
      lastCharTime = currentTime;  
    }
    
// Create a substring of the instruction text to display
    let displayedText = this.instructionText.slice(0, currentCharIndex);

    let lines = [];
    let currentLine = "";
    
// Handle line breaks
    for (let i = 0; i < displayedText.length; i++) 
    {
      let nextChar = displayedText[i];
      let potentialLine = currentLine + nextChar;

// Check if the potential line exceeds the available width
      if (textWidth(potentialLine) > width*0.9 - margin * 2 - x) 
      {
        lines.push(currentLine);  
        currentLine = nextChar;   
      } else 
      {
        currentLine = potentialLine;
      }
    }
    lines.push(currentLine);  
    fill(0);
    textAlign(LEFT, TOP);
    for (let i = 0; i < lines.length; i++) 
    {
      text(lines[i], x, y + i * lineHeight);
    }

    if (currentCharIndex >= this.instructionText.length)
    {
      if (currentTime - lastCharTime > 2000) 
      {  
        currentCharIndex = 0;  
      }
    }
  }
Problems I Faced and Solutions

In the development of this game I faced several challenges. Some  of them includes the following:

  1.  Synchronising the Animal sounds so that they do not overlap: After exploring several options, I was able to solve this by  creating a function that would pause all the sounds when not in use.
  2. Managing the game Flow: This was a problem as I was designing my game, I did not have a clear structure in mind. However as I began the implementation  I was able to figure out the pieces and manage the flow smoothy.
Reflections  

As I look forward to future works, I hope to maximise the use of OOP. While I have used OOP in the implementation of my game, I think I would even use it more to create a more easily manageable code for my game than it currently is. However, I am generally proud of how the game has turned out and I look forward to having people play it.

Week 5: Reading Response

Computer vision differs from human vision in several ways. Humans can focus on basic features of objects and identify them even under different conditions, such as low light or slight changes in color and shape. In contrast, computer vision focuses on details rather than basic features, relying on a set of rules to detect objects. This can lead to mistakes when slight environmental or object modifications occur, such as changes in lighting. Another key difference is the ability to recognize objects in three dimensions. Humans can perceive depth, while computer vision typically operates in two dimensions, meaning that slight tilting of objects can cause confusion.

Various techniques can help computers see and track objects more effectively, similar to how humans do. One such technique is frame differentiation, which is useful for detecting motion. This is done by comparing consecutive frames, where differences in pixel color indicate movement. Another technique is background subtraction, where the computer is provided with a reference image of the background. When an object is introduced into the scene, the computer detects pixels that differ from the background and identifies the object. A third method is comparing pixels with a threshold value, which is especially useful when there are significant light differences between the background and the object. Object tracking can also be achieved by tracking the brightest pixel in a video frame. Each pixel’s brightness is compared to the brightest encountered, and its location is stored. This technique can be adapted to track the darkest pixel or multiple objects of different colors.

In interactive art, the complexity of implementing certain ideas limits artistic expression, as only a few people have the expertise to implement such designs. However, with ongoing advancements making computer vision techniques more accessible and easier to use, art will increasingly benefit from these technologies.

Week 5: Mid-term Progress “Animal sounds trivia.”

Concept

My idea for Midterm is to create a simple game that I will call “Animal sounds trivia.I will create a simple sprite sheet of a human character walking and running. The movement of the human character will be determined by the pressing of the arrow buttons by the user.
As the user presses to move the background will move so that the human character appears to move as per the direction of arrows.  As the human character moves, I will position Animal animations at different intervals depending on how long the human character has moved (Determined by how long the key arrow was pressed). As the animal appears, I will play sounds that are related to the animal shown in the background. After the sound is played I will pop up a window, temporarily freezing the background. The pop up window will ask the user to tell the name of the animal. If the user tells a correct name, they get a score, otherwise they can choose to re-listen for once more  and guess again or reveal the animal and get zero score for that animal.  

The game will go to around 10 animals and stop with a window that displays the user’s total score and give them options to replay the game or quit.

My front screen should look something more like this one.

Implementation.  

I hope to implement my game using Four classes. My first class is the Player class. This class will manage the Sprite sheet for the player walking and standing animations as well as Player’s position with respect to the starting position. The second class will be the Animal class, this class will manage sounds as well as animal Images/animations. The third class will be the Message class. This class will manage the pop up window that keeps track of the information given by the user , comparing them with correct ones and updating the score of the player. The last class will be the Game class. The game class will contain instances of all the three classes and will manage the game flow. Allowing restarts and quitting. 

The starting window will be briefly detailed with instructions on movement and keys to use. With every interaction my users will be able to know what to do as the pop up window will ensure that!

Challenges

My hope is that I can create some good animations. Matching the photo I attached or at least close to it. I have seen that I can archive this using Unity. Which I have started  to explore and hopefully will work out.

In order to minimise the risk, I have thought of using a simpler design given the time frame. I will use some simple animations using available sprite sheets on the internet. 

Week 4: Reading response

One thing that drives me crazy in design and has not been directly discussed in the reading  is the struggle to create works with meaningful intentions or justifications. For me a good design, besides its aesthetics, interactivity and the good user experience is what it carries. I am usually interested in the reasons why the creator of an art piece wanted to make it in the first place. Even further beyond art  As I think about my future works, I often question myself on what challenges I want to tackle or what messages I want my designs and works  to convey as I believe that impactful arts and works should emerge from genuine reasons. 

Many principles from the reading are directly relevant to interactive media, as the field is rooted in design. Concepts such as discoverability, understanding, affordances, and signifiers as discussed in the reading can be directly applied to create more engaging experiences while using interactive designs. One thing I hope to take into serious consideration for my future works is to develop human-centered designs. Inspired by the reading I aim to create interactive artworks that first and foremost have a clear and easy to understand purpose. I can achieve this by using simple design principles that can be directly implied by the user or using simple and clear instructions if need be. Second, I also intend to take into consideration the significance of feedback as the reading reminded me of scenarios when even feedback given subconsciously makes a great difference. I hope that with artworks that provide feedback users may want to continue exploring to find more interaction thus enrich their experiences with the designs. 

Week 4 : Data Visualisation

Concept

This week I decided to implement a simple data visualisation. The simplest form of data visualisation techniques that came in mind were graphs. Out of many ways to visualise data I decided to implement four basic ones, Bar graph, Pie chart, scatterplot and Line graph. I was motivated to make my design interactive to the user, so I wanted to allow manipulation of  the default data from user input.

Implementation 

I managed to implement my design by creating four classes one for each of the four data visualisation method I chose. In each class, I defined data and categories attributes and implemented a display function that uses the data stored to decide how the graph is drawn. I also implemented a function outside all classes to decide what graph is plotted depending on the user input. I also added an input window, where user can add data and see them in the visualised.

Sketch

Below is my final sketch:

Piece of Code I am proud of

I am particularly proud with the design of the pie chart as it was hard to write labels and colour each pie section. Initially I used random colour generation but the colour appeared blinking so I decided to add a colour attribute so each section could have its colour. Below is the pie chart class definition :

class PieChart 
{
  constructor(data, categories) 
  {
    this.data = data;
    this.categories = categories;
    this.total = 0;
// Get sum of all data 
    for (let i = 0; i < data.length; i++) 
    {
      this.total += data[i]
    }
    this.colors = [];
    for (let i = 0; i < this.data.length; i++) 
    {
// Generate a unique color for each data section
      this.colors.push(color(random(255)%200, random(255), random(255)));
    }
  }
  
  display() 
  {
    let angleStart = 0;
    let radius = min(rectW, rectH) * 0.4; 
    let centerX = rectX + rectW / 2;
    let centerY = rectY + rectH / 2;

    for (let i = 0; i < this.data.length; i++) 
    {
      let angleEnd = angleStart + (this.data[i] / this.total) * TWO_PI;
      fill(this.colors[i]);
      arc(centerX, centerY, radius * 2, radius * 2, angleStart, angleEnd, PIE);
      
// Get positions for Categories lables 
      let midAngle = angleStart + (angleEnd - angleStart) / 2;
      let labelX = centerX + cos(midAngle) * (radius * 0.5); 
      let labelY = centerY + sin(midAngle) * (radius * 0.5);

      fill(0);  
      textAlign(CENTER, CENTER); 
      text(this.categories[i], labelX, labelY); 
    
      fill(0);  
      textAlign(CENTER, CENTER);  
      text(this.categories[i], labelX, labelY);
      angleStart = angleEnd;
    }
     
  }
}

Reflection and Improvements for future work

For future work, I would prefer adding more options with multiple kinds of data such as multi-categories data. For example data with temperatures of two cities. A visualisations techniques that allows for visual comparison between the two set of data.

Week 3: Reading Response

The whole idea of interactivity and its distinction from mere reactions or participation stood out for me considering the focus of this course (Introduction to Interactive Media). As the text analyses interactivity insisting on dynamic exchanges between participants, requiring active listening, thoughtful consideration, and responsive speaking, I realize the importance of these elements. As an artist, I aim to integrate emotional aspects of my designs, considering how my audience will hear, think, and speak as they interact with my work. Beyond artistic experiences and designs, I also hope that computer systems and programs continue to evolve becoming more interactive as we evidently see it bloom day by day through the advancement of generative AI and other technologies. 

While interactivity involves listening, thinking, and speaking, its application might be challenging or unnecessary in some contexts within computer systems and applications. I hope that the level of interactivity required be only tailored to the specific needs and goals of the system or application.

Week 3: Smooth Lights

Concept and Inspiration

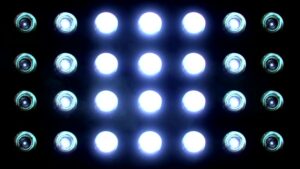
For this week, as I was looking forward to make use of arrays and object oriented programming, I wanted to draw lights that smoothly turn on and off. My idea has inspiration  from disco lights that blink turning on and off. An image of such an arrangement of lights can be seen here below:

The alternation of black and white colour are intended to create an illusion of lights turning on and off.

Implementation

To implement my idea, I created two classes one for the boxes and one for the circles. I had functions to draw the boxes and circles in each class and created the objects in the setup function and saved the locations of each in an array. In the draw function I used the arrays to draw the boxes in the canvas.

My sketch

My final sketch can be seen here below:
<

My code

Continue reading “Week 3: Smooth Lights”

Reading Reflection – Week2

As I reflect on my own artistic experiences, I have often tried to maintain control over my art pieces. While I do not consider myself a very skilled artist, I have been challenged by the idea of allowing a blend of randomness and planning, particularly in electronic art. Casey Reas’ idea of balancing order and chaos, with examples from various artworks, has shown me that chance can indeed add value to art. While I still believe that randomness can enrich a piece by adding layers of unpredictability, I lean more toward the idea that certain elements (if not most) should remain under the artist’s control to preserve uniqueness. Randomness should therefore complement what is already structured, rather than dictate the entire piece. A good example of how to effectively use randomness is to generate random inputs that run through algorithms the artist has defined.

While we value both the artist’s design and the abstractions from chance, a good balance between the two is necessary, especially in a time when there are so many generative options available. This balance helps preserve the value of art. Lastly, I believe the extent to which randomness is used should remain entirely up to the artist, and the way different artists apply it can also contribute to the uniqueness of their work.