User Testing – Cybertruck by Zaeem&Dev

Progress

So far, we have added extra an obstacle detection system using the ultrasonic sensor and a boost in maneuverability to the car. Earlier, the car would only curve slightly when moving left and right. Now, it stays in place and adjusts directions before moving forward or backward.

Car Movement

After user testing, we have concluded that the car works as it was intended to. The ultrasonic sensor adds the automatic breaking functionality that we wanted to add initially. There are a few problems with the sensor though.


Furthermore, we have also figured out how to use the XBee shield to establish wireless connection between two computers. Although, we ran into a problem here too. We will need to book office hours with the Professor to figure this out.

Challenges

As observed in the video shared above, the car moves forward in intervals. This only happens when the code for the motion sensor is uploaded. We have deduced that this must be because of all the system delays associated with the working of the ultrasonic sensor. Furthermore, we cannot figure out how to connect the Xbee shield to p5js. We figured out how to connect the two components of the shield together, but we cannot properly connect it to p5js and then to Arduino. Solving this issue will mark the end of our project.

Serial Communication Exercises – Zaeem

Exercise 1

Sketch:

Arduino Code:

void setup() {
  Serial.begin(9600);
  pinMode(5, OUTPUT);
  while (Serial.available() <= 0) {
    Serial.println("0,0"); // send a starting message
    delay(300);              // wait 1/3 second
  }
}

void loop() {
  while (Serial.available() > 0) {
    // read the incoming byte:
   int inByte = Serial.read();
   analogWrite(5, inByte);

    int sensorValue = analogRead(A0);
    Serial.print(sensorValue);
    Serial.println();
  }
}

Exercise 2

Sketch:

Arduino Code:

void setup() {
  Serial.begin(9600);
  pinMode(5, OUTPUT);
  while (Serial.available() <= 0) {
    Serial.println("0,0"); // send a starting message
    delay(300);              // wait 1/3 second
  }
}

void loop() {
  while (Serial.available() > 0) {
    // read the incoming byte:
   int inByte = Serial.read();
   int brightness = inByte * 50;
   analogWrite(5, brightness);
  }
}

Video:

Exercise 3

Sketch:

Arduino Code:

void setup() {
  Serial.begin(9600);
  pinMode(5, OUTPUT);
  while (Serial.available() <= 0) {
    Serial.println("0,0"); // send a starting message
    delay(300);              // wait 1/3 second
  }
}

void loop() {
  while (Serial.available() > 0) {
    // read the incoming byte:
   int inByte = Serial.read();
   analogWrite(5, inByte);

    int sensorValue = analogRead(A0);
    Serial.print(sensorValue);
    Serial.println();
  }
}

Video:


Final Project Concepts – Zaeem

For my final project, I want to make a game that can be controlled via Arduino. Within this general idea, I have three sub-ideas:

Piano Tiles

Building upon the project I worked on with Dev, I could make a game that prompts the user to use our piano – made with Piezoelectric pressure sensors – and hit specific notes to progress in the name. On the other hand, hitting the wrong keys on the piano will take away from the player’s progress in-game. My inspiration for this idea comes from the mobile game “Piano Tiles” that I used to play as a kid:

Fruit Ninja

Another game I used to play when I was younger was Fruit Ninja:

I could use motion sensors connected in a sequence with the Arduino to record input from the user that then cuts fruit in the p5js sketch (divided into grids to match the corresponding motion sensors).

Car Game

While browsing online for other ideas, I realized that I could also build a small robot car that can then be used to play a game in another p5js sketch. The robot car can be made using motors as the primary component. The car can be remotely connected with an Arduino, or the car can have an Arduino of its own that communicates with an Arduino connected with a computer via radio waves. I will have to check if equipment like this is available in the IM Lab though.  The player can use switches to control the car’s direction and pressure sensors to control acceleration and breaking. I think learning about motors this week will really help me think more about this idea.

Overall, by this week, I will finalize a final project idea from the list above.


Study Lamp

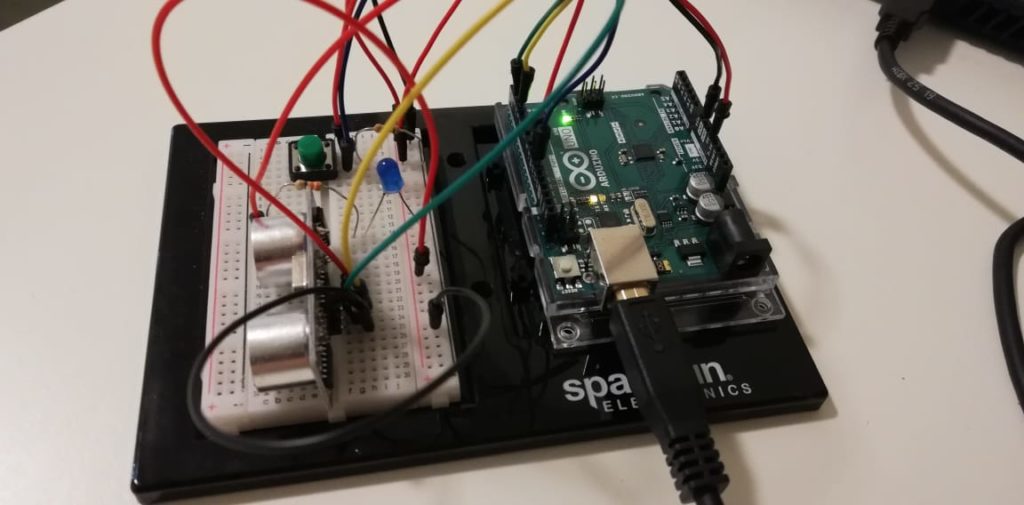
In this assignment, I decided to make study lamp which can be turned on or off and have adjustable brightness. To implement this, I decided to make an LED respond to how close I am to it. The LED is turned on using the switch and its brightness is varied using the ultrasonic sensor. I calculate the distance away from the ultrasonic sensor in centimeters using the time it takes for the ultrasonic sensor to read the trigger pulses.  Now, the closer I am to the ultrasonic sensor, the brighter the LED becomes if it is switched on. So, when I am studying, I can change the brightness levels depending on how close I sit next to the ultrasonic sensor.

Here is the circuit:


Here is the code:

const int trigPin = 3;
const int echoPin = 2;
const int led = 9;
const int buttonInp = 11;

bool run = false;
bool prevButtonState = LOW;

long duration;
int distance;

void setup() {
  pinMode(trigPin, OUTPUT); 
  pinMode(echoPin, INPUT); 
  pinMode(led, OUTPUT); 
  pinMode(buttonInp, INPUT);
  Serial.begin(9600);
}
void loop() {
  byte buttonState  = digitalRead(buttonInp);

  Serial.println(buttonState);

  // check to see if the button is pressed and last time it wasn't
  if (buttonState == HIGH && prevButtonState == LOW) {
    //toggle run
    run = !run;
  }
  // record the current button state for use next time through loop
  prevButtonState = buttonState;
  
  if(run){
    // Clear trigPin
    digitalWrite(trigPin, LOW);
    delayMicroseconds(2);
    
    //Set trigPin to HIGH state for 10 micro seconds
    digitalWrite(trigPin, HIGH);
    delayMicroseconds(10);
    digitalWrite(trigPin, LOW);
    
    // Reads the echoPin, returns the sound wave travel time in microseconds
    duration = pulseIn(echoPin, HIGH);
    
    // Calculating the distance
    distance = duration * 0.034 / 2;
    // Serial.println(distance);

    // Adjusting brightness of LED to be distance mapped to 0-255
    int brightness = map(distance, 0, 15, 0, 255);
    brightness = constrain(brightness, 0, 255);
    brightness = 255 - brightness;
    analogWrite(led, brightness);
  }
  else {
    //LED off
    digitalWrite(led, LOW);
  }
}

Here is the final product:


An Idea – Zaeem

For this assignment, I really tried thinking outside the box. And it finally clicked! In this assignment, I capture the process of me thinking and finally realizing what to do.

I start by making a circuit that is disconnected. It connects when two wires come into contact. I increase the length of the wires by attaching strips of aluminum foil to them using tape. Here is what the setup looks like:

And here is what I did with it:

I would agree with you if you said that the setup looks ugly, but I couldn’t think of any other way to do it. Maybe I could have made the wires longer so I don’t have to hold them up, and maybe I could have made them thinner. I will try to be more mindful of the design in further assignments.

When I showed this to a friend and asked them if they get it, they said “yeah, I think I have an idea 💡” and I couldn’t help but share this moment here 🙂

Metastasis – Midterm Project

Introduction

Switching my idea for this project was the best thing I could have done. Now, I am satisfied with the final result “Metastasis”. The user plays as a cancer cell that has to defeat the immune system’s cells: the white blood cells that shoot antibodies and the T-killer cells that secrete toxic substances in close proximity to the cancer cell. The game takes place in a blood vessel because it is a fitting environment for gameplay for this particular idea. The mechanics of every character in the game are characteristic of their real life counterparts. In order to ensure that the instruction screens are not too wordy, I had to limit the knowledge I impart on my audience about the biology of things. However, for the scope of this project. I believe only basic knowledge is required.

In the first level, the user gets used to movement and attacking as they face off against a horde of white blood cells. Then, as the white blood cells die, they signal the T-killer cell to respond to the situation. As the final boss, the T-killer, is defeated, the user wins the game and the cancer cell goes on to metastasize (grow to other parts of the body and take over). The game starts of with a main menu. If the user chooses to view the Instructions, they are taken to a screen that displays all the characters and the way they interact with each other within the game. When the game ends, either if the user dies or if they defeat the T-killer, the user has the option to play again or go back to the main menu.

Implementation

Where do I start…

I will only cover the concepts that I have not mentioned in the Midterm Progress Report.

1) Now, the user can shoot in all directions. The last key pressed is stored to determine which direction the user will shoot in. This idea of shooting in four directions was encoded to counter the T-killer enemy type.

2) There are now two levels of gameplay. First, the user learns how to play the game on an easier difficulty mode against white blood cells. These enemy types do not move much and fire antibodies. Next, the user has to face off against the T-killer which seeks the user’s position and attacks when in close proximity. To counter this, the user can shoot in all four directions.

3) A main menu, instructions menu, and endgame screens are now encoded. There are buttons on the screen that can take the user to the corresponding screens. When the T-killer is defeated, the endgame screen appears prompting that the user won. On the other hand, if the user (cancer cell) dies, the endgame screen appears prompting that the user lost.

4) Sounds have been encoded. I tried my best to find free sounds online that are the most relevant to the gameplay. Sounds for all the attacks, winning the game, losing the game, and receiving damage were encoded.

5) In the first level, the user can only move up until a little over half the width of the screen to encourage distance from the white blood cells. Eventually, in the second level, the user can move over the whole canvas to adapt to the T-killer’s movements.

Overall, the foundation of this project is built on Object Oriented Design with the exception of the T-killer’s attack that only needs to detect if it is in close proximity to the user to activate the attack.

Here is the game:

Conclusion

In the end, I have added every functionality in the final game that I had planned to add in the Midterm Project Report. Have fun playing!

Metastasis (Progress Report)

Idea

I wanted to create something that educates my audience (primarily pre-high school adolescents). Since I loved studying biology when I was that age, I decided to illustrate the defense mechanism our body employs against cancer cells. Through my game, I want to cover the basics of immune response to cancer cells i.e. the types of immune cells involved, their modes of action, the cancer’s response to it etc.

I started by exploring the free 2d models available online that could be relevant to my project. But, initially, I could not find anything that I could use. For example, I would find a cartoonish cancer cell 2d model but it would have a white background which would not fit very well with the background in-game. This is why I decided to change my project idea altogether. At this point, I decided to settle for a Spaceship-shooter-esque game. Good 2d models were very easy to found and I made good progress too. Here’s what I had been working on up until yesterday (use the arrow keys for movement):

Even though I was making good progress, I did not feel satisfied. I was passionate about implementing my initial idea and working on anything else felt like I was holding myself back. After a lot of thinking and much needed motivation from the professor, I decided to go back to my original idea.

Cancer cells can proliferate and spread to parts of the body other than where they initially appear. This process is called “Metastasis” and is the title of my game. The user plays as a cancer cell and it must fight off the immune system’s cells in order to take over the body. Through the game, the user will be prompted to learn about the immune system’s mechanisms by understanding how the enemies will attack the player. In this way, the user actually learns how the body defends itself against cancers in real life. I decided to let the user play as the cancer cell, even though playing as a cell of the immune system would make a better protagonist, because there would be more variation for the enemies (immune system’s cells) in the game. The game is set in a blood vessel (background).

Implementation

As I mentioned earlier, I started by exploring free resources for the game online.  I still ran into the problem of having images with colored backgrounds but I recently learned how to use Adobe Photoshop in another Interactive Media course – Communications Lab. Setting Alpha values to make the background transparent was easy and gave me exactly what I needed.

I wanted to code the most technical part of my game first. This is why I focused on the gameplay instead of the text-screens to guide the player. Even though not all the gameplay features have been added yet, I believe I have implemented a strong foundation to later introduce new enemies and changes to the cancer cell.

Here is what the game looks like right now:

I use object oriented programming to code the flowing red blood cells in the background, the enemies, the cancer cell the user plays as, and the projectiles fired by both the user and the enemies. The projectile fired by the user is representative of the toxic substances cancerous cells often secrete like enzymes that digest the body’s cells in its surroundings. As for the enemies, I have only encoded the white blood cells right now and they fire antibodies onto the cancer cell.

As of now, my code is not commented. But, I will explain the most technical aspects of the gameplay here:

1) Health Bar:

The health bar consists of two rectangles, one with a red fill and the other with a black fill. The red rectangle represents the percentage of the health the user still has left while the black represents the percentage that has been lost. Combined, they effectively represent a basic health bar.

2) Shooting:

The user fires a single projectile every second. Two enemies chosen randomly every two seconds fire a single projectile each that seeks the position of the user in the frame that the shoot() function is called. In this way, it is possible for the user to avoid the projectiles by maneuvering using the arrow keys. If an enemy is hit, it triggers a decrement in their health and triggers a hit animation. If the enemy’s or the user’s health equals 0 (set up to be at the second hit right now), the cell death animation is triggered.

Plan

Now, I only need to extend the gameplay to include at least one more enemy type that has a different mode of attack than white blood cells, like the T-killer cells that secrete toxic substances in close proximity to the cancer (include an enemy that utilizes melee instead of shooting projectiles). After that, I only need to encode the starting menu, instructions, and “game over”/exit screens. I will also add relevant sounds the game with perhaps background music, and different sounds for when an object is hit during the game. Overall, I feel more satisfied working on this project than the spaceship-based one.

Assignment 4 – Explosion

When the Professor shared the “dispersing circles” sketch in class, I immediately thought of an explosion. With this assignment, I decided to implement a similar concept using text instead of those circles.

I created a class Mover for the moving objects, characters in this case. All the characters in the parent string are instances of this class in the program. Upon pressing the mouse button, these characters scatter in random directions and the colors change to mimic an explosion. When the characters slow (speeds less than 0.1 – update()) down significantly to the point of not moving, they come back to their original place in the center of the screen.

I decided to integrate most of the concepts I have learned in class in this assignment. For example, when the characters are aligned in the center of the screen, I add noise to them to make it seem like they are unstable and reading to go flying in different directions. Perhaps the most technical part of my implementation was to ensure that they return to the center after the explosion. I did this by the subtraction method the Professor has pointed out in class numerous times. Each character has a position element associated with it which indicates its position within the word. Based on that, the offset from the starting of the word is calculated and then every character is positioned in the right order in the word.

I have also made sure not to hardcode the string being used so anything can be used in place of the “BOOM!” in the code. Here is what I got:

Assignment 2 – OOP

Inspiration/Idea

I realized that the most challenging aspect of this assignment is not coding, but coming up with an idea for the assignment. For this assignment, I was inspired by the following sketch that the Professor made in class:

I intended to make “Replicating Balls”: every time the ball collides with the edge of the canvas, it would spawn a new ball that goes off in a random direction. Additionally, every ball would have an “energy” level, so that it cannot spawn balls infinitely. This energy level would be apparent by the transparency of the ball: the more transparent it is, the less energy it has, and eventually it cannot replicate.

Problems

I could have used this idea to illustrate in the simplest way how biological cells replicate. However, I ran into a problem that would not allow the replicated ball to have the same initial coordinates as the origin ball. This is because if the coordinates of the new ball were on the edge, it would infinitely spawn new balls causing the program to crash. This is why I ended up making the new balls spawn randomly across the canvas.

Implementation

I made a class Circ for every circle. The update() function update the position of every circle each time it is called and the replicate() function checks if the balls are in contact with the edges – a new ball is spawned randomly if there is such contact. Finally, the run() function calls both the update() and replicate() functions in the draw loop. I made an array of circles to contain every instance of the Circ object, and called the run() function for every circle in this array. I also randomly choose the colors for the balls. The background is a black rectangle with a high transparency so that the balls are seen leaving trails. The balls have high transparency to achieve the trail effect.  I increase the transparency of every ball every time it bounces off the edges until at one point, the transparency is so low that it cannot replicate any further (I do this using the if statements in the replicate() function). Here is the sketch and the code:


Boxes, Assignment 2

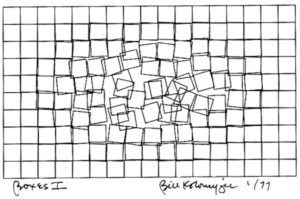
I picked the design Boxes I by William Kolomyjec to recreate in this assignment.

This image fascinates me. As the viewer, I naturally focus in the center of the image where the distortion in the boxes is the greatest. It feels as if my gaze is what’s causing that distortion. This is why I wanted to recreate, or create something similar to, this piece.

I started by creating a grid of squares – 10×17 squares on the canvas – using nested for loops. The first for loop is used to address the rows, creating rectangles starting from the left most to the right most side of the canvas. For every rectangle created in this row, the second nested for loop adds rectangles as columns for the row.

I thought of many views to achieve the same distortion effect as seen in the original image. The most important underlying concept in all those methods was that the lesser the distance of the squares from the center of the canvas, the greater the distortion. Using four if-statements, and dividing the canvas into quadrants, I record the above mentioned distance for every square into two variables: randx and randy. I also reserve a small rectangular space in the middle of the canvas where no squares are drawn (to achieve a higher distortion).

Finally, I use the random function coupled with the corresponding randx and randy values to set offsets for the coordinates for every squares. While experimenting with colors, I found an aesthetic combination and decided to implement it – instead of adhering to the style in the original. Here is what I came up with:

In the future, I will try to implement a rotation relative to the square’s distance from the center in all the squares to enhance the distortion effect in the original image.