For the midterm project, my inspiration was the “Bounce” game. The game play is similar to the original Bounce game: the character moves and tries to avoid the dangers. I wanted to challenge myself, so the whole game is built using “Vector” shapes. I went through Daniel Shifman’s THE NATURE OF CODE book’s first chapter, “Vector,” and his videos on Vector on YouTube (1, 2, 3) to grasp the basic understanding of the vector shape. As I used vector for all the shapes, all the shapes were preplanned, and it took a good amount of time to figure out the exact configuration.
The game is designed with multiple screens, each offering a different part of the game experience. The game structure is as follows:
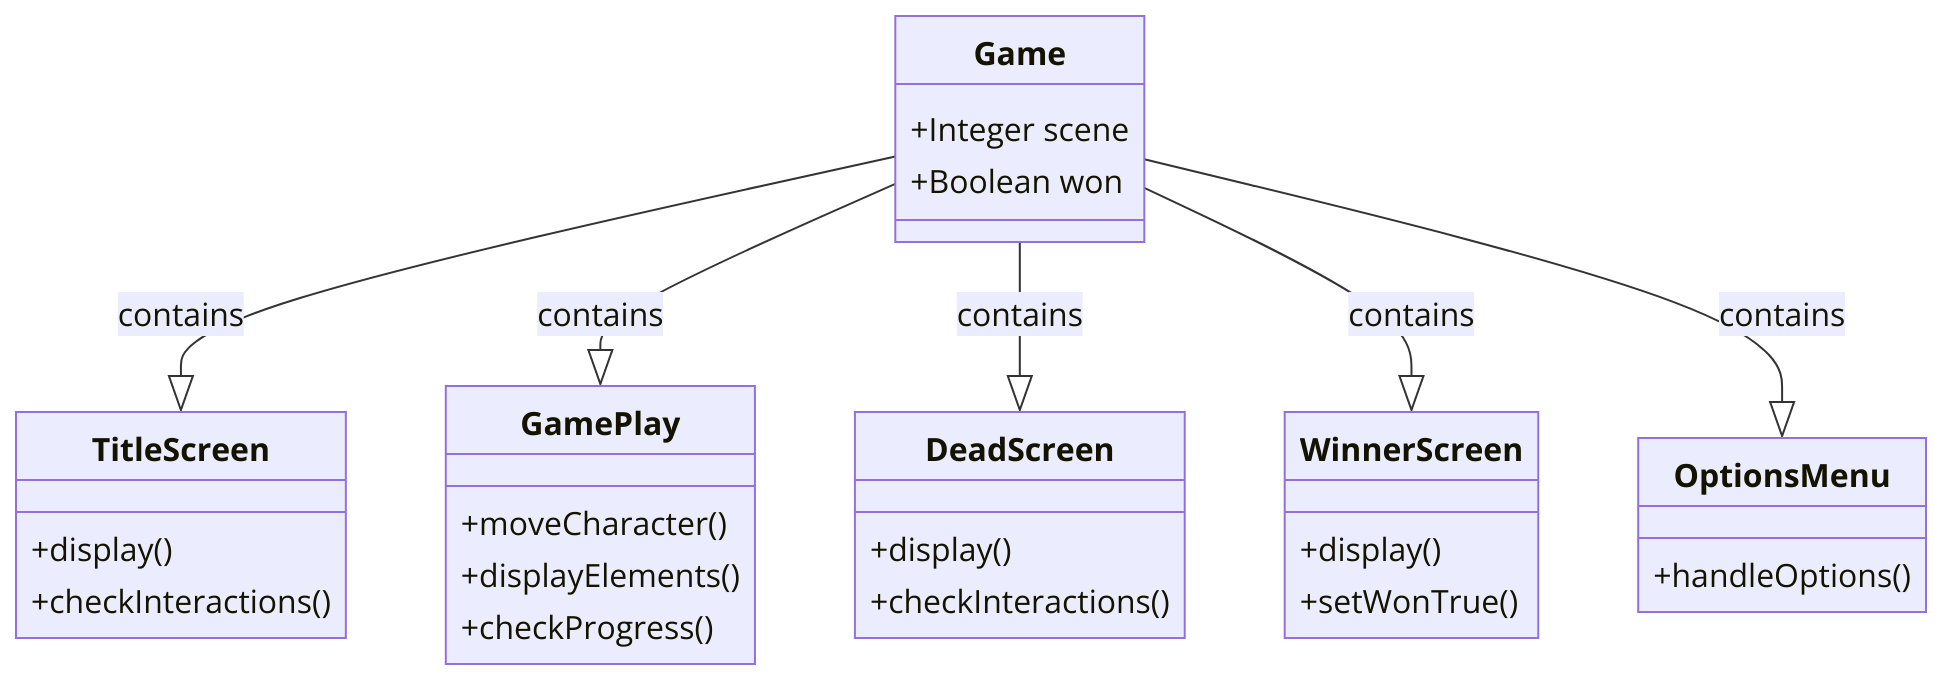
- Title Screen: Initially, the game will open to a title screen (scene 1), where players can see the game’s title and interact with inkdrop animations. I’ll include a play button and an options button, making sure to check for player interactions to navigate to other parts of the game.

- Game Play Screen: Moving onto this scene (Scene 2), I plan to have the main character move, attack, and be displayed on the screen. The gameplay will involve navigating through jump blocks, floors, jelbys (damage elements), and other elements, with the camera following the character to keep them in focus. I’ll implement a jumping function for character movement, and as players progress, they’ll encounter a moving door and health items that affect the character’s health, which will be displayed and updated on the screen. If the character’s position falls below a certain threshold, it’ll trigger a transition to the dead screen (scene 3), whereas reaching a higher position will lead to the winner screen (scene 4).

- Dead Screen: If the character dies (scene 3), I’ll display a game over screen where players can see their failure and have options to interact with, possibly to retry the level or go back to the main menu.

- Winner Screen: For those who conquer the levels (scene 4), I’ll cover the screen with a rectangle and display a winner message, indicating their success. This screen will also include interactions, possibly to proceed to the next level or return to the main menu, marking the `won` variable as true to track the player’s progress.
- Options Menu: Lastly, an options menu (scene 5) will be included to allow players to customize their game experience. I’ll handle this functionality through an `optionsStuff()` function, providing various settings for players to adjust according to their preferences.


The UML diagram:
I wanted to highlight the code for the floor design of the game. It was really challenging to find the sweet spot, as it could have made the game too easy or too hard. For this, I could not find any references. So I played the game itself to understand where to put the holes and hills.
//Normal Floors
function setupFloor() {
  floors.push(new Floor(-500, 0, 525, 600));   //0
  floors.push(new Floor(0, 500, 605, 100));    //1
  floors.push(new Floor(600, 425, 250, 400));  //2
  floors.push(new Floor(849, 325, 150, 500));  //3
  floors.push(new Floor(995, 500, 1000, 1000));//4
  floors.push(new Floor(1850, 375, 100, 500)); //5
  floors.push(new Floor(1950, 500, 300, 500)); //6
  floors.push(new Floor(2249, 370, 200, 500)); //7
  floors.push(new Floor(2448, 500, 200, 500)); //8
  floors.push(new Floor(2647, 240, 150, 500)); //9
  floors.push(new Floor(2796, 500, 450, 500)); //10
  floors.push(new Floor(3245, 400, 200, 500)); //11
  floors.push(new Floor(3444, 500, 400, 500)); //12
  floors.push(new Floor(4050, 500, 500, 500)); //13
  floors.push(new Floor(4549, 380, 150, 500)); //14
  floors.push(new Floor(5050, 480, 100, 500)); //15
  floors.push(new Floor(5149, 500, 1000, 500));//16
  floors.push(new Floor(6148, 365, 200, 500)); //17
  floors.push(new Floor(6550, 400, 150, 500)); //18
  floors.push(new Floor(7100, 550, 900, 500)); //19
  floors.push(new Floor(7999, 150, 200, 500)); //20
  floors.push(new Floor(8198, 500, 880, 500)); //21
  floors.push(new Floor(8977, 400, 150, 500)); //22
  floors.push(new Floor(9126, 450, 570, 500)); //23
  floors.push(new Floor(9825, 0, 20, 700));    //24
  floors.push(new Floor(9844, 450, 900, 500)); //25
  floors.push(new Floor(9705, 0, 20, 300));    //26
  floors.push(new Floor(9687, 430, 175, 500)); //27
  //This One is Special
  floors.push(new Floor(9705, 200, 20, 150));   //28
}

function Floor(x, y, w, h) {
  this.pos = createVector(x, y);
  this.w = w;
  this.h = h;
  this.dis = function() {
    fill(100, 100, 100);
    rect(this.pos.x, this.pos.y, this.w, this.h);
  }
}

//Pipes
function PipeParts() {
  this.pos = createVector(0, 0);
  this.dis = function() {
    //Pipe1 down
    fill(100, 100, 100);
    rect(this.pos.x, this.pos.y, 180, 30);
    rect(this.pos.x + 300, this.pos.y, 140, 30);
    rect(this.pos.x + 439, this.pos.y, 20, 20);
    rect(this.pos.x + 459, this.pos.y, 20, 10);
    fill(220, 100);
    rect(this.pos.x + 180, this.pos.y, 120, 100);
    fill(250, 200);
    rect(this.pos.x + 270, this.pos.y + 10, 5, 35);
    rect(this.pos.x + 270, this.pos.y + 50, 5, 15);
    rect(this.pos.x + 200, this.pos.y + 70, 5, 15);
    rect(this.pos.x + 200, this.pos.y + 85, 15, 5);
    fill(100, 100, 100);
    rect(this.pos.x + 170, this.pos.y, 20, 100);
    rect(this.pos.x + 290, this.pos.y + 0, 20, 100);
    rect(this.pos.x + 160, this.pos.y + 100, 160, 20);
    rect(this.pos.x + 156, this.pos.y + 103, 10, 14);
    rect(this.pos.x + 319, this.pos.y + 103, 5, 14);
    //Pipe2 up right
    //rect(this.pos.x + 9687,this.pos.y + 430,175,30);
    //rect(this.pos.x + 9825,this.pos.y + 200,20,500)
    fill(220, 50);
    rect(this.pos.x + 9725, this.pos.y, 100, 430);
    fill(250, 200);
    rect(this.pos.x + 9735, this.pos.y + 300, 5, 20);
    rect(this.pos.x + 9735, this.pos.y + 330, 5, 10);
    rect(this.pos.x + 9810, this.pos.y + 400, 5, 20);
    rect(this.pos.x + 9800, this.pos.y + 417, 15, 5);
    rect(this.pos.x + 9735, this.pos.y + 50, 5, 50);
    rect(this.pos.x + 9735, this.pos.y + 120, 5, 20);
  }
}

function movingDoor() {
  if (triggers[3].triggering() && floors[28].pos.y < 300) {
    floors[28].pos.y += 2;
  } else if (floors[28].pos.y > 200) {
    floors[28].pos.y += -2;
  }
  if (triggers[4].triggeredy()) {
    chars[0].pos.y += -6.5;
    triggers[4].trigged = true;
  }
}
I had the chance to do play testing with 3 users due to time constraints. The most common feedback was that I should have added sound effects for the damages. Two of the users felt the level was hard considering it’s the first and only level. They liked the vector animation for the jumps and movements.
As I played along to create the game, I lost sight of the difficulty. I should have play-tested while designing the floors. I wanted to make the game have infinite levels. Unfortunately, I could not finish it. The current gameplay is limited to only 1 level. In the future, I want to make the floors and scene more generative. Based on the feedback, I also want to improve the sound.