The two readings explore the broad subjects of design, usability, and the impact of emotions on cognition. The first reading (Emotion & design) focuses on the role that emotions play in designing and solving problems. It highlights how our emotions influence our perceptions, decisions, and behaviors. It also discusses how, in design, we frequently have to strike a balance between an object’s usability and beauty.
The second reading (Her Code Got Humans on the Moon—And Invented Software Itself) delves more into Margaret Hamilton’s contributions to the Apollo space program. It illustrates how important software design and usability were to the Apollo missions’ success even if it doesn’t specifically address emotions or usability. The development of flight software by Margaret Hamilton transformed our capabilities in space.
The lessons I learned from both the article and the book is that design and usability principles are crucial in a variety of contexts, from ordinary objects to space missions. Additionally, they recommend that while designing things to improve their functionality and make people happier, we take into account the ways in which our emotions shape our thoughts.
The readings also support the notion that emotions have a significant influence on our decision-making. According to the first reading (Emotion & design), our emotions cause our brains to generate chemicals that have an impact on our perception of reality and decision-making. It’s interesting to observe that our attention span increases and our thinking narrows down when we experience depression or anxiety. However, when we’re happy, we think more broadly and creatively.
Although it doesn’t address this specifically in the second reading, it makes a suggestion that our feelings have an impact on our actions. It demonstrates that anxiety causes us to concentrate intensely (depth-first processing), which is advantageous in some circumstances. However, when we’re in a good mood, we’re more inclined to use our imagination and focus on the wider picture.
This project idea sprang from something personal and relatable – my sister’s love for solving puzzles. It always fascinates me yet triggers me how she has the patience and dedication to tackle intricate puzzles. It got me thinking, why not bring that captivating experience into the digital realm? I want to create a digital puzzle game that captures the essence of those satisfying moments when you piece together the final part of a puzzle.
The concept of the game is to offer players an engaging and mentally stimulating experience. We’ve all experienced the satisfaction of solving a puzzle, and it’s this joy that served as our inspiration. The game is designed to provide players with a series of puzzles that vary in complexity. It’s a journey through creativity and problem-solving.
Coding, Logic, and Planning:
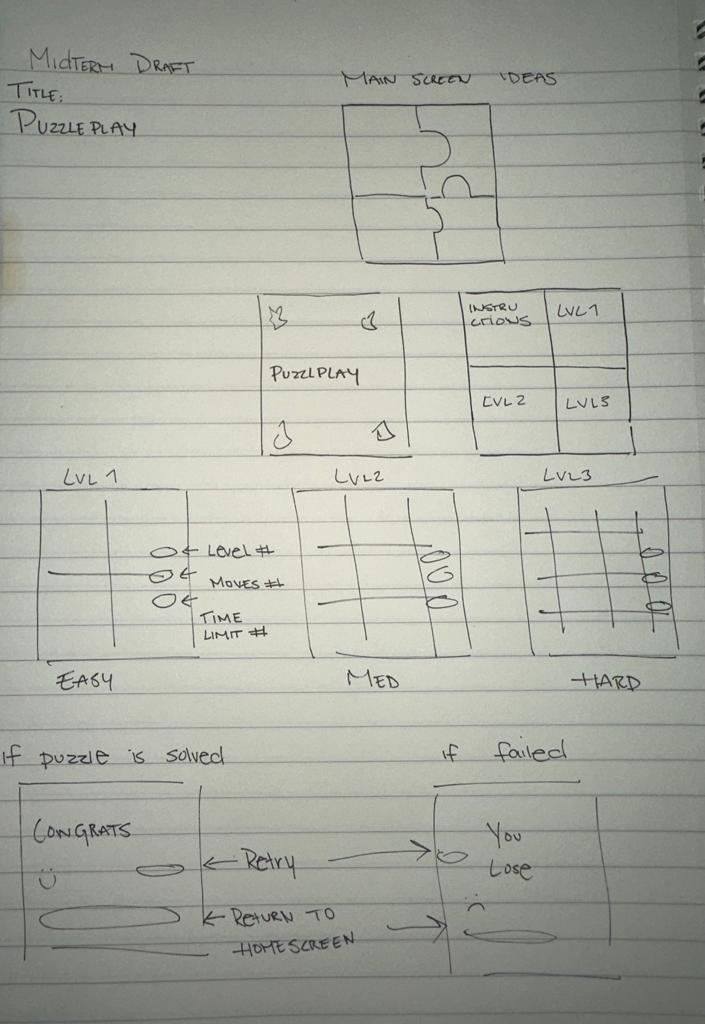
My journey in developing this puzzle game involved a bit of trial and error. It commenced with two drafts, each aimed at refining and enhancing the user experience. Initially, I allowed users to adjust the number of columns and rows within the puzzle, providing them with a sense of control over the challenge level. It was a good start, but I soon realized I could infuse more excitement into the gameplay.
That’s when the concept of progressive difficulty levels took shape. Instead of sticking with static user-defined settings, I decided to make the game more engaging. By adjusting the number of puzzle pieces, I introduced a system where each level offered a fresh challenge, making the game more exhilarating as players advanced. This change not only improved the game’s overall flow but also elevated the overall gaming experience.
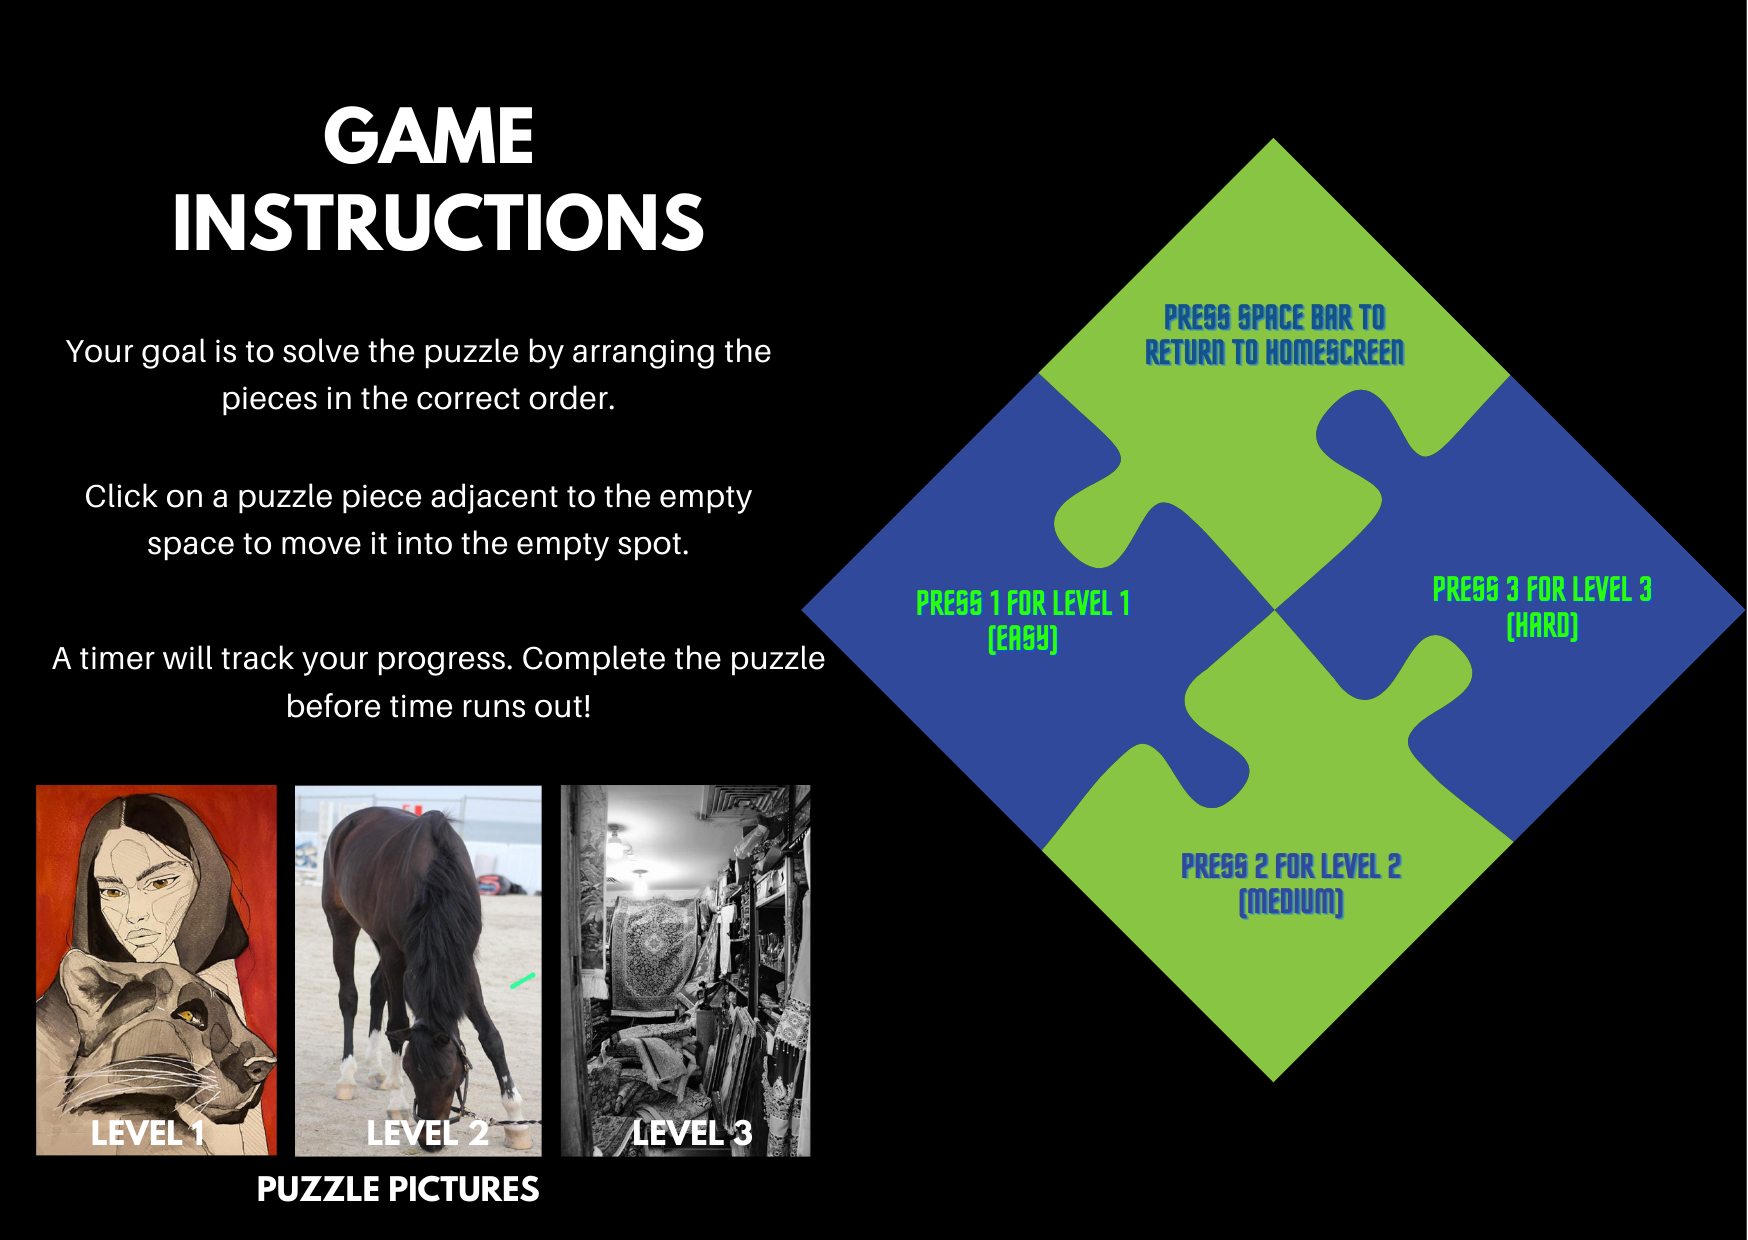
In the initial stages, the game featured a flower image, a mere placeholder. However, as the project evolved, I decided to swap it out for images that resonate with me on a personal level. Drawing from my passions for photography, art, and horseriding.
Draft 1ProcessFinal
As I developed this puzzle game, I planned the logic to offer players a compelling and progressively challenging experience. The heart of this game lies in its puzzles and how users engage with them as they progress through different levels. Each level presents a unique grid size and time frame, with Level 1 granting players 5 minutes, Level 2 extending the challenge to 10 minutes, and Level 3 pushing their limits with 15 minutes to solve the puzzle. This escalating difficulty curve keeps players engaged and motivated to sharpen their puzzle-solving skills.
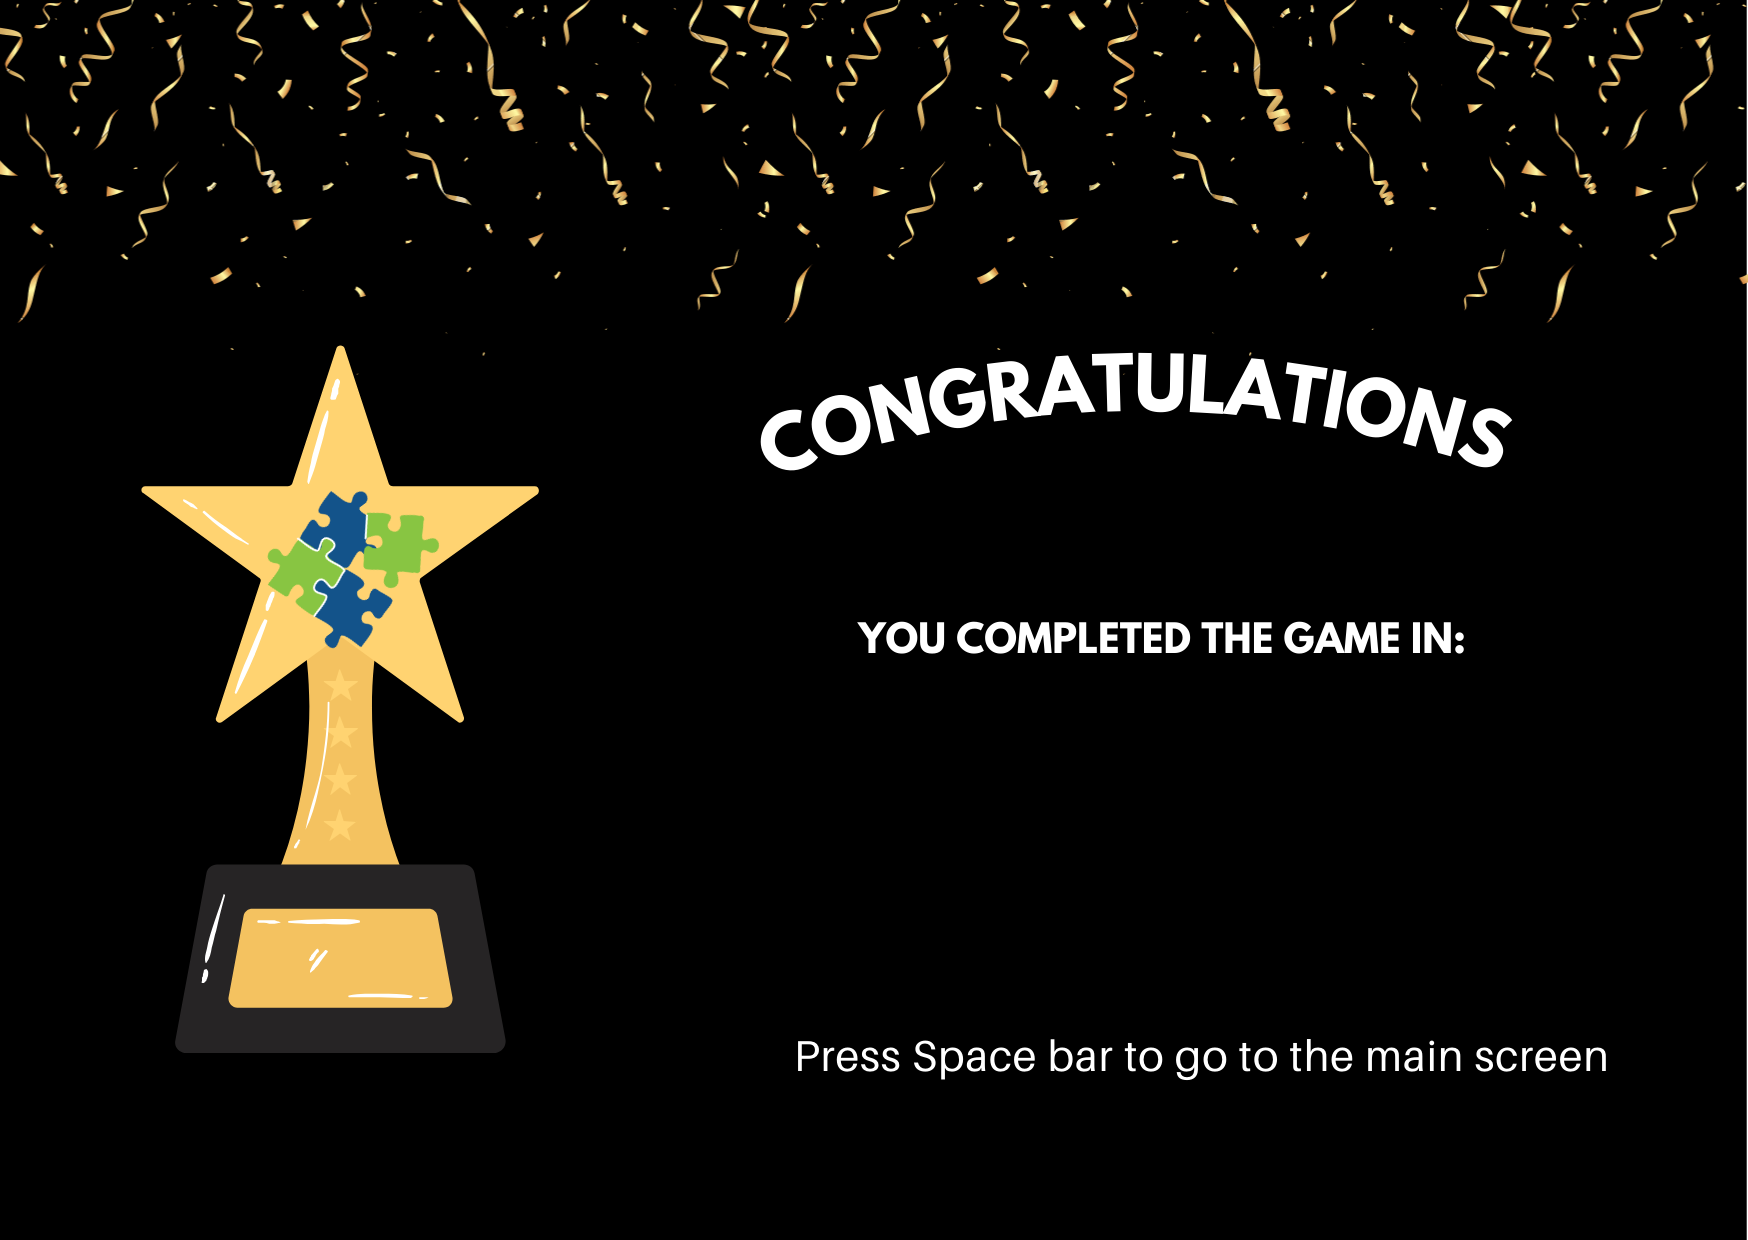
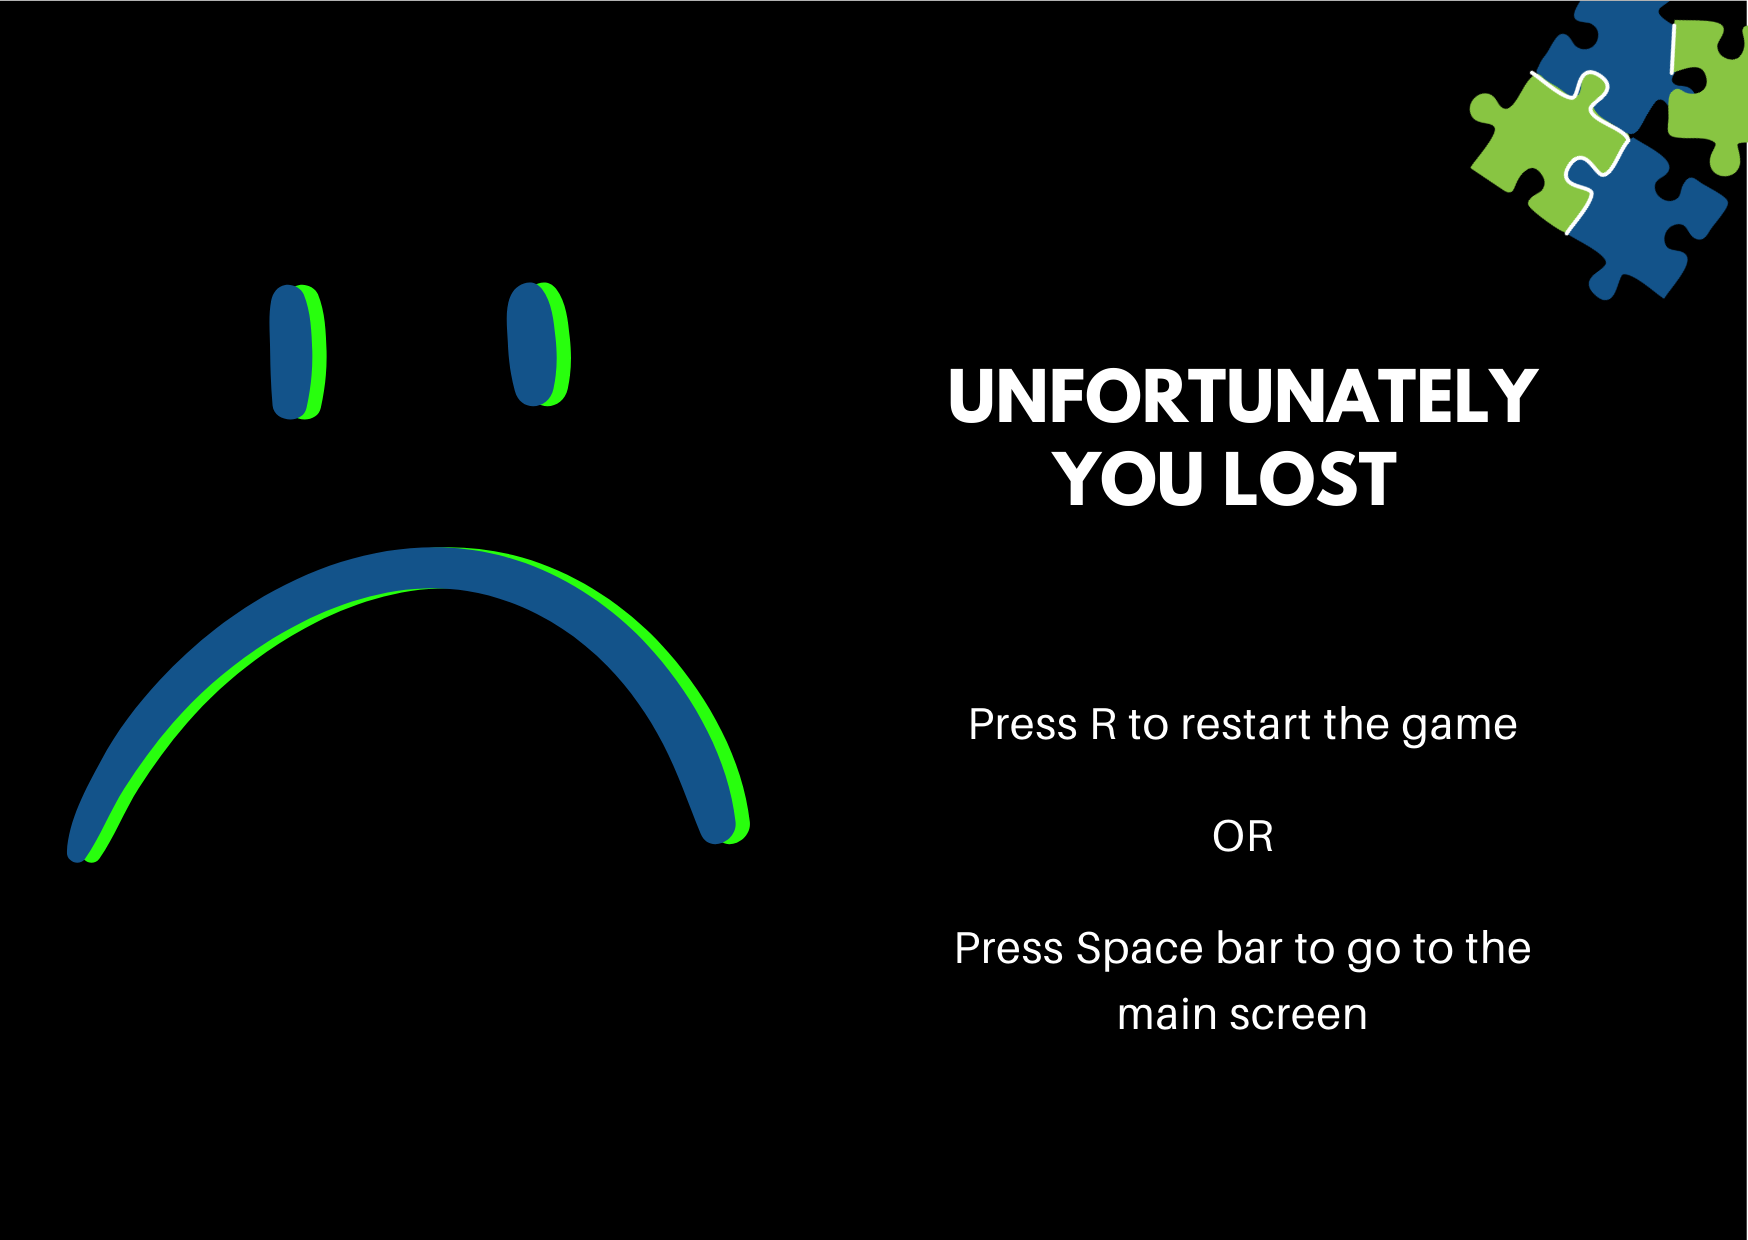
To accommodate these time limits and provide feedback to the player, I incorporated an intelligent system of game states. When players successfully solve a puzzle within the given time, they are rewarded with a “Congratulations” page. However, if they run out of time or fail to complete the puzzle, a “You Lost” page is displayed. I further enhanced the player experience by allowing them to restart the game by pressing “R” or returning to the home screen by hitting the space bar. These features allow players to navigate the game according to their preferences, ensuring an enjoyable and engaging gaming experience.
I’ve created all my backgrounds through Canva and then uploaded them into my code here are some examples:
Challenges:
Image Manipulation and Sizing was the most challenging part for me when I was working on the code. I struggled with it because resizing images while maintaining their aspect ratios and making sure they fit the game’s grid properly required a good deal of trial and error. It was a bit tricky to get the images to display correctly without distortion or going beyond the bounds of the grid. However, through experimentation and some research, I was able to overcome this challenge and get the images to work as intended in my game.
In this part of the code, I loaded different images using the loadImage function and then used the .resize() method on these images to adjust their dimensions. Image resizing is done to fit these images into specific dimensions before using them in the game.
Areas for improvement, future work:
In terms of areas for improvement and future work, I’d like to focus more on enhancing the visual aspect of the game. Currently, the game uses a black background for the puzzle grid, which is rather plain. To make the game more visually appealing, I would consider creating unique and visually engaging backgrounds for each level. For instance, I could design backgrounds that complement the theme of the puzzle, creating a more immersive experience for the players. Additionally, I’d extend this effort to the main screen as well, making it more captivating and visually appealing to draw players into the game right from the start. Improving the visual elements would not only enhance the game’s aesthetics but also contribute to a more enjoyable and engaging gaming experience.
I’ve introduced multiple levels that progress in difficulty. Users can now experience a gradual increase in challenge as they advance through the game.
For this draft, I’ve used the same sample image for all levels to focus on increasing the difficulty. The puzzle becomes more complex as the number of columns and rows increases, engaging players further.
Background Music and User Interface:
To enhance the gaming experience, I’ve added background music on the main screen. This sets the mood for puzzle-solving while ensuring user comfort.
The music then pauses when users click on the level number
Sound Effects for Interactivity:
Responding to user feedback, I’ve incorporated sound effects when tiles are moved. These audio cues make the gameplay more engaging.
Moves Counter:
To track progress and add a competitive element, I’ve added a moves counter. It records the number of moves players take to complete the puzzle, encouraging strategic thinking and efficient puzzle-solving.
Checking Puzzle Completion:
I’ve implemented an “isSolved()” function to check whether the puzzle has been completed. This function iterates through the board array, comparing current values with expected indices from the tiles array. (The result will later on be displayed on the canvas)
Next steps:
As part of my future plans for the project, I intend to replace the sample images with ones that are personally meaningful to me, reflecting my hobbies in horses, nature, and photography. This addition will infuse the game with a personal touch, creating a more enjoyable and relatable experience for users. Moving forward, I plan to further enhance the visual appeal of each level by adding backgrounds that match the theme of the image. This approach will create a more immersive and cohesive experience for players. For instance, if the puzzle features a nature image, the background will incorporate elements from the natural world, such as trees, leaves, or landscapes.
Additionally, I’m aware that the code is currently quite messy and scattered. While my initial focus was to ensure all functionalities work seamlessly, I plan to undertake a substantial code refactoring effort. In doing this, each level will have its own class, thus enabling independent adjustments to difficulty levels, as well as significantly improving code organization and management.
This project idea sprang from something personal and relatable – my sister’s love for solving puzzles. It always fascinates me yet triggers me how she has the patience and dedication to tackle intricate puzzles. It got me thinking, why not bring that captivating experience into the digital realm? I want to create a digital puzzle game that captures the essence of those satisfying moments when you piece together the final part of a puzzle.
But here’s where it gets exciting – users can take the reins to customize their puzzle-solving journey. Inspired by my sister’s passion for puzzles, I want to offer users the freedom to tweak the puzzle’s difficulty. They can do this by adjusting the number of columns and rows in the puzzle. It’s like having the power to set your own challenge level. this project aims to provide an interactive and enjoyable experience that’s both personal and engaging.
User Interaction Design:
The user is greeted with on-screen instructions
The puzzle piece will be an image from online
Puzzle pieces are displayed on the canvas, and users can click and drag them.
A “Shuffle” button resets the puzzle.
Sound effects play when pieces are clicked or moved.
Upon completing the puzzle, a “Congratulations!” message with a celebration sound effect is displayed.
The most frightening or complex part of the project would be the implementation of puzzle piece movement and the logic behind shuffling the puzzle once the user has completed it.
Piece movement:
As far as doing something to minimize that risk I’ve created a quick draft here of what the final project may look like I’ve numbered each piece on the puzzle so it will be easier for me to identify the grid location and can later replace the number with the image that I’ll use
Swapping pieces and finding the empty position: ( swap find/ 0 position):
I’ve created a function that allows me to check when the box is clicked if it’s valid to move to the empty position or not, also I created a function that can allow me to swap the pieces. Through an “IF” condition we check if the piece is valid/ empty then we allow the 2 pieces to swap.
The reading sheds light on how computer vision has gone through a significant makeover. It used to be this fancy field only accessible to experts in signal processing and AI, mainly serving military and law enforcement needs. But now, thanks to better software tools, open-source communities, faster computers, and cheaper video hardware, even newbie programmers and artists can dive into computer vision experiments. This shift has sparked a creative boom across the board, from cool art projects to smart home gadgets. It’s clear that technology’s become a lot more user-friendly, opening up tons of exciting possibilities.
The reading doesn’t exactly take sides, but you can sense the author’s excitement about this change. They see it as a great thing, how more people can get in on the computer vision action and create new stuff. While it hasn’t changed my mind about things, it does make me wonder about the bigger picture. As computer vision gets even more common in everyday life, what about ethics and privacy? How do we make sure this tech benefits everyone while keeping any potential problems in check? So, this reading isn’t just about fun gadgets; it also makes us think about the bigger issues that come with them.
Chapter 1 of “The Design of Everyday Things” by Donald A. Norman introduces a comprehensive perspective on design as a field that encompasses a wide array of artificial creations, including clothing, furniture, and bridges. Norman’s unique approach, particularly remarkable in the 1980s, melds three major design domains that were typically considered distinct at the time. These domains are industrial design, emphasizing the optimization of function, appearance, and value for users and manufacturers; interaction design, drawing on psychology, art, and emotion to understand how humans interact with technology; and experience design, which places a strong focus on enhancing user enjoyment.
Within this context, Norman argues that good design should be human-centered, emphasizing the crucial roles of discoverability and understanding in the usability of everyday objects. He also highlights the importance of effective communication between machines and users, emphasizing the need for products to not only perform well but also be easily interpretable. Norman’s call for designers to pay attention to situations when things go wrong underscores the significance of user satisfaction. In essence, Chapter 1 sets the tone for the book by advocating for design principles that prioritize user needs, usability, and satisfaction while integrating various design disciplines, making it a seminal work in the field of design.
The concept for this data visualization assignment is to create a compelling and informative visualization that helps users gain insights into the global impact of coronavirus-related deaths. I used the “Coronavirus Lat/Lon Dataset” sourced from Kaggle, which provides daily data on deaths, recoveries, and confirmed cases from around the world.
Challenges I faced:
The initial challenge I encountered was finding a suitable dataset to work with. I needed a dataset that not only contained coronavirus-related data but also included longitude and latitude information for different regions or countries. Locating a dataset that met these specific criteria was a time-consuming task.
A highlight of some code that you’re particularly proud of:
let pointX=map(longitude[x],-200,200,0,width);
   let pointY=map(latitude[x],-200,200,0,height);
   point(pointX,pointY,death_day[x]);
I am particularly proud of the code snippet where I use the map() function to transform longitude and latitude coordinates into screen coordinates. This part of my project stands out because it demonstrates my ability to convert real-world geographical data into a visually appealing representation on the canvas
“The Art of Interactive Design, Chapter 1” by Chris Crawford digs into the complexities of interactive design, putting light on its particular problems and spirit. Crawford’s emphasis on interactivity as a two-way conversation between the user and the system struck a chord with me. He correctly points out that interactivity is about active involvement rather than passive consumption. This idea is consistent with my conviction that great interactive experiences should empower users by giving them the ability to make meaningful choices and feel a sense of agency. Crawford’s viewpoint emphasizes the importance of user-centric design, which prioritizes the user’s experience.
However, I couldn’t help but think about Crawford’s pretty harsh perspective on storytelling in interactive design. He contends that interactivity and storytelling are frequently at odds, and that an overemphasis on storytelling might damage a system’s interactive nature. While I understand his concerns about a potential collision, it makes me wonder about the chances of reaching a compromise. Is it possible to include storytelling aspects into interactive design without compromising its interactive essence? This friction between story and interactivity serves as a point of reflection and inquiry for me, challenging me to consider how these two components might coexist happily in design. Crawford’s observations have enhanced my understanding of the nuances of interactive design and the complexities involved in striking the proper balance.
This generative artwork will consist of colorful bubbles that move randomly on the canvas, changing color and size as they go. Ive used Object-Oriented Programming (OOP) principles to create a Bubble class, each representing an individual bubble.
Description:
I created a Bubble class to represent each bubble. The class has properties like x, y, diameter, col (color), speedX, and speedY for position, size, color, and movement.
In the setup() function, Ive created 10 initial bubble objects and added them to the bubbles array.
In the draw() function, Ive update and display each bubble in the canvas.
When the mouse is pressed (mousePressed() function), a new bubble is created at the mouse position and added to the array.
Problems I ran into:
Creating a class and working with arrays was quite challenging for me as a beginner while I was developing the “Bubbles” project
At first, the concept of Object-Oriented Programming was a bit overwhelming. I had to wrap my head around the idea that a class is like a blueprint for creating objects. It felt like creating a set of rules for what each bubble should look like and how it should behave.
Implementing methods within the class, such as move() and display(), was another hurdle. I had to understand how these methods would change the bubble’s properties and behaviors. It felt like writing a set of instructions for each bubble to follow.
Working with arrays was entirely new to me. Understanding how to create and manipulate arrays, like let bubbles = [];, was a fundamental but challenging concept to grasp.
Putting instances of the Bubble class into the bubbles array was confusing initially. I had to get the hang of adding objects dynamically to an array and keeping track of them.
Despite the initial challenges, I found that practice, patience, and referring to documentation and tutorials helped me overcome these difficulties gradually.
One part of the “Bouncing Bubbles” code that I’m particularly proud of is the move() method within the Bubble class.
Random Movement: The bubble’s movement is randomized. It adds an element of unpredictability and liveliness to the bubbles’ motion, making them feel more like bouncing objects rather than following a predictable path.
Constraining within Canvas: I ensure that the bubble stays within the canvas by using the constrain() function. This prevents the bubbles from disappearing off the screen, which is crucial for maintaining a visually pleasing animation.
This simple p5.js sketch represents a grid of circles on a canvas. The circles are evenly spaced in rows and columns. The purpose of this artwork is to explore the fundamental principles of drawing shapes using p5.js, such as ellipses, and to create a pattern. While this version lacks interactivity, I believe that this grid of circles can be a starting point for more complex projects, where additional features and interactions can be incorporated to enhance the user experience.
one aspect of the code that I’m particularly proud of is the nested loop structure used to create the grid of circles. This nested loop efficiently iterates through rows and columns, positioning each circle at the correct coordinates on the canvas. This code snippet demonstrates the power of loops in creating repetitive patterns and organizing elements in a systematic way:
for (let x = 0; x < width; x += spacing) {
for (let y = 0; y < height; y += spacing) {
fill(0); // Set the fill color to black
ellipse(x + circleSize / 2, y + circleSize / 2, circleSize, circleSize);
}
}


