Final Project – Mastermind

Concept

As I mentioned in a previous post, I wanted to make a Mastermind game, which is a two-player board game where one person is the code maker, and they make a code using colored pegs. The other person is the code breaker, and they have to figure out the code in a limited number of moves. The less moves you take to figure out the code, the higher you score.

Mastermind - Code Breaking Game – Kubiya GamesIn the version that I made, this game is actually a 1-player game, where the code is randomly generated, and the players have to guess the code. Players use a physical system of colored pegs and holes to parse input to the board.

Final Game

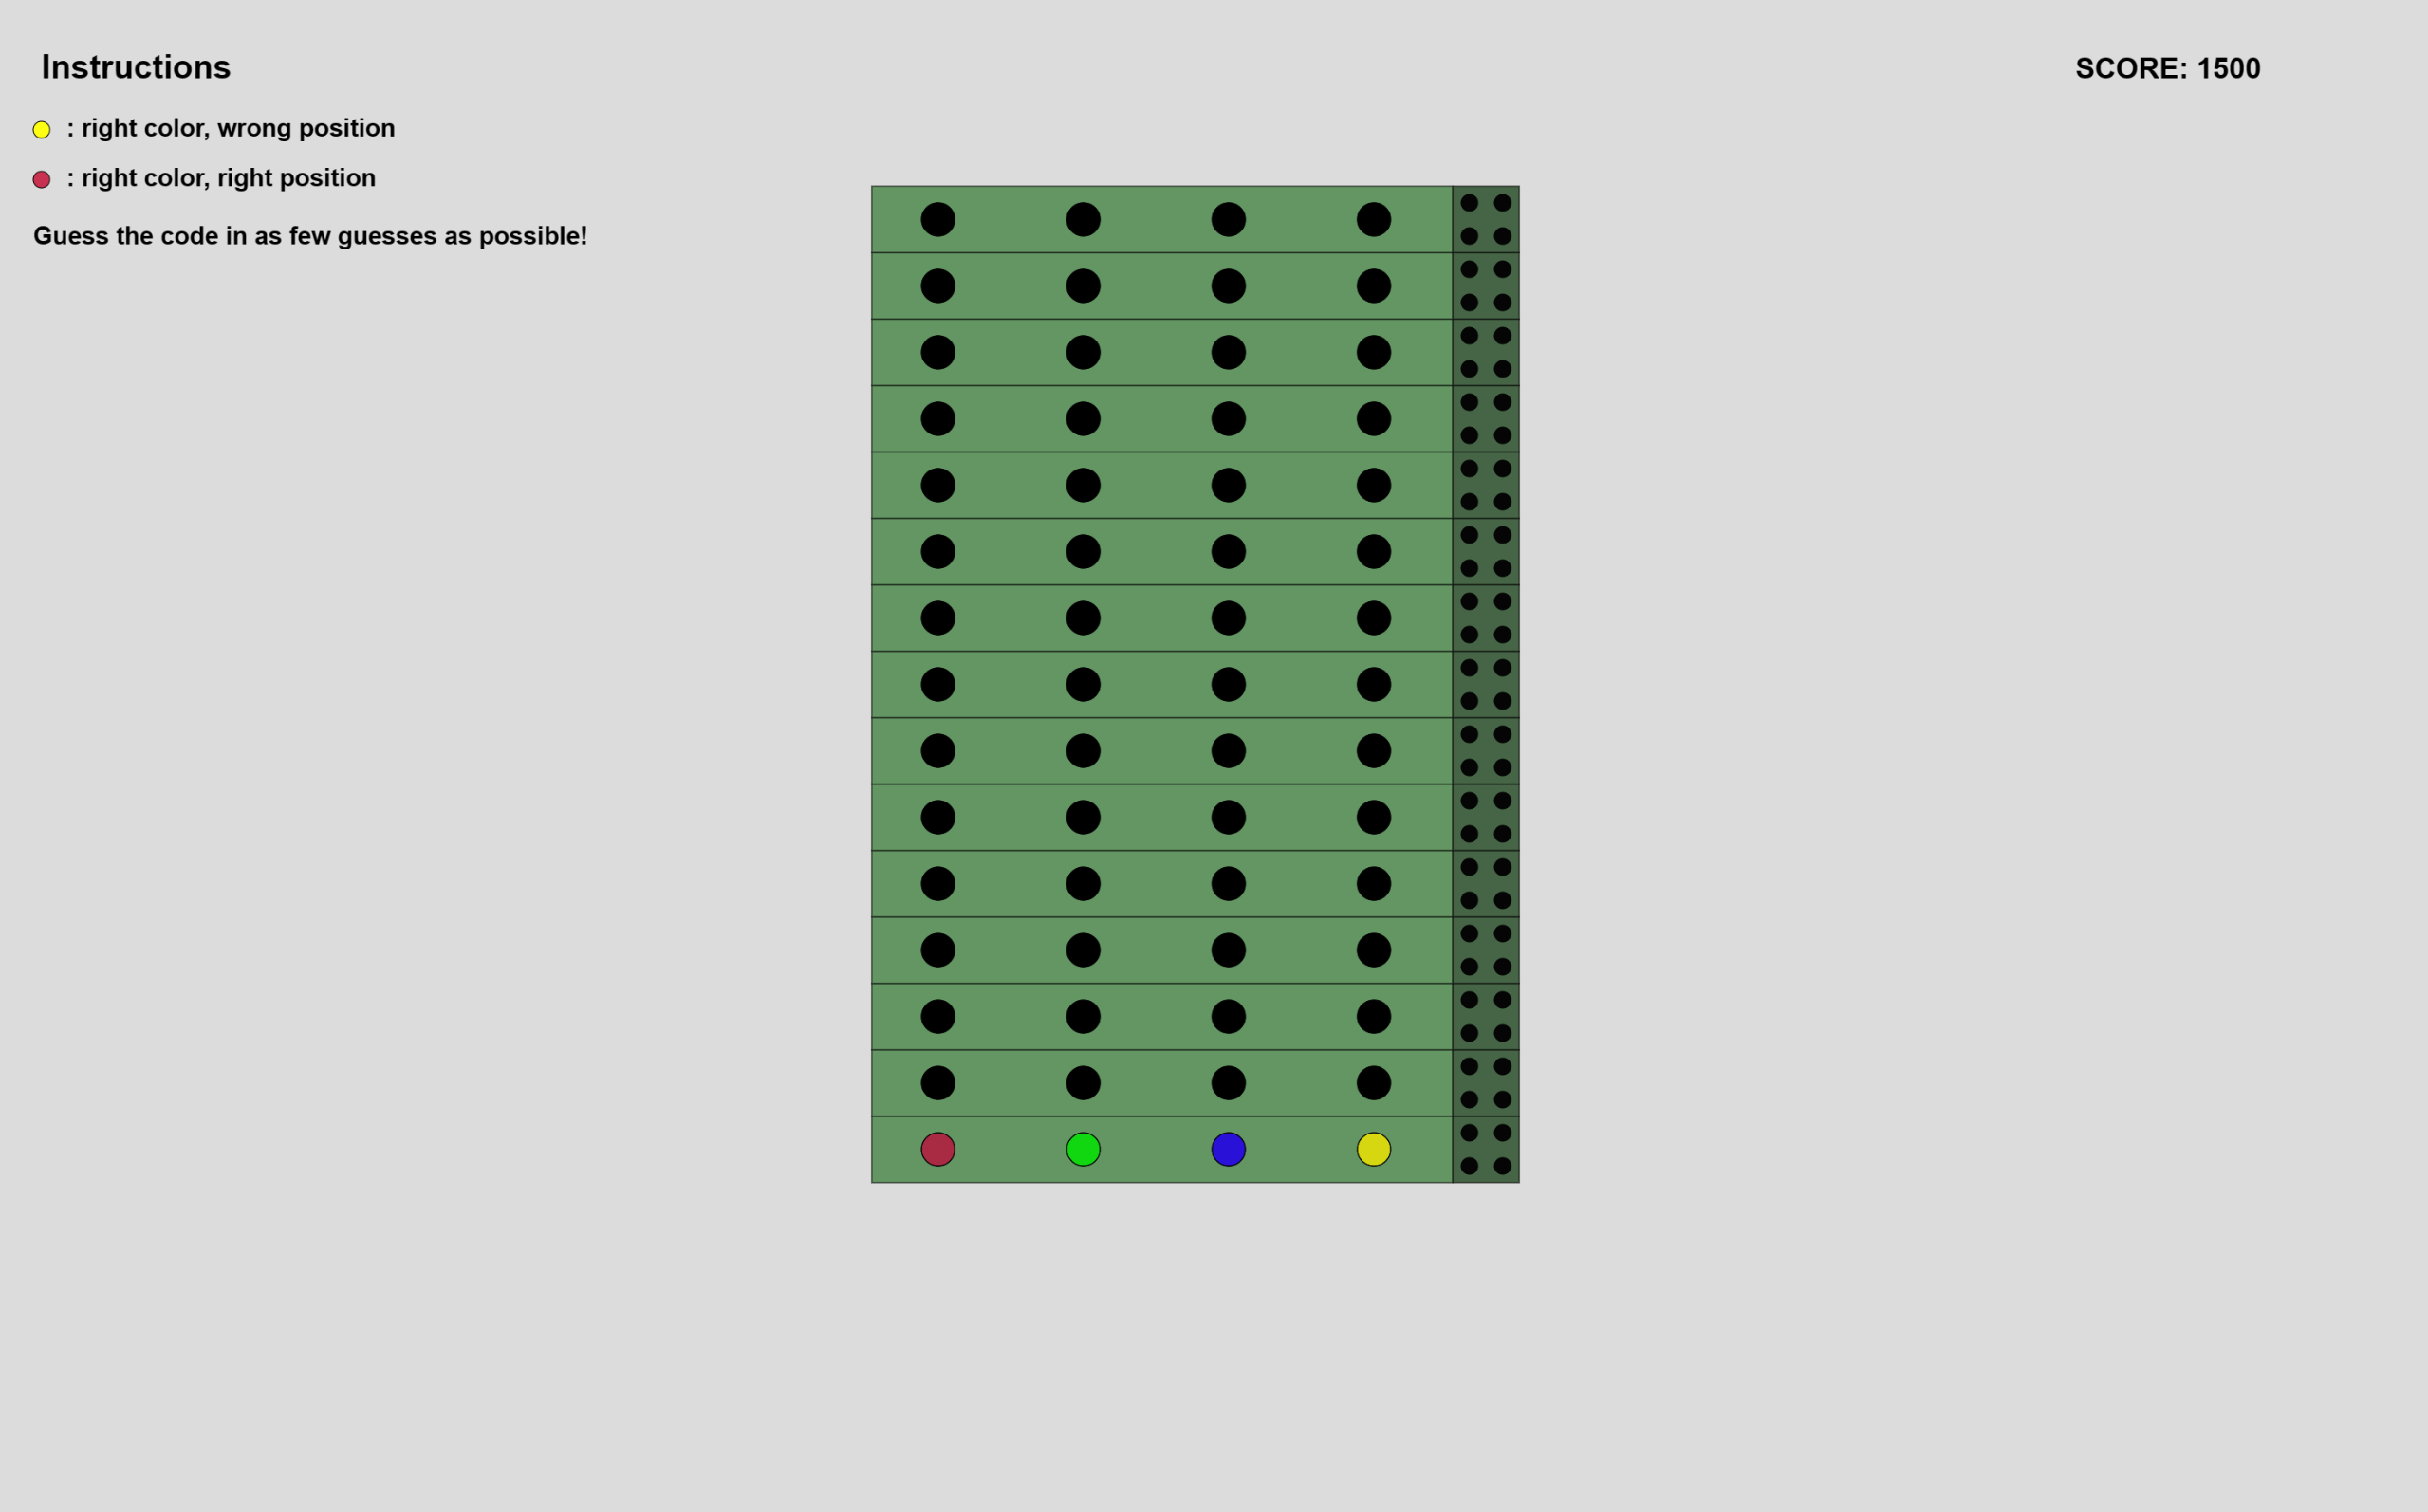
I’m very happy with the final P5Js interface for the game. It’s very minimalistic, which matches the style that I’ve chosen to go with for all of my projects. The instructions are in the upper left corner, as I didn’t want to clutter the interface by adding buttons to other pages. Also, I wanted to keep interaction with the laptop minimal if not zero, so I opted to have a static screen and focus on the physical input interface.

P5Js Sketch

The sketch does require a serial connection with Arduino. However, I enabled skipping the serial connection check for the purposes of viewing the sketch without an Arduino connection. You can press the “space” key to skip to the game screen. I have also edited the aspect ratio, for viewing it successfully within the Intro to IM blog post. It’s best viewed in fullscreen mode.
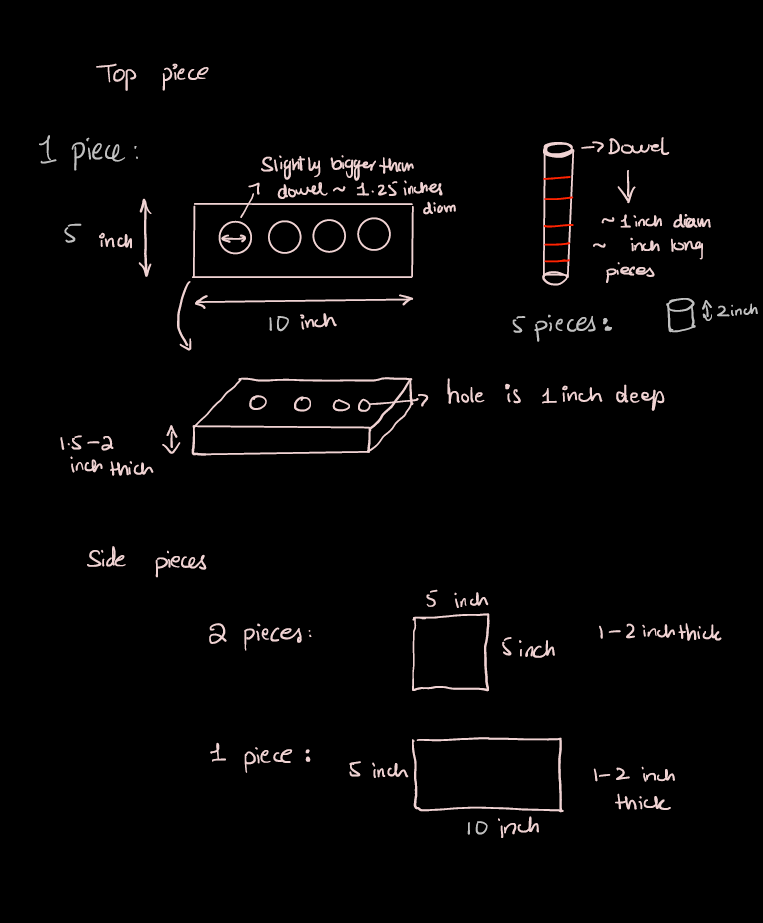
The Physical System

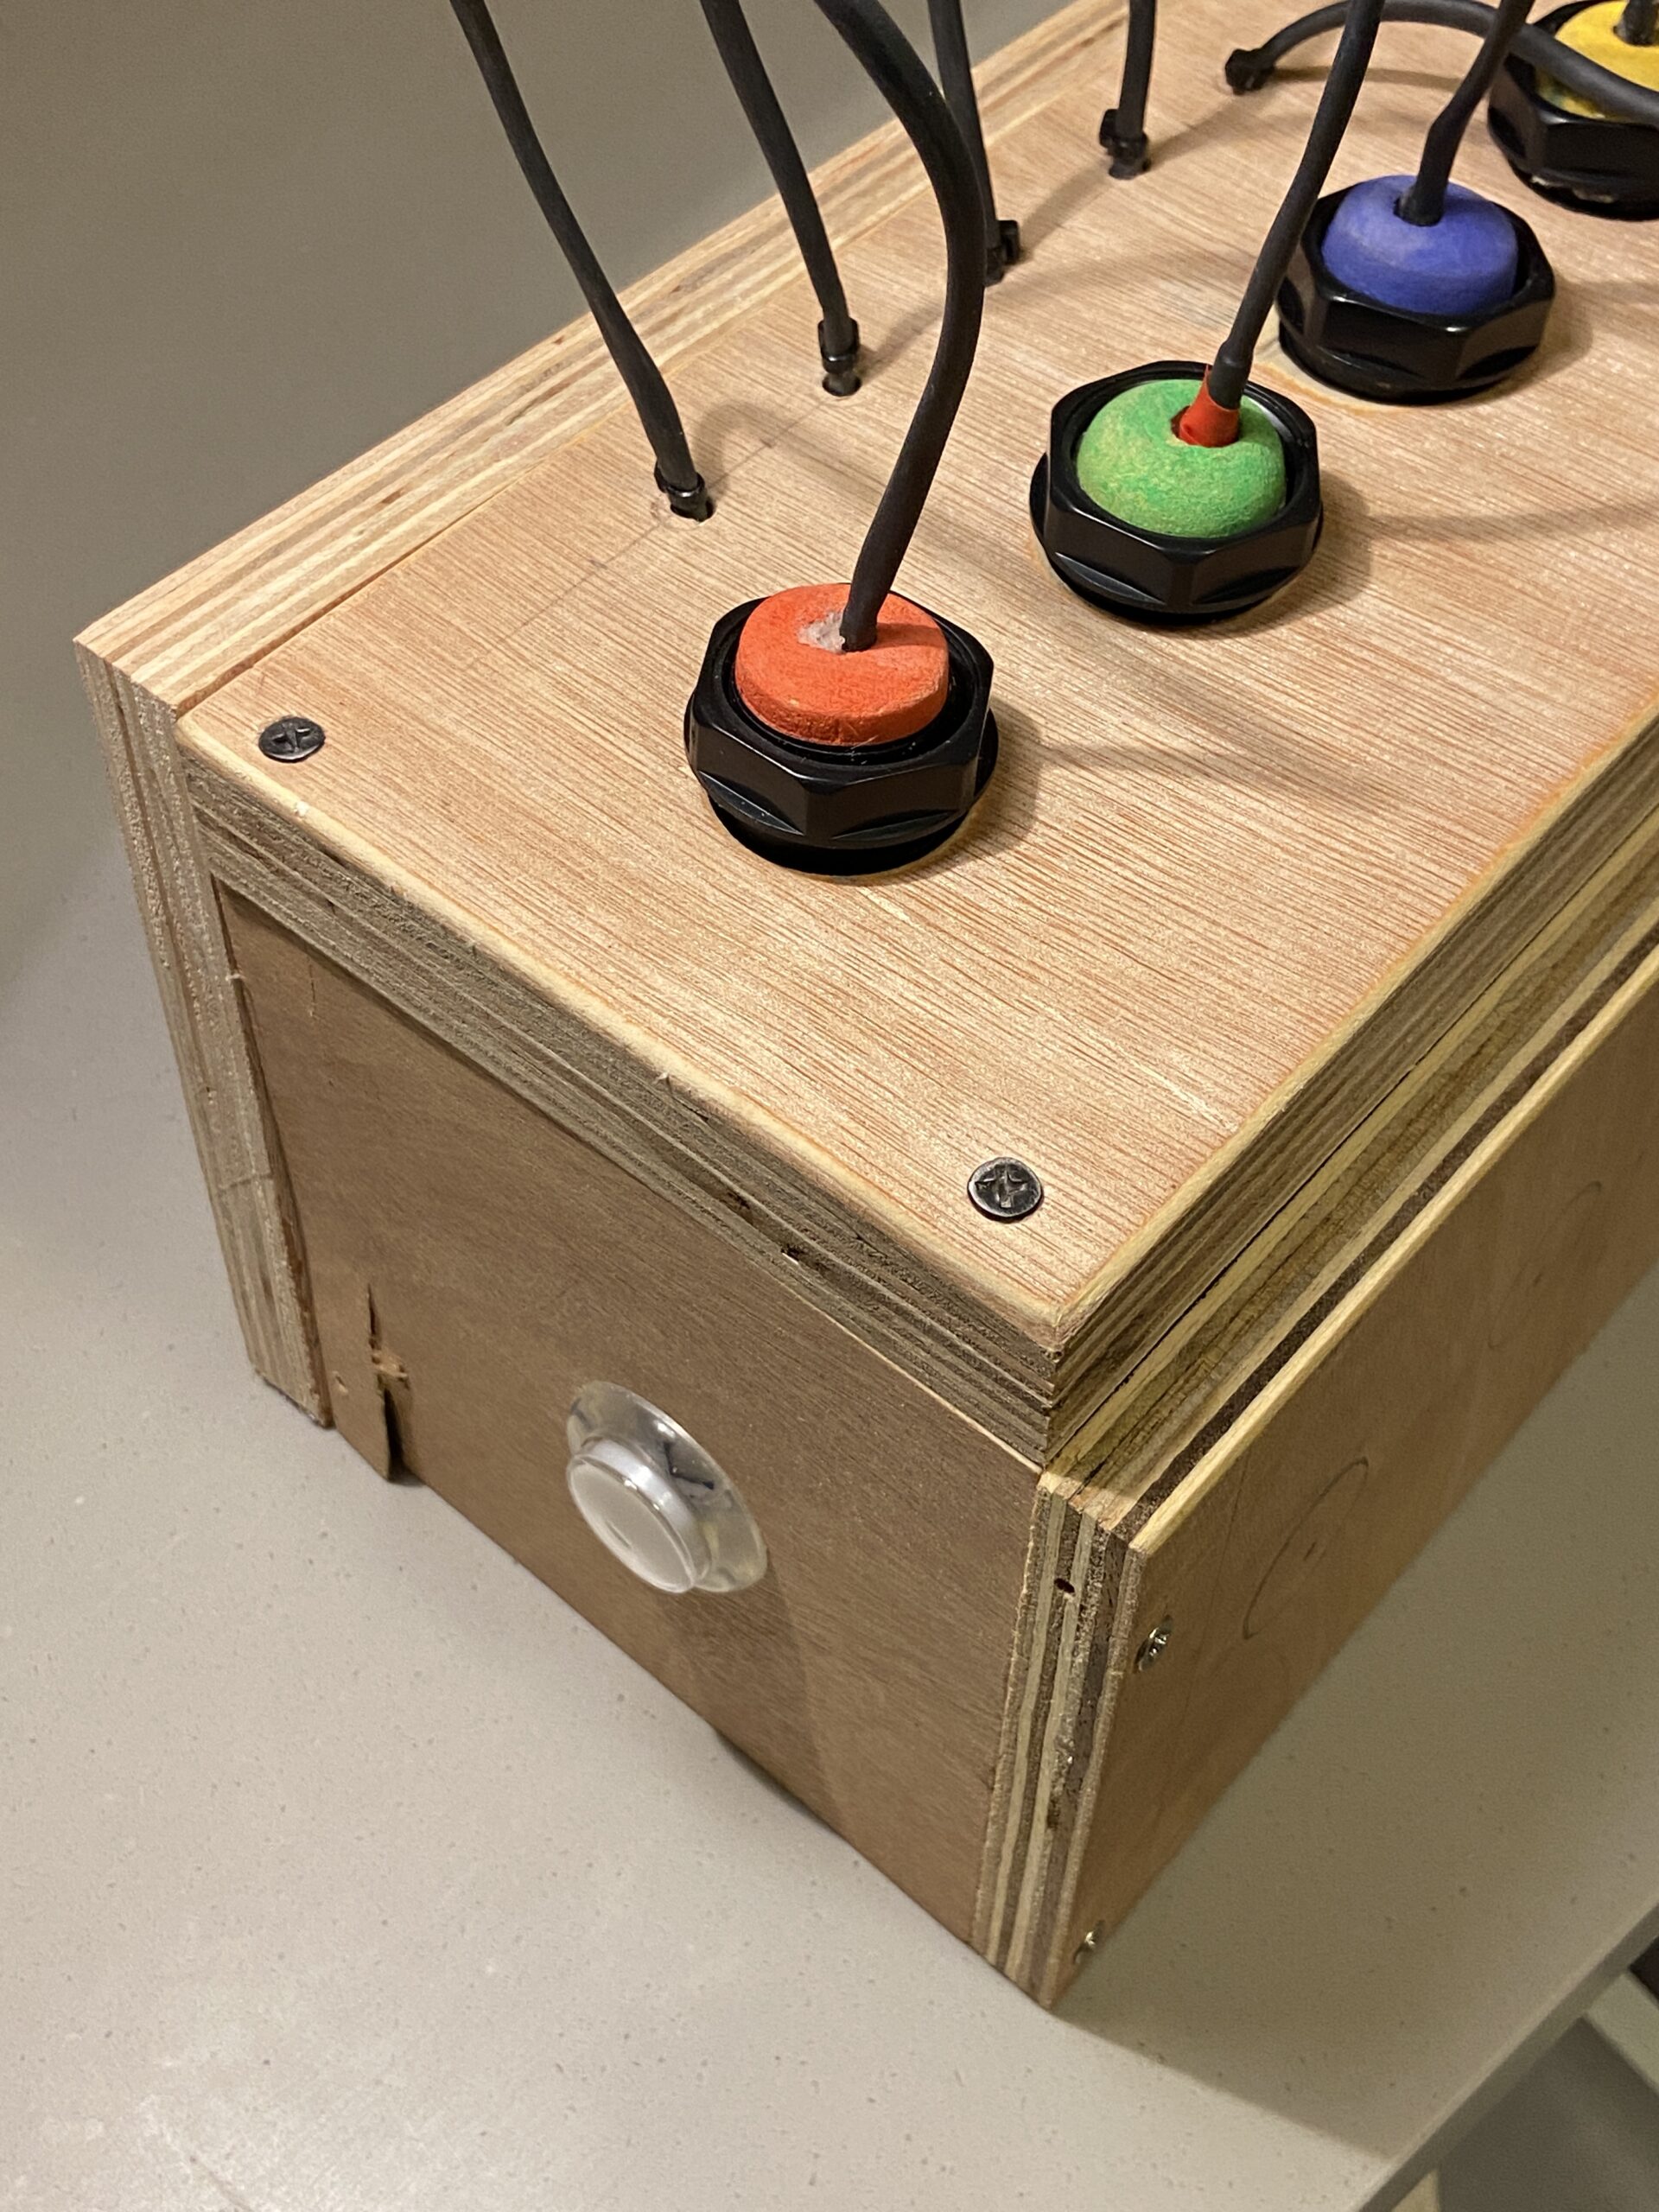
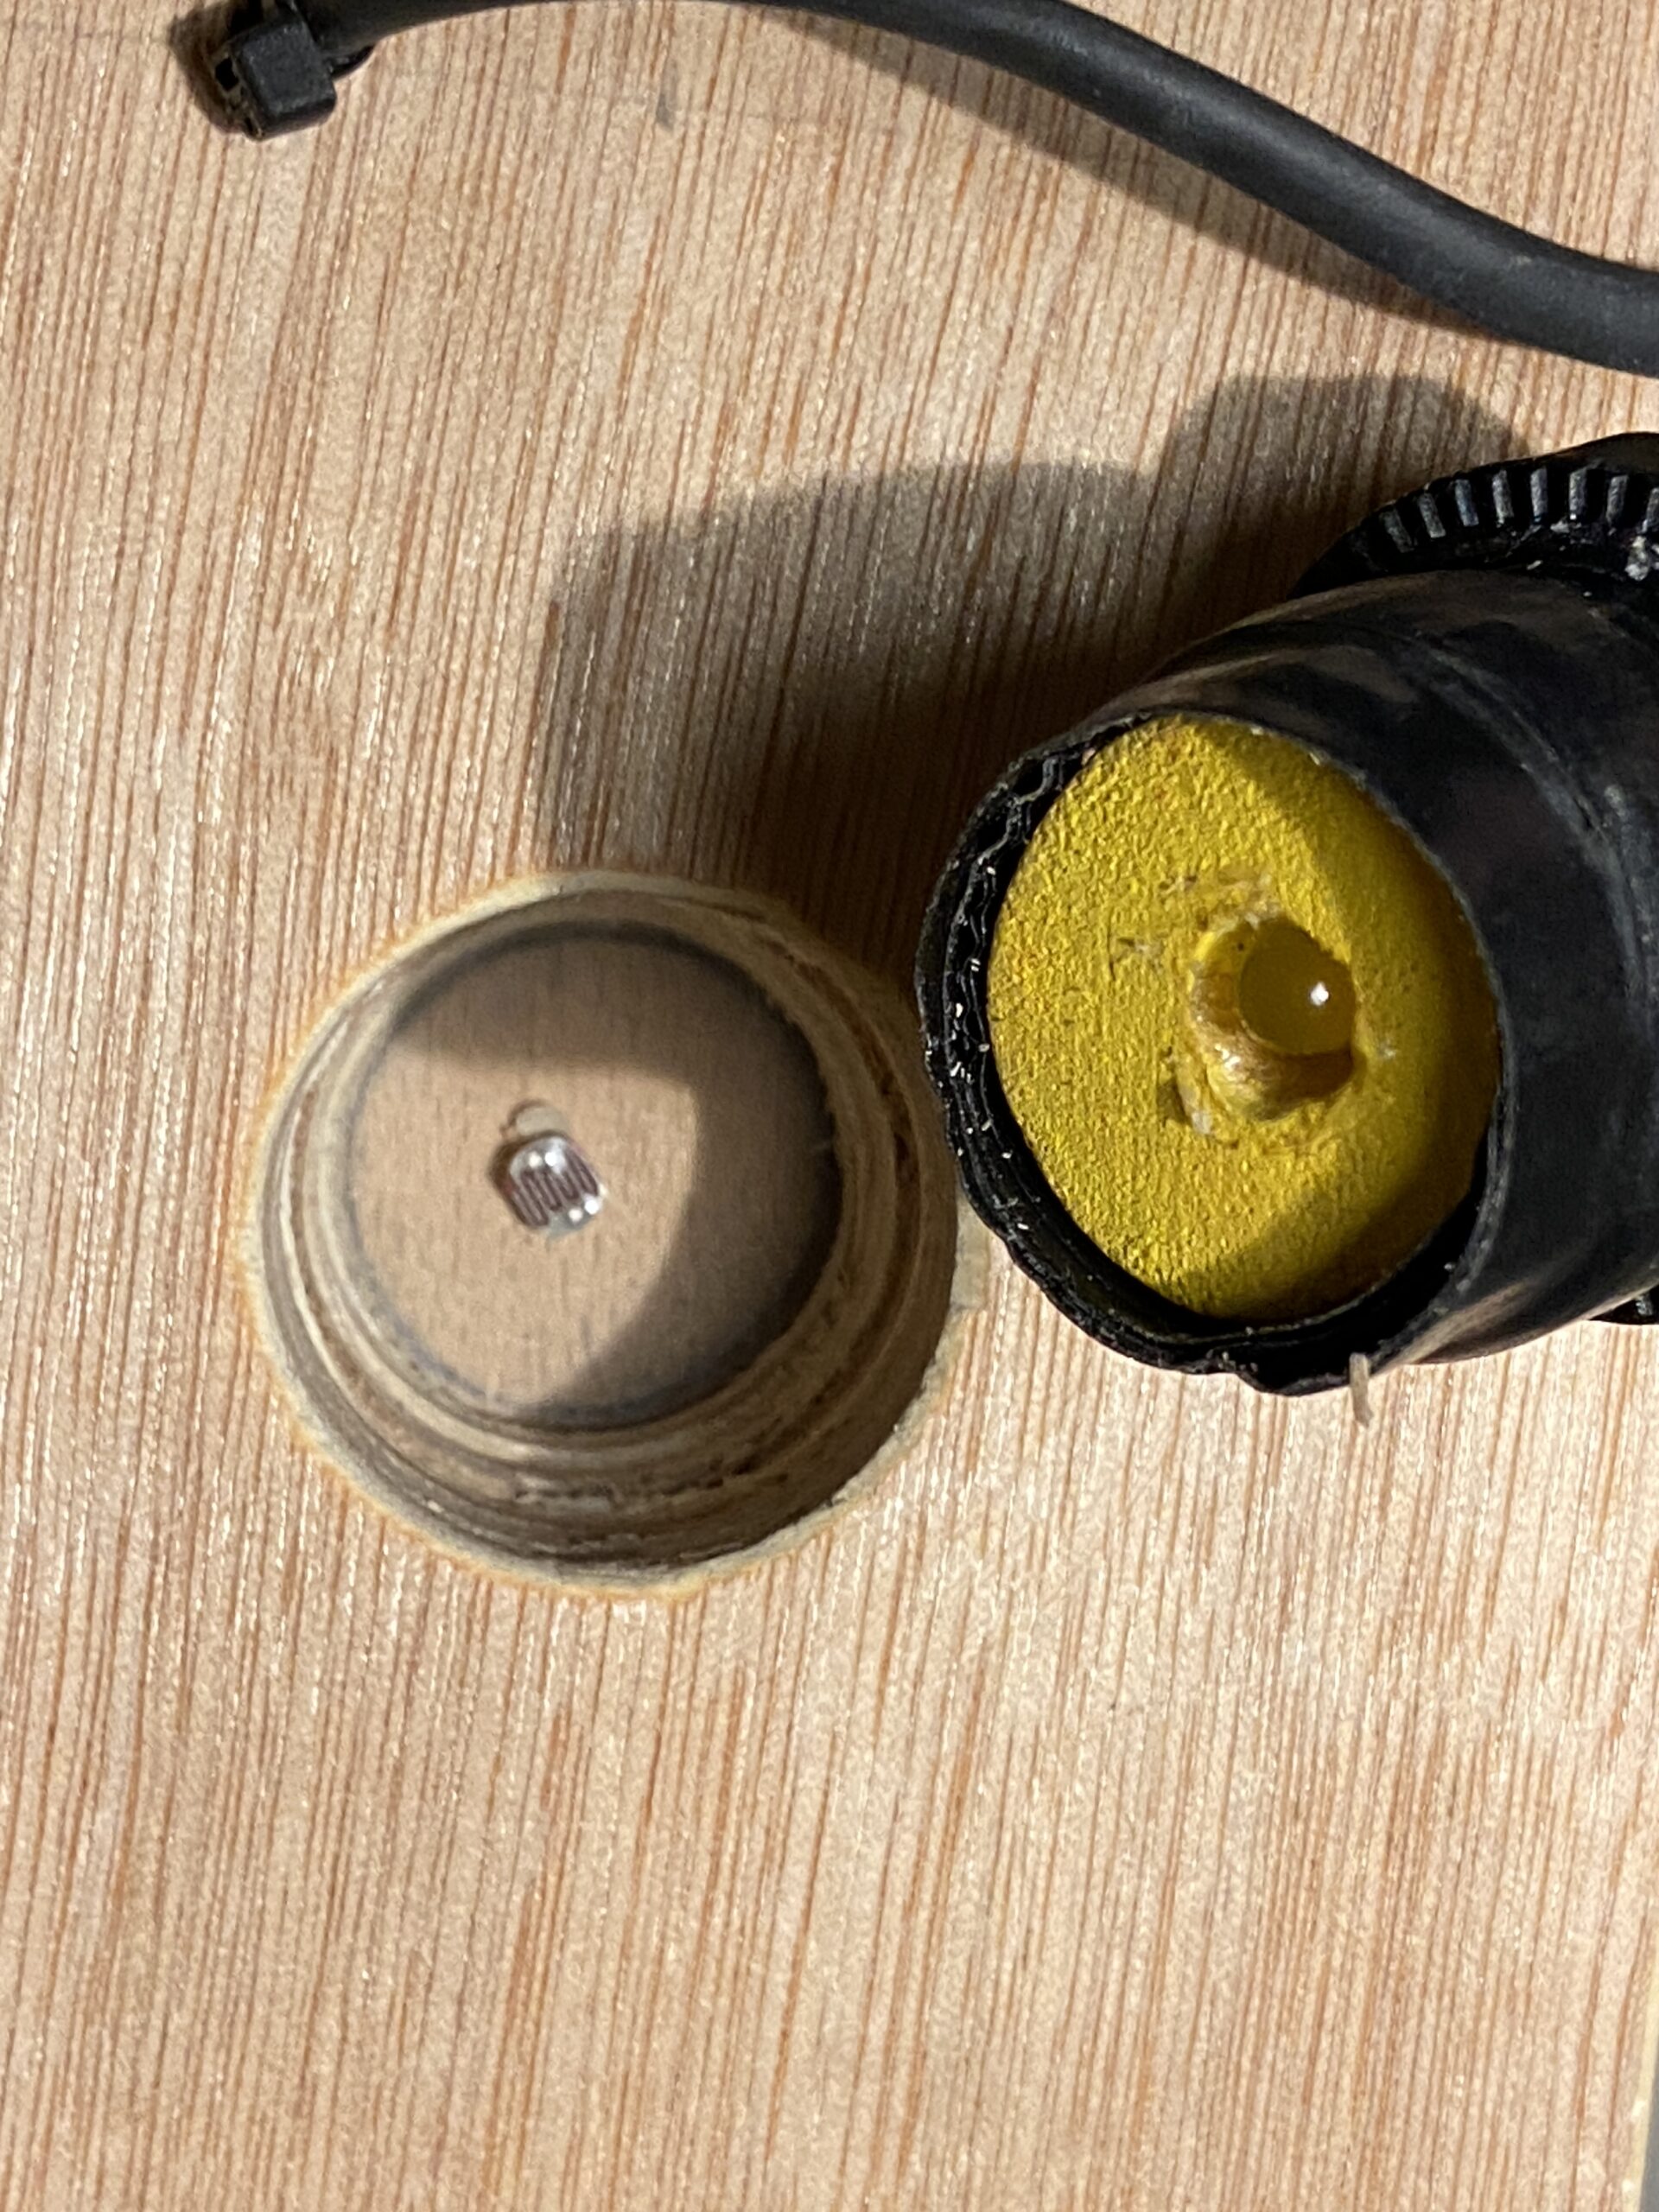
The control interface consists of a box with 5 colored pegs. In the picture below, you can see how the pegs fit into the console, and how the order can be changed to alter the input.


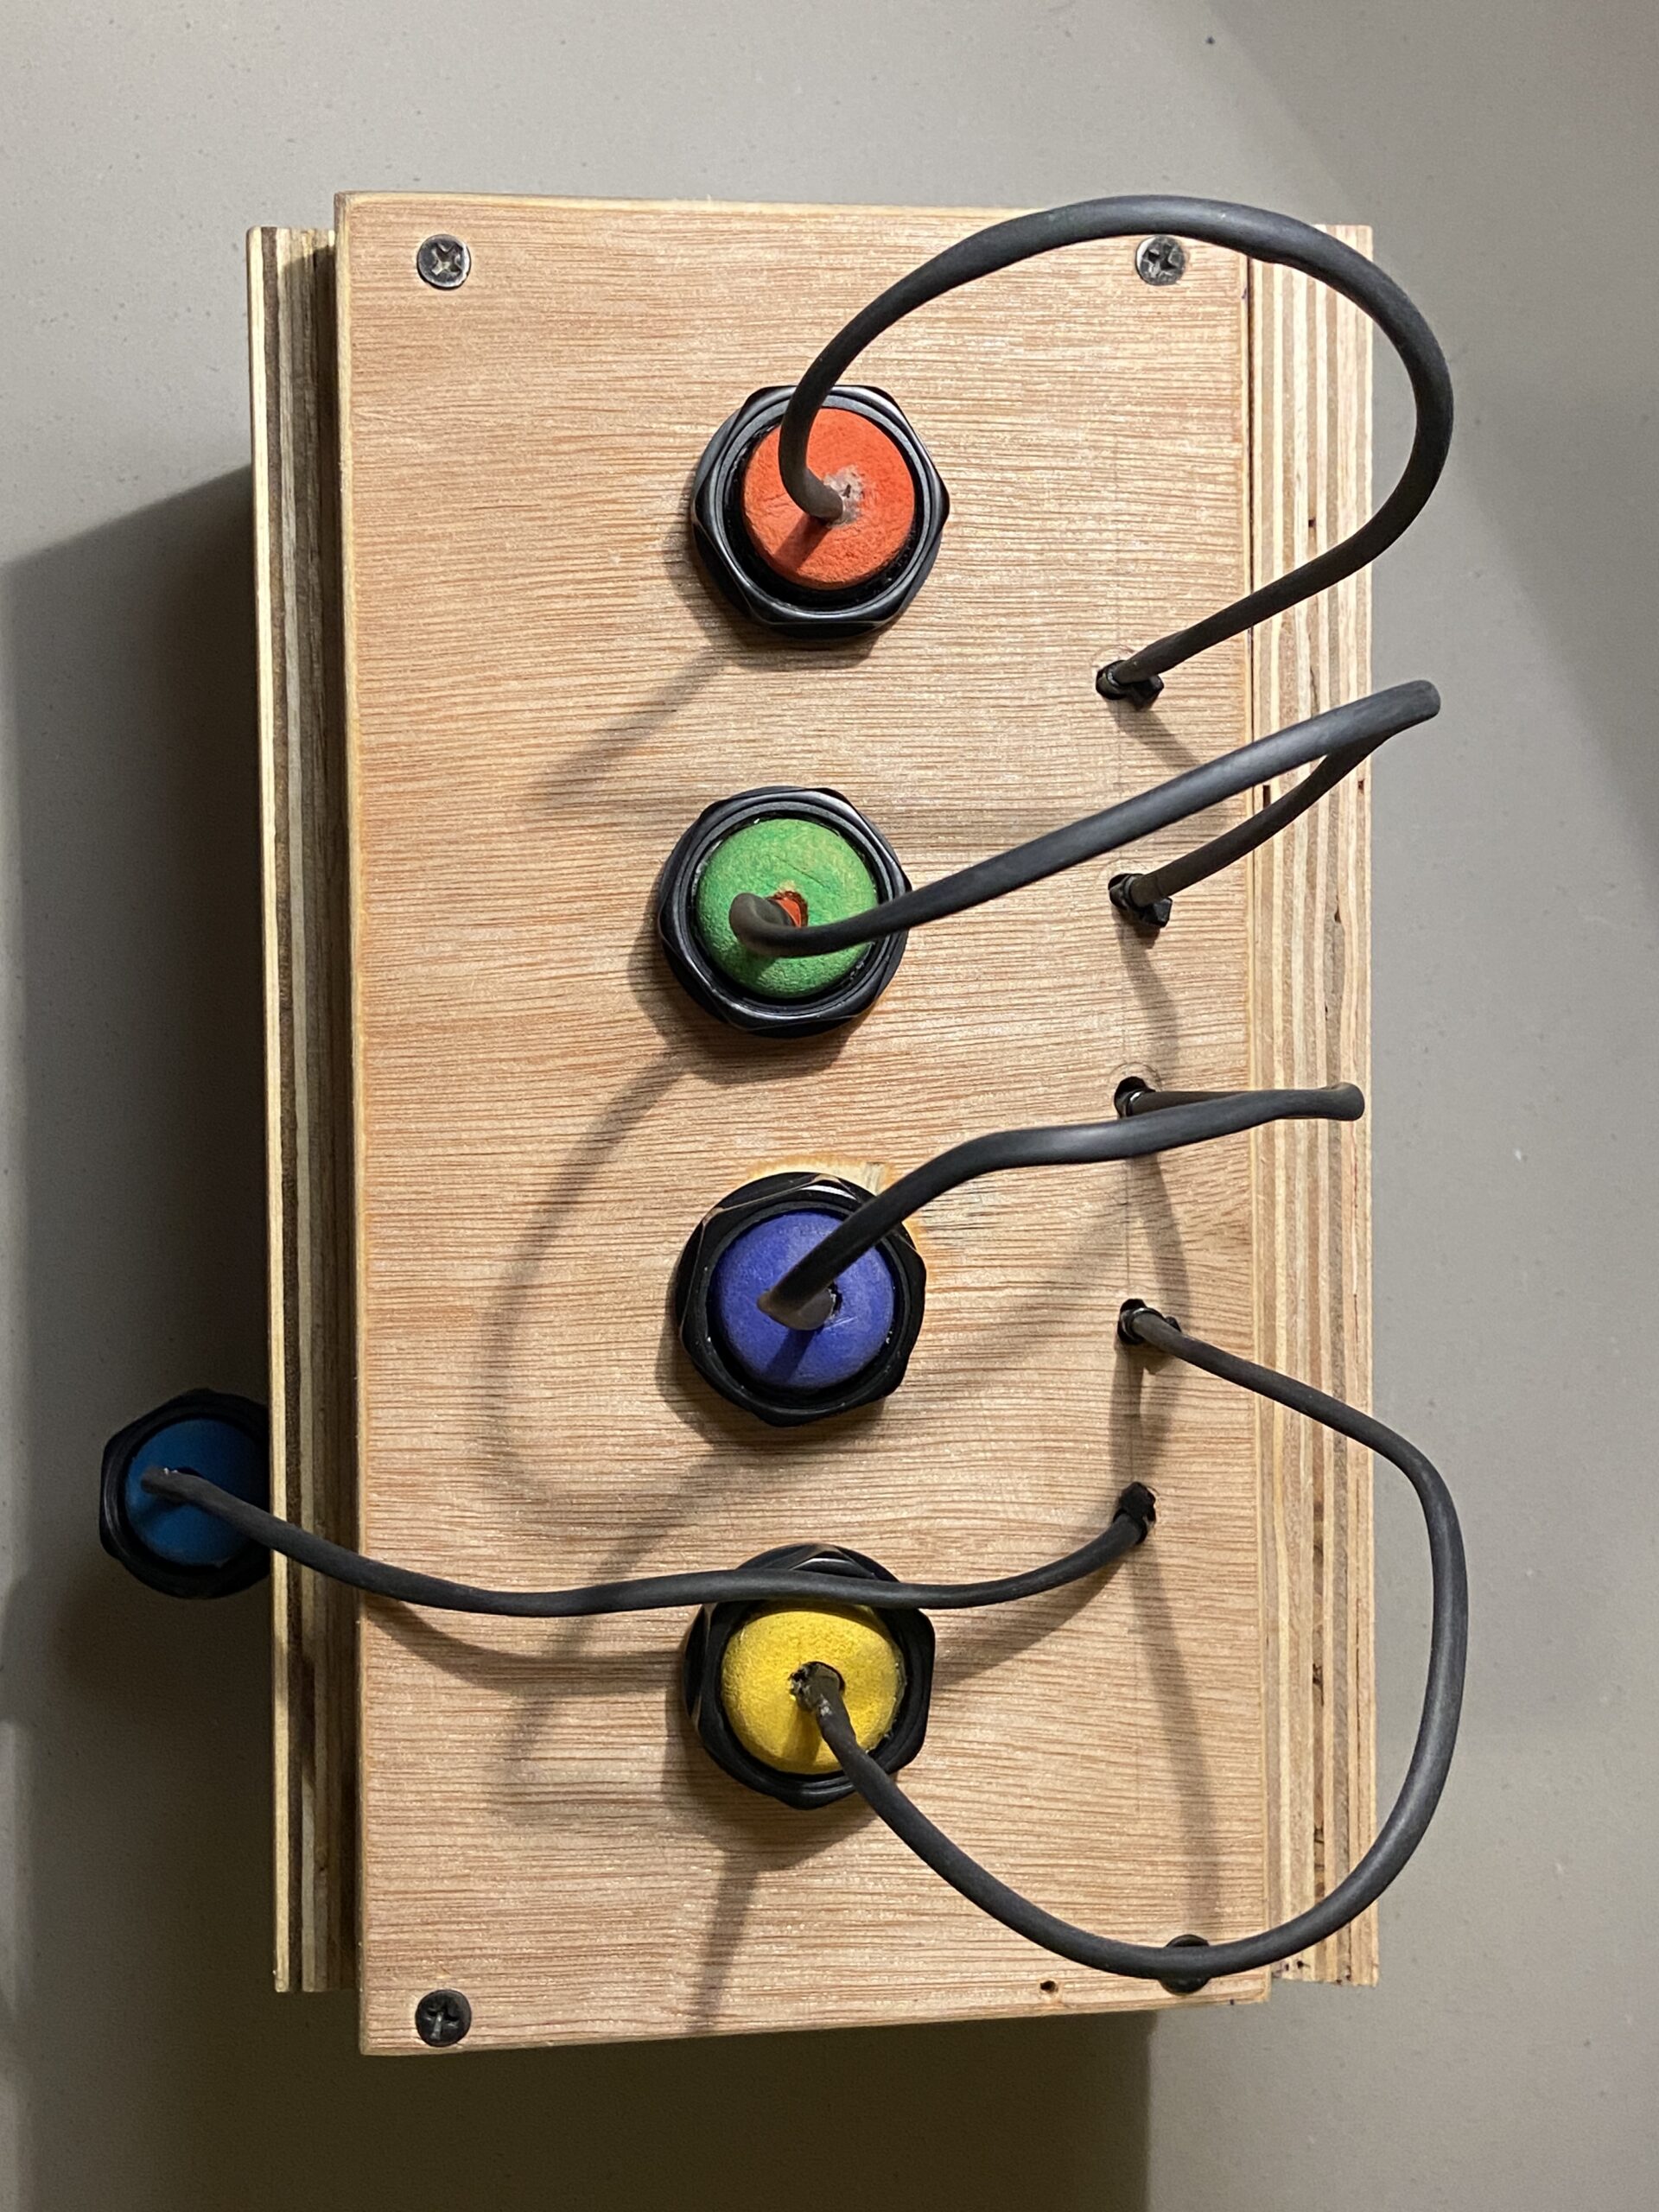
There is also a button on the left side of the interface, which can be pressed to confirm your choice. I used an LED momentary button because it reminded me of retro gaming consoles.

The color detection mechanism is rather naive, and it became a pain later on during the showcase as well. I have embedded LEDs in each peg, and each LED has a specific level of brightness. There is a single light sensor (LDR) in each of the 4 holes, which measures the brightness once a peg is placed into the hole. Depending on the brightness of the LED, a value corresponding to the respective color is generated. In the case of yellow, this would be the value “3”, which is the index in the array that contains the color values, as well as the index in which the pegs are fixed into the console, if you start counting from 0.

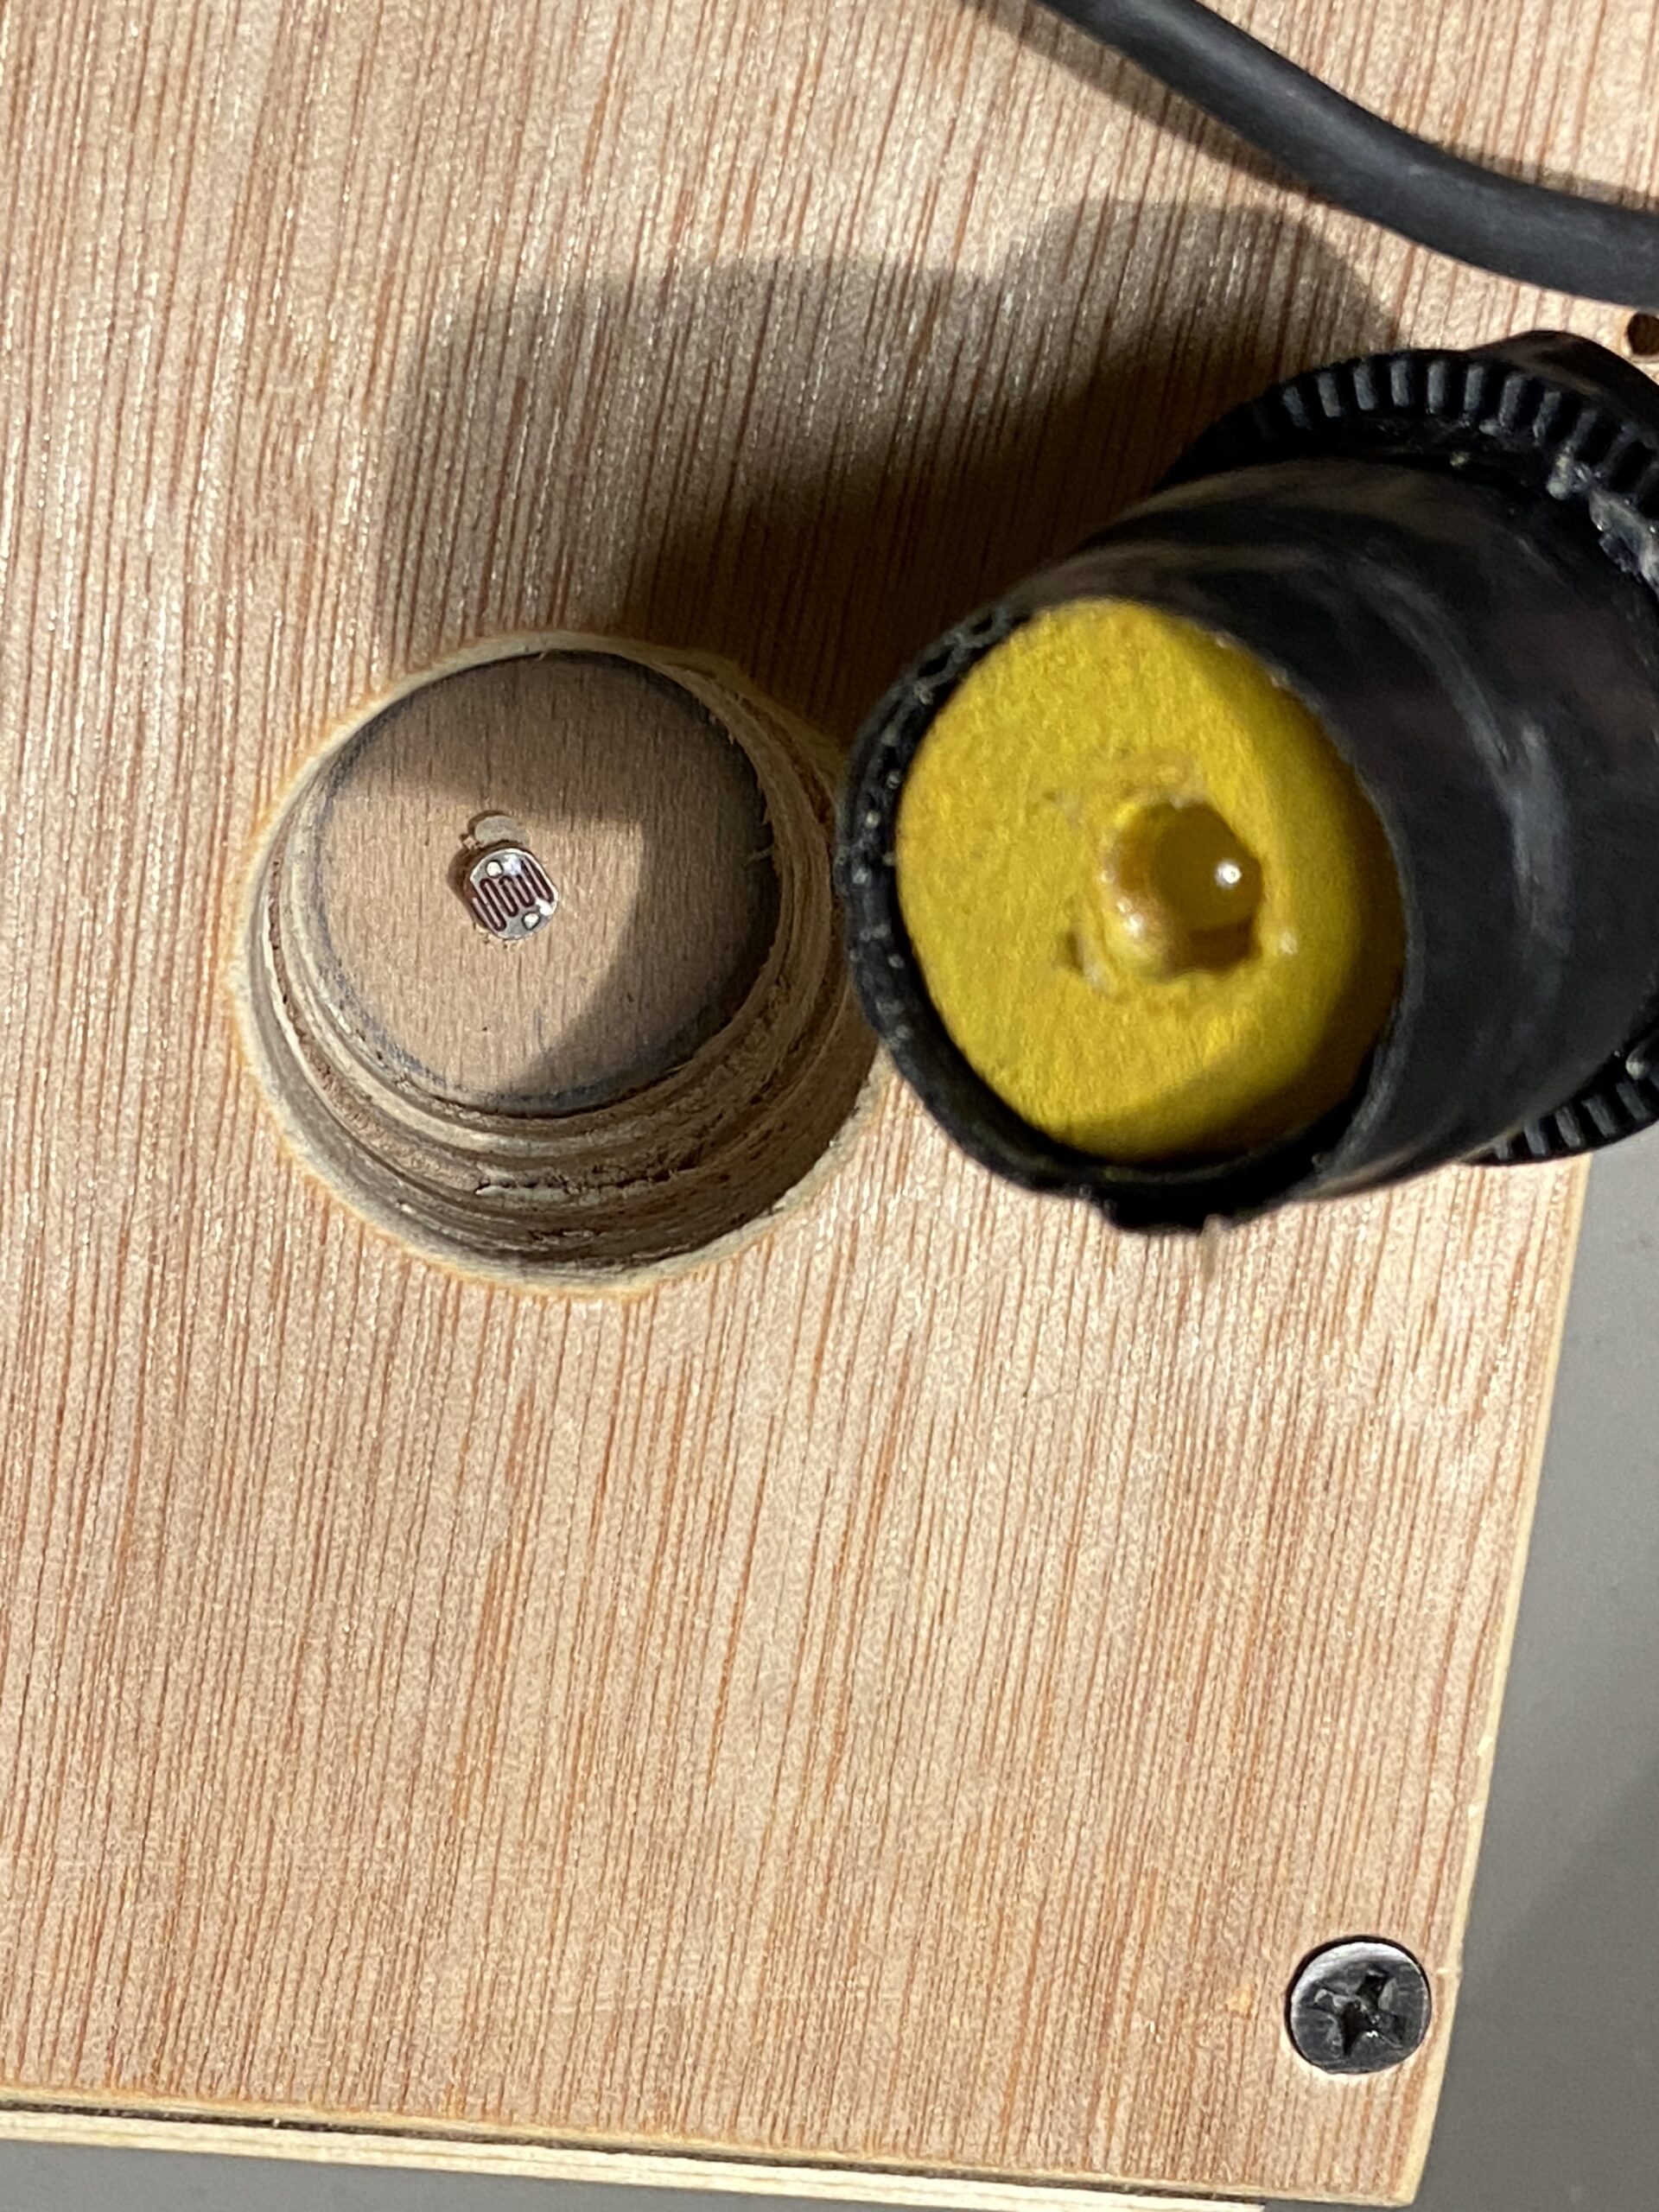
To ensure the fit was tight for consistent readings, I wrapped electrical tape around the pegs until there was a snug fit.

User Testing

I asked my friend to test the game for me. I told her nothing about how to use the interface, but she already knew about Mastermind.

She found the interface intuitive to use, but I think that it wasn’t as clear for people who didn’t know the game beforehand.

In the end, my friend won the game:
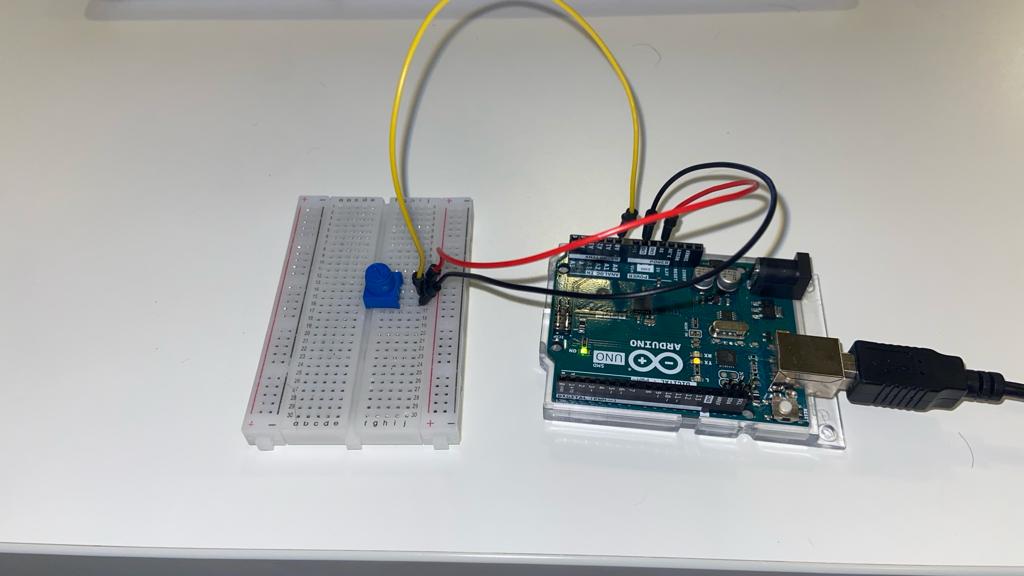
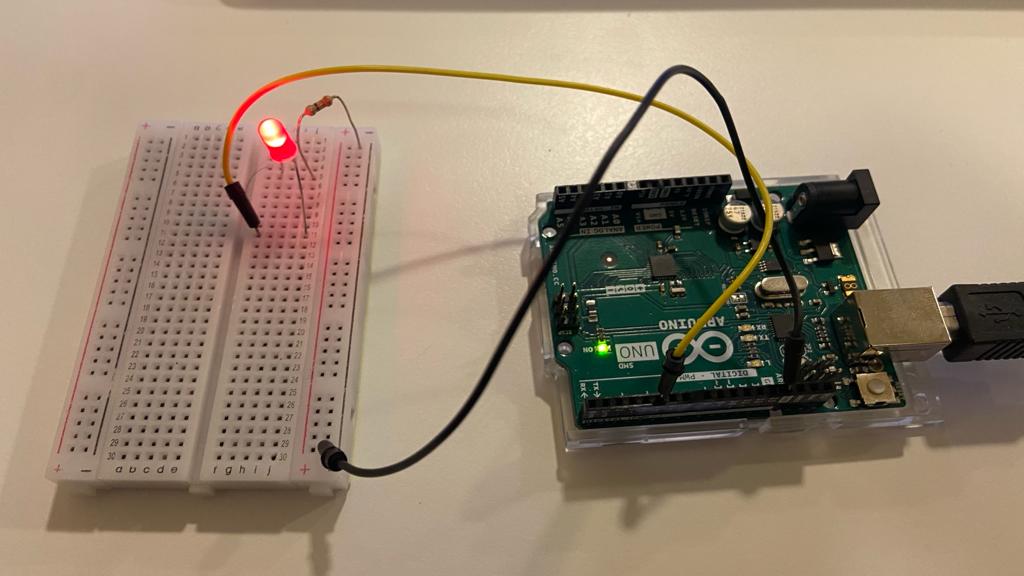
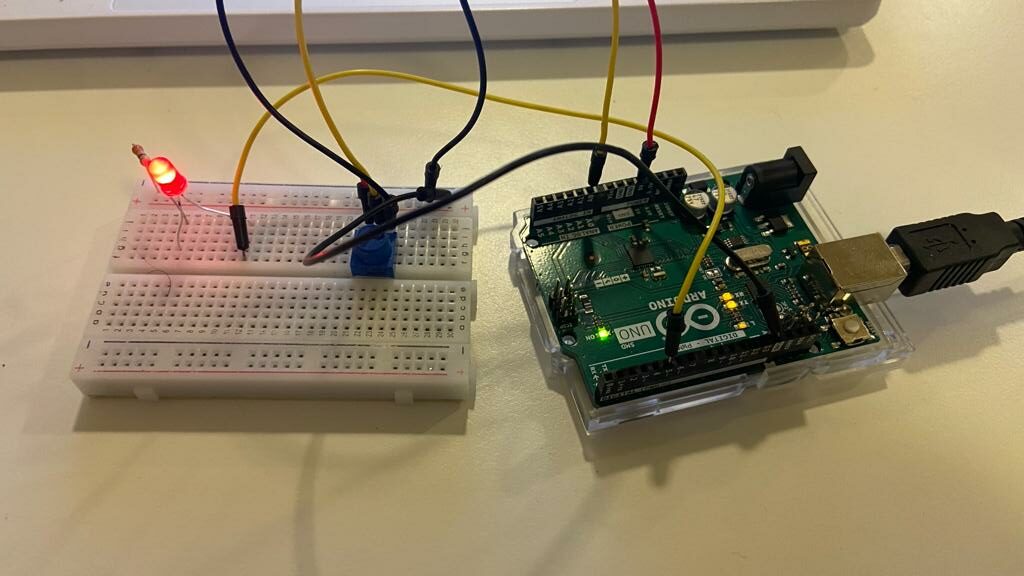
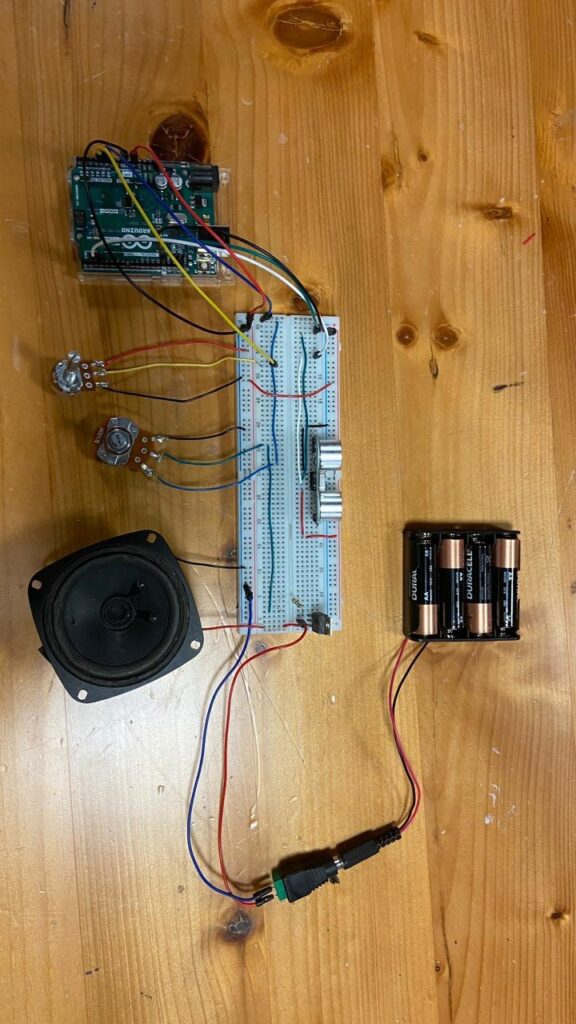
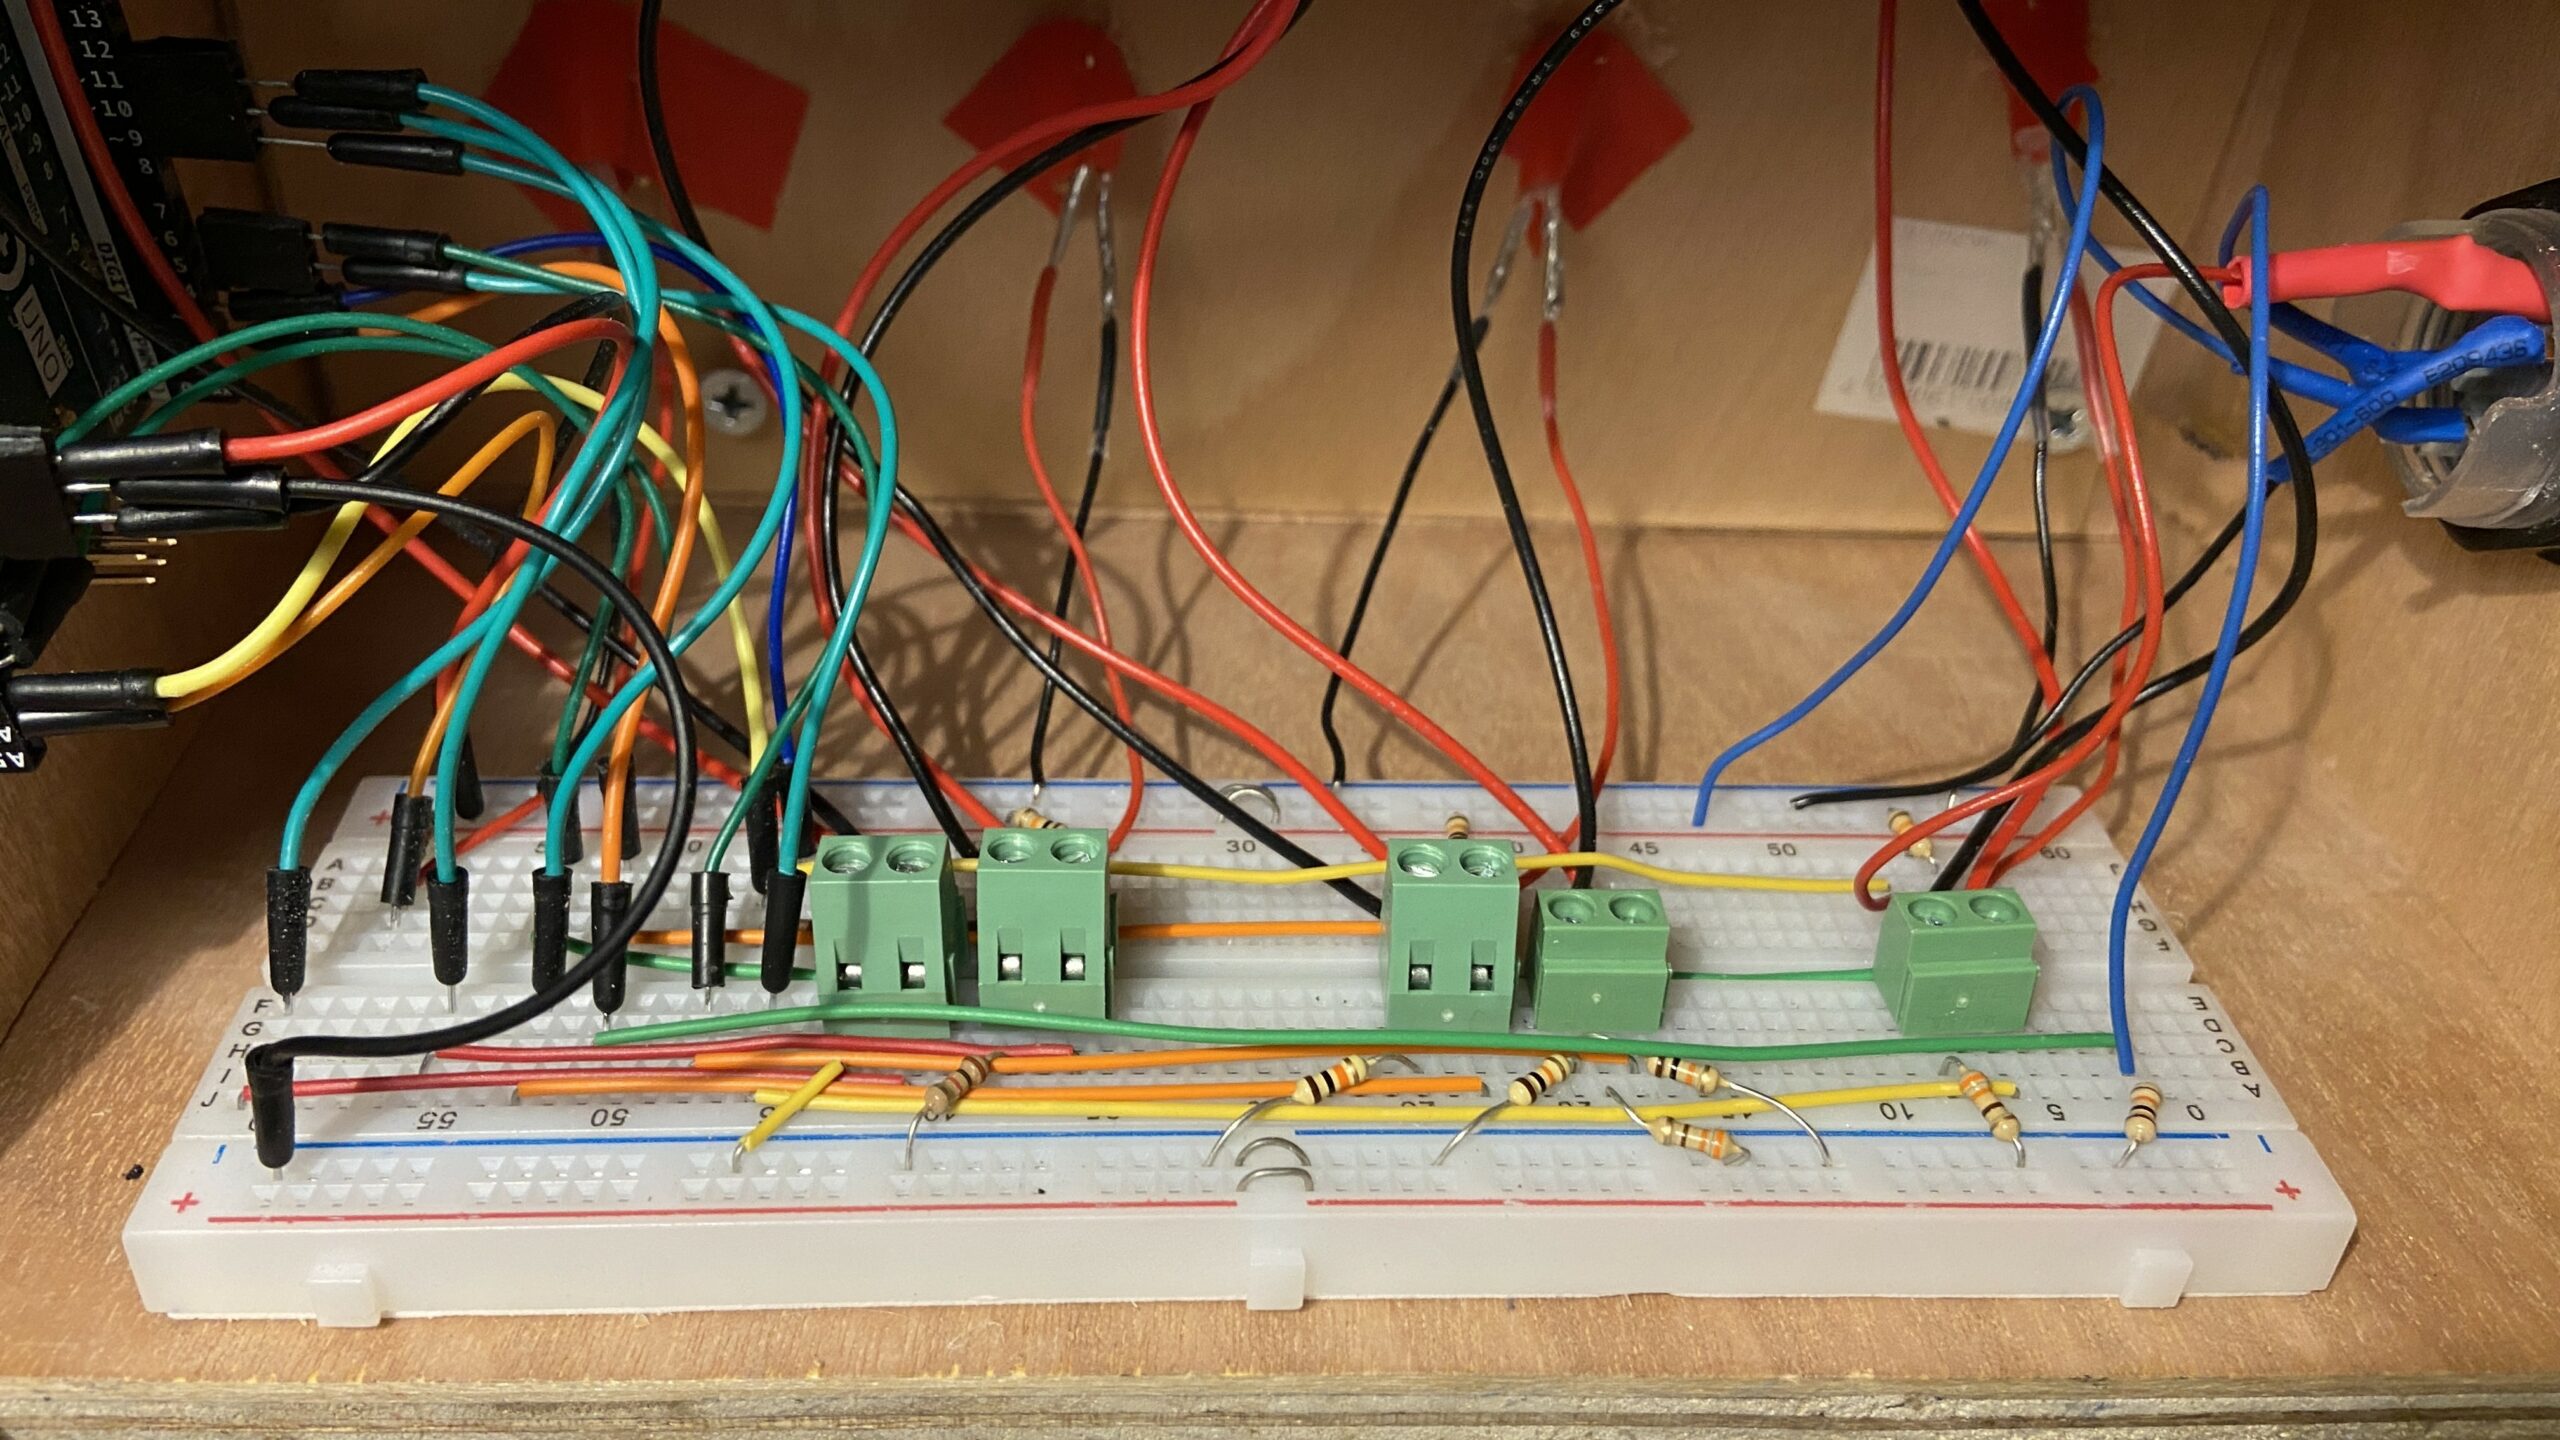
Circuit

I wanted to keep the circuit as neat as possible, so I kept the Arduino on one side of the box, had a long breadboard in the middle, and the wires connecting to the closest part of the breadboard to the corresponding hardware. I then used jumper wires to complete the circuit on the breadboard.

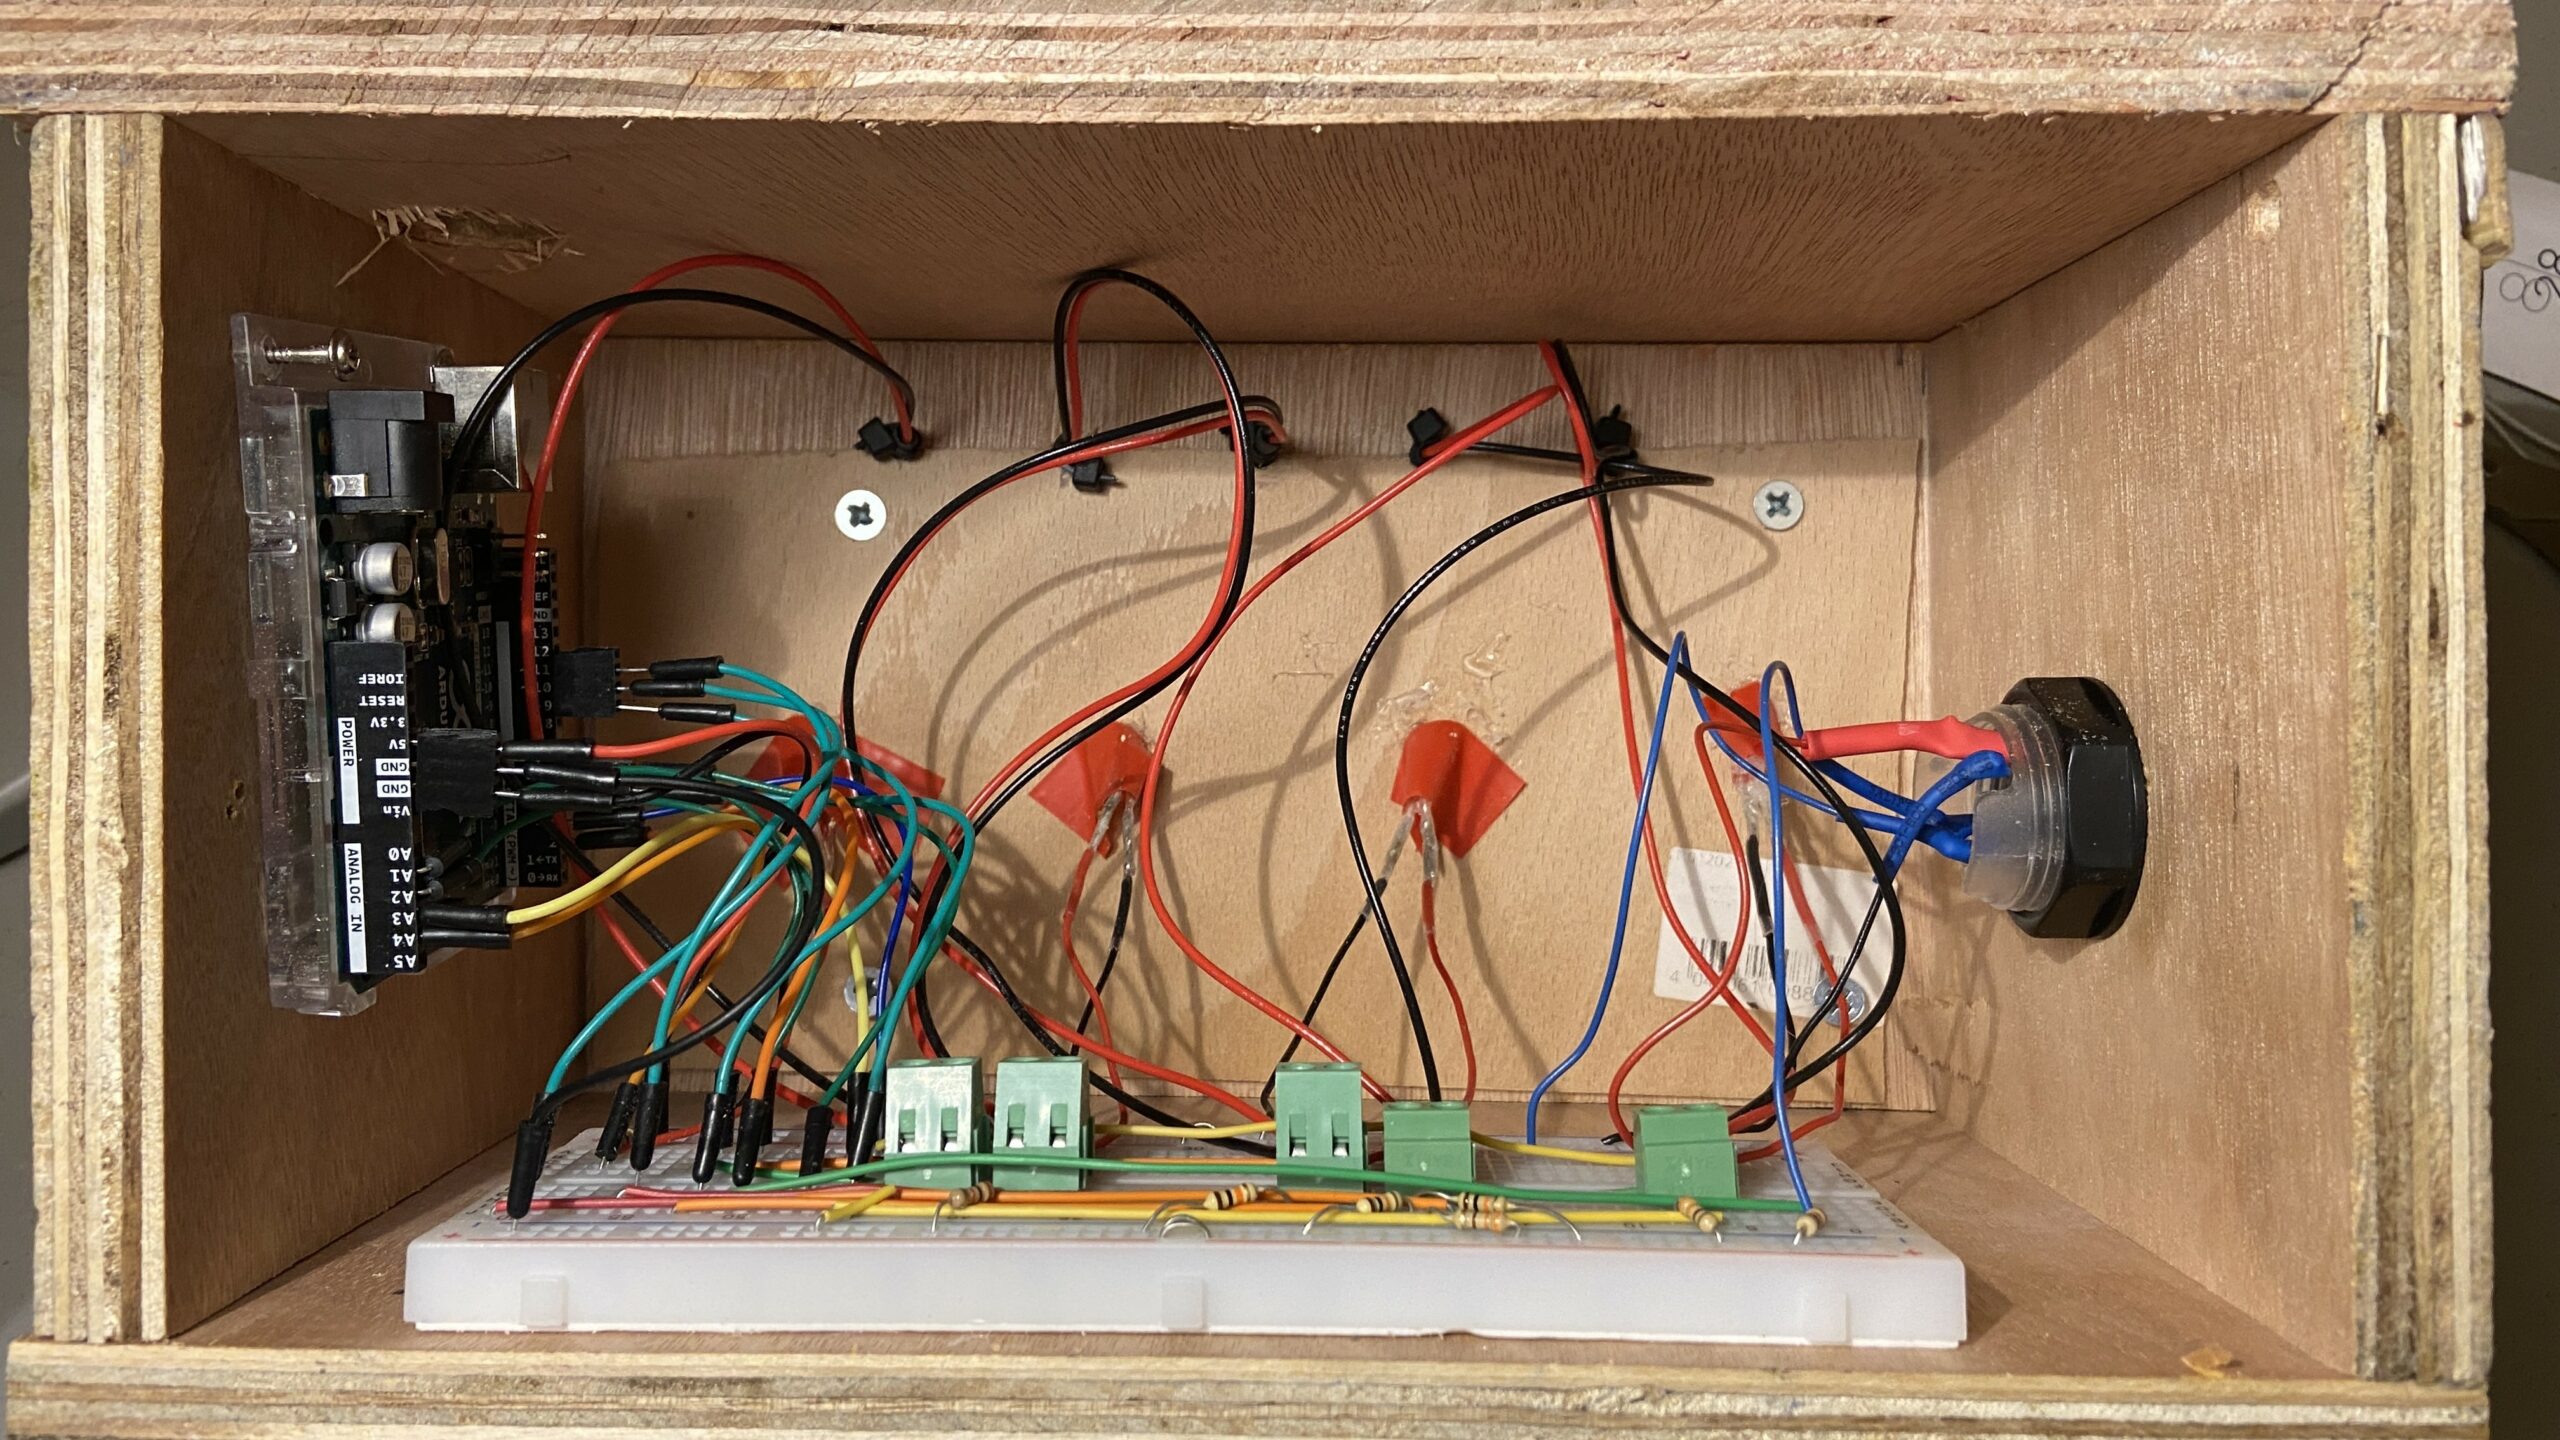
I soldered the wires onto the LDRs and LEDs, and then use screw mounts to connect the other ends to the breadboard. I did the same for the LED button as well.

Communication Between P5Js and Arduino

I only implemented one way communication, as the goal was to have Arduino serve only as an input device. Therefore, I just sent the state of the current row of the game as an integer code, as well as a binary value showing whether or not the button to lock in the choice was pressed.

Challenges

The most challenging aspect was calibrating the LDRs and tuning them so that each color had a particular range. However, due to the sensitivity of the LDRs, it was hard to have the LDR value ranges for each color not intersect. There was a tradeoff, as if I chose to spread out the ranges for each color, it would mean that some colors would have the same brightness as the ambient brightness, which would end up showing that color throughout the board. I chose to keep this in for the sake of having more consistency in the input, but I realize that that decision made the game confusing for some people.

Aspects that I’m proud of

I really like the aesthetics of the game overall, and I think that the P5Js aspect of the project was done very well. There are definitely some features that I would have liked to implement, but the things that I chose to keep in were well done.

I’m also proud of the way I handled an issue that occurred. Since I’m using light sensors, the mechanism needed recalibration whenever the ambient brightness changed. To tackle this, I took two approaches.

Firstly, I took some plastic nuts from the large LED buttons and fixed them on top of the knobs to block out any light from the cracks around the knob. To make sure that there was absolutely no light coming through from around the peg, I wrapped it in tape until it fit snugly. This was the physical steps that I took.

Secondly, I created a calibration script within Arduino. When I needed to calibrate the settings, I would run this, and it would tell me what settings I need for the current environment based on the minimum and maximum readings for each color across all the light sensors. The code for that is below:

void calibrateColorRanges()
{
  Serial.println("Calibration started. Please follow the instructions to calibrate each color.");

  const int numColors = 5; // Assuming 5 colors: Red, Green, Blue, Yellow, Turquoise
  const int numLDRs = 4;   // Assuming 4 LDRs

  int calibrationValues[numColors][2]; // Array to store min and max values for each color across all LDRs

  for (int color = 0; color < numColors; color++)
  {
    Serial.print("Calibrating ");
    switch (color)
    {
    case 0:
      Serial.print("RED");
      break;
    case 1:
      Serial.print("GREEN");
      break;
    case 2:
      Serial.print("BLUE");
      break;
    case 3:
      Serial.print("YELLOW");
      break;
    case 4:
      Serial.print("TURQUOISE");
      break;
    }
    Serial.println("...");

    // Initialize min and max values
    calibrationValues[color][0] = 1023; // Initial min value
    calibrationValues[color][1] = 0;    // Initial max value

    for (int ldr = 0; ldr < numLDRs; ldr++)
    {
      Serial.print("Move ");
      switch (color)
      {
      case 0:
        Serial.print("RED");
        break;
      case 1:
        Serial.print("GREEN");
        break;
      case 2:
        Serial.print("BLUE");
        break;
      case 3:
        Serial.print("YELLOW");
        break;
      case 4:
        Serial.print("TURQUOISE");
        break;
      }
      Serial.print(" to LDR ");
      Serial.print(ldr + 1);
      Serial.println(" and press Enter.");

      // Wait for user input (press Enter in the Serial Monitor)
      while (!Serial.available())
      {
        delay(100);
      }

      // Discard any existing input
      while (Serial.available())
      {
        Serial.read();
      }

      // Perform readings and find min and max values
      for (int i = 0; i < 100; i++)
      {
        int ldrValue = analogRead(LDR_1 + ldr);

        // Update min and max values
        calibrationValues[color][0] = min(calibrationValues[color][0], ldrValue);
        calibrationValues[color][1] = max(calibrationValues[color][1], ldrValue);

        delay(10); // Delay between readings
      }
    }

    // Display the min and max values for the current color across all LDRs
    Serial.print("Min value: ");
    Serial.print(calibrationValues[color][0]);
    Serial.print(", Max value: ");
    Serial.println(calibrationValues[color][1]);
  }

  Serial.println("Calibration complete. Use the following values in getColorFromLdrVal function:");
  for (int color = 0; color < numColors; color++)
  {
    Serial.print("Color ");
    switch (color)
    {
    case 0:
      Serial.print("RED");
      break;
    case 1:
      Serial.print("GREEN");
      break;
    case 2:
      Serial.print("BLUE");
      break;
    case 3:
      Serial.print("YELLOW");
      break;
    case 4:
      Serial.print("TURQUOISE");
      break;
    }
    Serial.print(": Min - ");
    Serial.print(calibrationValues[color][0]);
    Serial.print(", Max - ");
    Serial.println(calibrationValues[color][1]);
  }
}

Although some other approach might have been more elegant, I think that I was able to manage even with the drawbacks of the design that I selected.

Future Ideas

  • I think it would be fun to add a leaderboard. Since I have score metrics already, it would be more fun if people competed against people who played the game previously.
  • It would be nice to have the option for players to play as codemakers as well, since the original game is a two-player game. That would make my project true to the original.
  • It would be better if I had the calibration embedded into the P5Js sketch, so that there is no need to reflash the Arduino. Currently, the way that I do it is to reflash the Arduino with the calibration command, and then flash it again after calibrating it, which is a nuisance.

Arduino Code

#include <Arduino.h>

// colors as ints
const int RED = 0;
const int GREEN = 1;
const int BLUE = 2;
const int YELLOW = 3;
const int TURQUOISE = 4;

// 5 LEDS with variable brightness on Arduino UNO
// LEDs are connected to pins 3, 5, 6, 9, 10
const int LED_PINS[] = {5, 6, 9, 10, 11};

const String colors[] = {"R", "G", "B", "Y", "T", "N"}; // red, green, blue, yellow, turquoise, none
// different brightness levels for LEDS
const int brightnessLevels[] = {LOW, HIGH, HIGH, HIGH, HIGH};
// const int brightnessLevels[] = {10, 0, 4, 153, 255};

// 4 LDRS connected to pins A1, A2, A3, A4
const int LDR_1 = A1; // 15
const int LDR_2 = A2; // 16
const int LDR_3 = A3; // 17
const int LDR_4 = A4; // 18

// 4 variables to store the values from the LDRs
int ldrValue1 = 0;
int ldrValue2 = 0;
int ldrValue3 = 0;
int ldrValue4 = 0;

// button LED
const int buttonLED = 3;
const int buttonPin = 2;

void setup()
{
  // initialize serial communication at 9600 bits per second:
  Serial.begin(9600);
  // initialize the LED pins as an output:
  for (int i = 0; i < 5; i++)
  {
    pinMode(LED_PINS[i], OUTPUT);
  }

  // initialize the LDR pins as an input:
  pinMode(LDR_1, INPUT);
  pinMode(LDR_2, INPUT);
  pinMode(LDR_3, INPUT);
  pinMode(LDR_4, INPUT);

  pinMode(buttonLED, OUTPUT);
  pinMode(buttonPin, INPUT_PULLUP);
}

const int minRed = 980;
const int maxRed = 1023;
const int minGreen = 610;
const int maxGreen = 940;
const int minBlue = 220;
const int maxBlue = 460;
const int minYellow = 120;
const int maxYellow = 220;
const int minTurquoise = 0;
const int maxTurquoise = 70;
int ambientLight[] = {0, 0, 0, 0};

int getColorFromLdrVal(int ldrVal, int ambientLight)
{
  if (ldrVal >= minRed && ldrVal <= maxRed) // range of
  {
    return RED;
  }
  if (ldrVal >= minGreen && ldrVal <= maxGreen) // range of 175
  {
    return GREEN;
  }
  if (ldrVal >= minBlue && ldrVal < maxBlue) // range of 310
  {
    return BLUE;
  }
  if (ldrVal >= minYellow && ldrVal <= maxYellow) // range of 70
  {
    return YELLOW;
  }

  if (ldrVal >= minTurquoise && ldrVal <= maxTurquoise) // range of 80
  {
    return TURQUOISE;
  }

  else
  {
    return 5;
  }
}

void calibrateColorRanges()
{
  Serial.println("Calibration started. Please follow the instructions to calibrate each color.");

  const int numColors = 5; // Assuming 5 colors: Red, Green, Blue, Yellow, Turquoise
  const int numLDRs = 4;   // Assuming 4 LDRs

  int calibrationValues[numColors][2]; // Array to store min and max values for each color across all LDRs

  for (int color = 0; color < numColors; color++)
  {
    Serial.print("Calibrating ");
    switch (color)
    {
    case 0:
      Serial.print("RED");
      break;
    case 1:
      Serial.print("GREEN");
      break;
    case 2:
      Serial.print("BLUE");
      break;
    case 3:
      Serial.print("YELLOW");
      break;
    case 4:
      Serial.print("TURQUOISE");
      break;
    }
    Serial.println("...");

    // Initialize min and max values
    calibrationValues[color][0] = 1023; // Initial min value
    calibrationValues[color][1] = 0;    // Initial max value

    for (int ldr = 0; ldr < numLDRs; ldr++)
    {
      Serial.print("Move ");
      switch (color)
      {
      case 0:
        Serial.print("RED");
        break;
      case 1:
        Serial.print("GREEN");
        break;
      case 2:
        Serial.print("BLUE");
        break;
      case 3:
        Serial.print("YELLOW");
        break;
      case 4:
        Serial.print("TURQUOISE");
        break;
      }
      Serial.print(" to LDR ");
      Serial.print(ldr + 1);
      Serial.println(" and press Enter.");

      // Wait for user input (press Enter in the Serial Monitor)
      while (!Serial.available())
      {
        delay(100);
      }

      // Discard any existing input
      while (Serial.available())
      {
        Serial.read();
      }

      // Perform readings and find min and max values
      for (int i = 0; i < 100; i++)
      {
        int ldrValue = analogRead(LDR_1 + ldr);

        // Update min and max values
        calibrationValues[color][0] = min(calibrationValues[color][0], ldrValue);
        calibrationValues[color][1] = max(calibrationValues[color][1], ldrValue);

        delay(10); // Delay between readings
      }
    }

    // Display the min and max values for the current color across all LDRs
    Serial.print("Min value: ");
    Serial.print(calibrationValues[color][0]);
    Serial.print(", Max value: ");
    Serial.println(calibrationValues[color][1]);
  }

  Serial.println("Calibration complete. Use the following values in getColorFromLdrVal function:");
  for (int color = 0; color < numColors; color++)
  {
    Serial.print("Color ");
    switch (color)
    {
    case 0:
      Serial.print("RED");
      break;
    case 1:
      Serial.print("GREEN");
      break;
    case 2:
      Serial.print("BLUE");
      break;
    case 3:
      Serial.print("YELLOW");
      break;
    case 4:
      Serial.print("TURQUOISE");
      break;
    }
    Serial.print(": Min - ");
    Serial.print(calibrationValues[color][0]);
    Serial.print(", Max - ");
    Serial.println(calibrationValues[color][1]);
  }
}

unsigned long timeSinceLastSerial = 0;
int valFromP5 = 0;

float sum1, sum2, sum3, sum4 = 0;
unsigned int ldrVal1, ldrVal2, ldrVal3, ldrVal4 = 0;
unsigned int iterator = 0;

unsigned long buttonLEDTimer = 0;
unsigned long buttonSendTimer = 0;

int buttonBrightness = 0;
int buttonDirection = 1;

int buttonState = LOW; // if button is not pressed

void loop()
{

  // fade in and out button LED
  if (millis() - buttonLEDTimer > 5)
  {
    buttonLEDTimer = millis();
    if (buttonBrightness >= 255 || buttonBrightness <= 0)
    {
      buttonDirection = buttonDirection * -1;
    }

    buttonBrightness = (buttonBrightness + 1 * buttonDirection);
    if (buttonBrightness >= 255)
    {
      buttonBrightness = 255;
    }
    if (buttonBrightness <= 0)
    {
      buttonBrightness = 0;
    }
    analogWrite(buttonLED, buttonBrightness);
  }

  // turn on the LEDs to the corresponding brightness
  digitalWrite(LED_PINS[RED], brightnessLevels[RED]);
  digitalWrite(LED_PINS[GREEN], brightnessLevels[GREEN]);
  digitalWrite(LED_PINS[BLUE], brightnessLevels[BLUE]);
  digitalWrite(LED_PINS[YELLOW], brightnessLevels[YELLOW]);
  digitalWrite(LED_PINS[TURQUOISE], brightnessLevels[TURQUOISE]);

  // uncomment to calibrate color ranges
  // calibrateColorRanges();

  // send to processing
  if (millis() - timeSinceLastSerial < 10) // if it has not been more than 20ms since last serial message
  {
    return; // do nothing
  }

  timeSinceLastSerial = millis(); // update the time since last serial message

  if (iterator == 10)
  {
    ldrVal1 = int(sum1 / 10);
    ldrVal2 = int(sum2 / 10);
    ldrVal3 = int(sum3 / 10);
    ldrVal4 = int(sum4 / 10);

    // print the values if they are not nan
    if (!isnan(ldrVal1) && !isnan(ldrVal2) && !isnan(ldrVal3) && !isnan(ldrVal4))
    {

      // get the color from the LDR value
      int color1 = getColorFromLdrVal(ldrVal1, ambientLight[0]);
      int color2 = getColorFromLdrVal(ldrVal2, ambientLight[1]);
      int color3 = getColorFromLdrVal(ldrVal3, ambientLight[2]);
      int color4 = getColorFromLdrVal(ldrVal4, ambientLight[3]);
      int buttonState = digitalRead(buttonPin);

      Serial.print(color1);
      Serial.print(",");
      Serial.print(color2);
      Serial.print(",");
      Serial.print(color3);
      Serial.print(",");
      Serial.print(color4);
      Serial.print(",");
      Serial.println(buttonState);
    }

    iterator = 0;
    sum1 = 0;
    sum2 = 0;
    sum3 = 0;
    sum4 = 0;
  }

  // read and add values from the LDRs
  sum1 = sum1 + analogRead(LDR_1);
  sum2 = sum2 + analogRead(LDR_2);
  sum3 = sum3 + analogRead(LDR_3);
  sum4 = sum4 + analogRead(LDR_4);

  iterator++;
}

P5Js Code

let board;

let WIDTH = 2800;
let HEIGHT = 1500;
let colorsArray;

const RED = 0;
const GREEN = 1;
const BLUE = 2;
const YELLOW = 3;
const TURQUOISE = 4;
const BLACK = 5;

let canvas;
let port;

let highScores = [];


function generateCode() {
 let code = [];
  let array = [0, 1, 2, 3 , 4, 5];
  //select random subset of 4 colorsArray
  let colorsArray = shuffleArray(array);

  for (let i = 0; i < 4; i++) { // select only 4 colorsArray
    code.push(colorsArray[i]);
  }

  return code;
}

// Helper function to shuffle an array
function shuffleArray(array) {
  //copy the array
  array_copy = array.slice();

  for (let i = array_copy.length - 2; i > 0; i--) {
    const j = Math.floor(Math.random() * (i + 1));
    [array_copy[i], array_copy[j]] = [array_copy[j], array_copy[i]];
  }
  return array_copy;
}


function calculateScore(numGuesses) {
  return 1500 - 100 * numGuesses;
}

let r, g, b, y, t, bl;


let currentGuess;
let numberOfGuesses;
let lastButtonPressed;
let isButtonPressed;
let buttonClock;
let board_score;
let state;


function setup() {
  canvas = createCanvas(WIDTH, HEIGHT);
  board = new Board();

  r = color(200, 50, 80);
  g = color(20, 255, 20);
  b = color(50, 20, 255);
  y = color(255, 255, 20);
  t = color(20, 255, 255);
  bl = color(0, 0, 0);


  // colorsArray are red, green, blue, yellow, turquoise, black
  colorsArray = [r, g, b, y, t, bl];

  //generate the code
  code = generateCode();

  port = createSerial();

  //initialize important variables
  numberOfGuesses = 0;
  lastButtonPressed = 0;
  isButtonPressed = 0;
  buttonClock = 0;

  board_score = [0, 0];

  state = "AUTH_STATE";

}

function resetGame()
{
  board.reset();
  numberOfGuesses = 0;
  score = 0;
  state = "AUTH_STATE";
  code = generateCode();

}


function getNameInput()
{
  let name = prompt("Please enter your name ");
  if (name == null || name == "") {
    name = "Anonymous";
  }
  return name;
}


let delayClock = 0;
function draw() {

  if (state == "GAME_STATE") {
    background(220);

    board_score = board.score;
      print("score: " + board_score);

      if (board_score[0] == 4) {
        print("GAME WON")
        state = "GAME_WON_STATE";

        delayClock = millis();
      }

      if (board.currentRow == 15) {
        print("GAME LOST")
        state = "GAME_LOST_STATE";
        delayClock = millis();

      }

    // if the port is open, read the data
    if (port.available() > 0) {
      let data = port.readUntil("\n");

      split_data = int(data.split(","));

      // first 4 are the current guess
      // last is the button press
      currentGuess = split_data.slice(0, 4);
      isButtonPressed = split_data[4];
      board.update(currentGuess);
    }


    //if the button is pressed, finalize the guess
    if (isButtonPressed == 1 && lastButtonPressed == 0) {
      if (board.finalizeChoices(code))
      {
        numberOfGuesses++;
      };
      lastButtonPressed = 1;
    }

  
    else if (isButtonPressed == 0 && lastButtonPressed == 1) {
      lastButtonPressed = 0;
    }


    board.show();

    //show the score at the top right
    fill(0);
    textSize(35);
    push();
    textStyle(BOLD);
    text("SCORE: " + calculateScore(numberOfGuesses), width - 300, 100);
    pop();

    // print instructions to the side 
    fill(0);
    textSize(40);

    push();
    textStyle(BOLD);
    text("Instructions", 50, 100);
    pop();

    textSize(30);
    
    push(); 
    fill(y);
    circle(50, 162, 20);
    pop();
    text(": right color, wrong position", 80, 170);

    // red circle 
    push();
    fill(r);
    circle(50, 222, 20);    
    pop();

    text(": right color, right position", 80, 230);

    text("Guess the code in as few guesses as possible!", 40, 300);


  }

  else if (state == "GAME_WON_STATE") {
    background(220, 200);
    fill(0);
    textSize(60);
    textStyle(BOLD);
    text("YOU WON!", width / 2 - 200, height / 2);

    //SHOW SCORE
    fill(0);
    textSize(35);
    push();
    textStyle(BOLD);
    text("SCORE: " + calculateScore(numberOfGuesses), width / 2 - 200, height / 2 + 100);
    pop();


    if (millis() - delayClock < 2000) {
      return;
    }


    //read input from the serial port
    if (port.available() > 0) {
      let data = port.readUntil("\n");
      
      data = int(data.split(","));

      let buttonval = data[4];
      if (buttonval == 1) {
        print("resetting");
        board.reset();
        numberOfGuesses = 0;
        state = "GAME_STATE";
        board_score = [0, 0];
      }
    }
  }

  else if (state == "GAME_LOST_STATE") {
    background(220, 200);
    fill(0);
    textSize(60);
    textStyle(BOLD);
    text("YOU LOST!", width / 2 - 200, height / 2);

    text("The code was: ", width / 2 - 600, height / 2 + 200);
    //print the right code
    for (let i = 0; i < 4; i++) {
      push();
      fill(colorsArray[code[i]]);
      circle(width/2 - 100 + i * 100, height/2 + 185, 50);
      pop();
    }

    //push the button to reset
    push();
    textSize(30);
    text("Press the button to reset", width / 2 - 200, height / 2 + 400);
    pop();


    if (millis() - delayClock < 2000) {
      return;
    }

    //read input from the serial port
    if (port.available() > 0) {
      let data = port.readUntil("\n");
      
      data = int(data.split(","));

      let buttonval = data[4];
      if (buttonval == 1) {
        print("resetting");
        resetGame();
      }
    }
  }


  else if (state == "AUTH_STATE") {

    //ask to connect to the device
    background(220, 200);
    fill(0);
    textSize(60);
    textStyle(BOLD);
    text("PRESS SPACE TO START", width / 2 - 300, height / 2);

    if(port.opened()) {
      state = "GAME_STATE";
    }

  }


}


/**
 * Handles key press events and performs corresponding actions.
 */
function keyPressed() {
  /**
   * If the key pressed is "c" and the state is "GAME_STATE",
   * finalize the choices on the board using the provided code.
   *
   * @returns {void}
   */
  if (key == "c") {
    if (state != "GAME_STATE") {
      return;
    }
    board.finalizeChoices(code);
  }
}

  /**
   * If the key pressed is "n", update the current color of the current row on the board.
   * The color is updated by incrementing the current color index by 1 and wrapping around to 0 if it exceeds 5.
   *
   * @returns {void}
   */
  if (key == "n") {
    board.rows[board.currentRow].currentColor = (board.rows[board.currentRow].currentColor + 1) % 6;
  }

  /**
   * If the key pressed is " " (space) and the state is "AUTH_STATE",
   * open a port at 9600 baud using the port object.
   *
   * @returns {void}
   */
  if (key == " ") {
    if (state != "AUTH_STATE") {
      return;
    }
    port.open(9600);
  }

  /**
   * If the key pressed is "r", reset the game.
   *
   * @returns {void}
   */
  if (key == "r") {
    resetGame();
  }
}

Week 12 – Final Project Description

FINALIZED CONCEPT

I want to make a Mastermind game, which is a two-player board game where one person is the code maker, and they make a code using colored pegs. The other person is the code breaker, and they have to figure out the code in a limited number of moves. The less moves you take to figure out the code, the higher you score.

Mastermind - Code Breaking Game – Kubiya Games

Mastermind

Originally, I was going to have wooden floats that would complete a circuit through conductive water. However, thinking that would make a mess and potentially be hazardous due to being close to electronics, I switched to using LDRs and LEDs to detect different colors.

The structure will be made using wood of the following dimensions:

I want it to be an enclosed box, so that the readings on the LDR are stable. My idea is that I can use LEDs of different colors, and different brightnesses to “detect” color, and then use that as input for the Mastermind game built in P5Js.

Arduino to P5Js Communication

The pegs will be the interface of communication, and placing a colored peg into one of the holes should communicate what color the peg is at the respective position. The sensor values that are measured are LDR readings, but I do not want to transmit raw sensor values. Instead, I will do the checks to figure out what color the peg is and in what position within Arduino. Then, I want to transmit the respective color positions to Arduino in the form of a code. There are 4 positions, and 5 colors. So, there are 6 options for each position, including having no peg. Therefore, I will generate a 4-digit code with digits 0-5, and that is what will be sent to P5Js.

Also, I want to add a button that is used to confirm the code selection. To convey that information, I can include a fifth digit in the code, with a 0 or a 1 to represent whether or not the button has been pressed. Any extra checks, like prevent the button from clicking more than once in a certain timeframe, will be processed within P5Js, so that communication is simplified.

P5Js to Arduino

Since my project is centered around an interesting control interface, there is nothing that I want to send from P5Js to Arduino, as the Arduino side is a game controller. Unless there needs to be some sort of syncing that needs to be done, which I don’t expect, there will be no communication back to Arduino from P5Js.

Week 11 Exercises

Exercise 1: Move a circle in P5Js using a single Arduino Sensor

Idea:

My idea was to simply use a potentiometer, since I wanted to practice serial connection between Arduino and P5JS. Since a potentiometer gives stable input, I thought it would be the best to use it to test the waters.

P5Js Code:

let ardVal = 0.0; // global variable to store the incoming data
let circleRad = 25;
function setup() {
  createCanvas(400, 400);
   frameRate(60);
}

function draw() {
  background(220);
  
  //map the input from arduino to the position of the circle
  let xPos = map(ardVal, 0, 1023, circleRad, width - circleRad);
  
  noStroke();
  fill(255,0,0); //red ball
  ellipse(xPos, 200, 2 * circleRad, 2 * circleRad);

  if(!serialActive)
  {
    print("Serial is not active");
  }

}

// to establish the serial connection
function keyPressed() {
  if (key == " ") {
    // important to have in order to start the serial connection!!
    setUpSerial(9600);
    print("SERIAL ACTIVATED");
  }
}

// how we read the incoming data
function readSerial(data) {

  if (data != null) {
    // make sure there is actually a message
    ardVal = data //read the incoming data as a float
    }  
}

I wanted to display a simple red circle that moves across the screen based on the value of the potentiometer. Only the value of the potentiometer is sent from Arduino, and nothing is sent back to Arduino from P5Js.

Arduino Code:

#include <Arduino.h>

const int potInPin = A0;

void setup() {
  Serial.begin(9600); // 9600 bits per second
  pinMode(LED_BUILTIN, OUTPUT);
}

void loop() {
  int potValue = analogRead(potInPin);
  Serial.println(potValue);
}

The Arduino side of things is very simple. I read the value from the potentiometer and write it to the serial port.

Circuit:

The circuit simply takes input from the potentiometer using the A0 pin.

Exercise 2: Move a circle in P5Js using a single Arduino Sensor

Note:

For this exercise, I had issues getting serial communication from P5Js to Arduino to work. I tinkered for a few hours, but then ended up finding this P5Js serial library that seems to be simpler to use, and I was able to get communication up and running with this. I will be using this library for future projects, and the rest of the exercises.

It can be imported via adding this to your P5Js sketch, in the index.html file:

<script src="https://unpkg.com/@gohai/p5.webserial@^1/libraries/p5.webserial.js"></script>

Idea:

Once I had communication running, the idea I (actually my friend who was watching me tinker) came up with was to create a sensor that would let you know where mines in minesweeper were. Thus, this LED would serve as a mine sensor. For this, I needed to create a simple minesweeper game, and add the functionality of detecting mines via the LED in the Arduino circuit.

Instead of making it a minesweeper game though, I decided to turn the game into that of a mouse trying to detect mines on the field. You can press “d” to defuse if you are on a mine. However, if you press “d” on the wrong mine, you lose a turn. The game is won if you defuse all the bombs, and lost if you try to defuse incorrectly too many times. The mouse can be controlled via the arrow keys.

Note: Please open the sketch in a new tab

P5Js Code:

It was very easy to create the port for connection. All I had to do was create a serial port object in the setup() function as follows:

function setup() {
  createCanvas(400, 500);
  //create a 2D array
  grid = create2DArray(numRows, numCols);

  //setup the grid cells
  for (let i = 0; i < numRows; i++) {
    for (let j = 0; j < numCols; j++) {
      grid[i][j] = new Cell(i, j, gridWidth / numRows, gridHeight / numCols);
    }
  }

  //place the mines
  placeMines();

  //create the mouse
  bombMouse = new Mouse();

  //create the serial port
  port = createSerial()

}

And then I asked the user to press space to begin the game, and pressing space asks the user to connect to the correct serial device, in this case our Arduino.

function keyPressed() {
  //to open the serial port
  if (key == " ") {
    if(port.opened())
    {
      return; //already opened
    }
    print("ACTIVATED");
    port.open(9600);
  }

  if (key == "d") {
    bombMouse.defuse();
  }

}

Finally, sending input to Arduino from P5Js is very simple as well:

let distance = bombMouse.distanceFromClosestBomb();

  let message = String(distance) + "\n";

  //send the distance to the arduino
  port.write(message);
  print(distance + "vs" + message);

I send the message as a string, and parse the integers from the string in Arduino.

The rest of the code for the game can be viewed on the P5Js web editor linked above.

Arduino Code:

The Arduino code for this was very simple. Parse distance through Serial.parseInt(), and then map it to brightness values. If the distance is 0, AKA mouse is on a mine, then the LED should blink.

#include <Arduino.h>

const int LED_PIN = 5;

int lastToggleTime = 0;
int currentStatus = LOW;

void setup()
{
  pinMode(LED_PIN, OUTPUT);
  Serial.begin(9600);
}

void loop()
{

  if(Serial.available() == 0)
  {
    //if no data is available, wait
    return;
  }

  //read distance from P5Js
  int distance = Serial.parseInt();

  if(distance == 0)
  {
    if(millis() - lastToggleTime < 30)
    {
      //if less than 1 second has passed, wait
      return;
    }
    lastToggleTime = millis();

    if(currentStatus == LOW)
    {
      currentStatus = HIGH;
    }
    else
    {
      currentStatus = LOW;
    }

    //if distance is 0, start blinking
    digitalWrite(LED_PIN, currentStatus);

  }

  else{
      
  //map distance to brightness but only show values between 0 and 3
  float brightness = map(distance, 0, 8, 255, 0); // max distance is 4 + 4 = 8

  //set brightness
  analogWrite(LED_PIN, brightness);
  }
  
}

Circuit:

The circuit is a basic LED running circuit that takes input using a PWM pin (5).

Exercise 3:

This circuit takes input from the potentiometer to control the wind direction. Also, every time the ball hits the ground, a signal from P5Js is sent to Arduino so that the LED is turned on during the ball’s impact with the ground.

P5Js Code:

let velocity;
let gravity;
let position;
let acceleration;
let wind;
let drag = 0.99;
let mass = 50;

//port for arduino
let port;

function setup() {
  createCanvas(640, 360);
  noFill();
  position = createVector(width/2, 0);
  velocity = createVector(0,0);
  acceleration = createVector(0,0);
  gravity = createVector(0, 0.5*mass);
  wind = createVector(0,0);

  port = createSerial();
}

function draw() {
  if(!port.opened())
  {
    background(220, 200); 
    fill(0);
    textSize(25);
    text("PRESS SPACE TO START", 50, height/2);
    return;
  }

  //read the serial port
  if(port.available())
  {
    let inString = port.readUntil('\n');
    let potVal = -1;
    if(inString.length > 0)
    {
      potVal = int(inString);
      wind.x = map(potVal, 0, 1023, -1, 1);

    }
  }

  print("WIND: " + wind.x);


  background(255);
  applyForce(wind);
  applyForce(gravity);
  velocity.add(acceleration);
  velocity.mult(drag);
  position.add(velocity);
  acceleration.mult(0);
  noStroke();
  fill(255,0,0);
  ellipse(position.x,position.y,mass,mass);
  if (position.y > height-mass/2) {
      velocity.y *= -0.9;  // A little dampening when hitting the bottom
      position.y = height-mass/2;

      //send a signal to arduino to turn on the LED
      port.write("1\n");
    }

  else{
    port.write("0\n");
  }

  //clear the buffer
  port.clear();

  
}

function applyForce(force){
  // Newton's 2nd law: F = M * A
  // or A = F / M
  let f = p5.Vector.div(force, mass);
  acceleration.add(f);
}

function keyPressed(){
  if (keyCode==LEFT_ARROW){
    wind.x=-1;
  }
  if (keyCode==RIGHT_ARROW){
    wind.x=1;
  }
  if (key==' '){
    mass=random(15,80);
    position.y=-mass;
    velocity.mult(0);
  }

  if(key == " ")
  {
    port.open(9600); // open a port at 9600 baud
  }
}


Arduino Code:

#include <Arduino.h>

const int ledPin = 5;
const int potPin = A0;

int timeSinceLastSerial = 0;


void setup() {
  pinMode(ledPin, OUTPUT);
  pinMode(potPin, INPUT);
  digitalWrite(ledPin, LOW); //initially off

  Serial.begin(9600);

}

void loop() {
  int val;

  if(millis() - timeSinceLastSerial < 2) //if it has not been more than 20ms since last serial message
  {
    return; //do nothing
  }

  timeSinceLastSerial = millis(); //update time since last serial message

  //serial exchange

  if(Serial.available()) //if there is data to read
  {
    val = Serial.parseInt(); //read the input from serial
  }

  if(val == 1)
  {
    digitalWrite(ledPin, HIGH); //turn on LED
  }
  else
  {
    digitalWrite(ledPin, LOW); //turn off LED
  }

  Serial.println(analogRead(potPin)); //send potentiometer value across serial

}

Circuit:

The circuit is a combination of the circuits from Exercises 1 & 2. There is a potentiometer whose value is read from Pin A0, and an LED powered by PWM pin 5 based on input from the P5Js sketch.

Video Demonstration:

Week 11: Final Project Ideas

I haven’t selected a particular idea yet, but I have decided what I want to integrate into the project. Here are the ideas that I will be incorporating:

Interesting Input Design:

I want my project to have an interesting interaction interface for the user. Because of this, I want to limit the use of sensors to take input, and instead use a different approach. One idea that I had was to give the user the access to a bare breadboard. This breadboard wouldn’t be the main one that houses the circuitry for the project, but another one whose purpose is to act as input. This breadboard would be paired with wires, or some other type of plug that completes a circuit and thus provides some information as input.

Another type of input I thought of relates back to one of my earlier Arduino projects, which is to use some water as a conductive interface. I could have a few wooden floats that send a signal to the Arduino if put in the containers. The combinations of different floats in different containers serve as input to the project.


Week 11: Reading Response

Graham Pullin’s “Design Meets Disability” is an interesting read, as it pushes the idea of not constraining the design of assistive devices with a utilitarian approach. That is, we should not only focus on the overall function of assistive devices for disabled people, but also focus on the design aspect of it.

This reminds me of an earlier reading we did on the balance of form and function, where different teapots were compared in regard to the utility and aesthetic aspects of their design. I agreed with the author that aesthetic choices enhance the overall experience, even adding to the utility aspect of a design. The same principal applies here.

Take glasses for example. Anyone who’s grown up wearing glasses knows the desire to get the frames that fit you the best. There are two reasons for it. Firstly, why not? The glasses will serve the purpose of making you able to see, whether or not they’re fashionable. So why not get something that you love wearing? The second reason adds on to that, and it’s simply that you’ll feel better about wearing your glasses and actually use them, if they fit you and you like the way they look on you. In that sense, the aesthetic and fashion sense add on to the utility of the pair of glasses because it allows you to not feel hindered or lesser just because you have weaker eyesight. The same principle applies for other disabilities as well. People who have access to customizable prosthetics use them to express themselves and feel much more open about their disability. It gives them an avenue to express themselves and accept themselves.

In embracing the fusion of aesthetics and functionality, we acknowledge that design can be a powerful tool in fostering inclusivity and self-acceptance within the realm of assistive technology.

Week 10 Assignment– IM (Ivan & Muhammad) Techno

Concept

It took a while for us to come up with a properly functioning musical instrument with a decent sound. At first, we tried to incorporate an ultrasonic sensor for controlling the height of a sound, a servo motor to create a beat, and a flex sensor for controlling the duration of the notes. It turned out to be fine, but we weren’t satisfied with the quality of the sound or its instability. After a little experimenting, we finally decided to use transistors to amplify the sound, which gave the music a feel of the techno genre.

Technical structure

We used the ultrasonic sensor to control the height of a sound. The B10K potentiometer controls the duration of the note, while the B100K potentiometer controls the volume of the sound. The potentiometer, as mentioned earlier, amplifies the sound.

We decided to use a transistor to amplify the signal to the speaker. Moreover, we added an external 9V power supply to power the speaker, and these additions greatly enhanced the volume and clarity of the sound. The potentiometer controlling the volume is connected in series with the input signal to the speaker from the Arduino, and so the physical reduction of the voltage of the signal by adjusting the resistance of the potentiometer controls the volume. Therefore, we use the potentiometer as a variable resistor instead of an input here.

On the other hand, the potentiometer used for the delay is used to get analog input to the Arduino, which is then used to control the delay interval in code. This is just a way to showcase the different use cases of the same components.

Video demonstration:

Code

int mapDistanceToIndex(float distance) {
// Map distances into array index (2 cm steps from 5 cm to 15 cm)
// int index = constrain((distance - MIN_DIST) / 2, 0, ARRAY_LENGTH - 1);
int dist = int(distance);
int index = constrain(map(dist, MIN_DIST, MAX_DIST, 0, ARRAY_LENGTH - 1), 0, ARRAY_LENGTH - 1);
return index;
}

void loop() {
float dist = getDistance();


noteDuration = map(analogRead(OFFSET_DIMMER), 0, 1023, 100, 500);

if (millis() - noteStartTime >= noteDuration) {
// noTone(SPEAKER_PIN);
// delay(10);
// Play a funky note continuously based on the distance range
if (dist >= MIN_DIST && dist <= MAX_DIST) {
int note = FUNKY_NOTES[mapDistanceToIndex(dist)];


Serial.print(dist);
Serial.print("cm ");
Serial.print(note);
Serial.print("HZ");
Serial.print(" with duration = ");
Serial.print(noteDuration);
Serial.println();

// Check if the note duration has elapsed, then check for a new note

// If the note has changed, start a new note
if (note != lastNote) {
lastNote = note;
tone(SPEAKER_PIN, note);
noteStartTime = millis(); // Record the start time of the current note
}
} else {
noTone(SPEAKER_PIN);
}
}

Reflection

We have succeeded in creating a new instrument that wouldn’t just become the replication of already existing ones. Furthermore, we had a chance to experiment with new sensors and get experience working with transistors and potentiometers, implementing them in one project. We believe there’s more potential for this project, especially if we could use mp3 files. Nevertheless, we had fun working on this project, experimenting with Arduino.

Week 10 – Reading Reflection

Bret Victor’s perspective on the future of interaction design struck a chord with my own reflections on technological progress. Looking back at the portrayal of the future in movies, it’s clear that the evolution of technology often takes unexpected turns. The idea that inventors revolutionize existing technologies, rather than just refining them, makes sense. It’s a call to break free from envisioning the future as a mere extension of the present.

Consider the shift from fiction to reality in accessing information instantly. While the end goal remains the same, the path we took diverged significantly from those cinematic depictions. The emergence of the Internet and smartphones reshaped how we interact with information, emphasizing the need to actively shape the future rather than predict it.

I agree with Bret’s perspective, that he rehashes in his responses to “A Brief Rant on the Future of Interaction Design”, that we shouldn’t accept stagnation and minor improvements, and should still strive to achieve better design. Although touchscreens are a vision of the past come true, it would be staying in the past if we constrained the vision for future technology to what we have and know today. Touchscreens brought our vision and haptic senses together, and the user experience we can achieve through them is miles better than technology that we used to have. However, what if we were able to embed more senses into our technology? It’s hard to imagine, but that’s exactly the point. It’s easy to think about what we know already, but revolutionary ideas require exploring the unknown.

Assignment 9 – Did You Move My Cup?

Concept

I wanted to create a device to detect whether or not a cup was removed from its place. To do this, there is an LDR beneath the cup, and a button that sets the resting value of the LDR when the cup is placed on top. When the cup is removed, the value of the LDR increases and so the red LED turns on to indicate that the cup has been tampered with. A yellow LED turns on to indicate that the resting value of the LDR is being set.

Demonstration

The video demonstrates the above concept.

Code

#include <Arduino.h>

const int redLEDPin = 7;
const int buttonPin = 2;
const int LDRPin = A0;
const int yellowLEDPin = 8;

int restingValue = 0;

void setup() {
  pinMode(redLEDPin, OUTPUT);
  pinMode(yellowLEDPin, OUTPUT);
  pinMode(buttonPin, INPUT);
  pinMode(LDRPin, INPUT); 
  Serial.begin(9600);
  digitalWrite(redLEDPin, HIGH); //initially turn on the red LED
  digitalWrite(yellowLEDPin, LOW); //initially turn off the yellow LED
}

void loop() {
  //read and print the value of the LDR
  int LDRValue = analogRead(LDRPin);
  int buttonValue = digitalRead(buttonPin);

  //round the value to the nearest 100 for more consistent readings
  LDRValue = round(LDRValue / 100) * 100;

  //button is used to reset the resting value of the LDR
  if(buttonValue == HIGH) {
    digitalWrite(yellowLEDPin, HIGH); //to indicate that the button is pressed and the LDR resting value is being reset
    restingValue = LDRValue;
    return;
  }
  digitalWrite(yellowLEDPin, LOW); //turn off the yellow LED

  //for debugging
  Serial.println(LDRValue);


  //turn on the LED if the button is pressed
  if (LDRValue <= restingValue) { 
    digitalWrite(redLEDPin, LOW);
  } else {
    digitalWrite(redLEDPin, HIGH); // ISSUE! TURN ON LED!! CUP IS MISSING!!
  }

}

Technical Structure

This device is an amalgamation of different individual circuits. There is a sub-circuit to take analog input from a momentary switch. There are two LED circuits that take analog input in, so the LEDs only have HIGH and LOW states. There is one analog sensor, which is the LDR, to determine whether or not the cup has been moved.

Reflection

I realize that this device is not very useful if used in the dark. Since it is hard to see if someone messes with someone in the dark by naked eye, this would be a situation where it would be good to use this device. Since it fails in this particular case, I feel that this is a missed opportunity, and so the device isn’t particularly useful in real world applications. To make a device better suited to the task, I could use an infra-red sensor, or an ultrasonic sensor, so that proximity from the cup to the sensor is reached. However, that sensor is prone to being subdued by a replacement object. I am currently thinking about a foolproof device to protect the cup from being tampered with or taken away.

Week 9 Reflection

Making Interactive Art: Set the Stage, Then Shut Up and Listen

This reading showed me an interesting point of view, but I’m not too sure if I agree with it. Tigoe says that you should not interpret your own interactive art, but rather let the audience figure it out for themselves. The entire premise of this is that you shouldn’t think of interactive art as a finished painting or sculpture. However, I find myself disagreeing with Tigoe. Firstly, even with a finished painting, no two people will interpret it the same way given they are free to think anything about the painting. Although I understand Tigoe’s point of view of not confining the art piece to your own direction, I do not think that you should not interpret your own art pieces. If I want my audience to have a very specific experience, I will give them my interpretation or the direction that I took with the piece beforehand to guide their thoughts. It entirely depends upon what I want the piece to be. Of course, people can just ignore these directions, but I believe that there is still room for the audience’s personal interpretations of the guided art piece. Like a painting, maybe I want to express myself with the art piece. If you want what Tigoe wants, then his recommendations are very helpful. However, there is no right or wrong way to do interactive art.

Physical Computing’s Greatest Hits (and misses)

Exploring the themes in physical computing classes highlights a cool mix of established ideas and personal creativity. Even though some projects come up every year, it’s not about repeating but reimagining them with your own touch. The examples, from theremin-like instruments to remote hugs, show there’s a lot you can do.

The mention of different time periods and tech advancements adds context, showing how physical computing keeps evolving. I like the focus on projects that involve people rather than just machines. It’s a reminder that the connection between users and their creations is what makes physical computing special. Overall, this collection of different projects is like a guide to show the creative possibilities in interactive art.

Week 8 Reflection

Emotion & Design: Attractive things work better

Often good design is conflated with designs that incorporate the most mechanically efficient ways to complete certain tasks. For example, a well-designed kettle would be one that pours well, and heats up really fast. It could have some cool features, such as being able to maintain the temperature accurately. Function is the priority. But does that mean that form is unimportant?

Donald Norman addresses this question in Emotion & Design using the examples of three very different teapots: one that is inefficient, with its handle and spout facing the same direction, one that is effective in what it does, and one that is aesthetically pleasing. Yet, not one of them could be labelled as the best designed teapot. 

There are two general reasons for this. The first is that form and function are related; they add to one another. Time flies by when you’re having fun. Similarly, things feel better designed if they’re fun to use.

On the other hand, an object doesn’t even need to be that functional for it to be well designed. For example, take the Impossible teapot. It certainly doesn’t function too well as a teapot. You could brew tea in it, but the ergonomic experience would be terrible. Yet, it serves as a statement piece, or a conversation starter.

However, I think there is some distinction that needs to be made. I don’t think that as long as you enjoy using something, it is well designed. You could find a use for anything and enjoy it, but that would make the design of an object a subjective matter. I believe that there has to be some objectivity and some kind of measure of how well something is designed. In that sense, an object has to be intentionally designed in a certain way, targeted to fit some sort of function, and be good at it. If you allow looking good to be a function, then form and function meld together and we have a consistent system of determining what is well-designed, and what is not.

Her Code Got Humans on the Moon – And Invented Software Itself

Back in 1960, a period when women were discouraged from diving into technical realms, Hamilton began as a programmer at MIT, initially planning to support her husband through law school. But fate had other plans – the Apollo program emerged, and Hamilton found herself leading a groundbreaking engineering venture that would reshape what humanity deemed achievable.

As a mother working in the 1960s and a programmer for spacecraft, Hamilton’s narrative is anything but conventional; it is downright radical. Her story challenges not only the norms of the tech world but also societal expectations. Exploring her experiences made me rethink what I consider success to be. Is it reaching your goals, or the entire journey you take till the end.

Margaret Hamilton’s story challenges norms and suggests that success doesn’t always follow a conventional script. As a college student navigating a landscape of uncertainties, I see in her journey a call to embrace the unconventional, challenge stereotypes, and approach challenges with resilience. Her legacy urges us to view setbacks not as roadblocks but as avenues for innovation. Her unconventional path serves as a reminder that greatness often emerges from uncharted territories. As I navigate my academic and professional journey, I’ll carry Hamilton’s spirit—an emblem of resilience, innovation, and the transformative power of embracing the unexpected.