Concept
The Interactive Fruit Catcher Game combines physical hardware inputs with digital visuals to create an engaging and multisensory experience. The goal of the game is to catch falling fruits of various colors into a basket by pressing the corresponding colored buttons. Each button press generates a musical note, adding an auditory layer to the gameplay. The fruits fall faster as the game progresses, making it increasingly challenging. Players have three lives, and the game tracks both the current score and the highest score, fostering competitiveness.
Design
Interaction Design
The interaction design centers around three key elements:
- User Inputs: Physical colored buttons (Red, Yellow, Green, Blue) corresponding to the fruits.
- Visual Feedback:
- Correct button presses result in the fruit being “caught,” and the score increases.
- Incorrect presses or missed fruits deduct a life and provide visual feedback.
- Auditory Feedback:
- Each button press generates a unique musical note, which adds a playful sound layer.
Implementation
Hardware
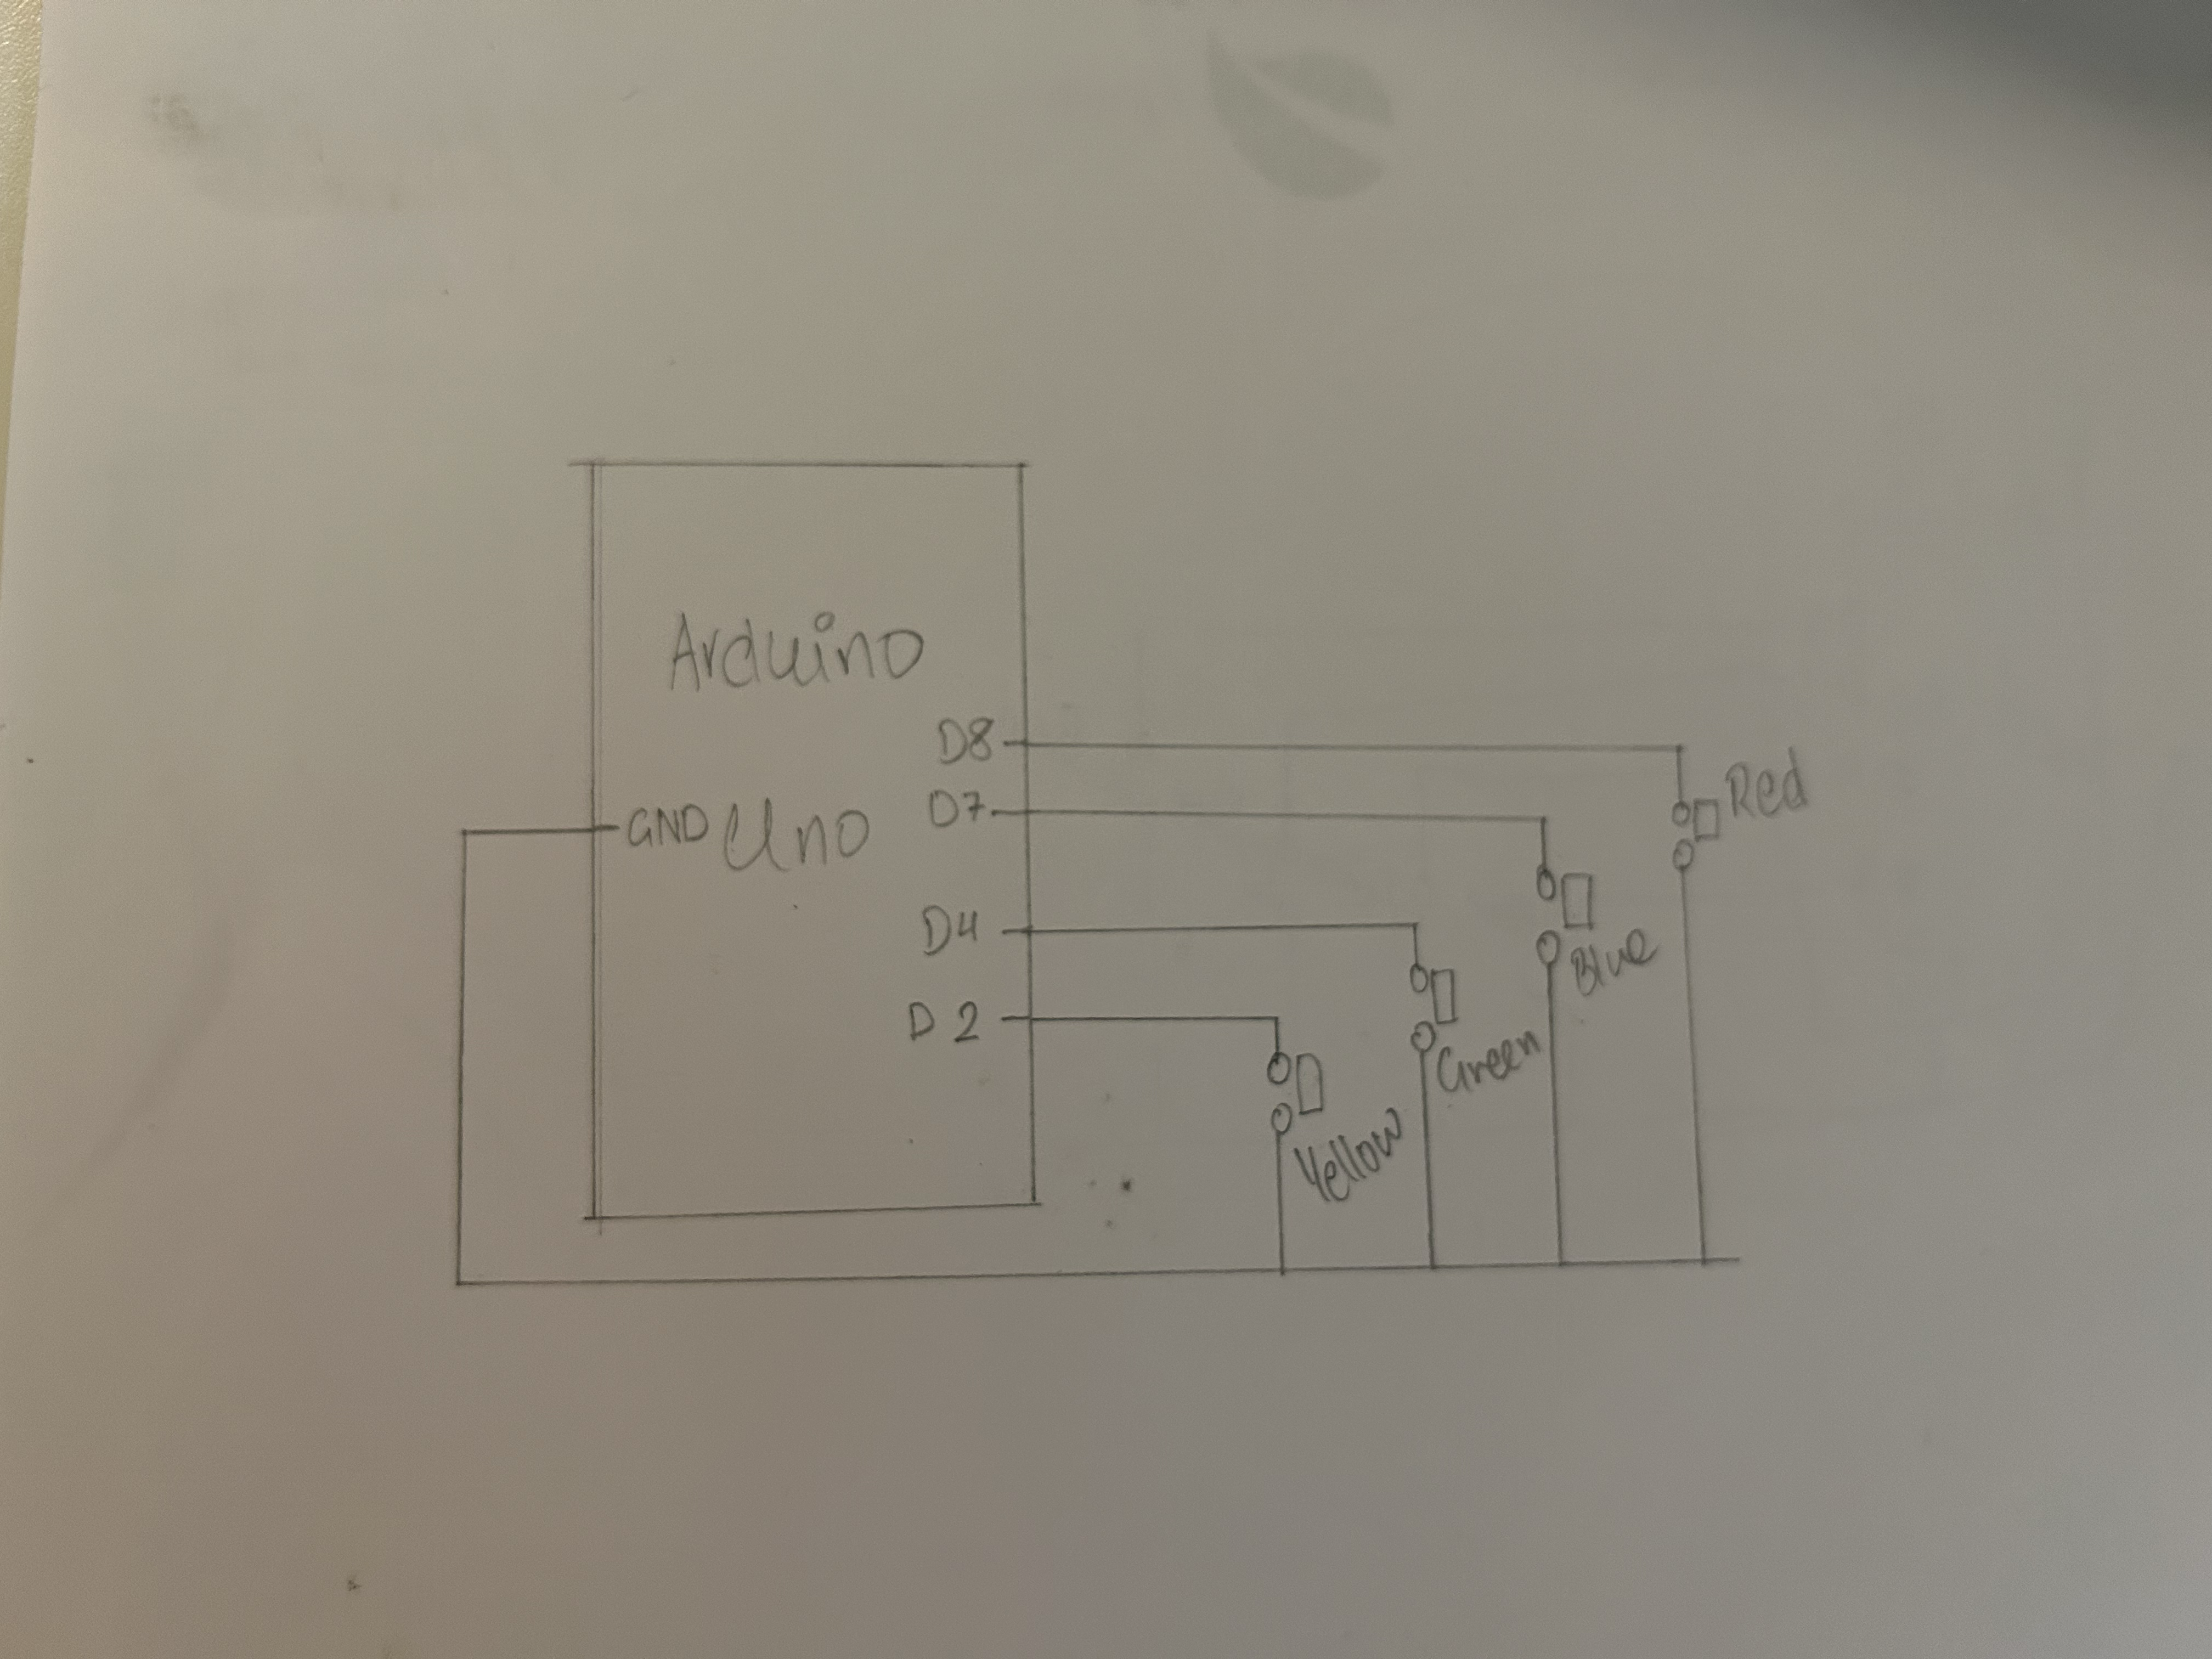
- Arduino Components:
- Four Colored Buttons:
- Red → Strawberries
- Yellow → Bananas
- Green → Green Pear
- Blue → Blueberries
- Speaker: Plays musical notes tied to each button.
- Wiring and Connections:
- Buttons connect to specific digital pins on the Arduino.
- Power is supplied through a USB cable.
- Four Colored Buttons:
- Challenges in Physical Computing:
- Learning to solder the arcade buttons took time.
- The wiring was difficult due to loose connections. I tried several approaches like alligator clips and direct connections but ended up using a combination of male-to-male, female-to-female, and male-to-female wires, which I secured using electrical tape.
- Ensuring stable connections was critical for gameplay.
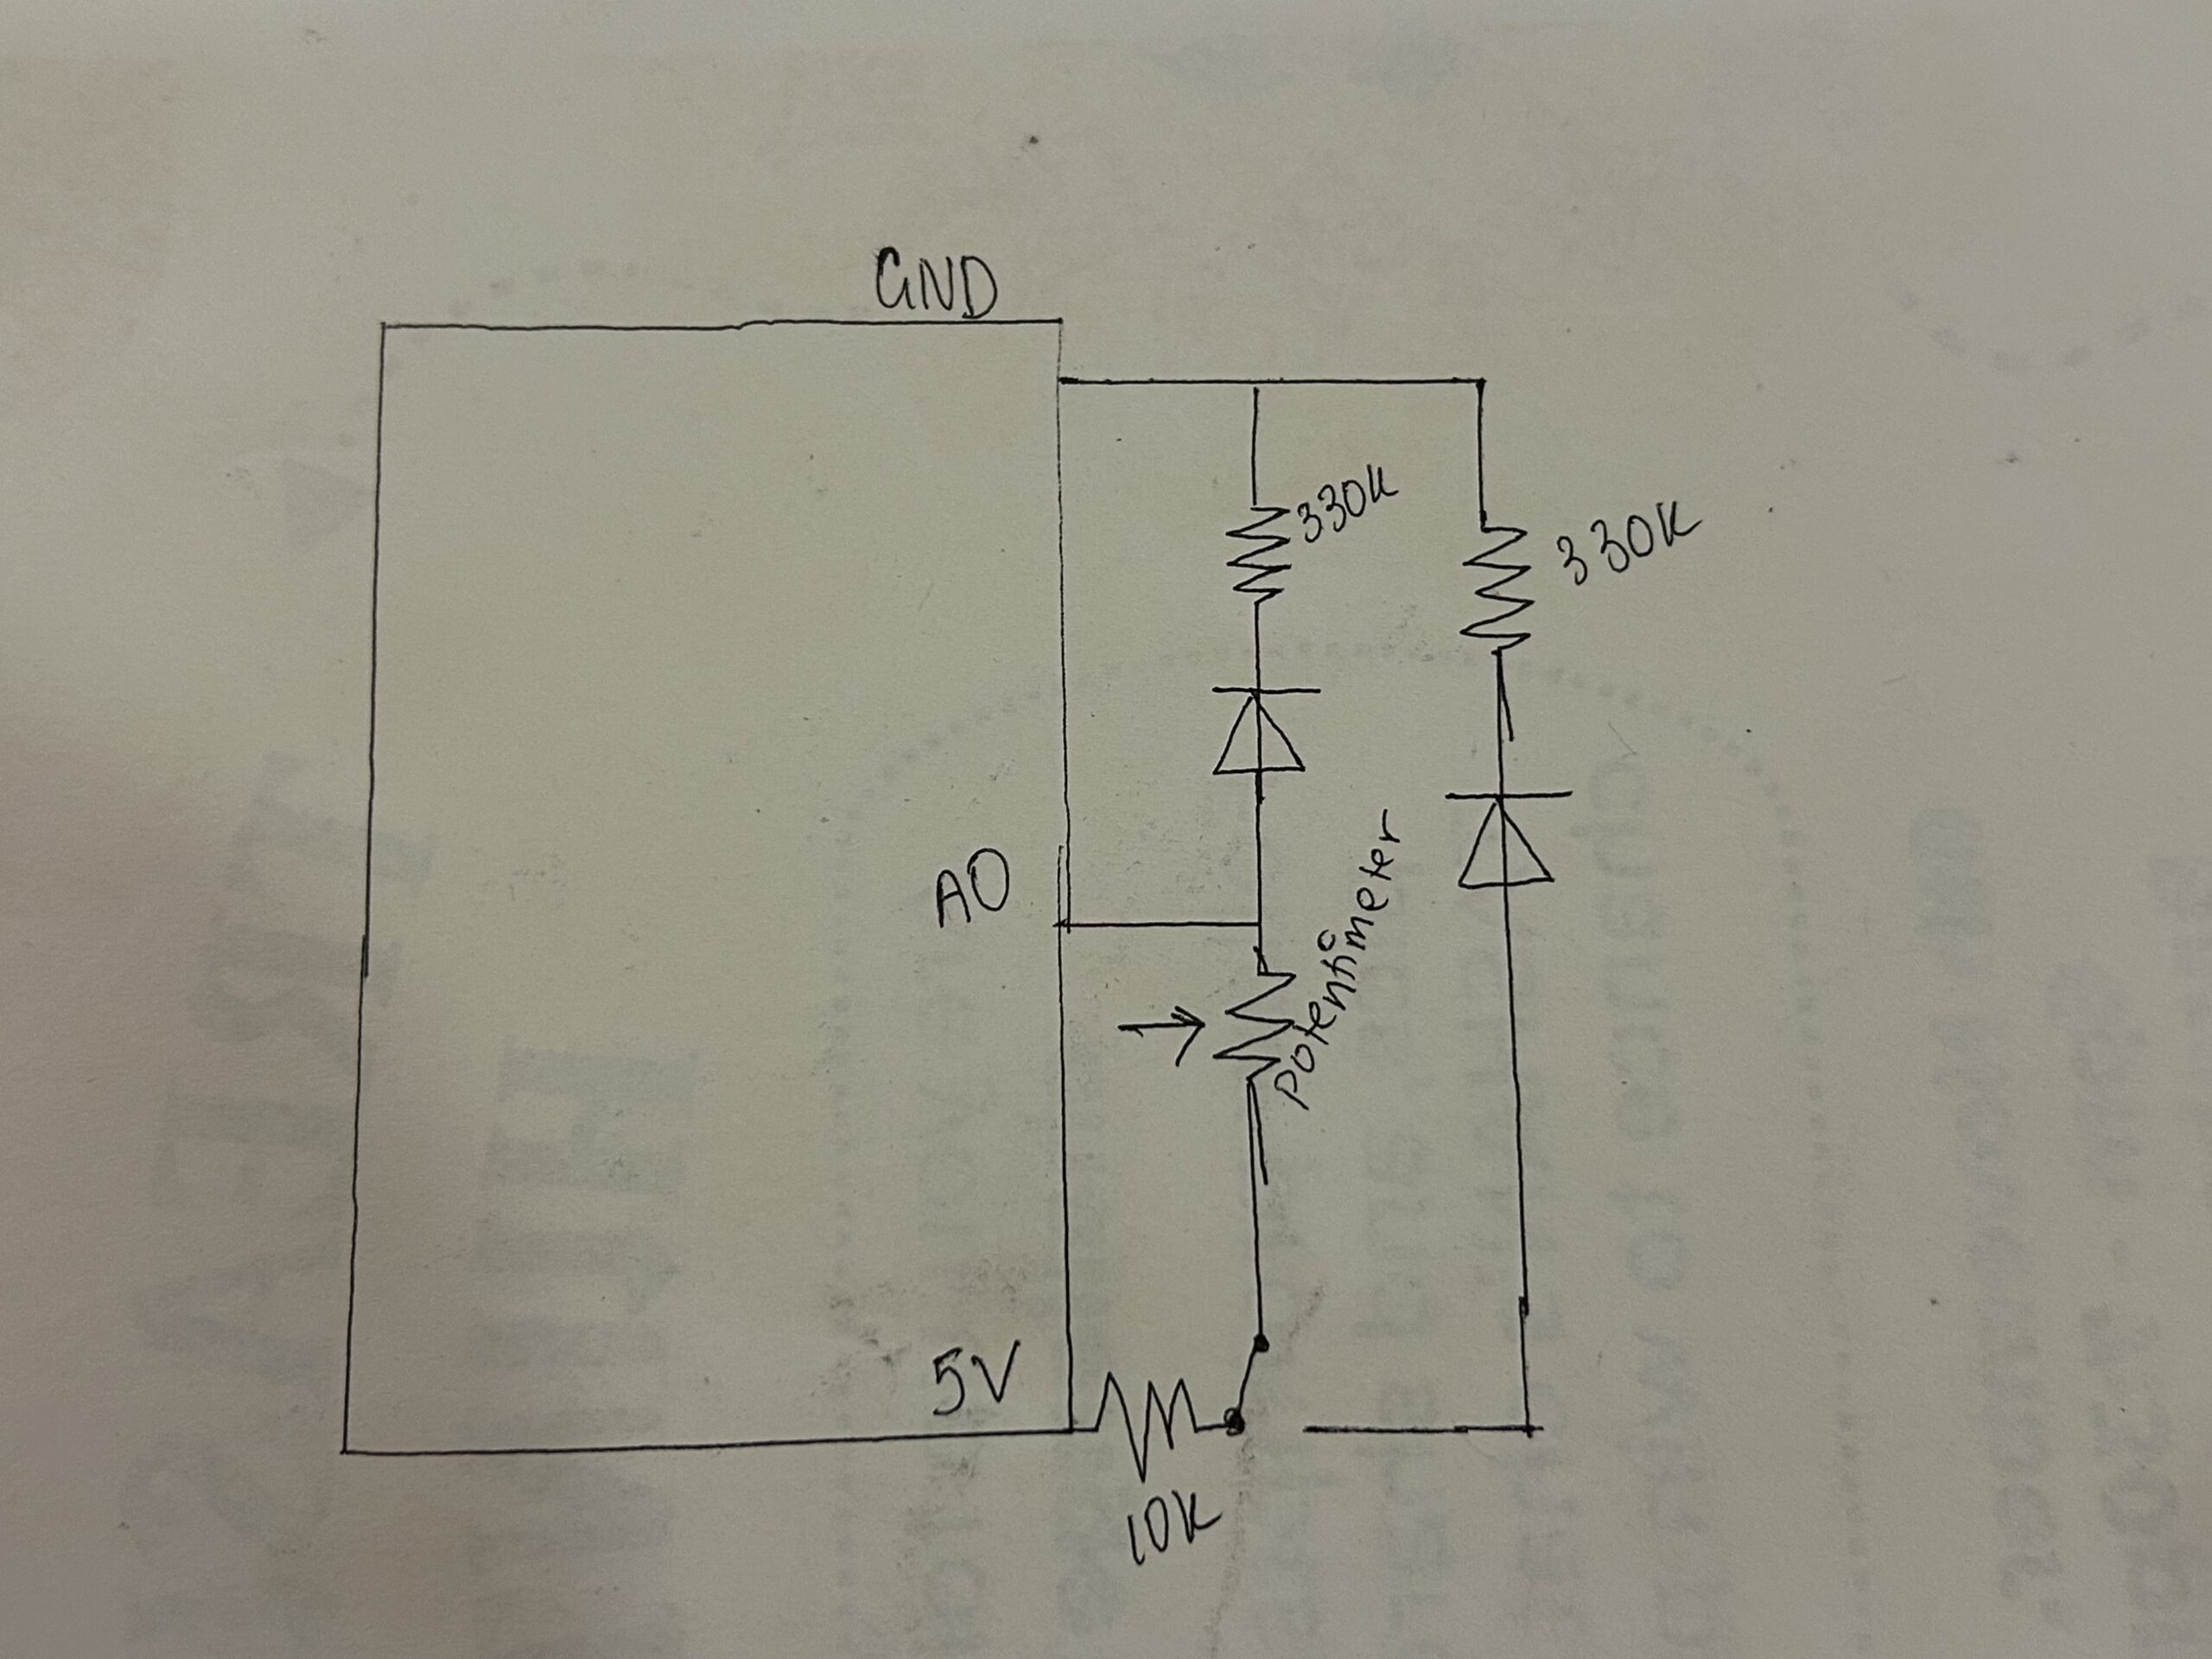
Schematic
Arduino Code
The Arduino code detects button presses and sends data (letters r, y, g, b) to the p5.js sketch via serial communication. Debouncing logic ensures that a single button press is registered cleanly, and each button press triggers a tone via the buzzer.
Key Features:
- Reads input from buttons using
digitalRead. - Sends corresponding data to p5.js.
- Plays tones through the speaker.
Arduino Code:
// Define button pins
#define BUTTON_R 8
#define BUTTON_Y 2
#define BUTTON_G 4
#define BUTTON_B 7

void setup()
{
  Serial.begin(9600);

  // Configure button pins as INPUT_PULLUP
  pinMode(BUTTON_R, INPUT_PULLUP);
  pinMode(BUTTON_Y, INPUT_PULLUP);
  pinMode(BUTTON_G, INPUT_PULLUP);
  pinMode(BUTTON_B, INPUT_PULLUP);
}

void loop()
{
  // Check each button and print the corresponding letter
  if (digitalRead(BUTTON_R) == LOW) // Button R pressed
  {
    Serial.println("r");
    delay(200); // Debounce delay
  }

  if (digitalRead(BUTTON_Y) == LOW) // Button Y pressed
  {
    Serial.println("y");
    delay(200); // Debounce delay
  }

  if (digitalRead(BUTTON_G) == LOW) // Button G pressed
  {
    Serial.println("g");
    delay(200); // Debounce delay
  }

  if (digitalRead(BUTTON_B) == LOW) // Button B pressed
  {
    Serial.println("b");
    delay(200); // Debounce delay
  }
}
p5.js Sketch
The p5.js sketch manages the game visuals, logic, and interactions. It reads the serial data from Arduino and maps it to fruit colors.
Key Features:
- Fruit Animation: Fruits of different colors fall from the top of the screen.
- Game Logic:
- Correct button presses “catch” the fruits and increase the score.
- Wrong presses or missed fruits deduct lives.
- Increasing Difficulty: The fruit speed increases over time.
- Audio Feedback: Musical notes are played for each button press.
Communication with Arduino:
- Data (
r,y,g,b) sent from the Arduino is read usingreadSerial()and processed in the game logic.
Aspects I’m Proud Of
Despite the challenges, I am particularly proud of:
- The Basket and Overall Theme:
- The game’s design, with colorful fruits falling into a basket, is cheerful and visually appealing.
- The integration of physical buttons adds an arcade-like feel, making it more interactive.
- Completion of the Physical Setup:
- Learning how to solder and fixing wiring issues was a huge milestone for me. I finally achieved a stable setup by creatively using multiple types of wires and securing them with electrical tape.
- The Multisensory Experience:
- The combination of visuals, button presses, and musical notes makes the game engaging and unique.
Challenges and Areas for Improvement
Challenges
- Physical Computing:
- Learning soldering took time.
- Fixing loose connections between the breadboard and buttons was tedious.
- Serial Communication:
- Connecting the Arduino to p5.js was challenging due to initial errors. Debugging and ensuring a stable connection required significant effort.
- Falling Fruit Logic:
- While the p5.js sketch initially worked, it started bugging out the day before the showcase. Debugging the logic for fruit falling and collision detection caused a lot of stress and worry.
Future Improvements
- Musical Notes Based on Songs:
- I initially planned for the chords to align with a specific song. As the player presses buttons, the chords would play in sequence, creating a recognizable melody. Implementing this would add depth to the auditory feedback.
- Improved Visual Feedback:
- Add animations for missed fruits or incorrect button presses.
- Enhanced Stability:
- Use a more permanent solution for physical wiring, such as a custom PCB or cleaner soldered connections.
- Gameplay Features:
- Introduce power-ups or different types of fruits for variety.
- Add multiple difficulty levels or a multiplayer mode for added fun.
Conclusion
This project successfully combines hardware and software to deliver an engaging and interactive game. The process of designing the hardware, troubleshooting physical connections, and integrating serial communication has been a valuable learning experience. I am proud of the final output and excited about the potential improvements for future iterations.