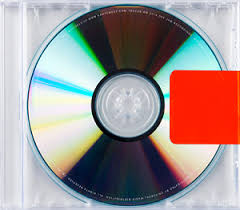
Midterm Project – Linus’s Dorm Experience

Sketch:

https://editor.p5js.org/lj2369/full/LBmJSPAC2

Concept:

A significant portion of my time outside of class is spent in my dorm— listening to music, playing games, browsing through my closet, and experimenting with making music. When brainstorming ideas for my midterm project, I realized how much of my life revolves around these everyday activities. This inspired me to recreate that personal experience in my project, aiming to capture the essence of my time in the dorm.

Description: 

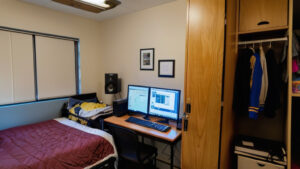
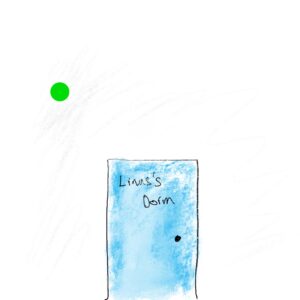
At the title screen of my project, you are greeted to 3 doors, the 2 dorms surrounding me, and my dorm, 705. The sketch highlights the dorm you are supposed to enter when you hover over it(it will not open the other doors). Once you step foot in the dorm, you are greeted with an amazing(AI photograph) of a dorm room.  In the Dorm, there are 5 things you can access, the computer, the photo above the computer, the speaker, the bed and the closet. If you mouse hover either one of those, the border of each will highlight, prompting you to click on it.

If you press on the computer, a menu page with a wallpaper and text greets you. If you follow the prompt on the computer, pressing 1 brings you to a drum machine/ beat sequencer and pressing 2 brings you to a menu page of a game of snake. The beat sequencer page has 6 different rows of different instruments, and 16 grids for each part of a drum. For each grid you select, when you press play, the specific part of the drum will play if you have selected the grid. In snake, you press enter to start the game, and control your snake using WASD. The objective is just trying to eat as many fruits as you can and grow as big as you can. In both applications, it will bring you back to the computer menu page if you press escape. Pressing escape on the menu page will bring you back to the dorm.

If you select the closet, you will enter a closet, where you can browse through my clothes. There are buttons on each side of the closet. The left button brings you to the previous clothing item, and the button on the right displays the next clothing item available. Once again, you can exit back to the dorm by pressing escape.

If you select the speaker, a music playback page is displayed, with a spinning record in the middle. I derived this part from a previous assignment where I drew 2 spinning records. However, I altered its functionality to fit what I wanted. It plays back a few songs I have selected and play/pause, next and previous track buttons work as you expect it to. The records spin while music is playing and stops when music stops. The color ring of the record corresponds to the color of the album in which the song was found on.  There is also a vertical slider for volume, and a horizontal one, to skip forwards or backwards into the track, and to watch how far into a song you are.

If you click on the bed, a stickman will be sleeping on the bed.

Lastly, if you click on the photo frame above the computer, an image of my favorite album cover will show.

Code Highlight: 

  //drum machine setup
  
  // Initialize grid with "off" cells
  for (let i = 0; i < numRows; i++) {
    grid[i] = [];
    for (let j = 0; j < numCols; j++) {
      grid[i][j] = false; 
      }
  }
   //Calculate the interval between steps based on BPM
  interval = (60 / bpm) * 1000 / (4); // Divide by 4 for 16th notes
  
  playPauseButton = createButton('Play');
  playPauseButton.position(3,320);
  playPauseButton.mousePressed(togglePlayPause);
  playPauseButton.hide();
  
  // Start sequencer
  setInterval(playStep, interval);
  
  // Define different colors for each row
  rowColors = [
    color(255, 100, 100),   // Red for Kick
    color(100, 255, 100),   // Green for Snare
    color(100, 100, 255),   // Blue for Open Hat
    color(255, 255, 100),   // Yellow for Closed Hat
    color(255, 100, 255),   // Pink for Crash
    color(100, 255, 255)    // Cyan for Clap
  ];


function playStep() {
  if (isPlaying) {
    // Play sounds for the active beats in the current step
    for (let i = 0; i < numRows; i++) {
      if (grid[i][currentStep +1 ]) {  // Adjust for the dead node
        
        soundFiles[i].play();
      }
    }
  
    // Move to the next step
    currentStep = (currentStep + 1) % numCols;
  }
}

This segment of code is responsible for the core functions of the Drum Machine/ beat sequencer. In the setup, the grids are initialized to an off position. Interval is set to create an even spacing between each note on the grid to a 16th note, based on the bpm initialized. The setInterval function(native to JS) is called, where the first parameter is our function, and the second parameter being the delay that we set. The function playStep checks whether our drum machine is playing, then checks if each row is selected, and plays the instruments that are selected, then moves on to the next step. It loops back once it reaches the last step.

Problems/Improvements: 

A problem I encountered multiple times while working on this project is, when entering and leaving a different scene, the strokeweight or stroke color is not reset, resulting in some of the artwork being messed up. However, i fixed this by resetting the stroke weight and stroke colors at the escape function when leaving the scene, or at the end of the draw functions.

For my hover detection, since the picture is 3D on a 2D space, for my hover detection, as i was using a rectangle to define the coordinates, it results in some inaccuracy. I was unable to come up with a solution.

Another problem I encountered was not having my code be as organized, resulting in difficulty debugging. I fixed some of this by creating classes, as opposed to having them be functions within the sketch file. However, I didn’t do this for all my different scenes, so that is a future improvement.



Week 5 Midterm Concept/Progress

Concept:

Coming up with this midterm progress took a long time of just sitting in my room and doing random things in my dorm to come up with a concept. I couldn’t choose whether I wanted to create an art piece, a game or something else. So like I always do, I decided to listen to some music, started looking at my clothes in my closet, and playing some random games on my computer.

Then that became my concept. A virtual interactive experience of my dorm. My concept takes inspiration from the class example of the the coffee shop experience, with my own personal twist.

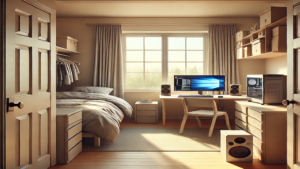
I drew some sketches and also used DALL-E to create some images to show the experience I want to portray.

We enter the experience by entering my dorm door(will draw better or use AI for final).


Upon entering the dorm, we are greeted to a closet, speakers and a computer.

I generated the below two images using DALL-E with the prompt: “create an image of a dorm room view from the door with a large window on the very left. To the right of the window is a bed. To the right of the bed is a table with a speaker, desktop computer, monitor, keyboard, and mouse. to the right of that is a closet.

When clicking on the computer, I want there to be 2 tabs available, one for the a snake game, and one for a beat sequencer/drum machine.


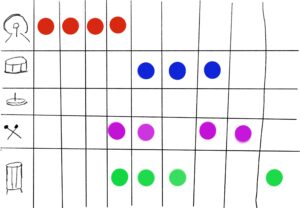
Below is a rough sketch of what the beat sequencer or drum machine would look like. I intend for it to create a drum sequence, based on the 4 bars that continuously loop.


On the second tab would be a recreation of the snake game.
I’m also considering an option to click into the closet, where you can just scroll through different clothing items.

Currently this is what the main page and the dorm room looks like.


Challenges: 

  • Producing the beat sequencer
    • I have been looking into the Tone.js library in order to help with making the beat sequencer.
    • Incorporating the selection method of items in the room(closet or computer) and also the switching of tabs on the computer for either the beat sequencer or the snake game.


Week 5 Reading Response

Computer Vision is a set of algorithms that are developed to be able to interpret information that are derived from a digital image or video. Human vision is able to recognize items based on past interactions with such items and its traits. Computer vision defers from human vision in that it doesn’t see things as a whole, but rather a collection of pixels, it is due to this that algorithms have to be developed to help.

For example, using pixel and color and brightness, it is able to detect motion. Also unlike human vision, computer vision is not a thing that can be widely used, it is an umbrella term for different algorithms that possesses the functions of tracking, or understanding information from images or videos.

Computer vision’s ability to track and focus on objects allows interactivity between human and art pieces. It allows for artists to create pieces that are able to have a layer of interactivity that doesn’t even need the user to be touching anything physical. As an example, in a project for a different class, using simple computer vision code, we were able to produce a program that detects hand gestures, which then translates to Morse Code.


Week 4 Reading

In the first chapter of the book” The Design of Everyday Things” by Donald Norman, we are introduced to the frustrations that the author has on everyday objects. Specifically, their ease of use, or in this case, the lack thereof. The concept of human-centered-design(HCD) is introduced, a philosophy where the human’s needs, capabilities and behavior on the forefront of design. Two concepts related to this that Norman also introduces are Affordances and Signifiers, meaning a design suggestion that helps with action and visual cues that guide the person to take an action respectively.

Within Interactive Media, as the name implies, interactivity is a crucial aspect. Numerous times when creating pieces, I rely on the user’s intuition for my interactive elements instead of making designs that would easily teach and guide the user on what to do. I believe within interactive media, there has to be a balance between the piece being intuitive, but also not taking away from the experience, eg. a button that is too out of place on interactive art piece.

There are a few designs that drive me crazy:

  1. USB A orientation, there is no easy way to differentiate the right way from the right way when plugging in a USB A port unless you’re looking right at the port. However, a fix has already been implemented through USB C.
  2. Laptop Trackpads. When you get a new laptop, there are no tutorials on how to use the trackpad. While it may seem silly to need a tutorial for a laptop trackpad, every computer brand includes different trackpad gestures and defaults to a different way of scrolling. An easy fix would be a quick guide during the setup of the computer and the option to choose which style of scrolling one prefers.
  3. TV remote. A new TV remote comes with way more buttons than most people use. The problem with that is that nobody really understands what half of the buttons do. A fix could be to either create a simpler remote, or have better labeling for the buttons.

Assignment 4 Outfit Generator

Sketch: 

Concept: 

The concept for this sketch came from my roommate and I’s  constant struggle each morning to decide what to wear for the next day. What I decided to produce was an random outfit generator that takes a list of hats, shirts, jackets, pants and shoes, and corresponding colors for each item that I had, in a form of an csv, and produces random results, yielding a different outfit.

Code Highlight: 


function generateOutfit() {
  let categories = ["Hat 🧢", "Shirt 👕", "Jacket 🧥", "Pants 👖", "Shoes 👟"];    //array for each article of clothing
  for (let c = 0; c < categories.length; c++) {  //loop through each category
    let category = categories[c]; //current category
    let colorOptions = [];        //array that color options for current category
    //loops through each row in clothesData to find the matching category
    for (let i = 0; i < clothesData.getRowCount(); i++) {
      //find a match for category based on first column in current row
      if (clothesData.getString(i, 0) === category) {
      //once the category of the table and the corresponding category matches, the colors in the same row are stored in the coloroptions array. 
        let row = clothesData.getRow(i).arr.slice(1);
        for (let j = 0; j < row.length; j++) {
          if (row[j] !== "") {
            colorOptions.push(row[j]);
          }
        }
        break;    //exit the loop once the matching category is found
      }
    }
    //randomly assign one of the color attributes to the corresponding category
    outfit[category] = random(colorOptions);
  }
}

This was the main function that was utilized within the sketch. the function is in charge of generating a random color option for each article of clothing. I first created an array called categories, which had the names of each category of clothing, which corresponds to the same name within each row in the csv file. Following this is a triple nested loop. The first loop loops through the categories array. and then creates an empty array called colorOptions, which would store the color options for each category.  The second loop loops through each row of the csv file. If the first string of the row matches with the same category in the categories array, an array: row, would be created, which would store each of the color options found within that row in the csv file, without the first item, which is the category. Then the third loop loops through the length of the row, if there is a string available, we push the item within the array to the coloOptions array. We exit the third loop once  the category is finished. Once all the categories are done, a random color option is chosen, and applied to the category of clothing.

Future Improvements:

As this is intended to be a tool, I hope to further improve this project through photos of the actual items I own, in order to visualize what the items would look like together. I would also want to add a toggle switch for each article of clothing, so I could for example, choose whether I want to wear a hat or jacket or not.

Week 3 reading


A significant part of the reading that stood out to me was where Crawford uses the example of a person dodging a tree branch to describe the difference between reactive and interactive. When I think of interactive elements within my programs, I would consider whatever happens on screen as a result my input counts as interactive. However, what the author is arguing is that this reactive element only becomes interactive, if it does something meaningful. The author defines interactivity through a metaphor of conversation, consisting of listening,thinking and speaking. 

I believe that the author’s metaphor works quite well in describing what we would want to see within an interactive system. For example, the user interface of the system must be easy to understand and use, as opposed to being filled with technical jargon, which may hinder your experience with the system. I believe another important aspect of interactivity is the response we get from the system or computer following an input from the user. Interactivity is undermined when the response doesn’t match well or isn’t suitable for what the user inputted. 

To improve my interactivity within my future p5 sketches, I want to incorporate more meaningful interactive elements, but more importantly, I should try to improve the aesthetics of my interactive elements. Currently, all my descriptions of interactivity are not within my sketch, which could be difficult if there wasn’t a guide to the interactive elements of my sketches. 

Assignment 3: Basketball Player

Sketch: 

Concept:

There wasn’t a specific artwork that inspired my piece, instead my inspiration just came from watching basketball over the  weekend. The artwork features a stickman dribbling a basketball, and the ball and stickman follows the horizontal movement of your mouse.


Code Highlight:

class Stickman {
  constructor(x, y, size) {
    this.x = x;
    this.y = y;
    this.size = size;
    this.ly = y + 65;    //seperate variable for the left arm y to make it move
    this.lyspeed = 1;     //speed variable of left arm
  }

  show() {
    // Draw the stickman's body parts
    circle(this.x, this.y, this.size);                     // Head
    line(this.x, this.y + 37, this.x, this.y + 186);       // Body
    line(this.x, this.y + 186, this.x - 49, height);       // Left leg
    line(this.x, this.y + 186, this.x + 52, height);       // Right leg
    line(this.x - 2, this.y + 60, this.x - 81, this.ly);  // Left arm with moving ly
    line(this.x - 2, this.y + 60, this.x + 36, this.y + 112);  // Right arm remains static
  }

  move() {
    // Move the left arm
    this.ly = this.ly + this.lyspeed;
  }

  limit() {
    // Limit the arm movement between y+65 and y+80
    if (this.ly > this.y + 80 || this.ly < this.y + 65) {
      this.lyspeed = this.lyspeed * -1;  
    }
  }
}

This class I created was in charge of the stickman. Specifically I want to focus on the arm movement part of the code, which is the variables ly, lyspeed, and the functions move and limit. Initially I had all the variables for all four limbs be the same, which resulted in all four limbs moving at the same time in my sketch, which was not what I intended. Instead, i solved this issue my creating a separate variable that would only vary the y variable of the line that was being drawn, creating an illusion of hand movement, bouncing the ball.

Future Improvements:

One part of the assignment where I wasn’t able to figure out was how to connect the movement of the bouncing ball and the hand movement, to ensure they are always synced up. Right now, they are moving at different speeds, so the animation could go out of sync sometimes. I also want to improve by adding more functions, such as being able to shoot into the hoops.

Week 2 reading reflection

What Casey Reas was trying to show through his talk was the usage of “controlled chaos” through an artistic manner. He gives many examples of art pieces that he took part in where through his code, he determines how much of the piece he was to leave up to chance.  Within my own work I aim to start incorporating randomness within my work through noise and random numbers to determine different aspects of my work like colors or placement. Through watching the talk, I believe the optimum balance depends on the specific works, but it really comes down to utilizing randomness in a way that is still cohesive to the work as a whole. For example, in a music piece, if incorporating randomness, you may not want the timing and the notes to be completely random, sounding like a complete mess, instead, you may want to incorporate randomness and chaos in a way where the piece still works nicely together.

One example piece that he showed during the count that stood out to me the most was the one line algorithm in the commodore 64. Even though it was simply just an algorithm that does a simulation of a coin flip, where one results prints a character and the second result prints a different character. This randomness creates a very unique piece of art that, to the human eye, may look like order. Although this piece was very simple, I found it to be the perfect balance of order and randomness.

Week 2 Assignment: Spinning Records


Concept: 

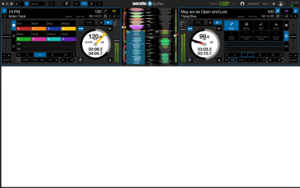
This idea of records spinning came into my head as I was djing over the weekend and seeing how the dj software looked like:

I was also inspired by the album cover of Kanye West’s album “yeezus”:

My piece inspired by these has a couple of functions. It spins freely when nothing is touching it. Once a mouse is hovering and pressed down above one of the records, that specific records starts slowing down, eventually coming to a stop, much like a real record. Once the mouse is released, the record starts spinning again, but with a different rectangle and central circle color, as if you have swapped the record out.

Code highlight: 

// Rotate and draw elements for each circle
 let angles = [angleLeft, angleRight];
 let rectColors = [rectColorLeft, rectColorRight];
 let innerCircleColors = [innerCircleColorLeft, innerCircleColorRight];
 for (let i = 0; i < centers.length; i++) {
   push();
   translate(centers[i], 200); // Move the origin to the center of each circle
   rotate(angles[i]); // Rotate by the current angle for each circle
   drawSpinningElements(rectColors[i]); // Draw spinning arcs and rectangles
   pop();
 }

// Update angles based on rotation speeds of each record
angleLeft += rotationSpeedLeft;
angleRight += rotationSpeedRight;

This segment of code is in charge of the spinning element of the piece, using a loop, it affects both records. Within the loop, rotate is used to rotate the elements of the rectangle and the arcs. the angleLeft and angleRight incrementing is what creates the animation.

Reflection and future improvements: 

For future improvements of this piece, I would love for the record to be spinning only when music is planning, and/or have the colors respond to different parts of music like drums or snares.

Assignment 1 – Self Portrait

Concepts: 

For this assignment, my concept was a self portrait of me, wearing a NYU shirt, and a sunny and sandy background. I utilized basic shapes to construct the portrait, with the concept being me in NYUAD right now. I aimed to recreate my hairstyle as much as I could on a 2D space. Apart from the portrait of myself, I also drew the sun in the background, which I believe is an important feature of Abu Dhabi.

Portrait

Highlight

I implemented a feature where the nightsky, moon, and stars would show when you click down on the canvas. I used an if statement to detect whether a mouse button was being held down, which is detected with the function ‘mouseIsPressed’.

if (mouseIsPressed){
//nightsky
fill(40)
rect(0,0,400,250)
fill(190)
//moon
circle(0,0,250)
fill(240)
circle(30,24,30)
fill(230)
circle(16,81,15)
fill(215)
circle(48,83,20)
fill(242)
circle(87,19,15)
fill(250)
circle(70,50,30)
//stars
fill(255)
circle(294,25,2)
circle(187,42,2)
circle(361,52,2)
circle(218,9,2)
circle(276,115,2)
circle(279,70,2)
circle(355,85,2)
circle(133,91,2)
circle(215,85,2)

} 

Improvements 

For the drawing of the rays of the sun, I tediously drew the triangles one by one to achieve the way I wanted it to look. This was quite time consuming and wasn’t very efficient. In the future, I could utilize a loop to speed up this process.