Casey Reas Chance Operations Reflection.

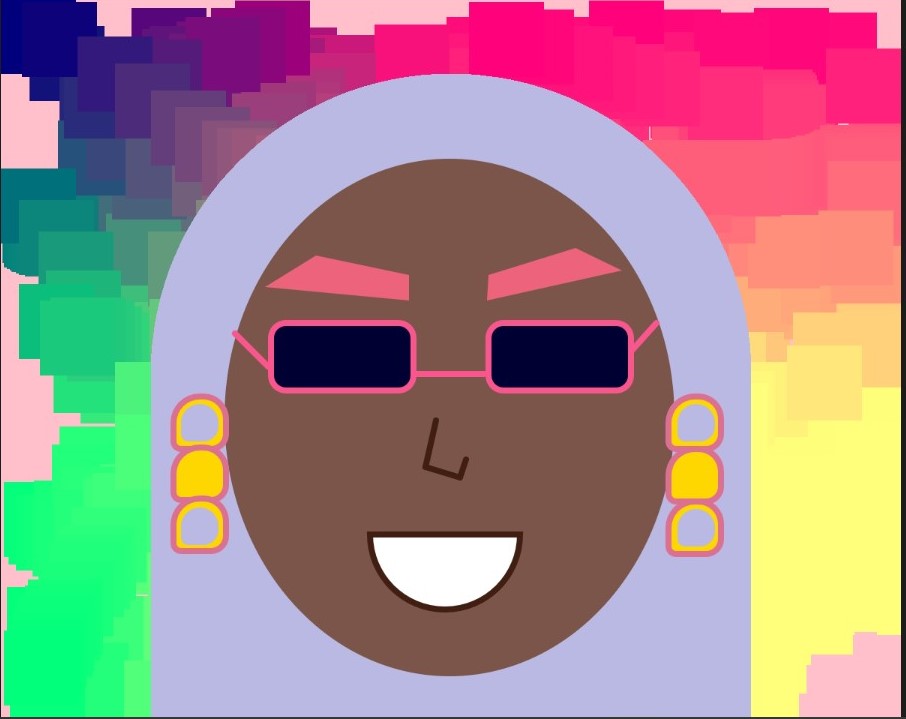
Casey Reas’ speech on chance operations highlights randomness, chance and order in art and explores the interplay of chaos and control in the creative process. He discusses how incorporating randomness and chance elements into art can lead to unexpected and exciting outcomes, challenging traditional notions of artistic control. He introduces chance in art as a form of chaos and destruction of an order society and this resonated with me because it expresses the escape I feel when I do interactive coding through IM as opposed to standard coding in Computer Science. I get to “replace logical nonsense of men with logical nonsense”. This chance in art opens pathways that allow for you to take full creative control in your coding, and it is heavily emphasized in his speech through his countless mentions of randomness which is a function that allows for imprecision and parametrized change to create art.

Reas also highlights the importance of setting up systems and rules within which randomness can operate. This controlled chaos allows artists to introduce an element of surprise and unpredictability into their work. It’s about relinquishing some level of control and letting the process itself become a collaborator in the creation of art.

On the other hand, he also touches on the idea that order can emerge from chaos. Through precision and exploration of the grid, even when randomness is a part of the creative process, patterns and structure can arise, creating a balance between chaos and order.  Referred to as order in art, though not the exact opposite of chance in art, this dynamic tension between randomness and order can result in art that is both visually striking and conceptually rich.

In short Casey Reas’ speech highlights the value of embracing randomness and chance as tools for artistic exploration and encourages artists to break free from rigid constraints and discover the beauty that can emerge from the unexpected.

Loop Portrait Assignment 2

This project was inspired by the grid-like patterns formed by concrete tiles around campus, which sometimes appeared curved when seen from a particular angle.

This resemblance to gentle ocean waves led me to delve into generative art. A search for “moving loop art” introduced me to Perlin noise flow fields, which were a significant source of inspiration for this creative endeavor. Combining these elements resulted in the generative art piece I created.

To start, I created a grid of squares using a simple for-loop. My aim was to make this static grid interactive, giving it the appearance of waves when the mouse cursor passed over it. Achieving this effect was both captivating and challenging. To mimic the motion of waves, I used trigonometric functions like sine and cosine. This part of the code was particularly interesting because it required me to use insights from sine and cosine graphs to estimate how each square should move.

The starting position of the circular motion of the squares would change direction depending on the mouse’s position, either clockwise or counterclockwise. The combination of Perlin noise-inspired flow fields and trigonometric functions brought the concept to life. It created the illusion of waves moving through the grid of squares as the mouse moved. The interaction between sine and cosine functions, along with Perlin noise-inspired angles, resulted in a visually captivating effect, making it seem as if the squares were moving together in a harmonious wave-like dance.

An essential part of achieving this, was a piece of code I referred to here. It provided helpful guidance for developing this project. The highlight of my code then follows below:

 
//starting position based on mouse position
const xAngle = map(mouseX, 0, width, -4 * PI, 4 * PI, true);
const yAngle = map(mouseY, 0, height, -4 * PI, 4 * PI, true);

//varying square positions
const angle = xAngle * (x / width) + yAngle * (y / height);

//circular motion for each particle
const X = x + 10 * cos(2 * PI * t + angle);
const Y = y + 60 * sin(2 * PI * t + angle);

square(X,Y,50);

Here’s an embedded sketch of my work:

The color of the squares was another dynamic aspect of the artwork. It changed in real-time based on the mouse cursor’s position, creating a colorful and interactive visual experience. This dynamic color variation added depth and engagement to the piece.

Reflecting on this artwork, it’s a variation of what I initially had in mind. Although I didn’t have precise expectations, I had a general concept. In future iterations, I plan to explore individual squares with different colors, creating a generative storytelling narrative. Perhaps the art could start with a single square and gradually build into a full canvas, conveying a visual story. Regardless of the directions I may explore in the future, I take pride in what I’ve accomplished with this piece. It fuels my excitement to continue learning and applying my newfound skills to real-life works of art.

Self-Portrait Assignment 1

The first class of the semester kicked off with an interesting challenge: creating a self-portrait using basic shapes. This task was not only a great way to start our Introduction to Interactive Media (IM) course but also showed us how this field can be applied in practical work.

For this assignment, I decided to explore how simple shapes could represent different aspects of myself. Since we could only use primitive shapes, I had to get creative to turn a square or a circle into something like an eyebrow. Before diving into coding with P5.js, I spent some time brainstorming and sketching out a rough idea of how I wanted to convey my self-portrait through these basic shapes.

The first challenge was figuring out how to represent myself wearing a hijab using 2D shapes. After some trial and error, I settled on using an arc connected to a quadrangle, which, after removing the outline, looked like a hijab to me. Once that was in place, the rest of the project flowed smoothly as I added details and brought my sketch to life.

The most challenging part for me was trying to recreate my eyebrows using quadrangles. It seemed straightforward in theory, but when I tried it, the brows looked off, and I had to experiment a lot to get the right dimensions that resembled real eyebrows. To help with this, I used the “Print mouseX and mouseY” function throughout the process. It made it easier to understand how to scale things properly because I was struggling to figure out which parameter corresponded to what size.

Even though the assignment didn’t require interactivity, I decided to give it a try. After watching a YouTube video about mouseClicked on p5.js here, I managed to create two global variables that responded to user clicks. This is the part of the code that I’m particularly proud of:

let brow = '#694133';
let smile='#694133';

function mouseClicked(){
  if (brow == '#694133'){
    brow='rgb(236,99,123)';
  }else{
   brow='#694133';
  }
  if (smile == '#694133'){
    smile='white';
  }else{
    smile='#694133';
  }
  
}

It added an extra layer of engagement to my self-portrait, and I found it quite satisfying to implement. It was a pleasant surprise to find out that this function was already built into the program. By using some simple if statements, I managed to change the color of my eyebrows and make my sketch smile whenever the mouse was clicked.

After putting in the effort, I’m proud of my first sketch. Here’s an embedded sketch of my work.

However, for future improvements, I want to add more interactive elements, like maybe a sticking-out tongue or something fun and quirky. I also want to experiment with dimensions and shadows to make the sketch look more realistic.

In any case, this project made me realize the potential of using interactive media to express ideas and identities in creative ways, setting the tone for what we would explore throughout the semester.