Assignment 4 – Reading Reflection

The excerpt from Don Norman’s “The Design of Everyday Things” offers a perceptive look at the psychology of commonplace objects and their designs. In his discussion of frequent problems with doors, light switches, and technology, Norman highlights the significance of design features like affordances and signifiers. He contends that effective design should be intuitive, enabling people to utilize a product without the need for manuals, mostly by means of obvious and sensible hints included into the design itself.

When I think about it, Norman’s emphasis on user-friendly design resonates even more. From my own experience, I have come across a lot of non-intuitive products and interfaces, which has caused annoyance and mistakes. I’m more conscious of the importance of user-centered design now that I’ve read this, and it’s inspired me to think about how the systems and items around me may be made clearer and easier to use. Norman’s concept of “affordances,” which refers to the potential interactions between people and their surroundings, has altered my understanding of how products should be made to fit naturally with human use rather than requiring users to adjust to complicated or counterintuitive systems.

Assignment 4 (production 4) Word Search

The concept of this assignment is a word search. I was inspired to do this because of how much I help my younger brother with his word search activities at home. So I immediately started working on the idea.

I started y creating a grid and then have randomized letters in the grid. There are three specific words that you need to find: “WOW” “FUN” “CAT”. Obviously there are more extra and bonus words that you will find in the grid. The process was long but this is what I ended up with. Please mouse click on the letter that you want to highlight:

A big part of the code that I am proud, which was the most challenging part is the WordGrid Class that I created to have many different functions.

class WordGrid {


    // Constructor 
    constructor(gridSize, cellSize) {
      // Number of cells along one edge of grid 
        this.gridSize = gridSize; 
      // Size of each cell in pixels
        this.cellSize = cellSize; 
        this.words = ['FUN', 'WOW', 'CAT']; 
      // Initialize grid layout
        this.grid = this.initGrid(); 
      // Place words in the grid
        this.placeWords(); 
      // Fill empty spaces in grid
        this.fillGrid(); 
    }


    // Initializes grid with empty values.
    initGrid() {
      // Array to hold grid data 
        let grid = []; 
      // Iterate over each row 
        for (let i = 0; i < this.gridSize; i++) { 
          // Initialize an empty row
            grid[i] = []; 
          // Iterate over each column in row
            for (let j = 0; j < this.gridSize; j++) { 
      // Set each cell to default state with no letter and not colored
                grid[i][j] = { letter: '-', colored: false };
            }
        }
        return grid; 
    }


    // Places words from 'words' array into grid 
    placeWords() {
        // Iterate over each word and its index in the array
        this.words.forEach((word, index) => {
    // Calculate row number based on word's index to space out words
            let row = index * 2; 
            // Place each letter of the word into grid.
            for (let i = 0; i < word.length; i++) {
       // Set cell at calculated row and current column to letter of word
                this.grid[row][i] = { letter: word[i], colored: false };
            }
        });
    }


    // Fills empty cells of grid with random letters
    fillGrid() {
        // Iterate over each cell in grid
        for (let i = 0; i < this.gridSize; i++) {
            for (let j = 0; j < this.gridSize; j++) {
                // Check if cell is empty (marked by '-') 
                if (this.grid[i][j].letter === '-') {
                    // Set the cell to random letter
                    this.grid[i][j].letter = this.getRandomLetter();
                }
            }
        }
    }


    // Returns random letter from the alphabet
    getRandomLetter() {
      // String containing all letters 
        const alphabet = "ABCDEFGHIJKLMNOPQRSTUVWXYZ"; 
        // Return random letter from alphabet string 
        return alphabet[Math.floor(Math.random() * alphabet.length)];
    }

    // Toggles color state of specific cell
    toggleCell(row, col) {
        // Check if cell contains a valid letter (not '-')
        if (this.grid[row][col].letter !== '-') {
            // Toggle 'colored' state of cell
            this.grid[row][col].colored = !this.grid[row][col].colored;
        }
    }


    // Draws grid on screen
    draw() {
        // Iterate over each cell in grid
        for (let i = 0; i < this.gridSize; i++) {
            for (let j = 0; j < this.gridSize; j++) {
              // Set fill color based on cell's 'colored' state
                fill(this.grid[i][j].colored ? 'red' : 255);
                // Draw border around cell 
                stroke(0);
                // Draw cell as rectangle
                rect(j * this.cellSize, i * this.cellSize, this.cellSize, this.cellSize);
                // Set fill color for text (letter) to black
                fill(0);
              // Align text to center of cell and draw letter
                textAlign(CENTER, CENTER);
                text(this.grid[i][j].letter, j * this.cellSize + this.cellSize / 2, i * this.cellSize + this.cellSize / 2);
            }
        }
    }
}

initGrid(): This function creates a two-dimensional array with objects that correspond to each cell in order to set up the grid’s basic structure. At first, I had trouble seeing the grid as an arrangement of objects instead than just letters or empty spaces. But structuring every cell as an object with letter and color characteristics made managing the state of the grid more adaptable.

placeWords(): It was difficult to arrange the words on the grid, especially to make sure they matched and did not overlap. Every word in this condensed form is arranged horizontally and separated by rows. This function established the foundation for comprehending how words interact with the grid, even though the true problem lay in creating more sophisticated placement algorithms.

fillGrid(): To finish the setup of a standard word search puzzle, random letters had to be placed into the remaining vacant cells of the grid. This method iterates across the grid, substituting random letters for unassigned cells. It filled all the cells that had “-” instead of letters of the words that we placed in the grid.

getRandomLetter(): This function selects a letter at random from the alphabet. It fills in the blank cells in the grid, completing the word search problem and enabling gameplay. It’s a little but essential component of the code. It works directly with the function before it.

toggleCell(row, col): The requirement for grid interaction made this function difficult to implement. Users can choose which cells to change color by clicking them. The gameplay revolves around this interaction, which lets players highlight words they come across.

draw(): Lastly, the draw method gives the word grid a visual representation of each cell’s condition, bringing it to life. For the game to be visually appealing and functional, it was essential that every cell’s content—a letter—and state—colored or not—be shown clearly.


There are a couple of limitations for my assignment though. First of all the function that places the words in the grid is placing them all horizontally and under each other which makes the word search game less interesting. Moreover, I only chose three words all with three letters only which again makes this game easy and will end fast. From the technical side, you are required to press on every letter of the grid when you find a word which makes it harder and less appealing to play the game. Making it more realistic like striking through the letters when the correct word is found will make the game more realistic and more appealing to the player. However, overall, I think I did a good job with the representation of the grid and creating a separate  file for the WordGrid class to make the code more organized.


Week 3 Reflection

As I consider the various viewpoints that the text have presented on the topic of interaction, I find myself drawn to the complex dance that takes place between user input and system response. Fundamentally, interaction is a dynamic exchange in which the user and the system participate in an ongoing cycle of input and feedback. This link forces us to reevaluate how we engage with commonplace items and technology, as well as how we understand interactive media.

As the reading demonstrates, the notion of interactivity encompasses more than just user participation; it also refers to a more profound and significant conversation between people and technology. It challenges us to reflect on the nature of our interactions, asking us to take into account not only the mechanics but also the purpose and result of these exchanges. Echoing the observations of my peers, I find the subjective character of interaction and the way it adjusts to the capabilities and requirements of its audience to be quite fascinating. This flexibility emphasizes how important careful design is to making experiences that appeal to a wide range of users and are both accessible and meaningful. Furthermore, the classification of interactive media into low, medium, and high levels of interaction provides a helpful framework for analysis. From the straightforward act of clicking a button at a pedestrian crossing to the intricate conversation with AI chatbots, it enables us to classify and assess interactions based on their depth and complexity. Every degree of interactivity presents different difficulties and chances for participation, highlighting the need for a sophisticated approach to interactivity design.

To sum up, the contemplations and illustrations presented throughout the class discussion enhance our comprehension of interaction. They force us to think about how our designs and interactions affect society more broadly, highlighting the importance of approaching interactive media with consideration and user-centered design. Our conceptual framework is expanded by this investigation, which also motivates us to innovate and push the limits of interactive design.

Assignment 3 (production 3) – Windows desktop!

The nostalgic interactive window displays and desktop backdrops that many of us cherish from our early years serve as the inspiration for this digital artwork assignment. My creative imagination has been deeply impacted by the joy and simplicity of those early interactive experiences, where one could lose hours exploring the graphical user interfaces of outdated operating systems and watching screensavers. This project started as an exercise in the classroom where we were to animate some balls and make them travel around the screen to look like they were bouncing off its edges. This exercise inspired me to create something new and dynamic that is similar to the old screens, while also bringing back fond memories of them.

I wanted to create an experience that would preserve the spirit of the effervescent Windows screensaver while adding contemporary interactive aspects. The idea was to design a dynamic canvas that, in response to human interaction, fills with bubbles, creating a lively and entertaining space evocative of a screensaver.


I wanted the bubbles to appear anytime the mouse was touched to make it more interactive. Therefore, I employed a mouse-press function that, based on the mouse’s position on the cavas, produced bubbles. Then, in order to make the entire piece more dynamic and creative—just as I was fascinated by the Windows screen when I was a youngster, so too would this pique kids’ interest in the labor of love that goes into creating it—I randomized a number of factors, including size, pace, and even the colors of the bubbles.

The code that I have is a lot similar to the one we had in class the only changes that I did is that I created an array to hold all the randomly generated bubbles in. This is the Bubbles file that has the class that generates the bubbles:

class Ball {
  // Constructor to initialize new Ball
  constructor(x, y, xspeed, yspeed, size) {
    this.x = x; // Ball x-coordinate
    this.y = y; // Ball y-coordinate
    this.xspeed = xspeed; // Ball speed in x-direction
    this.yspeed = yspeed; // Ball speed in y-direction
    this.size = size; // Diameter of ball
  }

  // Method to update ball position based on its speed
  move() {
    this.x += this.xspeed; // Update x-coordinate by x-speed
    this.y += this.yspeed; // Update y-coordinate by y-speed
  }

  // Method to change ball direction if it hits the canvas wall
  bounce() {
    // Checks if ball hits left or right edge of canvas
    if (this.x + this.size/2 > width || this.x - this.size/2 < 0) {
      this.xspeed *= -1; // Reverse x-direction speed
    }
    // Checks if ball hits top or bottom edge of canvas
    if (this.y + this.size/2 > height || this.y - this.size/2 < 0) {
      this.yspeed *= -1; // Reverse y-direction speed
    }
  }

  // Method to display ball on canvas
  display() {
    stroke(255); 
    strokeWeight(0); 
    fill(random(255), random(255), random(255)); // Sets fill color to random color
    ellipse(this.x, this.y, this.size, this.size); // Draws ellipse with specified size
  }
}

Then, I had the createBubble function in draw() so that every bubble that is created is randomized over and over again. This is the code for that:

// Initializes empty array to hold all Balls 
let balls = []; 


function setup() {
  createCanvas(600, 600); 
}


function draw() {
  background(0); 
  
  // Loops through each ball in balls array
  for (let ball of balls) {
    ball.move(); 
    ball.bounce(); 
    ball.display(); 
  }
}


function mousePressed() {
  createBall(); // Calls createBall function to create new Ball 
}


function createBall() {
  // Sets new ball's position to current mouse position
  let x = mouseX; 
  let y = mouseY;
  // Generates a random speed for new ball in both x and y directions
  let xspeed = random(-5, 5); 
  let yspeed = random(-5, 5);
  // Generates random size for new ball
  let size = random(10, 50); 

  // Creates new Ball object with specified parameters and adds it to balls array
  balls.push(new Ball(x, y, xspeed, yspeed, size));

I think a way to make this even better is to make the bubbles look more realistic like the bubbles in the windows server.

Week 2 Reflection – Casey Reas

The presentation prompted a thoughtful examination of the nature of creativity in the digital era by examining the relationship between chance and creativity.  In particular, it resonated with me that randomness can foster creativity within the inflexible confines of code. It suggests that the “unintentional” can contain a new kind of intentionality, challenging the conventional narrative that art is solely a human endeavor. This counterintuitive notion begs the questions, “Is creativity a uniquely human trait, or can it emerge from the interaction between computational randomness and human intention?” I was prompted to reevaluate the artist’s function in the digital age by the talk. Rather than being the only creator, it’s possible that the artist is becoming more of a curator, arranging the circumstances in which art is produced through human-machine collaboration.

The conversation on using code-generated randomness to create unexpected and meaningful art struck a deep chord as well. It suggests a change in perspective from seeing art as a static representation to seeing it as a dynamic process where meaning is created via interaction and interpretation rather than being predetermined. This viewpoint is consistent with broader societal movements that prioritize experience over possession and procedure over product. It also raises difficult issues regarding authorship and authenticity in art. In the event that the “creator” consists of a collection of human-designed algorithms, how can we distinguish between the creator and the medium? Furthermore, how does this affect how we see art itself? In addition to providing insights, the talk created a forum for a more in-depth examination of the changing dynamics between people, art, and technology.

Assignment 2 (production 2) – Liquid Floor

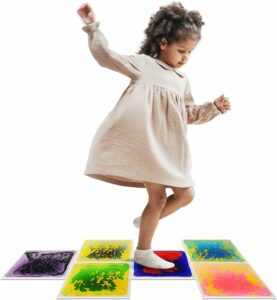
The concept for this piece was inspired by the kids toy, “Sensory Liquid Floor” which creates a nice colorful aesthetic. The same concept was applied on the canvas making the mouse be the “kid” and when moving, the mouse acts as if there is movement on the floor, changing the color of the screen to the background color. Another function a “mouse pressed” function that changes the color of the screen to the background color when the mouse is pressed.

Figure 1 – Liquid Floor Toy: 
Move the mouse around! Mouse click!

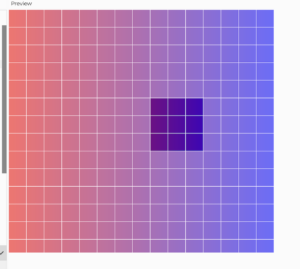
The first notable layer was a grid made of squares just as figure 2 shows. Then, a colorful gradient background with rainbow highlights that was painstakingly created using color interpolation to guarantee a fluid, flawless movement across the spectrum. Then, each square was programmed to react to the mouse cursor’s proximity, giving the piece its interactive quality. The vibrant colors beneath the squares were gradually revealed as the cursor traveled over them; the color blending and visibility were expertly calibrated to produce a fluid, organic interaction. The hard edges of the grid were softened, which improved the harmony of the squares against the background. The strokes of the squares were matched with the rainbow background to give it a smooth look and also hide the grid that was created using the loops. By doing this, the piece looked more interactive as the user is now able to move the mouse around and see colors appear without seeing the color of the whole background or the grid itself.

Figure 2:
I am proud of two parts of my code. The first part being:

// Calculate grid cell of current mouse position
    let hoverX = Math.floor(mouseX / spacing) * spacing;
    let hoverY = Math.floor(mouseY / spacing) * spacing;

    // Loop through grid of squares
    for (let x = 0; x <= width; x += spacing) {
      for (let y = 0; y <= height; y += spacing) {
        // Calculate distance from current square to mouse square
        let distance = max(abs(hoverX - x), abs(hoverY - y)) / spacing;

        // Decide transparency based on distance from mouse
        if (distance === 0) {
          // Directly under mouse
          noFill();
        } else if (distance === 1) {
          // Immediately adjacent to the selected square
          fill(255, 128);
        } else if (distance === 2) {
          // Set of squares after adjacent ones
          fill(255, 192);
        } else {
          // Squares further away are completely white.
          fill(255);
        }

This part of the code is responsible for creating an interactive grid where the color and transparency of each square dynamically respond to the position of the mouse cursor. The purpose is to provide a visual representation of proximity, with the nearest square to the cursor revealing the background color and the surrounding squares fading out based on their distance from the cursor. First, hoverX and hoverY variables are calculated by dividing the mouse’s x and y coordinates (mouseX and mouseY) by the spacing between the squares, using Math.floor to round down to the nearest whole number, then multiplying by spacing again. This snaps the mouse position to the nearest top-left corner of the grid squares, effectively determining which square the mouse is hovering over. Two nested loops run through each square in the grid. The outer loop (x) runs across the width of the canvas, and the inner loop (y) runs down the height of the canvas. The loops use spacing to step from one square to the next. For each square, the code calculates its distance from the square the mouse is over (hoverX, hoverY). This is done by finding the maximum of the absolute differences in x and y coordinates (max(abs(hoverX – x), abs(hoverY – y)) and dividing by spacing to get the distance in terms of squares, not pixels.

The second part was the function that created the rainbow background:

// Function to draw rainbow background
function drawRainbowBackground() {
  noFill(); 
  // Loop through the width of canvas to create gradient effect
  for (let i = 0; i < width; i++) {
    // Map position to range between 0 and 1 for color interpolation
    let inter = map(i, 0, width, 0, 1);
    // Interpolate between two colors based on current position
    let c = lerpColor(color(255, 0, 0), color(0, 0, 255), inter);
    // Set stroke color for line
    stroke(c);
    // Draw vertical line at position 'i' spanning height of canvas
    line(i, 0, i, height);
  }
}

This part of the code is responsible for creating a visually appealing rainbow gradient background across the canvas. The gradient smoothly transitions between two colors horizontally, providing a vibrant backdrop for the interactive squares. First, ‘for (let i = 0; i <width; i++)’ is a loop that runs once for every pixel along the canvas’s width. ‘i’ represents the current x-coordinate. It starts at 0 and increases by 1 until it reaches the canvas’s width, ensuring that the gradient effect spans the entire horizontal width of the canvas. Then, ‘let inter = map(i, 0, width, 0, 1)’ re-maps the x-coordinate (i) from the range of 0 to width (the canvas’s width) to a new range of 0 to 1. Finally, let c = lerpColor(color(255, 0, 0), color(0, 0, 255), inter) blends two colors together. Here, it’s used to create a transition between red and blue.

Assignment 1 (Production 1) – Smiley Face

MOUSE CLICK! MOVE THE MOUSE AROUND!

I had so much fun creating this piece and I was inspired by the “smiley face” or the concept of “emojis” for this production. What makes this a self portrait is that it has a little of touches that I added to it like the cap, the hair and the lipstick that makes it seem more like myself. I made the portrait interactive by having the skin tone change into different colors just like the emojis with different skin tones. I also made it a bit more fun by adding little circles that appear when the mouse is clicked. This was a bit challenging to me because, even with my coding experience, using P5 was not something that I usually do since I only have beginner experience with processing.

Creating a class and new functions to make the production more interactive was the most challenging part. This function:

function mousePressed() {
  let r = random(30, 70); // Make bubbles bigger
  let newColor = color(random(255), random(255), random(255)); // Generate a random color
  let b = new Circle(mouseX, mouseY, r, newColor); // Pass the random color to the Circle
  bubbles.push(b);
}
class Circle {
 // Constructor is called when a new Circle object is created
  constructor(x, y, r, color) {
    this.x = x; // x position of the bubble
    this.y = y; // y position of the bubble
    this.r = r; // radius of the bubble 
    this.color = color;
  }

 // Method to add a random motion to the bubble's current position
  move() {
    this.x = this.x + random(-2, 2); // Randomly move the x position
    this.y = this.y + random(-2, 2); // Randomly move the y position
  }

 // Method to display the bubble on the canvas
  show() {
    stroke(255); // Set the color of the bubble's stroke (outline)
    fill(this.color); // Set the fill color of the bubble
    ellipse(this.x, this.y, this.r * 2); // Draw the bubble as an ellipse at (x, y) with diameter of r*2
  }
}

Was created for the mouse pressed function that generates randomly colored bubbles (circles) all around the screen. The Circle class was created  to easily manage and organize the properties and behaviors of the bubbles that appear when the mouse is pressed. By using a class, we can create many Circle objects (bubbles), each with its own position, size, and color, and easily call their move and show methods to update and display them on the canvas. It’s a neat way to encapsulate (wrap up) properties and behaviors related to the bubbles.

I think this was a really interesting way to start with P5 and adapt to it.