Final Project – Meditative Moth

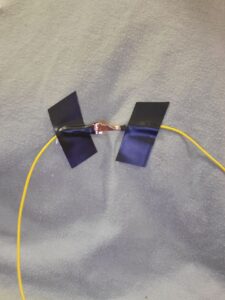
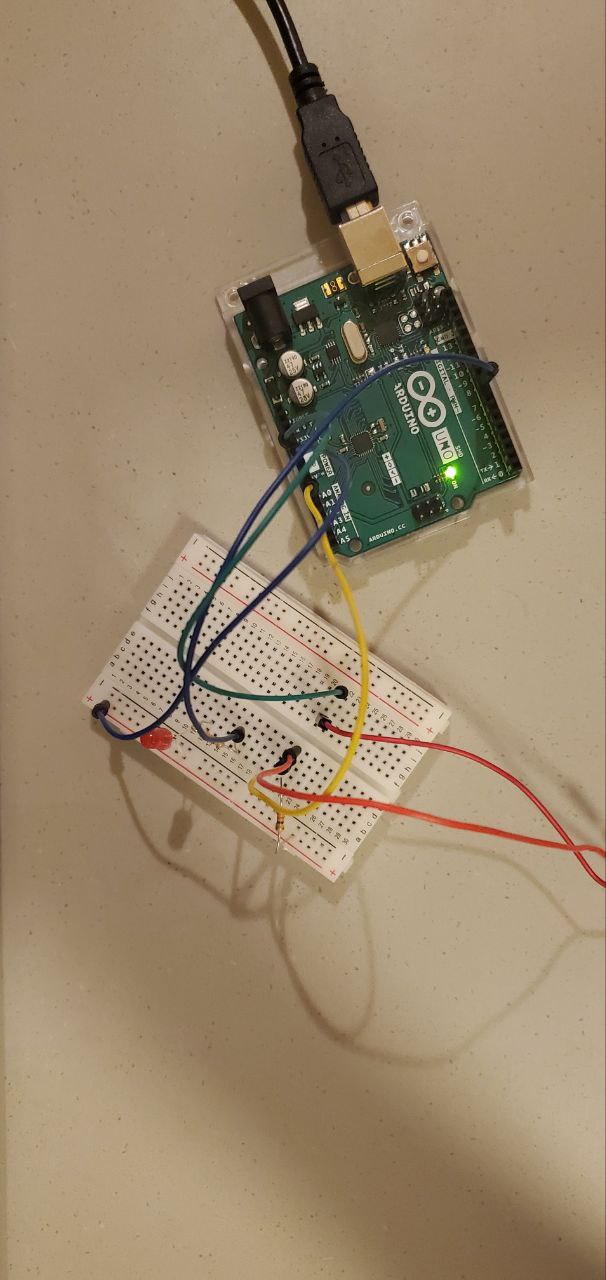
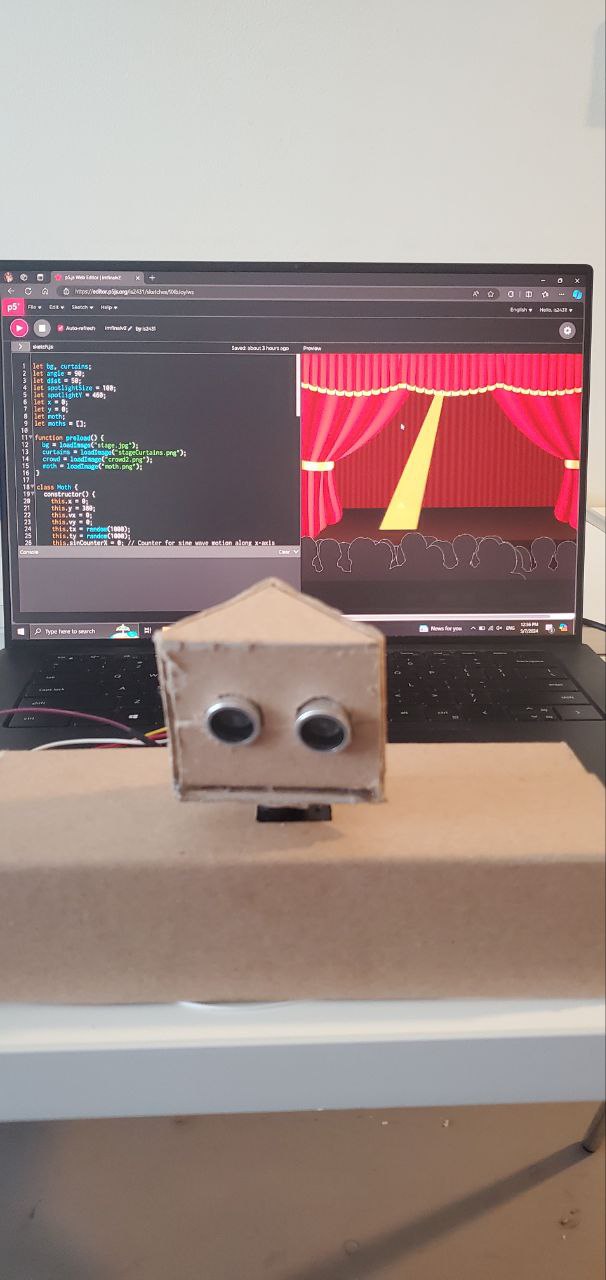
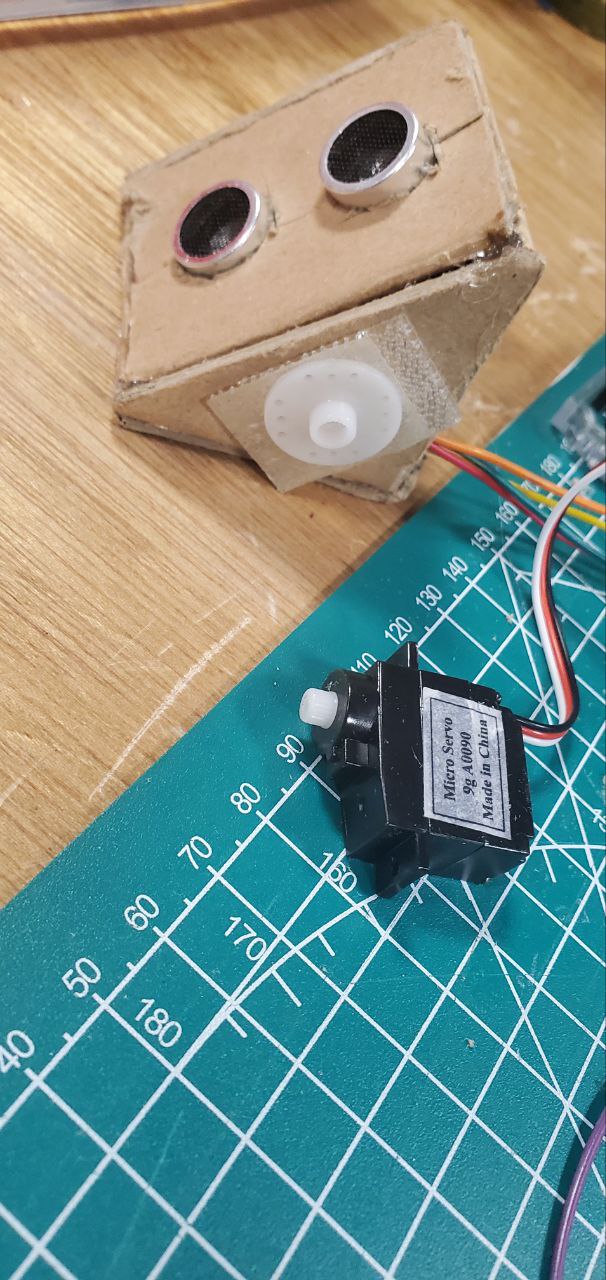
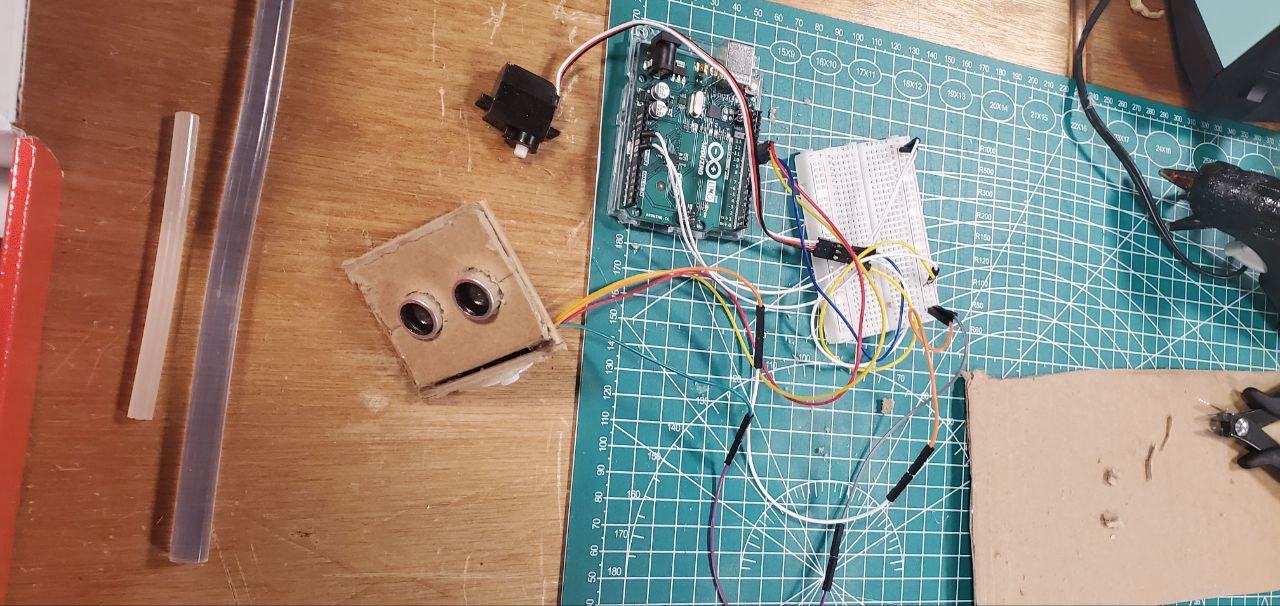
At its core, the Meditative Moth consists of a physical setup with an ultrasonic sensor, mounted on a servo motor, which detects objects within its range. This data is then transmitted to a p5.js sketch running on a laptop, where a virtual moth mirrors the movements of the physical sensor on screen. Adding another layer to the experience, a stage light follows the virtual moth’s path, creating an immersive and dynamic visual display.

The interaction is simple yet profound. As the sensor detects objects, the virtual moth flutters and dances across the screen, its movements guided by the presence and position of the objects. This interplay between the physical and digital, the real and the virtual, encourages us to reflect on our own attention and how we engage with the world around us.

The question of control in the Meditative Moth project adds a layer of intrigue to its artistic interpretation. Whether your movements directly guide the moth’s flight, with the spotlight following in its wake, or you command the spotlight, drawing the moth towards its illumination, the experience delves into the complexities of attention. The first scenario emphasizes conscious direction, where you actively choose your focus, while the second highlights the subconscious forces that influence our attention, drawing us towards certain stimuli. Ultimately, the ambiguity of control invites contemplation on the intricate interplay between conscious choice and subconscious influence, prompting us to explore the depths of our own attention and its ever-shifting nature.

Arduino and p5 files:

Arduino code:

#include <Servo.h>

// Define servo and sensor pins
const int servoPin = 9;
const int trigPin = 10;
const int echoPin = 11;

// Define variables for servo movement and distance
int distance;
int targetAngle = 90;  // Initial servo position
int sweepDirection = 1; // Sweep direction: 1 for right, -1 for left
int sweepAngle = 30;    // Angle to sweep from the target angle
int minDist = 50;

Servo myServo;

void setup() {
  myServo.attach(servoPin);
  pinMode(trigPin, OUTPUT);
  pinMode(echoPin, INPUT);
  Serial.begin(9600);
}

void loop() {
  // Scan for objects by sweeping the servo
  scanForObjects();

  // Track the object if found
  if (distance < minDist) {
    trackObjects();
  } 
  delay(50);
}

void scanForObjects() {
  //Serial.println("scanning");
  for (int angle = 20; angle <= 120; angle += 2) {
    myServo.write(angle);
    delay(50);
    distance = getDistance();
    Serial.print(angle);
    Serial.print(',');
    Serial.println(distance);
    if (distance < minDist) {
      //Serial.println("target found");
      targetAngle = angle;
      return;
    }
  }
}


void trackObjects() {
  while (distance < minDist) {
    distance = getDistance();
    //Serial.println("tracking");
    myServo.write(targetAngle);
  }
  sweepForObjects();
}

void sweepForObjects() {
  //Serial.println("sweeping");
  int currentAngle = targetAngle;
  for (int i = 0; i < 2; i++) { // Sweep left and right
    for (int angle = currentAngle; angle >= 20 && angle <= 120; angle += sweepDirection) {
      myServo.write(angle);
      delay(50);
      distance = getDistance();
      Serial.print(angle);
      Serial.print(',');
      Serial.println(distance);
      if (distance < minDist) {
        //Serial.println("target found while sweeping");
        targetAngle = angle;
        trackObjects(); // Return to tracking
        return;
      }
    }
    // Change sweep direction
    sweepDirection *= -1;
  }
  // If the object is not found during sweeping, return to scanning
  scanForObjects();
}

int getDistance() {
  long duration;
  int distanceCm;

  digitalWrite(trigPin, LOW);
  delayMicroseconds(2);
  digitalWrite(trigPin, HIGH);
  delayMicroseconds(10);
  digitalWrite(trigPin, LOW);

  duration = pulseIn(echoPin, HIGH);
  distanceCm = duration / 29 / 2;

  return distanceCm;
}

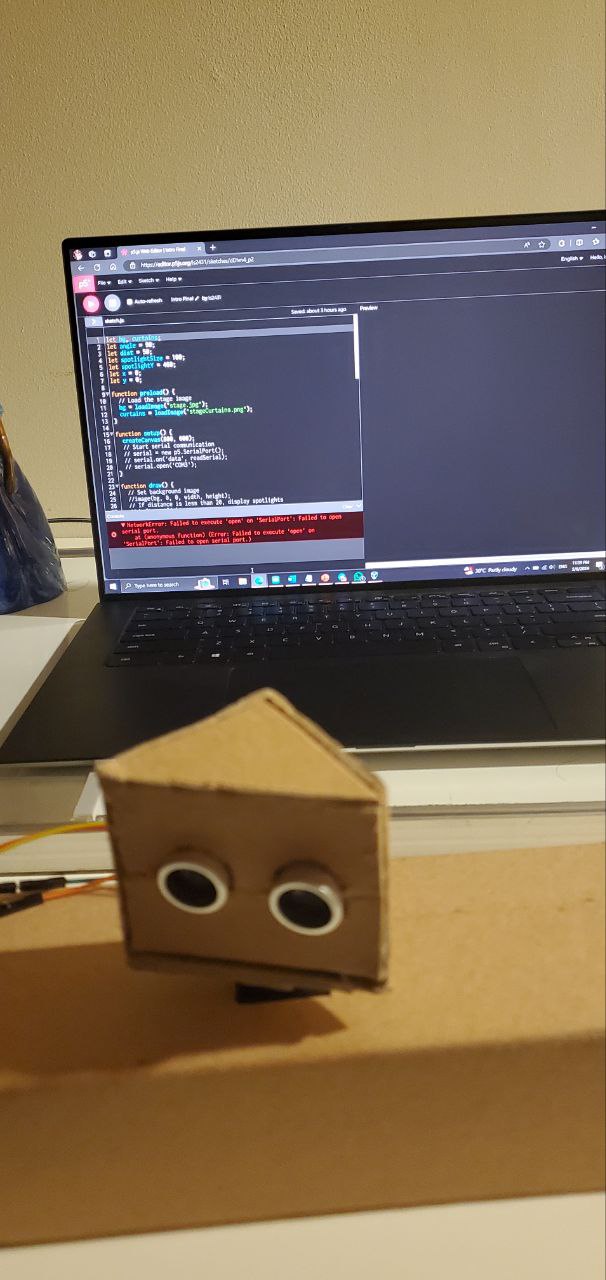
p5 Project (the project will not display anything without an Arduino):

p5 Project (non-interactive version, no Arduino needed):


Implementation:

Here’s a breakdown of the different components:

  • Physical Setup: The ultrasonic sensor and servo motor act as the eyes of the project, constantly scanning for objects and relaying their positions.
  • Arduino Code: The Arduino acts as the brain, controlling the servo motor and sending angle and distance data to the p5.js sketch via serial communication.
  • p5.js Sketch: The sketch receives the data and translates it into the movements of the virtual moth and spotlight on the screen. The moth’s flight path, as well as the spotlight’s location, directly corresponds to the detected object’s position.
Everything put together
Connection between sensor and motor, using Velcro pads
Project taken apart
All the internal wiring before the project was put together
An error message after my laptop updated

User interactions

Reflections and Future Directions:

One of the project’s highlights is the successful implementation of the tracking algorithm within the Arduino code. Although it may not be as good as I initially wanted it, this is more of a hardware issue than a code issue. This intricate dance between the physical and virtual environments forms the foundation of the entire experience. Additionally, the integration of physical and virtual elements creates a truly captivating and thought-provoking experience for the audience.

At the end of the project, right before the deadline, I ran into a pretty severe error after my laptop updated which prevented me from connecting my Arduino to p5. I tried many ways to debug, and eventually even tried getting a new laptop from the library. None of that worked, however when I plugged the Arduino into the new laptop, something in it updated, and the next time I plugged it into my laptop, the project started working again.

Looking ahead, there are many possibilities to enhance the Meditative Moth:

  • Enhanced Visuals: Refining the visual representation of the moth and the stage light effects could create an even more mesmerizing and aesthetically pleasing experience.
  • Auditory Expansion: Introducing music and crowd cheering, could deepen the audience’s engagement and further enrich the meditative aspects of the project.
  • Movement Exploration: Experimenting with different movement patterns and behaviors for the virtual moth could evoke a wider range of emotional responses and add another layer of depth to the project.
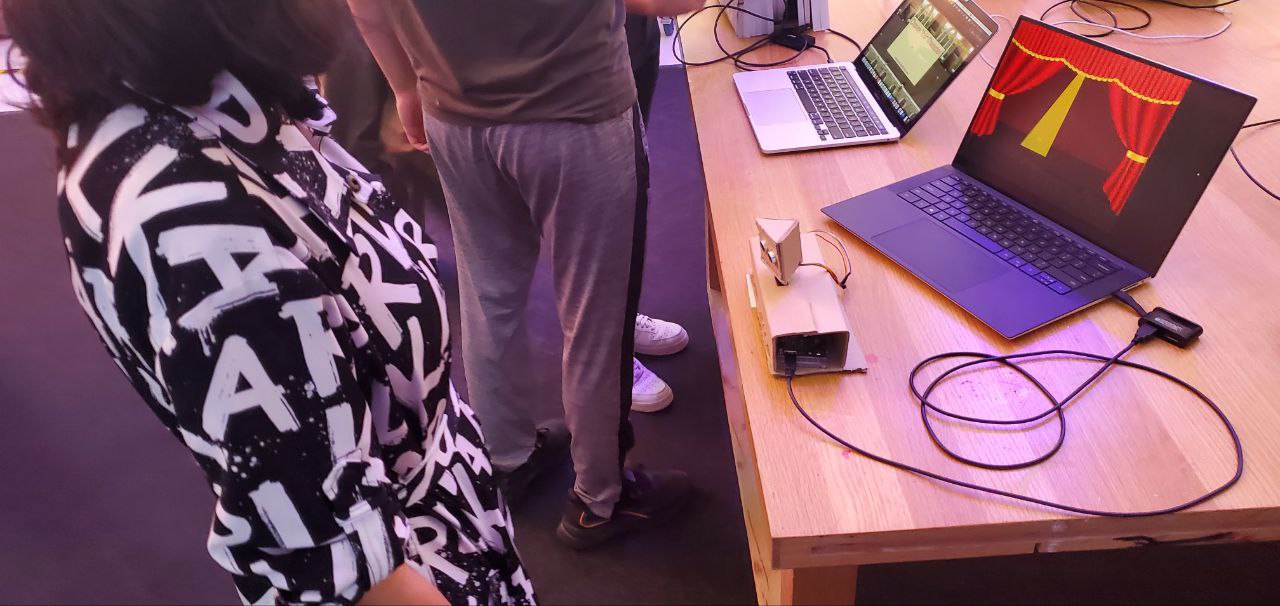
IM Fest

The moth did not see much time on-stage during the IM Festival. There are a multitude of reasons why. For one, it was not a game, thus it would struggle to retain people’s attention. In a hall full of fun games, a small art project would hardly catch anyone’s attention, especially since it is not immediately apparent what the message of the project is.

Additionally, people struggled with the intuitiveness of the controls. It was not entirely clear from the project that the was an optimal distance for the sensor to track the viewer.  Many people, I noticed, would try to activate the sensor by putting their hands in front of it, this never worked. I think I should have put some tape on the floor to indicate the optimal range to interact with the moth.

My monitor would often turn off during the festival, obviously obscuring the moth. I tried running a YouTube video in the background, however this failed to keep the monitor active.

I would occasionally see the sensor activate when people would pass it. This would grab their attention, but not enough for them to care for the whole project. Additionally, I would see the sensor sometimes tracking people who were interacting with the adjacent projects. This at least told me that the sensor and servo were doing exactly what I wanted them to do. Unfortunately, not many people were paying attention to see it.

Week 12 – Final Update

My final concept remains the same, although I would like to make it something a bit more. I am considering making it into an allegory for attention by having the sensor control a tracking flashlight. I have yet to figure out how I can attach and control a flashlight in an elegant manner, but that will come with time. Additionally, I have some music playing to enhance the contemplative nature of the piece.

I have begun playing around with methods of attaching the sensor to a servo. Likely, I will attach it to a wheel that was provided with the kit and disguise the wheel with some paper.

I have yet to figure out what exactly I should use the p5 portion for except for music. Initially I wanted a radar-like display but that is no longer suitable for what I want to make. Maybe if I don’t figure out the flashlight problem, I can just have a flashlight or stage graphic on the screen that changes on whether the sensor detects someone or not.

Week 12 – Reading Response

This week’s reading about design and disability has been eye-opening, prompting a shift in how I perceive both accessibility and aesthetics. It’s clear that the potential of design in creating assistive devices has been vastly underestimated. The notion that functionality must come at the expense of beauty is challenged, as exemplified by everyday items like glasses – seamlessly merging utility and style.

This realization aligns with the idea that good design goes beyond mere usability; it enhances user experience and self-perception. It’s not about creating universally bland solutions, but rather celebrating diversity through targeted designs that cater to individual needs and preferences. Involving artists and fashion designers in this process can inject a sense of identity and personal expression into assistive devices, transforming them from purely functional tools into extensions of oneself.

The shift in language, from “patients” to “wearers” and “hearing aids” to “HearWear,” further emphasizes this transformation. It moves away from medicalized labels and towards empowerment and individuality.

The idea of universal design resonated deeply as well. Creating things everyone can use and enjoy, like the curb cut example, demonstrates how good design benefits a wider range of people than initially intended. It’s not just about accessibility; it’s about smart and inclusive solutions. It’s always important to consider how to get more designers on board with inclusive design and ensure accessibility isn’t an afterthought. This involves asking crucial questions: How can we create a world where everyone feels welcome and valued? How do we ensure diverse needs and aspirations are met, not just accommodated? By merging functionality with individuality and embracing inclusive design principles, we can create a more accessible and empowering world for everyone.

Week 11 – Response

The author raises valid concerns regarding the current trajectory of interface design, particularly the over-reliance on “Pictures Under Glass” – flat, touch-based interfaces that neglect the incredible capabilities of human hands. I wholeheartedly agree that this approach is limiting and fails to tap into the full potential of human-computer interaction.

The article beautifully highlights the richness of tactile experience and the intricate ways our hands manipulate and interact with the world. Reducing interaction to mere sliding gestures on a flat surface ignores this wealth of human capability and expression.

Instead of simply extrapolating current trends, the author urges us to envision a future where interfaces are dynamic, engaging our senses of touch and manipulation in ways that are intuitive and expressive. This vision resonates deeply and calls for a shift in focus towards technologies that leverage the full potential of human hands.

The article rightly emphasizes the limitations of purely visual interfaces. Haptic feedback technology, which recreates the sense of touch, holds immense potential in enriching user experience. Imagine feeling the texture of fabrics while online shopping, or experiencing the resistance of virtual objects in a design program.

The article challenges the dominance of flat screens and encourages exploration of 3D interfaces. Technologies like volumetric displays and mid-air haptics could enable us to interact with digital content in a more natural and intuitive manner, mimicking real-world manipulation of objects.

When I ply videogames, I prefer playing with a controller, versus a mouse and keyboard. This is for many reasons, but I specifically enjoy the haptic feedback I get when I play. It adds and extra dimension and an extra sense for me when I play a game which is lost on a mouse and keyboard. I also appreciate the haptics on a Nintendo Switch, their quality. I like how they are integral to many games, which just makes them more fun.

While the current state of research in these areas might be nascent, the author’s call for ambitious, long-term vision is crucial. We need researchers, designers, and engineers to be inspired by the possibilities beyond “Pictures Under Glass” and work towards interfaces that truly empower and enhance human capabilities.

Week 11 – Final Project Proposal

Concept:

This project involves building a radar system using an Arduino, an ultrasonic sensor, and a joystick or buttons for control. The sensor data will be sent to p5.js, which will visualize the readings on a radar-like display, allowing you to detect objects in the surrounding environment.

Components:

  • Arduino: Controls the ultrasonic sensor and reads input from the joystick/ buttons.
  • Ultrasonic Sensor: Emits ultrasonic pulses and measures the time it takes for the echo to return, determining the distance to objects.
  • Joystick/Buttons: Provides input for controlling the servo motor that rotates the ultrasonic sensor.
  • Servo Motor: Rotates the ultrasonic sensor to scan the environment.
  • Computer with p5.js: Receives data from the Arduino and generates the radar visualization.

Implementation:

  1. Hardware Setup:
    • Connect the ultrasonic sensor to the Arduino.
    • Connect the servo motor to the Arduino.
    • Connect the joystick/buttons to the Arduino.
  2. Arduino Code:
    • Initialize the sensor, servo, and joystick/buttons.
    • In the loop function:
      • Read the joystick/button values to determine the desired rotation angle for the servo.
      • Rotate the servo to the specified angle.
      • Trigger the ultrasonic sensor and measure the distance to the nearest object.
      • Send the distance and angle data to the computer via serial communication.
      • Ensure wires connecting the sensor cannot get tangled.
  3. p5.js Sketch:
    • Establish serial communication with the Arduino.
    • Receive distance and angle data from the Arduino.
    • Create a radar-like display:
      • Draw a circular background representing the scanning area.
      • Convert the distance and angle data to Cartesian coordinates (x, y) on the display.
      • Draw points or shapes at the calculated coordinates to represent the detected objects.
      • Implement features like:
        • Different colors or sizes for objects based on distance.
        • Trail effect to visualize the movement of objects.
        • Numerical distance display.

Possible Additional Features:

  • Multiple Sensors: Use multiple ultrasonic sensors for wider coverage.
  • Sound Effects: Play beeps or tones that vary in pitch or frequency based on the distance to objects.
  • Object Tracking: Implement an algorithm to track the movement of objects over time.

Challenges and Considerations:

  • Sensor Accuracy and Noise: Ultrasonic sensors can be affected by environmental factors and may require calibration.
  • Visualization Design: Create a clear and intuitive radar display that effectively represents the sensor data.

Week 11 – Theremin-like instrument

This project provided valuable insights into the potential of technology in musical expression and exploration. Despite its seemingly simple design, utilizing two push buttons for sound generation and an ultrasound sensor for frequency modulation, the project unveiled a range of creative possibilities and highlighted areas for further development.

The incorporation of the ultrasound sensor was particularly intriguing. By translating physical distance into audible frequencies, the sensor effectively transformed space into a controllable musical parameter. This interaction proved to be a captivating demonstration of how technology can facilitate new forms of musical interaction and expression. The concept invites further exploration, prompting questions about the potential for incorporating additional sensors to create a multi-dimensional instrument responsive to a wider range of environmental stimuli.

// Check if distance is within range for playing sound
if (distance < 200 && distance > 2) {
// Map distance to frequency
int frequency = map(distance, 2, 200, 200, 2000);
tone(buzzerPin, frequency); // Play sound at calculated frequency
} else {
noTone(buzzerPin); // Stop sound if distance is out of range
}


While the project successfully demonstrated the feasibility of generating sound through Arduino, the limitations of pre-programmed sounds became evident. The lack of nuance and complexity inherent in such sounds presents a challenge for creating truly expressive and dynamic musical experiences. This observation underscores the need for further exploration into sound generation techniques, potentially involving machine learning or other advanced algorithms, to expand the sonic palette and introduce more organic and evolving soundscapes.

Week 10 – To artists who are not sure


I although I find that the subject of “Making Interactive Art: Set the Stage, Then Shut Up and Listen” is well meaning, it think that to an extent, it misses the reason why some artists interpret their own interactive works.

Coming from a mainly computer science background, its hard for me to see my programs being misused in a way that I did not intend. To me, this feels like failure, which in a way it is, as I have failed to design a program which accurately and correctly executes what it is supposed to. This is why I emphasize with artist who offer interpretation notes beside their work, as they too are hoping that it will be used or viewed in the “right” way, the way that they intended, as a way to prevent their “failure”.

However, the big difference here is that what they are doing is art, and not computer science. In computer science, the focus is often on precision, functionality, and predictability. A program that doesn’t work as intended is considered flawed and needs debugging or refinement.

Art, on the other hand, often thrives on ambiguity, interpretation, and the emotional response it elicits from its audience. Interactive art, especially, invites the audience to engage with it, to become part of the artwork’s evolution and meaning. This inherently means that the artist relinquishes some control over the final outcome.

When an artist provides interpretation notes or guidelines alongside their interactive art, it can be seen as a way to guide the audience’s experience or to share their perspective. However, it’s essential to remember that art is subjective. Each viewer brings their own background, experiences, and emotions to their interpretation of the artwork. This diversity of interpretation can enrich the artwork’s meaning and create a more profound connection between the viewer and the art.

Rather than viewing unintended interactions or interpretations as failures, artists can see them as opportunities for growth, learning, and further exploration of their art’s potential. It can lead to unexpected outcomes that even the artist hadn’t considered, expanding the artwork’s scope and impact.

Week 10 – Double Light Switch

For this assignment, I wanted to make something a bit funny. Thus, I decided to make a light switch powered by light. My idea was simple, point an LED at an LDR, record its readings, and light up another LED at the brightness the LDR recorded.

Unfortunately, after building by circuit, I ran into an issue with the Arduino, where it would not read anything from the IN pins and would not allow me to print anything to the terminal either.

Not to be discouraged, I decided to build the entire circuit in analog.

Had I been able to use the analog IN pins, my code would have looked like this.

// Define the LDR pin
const int ldrPin = A0;
// Define the digital LED pin
const int digitalLedPin = 13;

// Variable to store the LDR value
int ldrValue = 0;

void setup() {
  Serial.begin(9600);
  pinMode(digitalLedPin, OUTPUT);
}

void loop() {
  // Read the analog value from LDR
  ldrValue = analogRead(ldrPin);
  
  // Print the LDR value to Serial Monitor
  Serial.print("LDR Value: ");
  Serial.println(ldrValue);

  // Set the brightness of the digital LED based on the LDR value
  analogWrite(digitalLedPin, map(ldrValue, 0, 1023, 0, 255));

  // Add a delay to avoid flooding the Serial Monitor with data
  delay(500);
}

Additionally, I noticed that the who design does not work very in lit environments, so I wanted to add a function which would calculate the average light in a room, and set the output LED to 0, so that a change in lighting from the other LED would be more noticeable. This, however, is impossible to do with my understanding of analog circuits.

Week 9 – Breathing Switch

For this week’s exercise, I decided to make a switch that will detect breathing.

The rudimentary mechanism that functions as a switch is two pieces of tin foil which are separated by a small gap. When a person breathes in, their chest expands, and the pieces of foil are separated. They connect when a person exhales.

The materials needed for this project are:

  • Breadboard
  • Arduino board
  • Tape
  • Jumper wires
  • Tin foil
  • 330-ohm resistor
  • 10K-ohm resistor
  • 1 LED light

Wires with tinfoil are stung around a person’s chest to connect around the chest. There is no danger to the subject as the voltage of the circuit is really low and cannot pass through a body.

/

When the circuit is closed, the Arduino detects the closure and sends a signal to an LED to light up.

The switch/sensor

The circuit:

Similar devices already exist in the medical field, and as a part of a lie detector machine.

While creating this project, it was really fun to think of the many potential real world applications that machines such as this, basically simple switches, have.

I ran into some problems with the sensor when I made this. It was really hard to make the sensor align with itself, and the shirt to which it was attached was flimsy and moved around, causing the sensor to go off at times it should not have. Ideally, the entire contraption would be accompanied by an elastic band which would go around the chest of a person to keep the sensors secure and aligned, or the sensor would be attached directly to the skin, via tape.

Midterm – Asteroids

Concept and Inspiration

The inspiration behind this code is to create a classic arcade-style game similar to Atari’s Asteroids, where players control a spaceship navigating through space, avoiding asteroids, and shooting them down to earn points. The game incorporates simple controls and mechanics to provide an engaging and challenging experience for players.

Full screen link: https://editor.p5js.org/is2431/full/MvWdoI5tz

How It Works

  • The game uses the p5.js library for rendering graphics and handling user input.
  • It defines classes for the spaceship, asteroids, and bullets, each with their own properties and behaviors.
  • The game initializes with a start screen where players can see the controls and start the game by pressing the Enter key.
  • During gameplay, players control the spaceship using the arrow keys to move and the spacebar to shoot bullets.
  • Asteroids move randomly across the screen, and the player’s objective is to shoot them down while avoiding collisions.
  • When all asteroids are destroyed, the player advances to the next level, where more asteroids are spawned.
  • The game ends when the player runs out of lives, and their score and highscore are displayed along with the option to restart.

Highlights of Code I Am Proud Of

One highlight of the code is the generation of asteroid shapes. The Asteroid class utilizes a combination of randomization and mathematical calculations to create visually appealing and diverse asteroid shapes. By varying the number of vertices, radius, and offsets, the code generates asteroids that have unique patterns, enhancing the overall visual aesthetics of the game.

// Asteroid class
class Asteroid {
  constructor(pos, r) {
    if (pos) {
      this.pos = pos.copy();
    } else {
      this.pos = createVector(random(width), random(height));
    }
    this.vel = p5.Vector.random2D();
    this.r = r || random(15, 50);
    this.total = floor(random(10, 20));
    this.offset = [];
    for (let i = 0; i < this.total; i++) {
      this.offset[i] = random(0, 15);
    }
  }

  update() {
    this.pos.add(this.vel);
  }

  edges() {
    if (this.pos.x > width + this.r) {
      this.pos.x = -this.r;
    } else if (this.pos.x < -this.r) {
      this.pos.x = width + this.r;
    }
    if (this.pos.y > height + this.r) {
      this.pos.y = -this.r;
    } else if (this.pos.y < -this.r) {
      this.pos.y = height + this.r;
    }
  }

  display() {
    push();
    translate(this.pos.x, this.pos.y);
    noFill();
    stroke(255);
    beginShape();
    for (let i = 0; i < this.total; i++) {
      let angle = map(i, 0, this.total, 0, TWO_PI);
      let r = this.r + this.offset[i];
      let x = r * cos(angle);
      let y = r * sin(angle);
      vertex(x, y);
    }
    endShape(CLOSE);
    pop();
  }

  breakup() {
    let newAsteroids = [];
    newAsteroids.push(new Asteroid(this.pos, this.r / 2));
    newAsteroids.push(new Asteroid(this.pos, this.r / 2));
    return newAsteroids;
  }
}


Challenges with the Project

  1. Collision Detection: Implementing accurate collision detection between the spaceship, bullets, and asteroids while ensuring smooth gameplay was a challenge, requiring careful consideration of position, size, and velocity.
  2. Game State Management: Managing different game states such as start, play, level complete, and game over required careful handling of state transitions and user input to ensure a seamless gaming experience.
  3. UI and Feedback: Designing clear and intuitive user interfaces, including start screens, game over screens, and score displays, posed challenges in terms of layout, readability, and responsiveness.


Future Improvements

There are many improvements I can make to the project. For example, the original Atari game had aliens which would shoot at the spaceship. There are other game mechanics I could have added like powerups.