Final Project – Hear The World

Concept

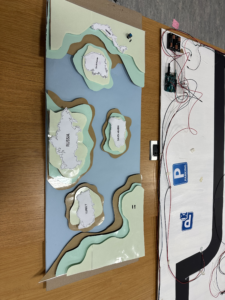
My original idea was to create an interactive world map where users could click on regions to listen to the music typical of that area, introducing them to different cultures. However, I later shifted gears to develop a project where users could hear languages spoken in those regions instead. I found this idea exciting because it provides an opportunity to become familiar with various dialects and accents. At one point, I questioned if I was just creating a translator, something readily available through apps like Google. But then I realized the simplicity of my concept: a straightforward map highlighting regions with less commonly known languages. When users click on these areas, they hear their own words spoken back to them in the local language. I want to acknowledge that my inspiration came from the installations at Lulu Island, Manarat Abu Dhabi.

How does the implementation work?

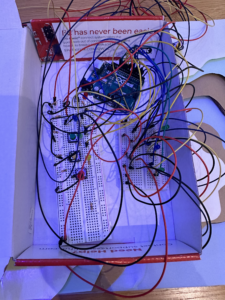
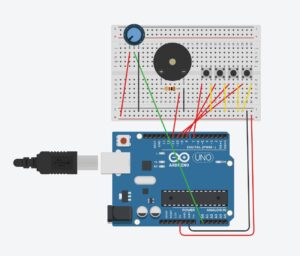
I used switches connected to the Arduino for input handling. Each switch corresponds to a country. When a user presses a switch, the Arduino records which country was selected. I also integrate a microphone to capture the user’s spoken words. The Arduino was set up to process this input when the user spoke. For the Visual Interface I used p5.js which was handling the graphical part of my project, it provided visual feedback when a country was selected and showed the status of voice input and translation. After capturing the audio input from the Arduino, use p5.js to handle the audio data, possibly sending it to a server for speech recognition and translation. The translated text can then be converted back into audio. An important implementation was the Interaction Between Arduino and p5.js their Communication using serial communication to pass the selected country and the captured audio from the Arduino to the p5.js application. I also had to Implement a speech recognition module to transcribe the spoken words into text. For that, I used translation API to translate the text into the selected language. In the end, ensured the implementation for Speech-to-text – TRANSLATION – text-to-Speech was working properly and in the right order.

Description of interaction design

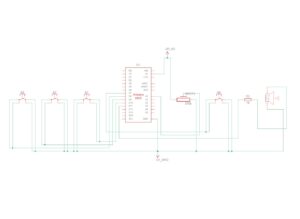
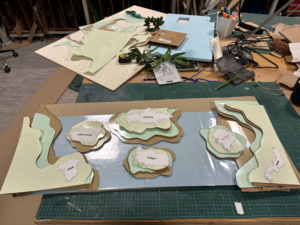
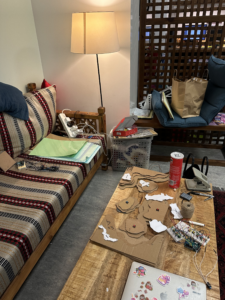
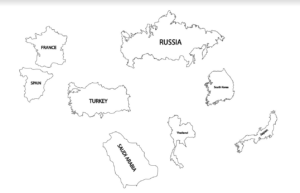
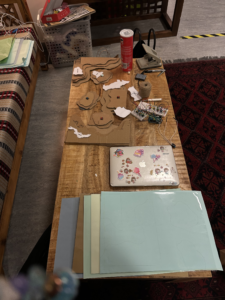
Initially, the design was supposed to be a layered map of the world [the laser cut design] but with the restraint of only being able to use it and the fact that I can only use 6 digital Arduino pins, I have to come up with 6 countries and then mapped out on the world, also than placed them in their respective location, so each. Because of not being able to utilize the laser machines, I had a plan to DYI my map, for I used the available contrasting color papers and then laminated them to get the surface but strong and then Layered them on top of each other {with the wholes so that wiring of the switches was easier).

Description of Arduino code + code snippets

This Arduino script is designed to handle inputs from six different switches, each corresponding to a unique country, and controls an LED and serial communication for each switch. When a switch is pressed, the associated LED turns on and a specific number is sent via serial to a connected p5.js application, indicating the country selected. Each button press triggers a brief activation of the LED and a serial print, followed by a deactivation of the LED after a short delay, ensuring clear feedback for each interaction. The code also debounces the switches to prevent multiple activations from a single press.

#include <Arduino.h>

const int switchPin1 = 2; //turkish
const int switchPin2 = 3; //korean
const int switchPin3 = 4; //arabic
const int switchPin4 = 5; //spanish
const int switchPin5 = 6; //Russian
const int switchPin6 = 7; //Japanease

const int ledPin1 = 8; //turkish
const int ledPin2 = 9; //korean
const int ledPin3 = 10; //arabic
const int ledPin4 = 11; //spanish
const int ledPin5 = 12; //Russian
const int ledPin6 = 13; //Japanease

// Variables to store the last state of each button
bool lastState1 = HIGH; //turkish
bool lastState2 = HIGH; //korean
bool lastState3 = HIGH; //arabic
bool lastState4 = HIGH;
bool lastState5 = HIGH;
bool lastState6 = HIGH;

void setup() {
  pinMode(ledPin1, OUTPUT); //turkish
  pinMode(ledPin2, OUTPUT); //korean
  pinMode(ledPin3, OUTPUT); //arabic
  pinMode(ledPin4, OUTPUT);
  pinMode(ledPin5, OUTPUT);
  pinMode(ledPin6, OUTPUT);

  pinMode(switchPin1, INPUT_PULLUP); //turkish
  pinMode(switchPin2, INPUT_PULLUP); //korean
  pinMode(switchPin3, INPUT_PULLUP); //arabic
  pinMode(switchPin4, INPUT_PULLUP);
  pinMode(switchPin5, INPUT_PULLUP);
  pinMode(switchPin6, INPUT_PULLUP);

  Serial.begin(9600);
}

void loop() {
  bool currentState1 = digitalRead(switchPin1); //turkish
  bool currentState2 = digitalRead(switchPin2); //korean
  bool currentState3 = digitalRead(switchPin3); //arabic
  bool currentState4 = digitalRead(switchPin4);
  bool currentState5 = digitalRead(switchPin5);
  bool currentState6 = digitalRead(switchPin6);

  // Check if button 2 was pressed (state change from HIGH to LOW)
  if (lastState1 == HIGH && currentState1 == LOW) { //turkish
    digitalWrite(ledPin1, HIGH); // Turn on LED
    Serial.println("1"); // Send "2" to p5.js
    delay(3000); // Short debounce delay
    digitalWrite(ledPin1, LOW); // Turn off LED
  }

  // Check if button 2 was pressed (state change from HIGH to LOW)
  if (lastState2 == HIGH && currentState2 == LOW) { //korean
    digitalWrite(ledPin2, HIGH); // Turn on LED
    Serial.println("2"); // Send "2" to p5.js
    delay(3000); // Short debounce delay
    digitalWrite(ledPin2, LOW); // Turn off LED
  }

  // Check if button 3 was pressed (state change from HIGH to LOW)
  if (lastState3 == HIGH && currentState3 == LOW) { //arabic
    digitalWrite(ledPin3, HIGH); // Turn on LED 
    Serial.println("3"); // Send "3" to p5.js
    delay(3000); // Short debounce delay
    digitalWrite(ledPin3, LOW); // Turn off LED
  }

  // Check if button 4 was pressed (state change from HIGH to LOW)
  if (lastState4 == HIGH && currentState4 == LOW) {
    digitalWrite(ledPin4, HIGH); // Turn on LED
    Serial.println("4"); // Send "4" to p5.js
    delay(10); // Short debounce delay
    digitalWrite(ledPin4, LOW); // Turn off LED
  }

  // Check if button 5 was pressed (state change from HIGH to LOW)
  if (lastState5 == HIGH && currentState5 == LOW) {
    digitalWrite(ledPin5, HIGH); // Turn on LED
    Serial.println("5"); // Send "5" to p5.js
    delay(3000); // Short debounce delay
    digitalWrite(ledPin5, LOW); // Turn off LED
  }

  // Check if button 6 was pressed (state change from HIGH to LOW)
  if (lastState6 == HIGH && currentState6 == LOW) {
    digitalWrite(ledPin6, HIGH); // Turn on LED
    Serial.println("6"); // Send "6" to p5.js
    delay(3000); // Short debounce delay
    digitalWrite(ledPin6, LOW); // Turn off LED
  }

  // Update last states
  lastState1 = currentState1;
  lastState2 = currentState2;
  lastState3 = currentState3;
  lastState4 = currentState4;
  lastState5 = currentState5;
  lastState6 = currentState6;

  delay(100); // Optional: Additional delay to reduce loop cycling speed
}

Description of p5.js code + code snippets + embedded sketch

This p5.js code manages a web-based interface that integrates with Arduino for a language translation project. It handles speech recognition and synthesis, and dynamically changes UI states to guide the user through different stages: from initial welcome, through instructions, to active speech input. The script uses serial communication to receive language selection from Arduino, updates the UI based on this input, and switches between different background images to reflect the current state. Users can initiate speech-to-text translation, which is then translated into the selected language and spoken back, providing an interactive system.

// Global variables for speech recognition and synthesis
let speechRec, speech, output, fromText, toText, langFrom, langTo, latestData;
let serial; // Serial communication object
let screenState = "welcome";
let languages = {};
let bg_img1, bg_img2, bg_img3, bg_img;
let prevData="0";

function preload(){
  bg_img1 = loadImage('assets/Screen1.png');
  bg_img2 = loadImage('assets/Screen2.png');
  bg_img3 = loadImage('assets/Screen3.png');
  bg_img4 = loadImage('assets/Screen1.png');
}
function setup() {
  // bg_img1.loadPixels();
  // bg_img2.loadPixels();
  // bg_img3.loadPixels();
  // bg_img4.loadPixels();
  // noCanvas();
  createCanvas(windowWidth, windowHeight);

  // DOM elements
  output = select("#speech");
  fromText = select("#from-text");
  toText = select("#to-text");
  langFrom = select("#lang-from");
  langTo = select("#lang-to");

  // Populate language dropdowns
  // populateLanguageOptions();

  // Initialize serial communication
  serial = new p5.SerialPort();

  // Event handlers for serial communication
  serial.on("connected", serverConnected);
  serial.on("open", portOpen);
  // serial.on("data", serialEvent);
  // serial.on("error", serialError);
  // serial.on("close", portClose);

  // select("#connect").mousePressed(connectSerial);

  // Open the serial port to your Arduino
  serial.open("/dev/cu.usbmodem1201"); // Adjust to match your Arduino's serial port
}

async function connectSerial() {
  // Prompt user to select any serial port.
  port = await navigator.serial.requestPort();
  // Wait for the serial port to open.
  await port.open({ baudRate: 9600 });

  let decoder = new TextDecoderStream();
  inputDone = port.readable.pipeTo(decoder.writable);
  inputStream = decoder.readable;

  reader = inputStream.getReader();
  readLoop();
  loop(); // Start the draw loop again
}

async function readLoop() {
  while (true) {
    const { value, done } = await reader.read();
    if (value) {
      console.log(`Received: ${value}`);
      latestData = value.trim();
    }
    if (done) {
      console.log("Closed the reader stream");
      reader.releaseLock();
      break;
    }
  }
}

function draw() {
  // Use the draw function to react to changes in data received from Arduino
  
  if (screenState === "welcome") {
    // background(220, 0, 0);
    image(bg_img1,0,0,windowWidth, windowHeight);
    
  }
  else if (screenState === "instruction") {
    // background(0, 0, 255);
    image(bg_img2,0,0,windowWidth, windowHeight);
  }
  else if (screenState === "speak") {
    // background(0, 255, 0);
    image(bg_img3,0,0,windowWidth, windowHeight);
    serialLanguageChange();
    text("Please Speak Whats on Your Mind", windowWidth/4, (windowHeight/4 - 50))
    text(fromText.value(), windowWidth/4, windowHeight/4)
    text(languages[langTo.value()], windowWidth/4, (windowHeight/4 + 50))
    text(toText.value(), windowWidth/4, (windowHeight/4 + 100))
  }
  else {
    // background(100);
    console.log('last_screen');
    image(bg_img4,0,0,windowWidth, windowHeight);
  }
  
  
}

// Populate language selection dropdowns
function populateLanguageOptions() {
  languages = {
    "en-GB": "English",
    "tr-TR": "Turkish",
    "ko-KR": "You were in Korea",
    "ar-SA": "Arabic",
    "ru-RU": "Russian",
    "ja-JP": "Japanese",
    "es-ES": "Spanish",
  };

  for (const [code, name] of Object.entries(languages)) {
    langFrom.option(name, code);
    langTo.option(name, code);
  }

  langFrom.selected("en-GB"); // Default language from
  langTo.selected("en-GB"); // Default language to
}

// Callback for received speech
function gotSpeech() {
  if (speechRec.resultValue) {
    let said = speechRec.resultString;
    // output.html("okay");
    fromText.value(said);
  }
}

// Serial data event handling
function serialEvent() {
  // console.log("In Serial Event");
  // let data = serial.readStringUntil("\r\n").trim(); // Read incoming data
  // console.log("Received from Arduino:", data); // Debugging log
  // if (latestData == "1" && prevData!="1") {
  //   console.log(data, "in");
  //   changeLanguage("tr-TR"); // Change to Korean
  //   prevData=1;
  // } else if (latestData == "2" && prevData!="2") {
  //   changeLanguage("ko-KR"); // Change to Turkish
  //   prevData=2;
  // } else if (latestData === "3" && prevData!="3") {
  //   changeLanguage("ar-SA"); // Change to Turkish
  //   prevData=3;
  // } else if (latestData === "4" && prevData!="4") {
  //   changeLanguage("ru-RU"); // Change to Turkish
  //   prevData=4;
  // } else if (latestData === "5" && prevData!="5") {
  //   changeLanguage("ja-JP"); // Change to Turkish
  //   prevData=5;
  // } else if (latestData === "6" && prevData!="6") {
  //   changeLanguage("uk-UA"); // Change to Turkish
  //   prevData=6;
  // }
}

// Change the translation language and translate text
function changeLanguage(langCode) {
  console.log("Changing language to:", langCode); // Debugging log
  console.log(prevData);
  langTo.selected(langCode); // Set translation language
  if (fromText.value().trim() !== "") {
    translateText(); // Translate the text if non-empty
  }
}

// Translate text using an external API
function translateText() {
  let text = fromText.value().trim();
  let translateFrom = langFrom.value();
  let translateTo = langTo.value();

  console.log("Translating from", translateFrom, "to", translateTo); // Debugging log

  let apiUrl = `https://api.mymemory.translated.net/get?q=${encodeURIComponent(
    text
  )}&langpair=${encodeURIComponent(translateFrom)}|${encodeURIComponent(
    translateTo
  )}`;

  fetch(apiUrl)
    .then((response) => response.json())
    .then((data) => {
      let translatedText = data.responseData.translatedText;
      toText.value(translatedText);
      console.log("Translation complete:", translatedText); // Debugging log
      speakText(translatedText, translateTo);
    })
    .catch((err) => console.error("Translation error:", err));
}

// Speak out the translated text
function speakText(text, lang) {
  speech.setLang(lang); // Set the speech language
  speech.speak(text); // Speak the text
}
// Serial event handlers
function serverConnected() {
  console.log("Connected to Serial Server");
}

function portOpen() {
  console.log("The serial port is open.");
}

function serialError(err) {
  console.log("Serial Error:", err);
}

function portClose() {
  console.log("The serial port is closed.");
}

function keyTyped() {
  if (screenState === "welcome") {
    if (key == "c") {
    connectSerial()
    }
    
    if (keyCode == ENTER) {
      screenState = "instruction";
      
    }
  }
  else if (screenState === "instruction") {
    if (keyCode == ENTER) {
      htmlElements();
      populateLanguageOptions();
      // Initialize speech recognition and synthesis
      speechRec = new p5.SpeechRec("en-US", gotSpeech);
      speech = new p5.Speech();
      speechRec.continuous = true;
      speechRec.interimResults = false;
      speechRec.start();
      serial.on("data", serialEvent);
      serial.on("error", serialError);
      serial.on("close", portClose);
      screenState = "speak";
    }
  }
  else if (screenState === "speak") {
    if (key === "r") {
      removeHtmlElements();
      resetAll();
      screenState = "welcome";
    }
  }
}

function htmlElements() {
  fromText = createInput('');
  fromText.position(-1000, -30);
  fromText.size(160);
  fromText.attribute('placeholder', 'Text to translate');
  fromText.id('from-text');  // Assign ID for consistency

  toText = createInput('');
  toText.position(-1000, -60);
  toText.size(160);
  toText.attribute('placeholder', 'Translated text will appear here');
  toText.attribute('disabled', true);
  toText.id('to-text');  // Assign ID for consistency

  langFrom = createSelect();
  langFrom.position(-1000, -90);
  langFrom.id('lang-from');  // Assign ID for consistency

  langTo = createSelect();
  langTo.position(-1000, -120);
  langTo.id('lang-to');
}


function removeHtmlElements() {
  if (fromText) {
    fromText.remove();
    fromText = null; // Clear the variable to prevent errors
  }
  if (toText) {
    toText.remove();
    toText = null; // Clear the variable to prevent errors
  }
  if (langFrom) {
    langFrom.remove();
    langFrom = null; // Clear the variable to prevent errors
  }
  if (langTo) {
    langTo.remove();
    langTo = null; // Clear the variable to prevent errors
  }
}

function serialLanguageChange(){
  if (latestData === "1" && prevData!="1") {
    changeLanguage("tr-TR"); // Change to Turkish
    prevData="1"
  } else if (latestData === "2" && prevData!="2") {
    changeLanguage("ko-KR"); // Change to Korean
    prevData="2"
  } else if (latestData === "3" && prevData!="3") {
    changeLanguage("ar-SA"); // Change to Arabic
    prevData="3"
  } else if (latestData === "4" && prevData!="4") {
    changeLanguage("ru-RU"); // Change to Thai
    prevData="4"
  } else if (latestData === "5" && prevData!="5") {
    changeLanguage("ja-JP"); // Change to German
    prevData="5"
  } else if (latestData === "6" && prevData!="6") {
    changeLanguage("es-ES"); // Change to Kazakh
    prevData="6"
   }
}


function resetAll() {
  // Remove HTML elements
  // removeHtmlElements();
  
  // Reset the speech recognizer and synthesizer
  // if (speechRec) {
  //   speechRec.stop(); // Stop the speech recognizer
  // }
  if (speech) {
    speech.cancel(); // Stop any ongoing speech synthesis
  }

  // Optionally reset any other state, e.g., clearing input fields or logs
  // if (output) {
  //   output.html(""); // Clear any displayed output
  // }

  // Reset the serial communication or any other interfaces
  if (serial) {
    serial.clear(); // Clear the data from the serial port
    serial.close(); // Close the serial port
  }

  // Reset global variables if necessary
  latestData = null;
  
  // if (speechRec) {
  //   speechRec.stop(); // Stop the speech recognizer if it's running
  // }

  // Reinitialize components if needed immediately
  // setupSpeech();
  // setupHtmlElements();  // Assume you have a function to setup HTML elements again if needed immediately
  // populateLanguageOptions();
}

Since it is a full-screen Sketch:

https://editor.p5js.org/ib2419/full/ChiVj1B9N

Links to resources used

https://mymemory.translated.net/doc/spec.php

https://github.com/cmooredev/LibreTranslate/blob/main/README.md

Challenges faced and how you tried to overcome them

There were 3 main phases in which I faced the challenges: Ideation (what should it be, a music system telling about the different regions or language translator) – Figuring out the Arduino ( I was planning that each time when the user presses on the country using the button there would be a LED with it too which will glow) – and finally integrating the API and ensuring its serial communication with Arduino, also the API was giving me the translation but then connecting that with the P5js speech library was another task that I had a really hard time figuring out. Also when I was making the text-to-speech activated after the translation, I had to make sure that the translated text was spoken in the particular region’s Language. Because It was giving me the error of speaking the translated text in an English accent, it was just like a foreigner trying to speak your native language, so I had to fix and I think this took the most time for my error to resolve time. Apart from that When I was integrating the images for different screens, when I added the last screen it gave me a hard time again, but yeah it was just about playing around with the code that then helped me fix the error.

What are some areas for future improvement?

The API I was using did not help me in translating lots of languages, only the main languages that were translated were the common ones, and also if I could get a good physical interface that would fit my Arduino init hiding all of the wiring and connections. Also, I can integrate more pins in the digital pins section to add more countries?

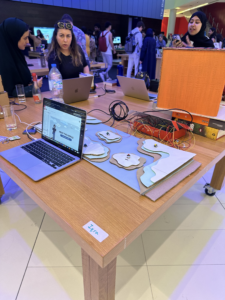
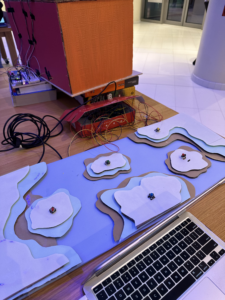
IM showCase documentation


Week 12 : Group Assignments [1,2, and 3]

Team Member : Iqra Bano and Vahagn Yeritsyan

Assignment 1:

For this assignment, it displays an ellipse whose horizontal position is controlled by a potentiometer connected to an Arduino board. When the space bar is pressed, it establishes a serial connection. The Arduino continuously reads the potentiometer value and sends it to the P5.js sketch via serial communication, allowing real-time adjustment of the ellipse’s position.

P5js code:

let ellipseHorizental;
function setup() {
  createCanvas(640, 480);
  textSize(18);
  ellipseHorizental = width/2; 
}
function draw() {
  background(220);
  // Draw ellipse with width based on potentiometer value
  fill("green");
  ellipse(ellipseHorizental, height / 2, 100, 150);
  if (!serialActive) {
    text("Press Space Bar to select Serial Port", 20, 30);
  } else {
    text("Connected", 20, 30);
    // Print the current potentiometer value
    text('Potentiometer Value = ' + str(ellipseHorizental), 20, 50);
  }
}
function keyPressed() {
  if (key == " ") {
    setUpSerial();
  }
}
function readSerial(data) {
  if (data != null) {
    // convert the string to a number using int()
    let fromArduino = split(trim(data), ",");
    // Map the potentiometer value to the ellipse width
    ellipseHorizental = map(int(fromArduino[0]), 0, 1023, 0, 640); 
  }
}


Arduino code:

const int potPin = A0;  // Analog pin connected to the potentiometer
void setup() {
  Serial.begin(9600);
}
void loop() {
    int potValue = analogRead(potPin);  // Read the value from the potentiometer
      // Send the potentiometer value to p5.js
      Serial.println(potValue);
}

Video:


Assignment 2:

For assignment 2 it establishes communication between a P5.js sketch and an Arduino board for controlling LED brightness. The P5.js sketch allows users to adjust brightness by dragging the mouse horizontally, with instructions displayed when the serial connection is active. The Arduino board continuously waits for serial data from the P5.js sketch, adjusting the LED brightness accordingly. During setup, a handshake process is initiated, blinking the built-in LED while waiting for serial data.

P5js code:

let brightness = 0; //variable for brightness control

function setup()
{
createCanvas(400, 400); //create canvas
}

function textDisplay() //display text in the starting
{
text("PRESS SPACE TO START SERIAL PORT", width/2 - 109, height/2 - 5);
}

function draw()
{

background(220); //grey background

if (serialActive) //if serial is active
{
text("connected", width/2 - 27, height/2 - 5); //tell the user that it is connected
text("Drag the mouse horizontally to change brighthess", width/2 - 130, height/2 + 15); //give instructions on how to control brightness
}
else
{
textDisplay(); //display instructions on how to start serial is not active
}
  
if (mouseX >= 0 && mouseX<=10){
  brightness = 0;
}
else if (mouseX >= 3 && mouseX<=width/5){
  brightness = 51;
}
else if(mouseX >= width/5 && mouseX<=2*width/5){
  brightness = 102;
}
else if(mouseX >= 2*width/5 && mouseX<=3*width/5){
  brightness = 153;
}
else if(mouseX >= 3*width/5 && mouseX<=4*width/5){
  brightness = 204;
}
else if (mouseX>=4*width/5){
  brightness = 255;
}
else{
  brightness = 0;
}
  
}

function keyPressed() //built in function
{
if (key == " ") //if space is pressed then
{
setUpSerial(); //setup the serial
}


}

//callback function
function readSerial(data)
{
let sendToArduino = brightness + "\n"; //add the next line to dimness counter
writeSerial(sendToArduino); //write serial and send to arduino
}


Arduino code:

int LED = 5; // Digital pin connected to the LED
void setup() {
  Serial.begin(9600);
  pinMode(LED_BUILTIN, OUTPUT);
  pinMode(LED, OUTPUT);
  // start the handshake
  while (Serial.available() <= 0) {
    digitalWrite(LED_BUILTIN, HIGH); // on/blink while waiting for serial data
    Serial.println("0");             // send a starting message
    delay(300);                       // wait 1/3 second
    digitalWrite(LED_BUILTIN, LOW);
    delay(50);
  }
}
void loop() {
  // wait for data from p5 before doing something
  while (Serial.available()) {
    digitalWrite(LED_BUILTIN, HIGH); // led on while receiving data
    int brightnessValue = Serial.parseInt();
    if (Serial.read() == '\n') {
      delay(5);
      Serial.println(brightnessValue);
    }
    analogWrite(LED, brightnessValue);
    digitalWrite(LED_BUILTIN, LOW);
  }
}

Video:


Assignment 3:

For this assignment, we tried to establish communication between a P5.js sketch and an Arduino board (bi-directional). The P5.js sketch simulates a ball’s motion affected by wind and gravity, with its behavior controlled by sensor data received from the Arduino. The Arduino reads data from an ultrasonic sensor to determine distance, sending LED control signals back to the P5.js sketch based on the received distance data, influencing wind direction and LED turning on.

P5js code:

//declare variables
let velocity;
let gravity;
let position;
let acceleration;
let wind;
let drag = 0.99;
let mass = 50;
let LEDvalue = 1401;
let goRight = 0;
let goLeft = 0;
let first

function setup() {
createCanvas(1000, 360); //create canvas
noFill();
position = createVector(width/2, 0);
velocity = createVector(0,0);
acceleration = createVector(0,0);
gravity = createVector(0, 0.5*mass);
wind = createVector(0,0);
}

function textDisplay()
{
text("PRESS SPACE TO START SERIAL PORT", width/2 - 109, height/2 - 5); //display the appropriate text in the start
}

function draw() {
background(255);
if (serialActive) //if the serial is active
{
applyForce(wind);
applyForce(gravity);
velocity.add(acceleration);
velocity.mult(drag);
position.add(velocity);
acceleration.mult(0);
ellipse(position.x,position.y,mass,mass);
if (position.y > height-mass/2) //if the ball touches the bottom
{
velocity.y *= -0.9; // A little dampening when hitting the bottom
position.y = height-mass/2;
LEDvalue = 1401; //take LED value to be 1401 because we dont want the value (1) to be lurking in the serial and then affecting the wind values

}
else
{
LEDvalue = 1400; //when the LED is off
}

}
else
{
fill(0);
textDisplay();
}
}

function applyForce(force){
// Newton's 2nd law: F = M * A
// or A = F / M
let f = p5.Vector.div(force, mass);
acceleration.add(f);
}

function keyPressed(){
if (key==' '){ //if space is pressed, then serial is set up
setUpSerial();
}

if (keyCode == DOWN_ARROW) //if down arrow is pressed
{
//mass etc is changed
mass=random(15,80);
position.y=-mass;
velocity.mult(0);
}
}

function readSerial(data) //call back function
{
let sendToArduino = LEDvalue + "\n"; //sends value of LED to Arduino with \n added
writeSerial(sendToArduino); //write to Arduino

if (data != null) //if the data is not null and something is received
{
console.log(data);
if (data > 1450) //if the distance is greater than 1450, then
{
wind.x = 1; //the ball/wind goes right
}
else if (data < 1350) //if the distance is less than 1350
{
wind.x = -1; //the ball/wind goes left
}
}
}

Arduino code:

//declare variables
const int LED_PIN = 4;
int LEDvalue = 0; //will contain whether or not the LED should be on or off
int distance = 0; //will contain the distance by ultrasonic sensor
const int pingPin = 2; //Trigger Pin of Ultrasonic Sensor
const int echoPin = 3; //Echo Pin of Ultrasonic Sensor

void setup()
{
Serial.begin(9600); // Start serial communication at 9600 baud

pinMode(LED_PIN, OUTPUT); //pin mode is output

//Set the ultrasonic sensor pins as output and input respectively
pinMode(pingPin, OUTPUT);
pinMode(echoPin, INPUT);

while (Serial.available() <= 0)
{
Serial.println(1400); //connection establishment. 1400 so that the wind values do not change
}
}

void loop()
{
//wait for p5js
while (Serial.available())
{
sensorReading(); //reads data from the sensor

LEDvalue = Serial.parseInt(); //parsing from the serial written data from p5js

if (LEDvalue == 1400) //if the LED value is 1400
{
digitalWrite(LED_PIN, LOW); //then turn off the LED
}
else if (LEDvalue == 1401) //if the LED value is 1401
{
digitalWrite(LED_PIN, HIGH); //then turn on the LED
}
}
}

//Function to read the ultrasonic sensor and measure distance
void sensorReading()
{
//Send a short low pulse
digitalWrite(pingPin, LOW);
delay(2); //delay to avoid complications
digitalWrite(pingPin, HIGH); //sends a high pulse for 10 microseconds
delay(10);
digitalWrite(pingPin, LOW); //turn off the ping pin
distance = pulseIn(echoPin, HIGH); //Measure the duration of the ultrasonic pulse and calculate the distance
Serial.println(distance); //print the serial from distance
}

Video:


Week 12: Response on Design Meets Disability

My understanding of the reading ‘Design meets Disability’ made me conclude that the evolution of disability aids into fashionable items, and it questions the idea that these designs must prioritize invisibility over style. One of the designs in the reading, portrays the evolution of glasses from stigmatized medical aids to stylish fashion accessories, challenging the notion that design for disability must be inconspicuous. And I think we can see how the transformation of eyewear serves as a case study, showing that embracing visibility can enhance the acceptability of assistive devices. In contrast to the historical push for devices to be flesh-colored and blend in, eyewear has achieved a positive image without invisibility, becoming both a tool for vision enhancement and a fashion statement (pg. 16).

One fascinating aspect is the historical perspective that considered glasses as a symbol of social humiliation, which has dramatically shifted over time. The change in perception from medical necessity to fashion accessories reflects a societal adaptation and a broader acceptance of diversity. The transition emphasizes how designs can shift cultural narratives and the importance of integrating aesthetic considerations into functionality (pg. 15-16).

Another compelling point is the influence of the design of Charles and Ray Eames’ leg splints on modern furniture. Their approach, integrating the constraints of disability to inspire innovative design, demonstrates how limitations can spur creativity, resulting in designs that serve a broader purpose and audience. The Eames’ work illustrates that design with a focus on disability does not have to forsake style or cultural relevance.

This exploration I think reevaluates how we perceive design in the context of disability, emphasizing that functionality need not exclude aesthetic appeal. And it surely highlights the potential for designs that acknowledge the user’s desire for both utility and style, fostering a more inclusive approach to product development.

Final Project Idea: Hear The World

I am looking to create an interactive display using photosensors and P5.js animations. The main setup could be either a flatboard designed as a world map or a globe. This display will feature specific regions that, when touched, trigger music related to that region along with corresponding images or animations displayed using P5.js.

Project Concept:

  1. Interactive Display: Choose between a flat board or a globe. This will act as the base for your project.
  2. World Map/Globe with Regions Marked: The display will have different world regions marked. These could be continents, countries, or specific cities.
  3. Photosensors Embedded: There will be photosensors in these marked regions. These sensors will detect when they are touched.
  4. Music and Visuals: Touching a sensor will play music that is typical of that region. Simultaneously, P5.js will show relevant images or animations to enhance the experience.
  5. Technology Integration: I’ll use P5.js, a JavaScript library, to handle the visual and audio outputs based on sensor inputs.

Week 11: Group Musical Instrument

Group members: Muhammed Hazza, Iqra Bano

Concept

For our assignment, we decided to create a musical instrument, and we settled on making a piano with four keys. Each key, when pressed, will produce a different tone. Our circuit is straightforward, utilizing four push buttons and a buzzer. However, we’ve added an extra component: a potentiometer. This potentiometer allows us to change the frequency of the tones produced by the buzzer. By turning the potentiometer, we can adjust the pitch of the notes, adding more flexibility and range to our piano.

Video Demonstration

Materials we used

– Arduino Uno board

– Breadboard

– 330-ohm resistor

– 4x Tactile push-button switch
– Potentiometer

– Jumper wires
– Piezo buzzer

TinkerCad Diagram


Functionality

Upon pressing a button, the Arduino reads which button is pressed and plays a specific tone. The potentiometer’s position adjusts the base frequency of this tone, making the sound higher or lower based on its rotation.

The piano uses the Arduino’s built-in “tone” library to handle tone generation, which simplifies the creation of audible frequencies through digital pins


Code

#include <Tone.h>

// Define the notes with more distinguishable frequencies.
#define NOTE_C 262 // Middle C (C4)
#define NOTE_G 392 // G above Middle C (G4)
#define NOTE_C_HIGH 523 // One octave above Middle C (C5)
#define NOTE_G_HIGH 784 // G above C5 (G5)

#define ACTIVATED LOW

const int PIEZO = 11;
const int LED = 13;

const int BUTTON_C = 10;  // Will play Middle C
const int BUTTON_D = 9;   // Will play G (above Middle C)
const int BUTTON_E = 8;   // Will play High C
const int BUTTON_F = 7;   // Will play High G

const int POTENTIOMETER = A0; // Analog input pin connected to the potentiometer

Tone toneGenerator;

void setup() {
  pinMode(LED, OUTPUT);
  
  pinMode(BUTTON_C, INPUT_PULLUP);
  pinMode(BUTTON_D, INPUT_PULLUP);
  pinMode(BUTTON_E, INPUT_PULLUP);
  pinMode(BUTTON_F, INPUT_PULLUP);

  toneGenerator.begin(PIEZO);
  digitalWrite(LED, LOW);
}

void loop() {
  int potValue = analogRead(POTENTIOMETER); // Read the potentiometer value
  int frequencyAdjustment = map(potValue, 0, 1023, 0, 255); // Map to a quarter of the full range for adjustment
  
  if (digitalRead(BUTTON_C) == ACTIVATED) {
    toneGenerator.play(NOTE_C + frequencyAdjustment); // Adjust Middle C frequency
    digitalWrite(LED, HIGH);
  } else if (digitalRead(BUTTON_D) == ACTIVATED) {
    toneGenerator.play(NOTE_G + frequencyAdjustment); // Adjust G frequency
    digitalWrite(LED, HIGH);
  } else if (digitalRead(BUTTON_E) == ACTIVATED) {
    toneGenerator.play(NOTE_C_HIGH + frequencyAdjustment); // Adjust High C frequency
    digitalWrite(LED, HIGH);
  } else if (digitalRead(BUTTON_F) == ACTIVATED) {
    toneGenerator.play(NOTE_G_HIGH + frequencyAdjustment); // Adjust High G frequency
    digitalWrite(LED, HIGH);
  } else {
    toneGenerator.stop();
    digitalWrite(LED, LOW);
  }
}

Future Improvements

For future improvements we would like to:

Enhance the clarity and volume of the piano’s notes.
Add more keys and different types of tones to the piano.
Integrate LEDs to make it look more attractive and visually appealing.

Week 11: Response on A Brief Rant on the Future of the Interaction Design

A brief rant on the future of interaction design

I thoroughly enjoyed reading ‘A Brief Rant on the Future of the Interaction Design’ by Bret. His article grabbed my attention from beginning to end with his discussion on the future of interactive design. It was fascinating to see his depiction of how everything might soon operate through mere hand movements. While this vision has its flaws, it opened up exciting possibilities for what the future could look like.

Bret makes an interesting transition by focusing on how current interactive designs primarily utilize hands for touch interactions – which he is also referring as ‘Pictures under Glass’. And I share his point of view too, **** for a decade of touch screen interactions it does seems limited when considering the full tactile and motor capabilities of hands, which are not fully exploited by today’s technologies. I was also intrigued by why Bret chose to critique the specific interactive design video. As we advance in the field of interactive design, it seems paradoxical that the way we interact with technology isn’t evolving in tandem.

Bret advocates for more varied hand interactions, which is a valid point given the context of the article’s 2011 publication. Back then, the predominant interaction models featured simple touch and slide gestures. Since then, technology has evolved. Devices like the Apple Vision Pro now incorporate gestures like pinching, using both hands to grasp and manipulate objects—yet, our hands’ full range of abilities remains largely underutilized in technological interfaces.

And this left me thinking some pressing questions: Will we see improvements that add greater depth to how we interact with technology, or are there inherent limitations in the systems we use that prevent them from fully embracing all possible interactions? or will we see innovations that allow for a richer, more intuitive user experience?

Responses: A Brief Rant on the Future of Interaction Design

I enjoyed reading Bret’s responses to the comments on his article, particularly two points that stood out to me.

Why is he forcing too much to add the other ‘hand involved’ interactions? — that was one of my questions when I was reading Bret’s article. I initially struggled to understand why adding other interactions was so important. Some suggested using voice commands, but Bret put it well by saying — that imagining, building, or designing things is something that our hands do better, because those voice instructions ‘just exist in space, and we manipulate space with our hands’. And this does make me think about how humans psychologically respond to the stimulus that require them to adjust, rebuild. And what is even the cognitive debate on ‘how human body are designed to interact?’, says that manual interaction is often preferred for creative tasks because it engages motor skills, spatial reasoning, and visual processing, enabling direct and nuanced control over the creative process. This mode provides immediate tactile and visual feedback, which is essential for fine-tuning and detailed work, making it more effective for tasks that require precision and sensory integration, such as painting or building models. So Bret’s point really resonates with me when he says ‘You come to understand the system by pointing to things, adjusting things, moving yourself around the space of possibilities. I don’t know how to point at something with my voice. I don’t know how to skim across multiple dimensions with my voice.’ But now here is another thing, ‘What about Vision?’, I thought maybe that debate was missing from the responses, I was curious to know what about, human interaction with other the technology that uses our ‘Eyes’ such as in this age our ‘Vision Pro’, it was later that I realized that this question was also well answer by his another response to a comment, where he quoted a neuroscientist; who stated that; If we don’t use our fingers to explore the world, especially during childhood, we lose a significant part of our brain’s potential, hindering our overall development which is going to be similar to having blindness.

Now it kind of makes me conclude that the push for more sophisticated hand interactions in technology stems from the need to preserve natural human capabilities in an increasingly advanced world. If we replace our everyday interactions with less interactive technologies, we risk losing a crucial part of ourselves in the process. While it might seem tangential, this issue is similar to how our reliance on small devices has reduced face-to-face social interactions. Although technology offers benefits, it also challenges us psychologically and biologically as we adapt, often leading to issues that affect both individuals and society as a whole.

Week 10: Ultrasonic Sensors and LEDs

Concept

For this weeks assignment I wanted to create a parking space detector system that assists drivers in finding available parking spots quickly and efficiently. It utilizes an ultrasonic sensor to detect the presence of vehicles in front of designated parking spaces. Through a series of LEDs, the system provides visual feedback to indicate the availability of parking spots to approaching drivers.

Technical Details:

I have used the ultrasonic sensor, after looking into it – this sensor emits ultrasonic waves and measures the time it takes for the waves to bounce back after hitting an object. Which means that it can be used to determines the distance of the object from its position.

LED Indicators

Connected the anode (longer leg) of each LED to digital pins 8, 9, and 10 on the microcontroller respectively.

Connected the cathode (shorter leg) of each LED to ground through a resistor ( 220Ω to 330Ω) to limit current and prevent damage.

Green LED: Indicates a vacant parking space. When the distance measured by the ultrasonic sensor exceeds a certain threshold (indicating no object is present), the green LED lights up, signaling to approaching drivers that the parking spot is available for use.

  • Red LED: Represents a partially occupied parking space. If the distance measured falls within a predefined range, suggesting the presence of a vehicle but with some space remaining, the red LED illuminates. This warns drivers that the space is partially occupied and may not be suitable for parking larger vehicles.
  • Blue LED: Signals a fully occupied or obstructed parking space. When the measured distance is very close to the sensor, indicating a fully occupied space or an obstruction such as a wall or pillar, the blue LED turns on. This prompts drivers to avoid attempting to park in the space to prevent potential collisions or damage to vehicles.
  • Ultrasonic Sensor:
    • Trig Pin: Connected  to digital pin 2 on the microcontroller.
    • Echo Pin: Connected to digital pin 3 on the microcontroller.
    • Vcc: Connected to 5V.
    • GND: Connected to ground.
  • Button:
    • One side connects to digital pin 13 on the microcontroller.
    • The other side connects to ground.
Code
// Define LED pins
int ledPin[3] = {8, 9, 10};

// Define Ultrasonic sensor pins
const int trigPin = 2; // or any other unused digital pin
const int echoPin = 3; // or any other unused digital pin

const int buttonPin = 13;
int buttonState = HIGH;
int lastButtonState = HIGH;
long lastDebounceTime = 0;
long debounceDelay = 50;
int pushCounter = 0;
int numberOfLED = 3;

void setup() {
  pinMode(buttonPin, INPUT);
  digitalWrite(buttonPin, HIGH); // Activate internal pull-up resistor
  
  // Set up LED pins
  for (int i = 0; i < numberOfLED; i++) {
    pinMode(ledPin[i], OUTPUT);
  }
  
  // Set up Ultrasonic sensor pins
  pinMode(trigPin, OUTPUT); // Sets the trigPin as an OUTPUT
  pinMode(echoPin, INPUT);  // Sets the echoPin as an INPUT
}

void loop() {
  int reading = digitalRead(buttonPin);

  // Check if the button state has changed
  if (reading != lastButtonState) {
    // Reset the debounce timer
    lastDebounceTime = millis();
  }

  // Check if the debounce delay has passed
  if ((millis() - lastDebounceTime) > debounceDelay) {
    // If the button state has changed, update the button state
    if (reading != buttonState) {
      buttonState = reading;

      // If the button state is LOW (pressed), increment pushCounter
      if (buttonState == LOW) {
        pushCounter++;
      }
    }
  }

  // Update the last button state
  lastButtonState = reading;

  // Turn off all LEDs
  for (int i = 0; i < numberOfLED; i++) {
    digitalWrite(ledPin[i], LOW);
  }

  // Perform Ultrasonic sensor reading
  long duration, distance;
  digitalWrite(trigPin, LOW);
  delayMicroseconds(2);
  digitalWrite(trigPin, HIGH);
  delayMicroseconds(10);
  digitalWrite(trigPin, LOW);
  duration = pulseIn(echoPin, HIGH);
  distance = (duration * 0.0343) / 2; // Calculate distance in cm

  // Perform actions based on distance measured
  if (distance < 10) {
    // Turn on first LED
    digitalWrite(ledPin[0], HIGH);
  } else if (distance < 20) {
    // Turn on second LED
    digitalWrite(ledPin[1], HIGH);
  } else if (distance < 30) {
    // Turn on third LED
    digitalWrite(ledPin[2], HIGH);
  }

  // Delay before next iteration
  delay(100); // Adjust as needed
}
Circuit

Video of the Final Circuit

Reference

I watched this video to get familiar to the ultrasonic sensor.

Week 10: Response on Physical Computing and Interactive Art Readings

Physical Computing Greatest Hits and Misses

I agree with the author’s description in the article that when someone is learning physical computing and is required to come up with project ideas, people sometimes just eliminate most of the ideas just because they thought that it has already been done before. While there is plenty of room for variety and enhancement, it can lead to an entirely new concept. In short, I found the author’s insight firmly aligned with the concept of ‘standing on the shoulders of giants’. And I think this is an amazing realization that one must have since innovation always comes out when individuals stole the ideas that are worth stealing and left behind others that are not attractive to them and then built something that is entirely new.

Two interesting technologies that were mentioned in this article that I like the most were the Gloves and the Hand-as-cursor. The way the drum gloves are designed on the interface of the gestural language, producing discrete musical notes though simple finger taps shows the integration of force-sensing resistors and flex sensors in the Power Glove to detect movement and gestures. This idea seems to be intriguing yet complex, as it captures the challenge of translating simple, intuitive human actions. I believe the complexity is not only in the technological implementation but also in ensuring that the user experience remains interesting and simple. This technical conversation causes me to reflect critically on the balance between technology and the simplicity required for widespread user acceptance. This thinking leads me to draw parallels with the evolution of touchscreen technology, particularly its incorporation into mobile devices. Initially, touch screens were a novel technology that some saw as gimmicky; nevertheless, their design centered on natural human actions, such as swiping and tapping, which led to widespread adoption. This “intertext” identifies a vital path for me from innovation to integration, underlining the necessity of user-centered design in technology.

Despite the advances these themes represent, they raise concerns about the extent to which such interfaces can replace more traditional input modalities such as keyboards and mice, which continue to provide unrivaled precision for particular activities. This makes me wonder about the future development of glove and hand-tracking technology. Could they employ haptic feedback to provide a tangible response to digital interactions, thereby increasing user engagement and control?

Making interactive Art: Set the Stage, Then shut up and Listen

This article introduced me to a new idea that I had never considered before. Because things were never taught that way before. In any classes that I have attended up to this point that involved interactive artwork creation or even ideation, I have always felt the need to describe what my artwork is supposed to do while you are experiencing it. While I had the opportunity, I came across what I call Freestyle art projects, in which the students creating the project choose the elements, randomize them, and then hold those elements responsible for the user’s experience. This is similar to what the author is attempting to say: let the audience grasp it on their own. But I was never convinced by this approach before; I believe that if you are unable to demonstrate and let the person on the other end comprehend what you truly created, you have not done your job effectively. But I believe the author’s perspective on this has persuaded me to think otherwise when he says — ‘if you’re thinking of an interactive artwork, don’t think of it like a finished painting or sculpture. Think of it more as a performance. Your audience completes the work through what they do when they see what you’ve made.’

Week 9 – LED and the Light Sensor

Concept and Idea:

I was working on an Arduino project in my core class, where we were playing with the light sensor and I thought about this idea to use for my unusual switch. So basically an LED using a light sensor: it reads the light level, converts it to a simplified scale, and then turns the LED on in dark conditions and off in light conditions. The sensor measures how much light is in the environment. Based on this measurement, the Arduino decides whether it’s dark or light around. If it’s dark, the LED turns on to provide light. If there’s enough light, the LED stays off. This setup is a practical way to automatically turn a light on or off depending on the surrounding light level.

Video:

Code:

const int sensorPin = A0;
const int ledPin = 7; 

// Initialize the setup
void setup() {
  pinMode(ledPin, OUTPUT); // Setup LED pin as an output
}

// Function to read and process light level
int readAndProcessLight(int pin) {
  int sensorValue = analogRead(pin); // Read the light sensor
  // Convert the sensor reading from its original range to 0-10
  return map(sensorValue, 1023, 0, 10, 0);
}

// Function to update LED status based on light level
void updateLedStatus(int lightLevel, int threshold, int pin) {
  if (lightLevel < threshold) {
    digitalWrite(pin, HIGH); // Turn LED on
  } else {
    digitalWrite(pin, LOW); // Turn LED off
  }
}


void loop() {
  int lightLevel = readAndProcessLight(sensorPin); // Read and process light level
  updateLedStatus(lightLevel, 6, ledPin); // Update LED status based on light level

  delay(200); // Short delay to avoid flickering
}


Improvements:

I was trying to incorporate the idea of replacing one LED light with 3 LED lights. With an RGB LED to enable color changes based on light levels. For example, so different colors could indicate different intensities of the light, and I was testing with the sunlight that was falling from my window, from morning to evening.

Week 8a: Attractive Things and Margaret Hamilton Reflection

While reading, I noticed that the author was creating a symbiosis between the design’s appearance, utility, and the emotional response associated with it. It was interesting to see how the author defined the balance between these aspects, and I believe it is a healthy way for them to exist. I have always thought that utility should take precedence over design, which I believe is a practical approach. However, the author appears to infer that good effects in design can improve usability and problem solving. Although I believe in the value of good design, here’s another perspective: if we have a problem and are designing a tool to help us solve it, why go the extra mile to make it attractive or visually appealing? While answering this question, I came to the conclusion that an aesthetically pleasing design is the result of properly implementing all of the necessary functionality in the tool.

I think it can be best explained with the modern kitchen designs. Consider the trend of open-plan kitchens that blend effortlessly with living spaces. This design choice is not purely aesthetic; it stems from the functionality of wanting a kitchen that supports not just cooking, but also social interaction and entertainment. The central kitchen island often serves multiple purposes: it is a prep area, a dining table, and a social hub, all in one. Its design—sleek, with clean lines and often featuring visually appealing materials like marble or polished wood—enhances the kitchen’s utility by making it a more inviting space. The aesthetics of the island, from its material to its positioning, are integrated with its function, creating a space that is both beautiful and highly functional. By contemplating this — approach to kitchen design, I mean that aesthetics and utility go hand in hand.

Thinking about the document’s ideas in a broader context, I’m drawn to look into how they relate to digital interfaces and even services. In a society increasingly mediated by screens, the emotional impact of design aesthetics on usability is even more important. I’ve experienced websites and apps whose gorgeous design increased my patience while navigating difficult functionality. This notion is supported by the document’s explanation that ‘Positive affect broadens the thought processes making it more easily distractible,’ which validates my experiences with digital interfaces. The emotional impact of design aesthetics on usability is critical, especially in our increasingly screen-mediated society. However, the document’s emphasis on the universal benefits of good effect in design fails to account for individual and cultural variations in aesthetic tastes. This error makes me think about the worldwide nature of design work nowadays. Products and interfaces developed in one cultural context may not elicit the same emotional responses in another, thereby affecting usability across user groups. This intricacy adds to the difficulty of attaining truly universal design—a goal that appears to be becoming increasingly relevant in our interconnected society.

Now about Margaret Hamilton, I believe her story shows how individual determination and intellectual bravery can redefine the possible, even against the backdrop of societal and professional norms. In a time when the professional landscape marked differently for women, bringing her daughter to work at the MIT lab is a powerful moment. It shows us how she balanced being a mom and working on the Apollo missions at a time when most people didn’t expect women to do such jobs. This story is special because it’s about more than just making software for the moon landing. It’s also about Hamilton showing that women can be both caring mothers and brilliant scientists. She didn’t let the rules of her time stop her from doing great things in technology. It also made me think about how personal life and big achievements can mix together. Hamilton’s story is really inspiring because it shows that, how anyone can break barriers and make a big difference, no matter what others might expect.