Week 3 – recreating my pattern with classes

For this week we had to use the artwork from last year and incorporate classes into the code. Since I already explained my concept I will write it down very briefly here:

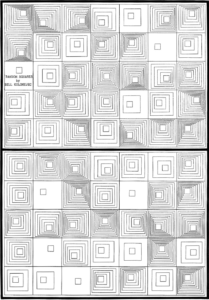
I was inspired to recreate one of the examples shown in class, and I did a series of 4 pieces of art which related to geometric patterns and symmetry as the one below. This one shows a different pattern each time the code is run, hence creating a new piece of art each time.

Since I revised last weeks’ work, there was no difference in the artwork (because that was the intention), there was, however, quite a difference in the code. I am a lot more pleased with the revised code, as it is easier to read and looks cleaner – grouping most of the repetitive things under the class, creating the squares in an array and keeping the setup() function cleaner.

class squareFiller {
  //constructor consists of the x and y coordinates
  constructor(x, y) {
    this.x = x;
    this.y = y;
  }

The constructor is very simple with just the coordinates as attributes.

//the first option of a pattern
  //the x and y coordinates are parameters as they will
  //be determined later in setup()
  //k variable determines how spaced each square will be 
  //from each other
  //the while loop determines the pattern by incrementing 
  //and decrementing respectively each of the variables
  //the rest of the fillers have the same idea but with 
  //different spacing and corners which they approach
  filler1(x, y) {
    var i = x;
    var j = y;
    var k = 100;
    while (i < x + 60) {
      square(i, j, k);
      i += 10;
      j += 10;
      k -= 15;
    }
  }

This is the first of 12 similar filler pattern functions.

randomizer() {
    let num = floor(random(12)) + 1;

    print(num);
    if (num == 1) {
      this.filler1(this.x, this.y);
    } else if (num == 2) {
      this.filler2(this.x, this.y);
    } else if (num == 3) {
      this.filler3(this.x, this.y);
    } else if (num == 4) {
      this.filler4(this.x, this.y);
    } else if (num == 5) {
      this.filler5(this.x, this.y);
    } else if (num == 6) {
      this.filler6(this.x, this.y);
    } else if (num == 7) {
      this.filler7(this.x, this.y);
    } else if (num == 8) {
      this.filler8(this.x, this.y);
    } else if (num == 9) {
      this.filler9(this.x, this.y);
    } else if (num == 10) {
      this.filler10(this.x, this.y);
    } else if (num == 11) {
      this.filler11(this.x, this.y);
    } else {
      this.filler12(this.x, this.y);
    }
  }

The randomizer function randomly chooses one of the patterns for the square at hand.

//instantiating the objects in the array for
 //each square in the grid
 for(let i = 0; i<601; i+=100)
   {
     for(let j =0; j<301; j+=100)
       {
         arr.push(new squareFiller(i,j));
       }
   }
 //calling the randomizer function for each
 //square in the array
 for(let i=0; i<arr.length; i++)
   {
     arr[i].randomizer();
   }

The setup() function is quite simple, with these lines being the most important as they instantiate the SquareFiller objects in an array, then there is another for loop which calls the randomizer function for each of the objects – hence choosing a pattern for each square in the canvas.

The biggest challenge for me was thinking about how I was going to incorporate a class into this code. But after a bit of pondering and experimenting I decided to create a SquareFiller class, which determined the pattern of each square.

Furthermore, I faced the challenges of writing a class in JavaScript as I had never done that before. To solve this, I referred to the class notes, used the Reference of P5 and the internet and figured everything out.

Assignment 2: Geometric Patterns – symmetry, patterns, randomization

The concept:

I looked through the pdf’s attached on computer graphics and saw a piece which inspired me a lot. This is where I drew my inspiration from:

Initially I created patterns of squares of one distance reaching for the four different corners. I decided to create a symmetric and ordered pattern which causes some sort of optical illusion.

Here is that piece:

Then I moved on to create the same four cornered patterns but with different distances between the squares – doubling and halving the distances.

This was with the intention of creating something which very closely resembles the inspiration piece. I randomly chose the patterns without thinking deeply about the pattern number I was choosing, then I arranged as I saw fit by changing the patterns into a piece which I liked best.

Here is the piece resembling the inspiration source:

Finally, after watching the video which talked about chance and randomness in art I was inspired to create an animation which randomly chooses a different pattern for each square in the canvas every 2 seconds. I think allowing randomness choose its course makes for a very interesting art concept.

Here is the modified version after watching the Chance in Art talk:

Curiosity got the best of me once again, and I wanted to see the above piece if the squares were of homogenous size and distance. I made the canvas smaller in order to focus more on the patterns which are created when the squares align. This one also changes every 2 seconds.

Here is what this looks like:

Reflections:

I truly allowed myself to indulge in my curiosity and inspiration from both the piece which I attached in the beginning but also in the talk given by Casey Reas on Chance Operation.

What initially began as a piece to itch the part of my brain which needs symmetry, then proceeded to become a demonstration of code in a way which imitated the first piece of inspiration, then became an exploration of chance and pattern creation.

I enjoy my 3rd piece the most, because it creates numerous variations of the initial inspiration source, and I believe it shows the work of chance in a very beautiful way by creating patterns.

The reason why I created the 4th piece was because I noticed that when the patterns were of homogenous size and distance and they were next to each other, they align to form interesting patterns, so I had the idea to create different patterns which only included squares of homogenous sizes. I see now that the most noticeable patterns are when the squares are more frequent and the distances between them are smaller, and the largest patterns barely align to create a pattern, but as a whole still create an interesting show of chance.

Challenge:

I had only one technical challenge initially because I started creating the mini patterns inside the squares using ‘for loops’, but quickly realized that was a mistake when the squares overlapped. Then I chose to use while loops instead because I have 3 different variables being incremented by different values. Here is one excerpt:

function filler1(x, y) {
  var i = x;
  var j = y;
  var k = 100;
  while(i<x+60)
    {
      square(i,j,k);
      i+=10;
      j+=10;
      k-=15;
    }
}

Where x and y determine the coordinates of the square, which get randomly chosen in setup (first two pieces) or randomizer functions (last two pieces).

I did, after all, utilize a ‘for loop’ to randomize the choices for each square:

function randomizerCall() {
  
  for(let i = 0; i<601; i+=100)
    {
      for(let j =0; j<301; j+=100)
        {
          randomizer(i,j);
        }
    }
}

Thankfully this project did not give me many technical challenges. The largest challenge was fulfilling my curiosities, because as soon as I was wrapping up one piece my curiosity would wonder about a variation of the piece which might make it more interesting – hence the 4 different pieces.

Self-Portrait – Hana

The concept behind this self-portrait was to create a simplistic image which looks similar to me.

The most fun part of the design was creating the eyes, since there were so many components – eyebrows, eye line, eyelashes, iris and eye shine. I like the way I created depth in the irises by making a darker and thicker stroke, then putting pupils and eye shine which was white with lower opacity. Here is the code below:

//eyebrows
 stroke(105, 73, 31);
 strokeWeight(5);
 noFill();
 arc(200, 235, 45, 15, 180, 360, OPEN);
 arc(300, 235, 45, 15, 180, 360, OPEN);
 
 //eyes
 stroke(214, 164, 99, 130);
 strokeWeight(6);
 arc(200, 255, 45, 15, 180, 360, OPEN);
 arc(300, 255, 45, 15, 180, 360, OPEN);
 arc(200, 257, 40, 30, 90, 180);
 arc(300, 257, 40, 30, 0, 90);
 
 strokeWeight(3);
 stroke(64, 41, 11);
 fill(82, 54, 18);
 circle(200, 260, 22);
 circle(300, 260, 22);
 noStroke();
 fill(0);
 circle(200, 260, 10);
 circle(300, 260, 10);
 
 //eye shine
 noStroke();
 fill(255,255,255, 200);
 circle(205, 255, 7);
 circle(305, 255, 7);
 
 //eyelashes
 stroke(105, 73, 31, 130);
 strokeWeight(5);
 noFill();
 arc(180, 230, 15, 45, 90, 120, OPEN);
 arc(190, 225, 15, 45, 90, 120, OPEN);
 arc(320, 230, 15, 45, 60, 90, OPEN);
 arc(310, 225, 15, 45, 60, 90, OPEN);

In the future I would like to do something more special than just a simple portrait, maybe even include dynamic components. But since this was the first assignment and animation was not required, I decided to keep things simple 🙂