Assignment 3 – Generative Art OOP: Particles


For this Assignment i wanted to create something simple but dynamic as well so I came up with the idea of particles interacting and creating a network.

I started by creating an array to hold particles as each objects and then pushed each new particle instance inside the array. The class for particle stored the position of each particle as coordinates inside a vector which would be initialized by random spawn positions on the canvas. It also had a random velocity so that some particles would move faster.

The class had an update method that allowed the position to be updates according to its respective velocity. It also called another method called the edges method which did all the error checking to ensure that the particle stayed on the canvas and bounced off the edge.

The draw class was simple a circle with a fill and random color with no stroke. My most important method was the check particle which uses the distance dist() function to check if there are any other particles within a certain distance and if so a line is drawn.

The concept of this was to visualize how gas particles would be able to behave in a certain container. A thing that i wanted to achieve was to somehow incorporate collision detection to show how they would be able to collide with each other and bounce off.

I also tried to use the map feature by following Dan Shiffman’s video but I couldn’t figure out how differently i could make use of it in my sketch.

Assignment 2: Computer Graphics Art

The beauty of Spirographic Art

I drew inspiration from one of the sketches in the Computer Graphics and Art book and started to experiment with lines and loops to see what creative and motion graphics i could create with all the knowledge we have acquired in class.

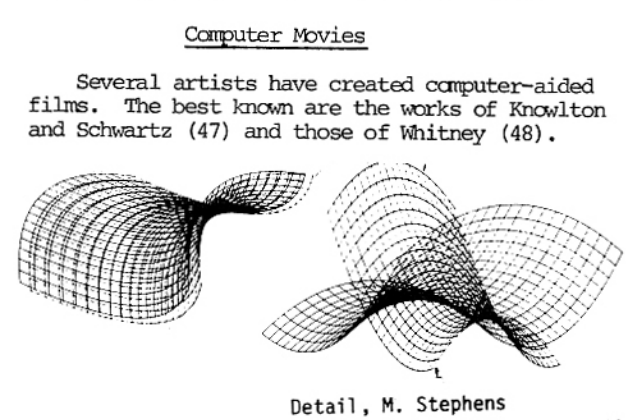
Here is the image of the Computer Graphics Art that inspired me.

After getting some practice with the looping and line strokes i wanted to create a rotating motion like figure with line strokes that would alternate in colors.

In order to get the motion correct i had to make sure I got the degrees and angles correct and being able to move them by a small angle. After watching Dan Shiffman’s video on rotate and Transformations I was able to learn the translate() and angleMode(DEGREES) functions and how to properly used them.

Here is a link to his p5.js tutorial video https://www.youtube.com/watch?v=o9sgjuh-CBM.

I started coding by initializing the global variables that i might need such as storing X and Y coordinates the color values and the boolean flag to alternate the colors. Then I began by creating the canvas and setting up the background color values. I used the random() function inside the color for all the RBG arguments so that i can get a new color on everycall. I also used a predefined alpha value as the transparency of the color.

I setup the X and Y position to be in the middle of the canvas as i wanted it to start from somewhere in the middle of the canvas since the range of the random spawn would be controlled by the new_step offset value. 

Inside the draw function i started by translating the X and Y position and rotate by the angle variable which was initialized as 0 but would increment by 1 every frame. I also created the line and played around with the x2 and y2 coordinates. I used to colorFlag to change the color of the stroke of the lines. 

After this i decided to increment both the X and Y position by 1 to move the next line a little bit. I also had a checking function which used the angle variable and checked if it was more than 360 if so it would reset the X and Y positions by randomly adding a new spawn distance from the step offset range, while setting the angle back to 0. In other words this allowed the circle of lines to start again from a new random location once it was completed. 

Lastly, something that i wanted to solve was the problem of the X and Y position to be out of the canvas. Thus i used 4 if conditions to see if it coordinate was greater than the canvas size if so i set it back to zero. Else if it was less than 0 then i simply set it to the canvas dimension (width and height). This allowed me to the wrap the design around and continue back on the canvas.

In order to make the sketch visually appealing I tried to remove the restarting aspect at a random location and started to create continuous spiral which wrapped around the whole sketch in a diagonal manner.

Assignment 1: Self-portrait

This assignment one of Intro to IM required us to come up with a self portrait using p5.js. The assignment was really fun to do since we had to play with different shapes and get them positioned in a way that looks real and meaningful.

I began by getting a basic sketch and starting with my face it self. The face ears, eyes and nose were not a big challenge since we could have simply used an ellipse. The Arc for the eyebrow and mouth took some time to get them into the position I wanted it to be in.

For the, t-shirt i used a rectangle and two ellipse to make it look realistic. By adding two lines similar to the color of the background i was able to create a gap and separate the arms from the body. I also enjoyed playing with quads to make my replicate the Adidas logo on the t-shirt. I also enjoyed playing around with circles and lines to create the glasses 🤓. I used the alpha value in RBGA to add the transparency to the glasses color.

The hardest part of this assignment for me was the hair itself, after reading documentation about quads I started to try out different sizes and shapes to see which would best suite my own hairstyle.

Something, that I really struggled with was getting the X and Y coordinates correct in order to position my shape. Thus, I came out with a short code that would print the X and Y coordinate on the screen when the mouse is hovered over. I also tried to not hardcode it as much as possible and tried to use height and width throughout the assignment.

For the Background I wanted to get a night-sky view. I started with making the background dark and used the random() feature to place the stars (as points) on the canvas. I used this video as reference to learn about random() https://www.youtube.com/watch?v=POn4cZ0jL-o.

For fading the background I simply used the alpha value for the RGB and set it to 1 so every frame it would slowly fade out. What i found best about the portrait was the shooting star effect that I was able to add with the use of lerp (which I learnt in A.rt Intel). I simply used the line function with lerp for the 4 arguments and using the random generated start and end X-Y coordinates. Lastly I used the increment or step as the smoothness argument for lerp in order to create a fading effect.