Shreya + Cole’s Final Bomb Defusing Game

Our Final Project:

Overall I am really happy with how our project came out. We went from a rough idea inspired by a VR game to a fully formulated and functioning team building game that really utilizes both the strengths of Arduino and Processing. Shreya was a great partner and we made this come together through great teamwork.

Here is our previous documentation that can show how we have come along

  1. Final Project Preliminary Idea – by Cole and Shreya
  2. Final Project Progress – by Cole and Shreya
  3. Final Project Update 2

Things added as a result of debugging:

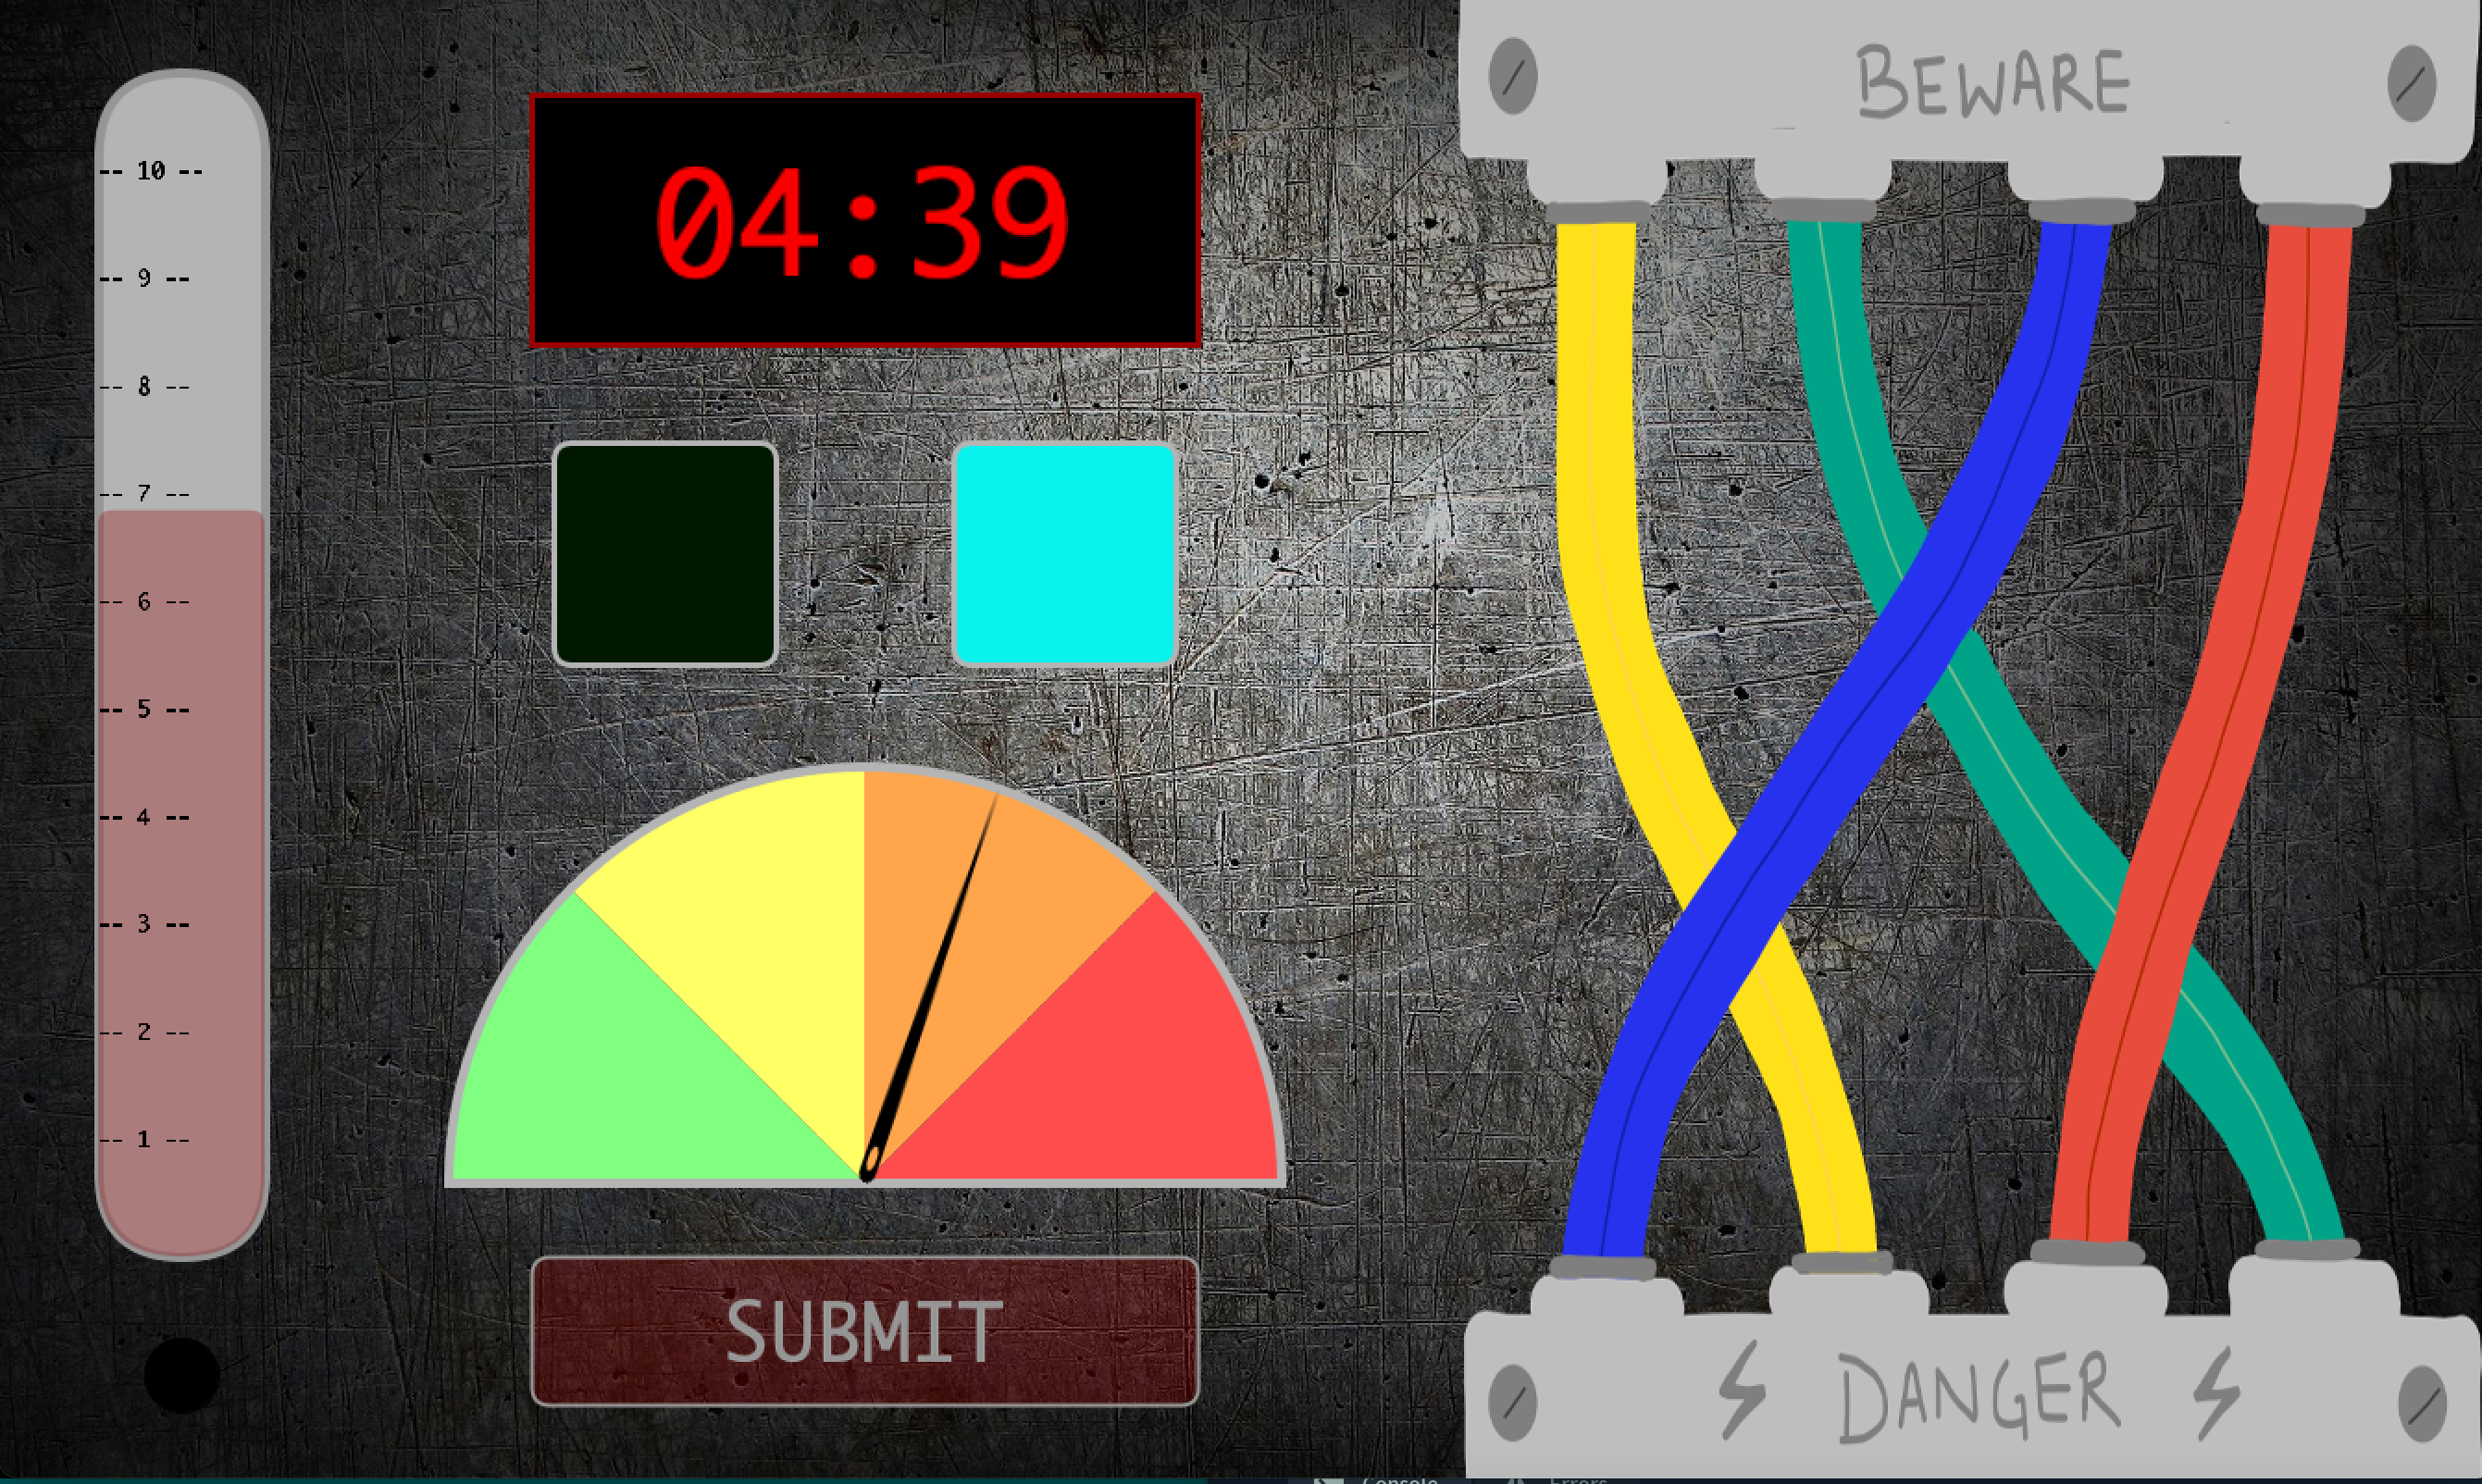
Since we were dealing with both Arduino and Processing, if something went wrong, or wasn’t working the way we expected it, it was really hard to find out where the problem was. It could have been in the circuit, or the Arduino code, or the handshake (arising from the difference in speeds of Arduino and Processing), or the Processing code/logic. So, we used a lot of println() statements to check if the input/output was being read from the Arduino and being correctly passed on to Processing. One problem we faced was on stage 3 when you have to replicate the LED patterns. It would set the bomb off sometimes even if the pattern was correct. After racking our brain on what was incorrect in the logic of our code, we realized that the problem was with the discrepancy in the speed of Arduino and Processing (even after establishing the serial communication) and not our code. Processing wouldn’t read all buttons pressed on the Arduino every time. When we printed these out, we realized where the problem was. This resulted in the addition of a small flashing light on the Processing screen on the bottom left corner to indicate which button color was pressed and read by Processing. If that light doesn’t flash, that means the button input wasn’t read. This proved to be a very important signifier.

Making it a bit harder

So, we coded our program to wait for specific inputs at each stage. But, what if a user by mistake, presses something Arduino/Processing is not waiting for at a specific stage such as a button when submit was expected? Since it is a bomb, ideally it should go off if something incorrect is done. So, to make the game harder and interesting, but not letting the bomb go off at every wrong input, giving the user a little flexibility to play around and have fun, we decided to have 2 checks. 1) Make the bomb explode if an incorrect input is given from one of the input methods the particular stage is waiting for, 2) reduce the time left by 10 seconds if an incorrect input is given from a wrong input method. In our program, you can record an input by either pressing one of the four buttons on the Arduino screen or the submit button on the Processing screen for the distance and potentiometer. If an input is expected from the Arduino button and submit button is mistakenly clicked, it reduces the time. However, if a yellow Arduino button was expected, but a red one was pressed, then the bomb goes off.

Additional Touches and User Experience

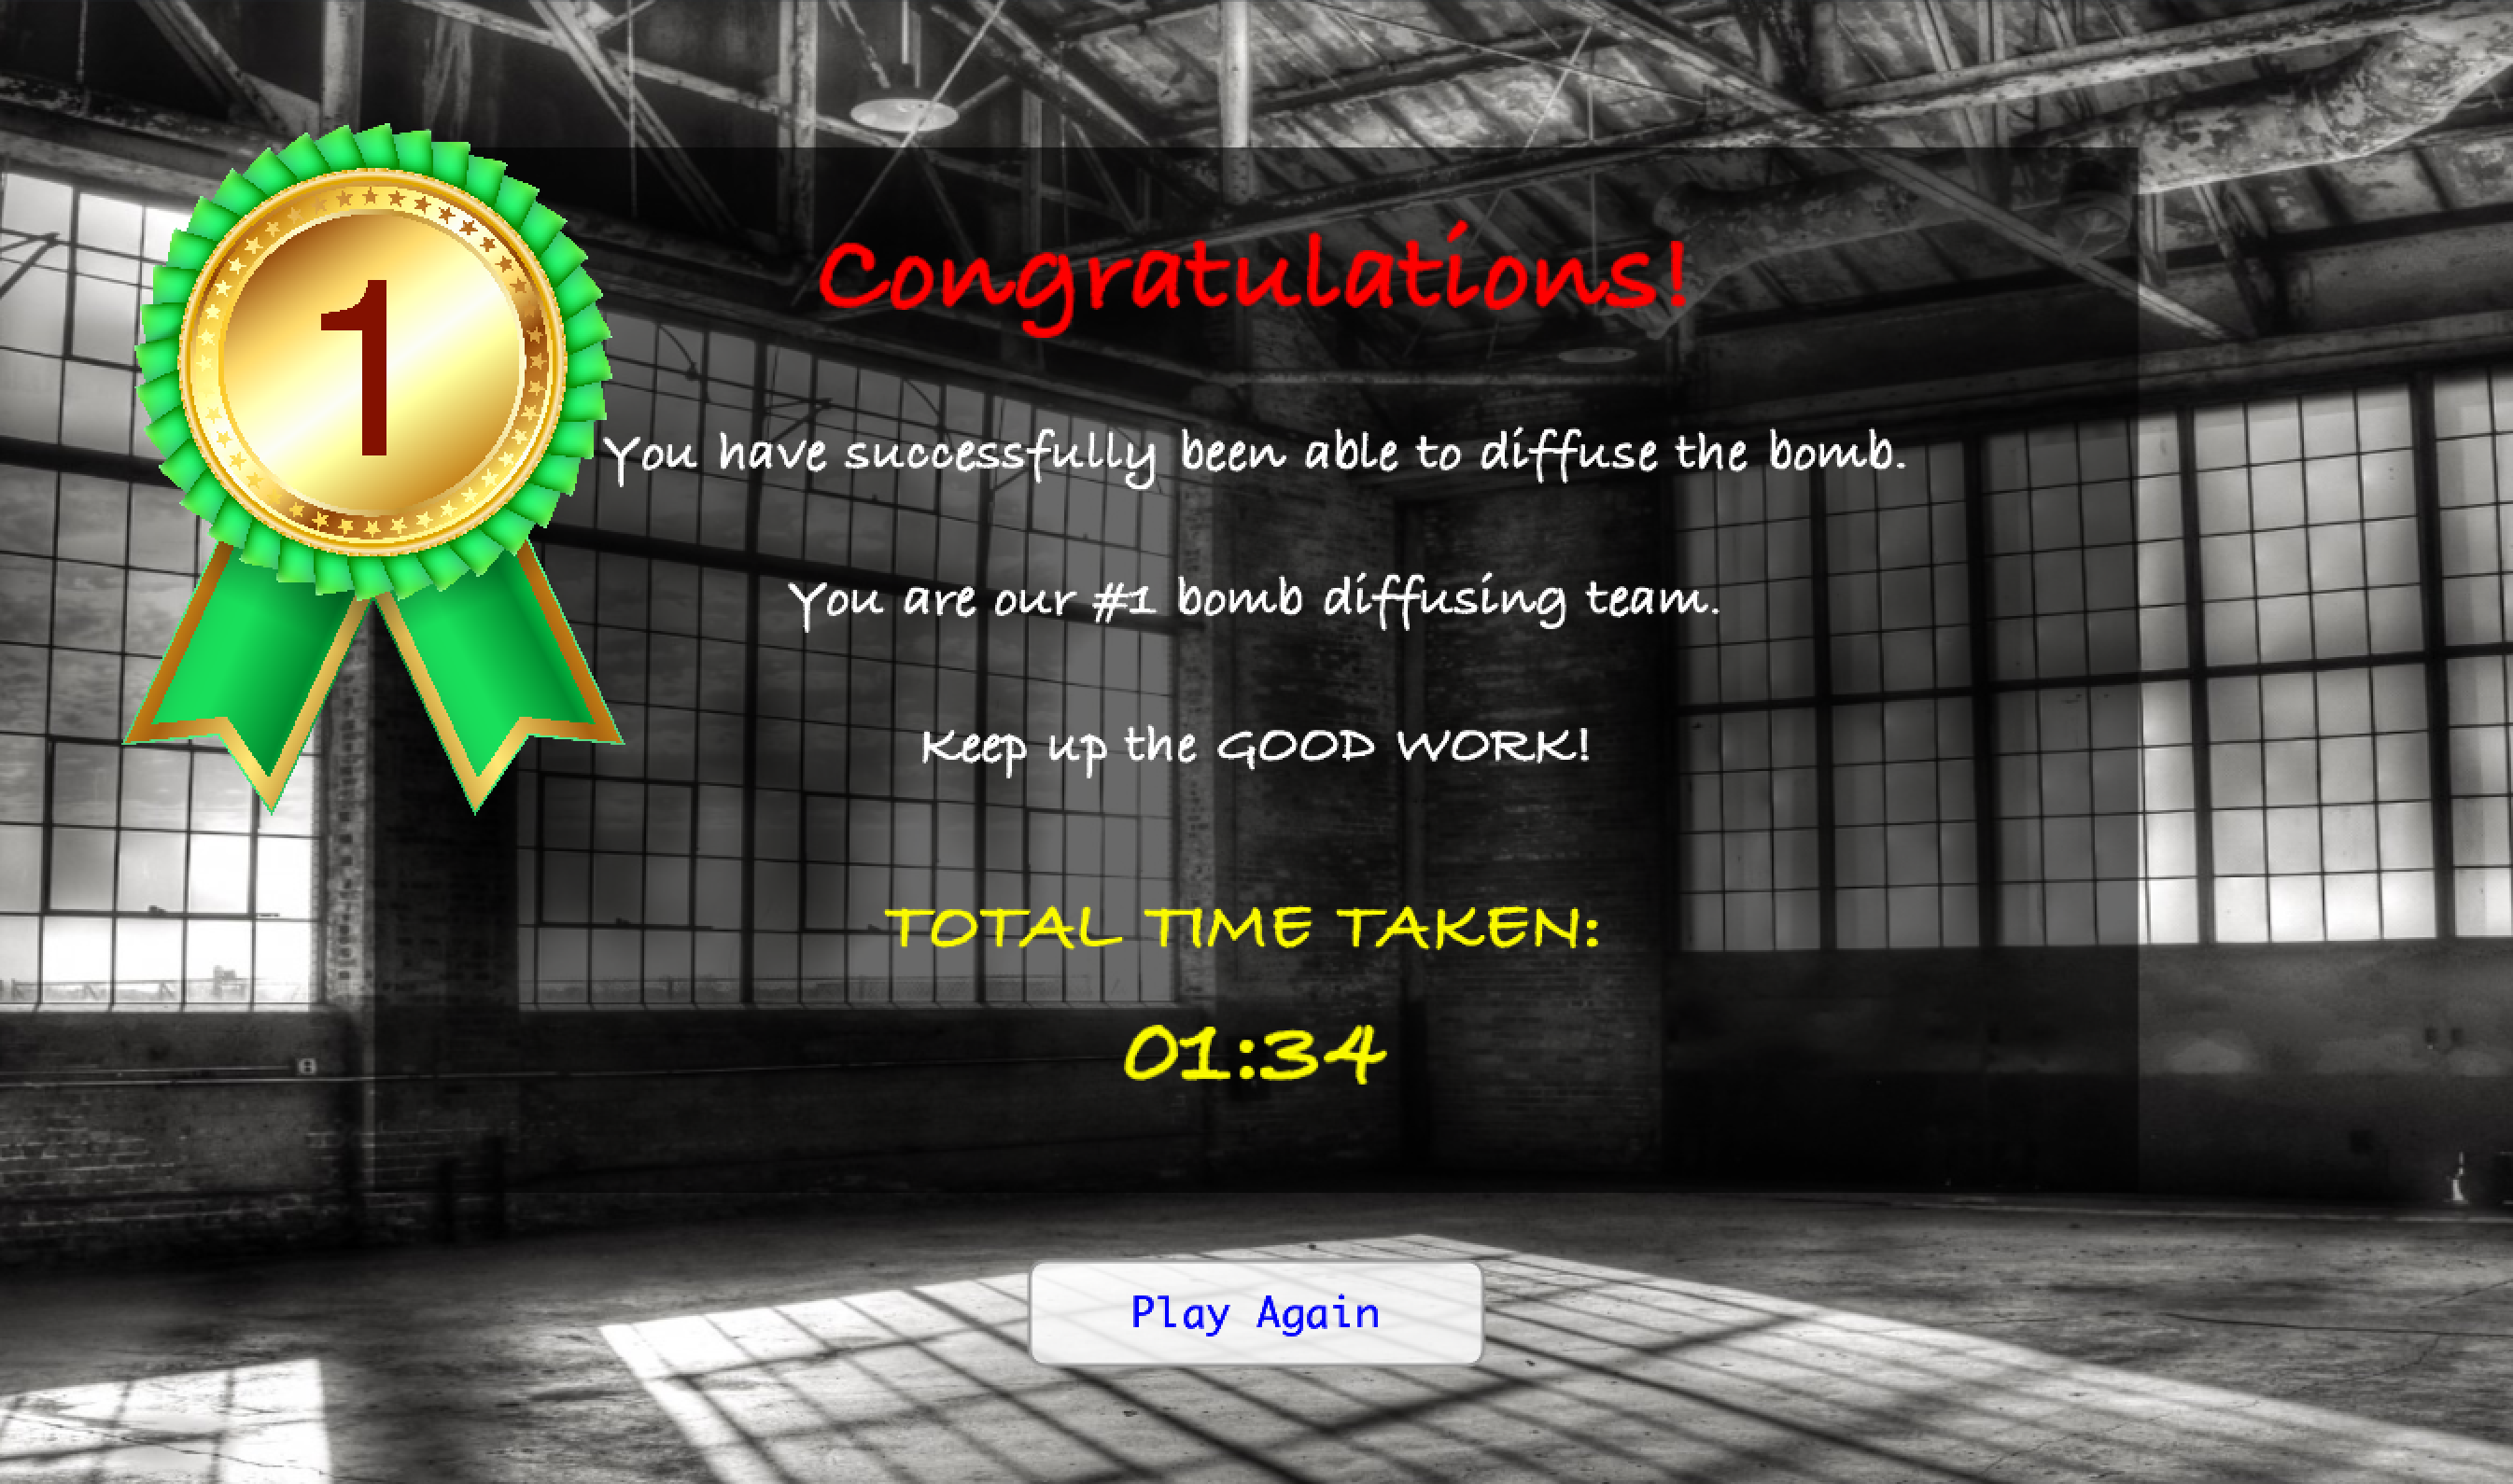
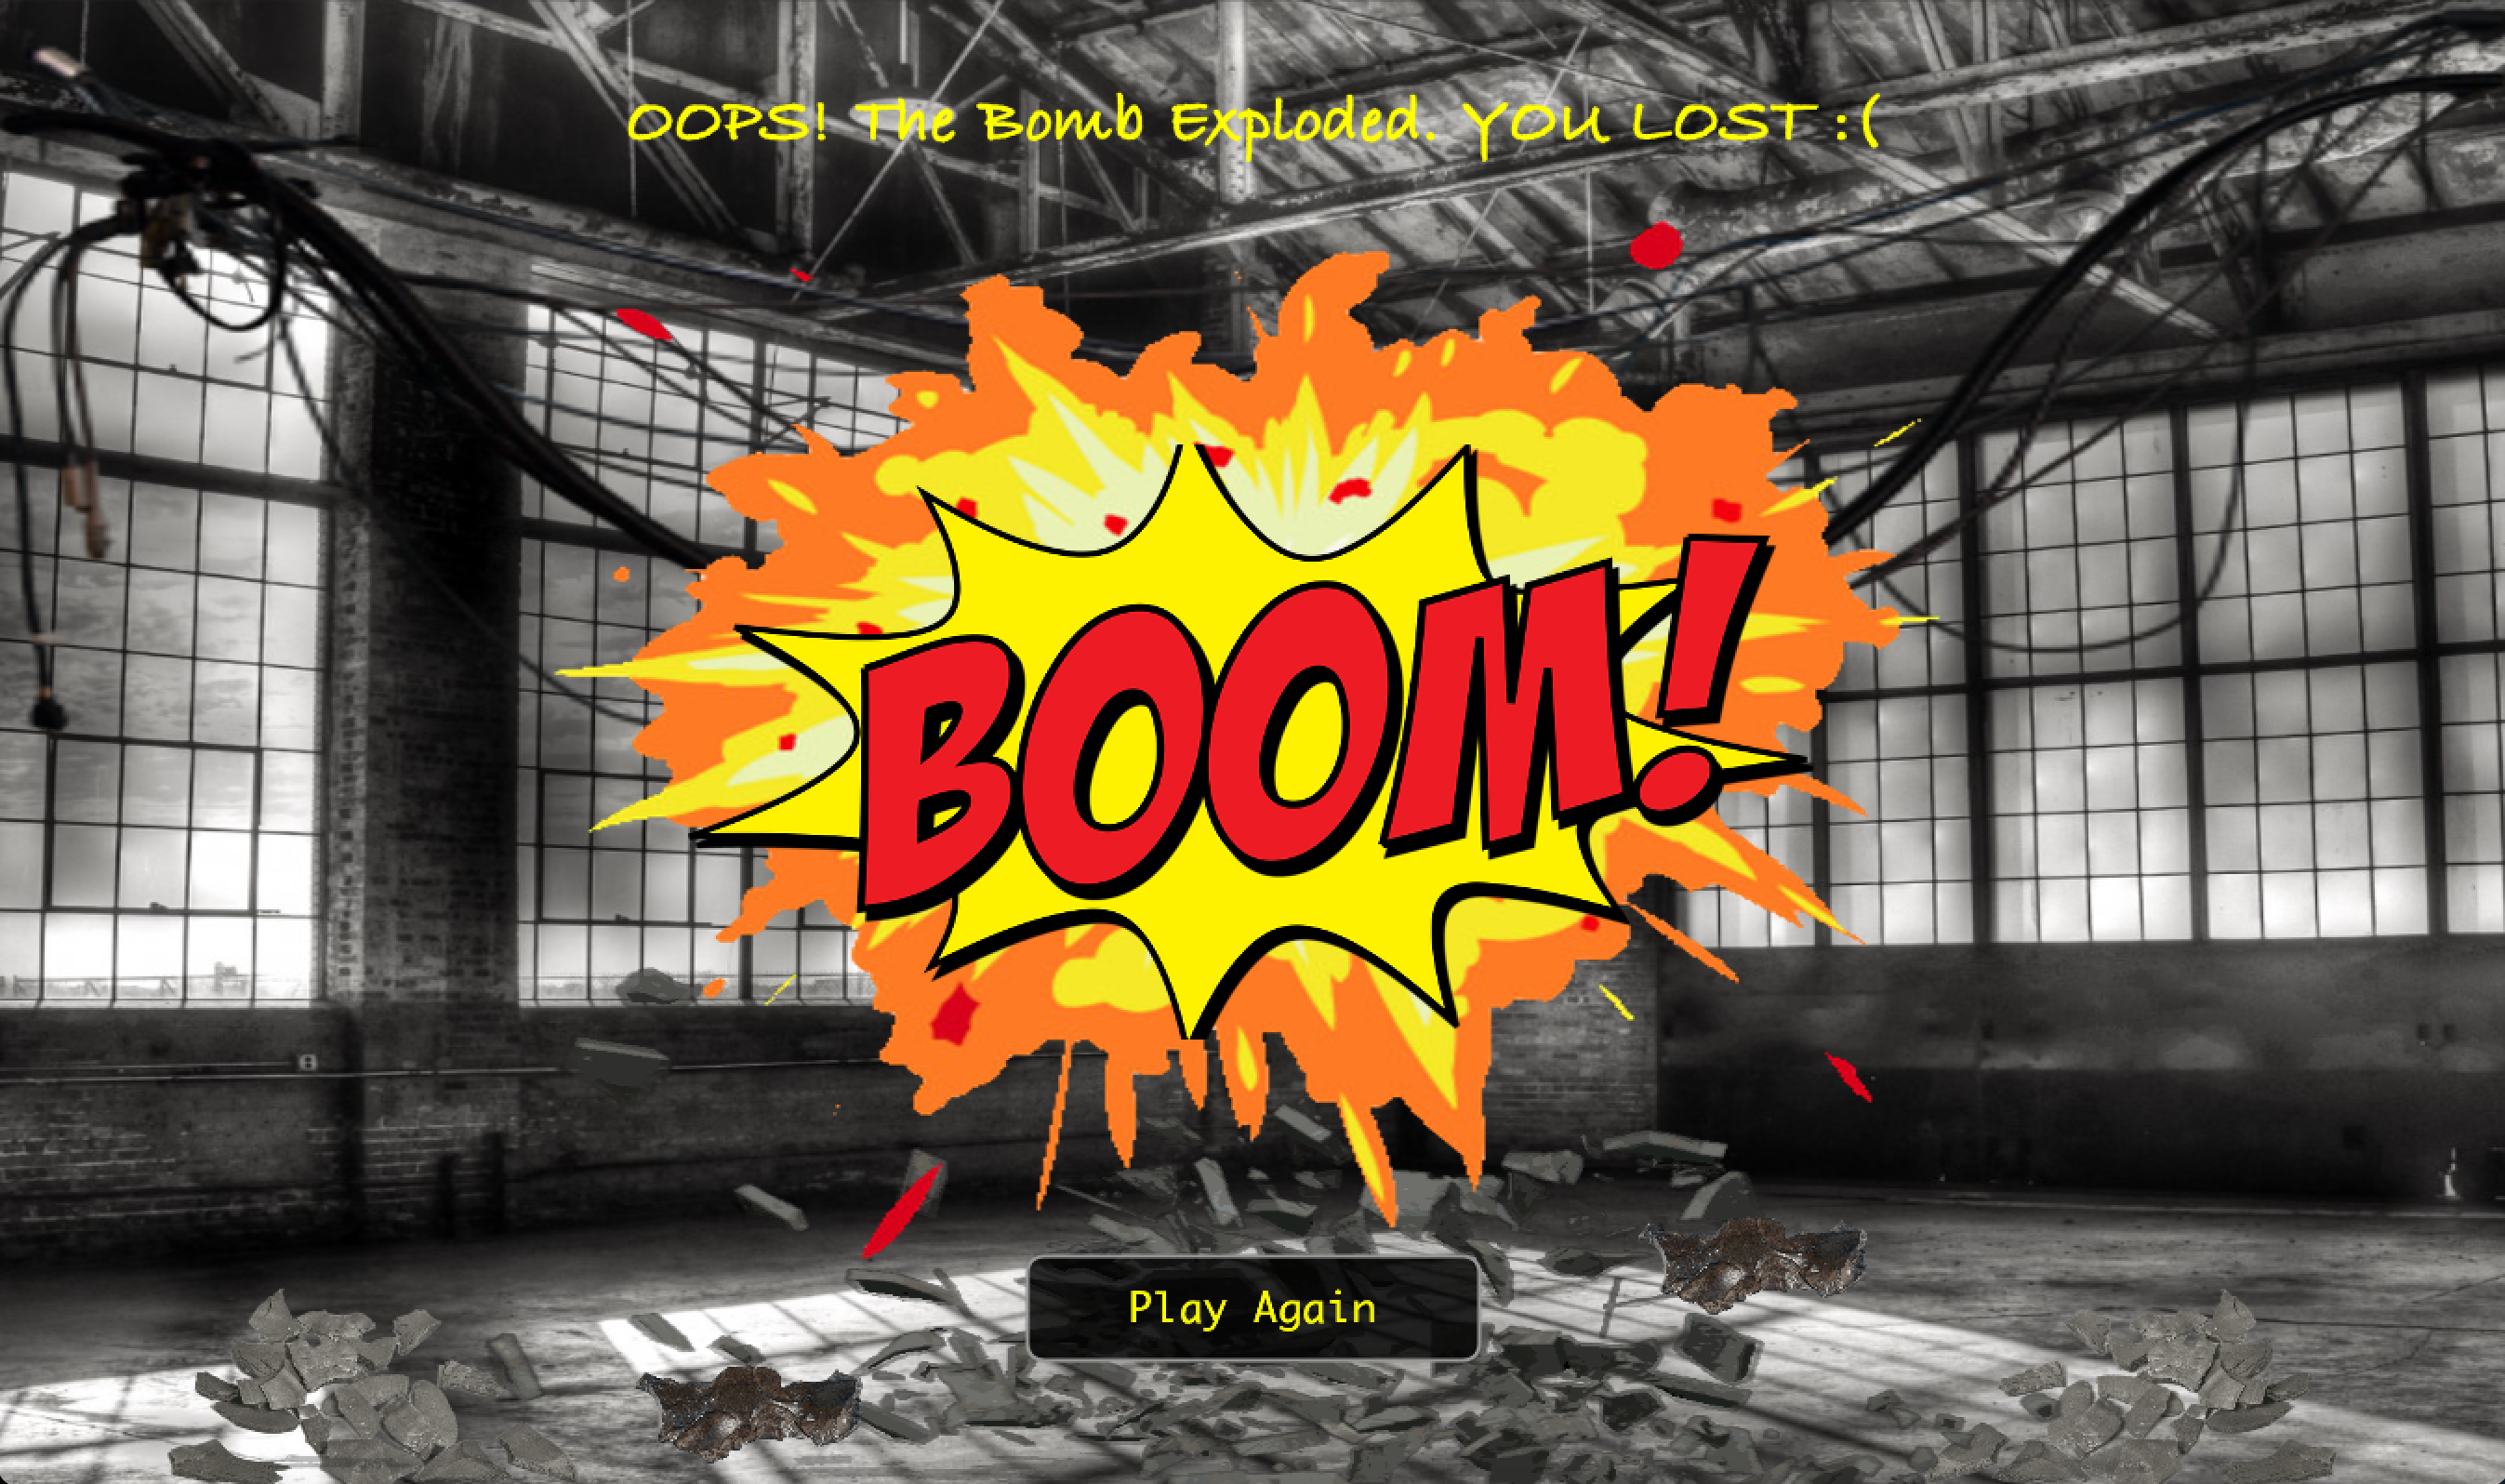
We decided to add sounds for user experience and specific feedback to the user. For example, it was essential to indicate to the user when their time was reduced. So we added a sound for this to the Processing program. Then, of course, you want to hear an explosion right when the bomb goes off? Should look real. So, we decided to add a sound to both our end screens – if you win or lose. Finally, we also have the best sound of all, the bomb being defused and the game being won!

Game Design and UI

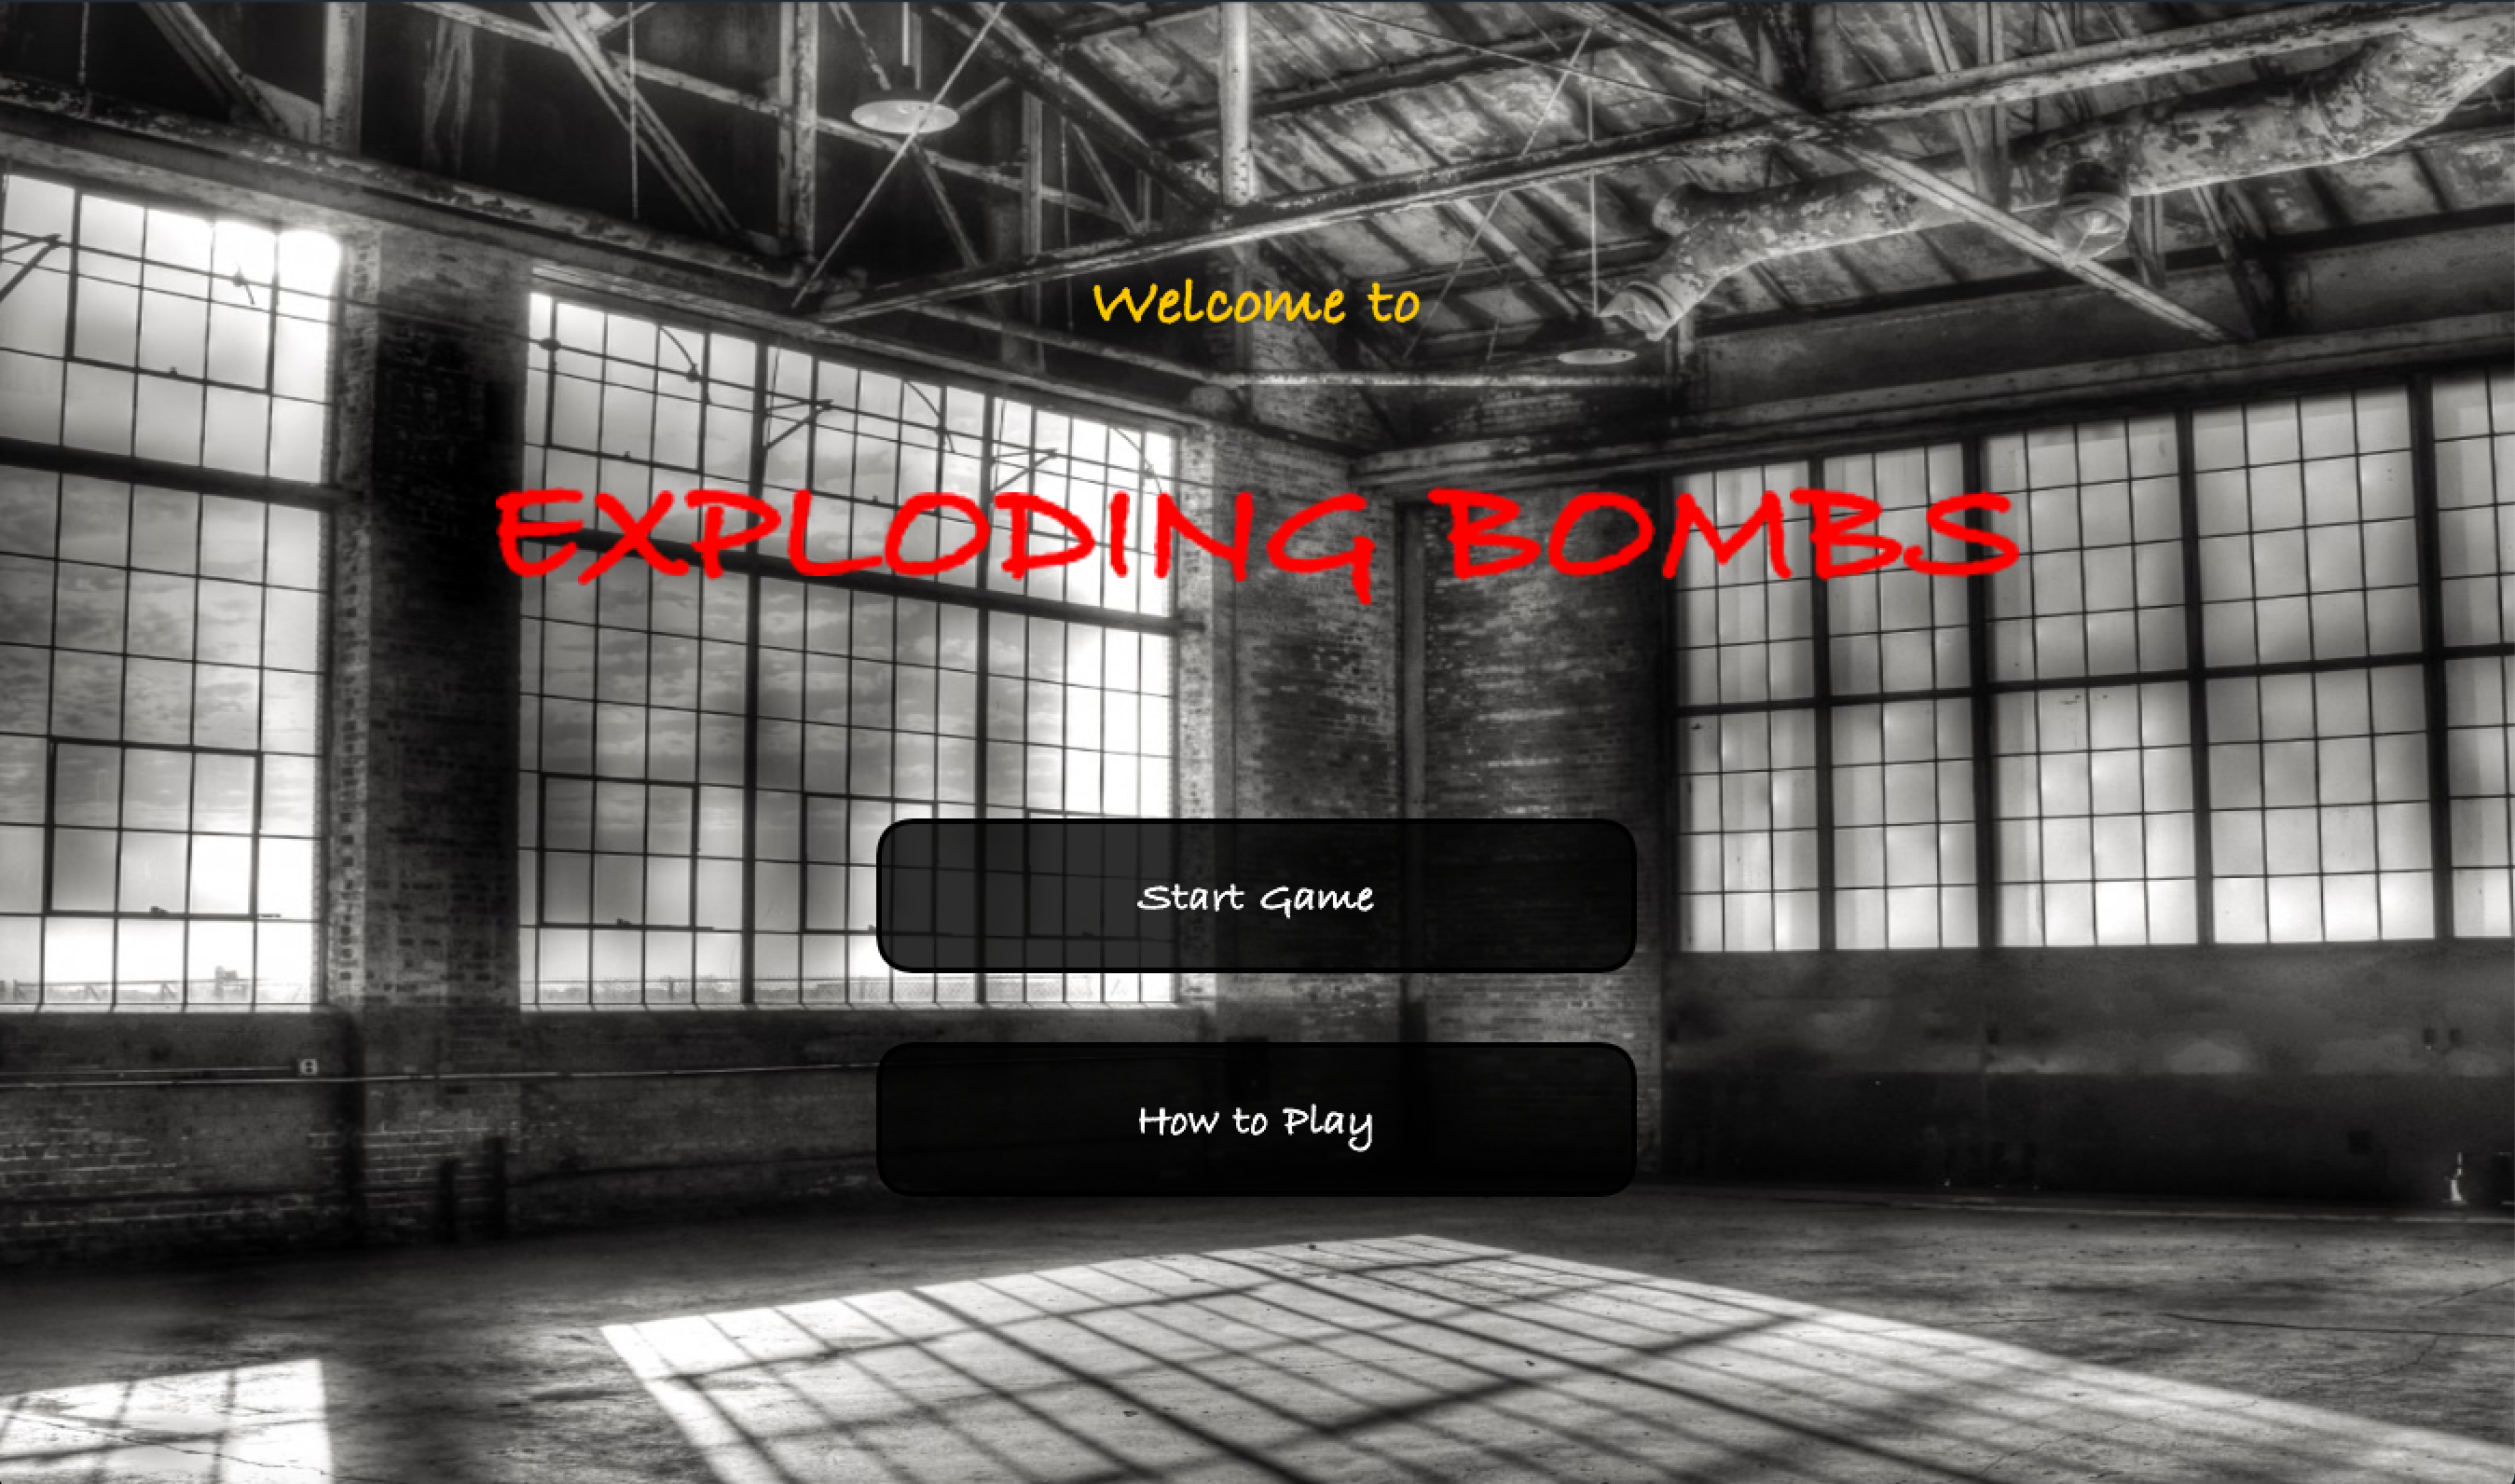
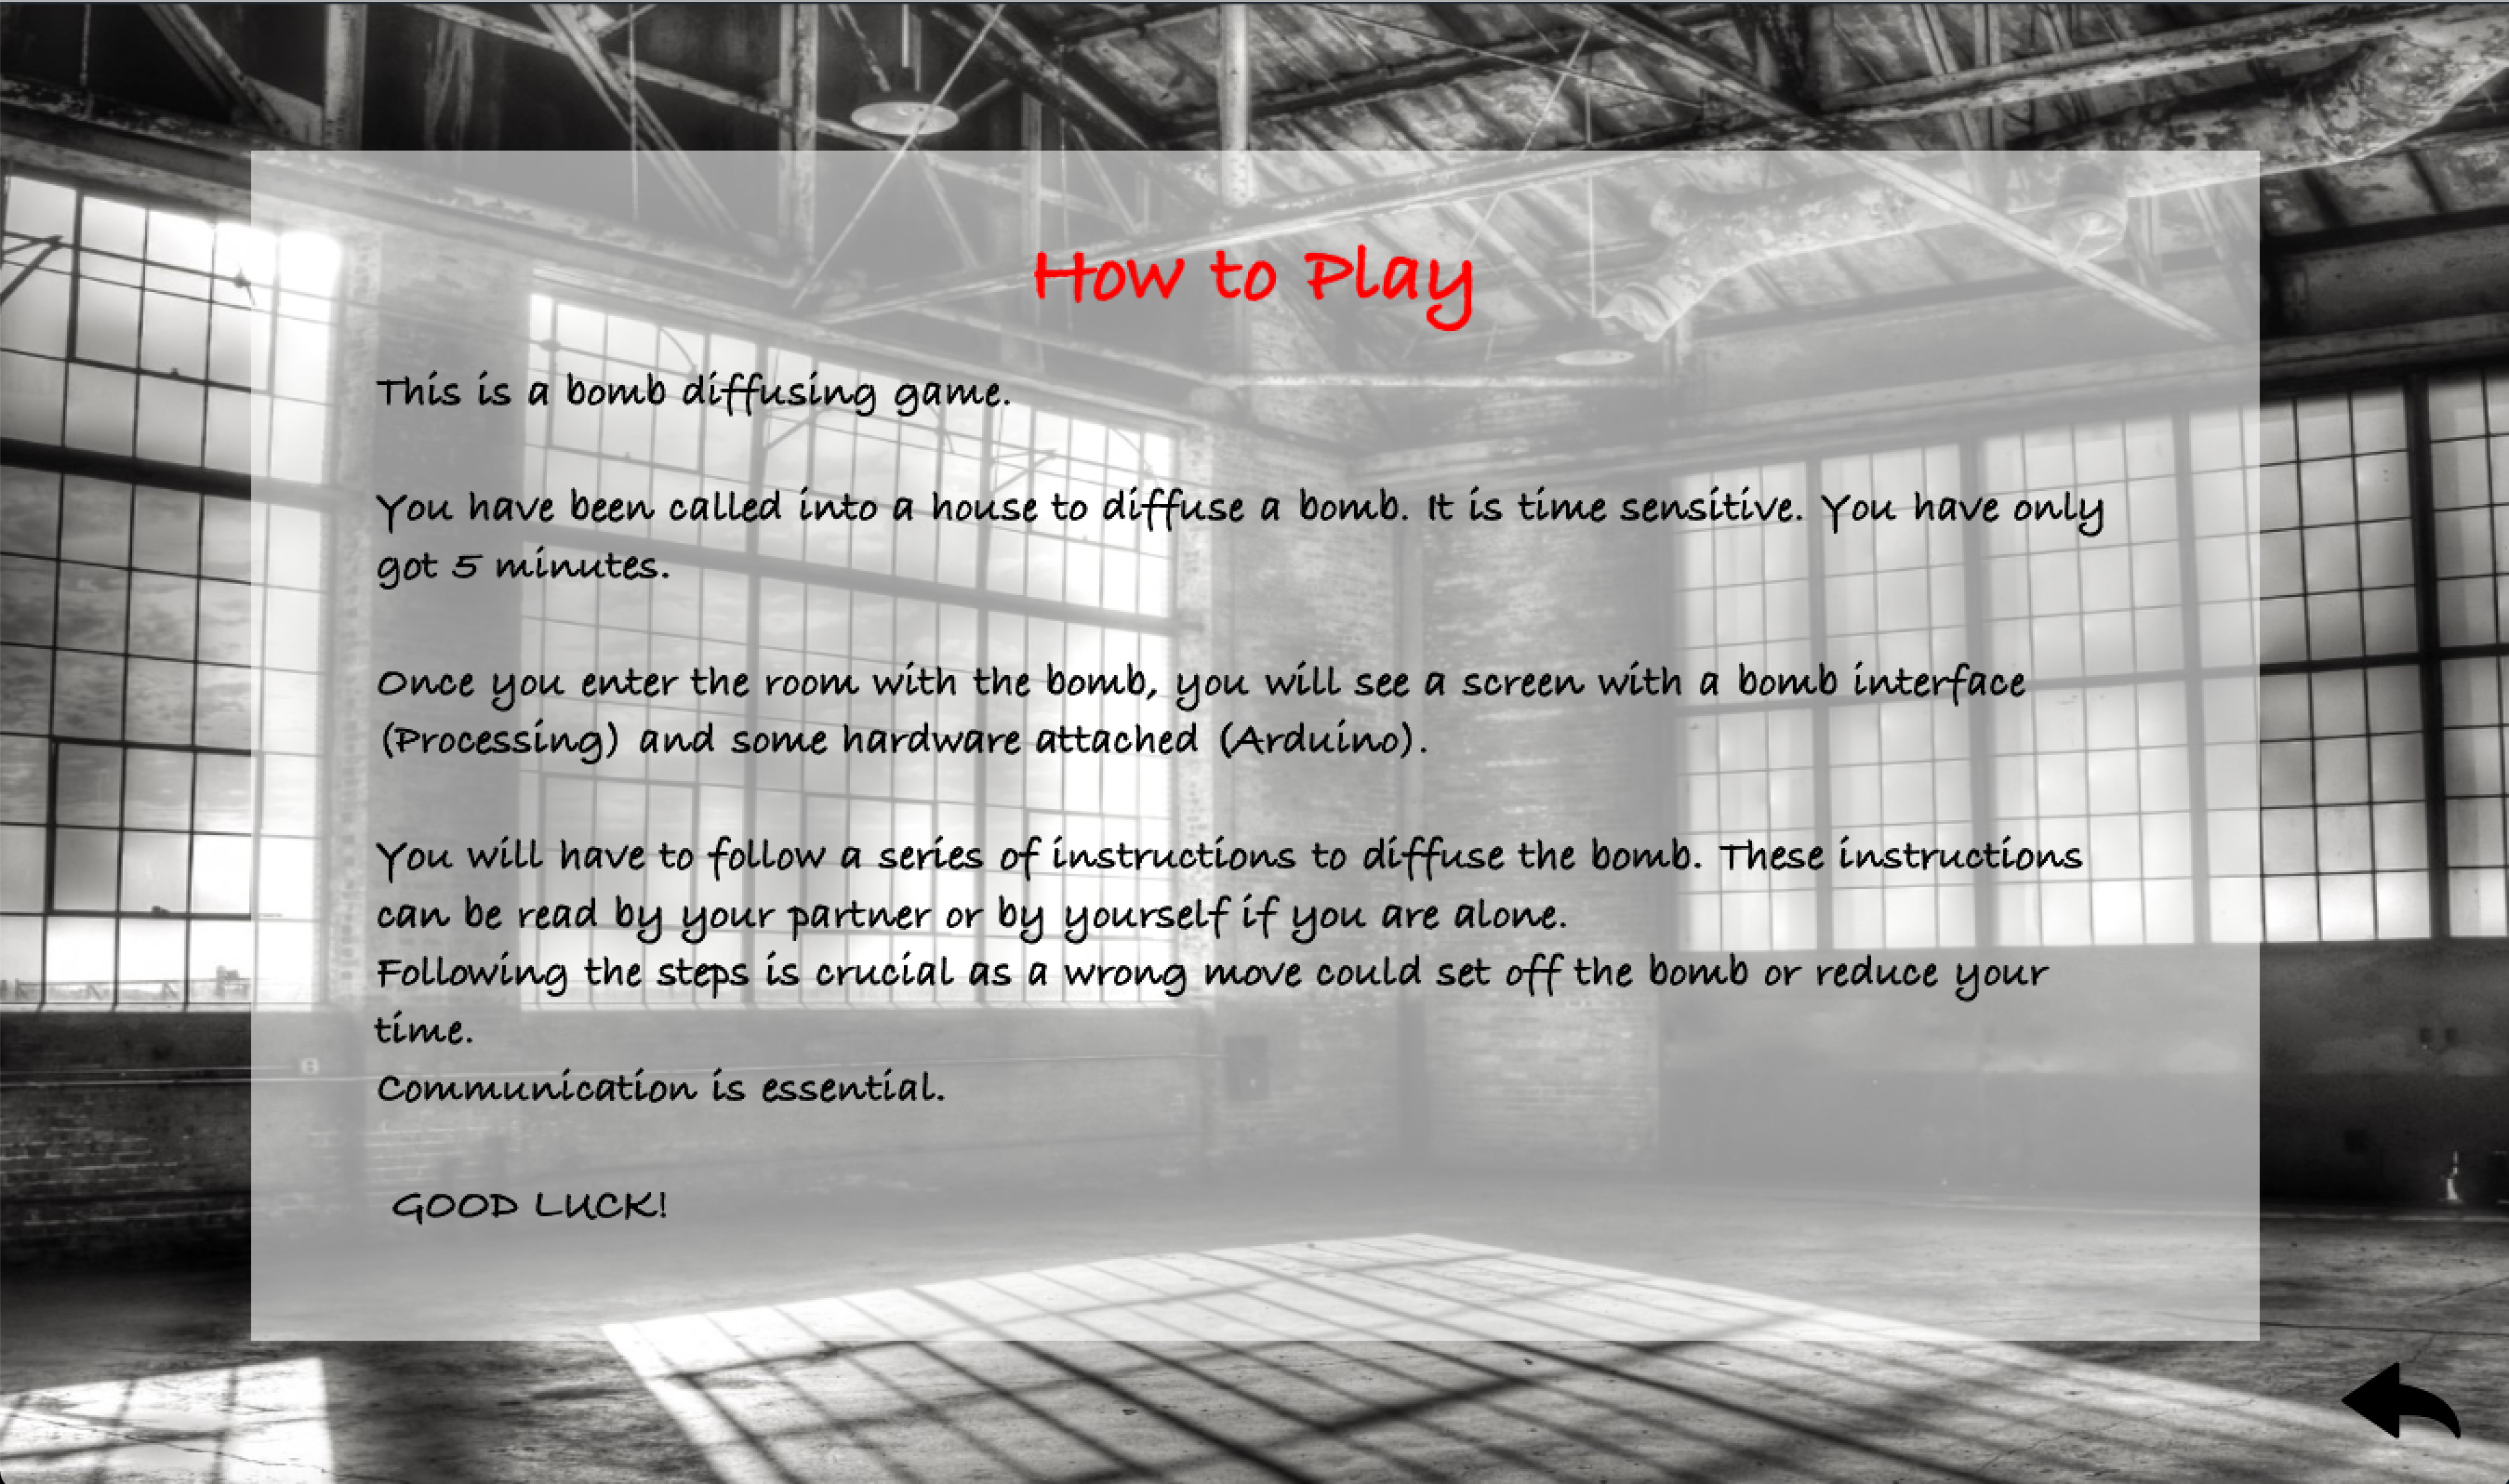
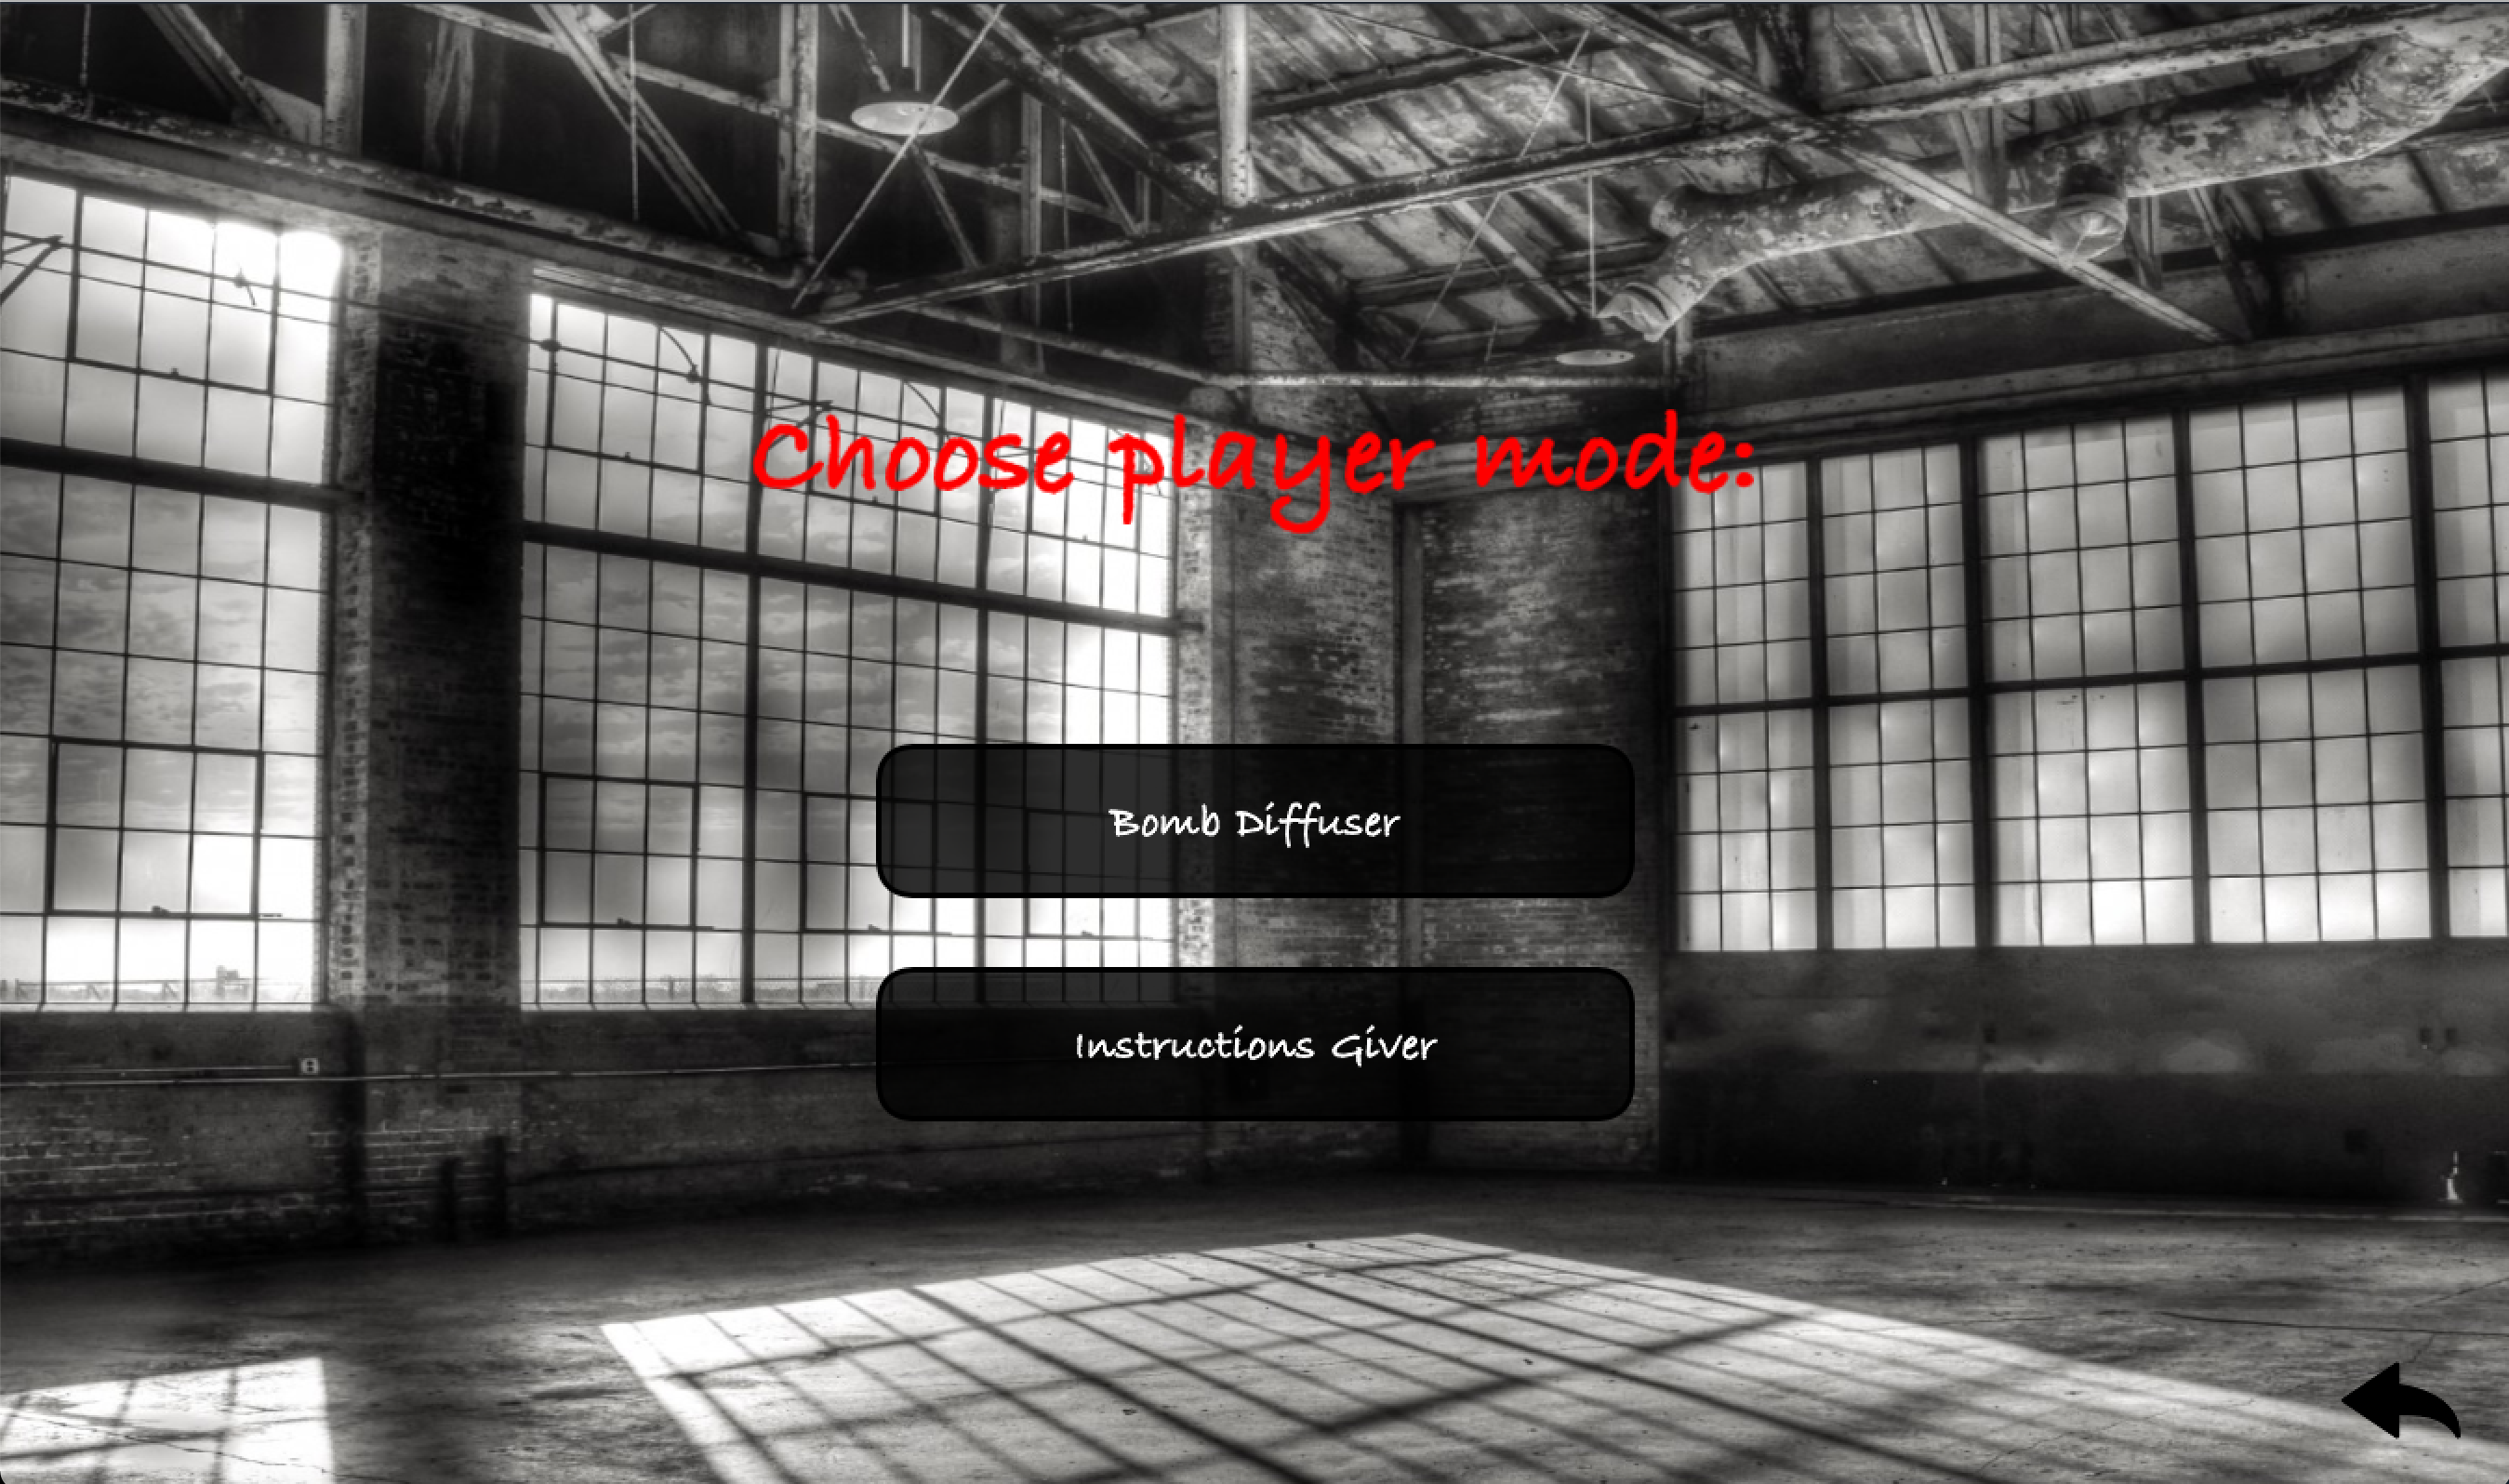
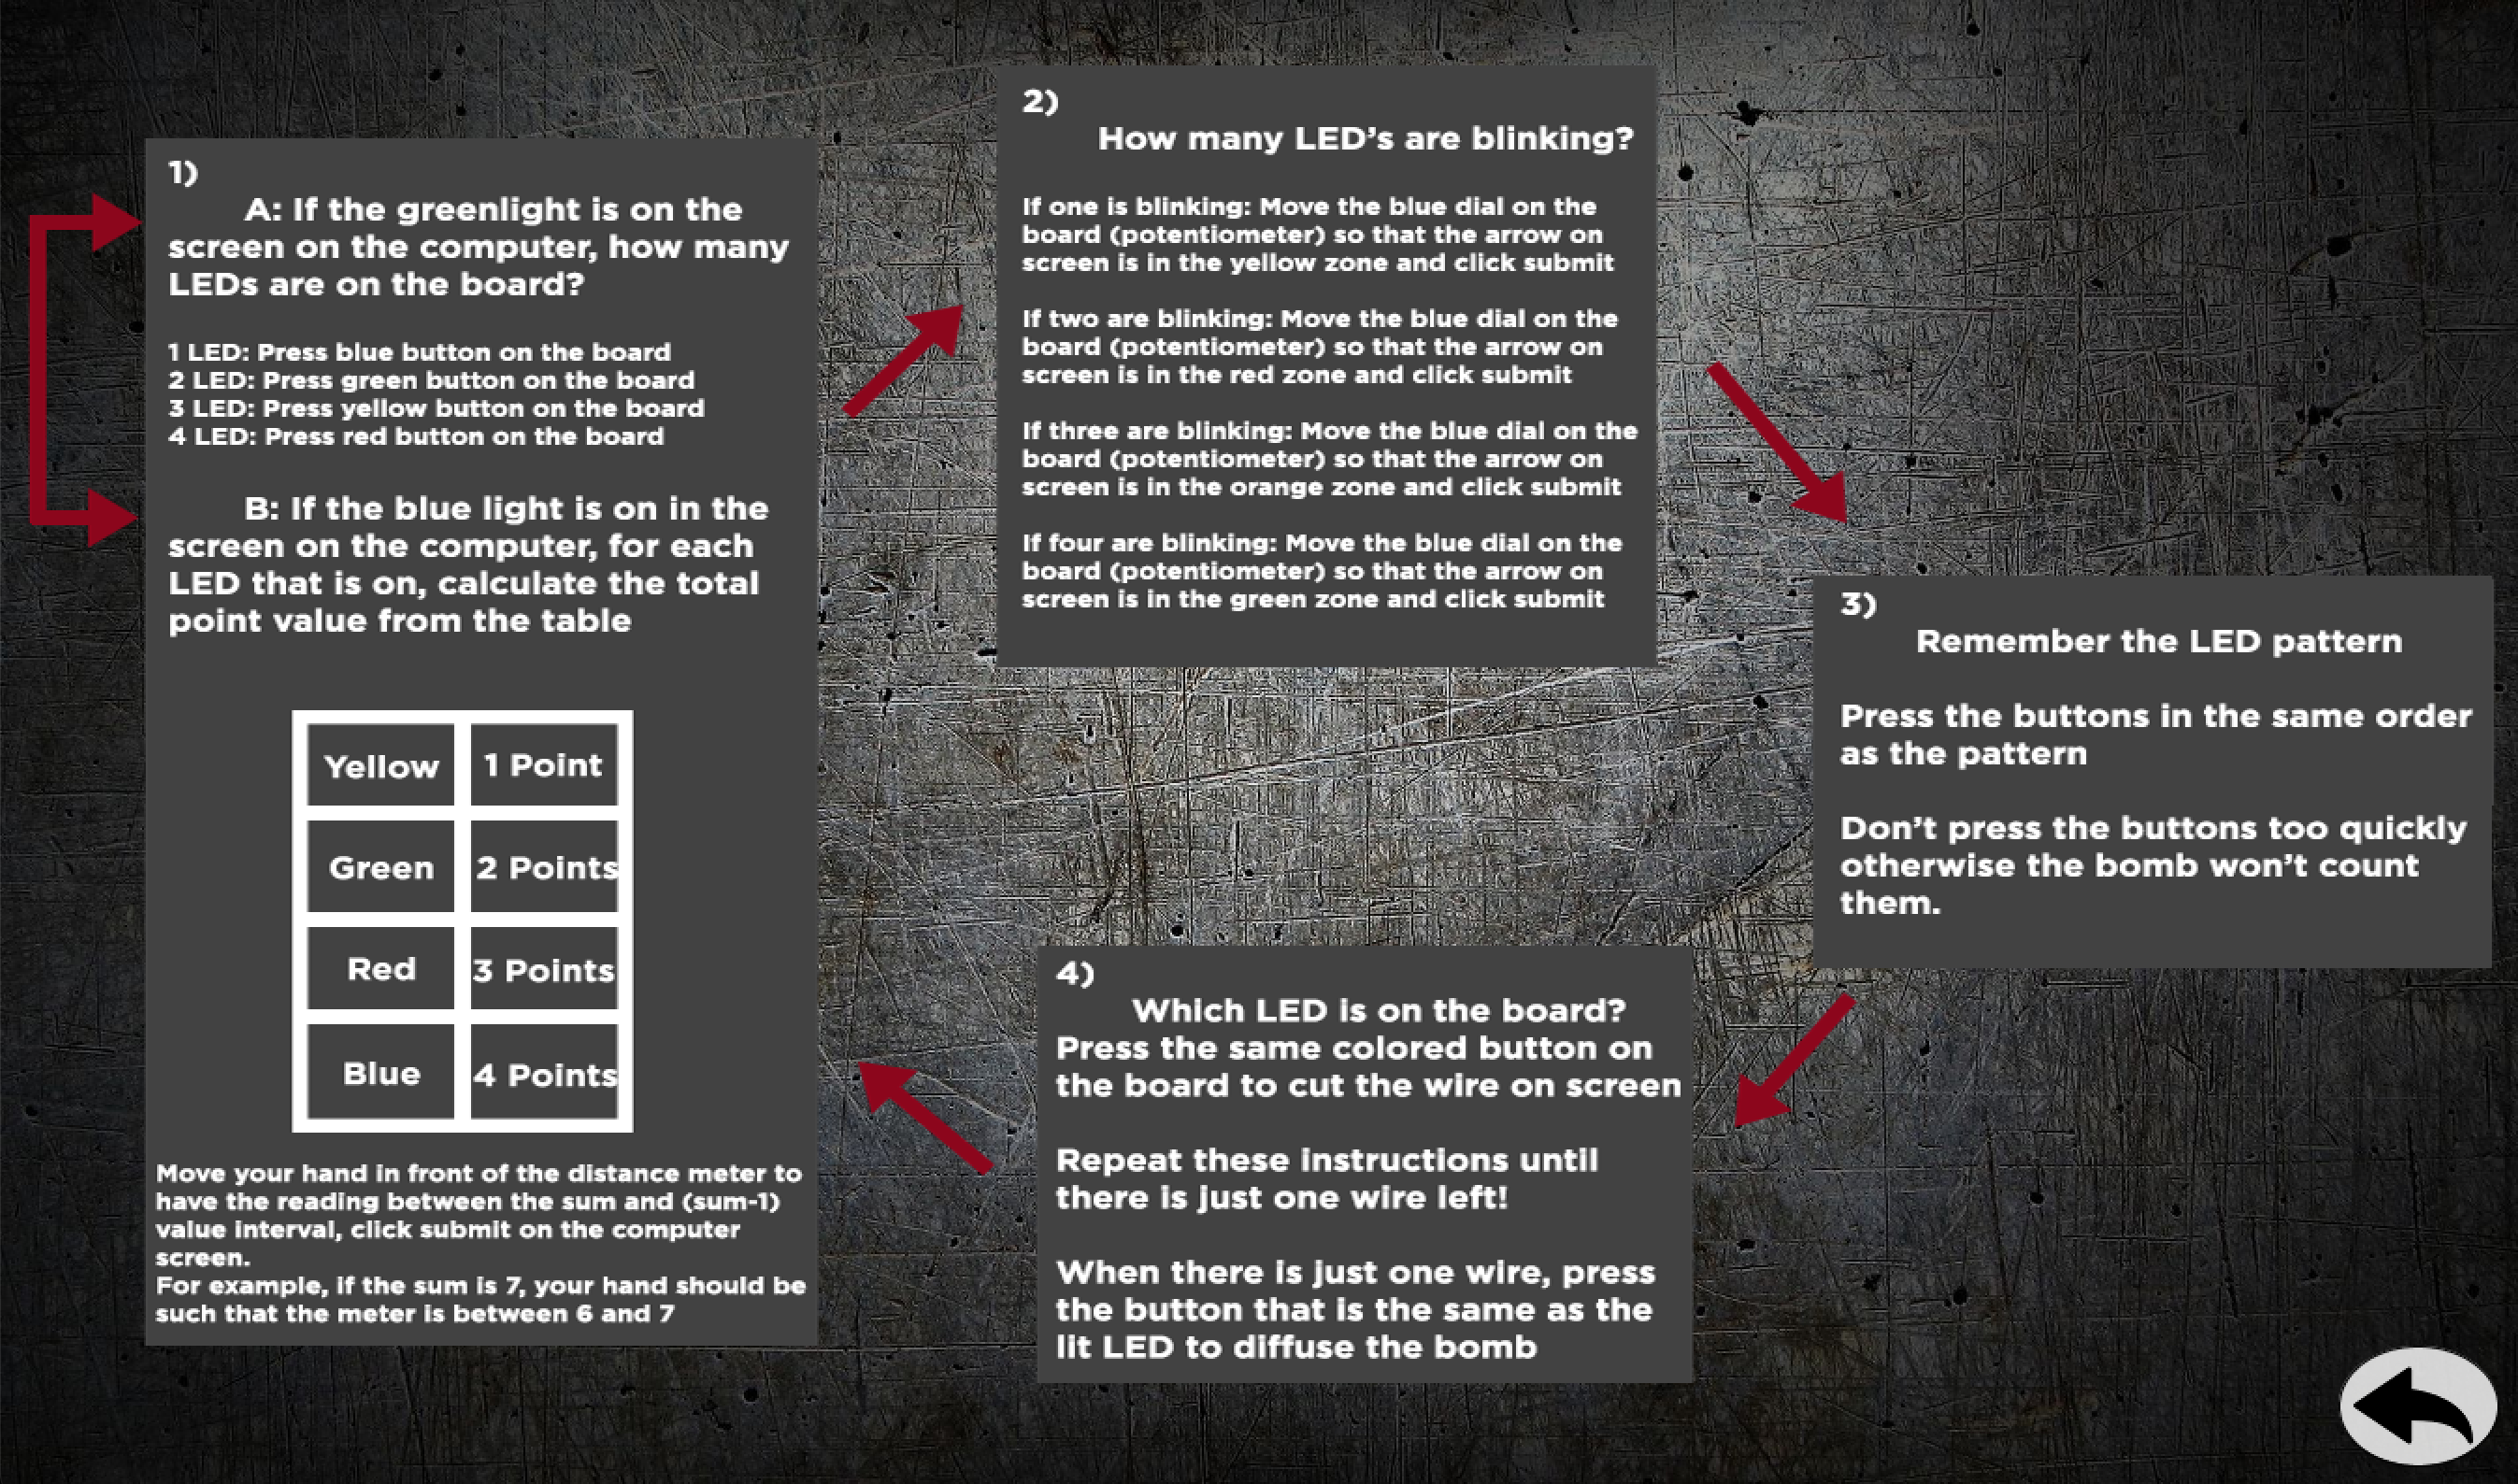
We made a total of 6 screens for the whole game (the last one having 2 parts) – 1) A start/menu screen, 2) a ‘how to play’ screen, 3) a player mode choosing screen which would navigate to the game screen or bomb instructions screen, 4) bomb instructions screen, 5) the game screen, 6) end screen: win screen and lose screen.

Honestly, UI takes quite some time to implement because of all the design, color choices, etc. We even added back buttons for easy navigation and a ‘play again’ button if the user wishes to go back and replay the game, switch roles with their partner, etc.

Our game is also designed in a way that it can be 2 players or 1 player. For one player, all you would have to do is keep a screenshot/printout of the bomb instructions printed out and handy.

See a video for each in the end!

User Testing

Shoutout to all our friends who played the game. Several nights we had friends trying out the game which helped us make several changes. We found that the instructions needed to be written in a more straightforward manner about the flow of the game, non-technical language used to describe the Arduino, as well as some limitations in what Processing was handling.

Final Game Presentation

The video for Team Cole and Shreya:

The video for Cole v/s Shreya

Code

The complete code can be found here. 

https://drive.google.com/file/d/1tCewHvnM6zKLZ8ocNCzcTAer62c9MZxg/view?usp=sharing

It can also found on the Github Shreya and I used regularly to merge our code together

https://github.com/crb596/IntroToIMFinal


Interesting Parts of the Code:

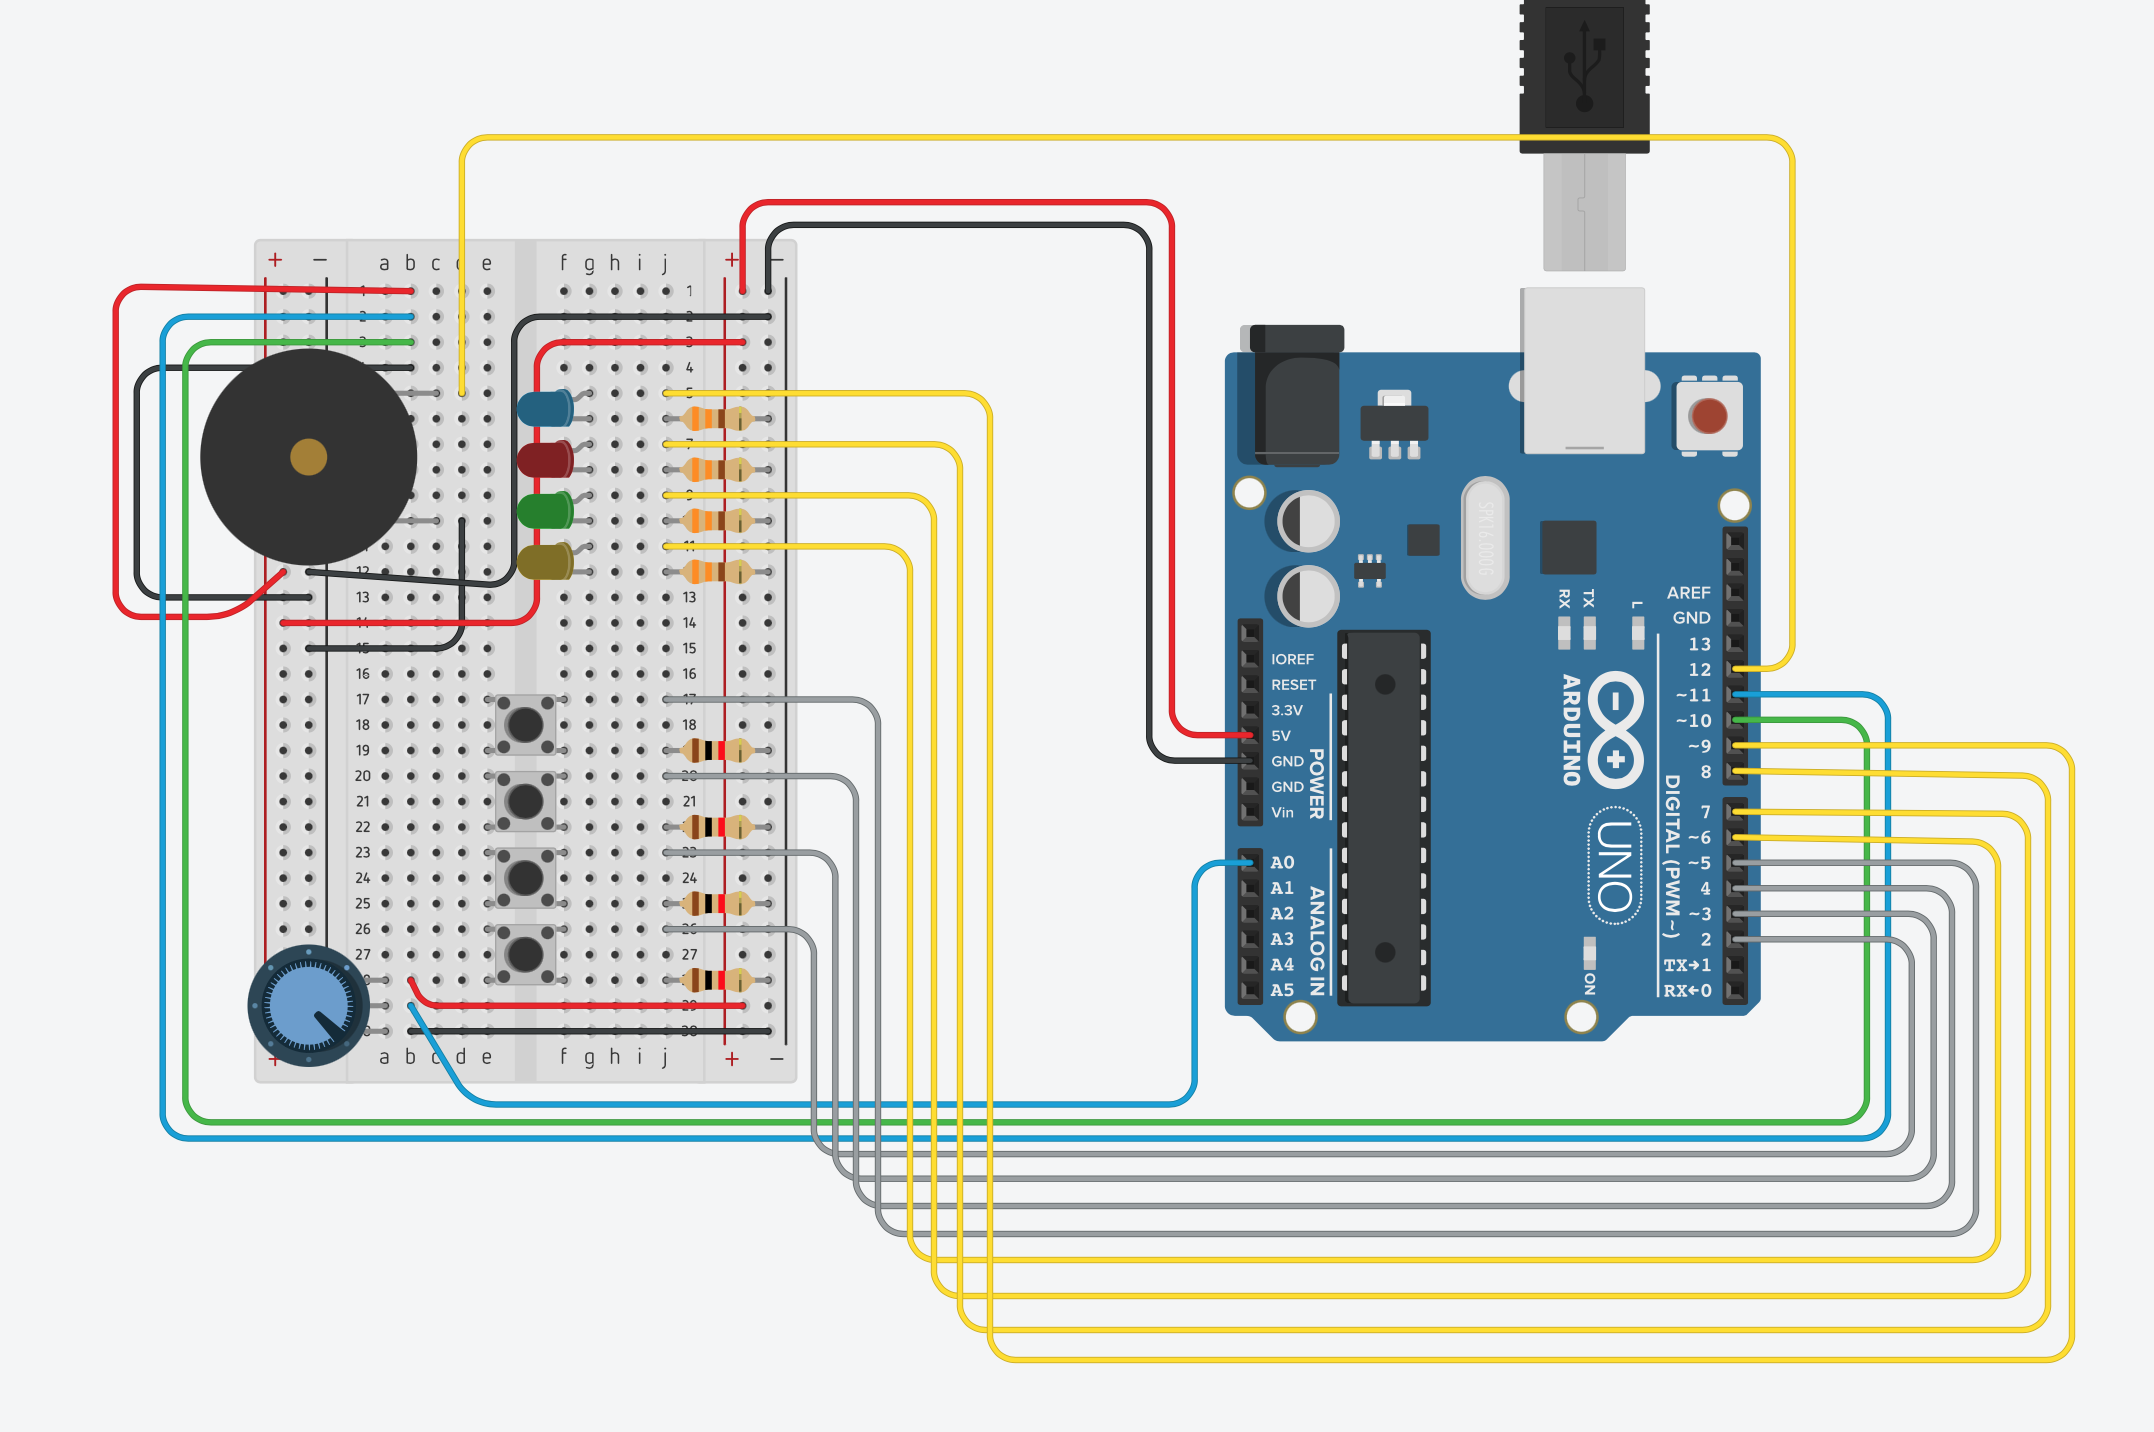
Processing/Arduino communication: As Processing is more powerful running on a laptop than on a computer, all the logic about which lights are on is done via Processing. Every handshake involves sending 4 boolean variables, one for each light, as well as two bomb state variables (exploded or defused) to the Arduino. Arduino receives this information, lights up the passed LEDs or goes into an exploded/defused state. Arduino then returns the state of each button, the distance meter reading, and the potentiometer back to Processing. 


Random LED: Each time the bomb goes into a new phase, the variables for each light are randomized within the constraints of that round. For example, on the round where a random amount of LEDs flash, first a random number 1-4 is chosen and then that many random LEDs are flashed.


Button Press/Used: Since Processing is running at 60fps(if we are lucky) and Arduino is running at a much faster rate, we had to add a variable that would determine if a button is being pushed, similar to the function mouseClicked(){}. We created a boolean variable that would be set to true whenever a button was recorded being down and back to false when released so we could keep track between rounds and extra inputs were not recorded.


Bomb timer: Processing gives current time in milliseconds using the function millis(). We used milliseconds as a unit to do all timer calculations – recording start time of game, getting current time, calculating time elapsed and time left, periodically updating those and also noting the final time taken to diffuse the bomb for the end screen. However, we wanted the time to be displayed in the usual format of minutes and seconds, so we made a convert time function to display it in the appropriate format.


Final Project Update 2

Update:

The project is moving along well. We have most of the visuals working, the Arduino (bomb) connecting with Processing and reading/writing data, and about half of the game phases have been made. This has allowed us to do some play testing. We are moving along well despite some external circumstances.

Arduino/Processing Communication:

Arduino and Processing have to be constantly communicating within our game. Now every cycle Processing is writing to Arduino which LED’s to turn on, as well if to turn on the buzzer or now. Arduino responds with various inputs including the pressing of each button and the values of the distance meter and the potentiometer.  By letting Processing handle the logic of which LEDs to turn on this allows the more powerful CPU of the computer to take the brunt of the calculations while the smaller Arduino processes will not be overwhelmed.

Game:

Following the instructions we posted last week, we have also began coding the game to be producing random outputs to Arduino and awaiting specific feedback from a user. The outputs have to be random so that the game is different each time, but controlled enough that we know what the possibilities could be and make sure the player can respond appropriately with what they are seeing.

To do so I coded a class which will contain functions for each phase of the game. Each phase will initially set some variables that are random generated, and then proceed to process inputs and compare them to these variables. Each function then decides if the user has passed this phase or if they have set the bomb off.

class GameStage {

  //Manage flow of game
  int gameStage; //Which instruction set is the player on?
  boolean pass; //Has the user passed the stage?
  boolean failed; //Has the bomb been set off

  //Timers used for flashing
  long timerStart;
  int flashLength;

  //Which stages have been set up 
  boolean stageTwoSetup = false;
  boolean stageThreeSetup = false;

  //Stage 2 variables
  int numberOfLights;
  boolean flashing[] = {false, false, false, false};
  boolean onOff;

  //Stage 3 variables
  int order[] = {-1, -1, -1, -1};  //Order LEDs flash
  boolean buttonsPressed[] = {false, false, false, false};
  int orderIndex;  //Which button should be pressed (on 0th button, 1st, 2nd, or 3rd)
  boolean buttonUsed = false; //Used to determine if a button is being pressed


  //Default constructor
  GameStage() {
    gameStage = 2;
  }

  int runGame() {
    if (gameStage == 2) {
      return stageTwo();
    }
    if (gameStage == 3) {
      return stageThree();
    }
    return -1;
  }

  //Blink lights until the user moves the potentiometer to the right zone
  int stageTwo() {
    //If first time on stage
    if (!stageTwoSetup) {
      numberOfLights = int(random(4)+1);  //Set how many lights are flashing
      timerStart = millis();
      flashLength = 500;
      onOff = false;
      stageTwoSetup = true;

      //Set which lights will flash 
      for (int i = 0; i < numberOfLights; i++) {
        int randomIndex = int(random(4));  //Set random lights to blink
        while (flashing[randomIndex] == true) {
          randomIndex = (randomIndex + 1)%4;  //Advance until there is an index set to false
        }
        flashing[randomIndex] = true;
      }
    }

    //Flash lights if needed
    if (millis() - flashLength > timerStart) {
      onOff = !onOff;
      timerStart = millis();
      for (int i = 0; i < 4; i++) {
        if (onOff) {
          lights[i] = flashing[i];
        } else {
          lights[i] = false;
        }
      }
    }

    //Check for a user input
    if (numberOfLights == 1) {
      if (potentiometer >= 512 && potentiometer < 777) {
        //In yellow
        gameStage++;
      }
    } else if (numberOfLights == 2) {
      if (potentiometer >= 0 && potentiometer < 256) {
        //In red
        gameStage++;
      }
    } else if (numberOfLights == 3) {
      if (potentiometer >= 256 && potentiometer < 512) {
        //In orange
        gameStage++;
      }
    } else if (numberOfLights == 4) {
      if (potentiometer >= 777 && potentiometer < 1024) {
        //In green
        gameStage++;
      }
    }
    return gameStage;
  }

  //Remeber the LED pattern, push the buttons in the same order
  int stageThree() {
    //Setup stage three
    if (!stageThreeSetup) {
      //Choose order of LEDS
      for (int i = 0; i < 4; i++) {
        //Chose random index to put light in order
        int randomIndex = int(random(4));
        while (order[randomIndex] != -1) {
          randomIndex = (randomIndex + 1) % 4;
        }
        order[randomIndex] = i;  //Asign light randomly in order
      }

      //Set timers
      timerStart = millis();
      orderIndex = 0;
      stageThreeSetup = true;
    }

    for (int i = 0; i < 4; i++) {
      print(buttonPressed[i] + ", " );
    }
    println();

    //Flash lights in order//If timer if 0 - 199ms
    if (millis() - timerStart < 400) {
      lights[order[0]] = true;
      lights[order[1]] = false;
      lights[order[2]] = false;
      lights[order[3]] = false;
    }
    //If timer is 200-399ms
    else if (millis() - timerStart < 800) {
      lights[order[0]] = false;
      lights[order[1]] = true;
      lights[order[2]] = false;
      lights[order[3]] = false;
    }
    //If timer is 400-599ms
    else if (millis() - timerStart < 1200) {
      lights[order[0]] = false;
      lights[order[1]] = false;
      lights[order[2]] = true;
      lights[order[3]] = false;
    }
    //If timer is 600-799ms
    else if (millis() - timerStart < 1600) {
      lights[order[0]] = false;
      lights[order[1]] = false;
      lights[order[2]] = false;
      lights[order[3]] = true;
    }
    //If timer is below 1200
    else if (millis() - timerStart < 3000) {
      lights[order[0]] = false;
      lights[order[1]] = false;
      lights[order[2]] = false;
      lights[order[3]] = false;
    } else {
      timerStart = millis();
    }

    //Look for user input
    //Look to see if no buttons are being pressed
    if (buttonUsed) {
      boolean tempNotUsed = true;
      for (int i = 0; i< 4; i++) {
        if (buttonDown[i] == 1) {
          tempNotUsed = false;
        }
      }
      if (tempNotUsed) {
        buttonUsed = false;
      }
    }

    //If no buttons are being pressed, look for one to be pressed, otherwise wait for them to be released before being used again
    if (!buttonUsed) {
      //Yellow button pressed
      if (buttonDown[0] == 1) {
        buttonUsed = true;
        //Check to see if the next button in the order is also a 0
        if (order[orderIndex] == 0) {
          orderIndex++;
        }
        //Wrong order
        else {
          fail = true;
        }
      }
      //Green button pressed
      else if (buttonDown[1] == 1) {
        buttonUsed = true;
        //Check to see if the next button in the order is also a 1
        if (order[orderIndex] == 1) {
          orderIndex++;
        }
        //Wrong order
        else {
          fail = true;
        }
      }
      //Red button pressed
      else if (buttonDown[2] == 1) {
        buttonUsed = true;
        //Check to see if the next button in the order is also a 2
        if (order[orderIndex] == 2) {
          orderIndex++;
        }
        //Wrong order
        else {
          fail = true;
        }
      }
      //Blue button pressed
      else if (buttonDown[3] == 1) {
        buttonUsed = true;
        //Check to see if the next button in the order is also a 3
        if (order[orderIndex] == 3) {
          orderIndex++;
        }
        //Wrong order
        else {
          fail = true;
        }
      }

      //Completed
      if (orderIndex == 4) {
        gameStage++;
      }
    }
    return gameStage;
  }
}


User Demo:

Here is an example of an early play test where I run through two of the stages of our game, but accidentally don’t follow the order of LED’s and set the bomb off!


Final Project Update

Shreya and I have been busy this week creating the set of instructions and the foundations of the bomb game. We met to create the instructions that one player will have and by doing so have defined the structure of our game and Arduino. We then created a Github and split up the tasks so we could begin.

https://github.com/crb596/IntroToIMFinal

Instructions:

Here is a link to the Google doc which defines the flow of the game and the all important instructions on how to defuse the bomb.

https://docs.google.com/document/d/1IC1wbFItw18_ripscYxjerpAAywCoYI5twqY-hYIsg0/edit?usp=sharing

Cole:

I finished creating the Arduino with all the wiring. I have on the board 4 LEDs, 4 buttons with corresponding colors to the LEDs, a potentiometer, a distance sensor, and a buzzer.

I have also created the Arduino code needed to control the whole board from  Processing as well as send the inputs from the sensors back.

Here is the Arduino circuit (note the distance meter in Tinkercad is a 3 pin, not a 4 pin variant like we have so I just placed 4 wires in the top left corner where the distance meter is actually at)


I have also written the following code to control this board and talk to Processing from our game.

(Code on WordPress no longer inserting?)

//Pins
const int blueLedPin = 9;
const int redLedPin = 8;
const int greenLedPin = 7;
const int yellowLedPin = 6;

const int potentiometerPin = A0;

const int blueButtonPin = 5;
const int redButtonPin = 4;
const int greenButtonPin = 3;
const int yellowButtonPin = 2;

const int echoPin = 10; // Echo Pin of Ultrasonic Sensor
const int pingPin = 11; // Trigger Pin of Ultrasonic Sensor
const int buzzerPin = 12;

//On or off values for led
int blue = 0;
int red = 0;
int green = 0;
int yellow = 0;

//Has the bomb gone off
int alarm = 0;

//Are the buttons being pushed
int blueButton = 0;
int redButton = 0;
int greenButton = 0;
int yellowButton = 0;

void setup() {
//Setup serial communication
Serial.begin(9600);
Serial.println(“0,0”);
pinMode(blueLedPin, OUTPUT);
pinMode(redLedPin, OUTPUT);
pinMode(greenLedPin, OUTPUT);
pinMode(yellowLedPin, OUTPUT);
pinMode(blueButtonPin, INPUT);
pinMode(redButtonPin, INPUT);
pinMode(greenButtonPin, INPUT);
pinMode(yellowButtonPin, INPUT);
}

void loop() {
while (Serial.available()) {
//Read in input values in form “yellowLed,greenLed,redLed,blueLed,alarm”
yellow = Serial.parseInt();
green = Serial.parseInt();
red = Serial.parseInt();
blue = Serial.parseInt();
alarm = Serial.parseInt();

if (Serial.read() == ‘\n’) {
//Turn lights on from read in values
digitalWrite(yellowLedPin, yellow);
digitalWrite(greenLedPin, green);
digitalWrite(redLedPin, red);
digitalWrite(blueLedPin, blue);

//Read in potentiometer value and the distance meter value, convert to centimeters
int meter = analogRead(A0);
delay(1);
long duration;
int cm;
digitalWrite(pingPin, LOW); //Send a ping out with sensor
delayMicroseconds(2);
digitalWrite(pingPin, HIGH);
delayMicroseconds(10);
digitalWrite(pingPin, LOW); //Ping sent
duration = pulseIn(echoPin, HIGH); //Wait for return on echo Pin
cm = duration / 29 / 2; //Convert to cm

//Write to processsing in following form “potentiometer,distanceincm,yellowbuttonpressed,yellowbutton,greenbuttonpressed,greenbutton,redbuttonpressed,redbutton,bluebuttonpressed,bluebutton”
//Button pressed meaning if that button was just pressed and the value is now changing write 1
Serial.print(sensor);
Serial.print(‘,’);
Serial.print(cm);
Serial.print(‘,’);
int yellowButtonRead = digitalRead(yellowButtonPin)
if(yellowButtonRead == 1 && yellowButton == 0){
Serial.print(1);
}
else{
Serial.print(0);
}
yellowButton = yellowButtonRead;
Serial.print(‘,’);
Serial.print(digitalRead(yellowButtonRead));
Serial.print(‘,’);
int greenButtonRead = digitalRead(greenButtonPin)
if(greenButtonRead == 1 && greenButton == 0){
Serial.print(1);
}
else{
Serial.print(0);
}
greenButton = greenButtonRead;
Serial.print(‘,’);
Serial.print(digitalRead(greenButtonRead));
Serial.print(‘,’);
int redButtonRead = digitalRead(redButtonPin)
if(redButtonRead == 1 && redButton == 0){
Serial.print(1);
}
else{
Serial.print(0);
}
redButton = redButtonRead;
Serial.print(‘,’);
Serial.print(digitalRead(redButtonRead));
Serial.print(‘,’);
int blueButtonRead = digitalRead(blueButtonPin)
if(blueButtonRead == 1 && blueButton == 0){
Serial.print(1);
}
else{
Serial.print(0);
}
blueButton = blueButtonRead;
Serial.print(‘,’);
Serial.println(digitalRead(blueButtonRead));
}
}
}

Shreya

(From Shreya’s post about progress)

We decided to start with the interface first because once we have the visualization, it will be easy to display the Arduino reads on the screen and check if our code/wiring is appropriate or not. Also, it is very hard to code the entire logic with no visible output. So, once we integrate Arduino with processing, we should be able to see the results on the screen.

I started with sketching the wires. I was thinking about how it could be possible to have wires disappear once they are cut. The best way I could imagine was draw these pieces individually and then display the appropriate wires based on their state (1 for uncut and 0 for uncut).

Next, I wanted to try to make the distance meter and potentiometer reading on screen. For testing purposes, I made them map to mouseX. This will be switched to Arduino readings later. The rotation of the needle was a little hard to achieve because I wanted it to pivot over a very particular point in the image. With a little trial and error and some calculations, I think I got that right!

Video: https://youtube.com/watch?v=-L6e0BAwrrE&t=14s

I am currently working on displaying the bomb timer/countdown on the screen. This is proving to be a bit challenging. After this, I will start with the driver program for the game which is the LED sequences, and randomizing those. Based on that, the code for the rest of the game will follow. Each LED sequence needs to wait for input and update multiple flag variables and then change the sequence to give the next signal. I have charted out a plan on how this will work… implementation will hopefully follow soon 🙂


Extra Arduino Game

Assignment:

This week we were given the option of creating a game with the Arduino and I decided to continue with my favorite Processing game thus far, my F1 simulator. I wanted to make a controller that would be integrated into the game.


Game Controller:

There are three main inputs in a car (a simplified automatic one anyways), steering, gas, and acceleration. My game already had these inputs but steering was in essence binary (full left, neutral, full right). I decided that analog input could make for much more fun steering and in addition to gas/brake buttons I could make a F1 car controller.

For the steering I used the potentiometer. I had to rework all my code for how the car was steered as it was no longer left or right, but rather any value from full left to full right and anywhere in-between. I ended up checking which way the potentiometer was facing and mapping the annual acceleration of the car off of this.

I also added a brake and gas button. These were super easy to implement as they behaved exactly the same as if I was pressing the up or down arrow in the keyboard controls so all I had to was change to binary values if they were on or off.

Finally I wanted something a bit extra than just inputs, also outputs that could make the player feel more like they were in a car. I decided to add two LEDs, a green one that would light up when pressing the gas, and a red one that would light up when braking, or flash when the car crashed like hazard lights. This allowed me to try the no delay blinking code as well.

Circuit

Code

Arduino Code

const int brakeLed = 5;
const int forwardLed = 4;
const int forwardButton = 2;
const int brakeButton = 3;
const int sensorPin = A0;

int forward = 0;
int brake = 0;
int crash = 0;
long timer = 0;
int timerLength = 500;
bool onOff = false;

void setup() {
  Serial.begin(9600);
  Serial.println("0,0");
  pinMode(brakeLed, OUTPUT);
  pinMode(forwardLed, OUTPUT);
  pinMode(forwardButton, INPUT);
  pinMode(brakeButton, INPUT);
}

void loop() {
  while (Serial.available()) {
    forward = Serial.parseInt();
    brake = Serial.parseInt();
    crash = Serial.parseInt();
    if (Serial.read() == '\n') {
      if (crash) {
        if (millis() > timer) {
          onOff = !onOff;
          digitalWrite(brakeLed, onOff);
        digitalWrite(forwardLed, LOW);
          timer = millis() + timerLength;
        }
      }
      else{
        digitalWrite(forwardLed, forward);
        digitalWrite(brakeLed, brake);
      }
      int forwardToggle = digitalRead(forwardButton);
      delay(1);
      int brakeToggle = digitalRead(brakeButton);
      delay(1);
      int steeringInput = analogRead(sensorPin);
      delay(1);
      Serial.print(forwardToggle);
      Serial.print(',');
      Serial.print(brakeToggle);
      Serial.print(',');
      Serial.println(steeringInput);
    }
  }
}

Processing Code

import processing.sound.*;

//======= Global variables ========
int gameMode = 0; //0 is main menu, 1 select your car, 2 running game, 3 crash, 4 controls menu, 5 credits
Team teams[] = new Team[10];
int teamSelector = 0;  //Which team from array is selected
int[][] teamDict = {{7, 0, 7, 0, 0}, {8, 1, 8, 0, 1}, {5, 2, 5, 0, 2}, {4, 3, 4, 0, 3}, {0, 4, 0, 0, 4}, {2, 5, 2, 1, 0}, {1, 6, 1, 1, 1}, {6, 7, 6, 1, 2}, {9, 8, 9, 1, 3}, {3, 9, 3, 1, 4}}; //Dictonary containing index of car sprite, associated team image sprite index, team name index, menu row, menu col

//====== Team Selection Menu Variables
PImage teamMenuImg;


//====== Trak Menu Variables
//  PImage track[][] = new PImage[10][10];  //For tile system
//float tileWidth = 2560;  //For tile system
PImage map;
float trackScale = 1; //What percent of original size should track be drawn

//====== Main Game Variables
float rotation = PI;  //Current angle
float speed = 0;  //Current speed
float maxSpeed = 500;  //Max speed on the track
float sandMaxSpeed = 20;  //Max speed off the track
float posX = -4886.6123;  //0,0 is top left of track , values increase negative as they are reversed
float posY = -1254.3951;

float acceleration = 5;  //How fast the car speeds up on track
float sandAcceleration = 1;  //How fast the car speeds up in sand
float brakeDeacceleration = 10;  //How quick the car stops when braking on track
float coastDeacceleration = 2;  //How quick the car stops when no power
float sandDeacceleration = 15;  //How quick the car stops in sand
float angularAcceleration = PI/20;  //How fast the car turns
boolean reverse = false;

float carScale = 0.3; //What percent of original size should car be drawn

//Keyboard inputs
boolean forward = false;
boolean brake = false;
boolean left = false;
boolean right = false;

//Sound
SoundFile accSound;
float accSoundAmp = 0;
float soundRate = 0.5;

//Timing
int passedTime;  //How long has passed since saved time mark
int savedTime;  //Savea time to start timer
boolean activeTimer = false; //Set to false, becomes active when crossing start line or false if reversed over
int bestTime = -1;

//Menu files
PImage controls;
PImage credits;

//Main menu variables  
  int numButtons = 3;
  int activeButton = 0; // 0 for start, 1 for controls, 2 for credits
  int buttonWidth = 200;
  int buttonHeight = 100;
  int buttonSpacing = 50;
  int buttonYOffset = 100;
  String buttonContent[] = {"Start Game","Controls","Credits"};
  float buttonX;
  float buttonY;
  
//Arduino game control variables
import processing.serial.*;
Serial myPort;
boolean crash = false;

void setup() {
  fullScreen();

  //Set up the team array
  //=======================================================================================
  PImage[] carSprites;
  PImage[] teamSprites;
  String[] nameArray = {"McLaren F1 Team", 
    "Scuderia AlphaTauri Honda", 
    "Mercedes-AMG Petronas F1 Team", 
    "ROKiT Williams Racing", 
    "Haas F1 Team", 
    "BWT Racing Point F1 Team", 
    "Scuderia Ferrari", 
    "Alfa Romeo Racing ORLEN", 
    "Aston Martin Red Bull Racing", 
    "Renault F1 Team"
  };
  //Alfa Romeo, Red Bull, Racing Point, Haas, Mclaren, Mercedes, AlphaTauri, Ferrari, Renault, Williams

  //Set sprite sheets
  carSprites = getCarSpriteSheet("SpriteSheetCars.png");  //Load the car sprite sheet into sprites
  teamSprites = getTeamSpriteSheet("Teams.png");  //Load the team sprite sheet into sprites

  //Set teams array with appropiate info
  for (int i = 0; i < 10; i++) {
    Team newTeam = new Team();
    newTeam.setName(nameArray[teamDict[i][2]]);  //Set team name
    newTeam.setCarImg(carSprites[teamDict[i][0]]);  //Set team img
    newTeam.setTeamImg(teamSprites[teamDict[i][1]]);  //Set team car img
    teams[i] = newTeam;
  }

  //=======================================================================================

  //Load menu imgs
  teamMenuImg = loadImage("Teams.png");
  controls = loadImage("Controls.png");
  credits = loadImage("Credits.png");

  //=======================================================================================

  //Load map
  map = loadImage("Track.png");

  //=======================================================================================
  //Load sound
  accSound = new SoundFile(this, "acc.wav");
  accSound.loop();
  accSound.amp(accSoundAmp);
  accSound.rate(soundRate);
  
  //Start lap timer
  savedTime = millis();
  
  //Start serial communication with controller
  String portname=Serial.list()[1];
  myPort = new Serial(this,portname,9600);
  myPort.clear();
  myPort.bufferUntil('\n');
}

void draw() {
  //Main Gamemode Control selector
  switch(gameMode) {
  case 0:
    mainMenu();
    break;
  case 1:
    teamMenu();
    break;
  case 2:
    runGame();
    break;
  case 3:
    crash();
    break;
  case 4:
    controls();
    break;
  case 5:
    credits();
    break;
  }
}


//When all game cariables need to be reset to start status
void resetVariables(){
  accSound.amp(0);
  forward = brake = right = left = false;
  activeTimer = false;
  speed = 0;
  gameMode = 0;
  posX = -4886.6123;  //0,0 is top left of track , values increase negative as they are reversed
  posY = -1254.3951;
  rotation = PI;
  crash = false;
}


void serialEvent(Serial myPort){
  String s=myPort.readStringUntil('\n');
  s=trim(s);
  if (s!=null){
    println(s);
    int values[]=int(split(s,','));
    if (values.length==3){
      if(values[0] == 1 && values[1] == 1){
        forward = false;
        brake = false;
      }
      else if (values[0] == 1){
        forward = true;
      }
      else if (values[1] == 1){
        brake = true;
      }
      else if (values[0] == 0 && values[1] == 0){
        forward = false;
        brake = false;
      }
      
      
      int steering = values[2];
      //Turn left
      if(steering > 1023/2){
        left = true;
        right = false;
        angularAcceleration = map(values[2],1023/2,1023,0, PI/20);
      }
      else if(steering < 1023/2){
        left = false;
        right = true;
        angularAcceleration = map(values[2],1023/2,0,0, PI/20);
      }
    }
  }
  println(crash);
  myPort.write(int(forward)+","+int(brake)+","+int(crash)+"\n");
}


Results

Class exercises

Here are the 3 examples that Minh and I did from our in class work.

Problem 1

const int sensorPin = A1;

void setup() {
Serial.begin(9600);
Serial.println("0,0");
}

void loop() {
// put your main code here, to run repeatedly:

//Read stuff from processing

while (Serial.available()) {
Serial.read() == '\n';

//Write to processing
int sensor = analogRead(sensorPin);
delay(1);

Serial.print(sensor);
Serial.print('\n');
}
}

//Processing code

//Move a ellipse on screen horizontally from arduino sensor

//import processing.serial.*;
//Serial myPort;
//int xPos = 0;
//
//void setup() {
// size(960, 720);
// printArray(Serial.list());
// String portname = Serial.list()[1];
// println(portname);
// myPort = new Serial(this, portname, 9600);
// myPort.clear();
// myPort.bufferUntil('\n');
//}
//
//void draw() {
// background(255);
// ellipse(xPos, height/2, 30, 30);
//}
//
//
////Wont do anything until there is something in serial buffer
//void serialEvent(Serial myPort) {
// String s = myPort.readStringUntil('\n');
// s = trim(s);
// if (s!=null) {
// println(s);
// int val = int(s);
// xPos = (int)map(val, 0, 1023, 0, width);
// }
// myPort.write('\n');
//}


Problem 2

const int ledPin = 11;
int brightness = 0;

void setup() {
Serial.begin(9600);
Serial.println("0,0");
pinMode(ledPin, OUTPUT);
}

void loop() {
while (Serial.available()) {
brightness = Serial.parseInt();
if (Serial.read() == '\n') {
analogWrite(ledPin, brightness);
// int sensor = analogRead(sensorPin);
delay(1);
Serial.println(brightness);
}
}
}

//Processing code

//Light an LED on the Arduino with varying brightness depending on how far left or right the mouse is

//import processing.serial.*;
//Serial myPort;
//int xPos = 0;
//int brightness = 0;
//
//void setup() {
// size(960, 720);
// printArray(Serial.list());
// String portname = Serial.list()[1];
// println(portname);
// myPort = new Serial(this, portname, 9600);
// myPort.clear();
// myPort.bufferUntil('\n');
//}
//
//void draw() {
// background(255);
// xPos = mouseX;
// ellipse(xPos, height/2, 30, 30);
// brightness = int(map(xPos, 0, width, 0, 255));
//}
//
//
////Wont do anything until there is something in serial buffer
//void serialEvent(Serial myPort) {
// String s=myPort.readStringUntil('\n');
// s=trim(s);
// int val = parseInt(s);
// if (s!=null){
// println("Brightness: " + val);
// }
// myPort.write(brightness+"\n");
//}


Problem 3

const int ledPin = 11;
int brightness = 0;
const int sensorPin = A0;

void setup() {
Serial.begin(9600);
Serial.println("0,0");
pinMode(ledPin, OUTPUT);
}

void loop() {
while (Serial.available()) {
int onOff = Serial.parseInt();
if (Serial.read() == '\n') {
digitalWrite(ledPin, onOff);
int sensor = analogRead(sensorPin);
delay(1);
Serial.println(sensor);
}
}
}

//Processing code

//import processing.serial.*;
//Serial myPort;
//int xPos=0;
//int yPos=0;
//boolean onOff=false;
//boolean onOff2=false;
//PVector velocity;
//PVector gravity;
//PVector position;
//PVector acceleration;
//PVector wind;
//float drag = 0.99;
//float mass = 50;
//float hDampening;
//
//void setup(){
// size(960,720);
// printArray(Serial.list());
// String portname=Serial.list()[1];
// println(portname);
// myPort = new Serial(this,portname,9600);
// myPort.clear();
// myPort.bufferUntil('\n');
// noFill();
// position = new PVector(width/2, 0);
// velocity = new PVector(0,0);
// acceleration = new PVector(0,0);
// gravity = new PVector(0, 0.5*mass);
// wind = new PVector(0,0);
// hDampening=map(mass,15,80,.98,.96);
//}
//
//void draw(){
// background(255);
//
// velocity.x*=hDampening;
//
// applyForce(wind);
// applyForce(gravity);
// velocity.add(acceleration);
// velocity.mult(drag);
// position.add(velocity);
// acceleration.mult(0);
// ellipse(position.x,position.y,mass,mass);
// if (position.y > height-mass/2) {
// velocity.y *= -0.9; // A little dampening when hitting the bottom
// position.y = height-mass/2;
// onOff = true;
// }
// else{
// onOff = false;
// }
//}
//
//void serialEvent(Serial myPort){
// String s=myPort.readStringUntil('\n');
// s=trim(s);
// int val = parseInt(s);
// if (s!=null){
// wind.x=map(val,0,1023,-2, 2); //2 instead of 1 to make it stronger
// }
// myPort.write(int(onOff)+"\n");
//}
//
//void applyForce(PVector force){
// // Newton's 2nd law: F = M * A
// // or A = F / M
// PVector f = PVector.div(force, mass);
// acceleration.add(f);
//}
//
//void keyPressed(){
// if (keyCode==LEFT){
// wind.x=-1;
// }
// if (keyCode==RIGHT){
// wind.x=1;
// }
// if (key==' '){
// mass=random(15,80);
// position.y=-mass;
// velocity.mult(0);
// }
//}


Final Project Idea (Shreya & Cole)

Idea

Shreya and I plan on making a game similar to the popular VR game “Keep Talking and Nobody Explodes.” This is a two player game where one person is faced with a bomb and a timer counting down till it explodes. Depending on the level, the bomb will look different each time with a series of lights, buttons, symbols, etc. The bomb defuser will have to communicate with a second player, the instruction reader. The instruction reader will have a list of instructions that they will have to communicate with the bomb defuser in the time limit. These instructions will be dependent on what the bomb defuser sees on screen so two way communication is critical for success.


Defusing Bomb:

The bomb will be defused when completing all the tasks provided from the instruction reader. Tasks will include interaction with the on screen bomb as well as the Arduino inputs such as lights, buttons, and dials.


Instructions

In our game, the instructions will be amiable in the start menu so that it can either be played with two laptops, if it is two player then the instructions will only be accessible to the second player. If playing alone, the bomb defuser will also have access to the instructions while playing, however the game is better when communicating with a friend. 


The general cycle of the game is as follow:

The instruction reader will have a choice in the instructions – “If the bomb looks like A, do B, if it looks like C, do D”. The instruction giver will ask about the state of the bomb which they cannot see.

The defuser player will relay back how the bomb looks

The instruction reader will read off the corresponding instruction based on the how the bomb looks

The defuser will interact with the bomb in the way instructed

This cycle repeats several times until the bomb is defused or the timer goes off!

Any wrong interrelation of course sets the bomb off and the players lose!


How do we plan to code this?

  • Create an array with a list of all possible LED combinations.
  • This array will drive our entire program
  • Depending on the series/types/color of LEDs lighting up, we will have the interface on Processing and that will also wait for a particular set of inputs from the Arduino board. Once the set of actions are completed, we get another set of LEDs lighting (by picking a random index in our array).


Categories of Instructions 

  • We plan to have categories of different LED setting, each of which will tell the diffuser what to do next
  • For example, the first category will be the number of LEDs lighting. The diffuser will answer this question and suppose they say 4 LEDs are lit. Then the instruction giver will read the instructions corresponding to that and say for example, press the blue button. After pressing the button, the diffuser needs to answer the next question. And this is how we envision the game to proceed.


Musical Instrument: Electric 4 String Bass

Assignment:

This week we had to make a musical instrument with at least one analog and one digital input. At first I wanted to try and make a guitar or piano as I am more familiar with them and can play them in a limited sense. Looking at the supplies in our kits I realized a full on instrument with the limited sensors and space we had would be hard. I ended up implementing a sort of 4 string bass that could play a full range of notes that one would find on a standard 4 string bass.

Result:

To play my Arduino bass, you use the distance finder to set the fret where you would be placing your finger. You then can press one of the buttons at a time to represent plucking a string on the bass.

Attached is the note layout that I modeled


You can imagine that the Arduino is at the base of the bass and so moving your hand further away from the distance sensor would be like moving your hand further up the neck.

Playing:

While I intended for the musician to move their hand closer and further to change frets, I found that the distance measurement was less consistent this way and as a result harder to control. Instead I ended up placing a flat box and moving the Arduino relative to that. I also placed marks on the table for the first few frets that I would need to play a basic C scale.

Here are the results

Wiring


(As TinkerCAD’s distance sensor is a three pin version while we used four pins I just placed the wires where the sensor would go in the top left of the board)

Code:

#include "pitches.h"

//Pins
const int string1Pin = 2; //E string
const int string2Pin = 3; //A string
const int string3Pin = 4; //D string
const int string4Pin = 5; //G string
const int echoPin = 6; // Echo Pin of Ultrasonic Sensor
const int pingPin = 7; // Trigger Pin of Ultrasonic Sensor
const int buzzerPin = 8;

bool stringOne = false;
bool stringTwo = false;
bool stringThree = false;
bool stringFour = false;

//20 fret (21 when including open strings) 4 string bass tuned to equal temperment tuning and standard pitch
int fourStringBass[21][4] = {
  {NOTE_E1, NOTE_A1, NOTE_D2, NOTE_G2},
  {NOTE_F1, NOTE_AS1, NOTE_DS2, NOTE_GS2},
  {NOTE_FS1, NOTE_B1, NOTE_E2, NOTE_A2},
  {NOTE_G1, NOTE_C2, NOTE_F2, NOTE_AS2},
  {NOTE_GS1, NOTE_CS2, NOTE_FS2, NOTE_B2},
  {NOTE_A1, NOTE_D2, NOTE_G2, NOTE_C3},
  {NOTE_AS1, NOTE_DS2, NOTE_GS2, NOTE_CS3},
  {NOTE_B1, NOTE_E2, NOTE_A2, NOTE_D3},
  {NOTE_C2, NOTE_F2, NOTE_AS2, NOTE_DS3},
  {NOTE_CS2, NOTE_FS2, NOTE_B2, NOTE_E3},
  {NOTE_D2, NOTE_G2, NOTE_C3, NOTE_F3},
  {NOTE_DS2, NOTE_GS2, NOTE_CS3, NOTE_FS3},
  {NOTE_E2, NOTE_A2, NOTE_D3, NOTE_G3},
  {NOTE_F2, NOTE_AS2, NOTE_DS3, NOTE_GS3},
  {NOTE_FS2, NOTE_B2, NOTE_E3, NOTE_A3},
  {NOTE_G2, NOTE_C3, NOTE_F3, NOTE_AS3},
  {NOTE_GS2, NOTE_CS3, NOTE_FS3, NOTE_B4},
  {NOTE_A2, NOTE_D3, NOTE_G3, NOTE_C4},
  {NOTE_AS2, NOTE_DS3, NOTE_GS3, NOTE_CS4},
  {NOTE_B2, NOTE_E3, NOTE_A3, NOTE_D4},
  {NOTE_C3, NOTE_F3, NOTE_AS3, NOTE_DS4},
};

int fret = 0;
int string = -1; //-1 means no string, 0 is E string, 1 is A string, 2 is D string, 3 is G string

//Datastructure used to determine which button to play to the buzzer, if two are pressed play last pushed one

void setup() {
  Serial.begin(9600);
  // put your setup code here, to run once:
  pinMode(string1Pin, INPUT);
  pinMode(string2Pin, INPUT);
  pinMode(string3Pin, INPUT);
  pinMode(string4Pin, INPUT);
  pinMode(pingPin, OUTPUT);
  pinMode(echoPin, INPUT);
}

void loop() {
  //=============================Deal with buttons and play sound=============================
  //Get button values, check to see if they were pushed and are now unpushed or vice versa
  int newStringOne = digitalRead(string1Pin);
  int newStringTwo = digitalRead(string2Pin);
  int newStringThree = digitalRead(string3Pin);
  int newStringFour = digitalRead(string4Pin);

  //Check if the buttons being pressed
  if(newStringOne && !stringOne){
    string = 0;
    stringOne = true;
  }
  if(newStringTwo && !stringTwo){
    string = 1;
    stringTwo = true;
  }
  if(newStringThree && !stringThree){
    string = 2;
    stringThree = true;
  }
  if(newStringFour && !stringFour){
    string = 3;
    stringFour = true;
  }
  
  //Check if button being unpressed
  if(!newStringOne && stringOne){
    string = -1;
    stringOne = false;
    noTone(buzzerPin);
  }
  if(!newStringTwo && stringTwo){
    string = -1;
    stringTwo = false;
    noTone(buzzerPin);
  }
  if(!newStringThree && stringThree){
    string = -1;
    stringThree = false;
    noTone(buzzerPin);
  }
  if(!newStringFour && stringFour){
    string = -1;
    stringFour = false;
    noTone(buzzerPin);
  }
  

  //===============Get distance of hand from ultrasonic sensor, usable range is 5-30 cm accuratley=====================
  long duration;
  int cm;
  digitalWrite(pingPin, LOW); //Send a ping out with sensor
  delayMicroseconds(2);
  digitalWrite(pingPin, HIGH);
  delayMicroseconds(10);
  digitalWrite(pingPin, LOW); //Ping sent
  duration = pulseIn(echoPin, HIGH);  //Wait for return on echo Pin
  cm = duration / 29 / 2; //Convert to cm

  //If value is too large or small just set it at 35 or 5
  if (cm > 35) {
    cm = 35;
  }
  else if (cm < 5) {
    cm = 5;
  }

  //Map the value 35-5 to 0-20 for frets
  fret = (int)map(cm, 35, 5, 0, 20);
  //=================Play Sound======================
  Serial.print("Fret: ");
  Serial.print(fret);
  Serial.print(", String:");
  Serial.println(string);
  if(string != -1){
    tone(buzzerPin, fourStringBass[fret][string]);
  }
}


Week 9 Assignment: Thermostat

Idea:

This week our task was to take digital and analog inputs, and light up LED lights with both digital and analog outputs. My goal was to make something similar to the thermostat on your wall. I wanted a power button, and a dial where you could turn up or down the temperature. I would then light up LED’s to show this working as if the heater or AC was turning on.

Implementation:

Digital Input: I started off using the button setup that we tried in class but decided it would be nicer if I used a switch. I found that a switch was wired very similarly to the button but was always in a 0 or 1 state. This made the code very easy as it did not require and saving of the previous state.

Analog Input: I needed two inputs here, the target temperature that the user wants which utilized a dial in the form of the potentiometer, as well as the room temperature which I tried using the included thermometer to implement. I found the wiring schematics online (short circuited it once by setting it up backwards), and managed to get analog outputs from it. The tricky part was converting from the analog input to degrees. I found that you could convert the analog input value into volts. The thermometer worked at a 10mV per degree linear ratio so I was able to convert it quite easily with the preset offset of 500mV from there. I checked the Serial.write value with my room thermostat and both matched.

Digital Output: The most basic part of my circuit was to light up a green power button if the system was on. I just wrote to a green LED high when the switch was on and low when it was off.

Analog Output: To light up the appropriate LED’s to represent the heater or AC turning on, I had to first get a target temperature from the potentiometer and compare that to the room temperature. If the room was warmer than the target I would light up the blue LED as if AC was turning on, and the red if the opposite was true to simulate the heater. I also lit up the LED’s stronger when the room temperature was further from the target temperature.


Results:

Here is a demo where I adjust the potentiometer to change the target temperature, as well as turn the system on and off with the switch.

Here is an example where I apply heat to the thermometer. This causes the system to think that the room is warm and you can see the AC light turn on. As it gets warmer the AC light gets brighter. (Headphone users beware)


Circuit: 


Code:

//Pins
const int tempPin = A0;
const int knobPin = A1;
const int switchPin = 2;
const int green = 3;
const int red = 5;
const int blue = 6;


bool on = false;
float temp; //What is the current temp from thermometer reading
float target; //Based on potentiometer what is the desired temperature

void setup() {
  //Start console comunication
  Serial.begin(9600);

  //Set pin modes
  pinMode(green, OUTPUT);
  pinMode(red, OUTPUT);
  pinMode(blue, OUTPUT);
  pinMode(switchPin, INPUT);

  //Set on off initial value
  on = digitalRead(switchPin);
}

void loop() {
  //Read in temperature value and convert it to celcius from analog in
  temp = (((analogRead(tempPin) * 5.0) / 1024) - 0.5) * 100;  //Convert from reading to mV to celcius with a 10mv per degree rating
  on = digitalRead(switchPin);

  //If on turn on lights
  if (on) {
    //Turn power (green light) on
    digitalWrite(green, HIGH);

    //Get the target temp from the potentiometer should be a value between 15 and 27, 21 is standard in the middle value
    target = map(analogRead(knobPin), 0, 1023, 15.0, 27.0);

    float difference = abs(map(temp - target, 0, 7, 0, 100)); //How far off the target value is it?, mapped to a value from 0 to 100 for an led to take
    //If hotter turn on red light up to 100 (so dimness is more clear)
    Serial.println(difference);
    if (temp - target < 0) {
      analogWrite(red, difference);
      analogWrite(blue, 0);
    }
    //Cooler than target
    else if (temp - target > 0) {
      analogWrite(red, 0);
      analogWrite(blue, difference);
    }
    //By some chance equal
    else {
      analogWrite(red, 0);
      analogWrite(blue, 0);
    }

  }
  else {
    //Turn power (green light) off
    digitalWrite(green, LOW);
    digitalWrite(red, LOW);
    digitalWrite(blue, LOW);
  }

  //  Serial.println(" ");
  //  Serial.print("Temp: ");
  //    Serial.println(temp);
  //  Serial.print(" Knob: ");
  //  Serial.print(analogRead(knobPin));

}


Midterm: F1 Racing Simulator

Overview: 

This was definitely the hardest game I have made in Processing. I decided to be a bit ambitious and make a full on racing game. The result I came up with is a 2D style game where a player can try to set the fastest lap around a course as possible.


Workflow:

I started off by making a menu where a player could select a team. I decided to take all the F1 2020 teams and car liveries and make them options. To do so I loaded up the team names, logos, and cars into arrays so that a single index could select all of these attributes of a single team. I made a team class to hold all these various data points and within the team selection menu let users use the arrow keys to scroll through the options. I decided to make it look like one was active so drew the menu tinted and then the current teams logo not tinted to make it look highlighted.

Next I moved on to making a car drive around a track. This was the hardest part by far. The car physics weren’t too bad, but since I wanted the car to stay stationary and the track to pan, like in most games, I had to sort out how to move the entire track. At first I wanted to do Yas Marina Circuit. I downloaded an image from Google and began playing around

I could drive the car around Yas Marina but to make the map look not pixelated I had to increase the image size by about 20 times. This meant huge files and a picture tens of thousands of pixels wide. I then tried breaking up the image into a 20×20 tiles so only 4 map tiles had to be drawn at once but even this was too much for processing to handle and caused out of memory errors. With Processing’s limitations I decided to ditch such a large track and make my own.


I created a track with striped curbs and sand on the corners much like real circuits. I also added grass, a finish line and starting grid, and water to keep players from cutting across or going off the map.

I could then adjust the car physics with this new map by detecting what surface the car was on. If the car was on the track or curbs it was fine and it could have full speed or acceleration. If the car was on the grass or sand it would decelerate much faster with a capped max speed. If a player put the car into the water they would lose and the car would crash!

Next up I added some important game mechanics such as a lap timer and a timer to save the best lap time. It was tricky to detect when players crossed the start line. I also had to make sure drivers couldn’t go backwards over the start line to cheat the system and make it look like a faster lap when they had not gone all the way around.

Sound was probably the hardest part. In normal racing games you would take an engine loop sound and adjust the pitch and fade in and out acceleration and deceleration tracks. I had a really hard time with this so decided to stick to a single engine loop to get the engine sound effect. The only way to adjust pitch in processing is through the rate which had some limitations. It sounds a little digitalized but overall not bad.

Finally I wrapped it all up with a main menu, credits, and controls to help the player navigate the game.

Gameplay:

When a user loads the game they will be greeted with the main menu. All menus are navigated with the arrow keys, enter, or backspace. I imagined console like controls so the mouse is never used in this game.

From the main menu, users can access the controls, the credits, or start the game itself


With the game started, users can now use the arrow keys to select which team they want (have to go with Ferrari here).

Once they press enter, they will be loaded onto the starting grid on the track. Once they cross the Start/Finish line, the lap timer will reset and begin actively counting their lap.

Users can control the car by pressing the up arrow for gas, the down arrow for brakes, and the left or right arrows to turn left or right. The car will speed up when given throttle, slowly decelerate when not given any gas, and decelerate quickly when braking. The car will also decelerate much quicker on sand or grass and can’t go very quick. Avoid the water or the game ends as you won’t drive very far in the marina! At any time the user can go back to the main menu with backspace.

The goal of the game is to set the quickest lap time possible. My best is 38 seconds, can you beat me?

Here is a short video showing some gameplay (the quality isn’t the greatest as I had a lot of recording software issues)


Here are the game files

F1Game

Midterm Progress

The Intro to IM GP is on!


Well not yet but on its way at least..

For my midterm I decided to try my hand at a racing game. The game will be a top down 2D style game. The car will not move relative to the center of the screen but instead the track will move relative to it. This will make the car look like its moving with focus remaining at the center of the screen. This technique is simulating a chase cam that many other games utilize.

This weeks focus was the game setup and art needed to create the game. Sprite sheets took a lot longer then I expected and all the art I found online needed adaptations to fit my game’s needs. First I started on the cars. I attempted to draw them.. big mistake. I then found a screensaver with all the cars I needed on them so with some resizing and cropping I had a sprite sheet. The same problem came up when trying to get icons for the teams. I found a wallpaper but it needed cropping and manipulation from imperfections. This photo editing took a long time but once I had a sprite sheet properly laid out it was easy to bring it into Processing.


Here is a video of the cars looping through the sprites at first


With media being brought into the game, I needed a menu where a player could select a team. I first displayed just the team and the associated car but decided that was not very intuitive. I then created a menu where a player could use the arrow keys to move across and vertically through the listed teams. I made it clear which one was selected by drawing all of them with a tint, and then the one selected with no tint making it look highlighted. I really liked this effect. I also listed the team name up top and have shown the car on the right.


To finish off the menu I need to play with the typefaces a bit, add a nice background and some music and of course the “play” button.

Next Steps:

With the art in and the cars begging to work I have begun movement. This is tricky as it is all relative. If a car is moving at ‘+10’ in the x direction then the background is actually moving at -10. I also am trying to use smoothing to make the car handle nicer and less jerky.


Here is my code thus far

//======= Global variables ========
int gameMode = 1; //0 is main menu, 1 select your car, 2 running game 
Team teams[] = new Team[10];
int teamSelector = 0;  //Which team from array is selected
int[][] teamDict = {{7,0,7,0,0},{8,1,8,0,1},{5,2,5,0,2},{4,3,4,0,3},{0,4,0,0,4},{2,5,2,1,0},{1,6,1,1,1},{6,7,6,1,2},{9,8,9,1,3},{3,9,3,1,4}}; //Dictonary containing index of car sprite, associated team image sprite index, team name index, menu row, menu col

//====== Team Selection Menu Variables
PImage teamMenuImg;


void setup() {
  fullScreen();
  
  //Set up the team array
  //=======================================================================================
  PImage[] carSprites;
  PImage[] teamSprites;
  String[] nameArray = {"McLaren F1 Team", 
                        "Scuderia AlphaTauri Honda", 
                        "Mercedes-AMG Petronas F1 Team", 
                        "ROKiT Williams Racing",
                        "Haas F1 Team",
                        "BWT Racing Point F1 Team",
                        "Scuderia Ferrari",
                        "Alfa Romeo Racing ORLEN",
                        "Aston Martin Red Bull Racing",
                        "Renault F1 Team"
                        };
  //Alfa Romeo, Red Bull, Racing Point, Haas, Mclaren, Mercedes, AlphaTauri, Ferrari, Renault, Williams
  
  //Set sprite sheets
  carSprites = getCarSpriteSheet("SpriteSheetCars.png");  //Load the car sprite sheet into sprites
  teamSprites = getTeamSpriteSheet("Teams.png");  //Load the team sprite sheet into sprites
  
  //Set teams array with appropiate info
  for(int i = 0; i < 10; i++){
    Team newTeam = new Team();
    newTeam.setName(nameArray[teamDict[i][2]]);  //Set team name
    newTeam.setTeamImg(carSprites[teamDict[i][0]]);  //Set team img
    newTeam.setCarImg(teamSprites[teamDict[i][1]]);  //Set team car img
    teams[i] = newTeam;
  }
  
  //=======================================================================================
  
  //Load menu img
  teamMenuImg = loadImage("Teams.png");
  
}

void draw() {
  //Main Gamemode Control selector
  switch(gameMode){
    //Select a car ------------------
    case 1:
      background(170);  //Redraw background
      imageMode(CENTER);  //Image mode
      tint(80);  //Darken unselected cars
      float menuWidth = (7*width)/10;
      float menuHeight = (7*height)/10;
      float menuX = (4.5*width)/10;
      float menuY = (11*height)/20;
      image(teamMenuImg, menuX, menuY, menuWidth, menuHeight);  //Menu
      tint(255);
      float teamImageWidth = menuWidth/5;
      float teamImageHeight = menuHeight/2;
      float teamImageX = (menuX - menuWidth/2) + (teamDict[teamSelector][4] * teamImageWidth) + (teamImageWidth/2);  //Where to draw the overlay team iamge on the menu x and y
      float teamImageY = (menuY - menuHeight/2) + (teamDict[teamSelector][3] * teamImageHeight) + (teamImageHeight/2);
      image(teams[teamSelector].getCarImg(), teamImageX, teamImageY, teamImageWidth, teamImageHeight);  //Draw team
      image(teams[teamSelector].getTeamImg(), (9*width)/10, height/2);  //Draw car
      fill(0);
      stroke(0);
      textSize(32);
      text("Select a team", width/10, height/10);
      textSize(64);
      text(teams[teamSelector].getName(), width/10, height/10 + 70);
      noLoop();  //Save performance
      break;
    //-------------------------------
  }
}


//Keyboard input controller
void keyPressed(){
  //Arrow keys during car selection
  if(gameMode == 1){
    if(keyCode == LEFT){
      //Left key selection
      int temp = teamSelector - 1;
      //Check if on 0 or 5,
      if(!(teamSelector == 0 || teamSelector == 5)){
        teamSelector = temp;
      }
      loop();
    }
    else if(keyCode == RIGHT){
      //Right key selection
      int temp = teamSelector + 1;
      //Check if on 4 or 9,
      if(!(teamSelector == 4 || teamSelector == 9)){
        teamSelector = temp;
      }
      loop();
    }
    else if(keyCode == UP){
      //Left up selection
      int temp = teamSelector - 5;
      //Check if not below 0 to set new value
      if(temp >= 0){
        teamSelector = temp;
      }
      loop();
    }
    else if(keyCode == DOWN){
      //Left up selection
      int temp = teamSelector + 5;
      //Check if not above to set new value
      if(temp <= 9){
        teamSelector = temp;
      }
      loop();
    }
  }
}


//Function which returns the array of sprites from the spritesheet of all the cars
PImage[] getCarSpriteSheet(String fileName){
  PImage spritesheet;
  PImage[] sprites;
  int counter = 0;  //Used to sepcify which car to display in sprite list
  int w = 151;  //Width of one car
  int h = 404;  //Height of one car
  spritesheet = loadImage(fileName);
  sprites = new PImage[12]; // 12 images across, 4 down, in the spritesheet

  //Loop through 5 rows
  for (int i = 0; i < 5; i++) {
    //Loop through 2 columns
    for (int j = 0; j < 2; j++) {
      sprites[counter] = spritesheet.get(j*w, i*h, w, h);
      counter++;
    }
  }
  return sprites;
}

//Function which returns the array of sprites from the spritesheet of all the teams
PImage[] getTeamSpriteSheet(String fileName){
  PImage spritesheet;
  PImage[] sprites;
  sprites = new PImage[12]; // 12 images across, 4 down, in the spritesheet
  spritesheet = loadImage(fileName);
  int counter = 0;  //Used to sepcify which car to display in sprite list
  int w = spritesheet.width / 5;  //Width of one car
  int h = spritesheet.height / 2;  //Height of one car

  //Loop through 2 rows
  for (int i = 0; i < 2; i++) {
    //Loop through 5 columns
    for (int j = 0; j < 5; j++) {
      sprites[counter] = spritesheet.get(j*w, i*h, w, h);
      counter++;
    }
  }
  return sprites;
}
class Team{
  String name;
  PImage carImg;
  PImage teamImg;
  
  //Default constructor does nothing
  Team(){
    name="";
    carImg = null;
    teamImg = null;
  }
  
  //Getters and setters
  void setName(String name){
    this.name = name;
  }
  String getName(){
    return name;
  }
  void setCarImg(PImage img){
    carImg = img;
  }
  PImage getCarImg(){
    return carImg;
  }
  void setTeamImg(PImage img){
    teamImg = img;
  }
  PImage getTeamImg(){
    return teamImg;
  }
  

}