Final Project Documentation – I See Sound

The main concept of “I See Sound” is to create an immersive experience with users and music by visualizing their favorite songs. By using 2 sensors, users are able to switch shapes and colors giving them a stylistic hand in the visualization. The aim is to put I See Sound in settings where upbeat music is played, for example in concerts, musical installations, parties, etc. 

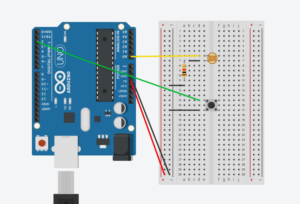
Arduino and p5.js scripts work together to create a dynamic audio-visual experience that responds to audio inputs via a photocell and a button. The Arduino script continuously monitors the environment through a photocell and a button. The photocell measures the light level and this data is read and printed. This value is then printed and sent to P5.js via serial communication. Additionally, the Arduino script checks for the state of a button. When pressed, it sends a specific command (“changeShape”) to the p5.js script. The combination of these sensors act as the main communication medium between users and the visualization.

The Arduino sends data values that include light levels and control commands, which the p5.js script reads and implements in different functions. This script is designed to respond to these inputs by altering visual and audio outputs accordingly. For example, higher light levels can result in brighter visuals, while pressing the button changes the visual form, demonstrating a real-time interactionbetween the user’s physical environment and the digital representation.

Arduino Code: 

int photocellPin = 0;     
int photocellReading;  
int buttonPin = 2;     
int buttonState = 0;

void setup() {
  Serial.begin(9600);
  pinMode(buttonPin, INPUT);    
}

void loop() {
  photocellReading = analogRead(photocellPin);  
  photocellReading = 1023 - photocellReading; 
  Serial.println(photocellReading);  

  buttonState = digitalRead(buttonPin);
  if (buttonState == HIGH) {
    Serial.println("changeShape"); 
    delay(200); 
  }
  delay(100); 
}

p5.js Code:

let dj =0;

let sound, amplitude;
let currentShape = 'ellipse'; 
let currentState = 'startScreen';
let photocellData = 0;

function preload() {
  
  sound = loadSound('sounds/aroundme.mp3');
  startScreenImage = loadImage('P5 DJ.gif'); 
}

function setup() {
  let cnv = createCanvas(700, 600);
  amplitude = new p5.Amplitude();
  noiseSeed(millis());
 
}

function draw() {
  if (currentState == 'startScreen') {
    displayStartScreen();
  } else if (currentState == 'running') {
    runVisualization(); 
  }
}

function displayStartScreen() {
  background(startScreenImage);
}

function runVisualization(){
  let level = amplitude.getLevel();
  photocellBackground();

  let numShapes = int(map(level, 0, 5, 15, 30));
 

  for (let i = 0; i < numShapes; i++) {
    let angleOffset = TWO_PI / numShapes * i;
    let x = width / 2 + 4 * (sin(frameCount * 0.02 + angleOffset) * 100 * noise(0.001 * frameCount + i));
    let y = height / 2 + 4 * (cos(frameCount * 0.02 + angleOffset) * 100 * noise(0.001 * frameCount + 100 + i));
    let size1 = map(sin(frameCount * 0.1 + angleOffset), -1, 1, 10, 100);

    let myColor = color(255 * noise(i), 255 * noise(i + 10), 255 * noise(i + 20), 200); 
    fill(myColor);
    let colors = ['red', 'blue', 'green', 'purple', 'maroon'];
    let chosenColor = random(colors)
    stroke(chosenColor);
    strokeWeight(map(level, 0, 1, 10, 100)); 
   
    switch (currentShape) {
      case 'ellipse':
        ellipse(x, y, size1, size1);
        break;
      case 'rectangle':
        rect(x, y, size1, size1);
        break;
      case 'triangle':
        triangle(x - size1 * 0.4, y + size1 * 0.4, x, y - size1 * 0.4, x + size1, y + size1 * 0.4);
        break;
      case 'star':
        drawStar(x, y, 5, size1 * 0.8, size1 * 0.4);
        break;
      case 'spiral':
        drawSpiral(x, y, size1 * 0.8);
        break;
    }
  }
}

function photocellBackground() {
  background(map(photocellData, 0, 1023, 0, 255)); 
 
}

function togglePlay() {
  if (sound.isPlaying()) {
    sound.pause();
  } else {
    sound.loop();
    amplitude.setInput(sound);
  }
}

function changeShape() {
  const shapes = ['ellipse', 'rectangle', 'triangle', 'star', 'spiral'];
  let index = shapes.indexOf(currentShape);
  currentShape = shapes[(index + 1) % shapes.length];
}

function drawStar(x, y, points, radius1, radius2) {
  let angle = TWO_PI / points;
  let halfAngle = angle / 2.0;
  beginShape();
  for (let a = 0; a < TWO_PI; a += angle) {
    let sx = x + cos(a) * radius2;
    let sy = y + sin(a) * radius2;
    vertex(sx, sy);
    sx = x + cos(a + halfAngle) * radius1;
    sy = y + sin(a + halfAngle) * radius1;
    vertex(sx, sy);
  }
  endShape(CLOSE);
}

function drawSpiral(x, y, maxRadius) {
  let angle = 0;
  let endRadius = 0;
  beginShape();
  while (endRadius < maxRadius) {
    let sx = x + cos(angle) * endRadius;
    let sy = y + sin(angle) * endRadius;
    vertex(sx, sy);
    angle += 0.1;
    endRadius += 0.5;
  }
  endShape();
}


function keyPressed() {
  if (key == " " && currentState == 'startScreen') {
    setUpSerial();
    waitForSerial();
  }
}

function waitForSerial() {
    if (serialActive) {  
        currentState = 'running';  
        togglePlay();  
    } else {
        console.log("Waiting for serial connection.. Press Space to Connect.");
        setTimeout(waitForSerial, 10);  
    }
}

  ////////////////////////////////////
  //READ FROM ARDUINO HERE
  ////////////////////////////////////
function readSerial(data){
if (data != null) {
    let fromArduino = data;
    if (fromArduino.length >= 1) {
      dj = int(data);
      print(dj)
      // Echo = int(fromArduino[1]);
      console.log(data);  // Print data for debugging
      if (data.trim() === "changeShape") {
        changeShape();  // Change the shape if the correct command is received
      }
      if (data.trim() === "photocellReading")
        photocellBackground();
    }

    // //////////////////////////////////
    // //SEND TO ARDUINO HERE (handshake)
    // //////////////////////////////////
    let sendToArduino = -1;
    writeSerial(sendToArduino);
}
}

Overall, I am particularly proud of myself because I really did try my best, as a beginner I found it hard to even wrap my head around most of the stuff and I am honestly very proud of myself. During the process, I didn’t feel as confident at some point however I seeked out different resources such as Berney Codes, asked some of my classmates for help (Thank You Sarah), and used ChatGPT to help me understand serial communication and revise errors in codes, as well as in  creating shapes. In the future, however, I would definitely work on the interaction part more, as well as stylistic choices. I did adapt this project from the p5.Amplitude library.


User Testing

During user testing, while understanding the visualization was easy, users found it hard to figure out how to interact with the visualization. 

The point of error was that there was no clear indication of what to do, a major design aspect I’ve overlooked. Eventually, however, the users understand that in the arduino circuit, the photocell is able to switch the colors of the beat in accordance with the light. And, to some I had to explain exactly what the sensor did since it isn’t clear when you first try it.

The p5.Amplitude library enabled the visualization consistency with any audio input, my friends who have tested this asked to add their own music and the code worked very well 99% of the time, the remaining 1% is that this only works well with upbeat music with heavy drums.

There is definitely more area for improvement in a number of things. It would be nice if the interactivity experience was elevated to a couple of sensors which would make the experience more inclusive to the users. Also another aspect would be the color palette for the overall look, while the rainbow is definitely beautiful a color palette that is consistent would be calmer and less disturbing for the eye. Additionally, I am still in the process of designing a cover page rather than the instructions in the top left corners.

Week 12 Reading Response — Design Meets Disability

In “Design Meets Disability,” Graham Pullin talks about how functionality meets aesthetics in the realm of assistive technologies. It was interesting how Pullin challenges the traditional views that often limit the design of assistive devices to practical purposes.

The call for a “design revolution” in the disability sector was very intriguing as Pullin illustrates this with the transformation of eyeglasses from simple visual aids to fashion accessories, showing us how societal perceptions and user demands can dramatically shift design priorities. This transformation, he argues, should serve as a blueprint for other assistive devices.

Pullin delves into the social implications of design choices, suggesting that the aesthetic neglect often found in the design of disability aids can reinforce feelings of stigmatization. By integrating design principles from mainstream fashion and technology, he suggests that these devices can instead promote a sense of pride and personal identity.

What I liked most was how realistic Pullin is about the challenges, he acknowledges the complexities of designing for such a diverse range of needs and the potential higher costs associated with the design concepts. 

In Class Exercises (Amal, Afra and Stefania)

Initial connection and wiring from the schematic:

Exercise 1:

This was probably the easiest exercise, we just had to edit the code that was in the Week 12 Lecture Notes.

P5.js Code:

let potentiometer = 0; 

function setup() {
  createCanvas(640, 480);
  textSize(18);
}

function draw() {
  background(255); 
  
  if (!serialActive) {
    text("Press Space Bar to select Serial Port", 20, 30);
  } else {
    text("Connected", 20, 30);
    text('Potentiometer = ' + potentiometer, 20, 70);
  }

  
  let ellipseX = map(potentiometer, 0, 1023, 0, width);
  fill(0);
  ellipse(ellipseX, height / 2, 50, 50);

function keyPressed() {
  if (key === ' ') {
    setUpSerial();
  }
}

function readSerial(data) {
  if (data != null) {
    let trimmedData = trim(data);
    if (!isNaN(trimmedData)) {
      potentiometer = int(trimmedData);
    }
  }
}

Arduino Code:

void setup() {
  Serial.begin(9600);

  pinMode(LED_BUILTIN, OUTPUT);
  digitalWrite(LED_BUILTIN, HIGH);
  delay(200); 
  digitalWrite(LED_BUILTIN, LOW); 
}

void loop() {
  int sensorValue = analogRead(A1);

  Serial.println(sensorValue);

  delay(10);
}

Week 11 – Bret Victor’s Rant

In Bret Victor’s rant called A Brief Rant On The Future Of Interaction Design an important element that is commonly forgotten in the realm of designing future interfaces is hands! I have never read anything that focused on something as mundane as hands this passionately but it is true! 

Victor categorizes the function of hands into feeling and manipulation, something that I was never fully aware of until it was pointed out in the rant, our hands have programmed ways of holding several different items in so many ways it is choreographed in such a way where it is efficient and functional. 

So it makes sense that the future of interaction design focuses on our hands and their function, but that doesn’t limit other sensory aspects such as eye tracking or voice user interface, of course, our hands have been our main interaction facilitator however that doesn’t mean it would continue to be so.

Final Project Proposal – ArSL to Arabic Translation System

Growing up, I always experienced a communication barrier with my grandfather’s brother, who is hard of hearing. At family gatherings, only a select few who understand Arabic Sign Language (ArSL) could successfully communicate with him. This situation has been frustrating, as he has many adventures and stories that remain unshared and misunderstood by most of our family.

While there are systems available that translate American Sign Language (ASL) into English, the representation of Arabic in the technological domain of sign language translation is lacking. This disparity has not only limited the communication within diverse linguistic communities but also shows the urgent need for inclusive technology that bridges linguistic and sensory gaps.

My goal is to develop a real-time translation system for Arabic Sign Language using pose estimation combined with proximity sensing. The goal is to enable direct communication for ArSL users by translating their sign language into written Arabic. It would be nice to use machine learning models that specialize in pose estimation but I would need to do more research.

Week 11 Assignment (with Stefania and Afra)

🌟 Inspiration: 

Music possesses a remarkable capacity to bridge cultural and linguistic divides and unite individuals from diverse backgrounds. Motivated by the notion of promoting interactive experiences and democratizing music creation, we set out to build a one-of-a-kind musical instrument out of buttons and Arduino. Our intention was to enable people to use sound as a creative medium for self-expression, irrespective of their experience with music. We chose the piano as our main inspiration because we could recreate the chords using buttons.

💡 Process:

Using Arduino Uno we wired up buttons to serve as interactive triggers for different musical notes. Each button was assigned a specific pitch or sound, allowing users to create melodies by pressing combinations of buttons. We leveraged our programming skills to code the logic behind the instrument, ensuring seamless functionality and an intuitive user interface.

🚀 Difficulties: 

Although our journey was exciting and innovative, there were certain difficulties. A major challenge we encountered was guaranteeing the reliability and consistency of button pushes. We have to use precise calibration and filtering techniques to get beyond problems like noise interference and debounce.

There were additional difficulties in creating an intuitive user interface. To ensure that users could simply grasp how to interact with the instrument while still having the freedom to explore and experiment with various musical compositions, we had to find a balance between simplicity and utility.

const int speakerPin = 9;  // Speaker connected to pin 9
int buttonPins[] = {2, 3, 4, 5};  // Button pins for C, D, E, F
int notes[] = {262, 294, 330, 349};  // Frequencies for C4, D4, E4, F4

void setup() {
  // Set up each button pin as an input with pull-up resistors
  for (int i = 0; i < 4; i++) {
    pinMode(buttonPins[i], INPUT_PULLUP);
  }
  // Set the speaker pin as an output
  pinMode(speakerPin, OUTPUT);
}

void loop() {
  // Check each button and play the corresponding note
  for (int i = 0; i < 4; i++) {
    if (digitalRead(buttonPins[i]) == LOW) {  // Check if button is pressed
      tone(speakerPin, notes[i]);  // Play the corresponding note
      delay(200);  // A short delay to help debounce the button
      while (digitalRead(buttonPins[i]) == LOW);  // Wait for the button to be released
      noTone(speakerPin);  // Stop playing the note
    }
  }
}

Week 10 Response – Tom Igoe

Tom Igoe’s articles on physical computing and interactive art describe the growing relationship between technology and user engagement. In Physical Computing’s Greatest Hits (and Misses), Igoe talks about the relationship between creativity and technology, highlighting how simple designs can provoke complex interactions and reflections. Additionally, in Making Interactive Art: Set the Stage, Then Shut Up and Listen, he advocates for a minimalistic approach in guiding the audience’s experience by using the art of subtlety in interactive design.

Igoe’s philosophy resonates deeply with me; it challenges the beauty of discovery within the constraints of design and technology, reminding creators to trust their audience’s intuitive interactions with their work. .

Week 10 – Assignment

The project is designed as a competitive game using an Arduino board to determine who can activate their respective LED faster: a player pressing a button or an automated response triggered by a photoresistor detecting darkness. The setup includes two LEDs connected to the Arduino. One LED (connected to pin 10) is controlled by a pushbutton, which, when pressed, signifies the  player’s reaction. The other LED (connected to pin 9) is controlled by a photoresistor, representing an automated “player” that reacts to the absence of light. The game’s objective is to see which mechanism can activate its LED first under the given conditions—either when it becomes dark enough for the photoresistor to react or when the human player presses the button.

This was a lot of fun to make and the concept sort of formed as I put everything together, I mostly focused on using the class notes as a resources however I did use some of the examples on the official Arduino website. 

https://forum.arduino.cc/t/using-an-led-and-a-photoresistor-to-switch-itself-on-and-off/179690

https://projecthub.arduino.cc/agarwalkrishna3009/arduino-diy-led-control-with-ldr-sensor-photoresistor-fa011f

int photoSensorPin = A0;
int buttonPin = 2;
int ledPin1 = 9;
int ledPin2 = 10;

void setup() {
  pinMode(photoSensorPin, INPUT);
  pinMode(buttonPin, INPUT);
  pinMode(ledPin1, OUTPUT);
  pinMode(ledPin2, OUTPUT);
}

void loop() {
  int sensorValue = analogRead(photoSensorPin);
  int buttonState = digitalRead(buttonPin);

  if (buttonState == HIGH) {
    digitalWrite(ledPin1, LOW);
    digitalWrite(ledPin2, HIGH);
  } else if (sensorValue < 512) {
    digitalWrite(ledPin1, HIGH);
    digitalWrite(ledPin2, LOW);
  } else {
    digitalWrite(ledPin1, LOW);
    digitalWrite(ledPin2, LOW);
  }
}


Week 8 Response

While reading the articles, it was challenging to find a link between the ideas due to the different design contexts discussed: Norman’s focus on emotional interaction with design and objects, versus McMillan’s article on Margaret Hamilton’s significant contributions to the Apollo mission. However, both narratives highlight the importance of innovative thinking and emotional engagement in creating technologies that are not only functional but also meaningful and intuitive for users. Adding to this, the concept discussed earlier in the semester, that design should be self-explanatory, resonates here. For example, Norman might argue that a well-designed object or interface naturally guides the user on how to interact with it, reducing the need for extensive instructions or training. Hamilton’s software, by being robust and error-tolerant, exemplifies this principle on a technical scale, ensuring astronauts could rely on it under the most extreme conditions without needing to understand its complexities.