I am 22 years old. Alumni of 42 Software Engineering School in Silicon Valley.
Born and raised in Astana, Kazakhstan. As hobbies, I workout, travel, and play volleyball, and chess.
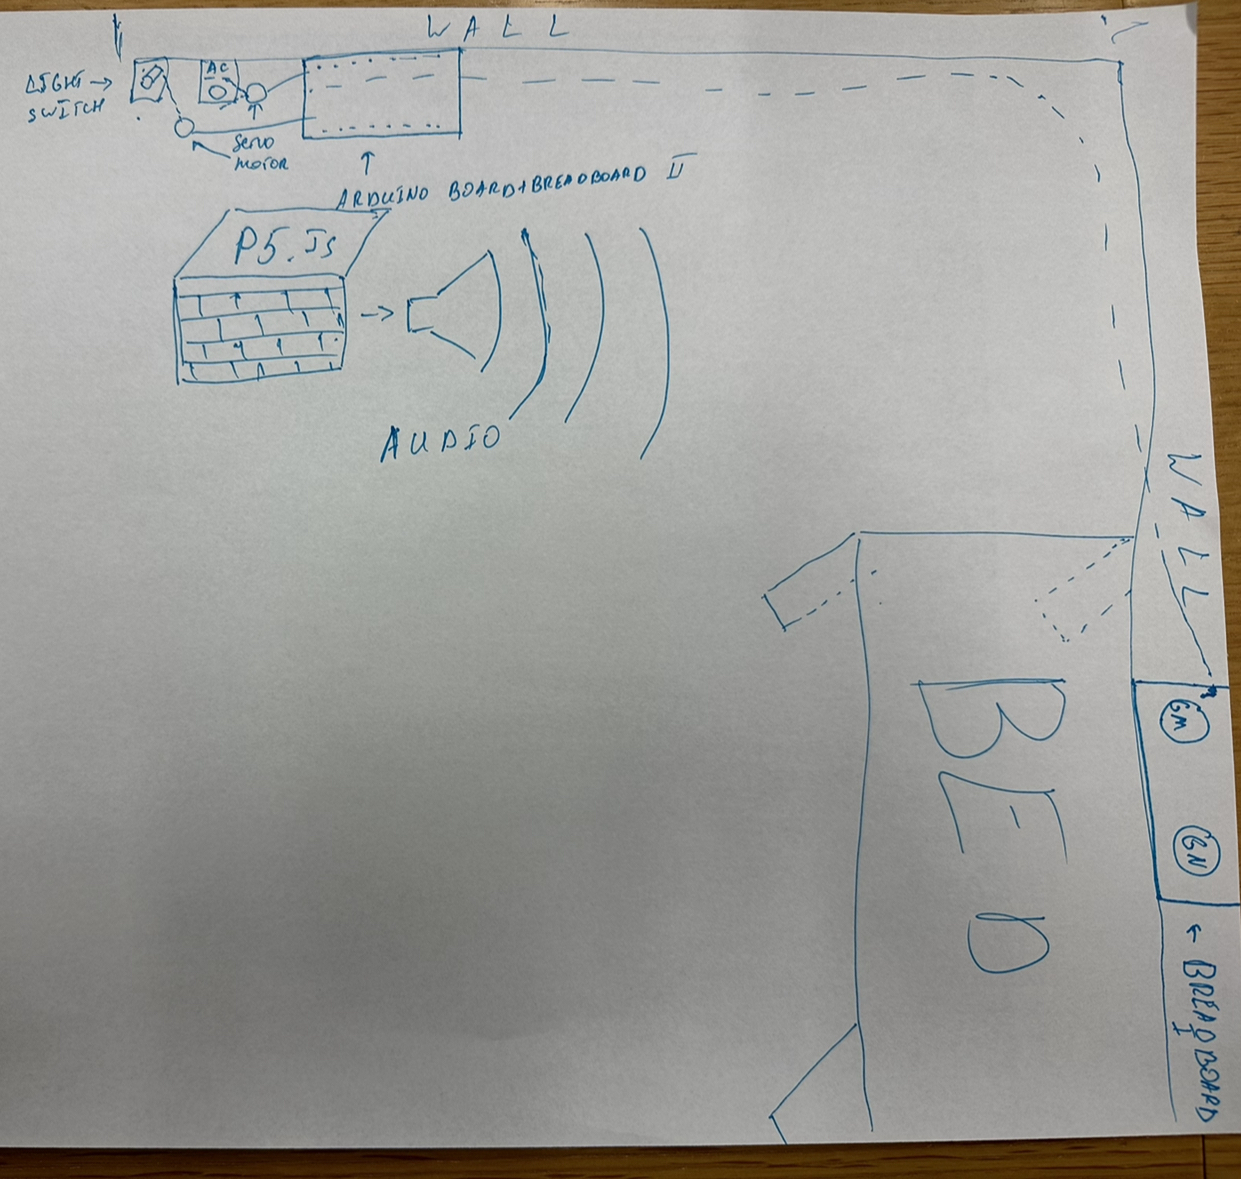
Akyn is a Jarvis(Iron Man) like artificial intelligence that helps to make morning and night routines more pleasant. As a student, I can indeed say that many of us are lazy. We keep procrastinating a lot and as a result, get stressed out when the deadline approaches. Akyn is a way to change that. With only 2 buttons, you can escalate your morning and night routines to a new level.
As part of the morning routine, Akyn will turn on the AC for you and greet you in a respectful manner. Afterward, it will read out(over voice) the emails you have gotten over the night. And as a last action, it will play motivational music so there is no way you still lay in your bed.
When you go to sleep, Akyn will turn off the lights and AC for you. Afterward, Akyn voices over your alarm time for tomorrow and starts listing the events from your Google Calendar for tomorrow. This way you will start visualizing tomorrow starting from tonight.
How does the implementation work?
Description of interaction design
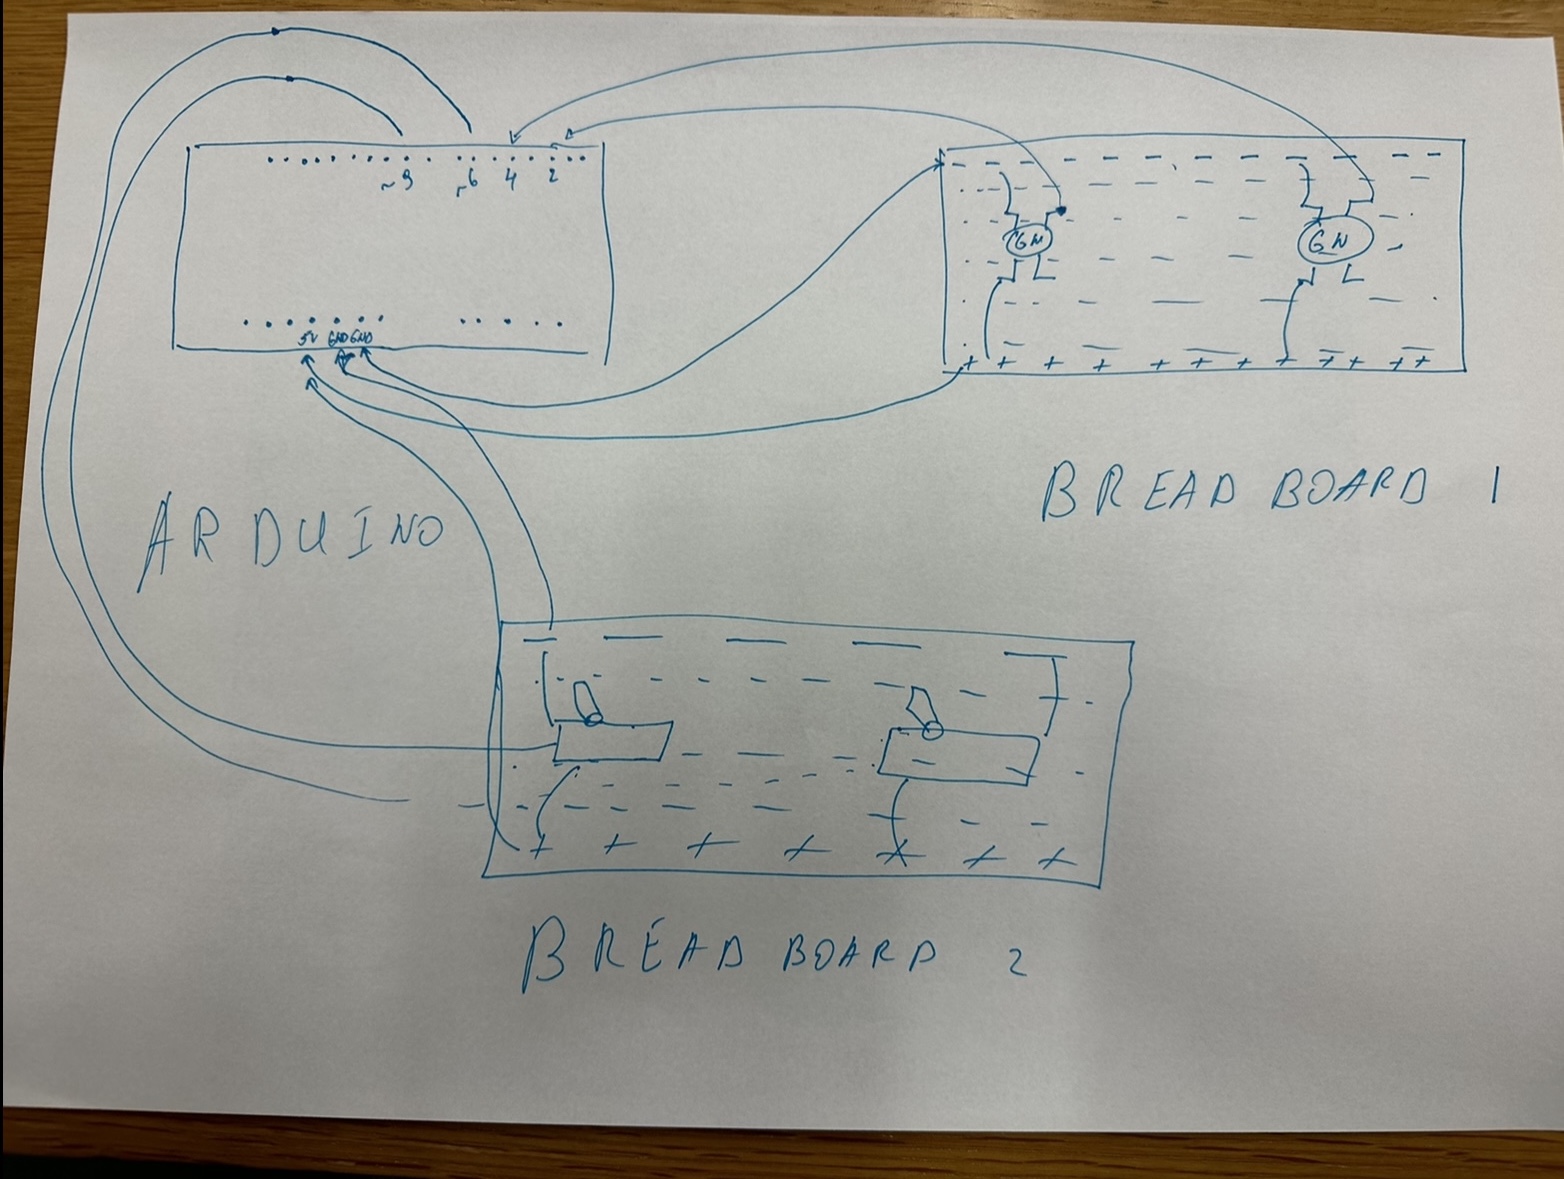
The interaction design is very simple. There are 2 buttons on the breadboard located right near your bed. Green button for morning routine and Blue button for night routine. By pressing one of them, the respectful routine gets triggered.
Description of Arduino code
The Arduino concept is very simple. There are 2 buttons and 2 servo motors connected. In the setup, I connect the motors and start the handshake process with the p5.js. In the main loop, while there is a connection established, I keep waiting for the user to press either of the buttons. Once one of them is pressed the motor(s) start rotating which turns on/off AC/lights. Lastly, 0 or 1 is sent to the p5.js indicating which button is pressed.
#include <Servo.h>

Servo servo_lights_off;
Servo servo_AC;

int pin_GM_button = 2;
int pin_GN_button = 4;

int pin_lights_off = 11;
int pin_AC = 9;

int state_GM_button = 0;
int state_GN_button = 0;
int prev_state_GM_button = 0;
int prev_state_GN_button = 0;

void setup() {
  servo_lights_off.attach(pin_lights_off);
  servo_AC.attach(pin_AC);
  Serial.begin(9600);

  // start the handshake
  while (Serial.available() <= 0) {
    Serial.println("-1"); // send a starting message
    delay(300);            // wait 1/3 second
  }
}

void loop() {
  while (Serial.available()) {
    state_GM_button = digitalRead(pin_GM_button);
    state_GN_button = digitalRead(pin_GN_button);
    // GM button is pressed
    if (state_GM_button != prev_state_GM_button && state_GM_button == 1) {
      // turn on the AC
      servo_AC.write(180);
      delay(1000);
      servo_AC.write(0);
      delay(1000);

      // send message to P5.js
      Serial.println("0");
    }
    // GN button is pressed
    if (state_GN_button != prev_state_GN_button && state_GN_button == 1) {
      // turn off the lights
      servo_lights_off.write(0);
      delay(1000);
      servo_lights_off.write(180);
      delay(1000);
      // turn off the AC, double click is needed to go to Night mode from Morning mode
      servo_AC.write(180);
      delay(1000);
      servo_AC.write(0);
      delay(2000);
      servo_AC.write(180);
      delay(1000);
      servo_AC.write(0);
      delay(2000);

      // send message to P5.js
      Serial.println("1");
    }

    // update the previous states of the buttons
    prev_state_GM_button = state_GM_button;
    prev_state_GN_button = state_GN_button;
  }
}
Description of p5.js code
P5.js is where the main magic happens. The main interaction happens in the javascript file while the authorization happens in the index.html page.
Authorization
When the user starts the code after a specific amount of time(10 seconds for the user to have some time to read the instructions) authorization script is run. This script sends requests to Google Calendar API and Gmail API over the gapi library. As a result, I am now able to send get requests to the Google API. After the authorization, I load the calendar using a specific query indicating what kind of events I want to see. All of this is saved into the CALENDAR_EVENTS variable
<script>

    const gapiLoadPromise = new Promise((resolve, reject) => {
      gapiLoadOkay = resolve;
      gapiLoadFail = reject;
    });
    const gisLoadPromise = new Promise((resolve, reject) => {
      gisLoadOkay = resolve;
      gisLoadFail = reject;
    });

    var tokenClient;

    (async () => {
      // First, load and initialize the gapi.client
      await gapiLoadPromise;
      await new Promise((resolve, reject) => {
        // NOTE: the 'auth2' module is no longer loaded.
        gapi.load('client', {callback: resolve, onerror: reject});
      });
      await gapi.client.init({
        // NOTE: OAuth2 'scope' and 'client_id' parameters have moved to initTokenClient().
      })
      .then(function() {  // Load the Google API's discovery document.
        gapi.client.load('https://www.googleapis.com/discovery/v1/apis/calendar/v3/rest');
        gapi.client.load('https://www.googleapis.com/discovery/v1/apis/gmail/v1/rest');
      });

      // Now load the GIS client
      await gisLoadPromise;
      await new Promise((resolve, reject) => {
        try {
          tokenClient = google.accounts.oauth2.initTokenClient({
              client_id: google_calendar_USER_ID,
              scope: 'https://www.googleapis.com/auth/calendar.readonly https://www.googleapis.com/auth/gmail.readonly',
              prompt: 'consent',
              callback: '',  // defined at request time in await/promise scope.
          });
          resolve();
        } catch (err) {
          reject(err);
        }
      });
    })();

    // get token in case error while authorizing appeared
    async function getToken(err) {

      if (err.result.error.code == 401 || (err.result.error.code == 403) &&
          (err.result.error.status == "PERMISSION_DENIED")) {

        // The access token is missing, invalid, or expired, prompt for user consent to obtain one.
        await new Promise((resolve, reject) => {
          try {
            // Settle this promise in the response callback for requestAccessToken()
            tokenClient.callback = (resp) => {
              if (resp.error !== undefined) {
                reject(resp);
              }
              // GIS has automatically updated gapi.client with the newly issued access token.
              resolve(resp);
            };
            tokenClient.requestAccessToken();
          } catch (err) {
            console.log(err)
          }
        });
      } else {
        // Errors unrelated to authorization: server errors, exceeding quota, bad requests, and so on.
        throw new Error(err);
      }
    }

    function loadCalendar() {
      const tomorrow = new Date();
      tomorrow.setDate(tomorrow.getDate() + 1);
      tomorrow.setHours(0, 0, 0, 0);

      const after_tomorrow = new Date();
      after_tomorrow.setDate(after_tomorrow.getDate() + 2);
      after_tomorrow.setHours(0, 0, 0, 0);

      var calendar_query = { 'calendarId': 'primary', 'timeMin': tomorrow.toISOString(), 'timeMax' : after_tomorrow.toISOString(), 'singleEvents': true, 'orderBy': 'startTime'};

      // Try to fetch a list of Calendar events. If a valid access token is needed,
      // prompt to obtain one and then retry the original request.
      gapi.client.calendar.events.list(calendar_query)
      .then(calendarAPIResponse => CALENDAR_EVENTS = JSON.stringify(calendarAPIResponse))
      .catch(err  => getToken(err))  // for authorization errors obtain an access token
      .then(retry => gapi.client.calendar.events.list(calendar_query))
      .then(calendarAPIResponse => CALENDAR_EVENTS = JSON.stringify(calendarAPIResponse))
      .catch(err  => console.log(err));   // cancelled by user, timeout, etc.
    }

    // call loadCalendar after 3 seconds so that gapi.client initiates connection
    setTimeout(loadCalendar, 10000);

  </script>
Main logic
Now once everything is loaded, the client connects the Arduino and p5.js by simply clicking on the screen and selecting the Arduino port. From now on, everything gets triggered once the button is pressed.
Green button – goodMorning function gets called.
1) Load Gmail information about unread emails
2) Clear up the saved array, leaving only the necessary information to display
3) P5.speech libraries voices over the amount emails received, the subject, and the sender info of each one as well. Upon completion, Mozart’s Eine kleine Nachtmusik classical music starts playing.
/* voices over the Good Morning mode*/
function goodMorning() {
  // load the unread emails
  loadGmail();

  // timeout to wait till the above functions finishes execution
  setTimeout(function() {
    clearEmails();
  }, 2000);

  setTimeout(function() {
    myVoice.speak(GM_PHRASES[Math.floor(Math.random()*GM_PHRASES.length)] + "You've got " + emails.length + " emails while you were sleeping.");
    if (emails.length === 0) {
      return;
    }
    emails.forEach((email, index) => {
      setTimeout(function() {
        console.log(numberMapping[index + 1] + ' email is from ' + email.from + ' about ' + email.subject); // -> debug
        myVoice.speak(numberMapping[index + 1] + ' email is from ' + email.from + ' about ' + email.subject);
      }, (index + 1) * 10000); // wait for the previous voice to finish before starting next one
    });
    setTimeout(function() {
      myVoice.speak("Turning on music!");
    }, (emails.length + 1) * 10000);
    setTimeout(function() {
      playMusic();
    }, (emails.length + 1) * 10000 + 3000); // wait till events finishes voicing and the previous line too.
  }, 6000); // this timer is the sum of the before called timers (1000 + 3000) + 1000 extra miliseconds
}
Blue button – goodNight function gets called.
1) Clear up the saved calendar events, leaving only necessary information to display
2) Voice over the number of events and the time the alarm is set to.
3) Voice over each of the events, time, and location
/* voices over the events happening tomorrow*/
function goodNight() {
  events = clearEvents();
  setTimeout(function() {
    const eventsLength = events.length - 1;
    let p = "Tomorrow you have " + eventsLength + " events. Your alarm is set to " + events[0]['startTime']+ " AM. " + GN_PHRASES[Math.floor(Math.random()*GN_PHRASES.length)];
    myVoice.speak(p);
    // console.log(p);
  }, 1500);

  // iterate thoruhg events and voice them over
  // timeout used since forEach does not wait for the voice to finish which gives undesired output
  for (let index = 1; index < events.length; index++) {
    const event = events[index];
    setTimeout(function() {
      console.log(numberMapping[index] + ' event is ' + event['eventName'] + ', happening from ' + event['startTime'] + ' till ' + event['endTime'] + ' at ' + event['location']);
      myVoice.speak(numberMapping[index] + ' event is ' + event['eventName'] + ', happening from ' + event['startTime'] + ' till ' + event['endTime'] + ' at ' + event['location']);
    }, index * 13000);
  }
}
Description of communication between Arduino and p5.js
Due to the nature of the project, communication is one-sided. P5.js keeps waiting for Arduino to send 0 or 1 after which the main logic happens. Arduino does not need any input from p5.js all it does is wait for the buttons to be pressed.
What are some aspects of the project that you’re particularly proud of?
I am very proud of embedding Google API’s into my project. This is something I have not done before nor was it reached in any of the classes. Yet this is something very useful and applicable in a lot of spheres. By doing this, I was able to make the project actually helpful and not just some dummy toy. I believe that the use of this API together with the speech library and servo motors makes the project very unique.
Also, coming up with balanced values for timeout is something to be proud of. All API requests need to be timeout so that the next functions can use the result of that get request. I experimented a lot with these values so that users do not wait too long and the response has enough time to arrive.
What are some areas for future improvement?
In the future, I would be happy to change the timeouts to Future Promises, so that the further functions only get triggered once the previous ones finish. This way it’s not hardcoded and works with any amount of response.
Working with wires was fun, however, it would be much more flexible and convenient to use either a Bluetooth connection or even a phone. With a little bit of research, I can substitute long and limited wires to a Bluetooth connection between the breadboard and Arduino. With more research, I will be able to write a telegram bot that sends commands directly to Arduino without any buttons.
Have people try your project without giving them any prompts/instructions and see how they use it
Are they able to figure it out? Where do they get confused and why? Do they understand the mapping between the controls and what happens in the experience?
I invited a few friends to try out my project. They really enjoyed the instructions screen and it was very straightforward to authorize Google Account. However, a useful comment I received was to specify the name of the port to which users have to press in order to establish a connection to the Arduino.
Further interaction was also very clear to my friends. They went near my bed and pressed either a blue or green button.
What parts of the experience are working well? What areas could be improved?
They enjoyed a lot the voiceover of the calendar and Gmail. They also liked my choice of music. One thing they stated can be improved is the choice of voices. Since p5 speech libraries hold more than 100 voices, people would like to pick one that they want to hear the most. I believe this is something that can be implemented, nevertheless, I did not want to complicate the project with voice pick since it does not align with the main goal of improvement of morning and night routines.
What parts of your project did you feel the need to explain? How could you make these areas clearer to someone experiencing your project for the first time?
I had to explain to them that once the button is pressed they have to wait till the whole routine is finished before pressing a button again. If someone rushes with a button press, the voice will queue up and some of them will be dropped which is highly undesirable. A possible solution for this is to lock the button action until the whole routine has finished(send value from p5.js to Arduino when everything is finished and keep waiting for a response on Arduino). This can be a great addition if I decide to improve the project in the future.
Akyn is a smart system that makes morning and night routines more pleasant. This device has 2 buttons, one for mornings and one for nights.
When the “Good Night” button is pressed, the system turns off the lights and AC with the servo motor. While Arduino does that, P5 will wish a random good night phrase(chosen out of a pre-established array of words) and notify the person what time the alarm is set and how many hours are left.
When the “Good Morning” button is pressed, Arduino will turn on the AC. P5 will greet the person with a good morning text, announce the daily schedule from the Google Calendar, announce how many emails in the user’s Gmail are, and play a random motivational song.
Design and description
As stated above, each button changes the state of the appropriate button variable, which when active will trigger either only one servo motor(Lights) or both of them(AC). When each button is active it sends a 0 or 1 code to P5 which will trigger the “Good Morning” code for 0 and “Good Night” code for 1(description of actions are at the top). P5 code fetches data from a person’s Google Calendar and Gmail which after some modifications will announce out loud. P5 will send a dummy value back to Arduino since the communication works one way only.
// Week 11.2 Example of bidirectional serial communication

int analog_pin = A2;
int led_pin = 9;

void setup() {
  // Start serial communication so we can send data
  // over the USB connection to our p5js sketch
  Serial.begin(9600);

  pinMode(analog_pin, INPUT);
  pinMode(led_pin, OUTPUT);

  // start the handshake
  while (Serial.available() <= 0) {
    Serial.println("-1"); // send a starting message
    delay(300);            // wait 1/3 second
  }
}

void loop() {
  // wait for data from p5 before doing something
  while (Serial.available()) {
    int led_brightness = Serial.parseInt();
    digitalWrite(led_pin, led_brightness);

    Serial.println(map(analogRead(analog_pin), 0, 1023, -1, 1));
  }
}
P5.js code:
/* Week 11.2 bidi serial example
 * Originally by Aaron Sherwood
 * Modified by Mangtronix
 *
 * Add this library to Sketch files
 *  https://github.com/mangtronix/IntroductionToInteractiveMedia/blob/master/code/p5.web-serial.js files
 *
 * Arduino code:
 * https://github.com/mangtronix/IntroductionToInteractiveMedia/blob/master/code/Week11Serial.ino
 */

let dir = 0;
let x = 40;
let r = 40;
let inc = 2;

function setup() {
  createCanvas(640, 480);
}

function draw() {
  // one value from Arduino controls the background's red color
  background(0);

  ellipse(x,height/2,r*2,r*2);
  if (serialActive)
    x = dir == 1 ? min(width - r, x + inc) : x = max(r, x - inc);

}

function keyPressed() {
  if (key == " ") {
    // important to have in order to start the serial connection!!
    setUpSerial();
  }
}

// This function will be called by the web-serial library
// with each new *line* of data. The serial library reads
// the data until the newline and then gives it to us through
// this callback function
function readSerial(data) {
  ////////////////////////////////////
  //READ FROM ARDUINO HERE
  ////////////////////////////////////

  if (data != null) {
    // make sure there is actually a message
    // split the message
    let fromArduino = split(trim(data), "\n");

    // if the right length, then proceed
    if (fromArduino.length == 1) {
      // only store values here
      // do everything with those values in the main draw loop
      dir = fromArduino[0];
    }

    //////////////////////////////////
    //SEND TO ARDUINO HERE (handshake)
    //////////////////////////////////
    console.log("X: ", x);
    let output = map(x, r, width - r, 0, 255);
    console.log("Output: ", int(output));
    writeSerial(int(output));
  }
}
Gravity:
Arduino code:
// Week 11.2 Example of bidirectional serial communication

int analog_pin = A2;
int led_pin = 9;

void setup() {
  // Start serial communication so we can send data
  // over the USB connection to our p5js sketch
  Serial.begin(9600);

  pinMode(analog_pin, INPUT);
  pinMode(led_pin, OUTPUT);

  // start the handshake
  while (Serial.available() <= 0) {
    Serial.println("-1"); // send a starting message
    delay(300);            // wait 1/3 second
  }
}

void loop() {
  // wait for data from p5 before doing something
  while (Serial.available()) {
    int led_brightness = Serial.parseInt();
    digitalWrite(led_pin, led_brightness);

    Serial.println(map(analogRead(analog_pin), 0, 1023, -1, 1));
  }
}
P5.js code:
let velocity;
let gravity;
let position;
let acceleration;
let wind;
let drag = 0.99;
let mass = 50;
let led_on = 0;

function setup() {
  createCanvas(640, 360);
  noFill();
  position = createVector(width/2, 0);
  velocity = createVector(0,0);
  acceleration = createVector(0,0);
  gravity = createVector(0, 0.5*mass);
  wind = createVector(0,0);
}

function draw() {
  background(255);
  if (serialActive) {
    applyForce(wind);
    applyForce(gravity);
    velocity.add(acceleration);
    velocity.mult(drag);
    position.add(velocity);
    acceleration.mult(0);
    ellipse(position.x,position.y,mass,mass);
    if (position.y > height-mass/2) {
        led_on = 1;
        velocity.y *= -0.9;
        position.y = height-mass/2;
    } else {
      led_on = 0;
    }
  }
}

function applyForce(force){
  // Newton's 2nd law: F = M * A
  // or A = F / M
  let f = p5.Vector.div(force, mass);
  acceleration.add(f);
}

function keyPressed(){
  if (keyCode==UP_ARROW){
    mass=random(15,80);
    position.y=-mass;
    velocity.mult(0);
  }
  if (key == " ") {
    setUpSerial();
  }
}

// This function will be called by the web-serial library
// with each new *line* of data. The serial library reads
// the data until the newline and then gives it to us through
// this callback function
function readSerial(data) {
  ////////////////////////////////////
  //READ FROM ARDUINO HERE
  ////////////////////////////////////

  if (data != null) {
    // make sure there is actually a message
    // split the message
    let fromArduino = split(trim(data), "\n");

    // if the right length, then proceed
    if (fromArduino.length == 1) {
      // only store values here
      // do everything with those values in the main draw loop
      wind.x = fromArduino[0];
    }

    //////////////////////////////////
    //SEND TO ARDUINO HERE (handshake)
    //////////////////////////////////
    console.log(led_on);
    writeSerial(led_on);
  }
}
Final Project
My plan for the Final Project is an interactive device for my room. It is going to have at least 2 buttons one for “Good Morning” and a second for “Good Night”. When pressed “Good Night”, Arduino will turn off the lights, and turn off the AC, while P5.js will wish me “Good Night”, and tell me what time my alarm is set for tomorrow and how much time is left, and something more(TBD). For the “Good Morning” button, Arduino will turn on the AC, while P5.js will greet me, tell me what’s on my calendar today, read me a motivational quote, and tell me how many emails and from whom I received while I was sleeping.
Most of this is very new for me and will be complicated but I believe that if APIs of external services will work properly on p5.js this project is very doable and I’m very optimistic about it. I will have to learn how to use Google Calendar API, Gmail API, and Text-to-Voice API.
The idea came from a “Jarvis” AI from the Iron Man movie. Just like Jarvis, my project will be able to control some aspects of my room and become my companion.
Initially, Aigerim and I set out to create a tool similar to Singing Horses using Arduino. We envisioned a project with multiple buzzers that could produce a unique melody when played together. However, we quickly realized that Arduino does not have built-in functionality to play music on multiple buzzers simultaneously. This was a challenge we needed to overcome if we wanted to create the tool we had envisioned.
Complications
After some brainstorming, we decided to switch gears and create a mini piano instead. We programmed the mini piano with three buttons, each of which would play a specific note when pressed. We also incorporated a pressure sensor that could modify the frequency of the note when pressure was applied to a pin.
To make this work, we had to tinker with the pressure sensor, buttons, and Arduino board. It took some time to figure out the best way to program each button to play its assigned note and adjust the frequency when pressure was applied. But with some experimentation and perseverance, we were able to make it work.
Creating this mini piano required some creative problem-solving and coding skills. While we had to adjust our original plan, we were pleased with the final outcome. The addition of a pressure-sensitive pin adds a unique element to the mini piano, making it a fun and interactive tool to play with.
The idea of this work was inspired by the car parking sensor. While parking your car starts playing a sound that gets louder the closer you get to an object. Likewise in my Arduino the close you get to the object the “Redder” the RGB LED light becomes. The farther you are from the object, the sensor becomes a blueish color. This way you can visually measure the distance between you and an object.
The ultrasonic sensor measures the time taken to get the response back from the object, which I later converted into the distance. RGB LED light displays the color based on the distance calculated before. A switch turns on the whole program when pressed. To display, the program works a green LED light lights on when the switch is pressed.
This snippet of the code is the main logic of the program. Quite simple. If the button is pressed then display the distance by showing Red and Blue colors. Otherwise, turn them to zero, and the green Led light to Low value.
In the future, I would like to add the sound just like in the car. This will allow measuring distance without looking anywhere. Also, a cool idea would be added to connect a projector to Arduino that displays an image stating “Stop! Too close” or “It’s ok. Go farther”. It would definitely look cool 🙂
The concept is pretty simple make an LED that reminds you if you forgot to grab something before leaving your room. The light will stay on until you picked up all the things you need before going outside. Only when you picked up everything it will turn off.
Circuit
1 LED, 5 jumper wires, a breadboard, an Arduino board, and 1 220-Ohm resistor were used. The switch makes use of a simple circuit that introduces an opened circuit when at least one item is still on the table and a closed circuit when all items are taken out.
Reflection
After building this switch, I gained some practical experience in working with an Arduino board and various electronic components. I learned how to connect different components together on a breadboard and how to use jumper wires to make connections between them. I also learned how to use a resistor to limit the current flowing through the LED.
I learned about the concept of switches and how they can be used to turn electrical circuits on and off. During the process of building the switch, I encountered some difficulties or errors, and I had to use my problem-solving skills to identify and fix the issues. This taught me the importance of troubleshooting and problem-solving when building electronic circuits.
Finally, successfully building the switch and seeing it work gave me a sense of satisfaction and accomplishment. It also gave me some inspiration for further projects or ideas for using switches and other electronic components in creative ways.
Overall, building this switch was a valuable learning experience that helped me develop my skills in electronics and problem-solving.
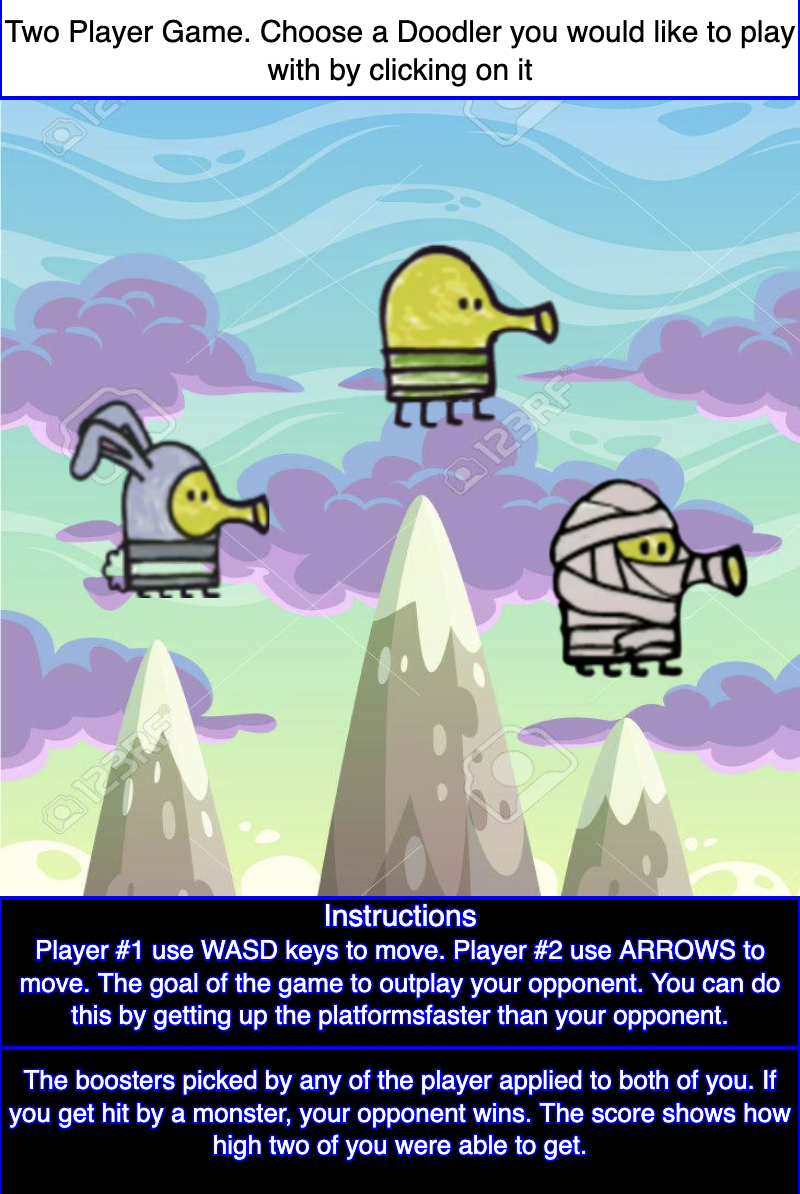
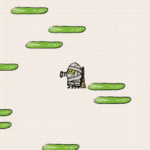
Good day! I wanted to offer some information on a Doodle Jump game I made using p5.js. I truly adored playing this game as a kid. Trying to steer the avatar to leap on platforms and dodge obstacles was both thrilling and difficult. I can still recall how good it felt when I was able to jump higher and advance to new levels. However, playing solo was in a way boring, so I decided to make it two player game.
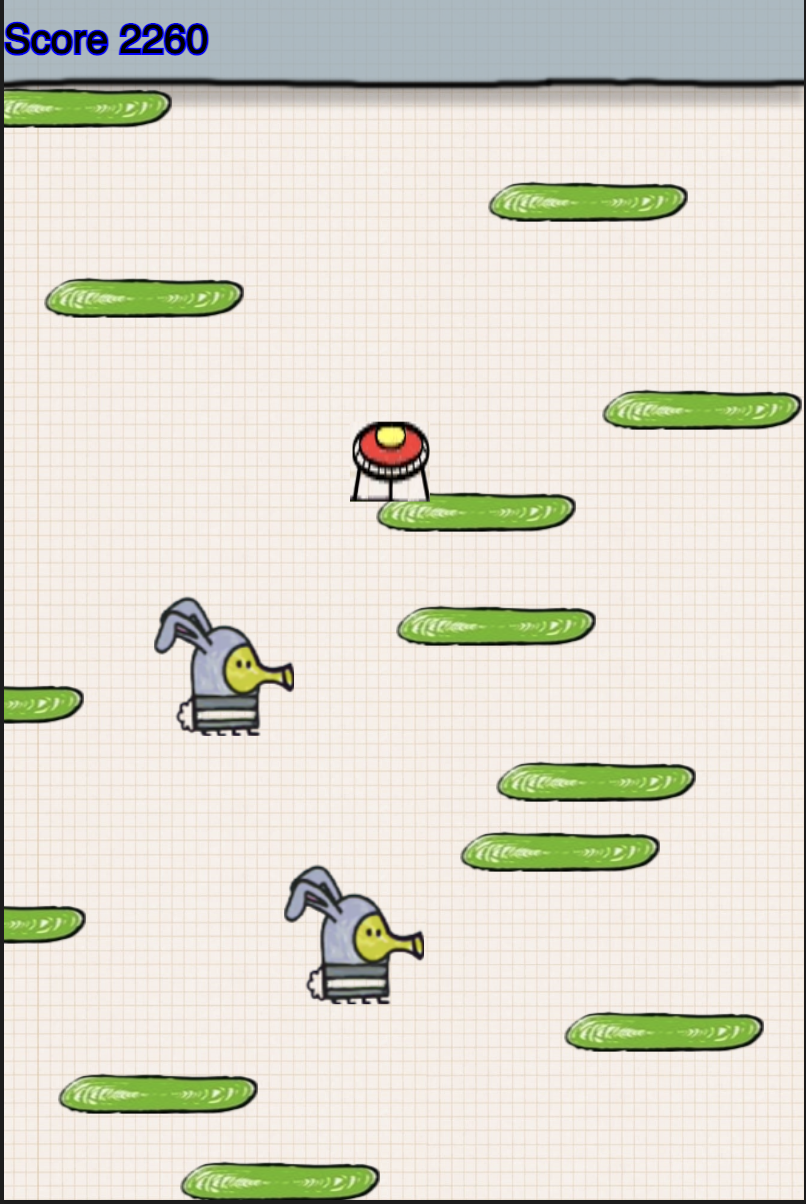
The objective of the game is to outperform your opponent. Both players control their Doodlers by using WASD keys and ARROWS keys. You compete against each other by getting up faster than your opponent. Whoever is left behind loses the game. On the way up you have obstacles such as monsters, UFOs, and black holes that can immediately kill you. Also, there are some pleasant surprises waiting on top such as boosters that speed up your way and make you invulnerable to the obstacles.
I’m pleased to inform you that I could effectively execute the game concept for my project. To improve the game’s realism and appeal, I included collision detection logic and gravity. Also, I took an effort to adjust the degree of difficulty such that it was demanding without being overly unpleasant.
Implementation and Design
How this project works
Welcome to Two Player Doodle Jump, the classic jumping game with a twist! In this game, you and a friend will control your own doodlers using WASD or ARROWS keys as you jump higher and higher.
But wait, there’s more! We have three different themes for you to choose from: Original, Ancient Egypt, and Easter Egg. Each theme has its own unique obstacles and designs to keep you entertained.
But beware, the journey to the top is filled with obstacles such as pesky monsters and UFOs trying to knock you off course. Don’t worry though, there are also boosters scattered throughout the game to help you on your way. Look out for jetpacks that will give you a temporary boost in height and trampolines that will launch you even higher.
As you climb higher, the obstacles become more difficult to avoid, making the game more challenging and exciting. With every jump, you and your friend will be on the edge of your seats, trying to reach the highest point possible.
So, gather your friends and get ready to jump into action in Two Player Doodle Jump. Can you make it to the top and become the ultimate jumping champion?
Technical Design/Good technical decisions
The game starts with an instructions screen where players will be able to learn how to play the game and select the theme they want to dive into. By clicking on any of the dancing Doodlers, the game will start with the appropriate mode(doodler skin, boosters, monsters).
After choosing the skin, players start competing in the main game.
One of the most impressive technical decisions in the game is its use of the p5.js library’s built-in functions for creating animations and graphics. The smooth animation of the doodlers jumping, the movement of the obstacles, and the booster effects all demonstrate the quality of the game’s technical design. Additionally, the use of different colors and themes for each level shows how I paid close attention to the visual design of the game.
Another notable technical decision is the game’s use of the keyboard as the primary control method for the doodlers. The use of WASD and ARROWS keys for the two players makes it easy to pick up and play the game without requiring any complicated controllers or devices. The control scheme is intuitive and responsive, which makes for a more enjoyable experience overall.
Furthermore, the game’s procedural generation of obstacles is a testament to the thought and effort put into the technical design of Two Player Doodle Jump. Each level presents new challenges with different patterns of obstacles and boosters, keeping the gameplay fresh and engaging. A lot of different computations were considered while working on the obstacle generation. You don’t want the user to get stuck in an impossible situation, otherwise, user will get angry and stop playing the game
The implementation of the game’s scoring system is also a well-executed technical decision. The scoring system is simple yet effective, with players earning points for each jump they make. The game’s technical design is also notable for its effective use of sound effects. The sound of the doodlers jumping, the obstacle collisions, and the booster pickups all enhance the overall experience of playing the game. The sounds are not random and actually resemble the physical world that people live in.
In conclusion, Two Player Doodle Jump is a well-designed game with excellent technical decisions that have contributed to its success. The use of the p5.js library’s built-in functions, the use of the keyboard as the primary control method, the procedural generation of obstacles, the scoring system, the effective use of sound effects, and responsive design are all examples of good technical design decisions.
Good Game Design
The availability of various characters to pick from increases the game’s originality and diversity is one of the things I’m most pleased about. I also included boosters that assist the player in making bigger jumps and scaling greater heights. In order to provide a personal touch, I left a particularly humorous message at the game’s conclusion. All the boosters are different depending on the doodler that is selected. That way the theme of the doodler stays the same. However, it was a bit tough to have all the pictures of the same dimensions(you can see in the game that some boosters are bigger than others). Nonetheless, even if it is not the same, it adds more of a personal touch to the game by being random and not symmetric(Who said that everything should be symmetric? xd)
Mummy jetpack
Bunny spray
Game over
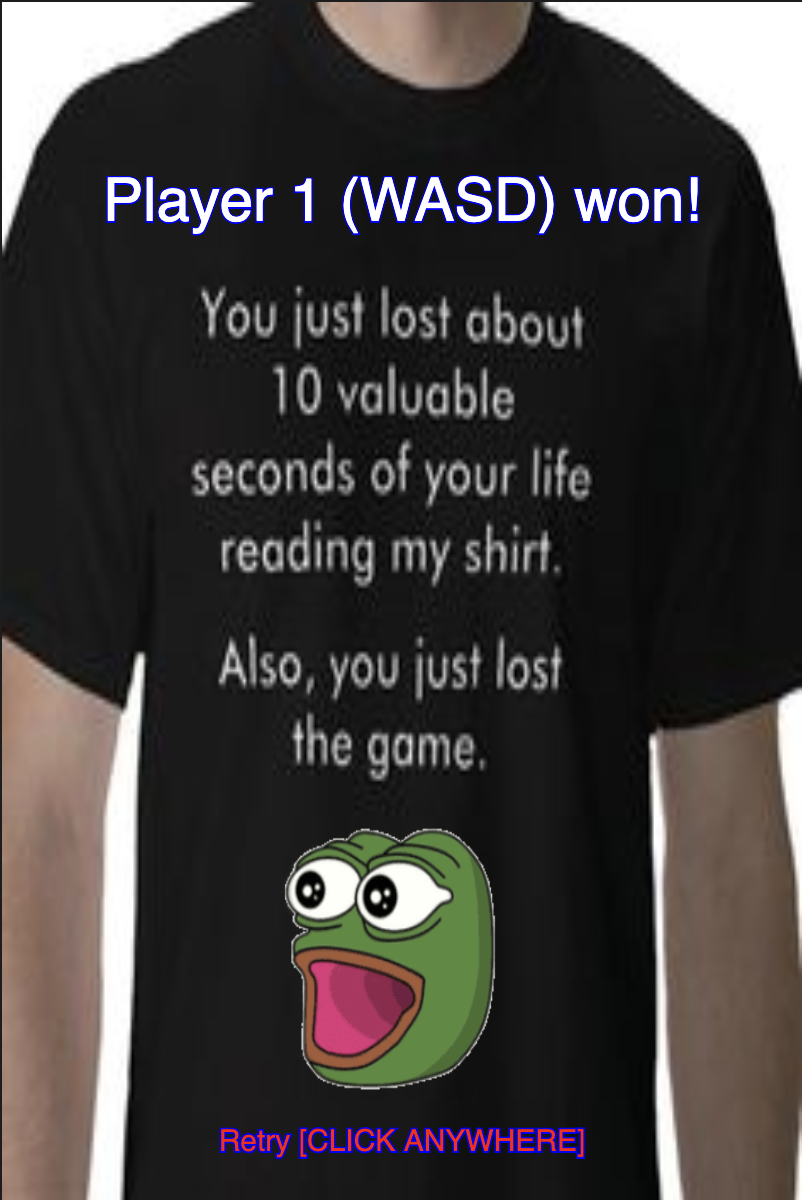
After I let a few of my friends test the game, they gave me a few hints on what to improve/make clear. Apparently, it was not clear who is WASD player and who is ARROWS player, so instead, I named them player 1 and player 2 at the beginning of the game and at the game over screen. This made it clear to the players who won, so they didn’t have to map the keys and numbers themselves
In addition to that, a few of my friends pointed out a case where the game was breaking if one of the doodlers picked up the jetpack and the second one didn’t. I found the flaw in the code and was able to fix it straight away. I learned that even though I thought of myself as an expert there is a still possibility of an error that I could not catch. Hence, user testing is a perfect solution to make sure the game works as intended.
Potential Improvements and Challenges
I did, however, have certain difficulties in the course of the work. Implementing the collision detection mechanism correctly took me some time since it was so challenging. In the below code, I had to iterate in a reverse manner in order to check if the doodler was on a specific platform. According to the platforms the direction of the doodler may change and the game ground level changes so that game shifts up.
for (let p of [...game.platforms].reverse()) {
        // checking if doodler on the platform then change it to the ground, this.r/3 needed to cut the nose of the doodler and not count it
        if (
          this.y + this.r <= p.y &&
          this.x + this.r / 3 >= p.x &&
          this.x - this.r <= p.x + p.w &&
          this.dir == 1
        ) {
          this.g = p.y;
          break;
        } else if (
          this.y + this.r <= p.y &&
          this.x + this.r >= p.x &&
          this.x - this.r / 3 <= p.x + p.w &&
          this.dir == 0
        ) {
          this.g = p.y;
          break;
        } else {
          // ground is the under the screen
          this.g = game.g;
        }
      }
I also had to make sure that the game mechanisms were balanced to provide the gamer with a demanding experience without making it too difficult. The toughest part was to make update the amount and type of platforms depending on the score of the game. I created 3 thresholds for simplicity that represent 3 levels of difficulty. The higher you go the less easy-green platforms spawn, fewer platforms in general spawn, and more white types of platforms that disappear once you jumped on them. This way, the game keeps being interesting without looking to easy for the players.
// last level of platforms
if (game.score > 100000) {

  // maintaining playable game logic
  while (game.platforms.length <= 7) {

    // randoming y position but making it possible to jump
    this.tmp_y =
      game.platforms[game.platforms.length - 1].y - int(random(100, 150));
    if (this.tmp_y > 70) {
      this.tmp_y =
        game.platforms[game.platforms.length - 1].y - int(random(50, 70));
    }
    this.tmp_x = int(random(0, WIDTH - this.w + 1));

    // counting the number of white platforms
    let count = 0;
    for (let p of game.platforms) {
      if (p.c == "white") {
        count += 1;
      }
    }

    // if their number is less than 2 then add them and call the monster method
    if (count < 2) {
      game.platforms.push(
        new Platform(this.tmp_x, this.tmp_y, 100, 20, "white")
      );
      this.monster();
    }

    // based on random add either darkblue or green platform and call the booster method
    else if (int(random(0, 10)) > 7) {
      if (int(random(0, 2)) == 0) {
        game.platforms.push(
          new Platform(this.tmp_x, this.tmp_y, 100, 20, "darkblue")
        );
      } else {
        game.platforms.push(
          new Platform(this.tmp_x, this.tmp_y, 100, 20, "green")
        );
        this.booster();
      }
    } else {
      game.platforms.push(
        new Platform(this.tmp_x, this.tmp_y, 100, 20, "blue")
      );
    }
  }
}

// second level of platforms
else if (game.score > 50000) {
  if (game.platforms.length <= 10) {
    // randoming y position but making it possible to jump
    this.tmp_y =
      game.platforms[game.platforms.length - 1].y - int(random(20, 100));
    if (this.tmp_y > 70) {
      this.tmp_y =
        game.platforms[game.platforms.length - 1].y - int(random(40, 70));
    }
    this.tmp_x = int(random(0, WIDTH - this.w));

    // counting the number of brown and blue platforms
    let count = 0;
    for (let p of game.platforms) {
      if (p.c == "blue") {
        count += 1;
      }
    }

    // if their number is less than 2 then add them and call the monster method
    if (count < 2) {
      game.platforms.push(
        new Platform(
          this.tmp_x,
          this.tmp_y - int(random(20, 50)),
          100,
          20,
          "blue"
        )
      );
      this.monster();
    } else {
      game.platforms.push(
        new Platform(this.tmp_x, this.tmp_y, 100, 20, "green")
      );
      this.booster();
    }
  }
}

// first level of platforms
else {
  if (game.platforms.length <= 12) {
    // randoming y position but making it possible to jump
    this.tmp_y =
      game.platforms[game.platforms.length - 1].y - int(random(30, 60));
    if (this.tmp_y > 70) {
      this.tmp_y =
        game.platforms[game.platforms.length - 1].y - int(random(20, 70));
    }
    this.tmp_x = int(random(0, WIDTH) - this.w);

    // based on random green platforms and call booster method
    if (int(random(0, 11)) > 9) {
      game.platforms.push(
        new Platform(
          int(random(0, WIDTH - this.w)),
          this.tmp_y - int(random(20, 50)),
          100,
          20,
          "green"
        )
      );
    } else {
      game.platforms.push(
        new Platform(this.tmp_x, this.tmp_y, 100, 20, "green")
      );
      this.booster();
    }
  }
}
Overall, building a Two Player Doodle Jump game using p5.js was rewarding, and I hope that others will find it as entertaining as I did as a youngster.
For the midterm, I decided to recreate one of my favorite childhood games, Doodle Jump. The user will be able to play the game using either WASD or arrows. The goal of the game is to score as many points as possible. The higher you get, the harder it will be to survive.
As you can see on the sketch, the game already has the intro page, the user selects which doodler he wants to use; the main page, the game itself with platforms, boosters, and hazards; and the game over the page, a meme about how you lost.
The hardest part of this project is the animation of a doodler. There are so many cases such as trampoline, jetpack, hat, shooting and etc. For each one of them, there is a different doodler. Hence, I had to upload more than 20 images and use each one of them accordingly. I already implemented this part, which makes my life much easier.
However, there are a few things that do not work right now. The sounds get collapsed. Only one platform is shown. The Jetpack is shown instead of the appropriate booster. These are the bugs I have to fix before spring break.
This code uses a circular pattern to represent sound. It plays a song using the p5 library and then plots the song’s amplitude in a circular pattern. The draw method in the code first sets up the canvas and the Amplitude object before preloading the sound file and drawing the visualization.
The circular pattern is produced by the code using the p5.js methods translate, beginShape, vertex, and endShape. The map and random functions are also used by the code to produce the visualization’s design. The amplitude data is likewise stored in an array. The circular pattern is then produced using the amplitude data.
It took some time to get the code to function correctly. I had to confirm that both the sound playback and the amplitude data storage were accurate. I wanted to confirm that the visualization was being rendered properly as well. The toughest issue was appropriately storing the amplitude data in the array.
I was able to add certain design components, such as the random fill color, and the way the sounds circle around the mouse after the code was functioning well. This gives the visualization a beautiful visual component.
I want to enhance the visualization in the future by including more design components. Also, I’d want to provide a mechanism for regulating the visualization’s pace. The user would be able to decide how quickly or slowly the visualization changes thanks to this. The visualization’s size and form may now be adjusted, I’d like to mention. The user would then be able to tailor the display to their preferences.
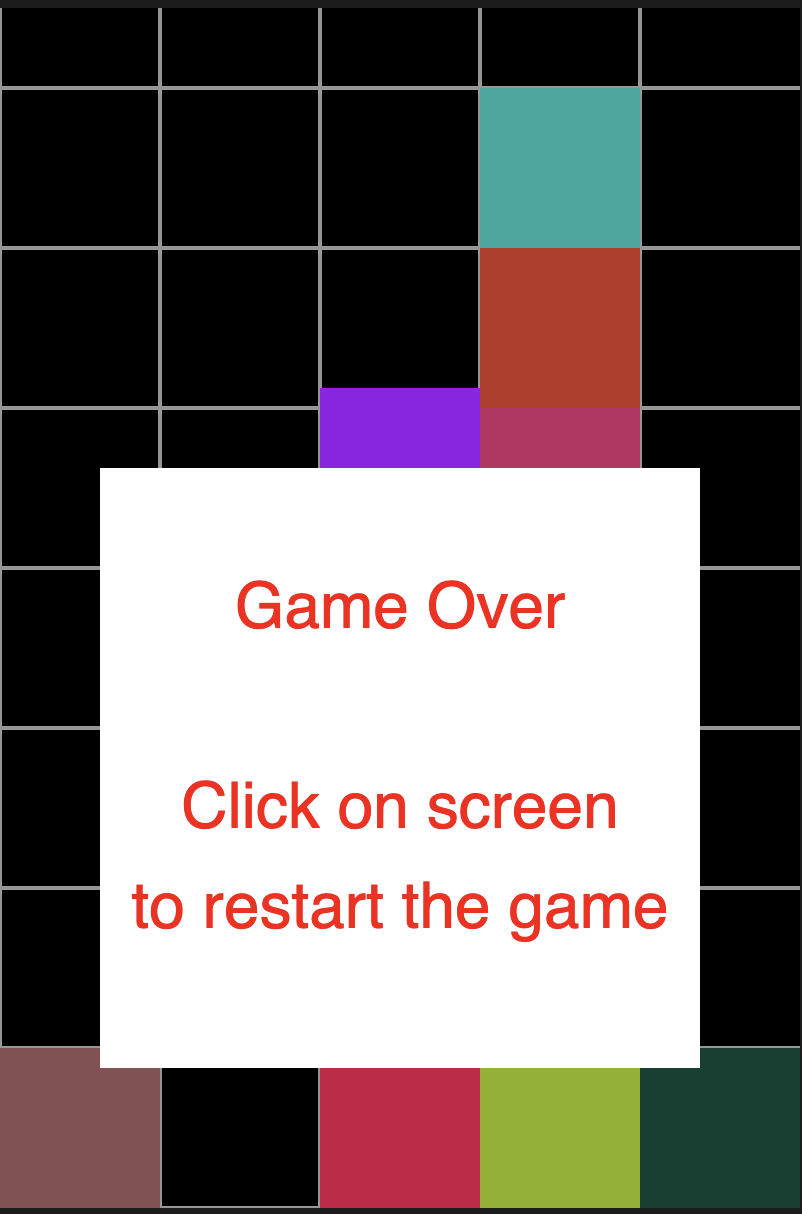
This program’s code carries out a straightforward falling-blocks game.
In order to avoid colliding with other blocks or the canvas’s bottom, the user must use the arrow keys to move the blocks to the right or left as they constantly fall from the top of the canvas in this piece of art. A block becomes a permanent block and a new block begins to fall when it collides with another block or reaches the bottom of the canvas. The game continues until all of the blocks have reached the top of the canvas or until it becomes impossible to construct new blocks because they would clash with existing ones.
A class called “Block” and numerous functions make up the code. The class is used to specify each block’s characteristics and behavior. When the game first begins, the canvas is initialized and the first block is started by using the “setup” method once. The lines of the matrix are drawn on the canvas via the “matrix” function. The “draw” function is used repeatedly in a loop to update and depict the game’s current state. The location of the falling block is updated using the “updateFallingBlock” function. All the blocks on the canvas are drawn using the “drawAllBlocks” function. A new block is created via the “startNewBlock” function. When the user taps an arrow key to move the falling block, the “keyPressed” function is invoked. If the user clicks the mouse to restart the game after it has ended, the “mouseClicked” method is invoked.
The main issue is that blocks may sometime collide with each other when the keys are pressed. The part of checking if there is a block already placed adjacently was a bit complicated. This is something I can work on in the future. Another issue is that there is no method to record the score or the time in the game. It is not too complicated to add the scoreboard, but I decided to focus on the OOP mainly on this Assignment.