FINAL PROJECT: “Togyzkumalak”

TO VIEW THE P5 CANVAS FULLSCREEN CLICK HERE.

To view the code click here.

CONCEPT

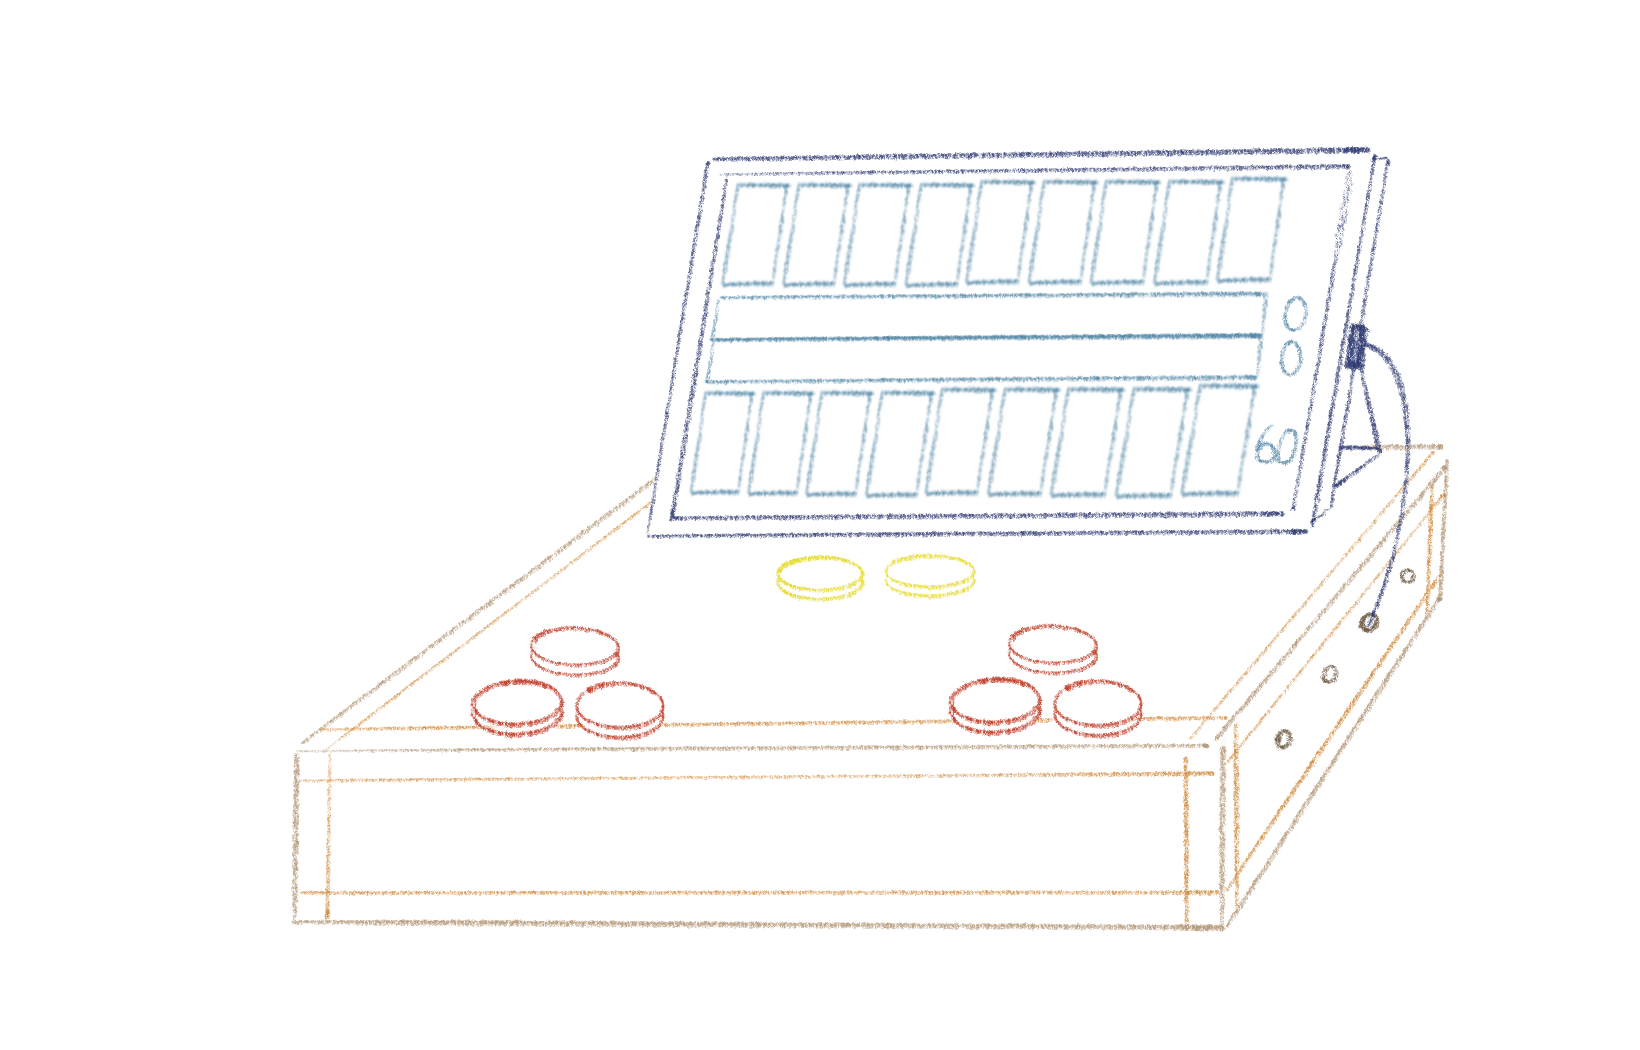
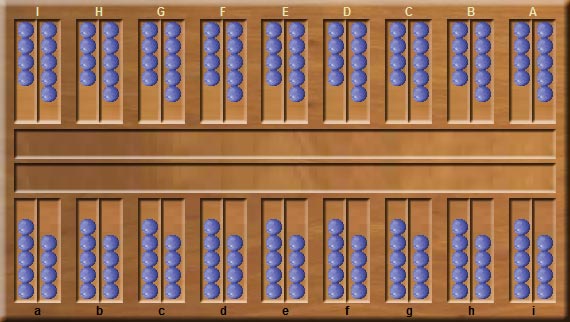
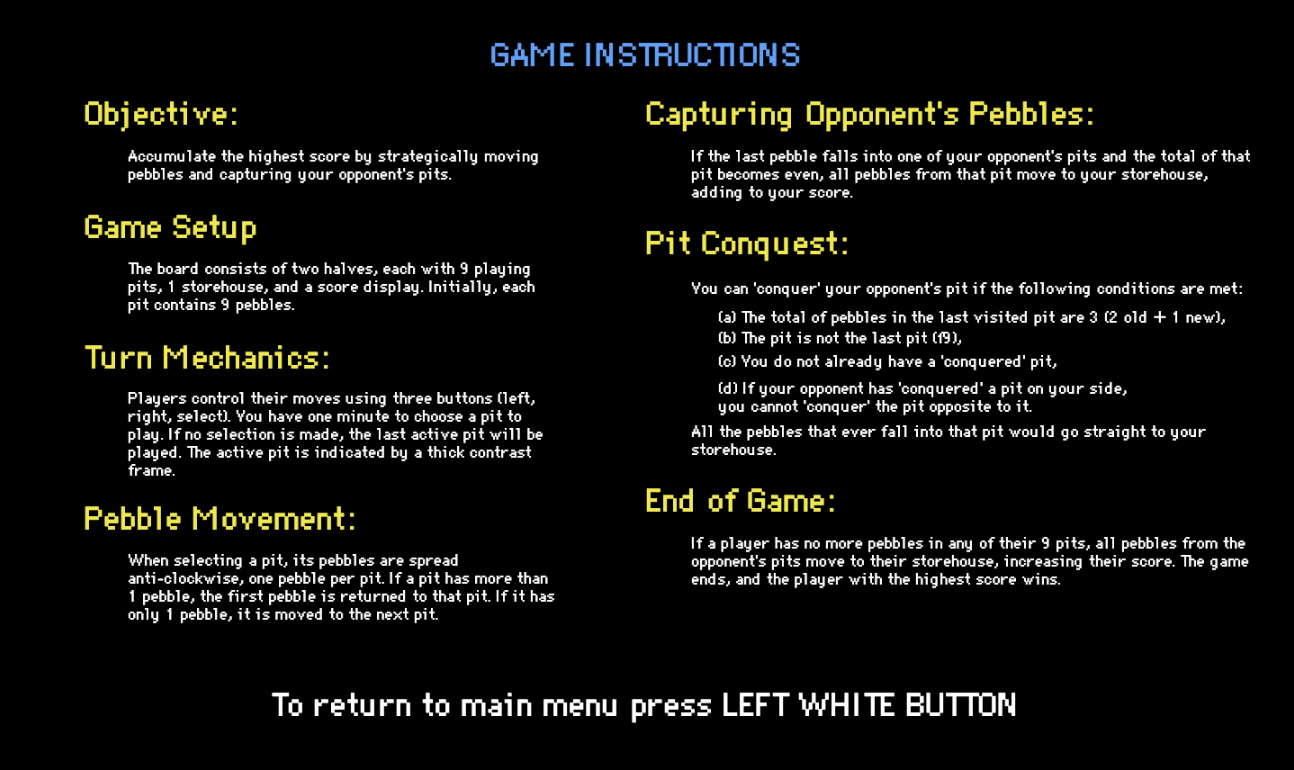
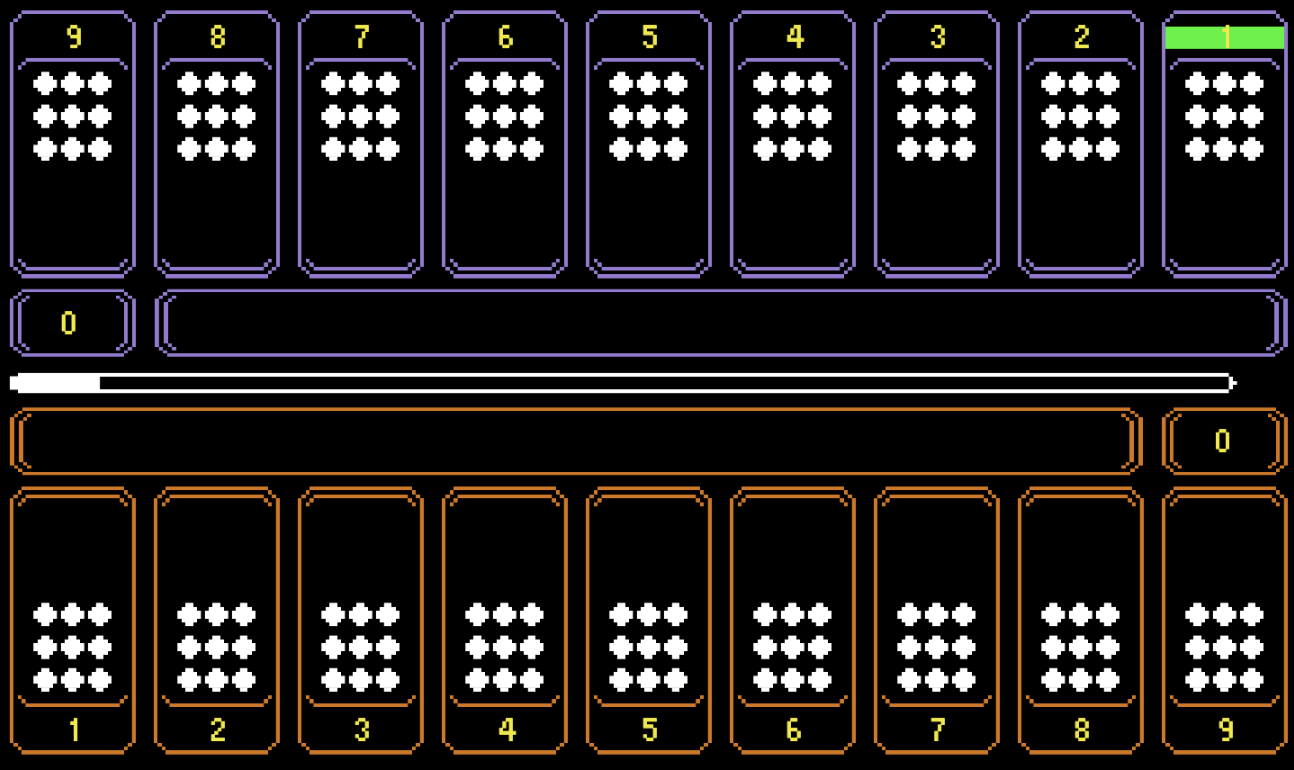
For my final project, I created a version of the Kazakh traditional two-player board game, Togyzkumalak (transl. “nine pebbles”). The game board is visualized on a p5 window, which is displayed to players through a laptop screen. The board consists of two halves, each half features 9 playing pits, 1 storehouse, and a score display.

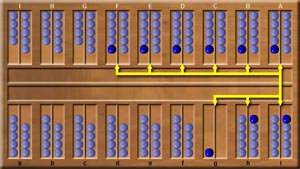
At the beginning of the game, each pit contains 9 pebbles. Players control their moves by using a set of three buttons (left, right, enter), featured on the arcade cabinet. Each player is given a minute to choose a pit to play. If the “select” button is not pressed by the end of the timer, the last active pit will be played. The active pit is indicated by a thick contrast frame around the pit. The pebbles from the chosen pit are spread in an anti-clockwise direction, one pebble per pit. If there is more than 1 pebble in the pit, the first pebble is put back into the pit it was taken from. If there is only 1 pebble in the pit, the first pebble is moved to the next pit. If the last pebble to be moved is put into one of the opponent’s pits and the total of the pebbles in that pit is an even number, all of the pebbles from that pit get moved to the player’s storehouse and add to their total score.

The opponent’s pit can be “conquered”, meaning that all the pebbles that ever fall on that pit will move to the player’s storehouse. However, there are some more conditions that need to be followed to do that (checked by p5 automatically):

        • the total of the pebbles in the last pit you’ve visited must be 3 (2 old +1 new);
        • the pit shouldn’t be the last pit of the player (pit #9);
        • you must not already have a “conquered” pit;
        • if your opponent already has “conquered” a pit on your side, you can’t “conquer” a pit that is opposite to it;

If one of the players doesn’t have any more pebbles in any of their 9 pits, the opponent’s pits are emptied into their storehouse, incrementing their score. The game ends and the player with the highest score wins.

IMPLEMENTATION

INTERACTION DESIGN

The game is hosted on a 30*40 acrylic arcade cabinet, which features two sets of game control buttons, a menu button, and an instructions button. For the screen, I am using a 13-inch laptop, the keyboard part of which is hidden in the cabinet, so that only the screen can be seen and accessed by the players. Along with the lower part of the laptop, the Arduino setup is also neatly organized inside the cabinet. To fit both without the size of the cabinet, I have put a small box inside the cabinet. The box plays two roles, it is both a home for the Arduino kit and a pedestal for the laptop. I have used a laser cutter, duct tape, bolts, and acrylic glue to assemble the cabinet. Below the cabinet, there is a box the pure function of which is to lift up the cabinet and make the whole setup look less disproportionate.

The biggest challenge at this stage was cutting the elements individually. The laser cutting machine died in the process multiple times, which made the process very time-consuming.

ARDUINO CODE

Setting up the Arduino code was pretty intuitive. It is fully based on the example provided by the professor in class. The code consists of the declaration of 8 buttons and their states. The state of each button is read and sent to p5. An empty line is sent from p5.js to Arduino.

To view the code scroll to the end of the sketch.js file in p5. Click here to view the p5 code.

P5.JS CODE

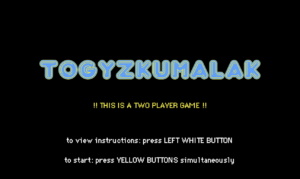
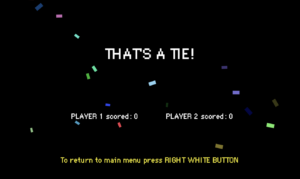
Most time was spent on setting up p5 canvas. There are four game states (start, playing, end, and instructions) that constitute the window displayed. The title page features a blinking text to serve as a sort of warning that the game requires two players. I found it necessary to add this warning and make it visible because my midterm project was also a two-player game and despite stating in class that it is multiplayer, my fellow classmates would still attempt to play it individually, which really breaks the experience. I decided to feature instructions on a separate page because (a) I didn’t find a way to make them concise enough to feature on the title page, and (b) I believe that there will be some people who know the instructions of the game. For the end screen, I have adopted the confetti display to make it feel less empty and more festive.

The arcade style of the game was dictated by the arcade cabinet and my general liking of this style. I find the arcade art style to be fitting for whatever game idea. It is easy to implement, not too difficult to modify if needed, and makes the game look more put together.

To explain the code in a more organized way, I will be focusing on each of the major functions of the game.

Turn mechanics

The turn mechanics in the game involve managing the timer, checking if a selected pit is empty, and handling situations where a selection is not made within the allotted time.

The game utilizes the frameCount variable to keep track of the elapsed time. The timeStart variable is set to the current frameCount value at the start of a player’s turn. The timer bar is displayed, indicating the remaining time for the player’s turn. If the timer reaches the time set for a turn, the turn is automatically ended.

If the player does not make a selection within the allowed time (e.g., before the timer reaches the threshold), the turn is automatically ended and whatever pit their selection window was on, would be played. If the last selected pit is empty, pit index + 1 would be played. This is achieved by comparing the current frameCount value with the timeStart value and determining if the time limit has been exceeded. When the turn times out, the game proceeds to the next player’s turn.

Pebble movement

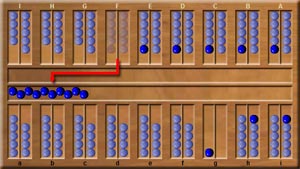
When there are multiple pebbles in a pit, the game determines the number of pebbles to be moved. If the pit has more than one pebble, the ballCount variable is set to the number of pebbles in the pit minus one. The pebbles are then moved one by one to the subsequent pits in an anti-clockwise direction. If there is only one pebble in the pit, a specific rule is applied. The ballCount variable is set to 1. If a player selects an empty pit, no pebbles are moved, and the player is forced to choose a pit that has pebbles in it.

Capturing opponent’s pebbles

After moving the pebbles to their respective pits, the game checks whether the total number of pebbles in the last pit visited on the opponent’s side is even. This is done by checking the index of the pit using modulo division (%), which checks if the remainder of the division by 2 is 0, indicating that the pit is even. If the final pit has an even amount of pebbles, the player’s score is incremented by the number of pebbles in the opponent’s pit. The player’s storehouse and the opponent’s pit are updated to reflect new values.

End of game

After each move, the game checks if the current player has any remaining pebbles in their pits. This is done by iterating through all nine pits of the current player and summing up the number of pebbles in each pit. If the total count of pebbles in the player’s pits is zero, it indicates that the player has no more pebbles to play with. The game state changes to “end” and the end window is displayed. The scores are compared to choose which ending message to display. An alternative way of finishing the game is by pressing the right white button.

FUTURE IMPROVEMENTS

There are a few. For a better experience of the game, it would be nice to have sound effects, music, and animations. I am an advocate for adding sound to whatever experience that doesn’t require a complete lack of sound. Especially if it’s a game. However, this time I really didn’t have the time to add by the project submission deadline. I may add it by the time of the showcase if I have some free time. As for animations, I just couldn’t figure it out. Perhaps if the distribution of the pebbles was slower and more emphasized, it would be easier to figure out the game flow for those, who didn’t understand it from instructions.

In the original game, there is also a different kind of pebble, but I don’t remember what rule is associated with it and surprisingly can’t find anything online. I do believe that it added more complexity to the game, however, it is currently difficult to explain instructions in simpler terms as it is. So for the starters, I wanted to focus on making the game’s logic and objective as understandable as possible without taking away from the strategic aspect of it.

Coming back to the display of the instructions, I feel like right now it is the biggest challenge of the game. While after user testing I was planning to have some visuals to accompany the rules, I realized that it would be more effective to explain the game in as many details as required to make the game make sense. In case players at any point want to clarify something about the rules, they can always press the button allocated specifically for this purpose. The game timer pauses for the duration of the instructions display so that players wouldn’t feel in a hurry and could actually focus on understanding the game.

One other thing is that even though it is written that to start the game players must press the yellow buttons simultaneously, most lack the group coordination to do so. I implemented this rule as one way of ensuring that there are two players at the start of the game. Maybe there is some condition I could add to make it so that as long as the other player presses within some brief time window from the first player to press the yellow button on the title screen, the game could be started.

Final Project: User Testing (Togyzkumalak)

For the user testing, I have asked a person outside of this class to test what I have so far. This includes the p5 screen only, as I was yet to have the physical part of the game and didn’t yet connect the Arduino to p5. On the p5 screen, there is an interactive board with pebbles distribution animation. The information about the order of turns, scores, and presence of any conquered pits is logged to the console and not yet displayed on the board. The turns are not timed yet.

The user was not given any instructions besides the p5 screen, so they navigated the game on their own. They have focused on using mouse clicks mainly, which correlates to the type of control that I had for p5 so far (players’ turns are played through mouse clicks on pits correlating to their side of the board). This observation indicates that it is only intuitive to want to interact with pits. I believe that the control will be even more intuitive when the physical aspect of the game will be built.

It could have been more effective if I asked two people to test the game instead of one because it is a two-player game. However, it could be observed that the user got a sense of it from the clear visual division of the board and the text from the console logs.

The tester was confused about the rules and the goal of the game. I believe that with well-written instructions, it would be an easy fix. My concern, however, is that people don’t like to read, especially when it comes to instructions. So if I make the instructions more than a few dozen of words long, people may skip through them, be confused through the game, and come to a conclusion that they don’t like it, when it’s actually very fun (like me with chess). I will try to add images where appropriate, however, I am not sure if images alone will suffice.

The video of the user testing is attached below. If the video window doesn’t show, use this link to view it.

Final Project Proposal: Togyzkumalak

CONCEPT

For my final project, I will create a version of the Kazakh traditional two-player board game, Togyzkumalak (transl. “nine pebbles”). Each player will be using three buttons connected through Arduino to p5 to control their movements in the game (left, right, enter). On p5 will be the visualization of the board, with 9 playing pits and 1 storehouse for each player. Players will use buttons to choose which pit to take the pebbles from.

Players will be given a minute to make their move. The player with the highest score wins (total of pebbles captured). To add something new to the game, chance games will be played between the turns.

        • after every 3rd turn, a player will be given a chance to roll a die in the game. The die will have both negative ((-3) to (-1)) and positive numbers (1 to 3). The number shown will be added to the score of the player.
        • after every 7th turn, a player will be given a choice between three cards shown backward. One of the cards will be empty, one will have a challenge, and the last one will have a bonus. Drawing an empty card will safely return you to the game. Drawing a challenge card will make decrease your turn time to 30s for the next two turns. Drawing a bonus card will add 1 more minute to your turn time for the next two turns.

To learn more about the rules refer to my previous post.

ARDUINO

Description

My Arduino setup will consist of 8 buttons:

        • 3 buttons for each player (left, enter, right);
        • 2 shared buttons (instructions, return to the main menu).

Each of the buttons will be assigned a value directly related to its function (ex. user1_right_btn, instructions_btn, etc). On button press, this value will be sent to p5.

p5 will be sending information to Arduino every second. The information to be received is:

        • which player’s turn is it – to enable playing player’s buttons and disable not playing player’s buttons during playing player’s turn.
        • the number of turns played so far (tentative) – to switch controls after every 3rd and 7th turn to play the chance games.

DESIGN

To add to the experience, I want to laser cut a custom playing board that will feature 8 arcade buttons for controls and an Ipad for the game display. The Arduino board and cord will be snuggly hidden under the box-like board. Below is the picture for reference:

Game Setup

P5

Description

P5 will receive information about the button pressed on Arduino to do one of the following:

        • userX_left_btn” – move the user selection window from the current pit to index-1 with min_index = 0 (when reaching the left limit of the board the selection doesn’t move).
        • userX_right_btn” – move the user selection window from the current pit to index+1 with max_index = 8 (when reaching the right limit of the board the selection doesn’t move).
        • userX_enter_btn” – select the pit -> pebble distribution -> update turns played so far -> update current_player value.
        • instructions_btn” –
            • if the instructions window is not displayed and the button is pressed -> display the instructions window,
            • if the instructions window is displayed and the button is pressed -> close the instructions window.
        • mainMenu_btn” – end game and display main menu window.

P5 will send information about which player’s turn is it and the turns played by the current player so far.

Design

The whole game will be displayed on p5. There will be 3 game states to display three different windows:

        • gameState = “start” -> display main menu
            • instructions display;
            • “play” button (triggered by synch press of the “enter” button by two players);
        • gameState = “playing” -> display the game
            • game board (9 even-sized playing pits and one big storehouse for each player);
            • scores;
            • timer (if the player didn’t press “enter” by the end of the timer -> currently selected pit will be played);
            • chance games displayed over the game board (after every 3rd and 7th turn);
        • gameState = “end” -> display end screen with scores
            • scores;
            • end message;
            • “return to main menu button” (same as the one during the game);

It would be nice to have animation during:

        • pebble distribution – view each pebble put into a pit;
        • die roll – rotation of a cube or change of the number on the moving flat square;
        • card picking – rotation of a card or some revealing movement.

To add to the experience relevant sound effects will be played.

Final Project Preliminary Concept – Togyzkumalak

CONCEPT

For our final project, I want to create a version of the Kazakh traditional board game, Togyzkumalak (transl. “nine pebbles”). The game is played on a board consisting of two rows of nine pits each, with 2 larger pits (storehouses) between the two rows. The objective of the game is to capture more pebbles than the opponent (-> high score). This is a two-player game.

game setup for reference

Each player will be using three buttons connected through Arduino to p5 to control their movements in the game (left, right, enter). On p5 will be the visualization of the board. Players will use buttons to choose which pit to take the pebbles from.

The rules of the game are (with consideration of Arduino):

1) The game begins with 9 pebbles in each pit. Each player will be given 1 minute to make a move.

2) The first player chooses one of the 9 pits on their side using the “left”, “right”, and “enter” buttons on their Arduino.

3) All of the pebbles from the chosen pit are distributed evenly over the pits in an anti-clockwise direction.

        • If there is more than 1 pebble in the pit, the first pebble is put back into the pit it was taken from.
        • If there is only 1 pebble in the pit, the first pebble is moved to the next pit in the anti-clockwise direction.
anti-clockwise movement of the pebbles

4) If the last pebble to be moved is put into one of the opponent’s pits and the total of the pebbles in that pit is an even number, they get moved to the player’s storehouse and add to their total score.

moving pebbles from the opponent’s pit if the total in the said pit is an even number

5) opponent’s pit can be “conquered”, meaning that all the pebbles that ever fall on that pit will move to the player’s storehouse. However, there are some more conditions that need to be followed to do that (it will be checked by p5 automatically):

        • the total of the pebbles in the last pit you’ve visited must be 3;
        • the pit shouldn’t be the rightmost pit of the player (pit #9);
        • you must not already have a “conquered” pit;
        • if your opponent already has “conquered” a pit on your side, you can’t “conquer” a pit that is opposite to it;

6) If one of the players doesn’t have any more pebbles in any of their 9 pits, the opponent’s pits are emptied into their storehouse.

7) The one with the biggest score wins.

CREATIVITY

To add something new to the game, chance games will be played between the turns:

        • after every 3rd turn, a player will be given a chance to roll a die in the game. The die will have both negative ((-3) to (-1)) and positive numbers (1 to 3). The number shown will be added to the score of the player.
        • after every 7th turn, a player will be given a choice between three cards shown backward. One of the cards will be empty, one will have a challenge, and the last one will have a bonus. Drawing an empty card will safely return you to the game. Drawing a challenge card will make decrease your turn time to 30s for the next two turns. Drawing a bonus card will add 1 more minute to your turn time for the next two turns.

POSSIBLE CHALLENGES

I think I will have a difficult time implementing the game logic. Another thing I usually have issues with is checking the time (setting up a timer). I also need to think of the way the transitions between different states of the game to make it look animated and not mechanical.

HW8: In-class Exercises (moving ellipse, LED brightness, gravity wind example…)

EXERCISE 1

Task description: Make something that uses only one sensor on Arduino and makes the ellipse in p5 move on the horizontal axis, in the middle of the screen, and nothing on Arduino is controlled by p5.

schematic used
setup used for all three exercises

Here is the link to the p5 code with the Arduino code commented out at the end of it.

If the video window doesn’t show, use this link to see the demo.

EXERCISE 2

Task description: Make something that controls the LED brightness from p5.

Here is the link to the p5 code with the Arduino code commented out at the end of it.

If the video window doesn’t show, use this link to see the demo.

EXERCISE 3

Task description: Take the gravity wind example and make it so that every time the ball bounces one led lights up and then turns off, and you can control the wind from one analog sensor.

Here is the link to the p5 code with the Arduino code commented out at the end of it.

If the video window doesn’t show, use this link to see the demo.


HW7: Musical Instrument

CONCEPT

Our project is a musical instrument that uses an ultrasonic sensor to measure the distance between the sensor and an object and plays different notes based on the distance. A note is played when a push button is pressed. The distance measurement is then mapped to an array of notes to play on a piezo buzzer.

IMPLEMENTATION

We have started from setting up a circuit that uses next components: ultrasonic sensor, piezo buzzer, 10 jumper wires, pushbutton, and 10k resistor. The ultrasonic sensor was used to measure the distance of the object from the instrument, and the piezo buzzer was used to play the musical notes based on the measured distance. The pushbutton was used to activate the instrument and play the notes, and the 10k resistor was used as a resistor for the button. We connected all these components using jumper wires to establish a circuit that would form the foundation for the instrument.

We have then moved onto adding a code component. In the setup() function we have set the pinMode for each of the pins used in the circuit. We have also used the Serial.begin() function to start serial communication between the Arduino and the computer, which would allow us to view debug messages.

The first part of the loop function was used to read the distance measurement from the ultrasonic sensor using the pulseIn() function. We then used this distance measurement to calculate which note to play on the piezo buzzer. We mapped the distance to a note by dividing the range of distances by the number of notes we wanted to play (in this case, five).

The code then checked the state of the pushbutton using the digitalRead() function. If the pushbutton was not pressed, the piezo buzzer would not play any sound, and a message would be printed to the serial monitor. If the pushbutton was pressed, the corresponding note would play on the piezo buzzer, and a message indicating the button’s state and the note being played would be printed to the serial monitor.

// 
// Project name: "HW7: Musical Instrument"
// Names: Adina & Aibar
// Class: Intro to IM
// Professor: Michael Shiloh
//

int trigPin = 10;
int echoPin = 11;
int buttonPin = 2;
int buzzerPin = 12;

long duration;
long distance;

int buttonState;

void setup() {
  //distance pins
  pinMode(echoPin, INPUT);
  pinMode(trigPin, OUTPUT);
  //button pin
  pinMode(buttonPin, INPUT);
  //buzzer pin
  pinMode(buzzerPin, OUTPUT);

  Serial.begin(9600);
}

void loop() {
  digitalWrite(trigPin, LOW); //triggers on/off and then reads data
  delayMicroseconds(2);
  digitalWrite(trigPin, HIGH);
  delayMicroseconds(10);
  digitalWrite(trigPin, LOW);
  
  duration = pulseIn(echoPin, HIGH);
  distance = (duration / 2) * .0344; //speed of sound converted into cms

  int notes[5] = {261, 294, 329, 349, 392}; //array of notes
  //          mid  C    D    E    F    G 

  buttonState = digitalRead(buttonPin);
  if (buttonState == 0) { //if not pressed
    noTone(12);
    Serial.println("button not pressed");
  }

  else if ((buttonState == 1)) {  //if pressed
    int sound = map(distance, 0, 30, 0, 5);  //map distance to the array of notes
    tone(buzzerPin, notes[sound]);  //play a note
    //checking if works through serial monitor
    Serial.print("button pressed, ");
    Serial.print(buttonState);
    Serial.print(", ");
    Serial.println(sound);
  }
}


VIDEO DEMO

If the video window doesn’t show, use this link to see the demo of the musical instrument.

CHALLENGES AND SOLUTIONS

Our biggest challenge was ensuring that the distance reader could detect the object in front of it accurately. When the reader did not detect the object correctly, the instrument played a weird sound that sounded like a very high pitch, which was not the sound we were hoping to achieve. It took several attempts to get the distance reader to work correctly. A solution that we came up with was decreasing the max distance when mapping the sound to the distance and using a solid object like the back of the phone, rather than a hand. By decreasing the maximum distance for the object, we were able to make sure that the distance reader could pick up on the object’s presence.

HW6: Analog and Digital, Input & Output – “code name: Purple”

CONCEPT

For this assignment, I have made a game called “code name: Purple”. The player is presented with an RGB LED that changes color based on the reading from a photosensor. The goal of the game is to press a button when the RGB LED turns the right shade of purple, which may be not discernable to the eye, so the only way for the player to find out is to play around with the photosensor and check by pressing the button. If the button is pressed at the right photoresistor value, a green LED lights up, indicating that the player has won. If the button is pressed at the wrong photoresistor value, a red LED lights up, indicating that the player has lost.

IMPLEMENTATION

I faced several challenges while setting up the circuit. Initially, I had difficulty understanding the pin mapping for the RGB LED and the photosensor. I had to refer to the documentation and online resources to understand how to wire these components to the Arduino. After some trial and error, I was able to successfully wire the components and read the analog values from the photosensor.

Another challenge was in getting the timing of the button press just right. Initially, I had set a fixed delay between the LED turning purple and the button press is registered. However, this did not work well as the timing varied depending on the ambient light level. I had to modify my code to dynamically adjust the timing of the button press based on the current color value of the LED. After some experimentation and tweaking, I was able to get the timing of the button press just right, and the game was fully functional.

schematic used

Below is the full code.

// define pins
int redLED = 9;
int greenLED = 5;
int rgbRed = 11;
int rgbGreen = 10;
int rgbBlue = 6;
int btnPin = 7;
int photoPin = A0;

// variables
int redVal = 0;
int greenVal = 0;
int blueVal = 0;
int photoVal = 0;
int btnState = 0;

void setup() {
  // set pins
  pinMode(redLED, OUTPUT);
  pinMode(greenLED, OUTPUT);
  pinMode(rgbRed, OUTPUT);
  pinMode(rgbGreen, OUTPUT);
  pinMode(rgbBlue, OUTPUT);
  pinMode(btnPin, INPUT);

  // initialize serial communication
  Serial.begin(9600);
}

void loop() {
  // read the photoresistor value
  photoVal = analogRead(photoPin);

  // map the photoresistor value to RGB LED color values
  redVal = map(photoVal, 0, 1023, 0, 255);
  greenVal = 0;
  blueVal = map(photoVal, 0, 1023, 255, 0);

  // set RGB LED color
  analogWrite(rgbRed, redVal);
  analogWrite(rgbGreen, greenVal);
  analogWrite(rgbBlue, blueVal);

  // read the button state
  btnState = digitalRead(btnPin);

  // WIN CONDITION
  // if RGB LED is the right shade of purple
  // ranges: 210 < red value < 220, 40 < blue value < 50
  if ((redVal >= 210 && redVal <= 220) && (blueVal >= 40 && blueVal <= 50)) {
    // if button is pressed when correct -> light the green LED
    if (btnState == 1) {
      digitalWrite(greenLED, HIGH);
      digitalWrite(redLED, LOW);
    }
    // if button not pressed
    else {
      digitalWrite(greenLED, LOW);
      digitalWrite(redLED, LOW);
    }
  }
  // LOSE CONDITION
  // if RGB LED is not the right shade of purple
  else {
    // if button is pressed when wrong -> light the red LED
    if (btnState == 1) {
      digitalWrite(greenLED, LOW);
      digitalWrite(redLED, HIGH);      
    }
    // if button is not pressed
    else {
      digitalWrite(greenLED, LOW);
      digitalWrite(redLED, LOW);
    }
  }

  // print values to serial monitor
  Serial.print("Photoresistor Value: ");
  Serial.print(photoVal);
  Serial.print("\t Red Value: ");
  Serial.print(redVal);
  Serial.print("\t Green Value: ");
  Serial.print(greenVal);
  Serial.print("\t Blue Value: ");
  Serial.print(blueVal);
  Serial.print("\t Button State: ");
  Serial.println(btnState);

  delay(100);
}

VIDEO DEMO

If the video window doesn’t show, use this link to see the demo of the game.

REFLECTION

Moving forward, there are a few things that I would add to improve the game. I would add a display that shows the player’s score and progress, to add a bit more feedback and motivation. Some audio feedback, such as a sound effect for when the button is pressed at the right time, would have been nice. I would also consider adding some power-ups that would make the game easier or more difficult. One example of such is a power-up that would make the RGB blue and red value ranges wider, allowing for less precise button presses.

HW5: Unusual Switch

CONCEPT

The inspiration for this assignment came from the treasure chests I have seen in cartoons as a child. The ones that glow and shine from inside when you open them. I made a box with a “hidden” breadboard that has LEDs on it that turn on when you open the lid of the box. I know that I don’t have the skills or the materials to make a realistic chest, so the vibe for this chest is DIY, something that a child would make to hide secret objects.

Treasure chest Vectors & Illustrations for Free Download | Freepik

IMPLEMENTATION

I used a popcorn box for a chest. Since the inside of the box is brown-grey and looks more like a chest I turned it inside out, and used some tape to put it back together. I then a hole at the bottom of the chest to hide the breadboard, one of the jumping wires on the breadboard, and the two jumping wires that connect to the Arduino. I made a small opening on the lid of the chest for one of the jumping wires to connect the circuit.

The circuit uses 5 LED lights, 5 330Ohm resistors, and 8 jumper cables. The LED lights are each connected to each other using 4 yellow jumper cables. One red jumper cable connects from positive on a breadboard to 5V on Arduino. A black jumper cable is used to connect from the negative on a breadboard to GND on Arduino. Blue (-) and green (LED) jumper cables need to connect to complete the circuit and light the LEDs. The blue cable is hidden under the box and attached by a piece of tape to the back of the box. A piece of foil is attached at the free end of the cable to make the connection area bigger. The free tip of the green cable sticks out of the lid of the box through a small opening. When the box is opened, the lid gets closer to the back of the box, making the green and blue cables touch.

To imitate a chest full of golden bits, I filled the box with ripped yellow paper and covered the breadboard for the most part. I have used yellow jumper cables for the cables that would stay fully inside the box to make them less visible.

schematic used

DEMO VIDEO

If the video window doesn’t show, use this link to see the demo of the treasure chest.

MIDTERM: “Grannys Lovely Maze”

TO PLAY THE GAME CLICK HERE!

If you are a professor and you want to see the code click here!

GAME CONCEPT

Grannys Lovely Maze is a 2-player maze chase game. Kitty (PLAYER 1) is a royal cat who enjoys spending time in the outdoor maze of his castle. He needs to find a way back to his grandma before the Bear (PLAYER 2) turns him into a dinner. The maze is set in the nighttime, meaning that neither the Kitty nor the Bear can see the full maze. Each player is spotlighted to only see the closest surrounding. This feature is the distinguishing point of this game, which adds some uniqueness as well as makes the game more challenging.

The game itself consists of 3 maps. If one of the players scores 2 consecutive wins, while the other player scores 0, the third map is not played and the game ends. Scores are not displayed during the game because I feel like with how short the game is there is no real need for a visual element on the screen that could potentially distract the players from the game.

Below are the screenshots from each of the screens.

IMPLEMENTATION

My project consists of three screens: start (instructions), game, and end. In designing each screen I have tried to be consistent with the sizes, shapes, and colors that I use. The overall visual concept can be probably described as an 8-bit pixel-style arcade. This is a style that I adore and used previously in personal and class projects. I have done some images myself (ground and bushes textures in the maze) as I couldn’t find what I was looking for online. I have sourced the sprites, the music, and the font to match online.

To create some order and organization, I have created 5 classes: Game (connects every class and controls the game logic), Cell (map display), Player (players display), Door (granny display), and Confetti (confetti display). I have used the gameState variable inspired by professor Mang’s example to switch between game screens. There is also a separate file that stores three available maps as arrays.

To create the spotlight effect and display only a part of the maze surrounding the players I have created a function inside of the Player class that uses an if statement to check if the cells around the player position are within the boundaries of the spotlight. I am no mathematician so I didn’t figure out how to make so that the spotlight round instead of boxy. However, I feel like it fits the pixel aesthetics of the game and doesn’t take away from the experience.

inSpot(other) {
    if (
      other.x < this.x * cellWidth + this.spotlight * cellWidth &&
      other.x > this.x * cellWidth - this.spotlight * cellWidth &&
      other.y > this.y * cellWidth - this.spotlight * cellWidth &&
      other.y < this.y * cellWidth + this.spotlight * cellWidth
    ) {
      return true;
    }
    return false;
  }

To add some aspect of celebration to the end screen and make it less plain I have added the Confetti class. It creates a list with randomly colored rectangles that both rotate and move vertically at random speeds. If the position of a rectangle is beyond the height of the screen, the rectangle is deleted from the list using the splice function. I am proud of this little feature. I think it adds some character and adds to the experience.

class Confetti {
  constructor() {
    this.x = random(width);
    this.y = -10;
    this.diameter = random(10, 20);
    this.color = color(random(255), random(255), random(255));
    this.speed = random(1, 5);
    this.rotation = 0;
    this.rotationSpeed = random(-0.05, 0.05);
  }
  
  update() {
    this.y += this.speed;
    this.rotation += this.rotationSpeed;
  }
  
  display() {
    push();
    translate(this.x, this.y);
    rotate(this.rotation);
    rectMode(CENTER);
    noStroke();
    fill(this.color);
    rect(0, 0, this.diameter, this.diameter/2);
    pop();
  }
  
  isOffScreen() {
    return this.y > height + this.diameter;
  }
}

Another part of the implementation I like is the display of the granny (exit point). I found a beautiful spritesheet online. To make her more dynamic, she is looking around before Kitty reaches her. She inherits her spotlight function from the Player class.

class Door extends Player {
  constructor(i, j, type) {
    super(i, j, type);
    this.spotlight = 3;
  }

  // MAKE THE SPRITE CHANGE EVERY SECOND
  update() {
    if (frameCount % 60 == 0) {
      this.sprite++;
      this.sprite %= 6;
    }
  }
  // DISPLAY
  draw() {
    this.update();
    image(
      oldladyImg,
      this.x * cellWidth,
      this.y * cellWidth,
      cellWidth,
      cellWidth,
      40 * this.sprite,
      0,
      40,
      54
    );
  }
}

CHALLENGES

In the implementation of my project, I have run into some problems, most of which were resolved. Main problems that I have tackled include:

        • Maze Building – initially I planned to implement an algorithm that would build random solvable mazes. I did have an algorithm, however, I then realized that I wouldn’t be able to correctly assign player and maze exit positions. In such a way that players can each reach one another and exit using multiple ways, and player 1 is as close to the exit as player 2 is close to player 1 (to make it equally possible for players to win in each round). A solution I found was building the maze from pre-existing maps. As a full maze is not shown to the players anyways, there is not as much need in generating new maze maps each time players want to play the game as they will have a harder time memorizing the map that they can’t fully see. I used the algorithm to show me possible map designs, which I slightly modified to increase the number of possible passages to the exit. For each of the maps, I store a list of starting positions for each player and the exit point.
        • Button Font – I use a custom font loaded as a file for my game. Initially, I loaded it and declared it as a variable in the javascript file. I used textFont("retroGaming"); the setup function to set the font of the body to the custom font, however, it didn’t work for the buttons. I have tried using button.style("font-family","retroGaming"); but it didn’t work either. After lots of thinking and searching, I realized that I can set button properties and load font in CSS, which was the solution to my problem.
        • Players Display – the sprites, though proportional to each other and their surroundings looked tiny in the 47*37 maze. I have recognized that this is an issue only at the very end of developing my project as I left sprite sheets for the very last. Changing canvas size didn’t make the players more visible and also made other screens look disproportionate, so I decided to find another solution, which was decreasing the size of the maze. I believe that this has made the maze less complicated to go through, which I am not happy about. On the other hand, with bigger-sized maps I didn’t use the entirety of the map useful for going through a level, meaning that usually a corner or 2 would be left untouched. If I had a chance to redo this project, I’d try making it so that the size of the map that each player sees is scaled up, so they don’t actually know if they are close to each other or to the exit until there are very few cells left between them and the two viewports merge. I think it would make the game more exciting but at the moment I have no idea how I would implement that.

MIDTERM: Progress

PROJECT PROPOSAL

A 2-player maze chase game built on p5.js. Players are each assigned a role, the hunter and the prey. The maze is set in the nighttime, meaning that neither the prey nor the target can see the full maze. Each player is equipped with a flashlight, which spotlights them and allows them to see some surroundings. Prey’s goal is to escape the maze before the hunter chases them. Hunter’s goal is to catch the prey before they escape from the maze. Prey’s flashlight is stronger and hence allows us to see more of the maze because I feel like their goal may be more challenging to fulfill.

BIGGEST CHALLENGE

I identify my biggest challenge for this project as the building of the maze itself. I have the hardest time understanding the logic behind the building of anything that uses grids. Besides that, I have minimal knowledge of algorithms that allow for maze generation. To help myself with that, I will refer to the multi-part youtube tutorial by The Coding Train, in which they create a maze generator using a depth-first search algorithm with recursive backtracking. I have also found this page useful in introducing myself to the pros and cons of different maze-building algorithms.

IMPLEMENTATION

I decided to start by addressing my biggest concern for this project, which is adding a self-generating maze. The tutorial that I have referred to uses a randomized depth-first search. After looking through other possible algorithms, I have settled on Kruskal’s algorithm, which generates more dead ends in the maze. So far, the code that I have generates a maze with one player and one maze exit. The player can move around the maze using WASD for controls. The maze exit doesn’t do anything yet.

THINGS TO WORK ON

Basically everything else (e.g. sound, player sprites, spotlight, intro window, player interaction, etc). As for the maze, I need to add another player to it, and possibly control the position of the maze exit so that it is closer to the “prey” than to the hunter. For now, it is pretty easy to get from the start to the end of the maze even with all of the dead ends. However, I think that the difficulty of the game won’t be a question once I have the spotlight feature implemented.