Assignment- Generative Text Design

Concept

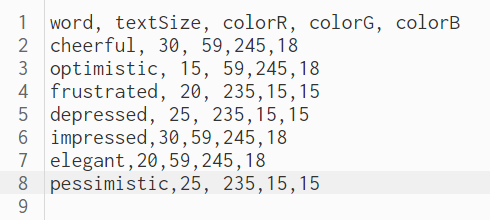
In this assignment, I created a generative text design that is based on data that I wrote into a CSV file. I was thinking about what words to add to my CSV file, then I decided to add two different types of words and mix them up in this CSV file. The first type of words will refer to words that have positive connotations like optimistic, while the other type of words will be words with negative connotations such as pessimistic. In this file, I added in each line a word, text size, and three numbers that refer to the RGB colors of the number. Mainly I decided to associate positive words with green color, and negative words with red color You can see some values in the CSV file below.

words.csv file

In my code, I loaded this data into p5.js and then decided to print the different types of words with their different colors in a creative way. I liked how we can translate the canvas in p5.js and wanted to explore this feature more in this project. Therefore I decided to translate the canvas each time the draw function is called by 10 units to the right and 10 units down. At each new canvas position, I add new text at four different angles, 0,90,180, and 270 degrees using the rotate function. You can find part of this code attached below.

function draw() {
  //split the csv file into separate lines and store each word as an element in singleRow array 
  singleRow=split(words[int(random(1,words.length))],",");
 
  //translate the canvas by 10 each time
  translate(j,j)
  j+=10;
  push()
  //rotate around the new translated canvas to place the words are the canvas
  rotate(radians(360*(i/4)))
 //access different elements in the string array
  let word1=singleRow[textWord]
  let wordRcolor=singleRow[colorR]
  let wordGcolor=singleRow[colorG]
  let wordBcolor=singleRow[colorB]
  singleRow=split(words[int(random(1,words.length))],",");
  let word1size=singleRow[wordSize]
  //add a random size to each word
  textFont("Courier New",word1size);
 
  //fill positive words with green color and negative words with red color

  fill(wordRcolor,wordGcolor,wordBcolor)
  //add the text
  text(word1,20,20)
  pop()
  i+=1
  noLoop()
}
//do not loop unless mouse is inside the square
function mousePressed(){
  if(mouseX>=300 && mouseX<=350 && mouseY>=50 &&mouseY<=100){
     loop()
  }
    
  
 }

To access the words from the file, I used the split function that split the file into lines and separates the words into elements in the line array. Then I randomly chose these words with random sizes that are stored in the file and printed them out on the screen with their own color(either red or green). To make my work more interactive I added a button that the user can press to generate text on the screen in the rotating fashion that I talked about, to do this I added a function that will loop through the draw function only when the mouse is pressed with the bounds of a rectangle placed on the top right of the screen. The more you press the more the text you will see on the screen. The final output of this is attached below.

Possible Improvements

I really liked the outcome of this work and initially I was not expecting to get an output that look like this. However, I would also like to improve on this work and add more to it by  maybe placing each word within a shape such as a square or a circle. Furthermore, after reaching the botton right of the canvas the words will stop generating. Thus I think that it would be better after reaching bottom right to translate the canvas to the bottom left of the screen and start changing the translation until I reach the top right, in this way I will make sure that I cover all of the screen.


Assignment 3- Generative Artwork using arcs

Concept

In this assignment, I wanted to come up with something interactive that starts moving on the screen randomly and would make the viewer so confused about what the result could be, then after a while, the viewer would understand everything and see the beauty behind the chaos. Therefore, I decided to add multiple arcs to the screen that have an angle that is even less than a quarter of a circle. Each time an arc bumps into a wall, its stop angle is increased and gradually becomes closer to looking like a full circle. When an arc becomes a full circle, its position is transferred to the center of the screen and it freezes there. I designed the work in a way such that smaller arcs are slower than faster arcs, thus the biggest arcs will freeze earlier, and with time as the smaller arcs freeze they fill the whole screen with concentric circles that would look amazing. You can see this interactivity in the sketch below.

To be able to come up with this sketch on p5.js I used an object-oriented programming approach, in which I created a class called bumpingArc and added member functions to this class. I added a constructor where I initialized all necessary variables such as the xPosition and yPosition of the arcs, as well as the dimensions of the arc. I decided to add parameters to my constructor so that when I create various objects in my class, I would have the freedom to modify these variables. You can see the code for the class attached below.

class bumpingArc {
  //initialize important variables in the constructor
  constructor(speedX, speedY, diameter) {
    this.xPos = width / 2;
    this.yPos = height / 2;
    this.xSpeed = speedX;
    this.ySpeed = speedY;
    this.stopAngle = 60;
    this.arcDiameter = diameter;
    this.angleChange = 30;
    this.Rcolor = random(0, 255);
    this.Gcolor = random(0, 255);
    this.Bcolor = random(0, 255);
  }
  //change the position of the arc each frame by adding xSpeed and ySpeed to initial positions
  moveArc() {
    this.xPos += this.xSpeed;
    this.yPos += this.ySpeed;
  }
  //check if the arc hit the bound, if yes increase the angle of the arc and flip positions
  checkBounds() {
    if (this.xPos >= width || this.xPos <= 0) {
      this.xSpeed = -this.xSpeed;
      this.stopAngle += this.angleChange;
    }
    if (this.yPos >= height || this.yPos <= 0) {
      this.ySpeed = -this.ySpeed;
      this.stopAngle += this.angleChange;
    }
  }

  changeArcColor() {
    //check if the arc becomes a full circle if it becomes a full circle place it in the center and freeze it
    if (this.stopAngle % 360 == 0) {
      fill(this.Rcolor, this.Gcolor, this.Bcolor);
      this.xPos = width / 2;
      this.yPos = height / 2;
      this.xSpeed = 0;
      this.ySpeed = 0;
    }
  }
  //drawArc functions draws an arc using the variables defined in the constructor

  drawArc() {
    arc(this.xPos,this.yPos,this.arcDiameter, this.arcDiameter, radians(0), radians(this.stopAngle));
    
  }
}

In addition to this, I added some other member functions to the class to be able to move these arcs and increase their angle when they are bumped into the wall, and freeze them when they become full circles. Most importantly, I added a member function to draw these arcs. To be able to make use of this class, I created an array of objects of this class, and I passed different parameters to each object. After that, I created another for loop to call all the functions related to these objects so that I can draw them in the way I wanted You can see the code for the objects attached below

let newArc = []; //initializing newArc as array as we will define arc objects
function setup() {
  createCanvas(400, 400);
  let xSpeed = 5; //initializing some variables to be passed as parameters to the constructor
  let ySpeed = 3;
  let initialDiameter = 400;
  //creating an array of size 10 to create 10 objects of class bumpingArc
  for (let i = 0; i < 10; i++) {
    newArc[i] = new bumpingArc(xSpeed, ySpeed, initialDiameter);
    xSpeed = xSpeed - 0.35;
    ySpeed = ySpeed - 0.35;
    initialDiameter -= 35;
  }
}

function draw() {
  background(220);
  strokeWeight(5);

  fill(255, 255, 255); //create a for loop to call the functions of each object and draw 10 arcs
  for (let i = 0; i < 10; i++) {
    newArc[i].moveArc();
    newArc[i].checkBounds();
    newArc[i].changeArcColor();

    newArc[i].drawArc();
  }
}

I was so happy and excited to see how my initial idea grew and how I was able to come up with this nice generative artwork that is generated purely from arcs. I was not inspired by any other artwork during this assignment.  Initially, I was only trying to test out how to use arcs with classes and objects realized that arcs can be manipulated in many ways, and after testing out a couple of things I realized that so many different and amazing artworks can be generated from the movements of arcs. Then I came up with this idea which I enjoyed implementing.

Possible Improvements

I still believe that more work can be done to make this artwork more interesting and understandable to others. This is because I believe that any viewer will not understand anything when they first see tens of arcs bumping over each other. Therefore, to solve this issue I believe that the best thing would be to create a new arc object of smaller size only after the previous arc is positioned in the center and freezes over there. In addition to this, I realize that all arcs change color whenever one of them becomes a complete circle. I was not planning to do this initially, but it ended up being like this. Therefore I would like in the future to control the colors of these arcs in a better way and make my code even work in a great way for a higher number of arcs.


Assignment 2: Work of Art with Loops

Concept

In this assignment, I decided to come up with a simple work of art that represents in some way a great board game that I like to play. Whenever I play chess, I feel that I get detached from this world and find myself in a completely different place. In that new place, I try to find the best strategies to win the game and while doing so I get drowned in my thought. Therefore, I believe that this drawing would show part of the experience I face while playing chess.

In the above drawing, I used squares of a repeating nature to be able to design a chessboard. On top of this board, I added a series of circles with a common center across the different parts of the chessboard. I wanted through these circles to visualize the kind of thought process and confusion that a chess player faces during the game. These circles form a whirlpool which is like what happens to me when my opponent plays a strong move in the game that puts me into a whirlpool of confusion.

Furthermore, I added these wavy-looking lines to the drawing to make it more appealing. I believe that these lines represent the line of thought of a chess player who tries to think about his next five moves before playing his current move. In addition, these lines look like a sound wave that is usually used as a means of communication between two people. This is because I find chess as a way for people’s minds to communicate without them even talking. I was very happy to be able to come up with these wavy lines, you can find the code for these lines attached below.

Code for drawing wavy lines

To draw the lines in this way I used two nested for loops and I began by drawing a point, the x-coordinate of this point increments by a value of 5 each iteration. While the y-coordinate is dependent on the x value as I used a sin function to control the position of the points in the next iterations. Using only one for loop I would have been able to come up with only one wavy line. However, to come up with these lines along the whole canvas I decided to use another for loop that controls the vertical translation of the sin function.

Possible Improvements


I was so satisfied to come up with this artwork and was not expecting it to look this way when I first thought about it. However, I believe that this drawing needs a bit more work to look better and more satisfying for the viewer. I feel that by looking at the drawing for a long time the viewer might find it confusing. Therefore, to make it look better to the eye I might decrease the number of lines intersecting each other in the drawing. In addition, by adding animation to the waving lines and being able to come up with spiral-looking whirlpools instead of circles I might be able to deliver my message in a better way.

Assignment 1 – Self Portrait

Concept

After getting introduced to p5.js I was excited to dive more into this program and try out new things. I decided to come up with a self-portrait that also depicts an important hobby in my life. I like playing football. It is a sport that relieves my stress and makes me excited. Therefore, I felt the need to include a soccer ball in my self-portrait which you can see below.


When I first started with the drawing I was so confused about how am I going to draw the main features of the face. I do not have a background in art and art was never a passion for me. However, I found this task an opportunity to explore art even more and find out how can I represent complicated things using simple objects. Therefore, I started playing with the different shapes in p5.js and was able to combine them in a way to create a face and an upper body. I had to explore new features in the reference page like the quad function to be able to draw my hair, eyes, and arms.


Code for Right Eye

I liked how the eyes of my portrait look. I could have done the eyes in a much simpler way by creating an ellipse. However,I decided to try out new shapes and see what I could get. Therefore, as seen in this code above I used two triangles and a quad to represent each eye. Furthermore, I only added a black stroke to the upper half of the eyes to represent the eyelid. To create the Iris for each eye, I used the ellipse feature with 3 parameters and this way I was able to create circles.

Ideas for Improvements

After completing my self-portrait, I was so happy with how it looked but I still that it needs some improvement to look better. I believe that I could have done the ball to look more realistic. This would be by creating more pentagons inside the ball and connecting them in a better way. Furthermore, in the future, I would like to make my full body portrait and show all my body features. In addition to this, I would like to make the drawing dynamic and make it move  by putting the ball on portrait’s foot and start juggling with the ball.