Midterm Project | Space Adventure | Aadil

Concept

I had initially intended to make an automated generative kaleidoscope but there were lots of issues with it and the sketch would lag a lot because of the large amount of random numbers generated. So, I decided to make a fun 2-Player game .

I used to play this game on my phone called 2 Player Games that had a variety of games in it that could be played by 2 players. One of them was Star Catcher, which is what inspired me to make this project.

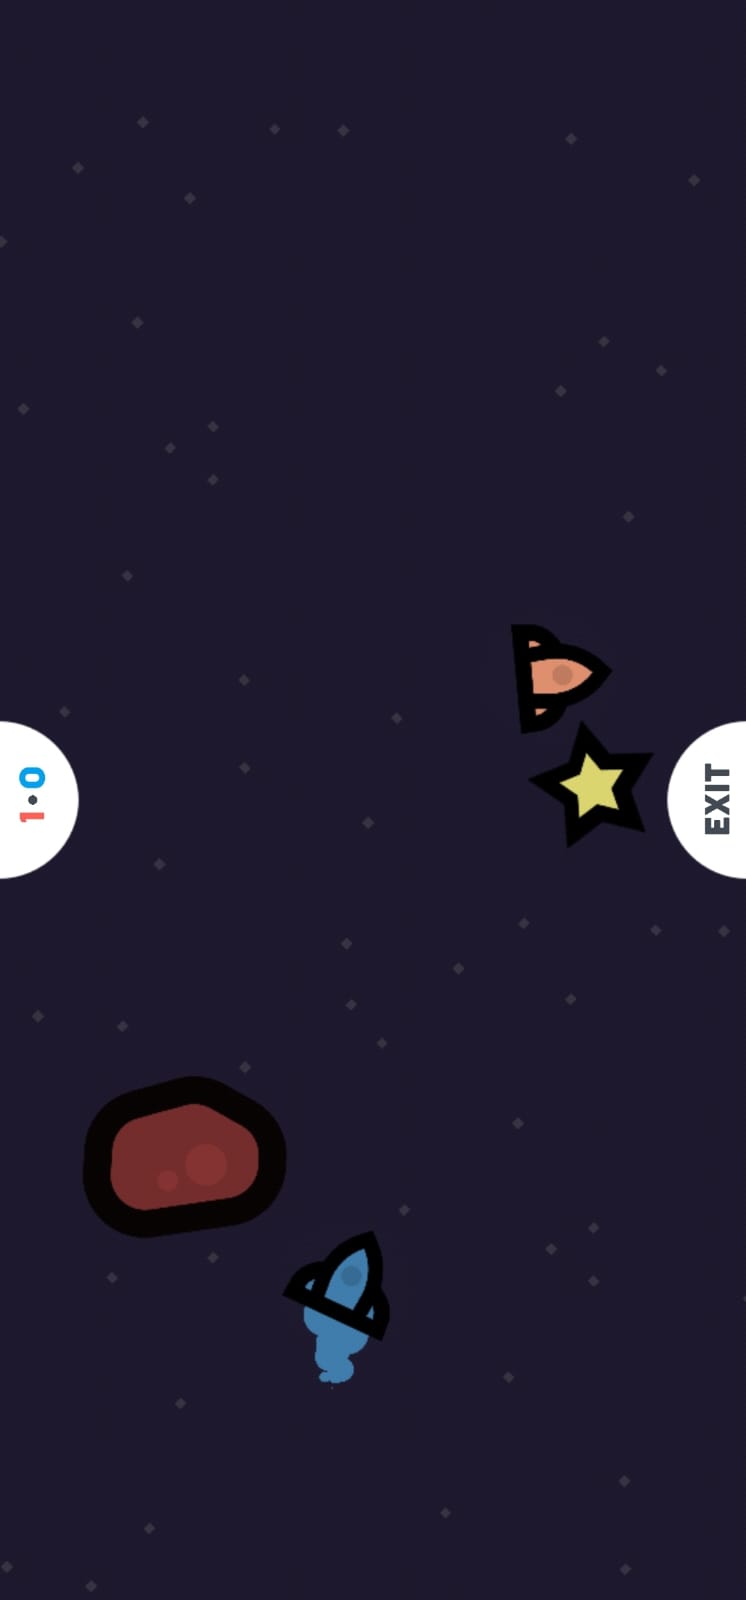
Star Catcher is a game where you have two spaceships each controlled by a player and stars randomly appear on the screen . The player who collects a required number of stars first wins the game . There are asteroids that the spaceships can collide with and also collision between the spaceships of the players. I could not find an online version of this game for PC so I thought that it would be great if I could build something like this .

I had do something’s differently for the keyboard control and Fullscreen options as compared to the mobile version which just relies on touch . I came up with the following rules and specifications for the game :

  1. There has to be a start scene ,  a game scene and a final winning scene
  2. The game starts after spacebar is pressed from the start scene, the first spaceship is controlled by WASD and the second spaceship is controlled by arrow keys. The movement must be smooth and there must be acceleration and deceleration rather than just velocity. The spaceships must rotate and be capable of moving in all directions.
  3. The goal is to collect 10 stars before the opponent.
  4. There are asteroids generated randomly that can collide with the player spaceship to make them bounce
  5. There is sound interaction for collisions, start screen, star collection and winning scene.

Sketch

Please run the sketch in p5 (it does not enter into Fullscreen mode properly in WordPress) . The Project contains 3 classes in addition to the sketch.js files . If using a browser that has esc as default key for exiting Fullscreen , make sure to use ‘e’ instead of esc to exit fullscreen.

Link to the sketch –p5.js Web Editor | IMMidtermProjectSpaceDodge (p5js.org)

How the Project works/ some Implementation details

The Project has 3 classes :

  1. Player Class:
    • Represents the players in the game.
    • Handles player movement based on keyboard input.
    • Updates player position, velocity, and angle.
    • Detects collisions with other players and asteroids.
  2. Asteroid Class:
    • Represents the asteroids in the game.
    • Updates asteroid position and rotation.
    • Displays asteroids on the canvas.
  3. Star Class:
    • Represents the stars that players can collect for points.
    • Updates star position and detects collisions with players.
    • Displays stars on the canvas.

The movement is smoothened out by adding acceleration and friction which are two variables defined in the beginning of the code .

I also have the following helper functions :

Helper Functions:

  • Functions for handling asteroid generation, resetting the game state, toggling Fullscreen mode, and resetting sound flags.
      1. handleAsteroidGeneration(): Generates a new set of asteroids based on the current game mode (Fullscreen or windowed) with random positions, speeds, sizes, and rotation speeds.
      2. handlePlayerAsteroidCollision(player): Checks for collisions between a player and asteroids and adjusts player velocity accordingly upon collision.
      3. handleCollision(): Detects and handles collisions between players in the game.
      4. resetGame(): Resets game variables and objects to their initial state for starting a new game.
      5. toggleFullscreen(): Toggles the game between Fullscreen and windowed mode.
      6. exitFullscreen(): Exits Fullscreen mode and adjusts game elements accordingly.
      7. resetSoundFlags(): Resets flags related to sound effects to their initial state.
      8. drawStartMenu(): Draws the start menu interface on the start canvas.
      9. drawEndScreen():
        • Draws the end screen interface when the game is over.

and an event handler:

  • key Pressed: Handles key presses for starting the game, toggling Fullscreen, and exiting Fullscreen.
Assets Used

Assets used for making the game are :

Images:

  1. Asteroid image: ‘Images/asteroid.png’
  2. Star image: ‘Images/star2.png’
  3. Background image: ‘Images/Space_background.jpg’

Audio:

(All audio used was found from Pixabay and trimmed to fit the game sound needed)

  1. Start menu background music: ‘AudioFiles/start_menu.mp3’
  2. Winner music: ‘AudioFiles/win_sound.mp3’
  3. Collision spacecraft sound: ‘AudioFiles/bump.mp3’
  4. Collect star sound: ‘AudioFiles/star_collect.mp3’

Font:

    1. Font file: ‘Roboto-Regular.ttf’

Key Challenges Faced 

  1. The movement implementation was quite challenging , I had to make sure to implement acceleration , deceleration and collision and make sure it looks realistic . I experimented with values to determine what looks good for the canvas size and full screen.
  2. Sounds- I faced difficulty implementing audio and spent a lot of time making sure that audio did not overlap. At the end, I decided to use Boolean flags to check whether an audio is being played or not.
  3. Switch to Fullscreen- I had some issues switching back to full screen, of course when going in full screen you need to change the speed of the spaceships and the number of asteroids to make the game fun.


Code that I am Proud Of

Implementing the movement mechanism was a bit difficult , as it had to be smooth and the spaceship had to change direction , this is implemented in the player class as follows:

  class Player{
//..........
update() {
    // Apply friction to the acceleration
    this.acceleration.mult(1 - friction);

    // Apply friction to the velocity
    this.velocity.mult(1 - friction);

    // Update velocity based on acceleration
    this.velocity.add(this.acceleration);

    // Limit the velocity to the maximum speed
    this.velocity.limit(maxSpeed);

    // Check if maximum speed is reached
    this.maxSpeedReached = this.velocity.mag() >= maxSpeed;

    // Update position based on velocity
    this.x += this.velocity.x;
    this.y += this.velocity.y;

    // Wrap around the canvas boundaries
    if (this.x < 0) {
      this.x = width;
    } else if (this.x > width) {
      this.x = 0;
    }
    if (this.y < 0) {
      this.y = height;
    } else if (this.y > height) {
      this.y = 0;
    }

    // Calculate angle
    if (this.velocity.x !== 0 || this.velocity.y !== 0) {
      this.angle = PI / 2 - atan2(-this.velocity.y, this.velocity.x);
    }
/* ........*/
}

This code brings acceleration and friction to the player movement, the calculate angle part changes the orientation of the spaceship with respect to its velocity vectors.

The collision mechanism was implemented in the two functions below :

 function handleCollision() {
  // Check for collision between players
   // Check for collision between players
    if (player1.collides(player2) && !player1Collision && !player2Collision){
        // Set collision state for both players
        player1Collision = true;
        player2Collision = true;

        // Record the time of collision
        lastCollisionTimePlayer1 = millis();
        lastCollisionTimePlayer2 = millis();}
  if (player1.collides(player2)) {
    // Calculate direction vector between the centers of the players
    let collisionVector = createVector(player2.x - player1.x, player2.y - player1.y).normalize(); //gives unit vector in direction of centeres and stores it in collision vector

    // Calculate the magnitude of the velocity components along the collision vector
    let velocity1AlongCollision = player1.velocity.dot(collisionVector);
    let velocity2AlongCollision = player2.velocity.dot(collisionVector);
    
    // Calculate the new velocities after the collision ,swaps the velocities
    let newVelocity1AlongCollision = velocity2AlongCollision;
    let newVelocity2AlongCollision = velocity1AlongCollision;


    // Update velocities with the new components
    let newVelocity1 = p5.Vector.add(player1.velocity, p5.Vector.mult(collisionVector, newVelocity1AlongCollision - velocity1AlongCollision));
    let newVelocity2 = p5.Vector.add(player2.velocity, p5.Vector.mult(collisionVector, newVelocity2AlongCollision - velocity2AlongCollision));

    player1.velocity.set(newVelocity1.x, newVelocity1.y);
    player2.velocity.set(newVelocity2.x, newVelocity2.y);

    // Play collision sound when spacecraft collides with another spacecraft
    if (!collisionSpacecraftSoundIsPlaying) {
      collisionSpacecraftSound.play();
      collisionSpacecraftSoundIsPlaying = true;
    }
  } else {
    // Reset collision sound flag when no collision occurs
    collisionSpacecraftSoundIsPlaying = false;
  }
}


function handlePlayerAsteroidCollision(player) {
  // Determine which player is being checked
  let isPlayer1 = player === player1;

  // Check if the player is in a collision state
  let playerCollision = isPlayer1 ? player1Collision : player2Collision;
  let lastCollisionTime = isPlayer1 ? lastCollisionTimePlayer1 : lastCollisionTimePlayer2;

  if (!playerCollision) {
    for (let asteroid of asteroids) {
      if (player.collides(asteroid)) {
        // Calculate collision angle
        let angle = atan2(player.y - asteroid.y, player.x - asteroid.x);

        // Calculate the relative velocity of the player with respect to the asteroid
        let relativeVelocity = p5.Vector.sub(player.velocity, createVector(asteroid.speed * cos(angle), asteroid.speed * sin(angle)));

        // Reflect player's velocity based on collision angle and asteroid's speed
        let velocityMagnitude = relativeVelocity.mag();
        let reflectionAngle = atan2(-relativeVelocity.y, -relativeVelocity.x);
        let newVelocity = p5.Vector.fromAngle(reflectionAngle);
        newVelocity.setMag(velocityMagnitude);

        player.velocity.set(newVelocity);

        // Set collision state for the player
        if (isPlayer1) {
          player1Collision = true;
          lastCollisionTimePlayer1 = millis();
        } else {
          player2Collision = true;
          lastCollisionTimePlayer2 = millis();
        }

        // Play collision sound when spacecraft collides with a rock
        if (!collisionSpacecraftSoundIsPlaying) {
          collisionSpacecraftSound.play();
          collisionSpacecraftSoundIsPlaying = true;
        }
      }
    }
  }
}


Another piece of code that is interesting is to solve the challenge I faced to change the asteroid count and speed of asteroids when the screen is made Fullscreen. This is implemented in the function below:

function handleAsteroidGeneration() {
  asteroids = []; // Clear existing asteroids
  let count = isFullscreen ? fullscreenAsteroidCount : defaultAsteroidCount;
  let speedMin = isFullscreen ? fullscreenAsteroidSpeedMin : defaultAsteroidSpeedMin;
  let speedMax = isFullscreen ? fullscreenAsteroidSpeedMax : defaultAsteroidSpeedMax;
  
  // Generate new asteroids based on the mode (fullscreen/windowed)
  for (let i = 0; i < count; i++) {
    let x = random(windowWidth); // Random x position
    let y = random(windowHeight); // Random y position
    let speed = random(speedMin, speedMax); // Random speed within the specified range
    let angle = random(TWO_PI); // Random initial rotation angle
    let rotationSpeed = random(-0.05, 0.05); // Random rotation speed
    let size = random(60,120); // Random size
    asteroids.push(new Asteroid(x, y, size, speed, angle, rotationSpeed));
  }
}

I have also implemented a similar switch for acceleration as indicated in the variable declarations that is modified in the toggle and exit Fullscreen functions.

let accelerationFullscreen = 0.7; // Acceleration value for fullscreen mode
let accelerationWindowed = 0.3; // Acceleration value for windowed mode
let acceleration = isFullscreen ? accelerationFullscreen : accelerationWindowed; // Set initial acceleration value based on current mode 
function toggleFullscreen() {
  fullscreen(true); // Switch to fullscreen
  isFullscreen = true;
  handleAsteroidGeneration(); // Handle asteroid generation for fullscreen
  acceleration = accelerationFullscreen; // Set acceleration for fullscreen mode
}

function exitFullscreen() {
  fullscreen(false); // Exit fullscreen
  isFullscreen = false;
  handleAsteroidGeneration(); // Handle asteroid generation for windowed mode
  resizeCanvas(600, 600); // Resize canvas back to original size
  acceleration = accelerationWindowed; // Set acceleration for fullscreen mode
}


This changes the speed as well as number of asteroids spawned according to the screen mode so that the user encounters roughly the same amount of challenge in both cases. Since these variables have been defined at top, they can be changed anytime .

Reflection

Overall, I am pretty happy with the final game I created. I learnt a lot of new things in p5 and realized how the organization of the code into classes representing various types of objects made it much easier to understand and develop. There is some scope for improvement that could be done in the future such as :

  1. Adding more Players to the game (The player class is already implemented).
  2. Adding more sounds to the game.
  3. Adding extra fun objects and classes such as a ‘black hole’ that pulls the spaceship towards it for some time and or a ‘super star’ that gives more points than usual but stays only for a certain duration of time.
  4. Changing the sprite of the spaceship? Right now, it’s just simple triangles but the code would also work for better sprites.
  5. Experimenting with different trails. I have a simple spacecraft booster with one large and two small ellipses but its possible to make more sophisticated ones and attach it to player class.

Midterm Project Idea | Automated Interactive Kaleidoscope

Concept, Thoughts and Research

For the midterm project ,I had initially thought of making a game but decided to challenge myself with something different.  I thought of making interesting generative art with user interaction and customization. I came across this kaleidoscope piece by Sheenest that uses Perlin noise to automatically generate random kaleidoscopes (without user input) – https://github.com/sheenest/Perlin-Kaleidoscope-Project . This idea of using symmetry to create generative art has always intrigued me . Kaleidoscopes have inspired a lot of art and any way of automating them + making them interactable is something I want to work on . Some cool kaleidoscope art that I found :

Something like this is inspiration for what I want to do. For sound effects, I plan on using my favorite Youtuber Melodysheep’s sound library –

Music Library — Melodysheep

This sound library was originally designed for space /astronomy videos but I believe  alternating the tracks will create a very immersive experience for the user .

The user interaction that I want to add to this project would be :

  1. Some way to draw something on the screen
  2.  Then play the program, the program uses Perlin noise to change the points and colors of what was drawn to create beautiful patterns
  3. Customizable bars for the user , I found a library on GitHub that automatically generates a GUI for the variables in the program . Here’s the link – https://bitcraftlab.github.io/p5.gui/.
  4. A way to save the image
  5. An option to add your own image instead of drawing something
  6. (maybe) use computer vision in some way to use audio to influence the pattern

Identifying Challenging aspects of the project 

Some key challenges that I expect to overcome are :

  1. Adding user interactivity AND applying Perlin noise is something that hasn’t been done before in such projects. Enabling the user to draw something with the mouse(on a graphics buffer that can be hidden later) is going to be challenging to implement .
  2. Thinking about how noise can be used to vary the user input so that it appears different but not too different . The user input should still significantly affect the final result.
  3. Sound effects associated with the project – when to play and pause sounds and if computer vision ends up being a part of it , how should sound influence the noise factor ?

Understanding Code for Kaleidoscope 

I started by looking at some classes in Sheenest’s code that I could recycle and modify to integrate user input into. One class that I plan to use after modification is the lin class (which represents a randomly drawn line) :

class lin {

  constructor( maxCurl , maxSpeed , size , sides , strokeMax , strokeMin , steps , fluct = 5 , order = 0.6) {

    // this.keyVel = createVector( 0 , 0 );

    // maxSpeed = 30; 
    this.maxCurl = maxCurl;
    this.maxSpeed = maxSpeed ;
    this.size = size ;
    this.sides = sides; 

    this.strokeMax = strokeMax ;
    this.strokeMin = strokeMin ;

    this.steps = steps ;

    this.trail = [] ; 
    this.vel = new polar ( 0 , 0 );

    this.noiseRad = new perlin( 
      'noiseRad',
      random(100),
      random(10),
      0.2 ,
      this.steps , 
      fluct , // more octaves/fluct , more fluctuation in velcities, default value is 5
      0.5 // 
    );

    this.noiseTheta = new perlin( 
       'noiseTheta', //name
       random(100), //seed 
       random(10), //step 
       0.2 , // counts 
       this.steps , 
       4 , // lod
       order //  order referring to the falloff level of the curves
       // more order/falloff , more persistence in the curves (more circles)
    );


    this.cHSB = []; 

    this.noiseHue = new perlin(
      'noiseHue',
      random( 100 ),
      random( 10 )
    );

    this.noiseSat = new perlin(
      'noiseSat',
      random( 100 ),
      random( 10 )
    );

    this.noiseBright = new perlin(
      'noiseBright',
      random( 100 ),
      random( 10 )
    );
    
    let bound = 1/sqrt(2) * boundary/2 ; 
    this.o_pos = createVector( random( - bound , bound ) , random( -bound, bound ) ); //random start position
    //this.pos is the independent position value that syncs with trail[0] after each iteration
    this.pos = this.o_pos.copy(); 

    //this.hueVal and this.cVal is the independent color value that syncs with cHSB[0] after each iteration
    this.hueVal = random(360) ;//random hue value at the start
    this.cVal = color ( this.hueVal , 0 , 0 );

    this.trailMemory = [] ; 
    this.cHSBMemory = [];
    this.memorySize = 1000;
    this.colormemorySize = this.memorySize * 4 ; //coz max inverse_speed = 4, each iteration of update() adds a max of 4 color values into cHSBMemory

    this.reverseCount = 0 ;
    this.reverseColorCount = 0 ;

    this.inverse_speed = [] ; // first value is for syncing of colors when this.vel is low
    // array size is equal to memmory size, to save past inver_speed values to tally with inverseColorCount

  }

This class creates a line object . I plan on adding simple user interactivity with something like this by creating a line object from user input and making an instance of this class -then manipulating the lines smoothly .

A very simple and primitive  example of the kind of code I can use for user interactivity is:

function draw() {
  if (mouseIsPressed) { // check if the mouse button is pressed (preferably the left click button) 
    stroke(0); // set the stroke color 
    strokeWeight(5); // set the stroke weight
    line(pmouseX, pmouseY, mouseX, mouseY); // draw a line from the previous mouse position to the current mouse position
  }

Instead of drawing a line using the line function, I will use the constructor for the lin class to create an instance of the line / multiple lines drawn by the user.

I have spent much time understanding the code generally used to create kaleidoscopes and thinking about design and user interactivity  .I look forward to  integrating user interactivity to create an intriguing generative art experience.


Reading response | Week 5 | Aadil Chasmawala

This week’s reading on computer vision was very interesting. The key idea presented was how computer vision is becoming more and more accessible to ordinary people and how we can use its power to create better and more interactive art.

The various uses of computer vision that the author gives in the beginning of the article illustrate how simple concepts can be so effective at generating something intriguing. The author’s discussion of some simple algorithms that enable object tracking was particularly interesting to me. I looked deeper into the code listings and found the algorithms very useful. I hope to include them in some way for my midterm project.

Additionally, the author’s emphasis on cleverly designing the physical environment stood out for me. His demonstration of how code can be simplified by creating the right physical environment was interesting to think about . It reminded me of how sometimes we focus on the wrong problem and looking at it from a broader perspective may greatly help . 

Overall, the idea of computer vision becoming more and more accessible to the general public excites me . With the advent of AI tools like Sora and Dall-E ,it seems like it’s only going to be a matter of time until creativity and design takes precedence over raw technical skill. These are the skills that I look forward to developing .


Generative text Output | Assignment 4 |Aadil

Concept 

Initially , I tried figuring out whether data visualization or generative text would be a cooler project to work on . I tried data visualization for precipitation for every city but I couldn’t find large clean datasets and had difficulty in setting the world map to scale as the background of my canvas .

Meanwhile , in the generative text side , I experimented with different fonts and different ways to display and adjust text . I came across the texttoPoints() method that creates an array of points from a text when using a specified font . I looked for cool implementations online and came across this video by Ed Cavett –

I thought this was amazing and decide to do something using this code and logic to create interactive generative text .

    1. First of all, I wanted to have dynamic text such that whatever the user would input in a text box would be displayed on the screen. Although I thought this would be easy, it was challenging for me to implement it as I had to understand the class lineMaker() created by Ed Cavett fully and had to change some aspects of it to ensure that text was generated dynamically.
    2. I wanted to add the words that were typed in the background too – this involved changing the position of the words in the background depending upon the textlength and using loops to fill the whole screen with the correct spacing . I also experimented with color and alpha values to see what suited the best .
    3. I wanted some moving letters based on what the user had typed . For each letter typed by the user, I created a letter object that would move in a circle of changing radius to give the effect that the circle was closing in to the center of the canvas . The letters would disappear as the text was changed .
    4. After reading about signifiers in this week’s reading , I had to make sure that the user knew how to change the text at the center of the canvas . So , I added a message next to the text box so that when the user presses enter, the message at the center is updated .
    5. I also wanted to add a ‘fire ‘ effect instead of a lightning effect to the letters at the center so I changed the color values for highlighting the text and the color of the ‘darts’ too .

Sketch


PLEASE ENTER TEXT IN THE TEXTBOX AND PRESS ENTER !! HAVE FUN !!


Challenges while implementing

    1. I had a lot of errors while implementing the code. The backspace functionality to remove any letters already on canvas was tricky to implement . It would duplicate the letters . I found a way to clear the array and regenerate it every frame to remove this error . Althouugh this is not the most efficient way to do it  (which would be to push and pop elements at the end of the array)
    2. The aligning of words typed to the background of canvas was another aspect . It took some time to get the alignment right. Initially , I had tried to use the array generated by textToPoints() function for drawing the words as points but the program would lag/crash due to the large number of points so I decided to stick with using text .
    3. The code to generate the darts and form the word in the center that is based on Ed Cavett’s code was fairly complicated for me and it took a lot of time understanding it . Thankfully , I did not have to change much and it was only  important to broadly understand what each segment does so that I could change the properties as intended .

Code that I am proud of 

This project took a lot of time and I am really proud of the fact that I was able to make a dynamic version of Ed Cavett’s text art . In addition , I implemented the background and the spiral letters as well as the Letter class . I am most proud of the code for letter class as follows :

class Letter {
  constructor(char) {
    this.char = char;
    this.x = random(width);
    this.y = random(height);
    this.angle = atan2(this.y - height / 2, this.x - width / 2); // Angle from center
    this.radius = 300;
  }

   update() {
    let angularSpeed = 0.05;
    
    // Increase or decrease radius based on current value
    if (this.radius >= 400) {
      this.radiusDecreasing = true; //boolean to determine whether circle should increase or decrease
    } else if (this.radius <= 200) {
      this.radiusDecreasing = false; //flase if radius is below 200
    }
    
    // Increment or decrement radius
    if (this.radiusDecreasing) {
      this.radius -= 1;
    } else {
      this.radius += 1;
    }
    
    // Update angle
    this.angle += angularSpeed;
    this.x = width / 2 + cos(this.angle) * this.radius;
    this.y = height / 2 + sin(this.angle) * this.radius;
  }

  display() {
    textSize(fontSize);
    fill(255,150,0);
    text(this.char, this.x, this.y);
  }
}

I also spent a lot of time implementing the alignment for the words in the background , this is the piece of code that does that :

// Word Decor
let charArray = input.value().split('');
word = input.value(); //implementing word decor

// Calculate text width
let text_Width = myFont.textBounds(word, 0, 0, fontSize).w;

// Calculate horizontal position for centering
let centerX = (width - text_Width)/2;

 
  // Draw points
  push();
  stroke(255);
  for (let i = 0; i < points.length; i++) {
    point(points[i].x, points[i].y);
  }
  pop();
}*/
for(let j=0;j<num_cols;j++){
  for(let i=0;i<num_lines;i++){
    fill(200,200,200,20);
    text(word,centerX,50+ i*fontSize);
  }
  translate(-text_Width,0);
}
//reset canvas
translate(text_Width*num_cols ,0);
  
for(let j=0;j<num_cols;j++){
  for(let i=0;i<num_lines;i++){
    fill(200,200,200,20);
    text(word,centerX,50+ i*fontSize);
  }
  translate(text_Width,0);
}
//resets canvas to OG position
translate(-text_Width*num_cols,0);

Here, the translate functions have been used to fill the whole canvas . I have made sure that I translate back to the original position once the drawing is done . Although looking back , I think using pop() in the right way would make it easier , this is the way I decided to implement it .


Reflection/Scope for improvement

I am very happy with what I achieved at the end . The project took a lot of time but I learnt a lot – especially while trying to understand the lineMaker() class  . However there are certain additional implementations that I had thought of which I would love to look into in the future but I couldn’t implement now because of errors that would take time to debug :

    1. Increase the number of letters in the circle – you will notice there is an unused variable called lettermultiplier in the beginning that is set to 5 as well as a commented out for loop in). This was for adding extra letters to the circle, however the for loop doesn’t work as expected for some reason and the letters attain complete randomness in motion instead of moving smoothly ( it probably has to do something with instantiating each letter object but I couldn’t pinpoint the source of the error) .
    2. Use different font (I have used Roboto which is fairly common , maybe a fancier font could look better)
    3. Experiment with different uses of texttoPoints() function . This function can be used in a variety of interesting ways . Although I have used it only for one such way , there seems to be endless possibilities with this function.

Reading Reflection | Week 4 | Aadil

In the design of everyday things, Don Norman discussed many interesting ideas and perspectives of design thinking. His example of doors – was quite thought provoking. Last week’s reading had this idea of ‘form and function’ in interactivity design. Thinking about something as simple as doors made this concept clear to me – both form and function are essential to develop a good design.

Norman’s idea of Human Centered Design that focuses on making machines discoverable and understandable was quite interesting too. He stated several things that I relate with – particularly about us taking shortcuts when a product is too complex. Thinking about this, I thought that maybe there is an ideal level of complexity for all products and the designer has to think about how much complexity is enough? In general, I would say that there should be as little complexity as possible and as much complexity as necessary.

The ideas of affordance, signifiers, constraints, mapping, feedback were all new to me. I had heard about affordance previously but never though t of it as a “relationship” between people and objects. This reading compelled me to think about some designs I encounter in everyday life (such as a lift or a chair). I hope to integrate these principles into any future design projects that I undertake , so that I can find solutions that are user-friendly and intuitive.

Assignment 2 | Loops | Aadil

Concept 

While watching Casey Reas’s talk, I realized that using looping to create grids is one powerful way to create generative art. I started off by generating a grid of points using loops and thinking about what I could do with it. I remembered the dots and boxes game from childhood-


I remember making patterns on these grids alone by drawing lines in a random fashion , I wanted to see whether I could use a program to do something similar with different colors that would look appealing to the audience .

I started by programming what I call a “seeker” . The seeker joins the points in a path such that :

  1. No point is visited more than once
  2. the points that can be chosen are either horizontally or vertically adjacent points (diagonals can’t be drawn)
  3. The seeker stops when all the points around it are joined

However, I found that to create something visually appealing , I would need multiple seekers of different colors . So, I used loops to create teams of seekers . The interaction of these seekers over time fill the grid and give a visually appealing effect as these grid paths are drawn .

Because the seekers can draw over each other, I wanted to mix the colors where this happens . Thus I defined colors in RGBA format and defined alpha value to be 150 so that the colors can be mixed to some extent when one is drawn over the other

Sketch

The sketch is embedded below :

Running the sketch again gives a different output every time that is based on the random properties of the Seeker object  . (namely the random point at which the seeker starts from + the random selection of the path).

Code that I am proud of 

I am proud of the code for the seeker class and especially the code for the getAdjacentPoints(points) function in this class  :

getAdjacentPoints(point) { //gets adjacent points in 4 directions
  let adjacent = [];
  //the following 3 lines are to make sure the argument point is a point on       an extended form of the grid (if the grid is extended forever)
  let currentIndex = grid.indexOf(point);
  let x = currentIndex % cols; // cols is initialized in setup()
  let y = floor(currentIndex / cols); 

  // Define the four cardinal directions
  const directions = [
    { dx: 0, dy: -1 }, // Up
    { dx: 0, dy: 1 },  // Down
    { dx: -1, dy: 0 }, // Left
    { dx: 1, dy: 0 }   // Right
  ];

  // Check each direction for valid adjacent points
  for (let dir of directions) {
    let newX = x + dir.dx;
    let newY = y + dir.dy;
    if (newX >= 0 && newX < cols && newY >= 0 && newY < rows) { //Check if this is withing the bounds of the grid
      let index = newY * cols + newX; // finds index in the array grid
      let adjacentPoint = grid[index]; //keep in mind grid is an array of coordinates (array of vectors))
       
        adjacent.push(adjacentPoint);//pushes the adjacent point to                                                 adjacent

    }
  }

  return adjacent; //returns an arry of possible adjacent points
}

Although I thought this would be simple , I had problems implementing this class in the beginning (especially about looking at the edge cases such as a point on the edge ) .

I am also proud of the idea of thinking about the seeker objects as ‘teams’ and realizing that the array containing each seeker had to be shuffled to display colors in equal proportion .

Challenges

The order in which the seekers are initiated matters because they can draw over each other. Thus, if we create a team of yellow seekers for example, and all of the team is appended at the end of the seekers array, the output will have a grid dominated by the yellow seekers (since yellow is drawn on top) . To fix this, I have implemented a method to shuffle the array called shuffleArray (which is an algorithm called Fisher-Yates Algorithm). This is applied to the array to shuffle all the teams of ‘seekers’, so the final output has the colors uniformly distributed.

Reflection and Scope for Future improvements

Since we had already learnt about classes in p5 when I created this project, I decided to use classes to simplify the code. However, loops remain a big part of the code both in generating the grid and in describing how the lines are chosen.  I am happy with the overall result of what I got. There is some scope of improving it – especially in exploring how seekers that consider joining points diagonally too would look like (I tried doing it, but it looked very messy – maybe it’s possible to figure out a way to make it cleaner). In addition, in my drawing the points are arranged in a grid (rectangular). However, it would be interesting to exploring different kinds of grids such as a circular grid of points and modify the seeker accordingly.


Assignment 3 | Generative art using OOP |Aadil

Concept

I was experimenting with the Circles class that we created in class and thought of some way of generating abstract art by using Circles to draw random lines on the Canvas . I came up with a simple algorithm to generate art : 

1.Create random points
2.Draw a circle with random radiuses around the points (restricted random radiuses)
3.Wherever the center of circle is in another, invert the color
4.Make options to change the frame rate
5.Move the circles randomly by making their speeds random
6.Make sliders to change color
7.At the end draw the paths taken to create something random but intriguing

Each Circle on the canvas would have its own corresponding class ,Whenever a Circle would pass over another, it would change color . The user could also add circles by clicking on the canvas. Initially I had fixed the color to a black background and tried experimenting with different colors of circles and backgrounds . Then I thought – ” Why not create a slider to let the user choose what background color they want according to their preferences ?” This would solve the problem of selecting the best looking background and would add user interactivity as well .

Then came the question of art . What kind of final product would I want ?I wanted the art generated to be random but intriguing . I decided to draw the paths traced by the circle . This was done using a graphics buffer . The entire canvas is emptied but only the buffer remains when the simulation ends . I experimented a bit with the color of the trails generated by the circles and decided to make this color relative to the background(just like the fill color of the circles) . I also tried different strokeWeights for the trails and different alpha values for color to make them more or less transparent . at the end I stuck to using strokeWeight as 1 and alpha value as 150 . 

Sketches 

The following are some interesting sketches that I got by experimenting with color, and strokeWeights and Alpha values for the circle trails 

The kind of sketch that We can get from default setting is like follows:


Default setting drawing with Black Background

The background color can also be changed according to what the user wants : 

Same image with yellow background

In short, there are a lot of variation that the user could decide on , the circles while drawing the lines are aesthetically pleasing too :

I had to make a decision of whether or not to display the trail lines when the circles are still there . At the end I decided to keep the trail lines . However, hiding them until the end requires changing just one if-else loop which I have indicated in the commented code .

Sketch

Below is the embedded sketch : 

Try playing with the color values and clicking on the sketch to draw the circles before clicking on end simulation to get the web of lines . Ideally the sketch at the end looks best with a black background

Code that I am proud of 

The Display() function of Circles Class is where the magic happens and this is the part of code that I am most proud of :

display() {
  stroke(255);
  strokeWeight(1);
  fill(150 - get(this.x,this.y)[0],255 - get(this.x,this.y)[1],255 -get(this.x,this.y)[2]); // inverting the color of fill from the color at the center of the circle
  circle(this.x,this.y,this.radius*2);
    // Draw a line segment from previous position to current position onto trails buffer
  
  trails.stroke(255 - get(this.x,this.y)[0],255 - get(this.x,this.y)[1],255 -get(this.x,this.y)[2] ,150);//writes to the trails buffer
   //alpha value is 150
    trails.strokeWeight(1);
    trails.line(this.prevX, this.prevY, this.x, this.y);

    
    // Store current position as previous position for next frame
    this.prevX = this.x;
    this.prevY = this.y;
}


The idea of using a graphics buffer called trails to make the trails was very useful . the fill() function in this class inverts the color of fill of the circle from the color of the background at the center of the circle . the trails.stroke and trails.strokeWeight command are at the essence of the final art piece (as illustrated in the picture gallery above) . Changing and experimenting with these values was a big part of this project .

Another part that I am proud of is creating the sliders for color and framerate and the end simulation button as it adds to the user interactivity of the sketch  . 

function setup() {
  createCanvas(400, 400);
  trails=createGraphics(400,400);
  backgroundColor = color(33, 33, 45); // Default background color
  
  //Sliders at the bottom of Canvas
  
  backgroundColorRedSlider = createSlider(0, 255, red(backgroundColor)); // Slider for the red component
  backgroundColorRedSlider.position(10, height + 30);
  backgroundColorRedSlider.style('width', '80px');
  let backgroundColorRedLabel = createDiv('Red');
  backgroundColorRedLabel.position(10, height + 10);
  backgroundColorRedLabel.style('color', '#FF5733'); // Custom color
  backgroundColorRedLabel.style('font-family', 'Arial, sans-serif'); // Custom font
  
  backgroundColorGreenSlider = createSlider(0, 255, green(backgroundColor)); // Slider for the green component
  backgroundColorGreenSlider.position(110, height + 30);
  backgroundColorGreenSlider.style('width', '80px');
  let backgroundColorGreenLabel = createDiv('Green');
  backgroundColorGreenLabel.position(110, height + 10);
  backgroundColorGreenLabel.style('color', '#156F25'); // Custom color
  backgroundColorGreenLabel.style('font-family', 'Arial, sans-serif'); // Custom font
  
  backgroundColorBlueSlider = createSlider(0, 255, blue(backgroundColor)); // Slider for the blue component
  backgroundColorBlueSlider.position(210, height + 30);
  backgroundColorBlueSlider.style('width', '80px');
  let backgroundColorBlueLabel = createDiv('Blue');
  backgroundColorBlueLabel.position(210, height + 10);
  backgroundColorBlueLabel.style('color', '#3366FF'); // Custom color
  backgroundColorBlueLabel.style('font-family', 'Arial, sans-serif'); // Custom font
  
  frameRateSlider = createSlider(10, 150, 70); // Min: 1, Max: 60, Starting value: 30
  frameRateSlider.position(10, height + 80);
  frameRateSlider.style('width', '80px');
  let frameRateLabel = createDiv('Frame Rate');
  frameRateLabel.position(10, height + 60);
  frameRateLabel.style('color', '#560F0F'); // Custom color
  frameRateLabel.style('font-family', 'Arial, sans-serif'); // Custom font
  
  frameRateSlider.position(10, height + 80);
  frameRateSlider.style('width', '80px');
  
  //End simulation button 
  let endButton = createButton('End Simulation');
  endButton.position(10, height + 100);
  endButton.mousePressed(stopSimulation);
  endButton.style('font-family', 'Arial, sans-serif');
  endButton.style('background-color', '#FF5733');
  endButton.style('color', '#ffffff');
  endButton.style('border', 'none');
  endButton.style('padding', '5px 10px');
  endButton.style('border-radius', '5px');
  endButton.style('cursor', 'pointer');

  //Create all required Arrays
  speeds = generateSpeeds(num_of_circles);
  v = generateRandomPoints(num_of_circles); //10 points
  r = createRandomRadiuses(num_of_circles, 30, 20); //(length , max_radius ,min_radius)
  arr_circles = createArrayCircles(v, r); //Create array of Circle objects
}


Challenges and Further Ideas

One challenge was thinking about the various variables involved in this sketch and asking questions like- the number of default circles? The range of speed? The framerate? the Background color? How should the trail color relate to the background color? What should be the Stroke weights and alpha values for the trail color? Some of these do not have a right or wrong answer and much depends on user preferences . I factored in user input for some of these and determined the rest by experimenting with what looked good (even the variables determined by the user needed to have a default value that should look good to most people) .

While adding user interactivity solved some of these problems, there is scope for taking even more input from the user in the form of asking for alpha values or Stroke weights that would allow the user to use this as a tool for creating generative art . 

I also had further ideas of changing the colors of the circles at the intersection (the part where they intersect)  rather than changing colors based on the coordinates of the circles center . This would make the “drawing” part perhaps more visually appealing or could be made into an artwork of its own .

Overall Reflections

I am happy with the final result and with the variety of sketches that I got playing around with the transparency and color of the trails drawn by the circle. I learnt a lot about creating sliders and graphicBuffers . This project also taught me the power of OOP – one small change in the circles class affects the entire sketch in drastic ways .  I was looking to implement something based on Perlin noise for the color of the circles if they are to change without any user input but eventually I just decided to stick to the slider mechanism . Replacing the user input with Perlin noise is something I look forward to experimenting with in future projects . 

Week 3 Reading Reflection | Aadil

In this reading, Chris Crawford presents interesting insights into what interactivity exactly means. I personally had not thought much about this, but this reading gave me a different perspective of looking at things. The idea of interactivity being qualitatively different from reactivity was interesting to me. It seems that there are certain things that are very hard to make interactive if they are kept as it is (such as a book).

The idea of how an interactivity designer is different from a user interface designer was also new to me. I really liked the analogy of form v/s function and how an interactivity designer focus on all three aspects of interactivity (listening, thinking and speaking). He also writes about graphic designing as being merely a subset of interactive designing.

I had never considered the challenges that interactivity designers would face in an industry where this is still an emerging field and, in a context, where interactivity designers are generally younger and less technically proficient.

Overall, this reading gave me a better understanding of what interactivity is and why it is important. The example that the author gave of a teacher being better than a mere book because of interactivity was very useful and helped me realize its importance. I hope to incorporate this way of thinking in designing future projects.

Assignment 1 : Self-portrait | Aadil

Concept

I wanted to create a simple image of myself with some level of user interaction . I started off by trying to use basic shapes to create the eyes, ears, nose and mouth of the self portrait . I realized knowing the coordinates accurately would save a lot of time spent in trial and error , so I added a small piece of code to display the mouse coordinates at the bottom of the canvas . This was very useful and saved a lot of time in positioning the shapes. For user interaction , I implemented two types of backgrounds – day and night –  that switch when mouse is clicked.

The Embedded Sketch is below :


Highlight of Code I am Proud of 

The code for generating stars in a different random pattern every time the scene shifts to night is something that I thought was cool to implement .

 //What happens when mouse is clicked
function mouseClicked(){
  isDay=!isDay;
  //The following piece of code ensures that the stars are at new positions 
  //everytime the mouse is clicked
  Stars=[];
  for(let i=0;i<50;i++){
    let x= random(height);
    let y=random(width);
    Stars.push(createVector(x,y));
  }
}

.
.
.
//draw() function
//Stars
    fill(250);
    noStroke();
    for(let i=0;i<Stars.length;i++){
      let Star=Stars[i]; //Star is variable of type Vector
      ellipse(Star.x,Star.y,2,2)
    }

Another Implementation that I am proud of is the drawClouds() function that takes cloud coordinates and size as inputs and draws clouds accordingly .

function drawCloud(x, y, size) {
  fill(255);
  noStroke();
  ellipse(x, y, size, size * 0.7);
  ellipse(x + size * 0.5, y, size, size * 0.7);
  ellipse(x - size * 0.5, y, size, size * 0.7);
  ellipse(x, y + size * 0.3, size, size * 0.7);
}

Reflections and Ideas for Future Work

Overall, I think it turned out to be a good initial exercise with p5 and I got a simplistic self image using basic geometry which is what  I had envisioned while starting with the project  . In future projects, I would love to add animations and even more user interaction . Maybe different backgrounds could also be added and something about the portrait itself can be changed when the background changes .

I look forward to improving my skills and making more realistic images /graphics  .

Aadil’s Reading Reflection – Week 2

Casey Reas’s talk got me thinking about the relationship between order and chaos that exists all around us . I also thought about the difference between pure randomness and controlled randomness . Reas’s simulations are an example of controlled chaos – where chaos is used along with some sort of constraints to ensure that there is both an element of order and randomness .

On the other hand, there is ‘natural randomness’ – such as the sounds of a waterfall or the pattern of scattered autumn leaves on the ground . I think both of these forms of randomness can lead to beauty and profoundness in unexpected ways .

Reas’s ideas embrace the notion of chaos leading to authenticity and beauty . Chaos is a way to break free from the Structured order . One quote that I really liked was ” I am often astonished to find how much better chance is than myself ” .

His discussion at the end of how new systems open up new possibilities for art is very exciting . His demonstration of how simple algorithms can be tweaked to create different art was very fascinating .Overall, the idea of art that stems from Randomness is very interesting to me and I am excited to explore it further .