
Final product
Make sure to open on the P5 web editor for sound and press f for full screen please!
Concept
My main concept for my midterm was based on the photo lab that I work at in New York. I wanted to create an interactive lab experience in which the user could go through some of the steps of developing/processing film while also hopefully learning a bit more about film in the process. My main goal when designing the program was to make something that was useful to the lab and could be used by my customers. Therefore, I ended up creating a ‘behind the curtain’ experience for customers to see what developing film is like and get small experiences in the different activities.
How it works
My program functions solely on mouse interaction and features 2 mini-games and 2.5 ‘resource tabs. The first mini-game is what I’ve considered as stage 1 of the development process, making the chemistry. Users are able to reveal the recipe card and then have to memorize the ratios for each chemical in order to make the chemistry needed for the development process. They have only 2 chances to refresh their memory but if they over pour it at all they immediately lose (because in the real world we’d have to throw the chemistry out). The second mini game is the fourth station where they are editing scans. Basically users have 15 seconds to edit 10 randomly generated pieces of ‘dust’ from the scans to prepare them to be sent off to the customer.
The two middle stations, splicing and feeding the machine do not have any major interactive piece. I made this decision for multiple reasons. The first, of course being time management and having figure out what I’d actually have time to compelte, and the second being that these stages don’t really have much that could be digitally represented like with the other two games. Step 2 typically just requires cutting a piece of film and labelling it while step 3 is literally just putting it in the machine. Therefore, by giving them this informative, resource functionality I believe it further instills how this program can be a resource for film photographers.
I also have a small easter egg which appears when you click on the film negatives hanging on the wall that just feature some photos, some of which were shot on film so that were not. While this doesn’t really add anything to the program I thought it was on theme with the design and added another layer of creativity to the project.
What I’m proud of
I am particularly proud of the mix chemicals station because it took many many hours of trial and error to reach the stage its at currently. Originally I wanted to incorporate the g, r, b, and y keys to represent filling up the vials but decided that jumping between input functions might be too much for the user. Also, while working on this station I completely deleted the relevant functions three times which I am honestly quite proud of because it took quite a bit of guts to just start over like that, but I am glad I did.
if (grow.blue && blueHeight < maxHeight) blueHeight += growthRate;
  if (grow.red && redHeight < maxHeight) redHeight += growthRate;
  if (grow.green && greenHeight < maxHeight) greenHeight += growthRate;
  if (grow.yellow && yellowHeight < maxHeight) yellowHeight += growthRate;

  // drawing rectangles
  fill('#4ba0f7');
  rect(windowWidth * 0.2 + 1.5, baseY - blueHeight, 57, blueHeight);
  fill('#f12721');
  rect(windowWidth * 0.31 - 5.5, baseY - redHeight, 57, redHeight);
  fill('#52c204');
  rect(windowWidth * 0.41 + 2, baseY - greenHeight, 57, greenHeight);
  fill('#ffeb67');
  rect(windowWidth * 0.52 - 3.75, baseY - yellowHeight, 57, yellowHeight);
The algorithm I ended up with is actually pretty simple it was just hard for me to conceptualize because I was originally unable to breakdown the mini-game into each separate requirement for what I wanted to happen. Above you can see the main part of the function that illustrates the rectangle growth.
I am also proud of the fact that everything is appropriately ratioed in full screen (or at least on my 13 inch MacBook Air screen it is) because it was a topic of growing anxiety for me as I continued to ratio everything in a split screen when I was actually implementing my ideas. Furthermore, while this is technically an area of improvement, I think that that way I problem solved was particularly effective. Due to poor design and planning I quickly became overwhelmed with the various errors I was dealing with and didn’t really know how to approach them but eventually just went back to the basic and wrote down whatever needed to be changed and I think that really helped reset my mentality and also the direction of my program.
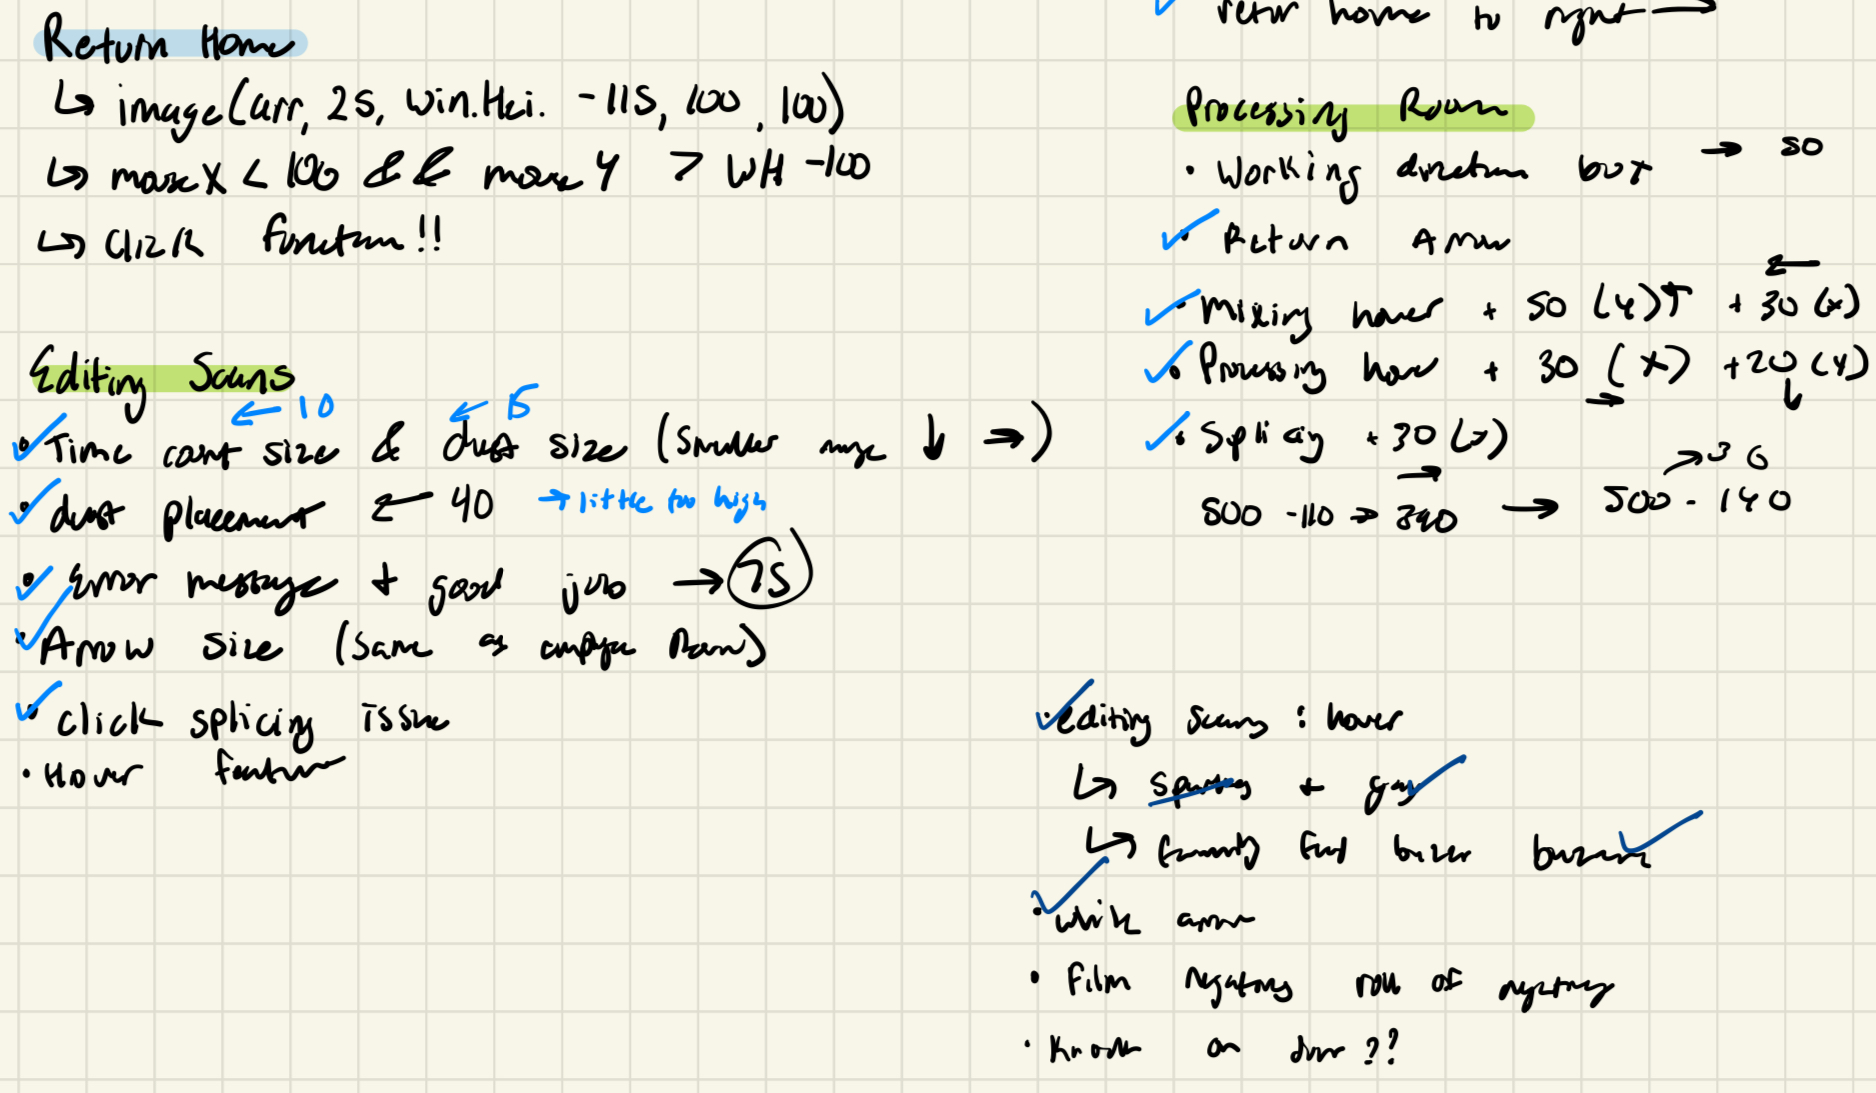 Please excuse my awful handwriting, it was nearing 3 AM when I wrote this…
Areas of improvement
Although I am very happy with how my program turned out, I also have a lot of areas of improvement that I’d like to see happen in the future. During the implementation process my code was extremely disorganized and messy which cause for a lot of unnecessary confusion and frustration while I was debugging errors. Also, while the worst of it has since been improved, I did quite a bit of hardcoding that I think with the right approach could be simplified in some creative ways that I’d like to test out. Lastly, I would like to think of some more ways I can further develop the user experience. In conceptualizing this project I considered having some drag and drop features, using the the laptops camera to take a picture, and other unique components that I would like to further explore eventually.