Concept and Inspiration
My concept and inspiration for the final project came from a wish to make something related to cameras/photo-taking/film. Initially, I wanted to make a “camera on wheels”, but then I realized the camera lens would be on my laptop and therefore couldn’t add wheels to it, haha. So, I changed my idea but stuck with the camera concept.
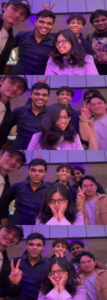
I really enjoy taking photo booth pictures. In fact, I will always push my friends to take them with me if I see a photo booth anywhere. I have collected these grid images from all around the world – Beirut, Abu Dhabi, Paris, New York, Madrid, London, Dubai… And I still have them all saved. They are, to me, a beautiful way of keeping memories in a non-digital fashion, which we tend to towards these days with our phones. I also enjoy the photo booth app on the phone, but the grid layout that results is not the same as a typical, “retro” photo booth.
So, I decided to create a photo booth, which generates four images as a vertical grid!
How to use it
This project is composed of two parts: my laptop with a p5 sketch, and a “camera” I built out of cardboard, inside which there is the Arduino and breadboard. The p5 sketch begins with a start page, that states “photo booth”. There are also instructions: the first step is to click on the screen (when the images are downloaded, the user needs to press on the screen to return to the chrome page); the second step is to press record on the camera to start taking the images.
Once the record button on the camera is pressed, a message is sent from Arduino to p5 to start the photo booth session. Simultaneously, a LED turns on for 20 seconds (which is the length of each session). The four images are taken at five second intervals, with a countdown starting at three seconds. After the twenty seconds have passed, the images are downloaded as a grid, and the user can airdrop it to their phone. Moreover, when the images are done, the start page is displayed again.
Codes
To achieve this, I created a short code on Arduino and a longer one on p5.
Arduino code & circuit
const int BUTTON_PIN = 2;
const int LED_PIN = 13;

bool ledState = false;
int lastButtonState = LOW;
unsigned long startTime = 0; // variable to store the time the button was pressed
const unsigned long interval = 20000; // interval of 20 seconds to indicate when the LED must turn off

void setup() {
  pinMode(BUTTON_PIN, INPUT);
  pinMode(LED_PIN, OUTPUT);
  Serial.begin(9600);
}

void loop() {
  int reading = digitalRead(BUTTON_PIN);

  // checking if the button was pressed
  if (reading != lastButtonState) {
    lastButtonState = reading;
    if (reading == HIGH) {

      ledState = true; // turn LED on
      digitalWrite(LED_PIN, HIGH);
      Serial.println("START"); // send "START" to p5
      startTime = millis(); // start recording the time of button press
    }
  }

  // checking if 20 seconds have passed since the button was pressed
  if (ledState && (millis() - startTime >= interval)) {
    ledState = false; // turn LED off
    digitalWrite(LED_PIN, LOW);
    Serial.println("STOP"); // when 20 seconds have passed, send "STOP" to p5
  }
}
p5 code snippets
→ a function to start the countdown between each image.
function startCountdown() {
  countdownValue = 4; // start the countdown with "nothing"
  clearInterval(countdownTimer); // clear the existing timer, necessary after the first image is taken after the sketch is played
  countdownTimer = setInterval(() => {
    countdownValue--;
    if (countdownValue === 0) {
      // when count is down to 0
      clearInterval(countdownTimer); // stopping the timer
      captureImage(); // capturing an image after the countdown
      countdownValue = 4; // resetting the countdown value back to 4
      setTimeout(startCountdown, interval); // 1-second delay before restarting the countdown
    }
  }, interval); // repeat the function at 1-second intervals
}
→ a function to capture and save the images, with a sound that plays when each image is taken.
function captureImage() {
  if (recording) {
    sound1.play(); // playing the sound when an image is captured

    images[captureIndex] = videos[captureIndex].get(); // capturing the image from each of the four video feeds
    captureIndex++;

    // when the four images are taken, recording is stopped and images are saved as a grid
    if (captureIndex >= 4) {
      stopRecording();
      saveImages();
    }
  }
}
→ determining the countdown value which is then displayed (3, 2, 1 only).
if (recording && countdownValue <= 3 && countdownValue > 0) {
  fill(255);
  textSize(200);
  textAlign(CENTER, CENTER);
  text(countdownValue, width / 2, height / 2);
}
→ function to start recording, which is later activated when the button of the camera is pressed, in a “START” state.
function startRecording() {
  if (!recording) {
    recording = true;
    captureIndex = 0;
    images = [null, null, null, null]; // reset the images array to clear previous session
    clearInterval(countdownTimer); // clear the timer from the previous session

    // clearing the video feeds
    for (let i = 0; i < 4; i++) {
      videos[i].hide(); // hide the video to clear the old feed
      videos[i] = createCapture(VIDEO); // create a new video capture
      videos[i].size(width / 3, height / 3); // set size for each video feed
      videos[i].hide(); // hide the video feed
    }

    startCountdown(); // start the countdown before the first image is captured
  }
}
→ function to stop recording, which is activated by the “STOP” message received by Arduino after the twenty seconds have passed.
// function to stop recording
function stopRecording() {
  print("Recording ended");
  if (recording) {
    recording = false;
    clearInterval(countdownTimer); // clear the countdown timer completely
  }
}
→ function to read the serial data from Arduino.
// read serial data from arduino
function readSerial(data) {
  if (data != null) {
    if (data == "START") { // when data from arduino is "START"
      displayStartPage = false; // switch to the photo booth page
      startRecording(); // start recording
    } else if (data == "STOP") { // when data from arduino is "STOP"
      displayStartPage = true; // display start page
      stopRecording(); // stop recording
    }
  }
}
Sketch
And here is a link to the full screen sketch:
https://editor.p5js.org/alexnajm/full/LVOvvvioq
What I am proud of
I am particularly proud of finally being able to understand how serial communication works. For me, I had a hard time processing it in practice, although in theory it did make sense. Applying it for this project which I made from scratch, as compared to the exercises we did in class, enabled me to better grasp the concept of serial communication.
Additionally, I am proud of how this project has evolved. I had a few ideas in between which truly were not challenging enough. I am not saying that this project is super complex, but it definitely took time and effort to try and understand how everything works in order to achieve this final result.
Challenges
I encountered multiple challenges, first, creating serial communication from scratch. Again, it was a bit hard for me to apply the concepts.
Another challenge was getting the feeds and countdown to reset after each session. At first, the images from the previous session remained on the feeds, which means the user couldn’t see a live version but only the images taken. Gladly, I was able to figure it out – same for the countdown.
Areas for future improvement
Eventually, I would like to create a better design for the p5 sketch. As of now, I feel like it’s a bit… bland.
I would also like to try to incorporate filters, which the user can choose from before taking the images. This was a bit hard as the images cannot be downloaded with the filter, and I did not want the grid to look different than the images displayed on the sketch.
References
https://p5js.org/reference/#/p5/createCapture
https://learn.digitalharbor.org/courses/creative-programming/lessons/using-timers-in-p5-js/


