Week 13: Final Project – HandiSynth

Hey everyone! 👋

This is it, my final project!
(wellll… actually, my backup project :(, but that’s a story for another time)


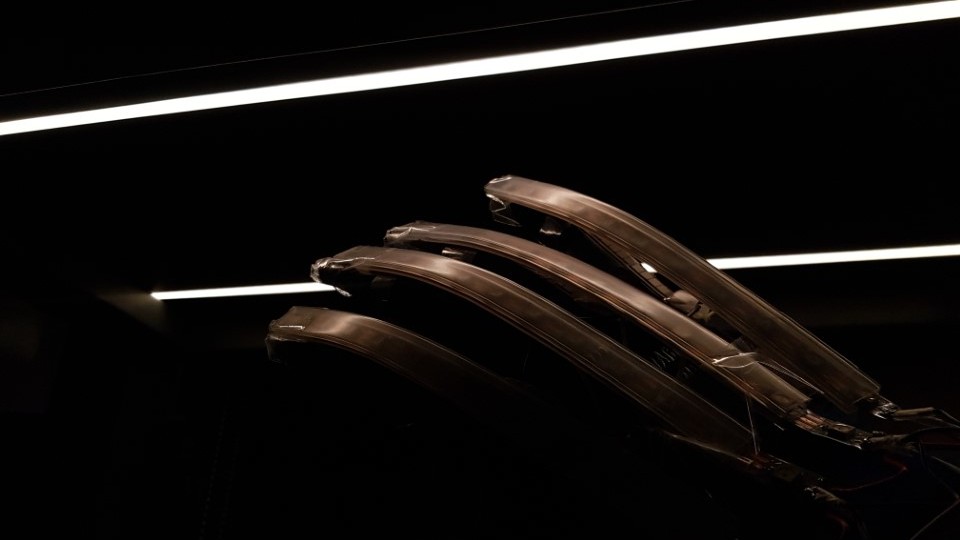
Description: It’s a glove that synthesizes music, controlled by your hand (specifically, the curling of the fingers), with feedback being shown on both the glove itself (through the neopixels, aka addressable LED strips), and also on the screen (with a p5 interface).


So, how does it work?

As stated previously, the music is controlled by the curl of the fingers. This is detected with flex sensors attached on the glove, which is then fed into the Arduino, mapped from an auto-calibrated range to the control values, which then modify the sound in different ways (the 4 fingers control the base frequency (can be interpreted as pitch), tempo (speed), mix ratio, and multiplier, respectively). These values are also mapped and shown on the neopixels attached on top of the flex sensors, providing immediate visual feedback (and ngl, they also just look cool, but that shouldn’t be overdone). For example, the neopixel for the speed, actually changes its blink rate based on the speed. The auto-calibrated range values are also mapped into the range 0-1000 and sent to the p5 sketch, allowing it to alter the height of the bars representing each control, and also modify the center circle based on the values.


Arduino code:

 
// Configuring Mozzi's options
#include 
#define MOZZI_ANALOG_READ_RESOLUTION 10 // Not strictly necessary, as Mozzi will automatically use the default resolution of the hardware (eg. 10 for the Arduino Uno), but they recommend setting it (either here globally, or on each call)

#include 
#include  // oscillator
#include <tables/cos2048_int8.h> // table for Oscils to play
#include 

#include  // For the neopixels


// Flex sensor stuff

// Define flex sensor pins (these have to be analog)
const int FREQ_SENSOR_PIN = A0;
const int SPEED_SENSOR_PIN = A1;
const int MOD_SENSOR_PIN = A2;
const int RATIO_SENSOR_PIN = A3;

// Smoothening for each pin
Smooth smoothFreq(0.8f);
Smooth smoothSpeed(0.8f);
Smooth smoothSpeedLED(0.8f);
Smooth smoothMod(0.8f);
Smooth smoothRatio(0.8f);

// Input ranges for flex sensors (will be calibrated)
unsigned int freqInputMin = 1000; // Just FYI, the flex sensors in our setup roughly output in the range of ~ 200 - 650
unsigned int freqInputMax = 0;
unsigned int modInputMin = 1000;
unsigned int modInputMax = 0;
unsigned int speedInputMin = 1000;
unsigned int speedInputMax = 0;
unsigned int ratioInputMin = 1000;
unsigned int ratioInputMax = 0;


// Neopixel (addressable LED strip) stuff

// Define neopixel pins
const int FREQ_NEOPIXEL_PIN = 2;
const int SPEED_NEOPIXEL_PIN = 3;
const int MOD_NEOPIXEL_PIN = 4;
const int RATIO_NEOPIXEL_PIN = 5;

// Number of LEDs in each strip
const int NEOPIXEL_NUM_LEDS = 11;

// Define the array of leds
CRGB freqLEDs[NEOPIXEL_NUM_LEDS];
CRGB modLEDs[NEOPIXEL_NUM_LEDS];
CRGB speedLEDs[NEOPIXEL_NUM_LEDS];
CRGB ratioLEDs[NEOPIXEL_NUM_LEDS];


// Sound stuff

// desired carrier frequency max and min
const int MIN_CARRIER_FREQ = 22;
const int MAX_CARRIER_FREQ = 440;

// desired intensity max and min, inverted for reverse dynamics
const int MIN_INTENSITY = 10;
const int MAX_INTENSITY = 1000;

// desired modulation ratio max and min
const int MIN_MOD_RATIO = 5;
const int MAX_MOD_RATIO = 2;

// desired mod speed max and min, note they're inverted for reverse dynamics
const int MIN_MOD_SPEED = 10000;
const int MAX_MOD_SPEED = 1;

Oscil<COS2048_NUM_CELLS, MOZZI_AUDIO_RATE> aCarrier(COS2048_DATA);
Oscil<COS2048_NUM_CELLS, MOZZI_CONTROL_RATE> kIntensityMod(COS2048_DATA);
Oscil<COS2048_NUM_CELLS, MOZZI_AUDIO_RATE> aModulator(COS2048_DATA);

int mod_ratio; // harmonics
long fm_intensity; // carries control info from updateControl() to updateAudio()

// smoothing for intensity to remove clicks on transitions
float smoothness = 0.95f;
Smooth aSmoothIntensity(smoothness);

// To keep track of last time Serial data was sent, to only send it every x millis
int lastTimeSerialSent = 0;


void setup(){
  Serial.begin(9600); // For communicating with p5

  // Set the flex sensor pins
  pinMode( FREQ_SENSOR_PIN, INPUT_PULLUP);
  pinMode(  MOD_SENSOR_PIN, INPUT_PULLUP);
  pinMode(SPEED_SENSOR_PIN, INPUT_PULLUP);
  pinMode(RATIO_SENSOR_PIN, INPUT_PULLUP);

  // Setup the neopixels
	FastLED.addLeds<NEOPIXEL, FREQ_NEOPIXEL_PIN>(freqLEDs, NEOPIXEL_NUM_LEDS);
	FastLED.addLeds<NEOPIXEL, MOD_NEOPIXEL_PIN>(modLEDs, NEOPIXEL_NUM_LEDS);
	FastLED.addLeds<NEOPIXEL, SPEED_NEOPIXEL_PIN>(speedLEDs, NEOPIXEL_NUM_LEDS);
	FastLED.addLeds<NEOPIXEL, RATIO_NEOPIXEL_PIN>(ratioLEDs, NEOPIXEL_NUM_LEDS);
	FastLED.setBrightness(32); // 0 - 255

  // Feed/prime/initialise the smoothing function to get a stable output from the first read (to ensure the calibration isn't messed up). A value of 1630 was chosen by trial and error (divide and conquer), and seems to work best (at least for our setup)
  smoothFreq.next(1630);
  smoothMod.next(1630);
  smoothSpeed.next(1630);
  smoothRatio.next(1630);

  startMozzi();

  // Start the serial handshake
  while (Serial.available() <= 0) {
    digitalWrite(LED_BUILTIN, HIGH); // on/blink while waiting for serial data
    Serial.println("0"); // send a starting message
    delay(250); 
    digitalWrite(LED_BUILTIN, LOW);
    delay(250);
  }
}


// Basically our actual traditional loop in Mozzi (but still needs to kept reasonably lean and fast)
void updateControl(){

  // Read the smoothened freq
  int freqValue = smoothFreq.next(mozziAnalogRead(FREQ_SENSOR_PIN - 14)); // value is 0-1023, -14 since mozzi just takes a number (eg. 0 instead of A0), and the analog ones are 14 onwards

  // Calibrate the mapping if needed
  if (freqValue < freqInputMin) freqInputMin = freqInputMin * 0.5 + freqValue * 0.5; if (freqValue > freqInputMax) freqInputMax = freqInputMax * 0.5 + freqValue * 0.5;

  // Map the input to the carrier frequency
  int carrier_freq = map(freqValue, freqInputMin, freqInputMax, MIN_CARRIER_FREQ, MAX_CARRIER_FREQ);


  // Read the smoothened ratio
  int ratioValue = smoothRatio.next(mozziAnalogRead(RATIO_SENSOR_PIN - 14));

  // Calibrate the mapping if needed
  if (ratioValue < ratioInputMin) ratioInputMin = ratioInputMin * 0.5 + ratioValue * 0.5; if (ratioValue > ratioInputMax) ratioInputMax = ratioInputMax * 0.5 + ratioValue * 0.5;

  // Map the input to the ratio
  mod_ratio = map(ratioValue, ratioInputMin, ratioInputMax, MIN_MOD_RATIO, MAX_MOD_RATIO);


  // calculate the modulation frequency to stay in ratio
  int mod_freq = carrier_freq * mod_ratio;
  
  // set the FM oscillator frequencies to the calculated values
  aCarrier.setFreq(carrier_freq);
  aModulator.setFreq(mod_freq);


  // Read the smoothened mod
  int modValue = smoothMod.next(mozziAnalogRead(MOD_SENSOR_PIN - 14));

  // Calibrate the mapping if needed
  if (modValue < modInputMin) modInputMin = modInputMin * 0.5 + modValue * 0.5; if (modValue > modInputMax) modInputMax = modInputMax * 0.5 + modValue * 0.5;

  // Calculate the fm_intensity
  fm_intensity = ((long)modValue * (kIntensityMod.next()+128))>>8;


  // Read the smoothened speed
  int speedValue = smoothSpeed.next(mozziAnalogRead(SPEED_SENSOR_PIN - 14));

  // Calibrate the mapping if needed
  if (speedValue < speedInputMin) speedInputMin = speedInputMin * 0.5 + speedValue * 0.5; if (speedValue > speedInputMax) speedInputMax = speedInputMax * 0.5 + speedValue * 0.5;

  // use a float here for low frequencies
  float mod_speed = (float)map(speedValue, speedInputMin, speedInputMax, MIN_MOD_SPEED, MAX_MOD_SPEED) / 1000;
  kIntensityMod.setFreq(mod_speed); 


  // Set the leds

  FastLED.clear(); // Resets them

  // The frequency controls how many of the LEDs are light up (in a rainbow colour)
  int freqLEDAmount = map(freqValue, freqInputMin, freqInputMax, 0, NEOPIXEL_NUM_LEDS);
  fill_rainbow(&freqLEDs[NEOPIXEL_NUM_LEDS - freqLEDAmount], freqLEDAmount, CRGB::White, 25); // &...LEDs[i] to start lighting from there, allowing us to light them in reverse

  // The speed controls the blinking rate of its LEDs (between 1/2 to 3 seconds per blink cycle)
  int speedLEDBlinkRate = smoothSpeedLED.next(map(speedValue, speedInputMin, speedInputMax, 2000, 500));
  if (millis() % speedLEDBlinkRate < speedLEDBlinkRate/2)
    fill_rainbow(speedLEDs, NEOPIXEL_NUM_LEDS, CRGB::White, 25);

  // For the mod, show a meter (blue - deep pink) showing the mix level of the 2 sounds
  int modLEDAmount = map(modValue, modInputMin, modInputMax, 0, NEOPIXEL_NUM_LEDS);
  fill_solid(modLEDs, NEOPIXEL_NUM_LEDS, CRGB::Blue);
  fill_solid(&modLEDs[NEOPIXEL_NUM_LEDS - modLEDAmount], modLEDAmount, CRGB::DeepPink);

  // The ratio controls the hue of its LEDs
  // int ratioLEDHue = map(ratioValue, ratioInputMin, ratioInputMax, 0, 360);
  // fill_solid(ratioLEDs, NEOPIXEL_NUM_LEDS, CHSV(ratioLEDHue, 100, 50));
  // We could also blend between 2 colours based on the ratio, pick the one you prefer
  fract8 ratioLEDFraction = map(ratioValue, ratioInputMin, ratioInputMax, 0, 255);
  // fill_solid(ratioLEDs, NEOPIXEL_NUM_LEDS, blend(CRGB::Blue, CRGB::DeepPink, ratioLEDFraction));
  fill_solid(ratioLEDs, NEOPIXEL_NUM_LEDS, blend(CRGB::Blue, CRGB::Red, ratioLEDFraction));

  FastLED.show(); // Shows them


  // Communicate with p5
  
  if (Serial.available() && Serial.read() == '\n') { // Send the data once a newline character is received, indicating the end of a message/handshake
      Serial.print(map(freqValue, freqInputMin, freqInputMax, 0, 1000));
      Serial.print(',');
      Serial.print(map(speedValue, speedInputMin, speedInputMax, 0, 1000));
      Serial.print(',');
      Serial.print(map(modValue, modInputMin, modInputMax, 0, 1000));
      Serial.print(',');
      Serial.print(map(ratioValue, ratioInputMin, ratioInputMax, 0, 1000));
      Serial.print(',');
      Serial.println(speedLEDBlinkRate);
    }
  }
}


// Mozzi's function for getting the sound. Must be as light and quick as possible to ensure the sound buffer is adequently filled
AudioOutput updateAudio() {
  long modulation = aSmoothIntensity.next(fm_intensity) * aModulator.next();
  return MonoOutput::from8Bit(aCarrier.phMod(modulation)); // phMod does the FM
}


// Since we're using Mozzi, we just call its hook
void loop() {
  audioHook();
}


Schematic:


p5 sketch (and code):


Description of communication between Arduino and p5:

They communicate using a wired serial connection, with the Arduino initiating the handshake. Once p5 acknowledges it, it sends back a newline character, causing the Arduino to send over the normalised values of the flex sensors, as well as the speed neopixel’s blinkrate, and then a newline character back (delimiting the end of the message). Each part waits until the newline to send their data (in the case of p5, just an acknowledgement, while in the case of the Arduino, the sensor and 1 computed value).


While I’m not incredibly happy for this, and do wish I could improve things a lot, I’m still pretty glad with how some things turned out. The glove input and the glove itself proved to be quite liked, with many people commenting about the unique control scheme. I also feel the p5 sketch provided another option to view data, resulting in a quicker understanding of the mapping between the amount the fingers are curled and the value it outputs.

However (for future reference), I do wish I could provide greater variety in the synthesizing options (eg. I thought of a button that cycles through different modes, with one mode for example controlling a set of instruments), improve the design & sturdiness of the glove (one of the wires actually disconnected! But luckily it was near the end of the show), and also polish it a bit more.

FINAL PROJECT – GOAL RUSH

CONCEPTS:

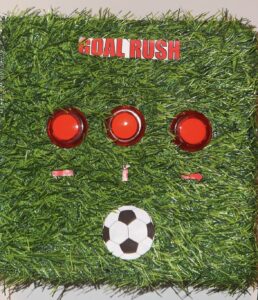
The game is a fast-paced, reaction-based experience inspired by the Speed Light Reaction Game, which I transformed into something I’m passionate about: football. The game requires players to quickly respond to an LED light by pressing the correct button. If they react correctly, they score a goal, but if they miss or press the wrong button, the ball hits a mannequin, simulating a failed attempt. The game incorporates visual and auditory feedback, a playlist of music inspired by FIFA, and a timer to create an engaging and immersive experience that challenges players’ speed and reaction time.

IM SHOW:

IMG_1736 2

IMG_1734 2

USER TESTING:

user_testing (1)

THE GAME:

the button (the control)-

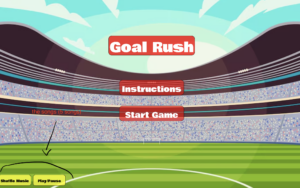
the layout

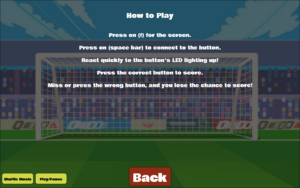
the instruction page

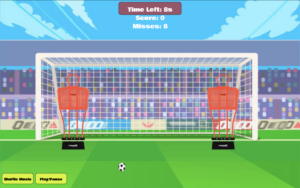
the game play page

P5 SKETCH:

SETUP:

How does the implementation work?

The game uses Arduino and p5.js software for an interactive experience.

  1. Hardware (Arduino):
    • LED button lights serve as control, which lights up signaling which button to press to score, allowing user input.
    • Serial communication sends user responses from the Arduino to P5.js.
  2. Software (p5.js):
    • Manages game visuals, including the football, goal, and mannequins.
    • Tracks scores, missed shots, and the countdown timer.
    • Plays music and sound effects to immerse players in the experience.

INTERACTION DESIGN

  • Title Screen:
    • Features:
      • Displays the game title with an bold font.
      • Includes buttons for “Start Game”, “Instructions” and “shuffle – play/pause” for music.
    • Design Choices:
      • Used bold colors and a clean layout for clarity and visual appeal.
    • Gameplay:
      • Press the matching led button that lights up to score.
      • Correct button presses make the ball move toward the goal, simulating a successful shot.
      • Incorrect or missed presses (not pressed within 1 sec) result in the ball hitting a mannequin, simulating a failed shot.
      • Additional on-screen buttons allow players to shuffle music or play/pause background tracks.
    • Feedback: The game uses visual (ball movement) and auditory (goal or miss sounds) feedback. Background music inspired by FIFA enhances the immersive experience
  • End Screen:
    • Displays the final score and missed attempts.
    • Includes buttons to restart the game or return to the main menu

DESCRIPTION OF P5.JS CODE:

The p5.js sketch manages the visuals, sounds, and game state.

  1. Key Features:
    • Dynamic Visuals: Updates scores, displays animations for goals and misses, and tracks time.
    • Audio Feedback: Plays sound effects for scoring and missing.
    • Serial Data Handling: Receives and processes data from Arduino.
  2. Code Snippets:
    • Serial Data Handling:
function readSerial(data) {
  if (data === "BUTTON:CORRECT") {
    score++;
    // Animate football to the goal
  } else if (data === "BUTTON:WRONG") {
    missedShots++;
    // Animate football to the mannequin
  }
}
  • Music Control:
function toggleMusic() {
  if (isMusicPlaying) {
    backgroundSounds[currentTrackIndex].pause();
    isMusicPlaying = false;
  } else {
    backgroundSounds[currentTrackIndex].play();
    isMusicPlaying = true;
  }
}

DESCRIPTION OF ARDUINO CODE:

The Arduino code handles LED prompts, button detection, and serial communication with p5.js.

Key Components:

  1. LED Control:
    • LEDs light up randomly, prompting user action:
void lightUpLED(int index) {
  for (int i = 0; i < 3; i++) {
    digitalWrite(ledPins[i], (i == index) ? HIGH : LOW);
  }
}
  • LEDs turn off after a button is pressed or the timeout ends:
void turnOffLEDs() {
  for (int i = 0; i < 3; i++) {
    digitalWrite(ledPins[i], LOW);
  }
}

Button Detection:

  • Checks if the correct button is pressed:
void checkButtonPress() {
  if (targetLED != -1 && digitalRead(buttonPins[targetLED]) == LOW) {
    Serial.println("BUTTON:CORRECT");
    targetLED = -1; 
    turnOffLEDs();
  } else {
    for (int i = 0; i < 3; i++) {
      if (i != targetLED && digitalRead(buttonPins[i]) == LOW) {
        Serial.println("BUTTON:WRONG");
        targetLED = -1; 
        turnOffLEDs();
        break;
      }
    }
  }
}

Serial Communication:

  • Sends formatted data to p5.js:
void sendLEDSignal(int ledIndex) {
  Serial.print("LED:");
  Serial.println(ledIndex);
}

Listens for responses from p5.js:

if (Serial.available()) {
  String command = Serial.readStringUntil('\n');
  if (command.startsWith("LED:")) {
    targetLED = command.substring(4).toInt();
    lightUpLED(targetLED);
  }
}

COMMUNICATION BETWEEN P5 AND ARDUINO:

How It Works:

  • Arduino sends data about user responses (correct or wrong button presses) to p5.js.
  • p5.js uses this data to update the game state:
    • Correct responses move the football to the goal and increase the score.
    • Incorrect responses move the football to a mannequin and increase missed attempts.
  • p5.js also sends signals back to Arduino to light up LEDs.

Challenges Overcome:

  • Initial miscommunication due to overlapping signals was resolved by implementing a debounce delay in Arduino and validation logic in p5.js.

CHALLENGES FACED:

One major challenge was managing communication between Arduino and p5.js. Initially, multiple data packets were sent for a single button press, causing disruptions in the game. To fix this, I added a debounce delay in the Arduino code:

if (magnitudeG > impactThreshold) {
  Serial.print("BUTTON:CORRECT");
  delay(200); // Debounce to avoid multiple signals
}

This ensured only one signal was sent per button press. I also validated inputs in p5.js by processing only expected packets like "BUTTON:CORRECT", which resolved signal misinterpretations.

Another challenge was ensuring strong soldering connections for the buttons and LEDs. My first attempts were unreliable, but then I secured the connections, improving hardware stability.

WHAT IM PROUD OF:

I’m proud of successfully integrating Arduino and p5.js to create a smooth and responsive game. Features like the animated football, scoring system, and FIFA-inspired music enhanced the user experience. Solving technical issues, such as serial communication and soldering, was rewarding, as they significantly improved the gameplay experience.

FUTURE IMPROVEMENTS:

One improvement would be adding a game mode where pressing the correct button contributes to building a beat or rhythm for a song. Each correct button press would play a specific musical note or drum beat, gradually creating a complete soundtrack as the player progresses. This mode would combine the fast-paced reaction element with creativity, making the game more dynamic and engaging. By turning gameplay into a musical experience, it would appeal to a broader audience and add a unique layer of interactivity. This feature could also include different difficulty levels, where faster reactions create more complex beats, challenging players’ skills and rhythm simultaneously.

RESOURCES USED:

https://www.instructables.com/Plug-and-Play-Arcade-Buttons/

https://editor.p5js.org/jps723/sketches/Byvw1lu6Z


Assignment 14: Create Your Own Cat (Final Project Documentation)

Concept

My final project is a pet cat experience. For someone who loves cats but was never fortunate enough to be blessed with one because her mother dislikes the idea of having a cat in the house, I want to take this opportunity to give those who are in the same situation like myself to experience the joy of having a cat, without upsetting their mothers.

I hope this cat will provide comfort for cat lovers like me, or even turn non-cat lovers into one!

Pictures and Videos

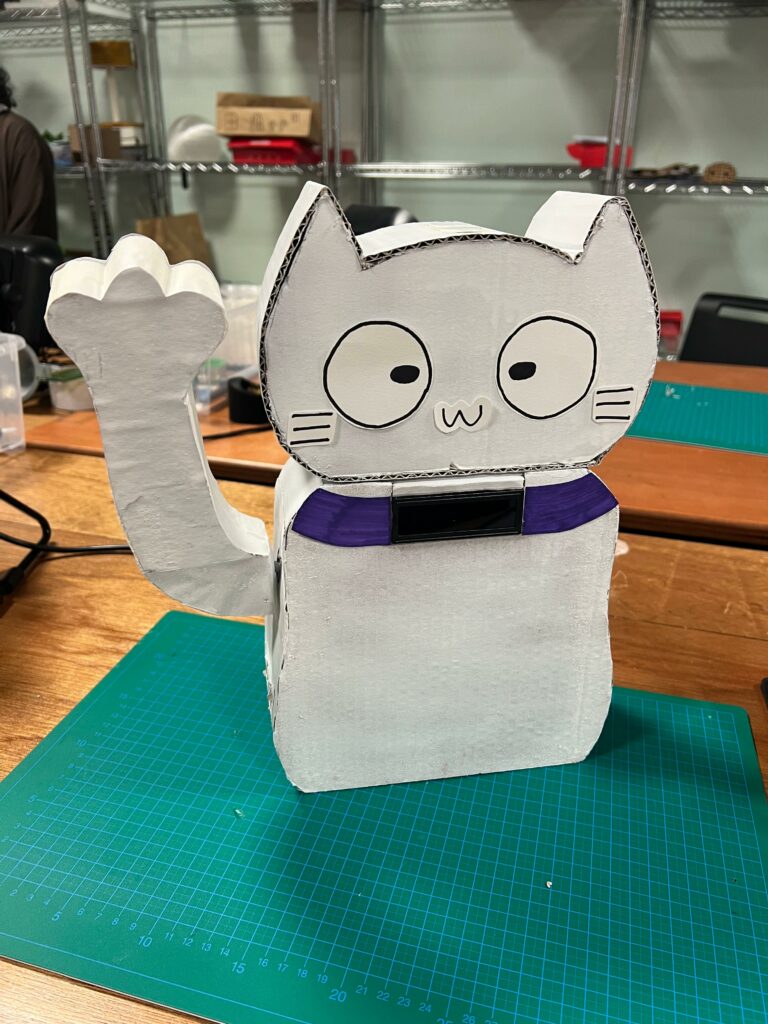
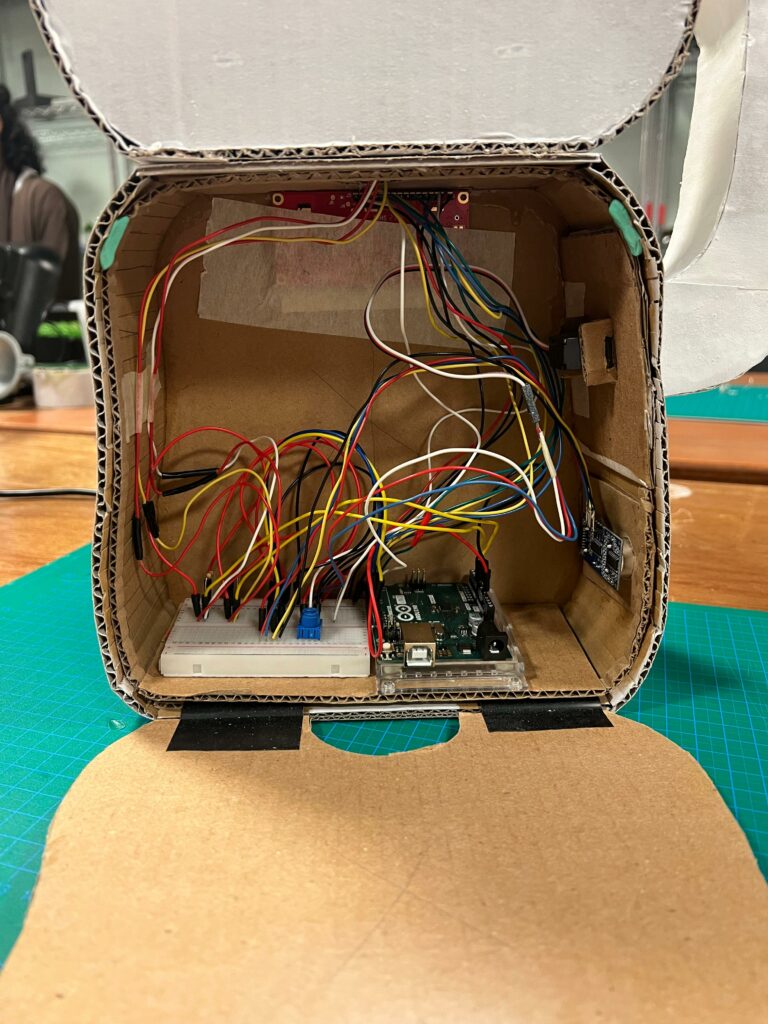
Some pictures of the physical project:

User testing video from the first version:

Demo of final version:

Implementation

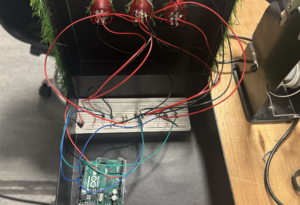
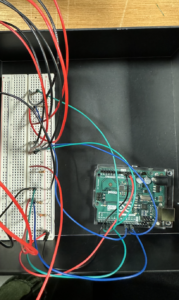
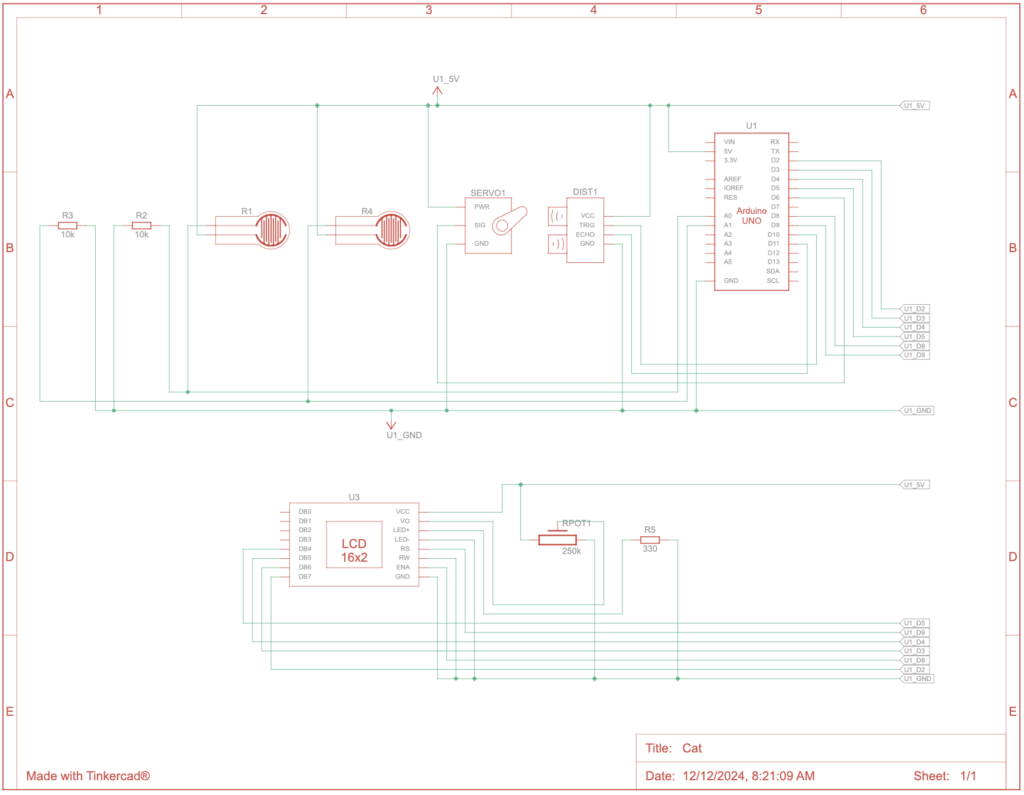
Schematic:

The cat itself is built using cardboard. The Arduino and breadboard are placed inside the body of the cat, accessible by opening the back panel of the body.

The arm of the cat is connected to a servo motor protruding from one side of the cat, and on the bottom of this same side, an electronic sensor also protrudes.

The head of the cat is also attached to the main body of the cat. On the bottom of the head, there is a circular hole to allow the wires connecting the two force sensors on the head to be able to connect to the breadboard and Arduino placed in the main body.

Over on the p5 side, I used a class to easily switch between the different states of the experience (start, play, end). Buttons were also made for user input to enter the name of the cat of their choosing and a submit button to confirm the name and trigger the sending of the name over to Arduino to be displayed on the LCD.

For the gifts, I illustrated each of the gifts on PowerPoint. The gifts are of a bird, a mouse, a yarn ball, a toy fish, and a donut.

I uploaded a meow sound onto p5 that plays when the cat is pet (based on the readings of the force sensors from Arduino).

Interaction Design

The cat is built from cardboard, and it has a collar in which the user can choose a name of their liking to be displayed on the collar. Cats love pets and users will be able to pet the cat and have it meow in content as a response.

When users extend their hand towards the cat, the cat lowers its paw and hand the users a “gift”. This act of gift giving from a cat is “an expression of affection and trust” which “shows they value the users companionship and consider them part of their social group.” (Cited from here)

However, the “gifts” the cats bring can range from random toys, to animals. This will be reflected in the p5.js sketch wherein every time a user extends their hand, the cat will give them a new “gift”.

Arduino

Github link to code

On the Arduino side, it was used mainly to get sensor readings and sending them to p5. It was used to calculate distance based on the readings from the ultrasonic sensor, change the servo motor position based on the distance readings, and output the name from p5 onto the LCD.

Here is a snippet of the code of how I triggered the move of the cat’s arm depending on the distance reading. It was initially using delay, but since delay will stop the whole program, I used millis() for time, stated the interval for delay between each increment or decrement of the servo position, and used the following code:

int servInt = 5;

// check if it's time to update the servo position

if (time - servoTime >= servInt) {
  // update the last move time
  servoTime = time; 

  if (distance <= 10 && increasing) {
    // increment position
    pos++; 
    if (pos >= 90) {
      // change direction
      increasing = false; 
    }
  } else if (distance > 10 && !increasing){
    // decrement position
    pos--; 
    if (pos <= 0) {
      // change direction
      increasing = true; 
    }
  } 
  // move the servo to the new position
  myservo.write(pos); 
}

And here is the code for writing onto the LCD based on the name sent from the p5 sketch:

if (Serial.available()){

  name = Serial.readStringUntil('\n');
  name.trim();
  // only update LCD if the name has changed
  if (name != previousName) {
    // update the last displayed name
    previousName = name;
    // center-align the name
    int offset = (16 - name.length()) / 2; 
    // reset to the first row
    lcd.setCursor(0, 0);
    // clear the row without lcd.clear()
    lcd.print("                "); 
    // position the cursor to the beginning
    lcd.setCursor(offset, 0);
    // display the new name
    lcd.print(name);                     
  }
  
}

p5.js

Fullscreen sketch

On p5, I developed a class called Screen with 3 methods that would display the different states of the experience (start, play, and end). An input box and submit button was created for the name of the cat to be read from user input and then sent to Arduino. I also used p5 to play the cat’s meow when it is petted.

Here is a snippet of the code to randomize the gift and display the gift when the user’s hand is under the cat’s arm and the cat’s hand is lowered.

// in the main sketch

function randomizeGift(){
  while (!isDown){
    gift = gifts[int(random(0, gifts.length))]
    break;
  }
}

// in the Screen class, under the play() method

    // displaying gift when cat hand is lowered
    if (isDown){
      image(gift, width/2, height/2+h3)
      gift.resize(0,300)
    }

Communication between Arduino and p5.js

From Arduino:

Ultrasonic Sensor and Servo Motor
The ultrasonic sensor is placed on the side of the cat, under one of the cat’s paws that is raised. The reading from the ultrasonic sensor is used to calculate the distance of the hand from the cat. If the distance is smaller than a certain threshold, this triggers the servo motor to turn which causes the cat’s paw to lower and touch the user’s hand. Once the hand is lowered, it triggers the display of the randomized object the cat hands to the user on the P5 sketch. So to p5, Arduino will send the value of the calculated distance, and a boolean that states whether the hand is down or not.

Force Sensors
Two force sensors are placed on the cats head, so that when a user pets the cat, this force is recorded. Both of the force readings are sent to p5 to trigger the sound of a cat’s meow to play from P5.

From p5:

LCD Screen
The P5 sketch prompts the user to fill in an input box to give the cat a name of their choosing. This name will be sent to the Arduino to be displayed on the LCD screen which is bplaced on the cat’s neck, like a collar.

Highlights

I’m really proud of how everything came together, but specifically in how I managed to handle the communication between arduino and p5 in terms of the cat hand interaction. On the arduino side, having calculated distance, using this distance value as a condition that triggers the change in position of the servo motor for the cat’s hand to lower, and using a boolean value to state if the cat’s hand is lowered or not is one thing I’m proud of for being able to pull off. Then on the p5 side, using the boolean variable of whether the cat’s hand is down or not to create a function that randomizes the gift and then within a method in the class that I created, I used this function and then displayed the gift when the cat’s arm is down. I think managing this whole process and communication to work well is something that I’m very proud of.

Resources

Calculation of distance from ultrasonic sensor

Wiring of LCD

LCD code from Arduino example

Challenges

I initially had issues with the delay of the servo motor, since delay would stop all of the code

One of the greatest challenges that I had with this project was finding the perfect pressure/force sensor to use for the petting and meowing experience. I initially made a prototype of a pressure sensor using velostat and copper tape which worked, but when I tried implementing it on a bigger scale, it was not giving me a varying range of readings. I then turned to use a piezo sensor, but the results were similar. It was then that I found the small force sensor that was very sensitive and is exactly what I was looking for, just that it was a tad bit small, so I ended up using two of them to cover a larger area of the cat’s head to trigger the meow sound.

Future Improvements

For the future, as I have been advised by a user I had the pleasure of meeting at the IM Showcase, I would like to implement a more technical approach to the project. I would like to try using a sensor for facial expression to detect the user’s facial expression (and thus emotions) and based on this reading, the cat will have certain reactions (or perhaps facial expressions as well, displayed on a larger LCD screen) as a response to the user’s emotions. I think with this approach, the experience will create a deeper relationship between the user and the cat, just as a real owner and pet relationship.

Fall 2024 Interactive Media Showcase Documentation
Tuesday 10 December 2024

Final Project Documentation (week 14): The ‘Robinson’ Maze

Concept:

Cover page for the game. I designed this using Photoshop, obtained the image from Pixabay, a free image place with copyright free usage policies.

This game incorporates two key concepts. The first concept, which inspired the creation of this game, is the maze itself—an idea drawn from my midterm project. In the game, the user starts at one end of the maze’s wire frame and navigates through it without touching the wire, aiming to reach the endpoint before time runs out. The maze is uniquely designed to resemble the word “Robinson,” with the first letter forming an “R,” the last letter forming an “N,” and the middle section creatively looped to provide a more engaging and challenging experience for players.

The second concept is inspired by urban design. The maze is mounted on two wooden blocks designed to resemble buildings, giving the entire structure the appearance of a miniature cityscape. This combination of gameplay and aesthetic design enhances the overall experience by integrating storytelling with visually appealing architecture.

Project Interaction:

Do you remember the person I used for my user testing? Well, they’re back again for another round to interact with the program, this time after addressing and resolving any misconceptions about how the game functions. Below is a video of Vladimir testing my game once again:

How Does the Implementation Work?

1. Description of Interaction Design

The interaction design focuses on creating a seamless and engaging user experience. The game begins with a welcome screen that introduces the user to the interface. It includes options to view instructions or start playing the game.

  • Instructions Screen: The instructions explain the rules of the game, such as the objective of navigating through the maze without touching the conductive walls and what happens when the wire is touched. A “Back” button is provided to return to the main menu.
  • Timer Selection: Players can choose their preferred play duration (30 seconds, 1 minute, or 2 minutes). After selecting a timer, the game transitions to a countdown preparation phase.
  • Game Play: During the game, the player must navigate the maze using the loop object without touching the maze walls. Touching the walls triggers a red glow effect and reduces the remaining time by 5 seconds. The player wins by reaching the endpoint (connected to the A3 pin) before the timer runs out. If the timer reaches zero before the endpoint is touched, the player loses.
  • Win/Lose Feedback: Winning triggers celebratory fireworks visuals, while losing displays visuals indicating failure. Both states return the user to the main menu after 5 seconds.

2. Description of Arduino Code

The Arduino code handles two primary functions:

  • Touch Detection (A0): When the loop object touches the maze walls, the Arduino sends a ‘Touch Detection’ message to p5.js. It also briefly activates the buzzer to provide immediate audio feedback.
  • Win Detection (A3): When the loop object reaches the endpoint, the Arduino sends a ‘win’ message to p5.js to indicate success.

The code integrates digital input from the A0 and A3 pins and sends serial messages to the p5.js sketch, allowing the game to react accordingly. The following code is my entire self-written code (including comments) that I used to bring the project to life using the Arduino IDE:

#define TOUCH_PIN A0
#define WIN_PIN A3
#define BUZZER_PIN 8

bool gamePlaying = false; // Flag to track if the game is currently active

void setup() {
  Serial.begin(9600);

  pinMode(TOUCH_PIN, INPUT);  // Touch detection
  pinMode(WIN_PIN, INPUT);    // Win detection
  pinMode(BUZZER_PIN, OUTPUT); // Buzzer feedback

  Serial.println("Setup Complete. Monitoring touch and win states...");
}

void loop() {
  // Check for serial messages from p5.js
  if (Serial.available() > 0) {
    String command = Serial.readStringUntil('\n');
    command.trim();

    if (command == "START") {
      gamePlaying = true; // Start the game
      Serial.println("Game started!");
    } else if (command == "STOP") {
      gamePlaying = false; // Stop the game
      Serial.println("Game stopped!");
    }
  }

  if (gamePlaying) {
    int touchValue = digitalRead(TOUCH_PIN); // Read A0
    int winValue = digitalRead(WIN_PIN);    // Read A3

    // Check if wires are touching
    if (touchValue == HIGH) {
      tone(BUZZER_PIN, 1000); // Play buzzer
      delay(100);
      noTone(BUZZER_PIN);
      Serial.println("Touch detected!"); // Notify touch
    }

    // Check if win condition is met
    if (winValue == HIGH) {
      Serial.println("WIN"); // Notify win
      delay(500);            // Avoid spamming
    }
  } else {
    noTone(BUZZER_PIN); // Ensure the buzzer is off when the game isn't active
  }

  delay(50); // Stability delay
}

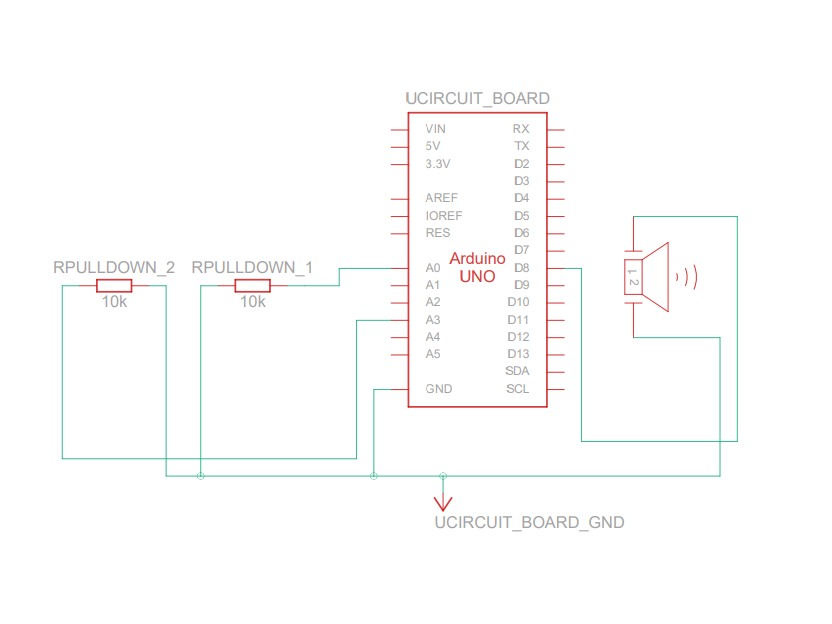
3. Schematic

The circuit consists of:

  • A0: Connected to the loop object with a 10kΩ pull-down resistor.
  • A3: Connected to the maze endpoint for win detection.
  • D8: Connected to the buzzer for audio feedback.
  • 5V and GND: Power and ground connections.

The schematic visually details how the components are connected to the Arduino board.

The following schematic represents the connection for the Arduino circuit while also inclusding the objects used to complete the circuit for the overall functioning of the game. The schematic was made using TinkerCAD

4. Description of p5.js Code

The p5.js code manages the visual interface, user interactions, and communication with the Arduino. Key functions include:

  • Serial Communication: Establishes a connection with the Arduino and processes messages received from it.
  • Visual Design: Displays custom backgrounds for each screen (e.g., welcome, instructions, timer selection, and game states). Buttons are styled and positioned for ease of use.
  • Game Logic: Handles the countdown timer, touch detection, win/lose conditions, and visual effects for the game (e.g., the red glow for touches, fireworks for wins).
  • Dynamic Transitions: Smoothly transitions between different game states and incorporates a 3-second preparation countdown to ensure the user is ready before gameplay begins.

The following is the p5 embedded code. Be sure to copy the Arduino code into the Arduino IDE, using the schematic connections on the Arduino Uno board if you would like to test this following program

for the full screen link, click here: https://editor.p5js.org/takuthulani/full/H_F1sS4qo

5. Description of Communication Between Arduino and p5.js

The communication between Arduino and p5.js is established through serial data transfer. The Arduino sends the following messages based on the game events:

  • “Touch detected!”: Sent when the loop object touches the maze walls (A0 input). p5.js responds by reducing the timer and activating the red glow effect.
  • “WIN”: Sent when the loop object reaches the endpoint (A3 input). p5.js displays the “You Won” message and celebratory visuals.

Additionally, p5.js sends a message to the Arduino when the game begins and a stop message when the game ends.

Aspect I am proud of:

If I am being truly honest, I feel really proud of the overall functioning of the game. The game works exactly as I imagined it would, and this is something to be proud of since we know that, from concept to final project, many things can go wrong. One often needs to make exceptions for unforeseen challenges and find creative solutions. In this case, the project works as intended, and I am particularly proud of the fact that when you touch the wire, the small speaker activates, and the screen flashes red to indicate the touch.

The serial communication was one of the trickiest parts of this project. Strangely enough, my game stopped working when the IM showcase began, requiring a few minutes of troubleshooting to get it running again. Beyond that hiccup, I am especially proud of the feature where the timer decreases whenever the user touches the wire. This functionality involved many late nights of debugging, but the result was worth it.

Lastly, I am happy that the program does not react when anyone touches the wire with the conductive loop object while the game is not being played. This demonstrates that the code I wrote provides enough control and that the communication between p5.js and Arduino is solid.

Areas of Future Improvements:

I am someone who enjoys visually stimulating designs, and one thing I would like to improve is the overall visual look of the game. The cover page seems too simple, and I would add enhancements to make it more engaging. Additionally, I would add sounds to the interface buttons so that they produce feedback whenever someone clicks them. More instructions and better visual cues for the game would greatly enhance the user experience.

For the timer, I would make it more visually apparent that the player is running out of time and that they lose time whenever they touch the wire. One improvement could be adding a louder speaker, as the sound of the small speaker was often drowned out by the environmental noise during the IM showcase. Providing users with options to enable or disable background music would also enhance the experience.

Furthermore, the physical structure of the game could use a more polished look. While not many people commented on this during gameplay, a better structure would contribute to the overall mood of the game. Lastly, I would add more engaging animations to the “You Win” screen to make users feel a greater sense of accomplishment. Implementing a high-ranking system could encourage competitiveness among players, as I noticed many users enjoyed challenging one another. Additionally, a more dramatic loss message could motivate users to replay the game more often.


Credits:

I would like to take this opportunity to thank Nelson from the scene shop for his immense help in cutting the wood for my project. I would also like to thank the lab TAs for assisting me in finding items in the lab and helping me progress through this project by supplying resources.

A special thanks to Professor Michael Shilo, whom I met in the lab. He helped me find wires in the scene shop, and I am grateful for his suggestions. Lastly, I would like to thank Professor Michael Ang for guiding me through this project from the beginning to the end, as well as for all the knowledge I gained from him throughout the semester.

Disclaimer

I use Grammarly as a browser add-on in Chrome, which assists me in fixing grammar issues while writing this blog.

FINAL PROJECT- THE PUNCHING BAG

CONCEPT:

The Punching Bag Game is an interactive project that combines physical activity with a digital arcade experience. The concept revolves around using a punching bag equipped with a sensor to detect punches and display real-time scores. It’s designed to bring the excitement of a classic arcade game into a physical activity, which inspired me in the first place. The game includes features like score tracking, a fuel bar, sound effects, and a visually engaging gamescreen that responds to the user’s actions. The goal is to create an immersive experience where users can engage physically while enjoying a fun and competitive game.

user testing video

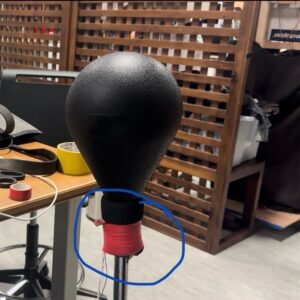
Here is where I placed the sensor on the punching bag:
THE PUNCHING BAG- sensor placment

How Does the Implementation Work?

The project integrates hardware (Arduino) and software (p5.js) to create a seamless interactive system:

Hardware (Arduino):

  • An ADXL335 accelerometer attached to the punching bag detects the magnitude of punches.
  • An arcade button starts and restarts the game.
  • The Arduino processes the sensor data and sends it to p5.js as a formatted packet.

Software (p5.js):

  • Displays the title screen, instructions, and gameplay.
  • Dynamically updates the score, best score, and fuel bar based on incoming data.
  • Plays sound effects and animates the punching bag for a realistic experience.

Description of Interaction Design

1. Title Screen

Features:

    • The game title (“The Punching Bag”) in an arcade-style font.
    • An “Instructions” button leads to a detailed instruction page.
    • A prompt directs users to press the arcade button to start the game.

Design Choices:

      •  I used bold, retro fonts and a simple overall design to mimic an actual arcade game.

2. Gameplay

  • User Interaction:
    • Players punch the bag, and the accelerometer calculates the strength.
    • Scores are displayed dynamically, increasing gradually like in classic arcade games.
    • A fuel bar at the bottom fills based on the user’s performance.
    • Sound effects play after each punch.
  • Visual Elements:
    • The punching bag vibrates after each punch, mimicking the actual punching bag
    • A restart button allows players to reset the game and try again.

3. Restart Button

  • After the game ends, users can press the restart button to reset the game and clear all scores, unlocking the ability to punch again.

Description of Arduino Code

The Arduino is responsible for detecting punches, processing the sensor data, and communicating with p5.js.

How It Works:

  1. Punch Detection:
    • The ADXL335 accelerometer calculates the acceleration magnitude of each punch.
    • If the magnitude exceeds a set threshold, it’s mapped to a score value.
  2. Data Transmission:
    • The Arduino sends a data packet in the format ,:<value> to p5.js via serial communication.
  3. Button Functionality:
    • The arcade button sends a “START” signal to p5.js to initiate gameplay.
void handleAccelerometer() {
  int xRaw = analogRead(xPin);
  int yRaw = analogRead(yPin);
  int zRaw = analogRead(zPin);

  float magnitudeG = calculateMagnitude(xRaw, yRaw, zRaw);

  if (magnitudeG > impactThreshold) {
    int punchValue = map(magnitudeG, impactThreshold, impactThreshold + 10, 0, 2000);
    Serial.print(",:");
    Serial.println(punchValue);
    delay(200);
  }
}

GITHUB


Description of p5.js Code

The p5.js sketch displays the visuals and processes incoming data from the Arduino to create a responsive and interactive experience.

Key Features:

  1. Dynamic Visuals:
    • Real-time updates to the score and fuel bar.
    • Vibration animation for the punching bag.
  2. Audio Feedback:
    • Plays sound effects after each punch.
  3. Serial Data Handling:
    • receives incoming data and updates the game state.
function handleSerialData(data) {
  serialBuffer += data; // Add incoming data to the buffer

  // Check for complete packets
  let startMarker = serialBuffer.indexOf("<");
  let endMarker = serialBuffer.indexOf(">");
  if (startMarker !== -1 && endMarker > startMarker) {
    let packet = serialBuffer.substring(startMarker + 1, endMarker); // Extract packet
    serialBuffer = serialBuffer.substring(endMarker + 1); // Remove processed packet

    // Process the packet
    if (packet.startsWith(",:")) {
      let scoreValue = parseInt(packet.substring(2)); // Extract score value
      if (!isNaN(scoreValue)) {
        console.log("Score received:", scoreValue);
        if (!scoreLocked) {
          score = scoreValue;
          fuel = constrain(fuel + scoreValue / 10, 0, 100);
          bestScore = max(bestScore, score);
          scoreLocked = true;
           isVibrating = true; 
        vibrationTimer = 80; 

        // Play punch sound
        if (roundEndSound.isPlaying()) {
         roundEndSound.stop(); 
        }
      roundEndSound.play(); 
        }
      }
    } else if (packet === "START") {
      gameState = "game";
    }
  }
}


COMMUNICATION BETWEEN ARDUINO AND P5.JS:

he communication between Arduino and p5.js is essential for the game to function properly, allowing the physical punches on the bag to reflect accurately in the digital interface. When the punching bag is hit, the ADXL335 sensor attached to it measures the force of the punch in terms of acceleration along the x, y, and z axes. The Arduino processes these raw sensor values and calculates the overall magnitude of the punch. If the punch strength exceeds a preset threshold, the Arduino sends a data packet to p5.js in the format ,:<value>, where <value> is the calculated punch strength mapped to a score range which was 2500. In addition to handling the punches, the Arduino also manages the arcade button. When the button is pressed, it sends a “START” command to p5.js. On the title screen, this command transitions the game to the gameplay state, and during gameplay, it acts as a reset function, clearing the scores and unlocking the ability to punch again. On the p5.js side, the sketch listens for incoming data through serial communication. When data is received, it first checks if it matches the  format to avoid any invalid or incomplete packets. Once validated, p5.js takes the score from the data and updates the game elements, such as the score display, fuel bar, and sound effects. To prevent multiple scores from being processed for a single punch, p5.js locks the score after the first valid data packet and ignores any further updates until the game is restarted.

CHALLENGING ASPECTS AND WHAT IM PROUD OF:
Getting the communication between Arduino and p5.js to work was one of the biggest challenges, but I got it to work in the end woohooo!. At first, the Arduino sent multiple data packets for a single punch, causing issues in p5.js, but I fixed this by adding a debounce delay and structuring the data packets. Soldering was also frustrating at first as it was my first time, and the wires kept coming loose. After several attempts, I managed to secure the connections, ensuring the sensor and button worked properly.

AREAS FOR FUTURE IMPROVEMENT:

I believe I could have maybe made the game more interactive by adding different game modes, maybe like a mode where there’s a timer and the user has to keep punching to fill up the fuel bar within that certain time. So in general, adding more features to the game would have been great.


IM SHOW

FINAL PROJECT – USER TESTING

USER TESTING:

user_testing

FEED BACK:

At first, creating the game was challenging because I struggled to get the buttons to function the way I wanted them to. Mapping the LED buttons to the gameplay and ensuring they triggered the correct actions was particularly difficult. However, I overcame this by refining the logic for button inputs and testing repeatedly to ensure everything worked as intended. This process required a lot of trial and error, and it was hard to troubleshoot the interactions between the controls and the game logic. Despite the difficulties, resolving these issues was rewarding and helped me improve my understanding of how to create interactions in the game.

During user testing, most users were able to figure out the game easily as the instructions were clear; however, I had to explain to some users that this is a reaction-based game where they need to react to the LED button that lights up and not to focus on the defenders on the screen. While the instructions were effective, a few players needed additional clarification about the LED mapping and corresponding button. Once users understood the concept of reacting to the LED, the gameplay became much smoother. Also, I need to fix a minor issue where when the users press start, the positions of the manequins wouldn’t be where they were supposed to be until a few seconds later, it gets fixed. However, the experience worked well overall, with the audio feedback for scoring and missing enhancing the immersion. The visual design also made the game enjoyable, and the fast-paced gameplay kept users engaged. To improve the experience, I plan to add a more detailed instruction page to eliminate the need for further explanation and slightly increase the reaction time to make the game more accessible for new players. Additionally, I was inspired by the FIFA game and would like to incorporate a shuffled playlist for background music to elevate the experience further and create a more engaging atmosphere.

Final Project User Testing (Week 13)

User Testing

The user testing for this project was both enlightening and entertaining. The first test occurred just a few minutes before the Interactive Media (IM) showcase. Vladimir Sontea, the first person I invited to test the game, provided a unique perspective and valuable feedback. Below is the video recording of the session:

In the video, you can hear me laughing at how quickly Vladimir lost before even starting the game. What stood out wasn’t his loss but the realization of certain faults in my game design. This moment marked the beginning of identifying key areas for improvement.

Observations:

User Experience

  • The user quickly figured out the navigation system, including accessing the instructions page, selecting the desired timer, and starting the game. This indicates that the visual structure of the game is intuitive and easy to understand.
  • However, there was significant confusion about what happens when the wire is touched. Questions like “How many lives do I have?” and “What are the conditions for losing?” came up frequently.

Game Mechanics

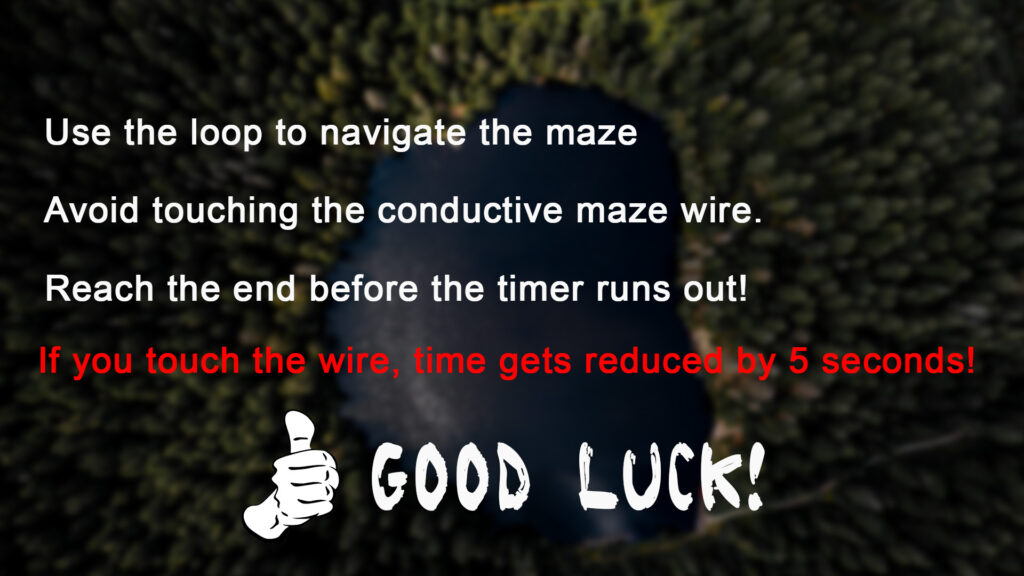
  • The key mechanic—reducing the timer by 5 seconds when the wire is touched—was unclear to users. This detail was missing from the instructions, which many users tended to skip.
  • Initially, I left this aspect as part of the game’s “discoverability,” where players would learn the rules by playing. However, based on feedback, I made this mechanic more explicit to avoid unnecessary confusion. The following image shows the changes I made to ensure users understood the game instructions:

What Worked Well

  • The core mechanics, including the timer countdown and the win/loss conditions, functioned as intended.
  • The navigation system, with options for instructions and gameplay, was clear and easy to use.
  • The visual appeal of the game effectively drew users’ attention, and the inclusion of the “gold handle” added a premium feel to the design.

Areas for Improvement

  1. Instructions:
    • Many users skipped the instructions page, leading to confusion about certain game rules. Adding more visual and interactive cues to emphasize key mechanics (like the 5-second penalty for touching the wire) could help.
  2. Design:
    • While functional, the game’s visuals could be enhanced further to improve its overall polish and user experience.
  3. Preparation Countdown:
    • The 3-second countdown appeared as a glitch to users unfamiliar with its purpose. Better visual or auditory cues could make it clear that the countdown is intended to give players time to prepare.
  4. Safety Concerns:
    • Some users were hesitant to interact with the conductive handle, fearing they might get shocked. Adding a clear safety disclaimer in the instructions would address these concerns.


These insights, gathered during the first user test case, informed improvements in the game’s mechanics, design, and user experience. Although these seemed to be the challenges of the game, I strongly believe that it would not take away the experience of the game.

USER TESTIG – PROGRESS

PROGRESS:

Over the course of the project, I encountered several challenges, particularly with the hardware and data communication between the Arduino and p5.js. Initially, the score wasn’t sending correctly from the Arduino to p5.js. The issue was from the fact that the data being sent was triggered by every impact, causing the Arduino to send multiple data quickly, one after the other. This resulted in incomplete or overlapping data being received in p5.js.

To resolve this, I modified the Arduino code to send data in separate packets. It now sends only one score value per impact and ignores any other impacts until the restart button is pressed. This solution ensured that p5.js received clean and complete data, allowing the game to function as intended.

On the hardware side, securing the sensor to the punching bag was also tricky. The sensor kept shifting due to the force of punches, which required me to reattach it multiple times. I also had to redo the wiring and soldering to ensure the connections were stable and durable during testing. Another adjustment involved adding water to the punching bag base, which I had initially removed, as the bag became unstable during heavy use.

The overall p5.js sketch is now complete. It includes a functional title screen, instruction menu, and gameplay with features such as dynamic scoring, a fuel bar, and a restart button. I used an arcade font for all the text to maintain a cohesive theme, and the punching bag’s vibration and animation added a realistic touch to the game. The game also plays sound effects after each punch, adding to the immersive experience.

USER TESTING:

During user testing, the instructions were clear, and players easily understood how to start the game. However, one recurring issue was the instability of the punching bag due to the lack of water in the base. Once I added water, the problem was resolved, and users could play without interruptions.

Another key observation was the need to test the sensor with punches of varying strengths. Users with stronger punches sometimes triggered unexpected behaviors in the scoring system. This helped me fine-tune the sensitivity of the sensor, ensuring accurate calculations regardless of punch strength. I used AI assistance to determine the optimal sensitivity settings and a built-in math file in Arduino to calculate the results from the data.

Feedback from users also highlighted that the gameplay felt smooth, and they appreciated the arcade-like visual and audio elements. The scoring system and the gradual increase of the score display were well-received, as they mirrored the pacing of arcade games. Overall, the changes I implemented addressed the main issues, and the game is now ready for final polishing.

USER TESTING VIDEO

Week #13 – “To Gaze Is Not To See”, Final Project User Testing

Concept

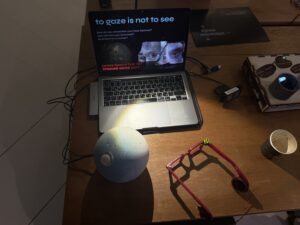
Throughout history glasses have developed from tool for eyesight that simply follows its function to a fashion piece that remains essential for people with poor vision. As a person who is prescribed to wear glasses, I am a big fan of the frame that I have, but I decide to wear contact lenses instead, since lenses for my glasses make my eyes seem small – at least this is what I notice a lot. Lenses for myopia and hyperopia, two most popular vision conditions, distort the look of eyes through the lenses by making them smaller or bigger, respectively. However, such changes of proportions are often noticed solely by those who wear glasses and not by others – we memorise our own face features and overlook such minor changes on the faces of others.

“To Gaze is Not To See” is an interactive artwork that invites the user to put on a pair of glasses to begin their experience. The frame is red, which is what allows the visuals to appear on the screen – when web camera detects red, the ornament is displayed. Unless the user puts on the glasses, they are unable to explore the work.

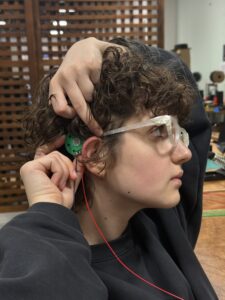
The glasses are equipped with two speakers located at the end of both temples, which are connected to Arduino to play sound. The chosen song is “Triangle/Gong/What” by Wolfgang Tillmans – I have decided to play it on loop to make the experience of the user more immersive and slightly disturbing due to the surreal flow of the melody. In order to attach the speakers, I have 3D modelled the glasses from scratch using Rhino, then printed them on Prusa printer, and then spray painted with the desired shade of red. Several prototypes were made and 6 pairs of glasses were printed in total, but only one was perfected and chosen for the showcase.

The electronic components were hidden in a 3d printed eyeball that featured an LED Arcade button as an iris – when it was pressed, the visuals on the screen changed from “myopia” mandala to “hyperopia” mandala. The difference between two ornaments was in the size of the eyes and their placement on the screen, creating a confusing and almost surreal imagery of changing projections of eyes.

Figure 1: testing the placement of speakers
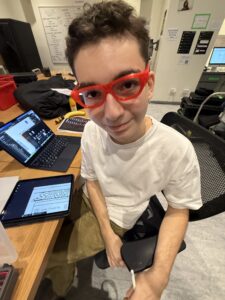
Figure 2: testing the first printed frame downloaded from outside
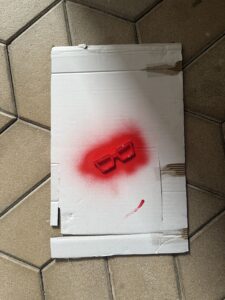
Figure 3: testing the frame modelled by me

Figure 4: spray painting the frame

User Interaction

During the showcase more than a dozen of people came up to my project to test it. Thanks to planning the setting in advance, I have managed to set up proper light conditions to make the image captured by the web camera more clear. However, due to the loud conversations and music around, it was difficult to hear the melody playing through the glasses, so I had to adjust the volume on the spot.

All people who experienced my work were very interested by the concept and surprised by the implementation, as they did not expect to see their own eyes on the screen displayed in real time. The problem behind the concept was relatable to all participants who also wear glasses, as they have agreed that they experience the same issue.

IMG_9653

Figure 5: User Interaction video

Figure 6: showcase setup

Sketch and code

GitHub Repository: https://github.com/am13870/FinalProjectIM

p5.js sketch:

What I am proud of

I was happy with my concept from the start, and I think I have managed to create a good representation of the experience I was intended to capture. The most challenging part was to connect the audio, as I was not simply using tones that would work directly with Arduino UNO, but decided to play an mp3 file with an actual song. I did not realise that I would have to use additional electronic components for this until the day before the showcase, since I was so involved into modelling of the glasses and perfecting the mandala ornament visuals. As such, I had to make urgent edits of the electronic scheme, adding an MP3 Playback Shield from Adafruit, exploring and testing the libraries that had to be added to my code, then adding an amplifier for the speakers, and finally soldering a connector from actual headphones to the speakers. Nonetheless, in the end I was satisfied with the quality of the audio, and I am very proud that I did not give up with the idea of including an mp3 file and have managed to do this.

Future improvements

While I am glad that I have managed to find and implement a proper library to work with eye tracking, I believe that the visual part could be improved even further in terms of quality of the image and variety and complexity of ornaments. I have tried to use an external web camera to extract video with a higher resolution, however, this made the sketch too heavy for my laptop to run correctly. I wish to develop this project further, as I have really enjoyed working on it and I plan to include it into my portfolio.


Final Project Proposal & Concept (from week 11 and 12)

Introduction (week 11)

Coming up with an idea for this project was a challenge. I struggled with creative block and external pressures, which delayed the process. After two weeks of reflection, I decided to revisit and expand on a concept from my midterm project.

In the midterm project, the idea was to guide the main character through a maze. The narrative was that the character (the player) journeys through the maze to finally meet their parents. However, the maze portion was not fully realized. For this project, I wanted to bring this maze concept to life using p5.js and Arduino.

This final project builds on that narrative and integrates digital and physical interaction, creating an engaging and immersive experience.

Game Design and Features (week 12)

Overview

The game combines p5.js visuals with Arduino-based physical interactivity. The player navigates a conductive wire maze using a loop object. The goal is to reach the end of the maze without touching the maze walls and within a set time limit. As a key design element, the maze design spells out the word “ROBINSON,” tying back to the narrative of the midterm project. More on this later.

Arduino Program

The following are the functionalities of the project:

Inputs:

  1. A0 (Touch Detection): Detects if the loop touches the maze wire.
    • Behavior: When a touch is detected, it sends a “Touch detected!” message to p5.js.
  2. A3 (Win Detection): Detects if the loop reaches the end of the maze.
    • Behavior: When contact is made, it sends “WIN” to p5.js.

Outputs:

  1. BUZZER_PIN (Buzzer): Plays a short tone when a touch is detected during gameplay.
    • Behavior: Activates only while the countdown timer is active.

The following is code snippets of how this is brought to life:

void loop() {
  int touchValue = digitalRead(TOUCH_PIN); // Check for touches
  int winValue = digitalRead(WIN_PIN);     // Check for win condition

  if (touchValue == HIGH) {
    tone(BUZZER_PIN, 1000); // Activate buzzer
    delay(100);
    noTone(BUZZER_PIN);
    Serial.println("Touch detected!"); // Notify p5.js
  }

  if (winValue == HIGH) {
    Serial.println("WIN"); // Notify p5.js of win
    delay(500);
  }

  delay(50); // Stability delay
}

p5.js Program

Inputs from Arduino:

  1. ‘Touch detection’
    • Deducts 5 seconds from the timer.
    • Triggers a red glow effect on the screen edges.
  2. ‘WIN’ detection
    • Displays a “You Won!” message with a fireworks animation.

Outputs to Arduino:

  1. START: Sent when the game begins, activating Arduino’s detection logic.
  2. STOP: Sent when the game ends, deactivating Arduino outputs.

Key Features:

  • Dynamic Timer Countdown: Starts a countdown when a timer button is selected, with a 3-second preparation countdown before the game begins.
  • Touch Feedback: Deducts time and triggers a glow effect when the maze walls are touched.
  • Win and Lose States: Celebrates a win with fireworks or displays a loss message if time runs out

the following are some key code snippets for how this would work:

function readSerial(data) {
  if (gameState === "playing") {
    const trimmedData = data.trim();

    if (trimmedData === "Touch detected!") {
      glowEffect = true;
      clearTimeout(glowTimer);
      glowTimer = setTimeout(() => (glowEffect = false), 100);
      timeLeft = Math.max(0, timeLeft - 5); // Deduct 5 seconds
    }

    if (trimmedData === "WIN" && timeLeft > 0) {
      clearInterval(timerInterval);
      writeSerial("STOP\n");
      gameState = "win"; // Transition to the win state
    }
  }
}

function startGame(time) {
  timeLeft = time;
  gameState = "countdown";
  let countdownTime = 3;

  let countdownInterval = setInterval(() => {
    countdownTime--;
    if (countdownTime <= 0) {
      clearInterval(countdownInterval);
      gameState = "playing";
      writeSerial("START\n");
      startTimer();
    }
  }, 1000);
}

Execution Process (progress)

Physical Setup

  1. Maze Design: The maze spells out “ROBINSON,” aligning with the narrative. This design adds a storytelling element to the game while providing a challenging maze path.
    • Material Used: Conductive wire shaped into the letters of “ROBINSON.”
    • Support Structure: Cut wood panels to create a stable base for the maze.
    • Process: Shaped the conductive wire carefully to form the letters and attached it to the wood base for durability and aesthetics.

the following image is an attempt made to spell the word mentioned above using conductive wire:

The following images show the progress of this project through wires, woodcutting and soldering:

soldering
Wood cutting. Special thanks to Nelson for helping me immensely with cutting this wood into shape.
Shaping the wire in the scene shop. Special thanks to Nelson and Michael Shilo for assisting me with finding the conductive materials to use for this project.

Wiring Schematic

  • A0: Connected to the loop object and configured with a pull-down resistor for touch detection.
  • A3: Configured for detecting contact at the maze endpoint.
  • BUZZER_PIN: Connected to a larger external buzzer to provide audible feedback during gameplay.

The following is the schematic used for this project:

The following schematic represents the connection for the Arduino circuit while also including the objects used to complete the circuit for the overall functioning of the game

This concludes the progress made for the maze program. After completing this progress, this is when I came up with the name for it: The Robinson Maze.