Week 11 Assignment | Serial Communication Exercise 1-3

Example 1 – Arduino to p5 communication

IMG_3382

P5 code

let X = 0; // ellipse x position


function setup() {
  createCanvas(400, 400); 
}

function draw() {
  background(240); 

  fill('rgb(134,126,126)'); 
  ellipse(X, height/2, 80); 
}

function keyPressed() {
  if (key === " ") {
    setUpSerial(); // Start the serial connection on space bar press
  }
}

// Processes incoming data from Arduino
function readSerial(data) {
  if (data != null) {
    let fromArduino = split(trim(data), ","); // Split incoming data by commas

    if (fromArduino.length >= 1) {
      // Process the first value for X position
      let potValue = int(fromArduino[0]); // Convert string to integer
      X = map(potValue, 0, 1023, 50, width - 50); // Map potentiometer value to X position
      Y = height / 2; // Keep Y position constant
    }
  }
}

Arduino code

void setup() {
  Serial.begin(9600); //  serial communication
}

void loop() {
  int potValue = analogRead(A0); // potentiometer value
  Serial.println(potValue);     // send the value to the serial port
  delay(10);                   
}

Example 2 – P5 to Arduino Communication


p5 code

let brightness = 0; // Brightness value to send to Arduino

function setup() {
  createCanvas(640, 480);
  textSize(18);
}

function draw() {
  background(255);

  if (!serialActive) {
    // If serial is not active display instruction
    text("Press Space Bar to select Serial Port", 20, 30);
  } else {
    // If serial is active, display connection status and brightness value
    text("Connected", 20, 30);
    text('Brightness = ' + str(brightness), 20, 50);
  }

  // Map the mouseX position (0 to width) to brightness (0 to 255)
  brightness = map(mouseX, 0, width, 0, 255);
  brightness = constrain(brightness, 0, 255); // Ensures brightness is within the range 0-255

  // Sends brightness value to Arduino
  sendToArduino(brightness);
}

function keyPressed() {
  if (key == " ") {
    // Start serial connection when the space bar is pressed
    setUpSerial();
  }
}


function readSerial(data) {
  if (data != null) {

  }
}
// We dont need this part of the code because we are not getting any value from the Arduino

// Send brightness value to Arduino
function sendToArduino(value) {
  if (serialActive) {
    let sendToArduino = int(value) + "\n"; // Convert brightness to an integer, add newline
    writeSerial(sendToArduino); // Send the value using the serial library
  }
}

Arduino code

void setup() {
  Serial.begin(9600); //  serial communication
}

void loop() {
  int potValue = analogRead(A0); // potentiometer value
  Serial.println(potValue);     // send the value to the serial port
  delay(10);                   
}

Example 3 – Bi-Directional Communication


p5 code

let velocity;
let gravity;
let position;
let acceleration;
let wind;
let drag = 0.99;
let mass = 50;


let windValue = 0; // Wind value from Arduino (light sensor)
let serialConnected = false; // Tracks if the serial port is selected

function setup() {
  createCanvas(640, 360);
  textSize(18); 
  noFill();

  position = createVector(width / 2, 0);
  velocity = createVector(0, 0);
  acceleration = createVector(0, 0);
  gravity = createVector(0, 0.5 * mass);
  wind = createVector(0, 0);
}

function draw() {
  background(255);

  if (!serialConnected) {
    // Show instructions to connect serial port
    textAlign(CENTER, CENTER);
    fill(0); // Black text
    text("Press Space Bar to select Serial Port", width / 2, height / 2);
    return; // Stop loop until the serial port is selected
  } else if (!serialActive) {
    // Show connection status while waiting for serial to activate
    textAlign(CENTER, CENTER);
    fill(0);
    text("Connecting to Serial Port...", width / 2, height / 2);
    return; // Stop until the serial connection is active
  } else {
    // display wind value and start the simulation if connected
    textAlign(LEFT, TOP);
    fill(0);
    text("Connected", 20, 30);
    text('Wind Value: ' + windValue, 20, 50);
  }

  // Apply forces to the ball
  applyForce(wind);
  applyForce(gravity);

  // Update motion
  velocity.add(acceleration);
  velocity.mult(drag);
  position.add(velocity);
  acceleration.mult(0);

  // Draw the ball
  ellipse(position.x, position.y, mass, mass);

  // Check for bounce
  if (position.y > height - mass / 2) {
    velocity.y *= -0.9; 
    position.y = height - mass / 2; // Keep the ball on top of the floor 

    // Sends signal to Arduino about the bounce
    sendBounceSignal();
  }

  // Update wind force based on Arduino input
  wind.x = map(windValue, 0, 1023, -1, 1); // Map sensor value to wind range
}

function applyForce(force) {
  let f = p5.Vector.div(force, mass);// Force divided by mass gives acceleration
  acceleration.add(f);
}

// Send a bounce signal to Arduino
function sendBounceSignal() {
  if (serialActive) {
    let sendToArduino = "1\n"; // Signal Arduino with "1" for a bounce
    writeSerial(sendToArduino);
  }
}

// incoming serial data from Arduino
function readSerial(data) {
  if (data != null) {
    windValue = int(trim(data)); // store the wind value
  }
}

// Press space bar to initialize serial connection
function keyPressed() {
  if (key == " ") {
    setUpSerial(); // Initialize the serial connection
    serialConnected = true; // Mark the serial port as selected
  }
}

// Callback when serial port is successfully opened
function serialOpened() {
  serialActive = true; // Mark the connection as active
}

Arduino code

const int ledPin = 9;  // Digital pin 9 connected to the LED
const int lightSensor = A0; // Analog input pin A0 for the light sensor

void setup() {
  Serial.begin(9600);      // Start serial communication
  pinMode(ledPin, OUTPUT); // Set LED pin as an output
}

void loop() {
  // Read the light sensor value
  int lightValue = analogRead(lightSensor);

  // Send the light value to p5.js
  Serial.println(lightValue);

  // Check for bounce signal (when ball touches the ground) from p5.js
  if (Serial.available() > 0) {
    int bounceSignal = Serial.parseInt();
    if (Serial.read() == '\n' && bounceSignal == 1) {
      // Turn on the LED briefly to indicate a bounce
      digitalWrite(ledPin, HIGH);
      delay(100);
      digitalWrite(ledPin, LOW);
    }
  }

  delay(50); // Small delay 
}


Final Project Idea

For my final project, I’m creating a music learning device to help kids read beginner music notes in a fun and interactive way. The device will have an LED button panel with nine buttons, each representing a specific musical note on the staff. These buttons will cover notes on both the lines and spaces, making it easy for kids to learn where each note is positioned.

I’ll start with a tutorial to introduce the notes, showing their names and positions on a staff while the matching LED button lights up. This way, kids can visually connect each note’s name with its place.

After the tutorial, there’s a gameplay mode to reinforce what they’ve learned. Notes will appear on a screen, and the player needs to press the corresponding LED button as fast as they can. They’ll earn points for correct answers and lose points for wrong ones, with the goal of getting as many points as possible in 90 seconds. This competitive element makes learning both challenging and enjoyable.

The device will use serial communication between an Arduino and p5.js. The Arduino will handle the LEDs and buttons, while p5.js will display notes on the screen and manage the game logic, like scoring and timing. This setup will create a smooth connection between what’s happening on screen and the physical buttons.

To make the learning even more immersive, there will be sounds for each note. A potentiometer will be included to allow the user to adjust the volume of the sound, giving them control over how loud or soft they want the feedback to be. When a button is pressed, the corresponding musical tone will play, helping kids connect the note visually.

Reading Response 8

In “Design Meets Disability,” the author talks about how design and disability come together in ways we don’t usually think about. He challenges the idea that things made for people with disabilities shouldn’t only be practical. Instead, they can be beautiful and a way for someone to express who they are. I found this really interesting, especially when the author compared eyeglasses, which are now a fashion accessory, with hearing aids, which are often hidden. It made me realize how much society’s views affect the way these tools are designed.

I really liked how the author said that designers should do more than just try to “fix” disabilities. They should make products that celebrate differences. It made me think about what good design really means. Shouldn’t it be about helping people feel empowered and giving them choices? For example, think about how wheelchairs have changed over time. Old wheelchairs were bulky and just focused on function. But now, there are wheelchairs that are lightweight, stylish, and customizable. They give people more than just mobility, they help them feel confident. This is exactly the kind of change the author is talking about.

Another example is prosthetic limbs. In the past, they were designed to blend in and look as “natural” as possible. But now, some prosthetics are colorful and artistic, or they look futuristic, like the bionic limbs. These designs are more than just tools, they let people show their personality and feel proud of what they’re wearing.

The book left me feeling hopeful about what could happen if more designers thought this way. Assistive devices could become something people actually want to use, not just something they need. Imagine a future where these devices are seen as an exciting part of someone’s personality, like how clothes or accessories are today.

Overall, I appreciated the author’s perspective. It added a lot to the conversation about inclusion and made me see how much potential there is in rethinking assistive design as something not just useful, but also appealing.

Assignment 9 – Serial Communication

Example 1 – Arduino to p5 communication

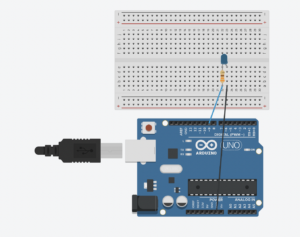
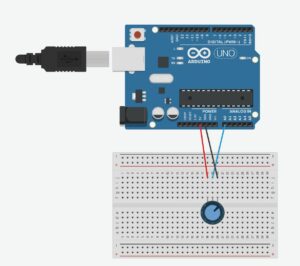
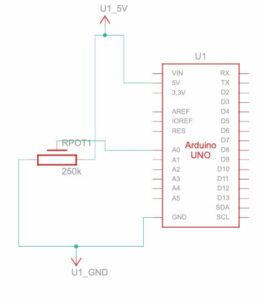
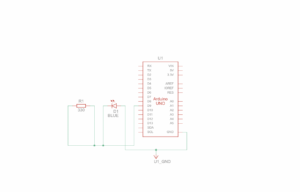
The potentiometer was used to control the horizontal axis of the ellipse.

Setup


Schematic

P5 code

let X = 0; // ellipse x position


function setup() {
  createCanvas(400, 400); 
}

function draw() {
  background(240); 

  fill('rgb(134,126,126)'); 
  ellipse(X, height/2, 80); 
}

function keyPressed() {
  if (key === " ") {
    setUpSerial(); // Start the serial connection on space bar press
  }
}

// Processes incoming data from Arduino
function readSerial(data) {
  if (data != null) {
    let fromArduino = split(trim(data), ","); // Split incoming data by commas

    if (fromArduino.length >= 1) {
      // Process the first value for X position
      let potValue = int(fromArduino[0]); // Convert string to integer
      X = map(potValue, 0, 1023, 50, width - 50); // Map potentiometer value to X position
      Y = height / 2; // Keep Y position constant
    }
  }
}

Arduino code

Github

Video

Example 2 – P5 to Arduino Communication

The horizontal position of the mouse detects the brightness of the LED.

Setup

Schematic

P5 code

let brightness = 0; // Brightness value to send to Arduino

function setup() {
  createCanvas(640, 480);
  textSize(18);
}

function draw() {
  background(255);

  if (!serialActive) {
    // If serial is not active display instruction
    text("Press Space Bar to select Serial Port", 20, 30);
  } else {
    // If serial is active, display connection status and brightness value
    text("Connected", 20, 30);
    text('Brightness = ' + str(brightness), 20, 50);
  }

  // Map the mouseX position (0 to width) to brightness (0 to 255)
  brightness = map(mouseX, 0, width, 0, 255);
  brightness = constrain(brightness, 0, 255); // Ensures brightness is within the range 0-255

  // Sends brightness value to Arduino
  sendToArduino(brightness);
}

function keyPressed() {
  if (key == " ") {
    // Start serial connection when the space bar is pressed
    setUpSerial();
  }
}


function readSerial(data) {
  if (data != null) {

  }
}
// We dont need this part of the code because we are not getting any value from the Arduino

// Send brightness value to Arduino
function sendToArduino(value) {
  if (serialActive) {
    let sendToArduino = int(value) + "\n"; // Convert brightness to an integer, add newline
    writeSerial(sendToArduino); // Send the value using the serial library
  }
}

Arduino Code

Github

Video

Example 3 – Bi-Directional Communication

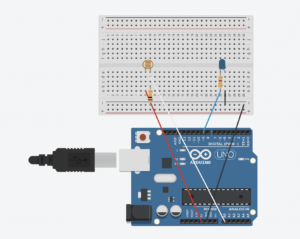
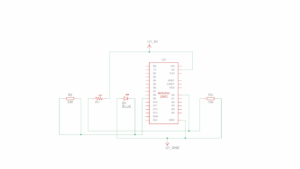
Every time the ball bounces and LED blinks, and the wind is controlled by the light sensor

Setup

Schematic

P5 Code

let velocity;
let gravity;
let position;
let acceleration;
let wind;
let drag = 0.99;
let mass = 50;


let windValue = 0; // Wind value from Arduino (light sensor)
let serialConnected = false; // Tracks if the serial port is selected

function setup() {
  createCanvas(640, 360);
  textSize(18); 
  noFill();

  position = createVector(width / 2, 0);
  velocity = createVector(0, 0);
  acceleration = createVector(0, 0);
  gravity = createVector(0, 0.5 * mass);
  wind = createVector(0, 0);
}

function draw() {
  background(255);

  if (!serialConnected) {
    // Show instructions to connect serial port
    textAlign(CENTER, CENTER);
    fill(0); // Black text
    text("Press Space Bar to select Serial Port", width / 2, height / 2);
    return; // Stop loop until the serial port is selected
  } else if (!serialActive) {
    // Show connection status while waiting for serial to activate
    textAlign(CENTER, CENTER);
    fill(0);
    text("Connecting to Serial Port...", width / 2, height / 2);
    return; // Stop until the serial connection is active
  } else {
    // display wind value and start the simulation if connected
    textAlign(LEFT, TOP);
    fill(0);
    text("Connected", 20, 30);
    text('Wind Value: ' + windValue, 20, 50);
  }

  // Apply forces to the ball
  applyForce(wind);
  applyForce(gravity);

  // Update motion
  velocity.add(acceleration);
  velocity.mult(drag);
  position.add(velocity);
  acceleration.mult(0);

  // Draw the ball
  ellipse(position.x, position.y, mass, mass);

  // Check for bounce
  if (position.y > height - mass / 2) {
    velocity.y *= -0.9; 
    position.y = height - mass / 2; // Keep the ball on top of the floor 

    // Sends signal to Arduino about the bounce
    sendBounceSignal();
  }

  // Update wind force based on Arduino input
  wind.x = map(windValue, 0, 1023, -1, 1); // Map sensor value to wind range
}

function applyForce(force) {
  let f = p5.Vector.div(force, mass);// Force divided by mass gives acceleration
  acceleration.add(f);
}

// Send a bounce signal to Arduino
function sendBounceSignal() {
  if (serialActive) {
    let sendToArduino = "1\n"; // Signal Arduino with "1" for a bounce
    writeSerial(sendToArduino);
  }
}

// incoming serial data from Arduino
function readSerial(data) {
  if (data != null) {
    windValue = int(trim(data)); // store the wind value
  }
}

// Press space bar to initialize serial connection
function keyPressed() {
  if (key == " ") {
    setUpSerial(); // Initialize the serial connection
    serialConnected = true; // Mark the serial port as selected
  }
}

// Callback when serial port is successfully opened
function serialOpened() {
  serialActive = true; // Mark the connection as active
}

Arduino Code

Github

Video

Week 11 | Reading Response

The reading explains how good design transcends functionality. The transition from medical necessity to mainstream artistry shows how constraints can drive innovation. It challenges the assumption that advances flow only from mainstream to niche needs, showing that disability inspired innovations can enrich and transform general design.

Aimee Mullins’s carved wooden legs is an example of how disability can be used as a unique and artistic expression. Mullins’s prosthetic legs are not just functional but also works of art, showcasing intricate carvings and unique designs that celebrate individuality rather than hiding difference. This approach challenges the traditional narrative of discretion in assistive devices, turning them into tools for personal empowerment and storytelling. It blends function with artistry creating meaningful user experiences. Just as Mullins’s legs redefine prosthetics as wearable art, I think it’s amazing to create projects that invite users to see technology as not just practical but as an extension of self expression and creativity.

The reading presents a compelling argument for balancing functionality and artistic expression in design, particularly in the context of disability. I agree with most of the points made especially the idea that design should aim to empower users and reduce stigma. However, I question the extent to which simplicity is always the best approach in inclusive design. I always believe less is more, but while minimalism can enhance cognitive accessibility, it may not always meet the diverse needs of users. In some cases, a more complex design with customizable features could provide greater flexibility and inclusivity, especially for users with varying preferences or conditions, like the color changing display or text size change on the iPhone, for those who have vision problems. 

Final Project Concept

While thinking about my Final Project, I decided that I want to do either something useful or something connected to art/music. Thus, I so far have two ideas that I will be deciding between during the upcoming week.

1) Useful – Morse Code (or anything similar) translator. I will create the physical device that will take the input as a Morse Code (dashes and dots by pressing the button long or short period of time), and then translate it to the words on the screen of p5.js. At the same time, the person will be able to type the text on the laptop and it will be played as a sound on the p5.js.

2) Art/Music – I want to combine those two terms by expanding on the usage of the sensors. I want to connect a bunch of distance/light sensors and let the user control the music and the drawings on the canvas of p5.js. Just like with the assignment where we played the Jingle Bells song, I will use the sensors to speed up the music, change its tone of, and also add sounds on top of the song that is playing to allow a user to create the music. At the same time, it will also be reflected on the canvas as a unique kind of art. This is a very ambitious project that I am not 100% sure how to accomplish, but I will do my best to think about it during the week.

Final Project Idea

Project Title:

Traffic Light Control Game


Overview:

The Traffic Light Control Game is an interactive simulation where a car on the p5.js screen reacts to traffic light LEDs controlled by an Arduino Uno. Players use keyboard arrow keys to control the car’s movement, adhering to basic traffic light rules:

  • Red LED: Stop the car.
  • Green LED: Move the car.
  • Yellow LED: Serves as a warning with no required interaction.

The game emphasizes real-time interaction between physical components and digital visuals, showcasing the integration of hardware and software.


Key Features:

  1. Traffic Light Simulation:
    • Red, yellow, and green LEDs simulate a real-world traffic light.
    • The lights change sequentially in predefined intervals.
  2. Interactive Car Movement:
    • Players use arrow keys to control the car:
      • Up Arrow: Move forward.
      • Down Arrow: Stop the car.
    • The car’s behavior must match the traffic light signals.
  3. Real-Time Feedback:
    • If the car moves during a red light or stops during a green light, a buzzer sounds to indicate a violation.
  4. Game Over:
    • If repeated violations occur, the game ends with a “Game Over” screen.

Objective:

The goal is to follow traffic light rules accurately and avoid violations. The game offers an educational yet engaging experience, simulating real-world traffic scenarios.


Technical Components:

Hardware:
  1. Arduino Uno:
    • Controls traffic light LEDs and buzzer.
  2. 3 LEDs:
    • Represent traffic lights (red, yellow, green).
  3. Buzzer:
    • Provides auditory feedback for rule violations.
  4. Resistors:
    • Ensure proper current flow for LEDs and buzzer.
  5. Breadboard and Wires:
    • Connect and organize the components.
Software:
  1. Arduino IDE:
    • Manages traffic light logic and sends the light states to p5.js via serial communication.
  2. p5.js:
    • Displays the car and road.
    • Handles player input and real-time car behavior based on the light states.

Implementation Plan:

1. Traffic Light Control:
  • The Arduino controls the sequence of LEDs:
    • Green for 5 seconds.
    • Yellow for 3 seconds.
    • Red for 5 seconds.
  • The current light state is sent to p5.js via serial communication.
2. Car Movement:
  • The p5.js canvas displays:
    • A road with a car.
    • The current traffic light state using on-screen indicators.
  • Arrow keys control the car’s position:
    • Right Arrow: Move forward.
    • Up Arrow: Stop.
3. Feedback System:
  • If the car moves during a red light or doesn’t move during a green light:
    • A buzzer sounds via Arduino.
    • Violations are logged, and after three violations, the game ends with a “Game Over” message.

Expected Outcome:

  • Players will interact with a dynamic simulation where their actions on the keyboard directly correspond to the car’s behavior.
  • The integration of physical LEDs and buzzer with digital visuals will create a seamless interactive experience.
  • The project demonstrates a clear understanding of hardware-software integration and real-time interaction design.

Extensions (STILL THINKING ABOUT IT):

  1. Scoring System:
    • Reward correct responses with points.
  2. Dynamic Difficulty:
    • Reduce light duration intervals as the game progresses.
  3. Enhanced Visuals:
    • Add animations for the car (e.g., smooth movement, brake effects).


Week 11: Final Project Proposal

First Idea

My first Idea was to develop an interactive game called “Connect Four.” The game  involves two (or one player vs the computer)  taking turns dropping coins into a 7×6 grid displayed in p5.js. Each player is assigned a color—red or blue—and the goal is to be the first to connect four coins in a row, column, or diagonal or the grid is full resulting into a tie. My design will combine physical interaction with a  hardware that allows players to select columns and insert coins. Then whole grid display will be shown in the P5.js in real time.

I hope to develop two modes :

1.Two-Player Mode: In this mode, two players alternate turns, dropping coins into the grid to win against their opponent.

2. Single-Player Mode (vs. Computer): In this mode, the player competes against the computer that follows either of two approaches one being for easy and one for difficult play to accommodate different skill levels.

I hope that the physical  interaction adds a unique experience and the game nature makes it competitive and fun.

Second Idea

I am hoping to develop an interactive game called “NYUAD Puzzle Adventure.” The game involves solving digital jigsaw puzzles displayed in p5.js sketch, controlled entirely through user input on the hardware. Players will use two adjustable controllers (potentiometers) to move puzzle pieces, one controlling horizontal movement and the other controlling vertical movement. A slide button will be used to select and lift a piece or release it into the desired position on the board.

The game will feature images of the NYU Abu Dhabi campus, and a timer will track how long players take to complete each puzzle. To make the game even more interactive, I will use hidden motors to provide physical feedback like vibrations whenever players move pieces and whenever the Game is solved correctly. 

Whenever the game is completed and the player manages to solve the puzzle setting a new record in the shortest time possible the wooden box controlled will open to reveal an NYU Abu Dhabi inspired gift to the player.

I hope that with this design:

Players’ interaction with the puzzle through adjustable controls and physical feedback makes the game more engaging.

The storytelling nature of the puzzle, by using NYUAD images, and the rewarding mechanism will make it fun and relevant to players.

Final Project Idea

Sometimes, all we need is a long hug to help us recover from a long day. So, why not be able to hug a responsive cute fuzzy teddy bear?

The idea for my final project is still pretty rough, but I want to make something that is cute and wholesome that can also help promote well-being as final season is approaching. I was thinking of a teddy bear with a pressure sensor that activates LEDs that form a heart shape when the user hugs it. Maybe I could also figure out getting it to output randomized sounds for each hug, such as “That made my day!” “Aww thanks!” “Cozy!” Etc.. The P5 screen could animate a corresponding background for the teddy bear in awe, such as a bunch of hearts growing in size or cheerful floating bubbles. In the end, I just want to create something that will make users feel loved and appreciated, even if it’s just a little teddy bear

For a back up idea, that’s actually quite ambitious, I thought I could make a fake robot pet that’s always grumpy and will turn around and move away from you when you come close to it unless you have a hot treat for it. I think think the hot treat part might be a bit hard to accomplish, because warm cookies aren’t super hot and I haven’t used a temperature sensor yet, so I don’t know how sensitive it is

Final project concept

Concept

For my final project, I plan to create a game using Arduino and P5js. This game will allow user to use physical components (boxes, figures) in real life to control the game happening on the computer.

Particularly, I want to create a platformer game where player can alter the platforms or the obstacles. The physical components will include some card board boxes that looks like the platforms on the computer. When player moves these boxes or obstacles, the platforms on computer will also move. Based on this mechanism, I will design a few levels of puzzle for the player. The goal of the game is to move the boxes around so that the game character on the computer can get from one point to another.

An introductory or example of this game can be moving the boxes (2 different platforms) so that the game character can jump across.