Week 10 – Echoes of Light

Concept

Our project, Ibrahim and I, “Echoes of Light,” emerged from a shared interest in using technology to create expressive, interactive experiences. Inspired by the way sound changes with distance, we aimed to build a musical instrument that would react naturally to light and proximity. By combining a photoresistor and distance sensor, we crafted an instrument that lets users shape sound through simple gestures, turning basic interactions into an engaging sound experience. This project was not only a creative exploration but also a chance for us to refine our Arduino skills together.

Materials Used

  • Arduino Uno R3
  • Photoresistor: Adjusts volume based on light levels.
  • Ultrasonic Distance Sensor (HC-SR04): Modifies pitch according to distance from an object.
  • Piezo Buzzer/Speaker: Outputs the sound with controlled pitch and volume.
  • LED: Provides an adjustable light source for the photoresistor.
  • Switch: Toggles the LED light on and off.
  • Resistors: For the photoresistor and LED setup.
  • Breadboard and Jumper Wires

    Code

The code was designed to control volume and pitch through the analog and digital inputs from the photoresistor and ultrasonic sensor. The complete code, as documented in the previous sections, includes clear mappings and debugging lines for easy tracking.

// Define pins for the components
const int trigPin = 5;               // Trigger pin for distance sensor
const int echoPin = 6;              // Echo pin for distance sensor
const int speakerPin = 10;           // Speaker PWM pin (must be a PWM pin for volume control)
const int ledPin = 2;                // LED pin
const int switchPin = 3;             // Switch pin
const int photoResistorPin = A0;     // Photoresistor analog pin

// Variables for storing sensor values
int photoResistorValue = 0;
long duration;
int distance;

void setup() {
  Serial.begin(9600);                // Initialize serial communication for debugging
  pinMode(trigPin, OUTPUT);          // Set trigger pin as output
  pinMode(echoPin, INPUT);           // Set echo pin as input
  pinMode(speakerPin, OUTPUT);       // Set speaker pin as output (PWM)
  pinMode(ledPin, OUTPUT);           // Set LED pin as output
  pinMode(switchPin, INPUT_PULLUP);  // Set switch pin as input with pull-up resistor
}

void loop() {
  // Check if switch is pressed to toggle LED
  if (digitalRead(switchPin) == LOW) {
    digitalWrite(ledPin, HIGH);      // Turn LED on
  } else {
    digitalWrite(ledPin, LOW);       // Turn LED off
  }

  // Read photoresistor value to adjust volume
  photoResistorValue = analogRead(photoResistorPin);
  
  // Map photoresistor value to a range for volume control (0-255 for PWM)
  // Higher light level (LED on) -> lower photoresistor reading -> higher volume
  int volume = map(photoResistorValue, 1023, 0, 0, 255); // Adjust mapping for your setup

  // Measure distance using the ultrasonic sensor
  digitalWrite(trigPin, LOW);
  delayMicroseconds(2);
  digitalWrite(trigPin, HIGH);
  delayMicroseconds(10);
  digitalWrite(trigPin, LOW);
  
  duration = pulseIn(echoPin, HIGH);
  
  // Calculate distance in cm
  distance = duration * 0.034 / 2;

  // Set frequency based on distance in the range of 2-30 cm
  int frequency = 0;
  if (distance >= 2 && distance <= 30) {
    frequency = map(distance, 1, 100, 20000, 2000); // Closer = higher pitch, farther = lower pitch
    tone(speakerPin, frequency);
    analogWrite(speakerPin, volume);  // Apply the volume based on photoresistor reading
  } else {
    noTone(speakerPin);  // Silence the speaker if the distance is out of range
  }

  // Debugging output
  Serial.print("Photoresistor: ");
  Serial.print(photoResistorValue);
  Serial.print("\tVolume: ");
  Serial.print(volume);
  Serial.print("\tDistance: ");
  Serial.print(distance);
  Serial.print(" cm\tFrequency: ");
  Serial.println(frequency);

  delay(100); // Short delay for sensor readings
}

Video Demonstration

In our video demonstration, we showcase how the instrument responds to changes in light and proximity. We toggle the LED to adjust volume and move a hand closer or farther from the ultrasonic sensor to change pitch, demonstrating the instrument’s sensitivity and interactive potential.

Week10

Reflections

The project successfully combines multiple sensors to create a reactive sound device. The integration of volume and pitch control allows for intuitive, responsive sound modulation, achieving our goal of designing an engaging, interactive instrument.

Improvements:
To improve this instrument, we would enhance the melody range, creating a more refined and versatile sound experience. This could involve using additional sensors or more sophisticated sound generation methods to provide a broader tonal range and a richer melody.

Week 10: Musical Instrument

Concept

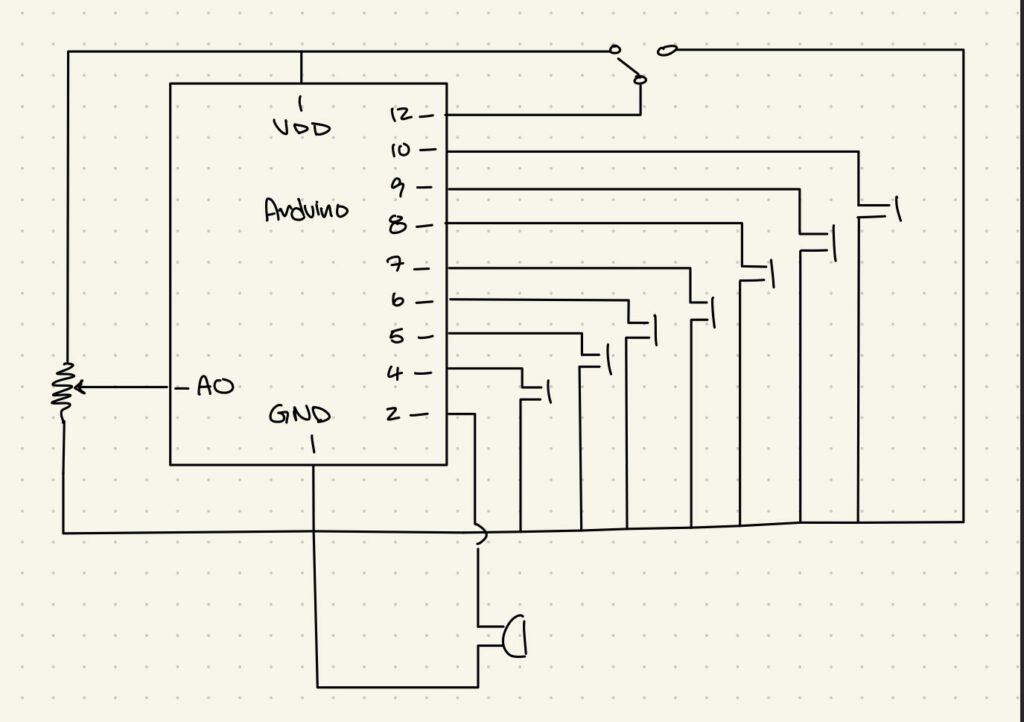
For this week’s assignment we spent a lot of time brainstorming ideas and developing different components of the instrument. Originally, we considered a light sensor activated lullaby machine (at night it plays a lullaby and an alarm in the morning) but weren’t sure if that actually constituted an instrument. Therefore, we decided to keep it more straightforward with an electric keyboard design that you can adjust the speed or “consistency” of the notes playing.

Materials
  • Arduino Uno
  • Jumper wires
  • 7 button switches
  • Speaker
  • SPST Switch
  • Potentiometer
Schematic

Design

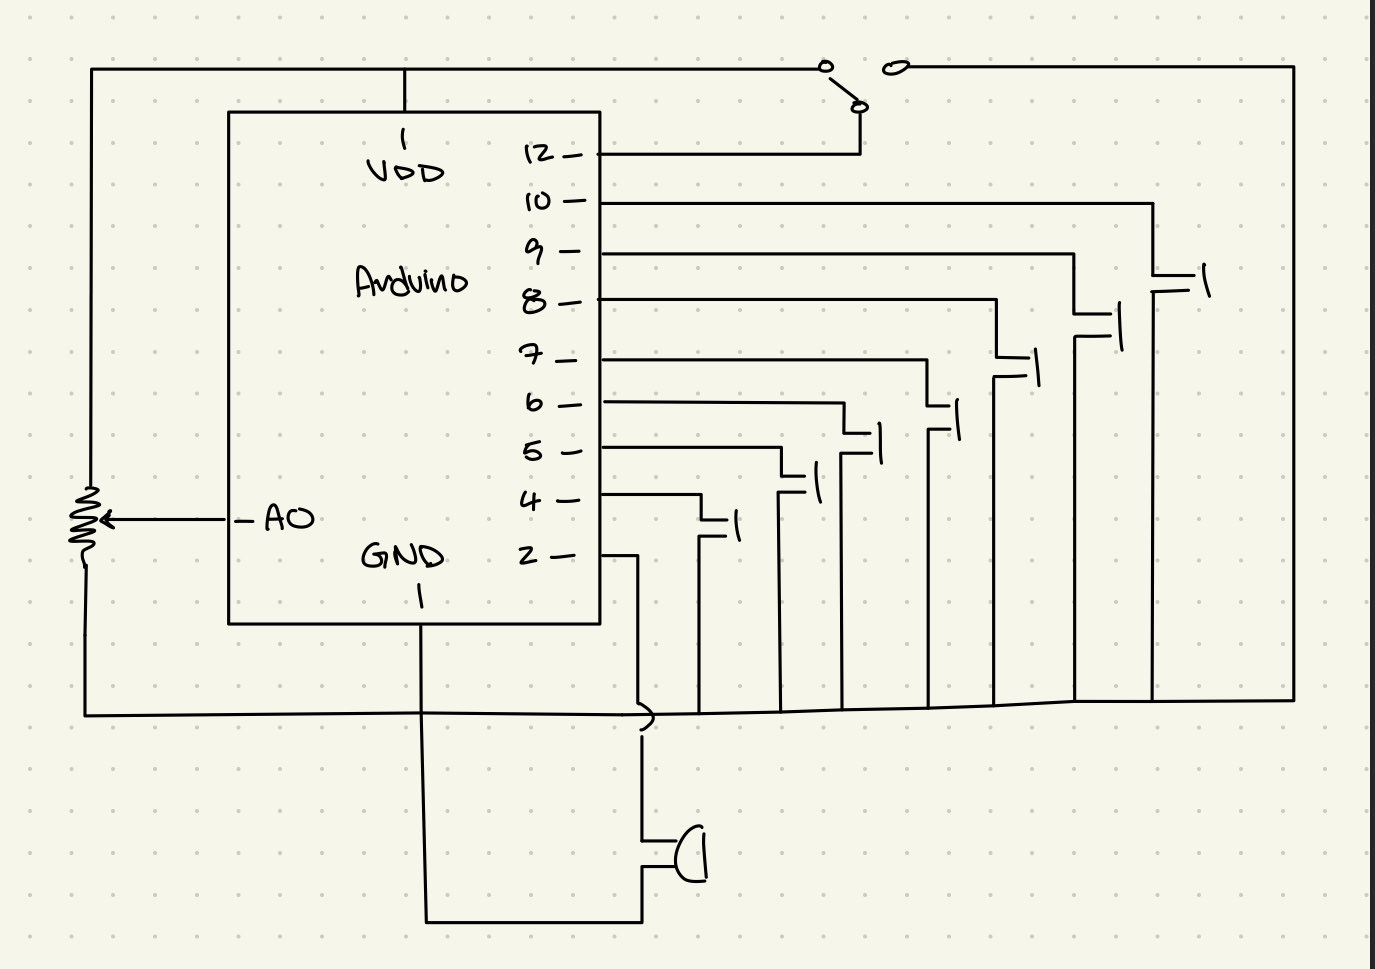
This project’s two main components are 7 buttons to play the notes and a potentiometer to control the speed of the notes playing. The green button to the left (closest to our potentiometer) represents middle C and then each button plays the consecutive note going up that scale. In our design, we also implemented a an SPST switch to control whether or not you could play anything on it, with the intention of mimicking an electric keyboard’s power button. A unique component to our design is the fact that we used both of our Arduino breadboards in order to better organize and manage the aesthetics of the design. Additionally, by still using one actual Arduino Uno we were able to avoid any complications with synching the information which was convenient in terms of time efficiency.

On the implementation side our biggest challenge was getting the volume to change with the adjustments of the potentiometer. After a bit of troubleshooting and heading back to the drawing board we decided to switch our original play and allow the potentiometer to control the speed of the notes. We intended to recycle as much code as we could from class and ultimately ended up use components from both Arduino’s tone() and button example codes that were reviewed in class. After switching between trying to change the pitch, speed, and volume of the notes with the potentiometer we decided on speed simply because we felt that the other adjustments weren’t noticeable enough for our intended purpose.

Code
#include "pitches.h"
 
// button pins
const int B_key = 4; 
const int A_key = 5;
const int G_key = 6; 
const int F_key = 7;
const int E_key = 8;
const int D_key = 9; 
const int C_key = 10; 
 
const int SWITCH_PIN = 12;  // switch pin
const int BUZZER_PIN = 2; // buzzer pin
const int POT_PIN = A0; // potentiometer pin 
 
// notes
int melody[] = {
  NOTE_B5, NOTE_A5, NOTE_G4, NOTE_F4, NOTE_E4, NOTE_D4, NOTE_C4
};
 
// Array for button pins
int buttonPins[] = { A_key, B_key, C_key, D_key, E_key, F_key, G_key };
 
void setup() { // initalization of the buttons, buzzer, and switch pins 
  for (int i = 0; i < 7; i++) {
    pinMode(buttonPins[i], INPUT_PULLUP); // sets button pins as inputs with internal pull-up resistors
  }
 
  pinMode(BUZZER_PIN, OUTPUT); // sets the buzzer pin as an output
  pinMode(SWITCH_PIN, INPUT_PULLUP);  // sets switch as inputs with internatinoal pull-up resistors
}
 
void loop() {
  int switchState = digitalRead(SWITCH_PIN);    // reads the state of the switch
  int potValue = analogRead(POT_PIN);   // reads the potentiometer value (0-1023)
 
  int speedDelay = map(potValue, 0, 1023, 50, 500);  // maps potentiometer value to speed delay range (50-500 ms)
 
  // if the switch is HIGH the button functionality is enabled
  if (switchState == HIGH) {
    // continously checks each button state
    for (int i = 0; i < 7; i++) {
      int buttonState = digitalRead(buttonPins[i]);
        
      // if the button is pressed,  play the corresponding note
      if (buttonState == LOW) {
        tone(BUZZER_PIN, melody[i], 200); // play note for 200ms
        delay(speedDelay); // speed delay based on the position/ value of the potentiometer 
      }
    }
  }
  delay(50);
}


Final Project music.mov – Google Drive

Conclusion and Reflection

All in all, we are both rather pleased with the outcome of this weeks assignment. With it being our first assignment working with another person, it was an interesting opportunity to compare techniques in regards to simpler things like breadboard organization or schematic design preferences. We were able to use both of our strengths in different ways and support each other in areas that we were weaker. In terms of future developments we had a few smaller ideas such as adding LEDs to correspond with the keys, or allowing the user to control the pitch of the notes. Looking at the bigger picture, we even discussed what it would look like to allow the user to choose what kind of electric keyboard sounds they wanted to play (going beyond the use of the speakers we have). Although our project is rather simple, we were truly tested when it came to debugging our code but really appreciated the experience of going at it together.

Week 10 Reading Response

In the article A Brief Rant on the Future of Interaction Design, Bret Victor critiques the current state of interactive design by highlighting our reliance on “pictures under glass” aka electronic technology using screens. He argues that they over usage of them limits the way we interact with the digital world. Victor argues that by only using our fingers to complete so many different tasks, we lack the tactile experience. An ultimately cut ourselves short of the full potential of our hands, which are intended for so much more complex and creative things. Furthermore, he envisions a future where technology engages all of our senses and thus, feels more real, bridging the gap between our physical existence and digital experience. His perspective is interesting to me because it sheds light on how we as a society are not reaching our full potential, making us creatively lazy.  I also really enjoyed his argument because it made me think of the show Black mirror, which critiques society in a similar manner and provides dystopian snapshots of what we may be on track to become.

The second article is an additional piece providing reflection on what the audience thought and Victor’s responses to that. I particularly enjoyed this section because it posed a lot of interesting opinions and arguments that I, myself thought of and agreed with while reading both articles. All in all, I think this gave an unique look at how we must balance the present of technology in interactive media and design. It is a tool with endless capabilities but we cannot let the excitement of the unknown limit us from the potential of what we still can grow. I hope to apply these principals in my design process as I find ways to combine modern and innovative technology with traditional and reliable physical experiences.

Week 10: Musical Instrument

Concept 

For this week’s assignment we spent a lot of time brainstorming ideas and developing different components of the instrument. Originally, we considered a light sensor activated lullaby machine (at night it plays a lullaby and an alarm in the morning) but weren’t sure if that actually constituted an instrument. Therefore, we decided to keep it more straightforward with an electric keyboard design that you can adjust the speed or “consistency” of the notes playing.

Materials

  • Arduino Uno
  • Jumper wires
  • 7 button switches
  • Speaker
  • SPST Switch
  • Potentiometer

Schematic

Design 

This project’s two main components are 7 buttons to play the notes and a potentiometer to control the speed of the notes playing. The green button to the left (closest to our potentiometer) represents middle C and then each button plays the consecutive note going up that scale. In our design, we also implemented a an SPST switch to control whether or not you could play anything on it, with the intention of mimicking an electric keyboard’s power button. A unique component to our design is the fact that we used both of our Arduino breadboards in order to better organize and manage the aesthetics of the design. Additionally, by still using one actual Arduino Uno we were able to avoid any complications with synching the information which was convenient in terms of time efficiency.

On the implementation side our biggest challenge was getting the volume to change with the adjustments of the potentiometer. After a bit of troubleshooting and heading back to the drawing board we decided to switch our original play and allow the potentiometer to control the speed of the notes. We intended to recycle as much code as we could from class and ultimately ended up use components from both Arduino’s tone() and button example codes that were reviewed in class. After switching between trying to change the pitch, speed, and volume of the notes with the potentiometer we decided on speed simply because we felt that the other adjustments weren’t noticeable enough for our intended purpose.

Code

#include "pitches.h"
 
// button pins
const int B_key = 4; 
const int A_key = 5;
const int G_key = 6; 
const int F_key = 7;
const int E_key = 8;
const int D_key = 9; 
const int C_key = 10; 
 
const int SWITCH_PIN = 12;  // switch pin
const int BUZZER_PIN = 2; // buzzer pin
const int POT_PIN = A0; // potentiometer pin 
 
// notes
int melody[] = {
  NOTE_B5, NOTE_A5, NOTE_G4, NOTE_F4, NOTE_E4, NOTE_D4, NOTE_C4
};
 
// Array for button pins
int buttonPins[] = { A_key, B_key, C_key, D_key, E_key, F_key, G_key };
 
void setup() { // initalization of the buttons, buzzer, and switch pins 
  for (int i = 0; i < 7; i++) {
    pinMode(buttonPins[i], INPUT_PULLUP); // sets button pins as inputs with internal pull-up resistors
  }
 
  pinMode(BUZZER_PIN, OUTPUT); // sets the buzzer pin as an output
  pinMode(SWITCH_PIN, INPUT_PULLUP);  // sets switch as inputs with internatinoal pull-up resistors
}
 
void loop() {
  int switchState = digitalRead(SWITCH_PIN);    // reads the state of the switch
  int potValue = analogRead(POT_PIN);   // reads the potentiometer value (0-1023)
 
  int speedDelay = map(potValue, 0, 1023, 50, 500);  // maps potentiometer value to speed delay range (50-500 ms)
 
  // if the switch is HIGH the button functionality is enabled
  if (switchState == HIGH) {
    // continously checks each button state
    for (int i = 0; i < 7; i++) {
      int buttonState = digitalRead(buttonPins[i]);
        
      // if the button is pressed,  play the corresponding note
      if (buttonState == LOW) {
        tone(BUZZER_PIN, melody[i], 200); // play note for 200ms
        delay(speedDelay); // speed delay based on the position/ value of the potentiometer 
      }
    }
  }
  delay(50);
}

Final Project 

Conclusion and Reflection

All in all, we are both rather pleased with the outcome of this weeks assignment. With it being our first assignment working with another person, it was an interesting opportunity to compare techniques in regards to simpler things like breadboard organization or schematic design preferences. We were able to use both of our strengths in different ways and support each other in areas that we were weaker. In terms of future developments we had a few smaller ideas such as adding LEDs to correspond with the keys, or allowing the user to control the pitch of the notes. Looking at the bigger picture, we even discussed what it would look like to allow the user to choose what kind of electric keyboard sounds they wanted to play (going beyond the use of the speakers we have). Although our project is rather simple, we were truly tested when it came to debugging our code but really appreciated the experience of going at it together.

Reading Reflection – Week 10

I really enjoyed reading this article and the Q&A based on it. Watching the video from Microsoft, reminded me of watching the Iron Man movie when I was a kid. The moments of Tony Stark working on armor using super advanced 3D technologies always impressed me, and I imagined how, perhaps, I could do the same when I grew up. It is quite common to see widely published fiction movies, books, articles, etc. as an inspiration for future technologies. The other day I was watching the video of how some things depicted by authors or artists in the previous centuries were actually implemented in real life. Moreover, many of them are used every single day – take a plane, for example. At the same time, other products of our predecessors’ imagination have not yet been feasible. Time machines, teleports, and other stuff that we often consider out of our current range of scientific skills. I made this long introductory statement to come to the idea that not all the things that we foresee and, in many cases, ‘make up’ based on our perception of what could happen in the future, actually become true.

Going back to the video from Microsoft and the article by Bret Victor on it, I, personally, mostly agree with the main statements made by the author. First, while I would be highly impressed if one showed me this video when I was 10 years old, watching from the current perspective of the experienced technology user, I can surely say I would not like to live in such a world. I feel that it is incredibly over-interactive. Excess of a technology can often hurt the technology, and this is exactly the case. As Bret Victor mentioned, we already spend too much time using electronic devices (btw his article was published in 2011, and now we use gadgets much much more). If we create the whole world around us based on augmented reality, it will mess up our initial perception of life, as how I see it. I am currently kind of skeptical about augmented reality as a whole, but who knows, maybe in 20 years I will change my mind. Anyway, I resonate with the author on the part that the future described in the video is pretty far from ideal. We should not abandon our core activities and ‘natural’ interactions. Otherwise, it will not only distort our lifestyle but also, as scientifically proven, will make our brains less developed.

The only remark I would make is that as of now, I feel like neither voice control nor, as I have mentioned above, augmented reality can be perceived as an adequate substitute for the fingers and mouse control. Yes, thinking about the future of interactive technologies being solely dependent on our finger clicking and primitive hand movements is quite sad, but I guess we got so used to them that any quick transition would be extremely difficult and inconvenient. At the same time, innovations are happening extremely fast, and who knows, maybe a couple of decades from now we will adopt another method and will be using it every 5-10 minutes of our lives as we do with our phones.

Music Box; Penguin edition

Tinh and I going into this were slightly stuck on the creative idea first. However, during a brainstorm session, we came across a video of a ballerina music box – inspiring us to create something similar to this whilst sticking to the ‘instrument’ concept of the assignments. As we did not have a mini ballerina, I had a mini figurine nonetheless – a small penguin rubber (Basil Jr). Now that we had a figurine, we had to figure out how to implement the ‘instrument’ concept into this, as we did not want to make it into a passive music box.

Therefore, we decided we wanted to control the movement of the penguin with the instrument. We ended up deciding that buttons could be used as the method to control movement — we decided that each button would correspond to a note, and each note has a specific rotation. Originally, we wanted to use 8 buttons to correspond to the 8 notes, however, due to the limited space on our breadboard, we chose to stick with three – C,D,E.

This is our code:

#include <Servo.h>
#include "pitches.h"


const int photoPin = A0;        // Photoresistor analog pin
const int ledPin = 6;           // LED pin
const int buttonPins[] = {2, 3, 4};  // Button pins for sound triggers
const int photoThreshold = 100; // Threshold for photoresistor reading
const int speakerPin = 8;

Servo penguinServo;             // Create servo object
const int servoPin = 9;         // Servo pin

void setup() {
    // Initialize the photoresistor, LED, and buttons
    pinMode(ledPin, OUTPUT);
    for (int i = 0; i < 3; i++) {
        pinMode(buttonPins[i], INPUT_PULLUP);  // Using internal pull-up resistor
    }

    // Attach servo to pin
    penguinServo.attach(servoPin);

    Serial.begin(9600);  // For debugging if needed
}

void loop() {
    // Read the photoresistor value
    int photoValue = analogRead(photoPin);
    Serial.println(photoValue);

    // Control the LED based on photoresistor value
    if (photoValue < photoThreshold) {
        digitalWrite(ledPin, HIGH);  // Turn on LED if it's dark
    } else {
        digitalWrite(ledPin, LOW);   // Turn off LED otherwise
    }

    // Check each button 
    for (int i = 0; i < 3; i++) {
        if (digitalRead(buttonPins[i]) == LOW) { // Button pressed
            playPitch(i);
            movePenguin(i);  // Move penguin based on button pressed
        }
    }
}

// Function to move the penguin based on the button pressed
void movePenguin(int buttonIndex) {
    switch (buttonIndex) {
        case 0:
            penguinServo.write(0);   // Move penguin in one direction
            break;
        case 1:
            penguinServo.write(90);  // Move penguin to center
            break;
        case 2:
            penguinServo.write(180); // Move penguin in the other direction
            break;
    }
    delay(1000);  // Hold position for 1 second
    penguinServo.write(90);  // Return to center
}


void playPitch(int buttonIndex) {
    switch (buttonIndex) {
        case 0:
            tone(speakerPin, NOTE_C4, 300); // Play note C4
            break;
        case 1:
            tone(speakerPin, NOTE_D4, 300); // Play note D4
            break;
        case 2:
            tone(speakerPin, NOTE_E4, 300); // Play note E4
            break;
    }
    delay(300);
    noTone(speakerPin);
}


Week 10 | Reading Response

The author’s “Brief Rant on the Future of Interaction Design” and their follow-up response focuses on how much we lose by relying so heavily on touchscreens. I find their argument pretty convincing especially their critique of “Pictures Under Glass,” which, as they put it, restricts the real power of our hands. They back this up with simple but relatable examples, like the feel of turning a page or lifting a glass, where you can actually feel the weight, texture, and resistance. With touchscreens, on the other hand, all we get is this flat, “glassy” feeling, stripping away any real tactile feedback and creating a disconnect between our natural capabilities and the digital world.

In the follow-up response, the author clarifies that the original piece wasn’t meant to prescribe solutions. This distinction feels important because, often, when we discuss technological limitations we jump to solutions without fully understanding the problem. By reframing interaction design around human capabilities, the author challenges us to think about interfaces that go beyond visual appeal and engage more fully with our innate physical skills.  I agree with their argument that future interfaces should not only acknowledge but amplify these natural interactions rather than reduce them to simplified swipes and taps. I still think touch screens can be beneficial and can offer other tactile sensations and experiences. Just because it’s different doesn’t mean it’s less interactive. Take the example the author gives about turning a page; sure, turning a page on a flat screen isn’t exactly the same as flipping through a real book. But the way a digital page moves, the sound effect, the visual cues.  It still feels interactive and immersive in its own way. I don’t see one as being better than the other; they’re just different experiences that each bring something unique. 

Reading Reflection Week 10

A  Brief Rant on the Future of Interaction Design

Bret Victor’s article was both frustrating and inspiring to me. I had not realised how number I’d become to the limitations of  “Pictures Under Glass” which he argues that it is a compromised way to interact with technology. His words made me think of how I have often felt detached from my daily devices like my phone. The smooth, untouchable screens which might seem convenient deny me any real physical feedback making interactions feel shallow.

The article also made me think about what “innovation” really means. To me progress meant having the devices faster and sleeker but now I wonder whether this progress is moving us further from natural, embodied ways of knowing. It leaves me wondering how we can design technology that will genuinely respect and use our physicality. Technology that will feel like extensions of ourself than barriers. Another weird realisation is the fact that the more advanced our devices become, the less they seem to engage with what makes us fundamentally human.

Reading Reflection – Week #10

A Brief Rant on the Future of Interaction Design by Bret Victor

I usually feel very skeptical about videos, such as one that was presented by Microsoft on Productivity Future Vision. But, here are couple of points that I made on it:

  • I really liked how gamification in education was presented in the video, as it feels less daunting to study for children and they feel more integrated in real life.
  • It’s interesting that in all this digitalization, people still have to carry their suitcases physically, they have to wait in lines waiting for train and do other not so productive stuff. So, the video shows a reform in terms of digital devices solely. It’s a shallow vision of the future and our interaction.
  • In the video, I saw future life, which lost its colors, because the main color that you can see are blue, green, white and black. There is no vividness.
  • I didn’t recognize that so many devices convert what we can do to what we want to do.
  • Also, you don’t really think about hands being central point of interaction. Hands our main sensors.
  • Feedback from the objects that we are using usually is not verbal, but we can unconsciously feel things, especially if we remember or extensively use things. For example, I’m using a keyboard with arabic characters for writing in english, kazakh and russian languages, because my hands basically remember the location of each letter, which I’m not really aware of.
  • The Pictures Under Glass concept can be applied to kids games applications, where they play being a hairdresser and cutting someone’s hair.
  • After author of the article said it, I understood that the thing that seemed very strange to me about interactions shown in the video – they felt numb and senseless.
  • I found pictures with hands and objects they carry kind of powerful.
  • It occurred to me that dance as an activity can bring so much understanding about our daily interactions with our body, since we become more conscious about them.
  • I strongly resonated with Bret’s saying that most artistic and engineering projects can’t just be described.
  • I didn’t agree with one of the author’s points that if physical interactions should always be very informative and communicative, since I feel like in today’s interactions there is a lot of imagination employed by the users, hence physical may not be the only priority.
  • I liked that the author addressed comments in separate article, where he also discussed concept of finger blindness, which is really fascinating.

Reading Reflection 6

Thoughts on physical computing and how to do it:

Physical Computing’s Greatest hits and misses
Making Interactive Art: Set the Stage, Then Shut Up and Listen

In reading Physical Computing’s Greatest Hits and Misses and Making Interactive Art: Set the Stage, Then Shut Up and Listen, I got a sense that while physical computing has been around for a long time, the approach to creating interactive art has evolved. Rather than focusing on creating fixed meanings, artists are now encouraged to let meaning emerge through interaction, giving audiences more freedom in their interpretation.

From my own experiences visiting new media art installations in Paris and London, I’ve noticed that many installations still tend to be defined by the artist’s initial inspiration, which can limit the ways audiences experience them. One example is an installation I saw in the meditation room at the Museum of the Future. The setup involved placing your hands over a column that emitted vibrations, designed to create a relaxing, full-body sensation. However, instead of allowing us to engage directly with the sensations, an interpreter was there to tell us how to think and feel as we experienced it, even instructing us to close our eyes and envision a door. This guidance controlled our interpretation, making it harder to form a personal connection with the piece.

This experience reinforced what the readings suggest: interactive art is most impactful when artists “set the stage” but avoid overly directing the audience’s interpretation. By allowing viewers to find their own meaning in the experience, the connection to the art becomes more personal and engaging.