Final Video Demonstration can be found here: https://youtu.be/CTLXGrMEBxU

Exercise 1:
“make something that uses only one sensor on Arduino and makes the ellipse in p5 move on the horizontal axis, in the middle of the screen, and nothing on Arduino is controlled by p5”
The following code was utilized for this particular exercise:
let sensorValue = 0; // To store the sensor value from Arduino

function setup() {
  createCanvas(640, 480);
  textSize(18);
}

function draw() {
  background(220);

  if (!serialActive) {
    text("Press Space Bar to select Serial Port", 20, 30);
  } else {
    text("Connected", 20, 30);

    // Display the sensor value
    text('Sensor Value: ' + sensorValue, 20, 50);

    // Map the sensor value to the horizontal position of the ellipse
    let ellipseX = map(sensorValue, 0, 1023, 0, width);

    // Draw the ellipse in the middle of the canvas vertically
    fill(255, 0, 0);
    ellipse(ellipseX, height / 2, 50, 50);
  }
}

function keyPressed() {
  if (key == " ") {
    setUpSerial(); // Start the serial connection
  }
}

// This function is called by the web-serial library
function readSerial(data) {
  if (data != null) {
    let fromArduino = trim(data); // Trim any whitespace
    if (fromArduino !== "") {
      sensorValue = int(fromArduino); // Convert the sensor value to an integer
    }
  }
}
The following code was used in the Arduino IDE for this exercise:
// make something that uses only one sensor  on Arduino and makes the ellipse in p5 move on the horizontal axis,
// in the middle of the screen, and nothing on arduino is controlled by p5

int sensorPin = A0; // Single sensor connected to A0

void setup() {
  Serial.begin(9600);
}

void loop() {
  int sensorValue = analogRead(sensorPin); // Read sensor value
  Serial.println(sensorValue); // Send sensor value to p5.js
  delay(50); // Short delay for stability
}
Exercise 2:
“make something that controls the LED brightness from p5”
The following code was used to make this exercise come to fruition:
let brightness = 0; // Brightness value to send to Arduino

function setup() {
  createCanvas(640, 480);
  textSize(18);

  // Create a slider to control brightness
  slider = createSlider(0, 255, 0);
  slider.position(20, 50);
}

function draw() {
  background(220);

  if (!serialActive) {
    text("Press Space Bar to select Serial Port", 20, 30);
  } else {
    text("Connected", 20, 30);

    // Display brightness value
    text("Brightness: " + brightness, 20, 90);

    // Update brightness from the slider
    brightness = slider.value();

    // Send brightness to Arduino
    writeSerial(brightness + "\n");

  }
}

function keyPressed() {
  if (key == " ") {
    setUpSerial(); // Start the serial connection
  }
}

function readSerial(data) {
  if (data != null) {
    let fromArduino = trim(data); // Trim whitespace
    brightness = int(fromArduino); // Parse data into an integer
  }
}
The following Arduino code was used for this particular exercise:
//make something that controls the LED brightness from p5

int ledPin = 3;

void setup() {
  Serial.begin(9600);
  pinMode(ledPin, OUTPUT);
}

void loop() {
  if (Serial.available()) {
    int brightness = Serial.parseInt();
    if (Serial.read() == '\n') {
      brightness = constrain(brightness, 0, 255);
      analogWrite(ledPin, brightness);
      Serial.println(brightness); // Send brightness to p5.js
    }
  }
}
Exercise 3:
The following code is an alteration of professor Aaron Sherwood’s code which was used for this exercise:
let velocity;
let gravity;
let position;
let acceleration;
let wind;
let drag = 0.99;
let mass = 50;

let windSensorValue = 0; // Value from the wind sensor
let connectButton; // Button for connecting to the serial port

function setup() {
  createCanvas(640, 360);
  noFill();

  position = createVector(width / 2, 0); // Initial position of the ball
  velocity = createVector(0, 0); // Initial velocity
  acceleration = createVector(0, 0); // Initial acceleration
  gravity = createVector(0, 0.5 * mass); // Gravity force
  wind = createVector(0, 0); // Initial wind force

  // Create a button to initiate the serial connection
  connectButton = createButton("Connect to Serial");
  connectButton.position(10, 10);
  connectButton.mousePressed(setUpSerial); // Trigger serial connection on button press
}

function draw() {
  background(255);

  if (!serialActive) {
    text("Click 'Connect to Serial' to start", 20, 50);
    return; // Exit the draw loop until the serial connection is established
  }

  // Map wind sensor value to wind force (affects horizontal movement)
  wind.x = map(windSensorValue, 0, 1023, -1.5, 1.5); // Adjust force range as needed

  // Apply forces
  applyForce(wind); // Apply wind force
  applyForce(gravity); // Apply gravity force

  // Update velocity and position
  velocity.add(acceleration);
  velocity.mult(drag); // Apply drag (friction)
  position.add(velocity);
  acceleration.mult(0); // Reset acceleration

  // Ball bounce logic (vertical boundary)
  if (position.y > height - mass / 2) {
    position.y = height - mass / 2; // Place the ball on the ground
    velocity.y *= -0.9; // Reverse and dampen vertical velocity

    // Notify Arduino to toggle the LED when the ball touches the ground
    writeSerial("1\n"); // Send '1' to Arduino
  } else {
    // Ensure the LED is off when the ball is not touching the ground
    writeSerial("0\n"); // Send '0' to Arduino
  }

  // Draw the ball
  ellipse(position.x, position.y, mass, mass);
}

function applyForce(force) {
  // Newton's 2nd law: F = M * A -> A = F / M
  let f = p5.Vector.div(force, mass); // Scale force by mass
  acceleration.add(f); // Add force to acceleration
}

// Reset the ball to the top of the screen when the space key is pressed
function keyPressed() {
  if (key === " ") {
    position.set(width / 2, 0); // Reset position to top center
    velocity.set(0, 0); // Reset velocity to zero
    mass = random(15, 80); // Randomize mass
    gravity.set(0, 0.5 * mass); // Adjust gravity based on new mass
  }
}

// Serial communication: Read sensor value from Arduino
function readSerial(data) {
  if (data != null) {
    let trimmedData = trim(data);
    if (trimmedData !== "") {
      windSensorValue = int(trimmedData); // Read wind sensor value
    }
  }
}
The following code was used in the Arduino IDE to bring this to life:
//gravity wind example
int ledPin = 2;     // Pin connected to the LED
int windPin = A0;   // Analog pin for the potentiometer (A0)

void setup() {
  Serial.begin(9600);        // Start serial communication
  pinMode(ledPin, OUTPUT);   // Set the LED pin as an output
  digitalWrite(ledPin, LOW); // Turn the LED off initially
}

void loop() {
  // Read the analog value from the potentiometer
  int windValue = analogRead(windPin);

  // Send the wind value to p5.js over serial
  Serial.println(windValue);

  // Check if a signal is received from p5.js for the LED
  if (Serial.available()) {
    char command = Serial.read(); // Read the signal from p5.js
    if (command == '1') {
      digitalWrite(ledPin, HIGH); // Turn on the LED when the ball touches the ground
    } else if (command == '0') {
      digitalWrite(ledPin, LOW);  // Turn off the LED
    }
  }

  delay(5); // Small delay for stability
}
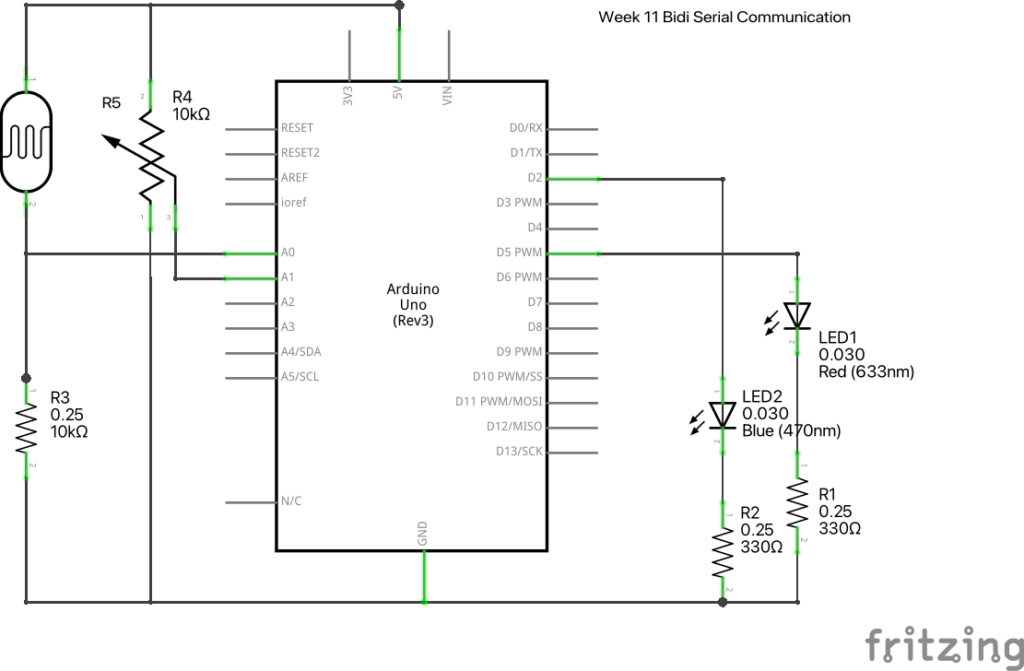
The following schematic was used for all 3 of the exercises with slight moderations, provided in class:

