Concept
For this week’s assignment we spent a lot of time brainstorming ideas and developing different components of the instrument. Originally, we considered a light sensor activated lullaby machine (at night it plays a lullaby and an alarm in the morning) but weren’t sure if that actually constituted an instrument. Therefore, we decided to keep it more straightforward with an electric keyboard design that you can adjust the speed or “consistency” of the notes playing.
Materials
- Arduino Uno
- Jumper wires
- 7 button switches
- Speaker
- SPST Switch
- Potentiometer
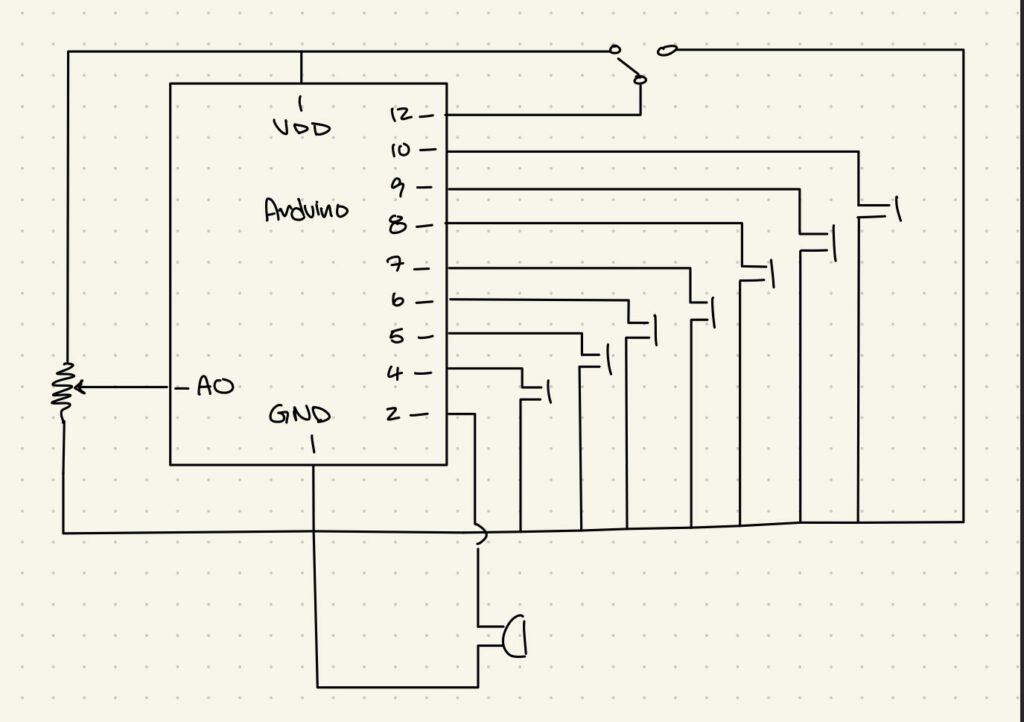
Schematic
Design
This project’s two main components are 7 buttons to play the notes and a potentiometer to control the speed of the notes playing. The green button to the left (closest to our potentiometer) represents middle C and then each button plays the consecutive note going up that scale. In our design, we also implemented a an SPST switch to control whether or not you could play anything on it, with the intention of mimicking an electric keyboard’s power button. A unique component to our design is the fact that we used both of our Arduino breadboards in order to better organize and manage the aesthetics of the design. Additionally, by still using one actual Arduino Uno we were able to avoid any complications with synching the information which was convenient in terms of time efficiency.
On the implementation side our biggest challenge was getting the volume to change with the adjustments of the potentiometer. After a bit of troubleshooting and heading back to the drawing board we decided to switch our original play and allow the potentiometer to control the speed of the notes. We intended to recycle as much code as we could from class and ultimately ended up use components from both Arduino’s tone() and button example codes that were reviewed in class. After switching between trying to change the pitch, speed, and volume of the notes with the potentiometer we decided on speed simply because we felt that the other adjustments weren’t noticeable enough for our intended purpose.
Code
#include "pitches.h"

// button pins
const int B_key = 4;
const int A_key = 5;
const int G_key = 6;
const int F_key = 7;
const int E_key = 8;
const int D_key = 9;
const int C_key = 10;

const int SWITCH_PIN = 12;  // switch pin
const int BUZZER_PIN = 2; // buzzer pin
const int POT_PIN = A0; // potentiometer pin

// notes
int melody[] = {
  NOTE_B5, NOTE_A5, NOTE_G4, NOTE_F4, NOTE_E4, NOTE_D4, NOTE_C4
};

// Array for button pins
int buttonPins[] = { A_key, B_key, C_key, D_key, E_key, F_key, G_key };

void setup() { // initalization of the buttons, buzzer, and switch pins
  for (int i = 0; i < 7; i++) {
    pinMode(buttonPins[i], INPUT_PULLUP); // sets button pins as inputs with internal pull-up resistors
  }

  pinMode(BUZZER_PIN, OUTPUT); // sets the buzzer pin as an output
  pinMode(SWITCH_PIN, INPUT_PULLUP);  // sets switch as inputs with internatinoal pull-up resistors
}

void loop() {
  int switchState = digitalRead(SWITCH_PIN);    // reads the state of the switch
  int potValue = analogRead(POT_PIN);   // reads the potentiometer value (0-1023)

  int speedDelay = map(potValue, 0, 1023, 50, 500);  // maps potentiometer value to speed delay range (50-500 ms)

  // if the switch is HIGH the button functionality is enabled
  if (switchState == HIGH) {
    // continously checks each button state
    for (int i = 0; i < 7; i++) {
      int buttonState = digitalRead(buttonPins[i]);

      // if the button is pressed,  play the corresponding note
      if (buttonState == LOW) {
        tone(BUZZER_PIN, melody[i], 200); // play note for 200ms
        delay(speedDelay); // speed delay based on the position/ value of the potentiometer
      }
    }
  }
  delay(50);
}
Final Project
Conclusion and Reflection
All in all, we are both rather pleased with the outcome of this weeks assignment. With it being our first assignment working with another person, it was an interesting opportunity to compare techniques in regards to simpler things like breadboard organization or schematic design preferences. We were able to use both of our strengths in different ways and support each other in areas that we were weaker. In terms of future developments we had a few smaller ideas such as adding LEDs to correspond with the keys, or allowing the user to control the pitch of the notes. Looking at the bigger picture, we even discussed what it would look like to allow the user to choose what kind of electric keyboard sounds they wanted to play (going beyond the use of the speakers we have). Although our project is rather simple, we were truly tested when it came to debugging our code but really appreciated the experience of going at it together.


