Concept
When trying to decide what I wanted to do for this assignment, I found Chris Crawford’s definition of interactivity coming to mind. In previous assignments, I think I was too focused on one or two aspects of interactivity that made my piece feel like it was lacking something, despite me being finished. So in getting started with this one, I took to the internet for some general brainstorming on what interactive art could be. After a quick Google search, I came across the following image: 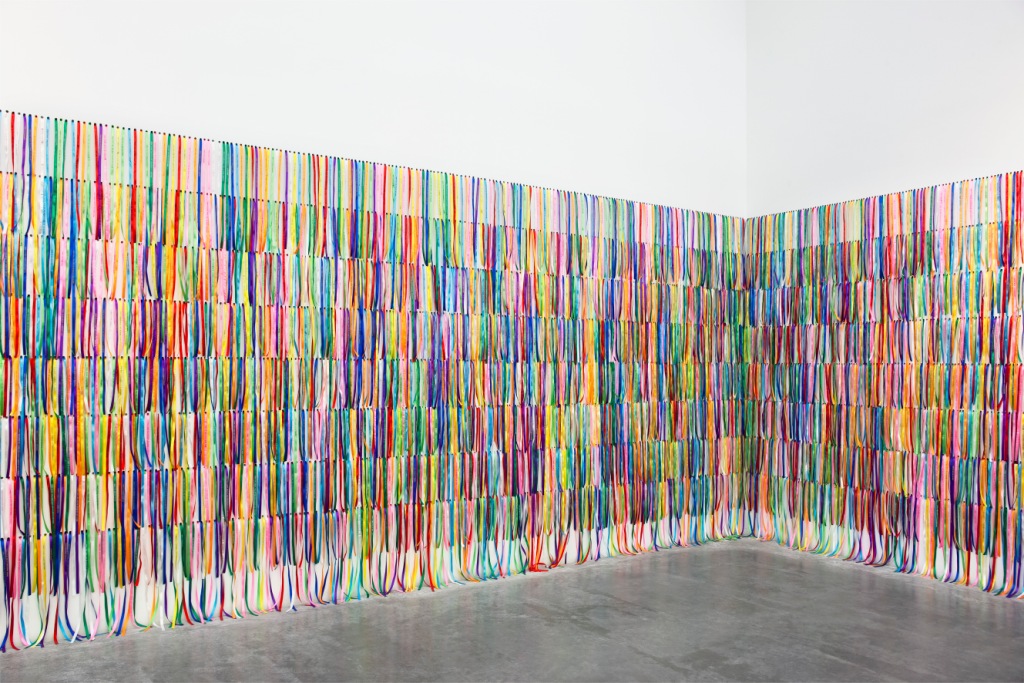
This ribbon installation by Benoit Pailley caught my attention and became the main inspiration for my piece. In addition, either in class or through clicking through other people’s work I saw a cool blending trail element and definitely wanted to incorporate that feature into my own project.
Lastly, as I began to see the project develop further I was reminded of wind chimes (mostly because of their rectangular shape) and their movement in the fading out of colors so decided to go with that as my overall theme. I briefly considered making all the rectangles hues of green to represent the flow of nature but felt that that was a bit too far of a reach and was more comfortable with the brighter, louder colors for this one. I thought the bright colors on contrast with the black and white background was a nice juxtaposition with the soothing nature with which the objects are moving.
Components
Although it made a big difference in the final outcome making the object trail as they move was super simply. I simply added on a second parameter to background(0, 10) so that the alpha transparency value would smooth out the color of the rectangle for every frame. I got this idea from Ethan Hermsey on Stack Overflow. For the foundation of the code (generating the rectangles and having them move) I referenced the code we reviewed in class, more specifically Ball Class 2. From there, I simply added an array og objects so that I could store all of the rectangles in one place, and change them by referencing for (let rectangle of rectangles) .
I added a few ‘interactive’ (not sure if they live up to Crawford’s definition) components for the user that are accessed through the mouse and keys. For starters, when the mouse is double clicked, all of the rectangles become shades of grey and depending on what key is pressed, the rectangles will flow from a different side of the canvas. Also, the spacebar changes the colors back from shades of grey to multi-colored and all the rectangles stop moving when you hold down on the mouse.
An Aspect I Am Proud Of
I am most proud of the interactivity in this assignment. Although once you get one side down, it is rather easy to apply it to the other three I ran into little problems (like dealing with keyCode() and keyPressed() that prolonged the process. Furthermore, I ended up undoing a couple of changes with these moving pieces that took me quite a while was rather proud of myself for doing so because although it made me feel like I wasted time, it was all in the name of the artistic process.
function doubleClicked(){
  //why does it change direction for bw but not back to color?
  whiteBack = true;
  for (let rect of rectangles) {
    rect.color = random(255);
    rect.speedX *= -rect.speedX;
  }
} //color -> BW change direction (after first time?)
//bw -> no change
function keyPressed() {
  whiteBack = true;
  if (key === ' ') {
    for (let rect of rectangles) {
      rect.color = color(random(255), random(255), random(255));
      // rect.speedX *= -rect.speedX;
    }
  }
The code that I’ve embedded is not my entire keyPressed function but actually a piece of keyPressed() and the entirety of doubleClicked(). I chose these two because they were the first two functions I added to alter the rectangles movement and thus the most difficult for me to implement.
Final Product
Reflection
Overall, I am fairly satisfied with the outcome of this piece. It is by far the most aesthetic thing I’ve created for class so far and was an effective application of the concepts we learned. However, I feel like it lacked depth in terms of meaning and kind of just developed as something I’d enjoy visually.
Also, there are two odd bugs that I couldn’t figure out and would like to solve in the future. The first one being that after switching from black and white to color (or vice versa) there are streaks of the previous paths of the rectangles as if they were created in a background of a different color. From what I could tell, I set it so that the background would be the same throughout (either black or white) but when it is supposed to be white, it almost appears grey against the white-streak contrast. Finally, in some instances when the rectangles are returning back to their starting side (after bouncing on the opposite wall) they just fade away and I could not figure out why. I used the code from class for the walls of the bouncing ball (if (this.y < 0 || this.y > height) ) for both x and y (when deemed necessary) to ensure they stayed within their boundaries but was unable to get it to work how I imagined.
All in all, I really am pleased with this piece and do actually want to fix these issues because once that is done, I do feel like the project will actually be complete.

 Christopher Nkunku, the chelsea Player who scored the only goal of the game and did his iconic balloon celebration.