Inspiration:
After attending both RealAD shows this past week, I haven’t been able to get the songs out of my head. RealAD is a theater performance that is offered every year, intended for First Years to know they’re not alone throughout their new college journey, as everyone has their ups, downs, bad, and good. The show being so relatable while remaining positive made it stand out to me since my Freshman year, so I was inspired to somehow implement it into my project. I ended up deciding to use a mix of the mini-projects we tested out to learn in class, and out came “Starry Self-Love.”
For the background of this piece, I got help from Rio’s code.
Concept:
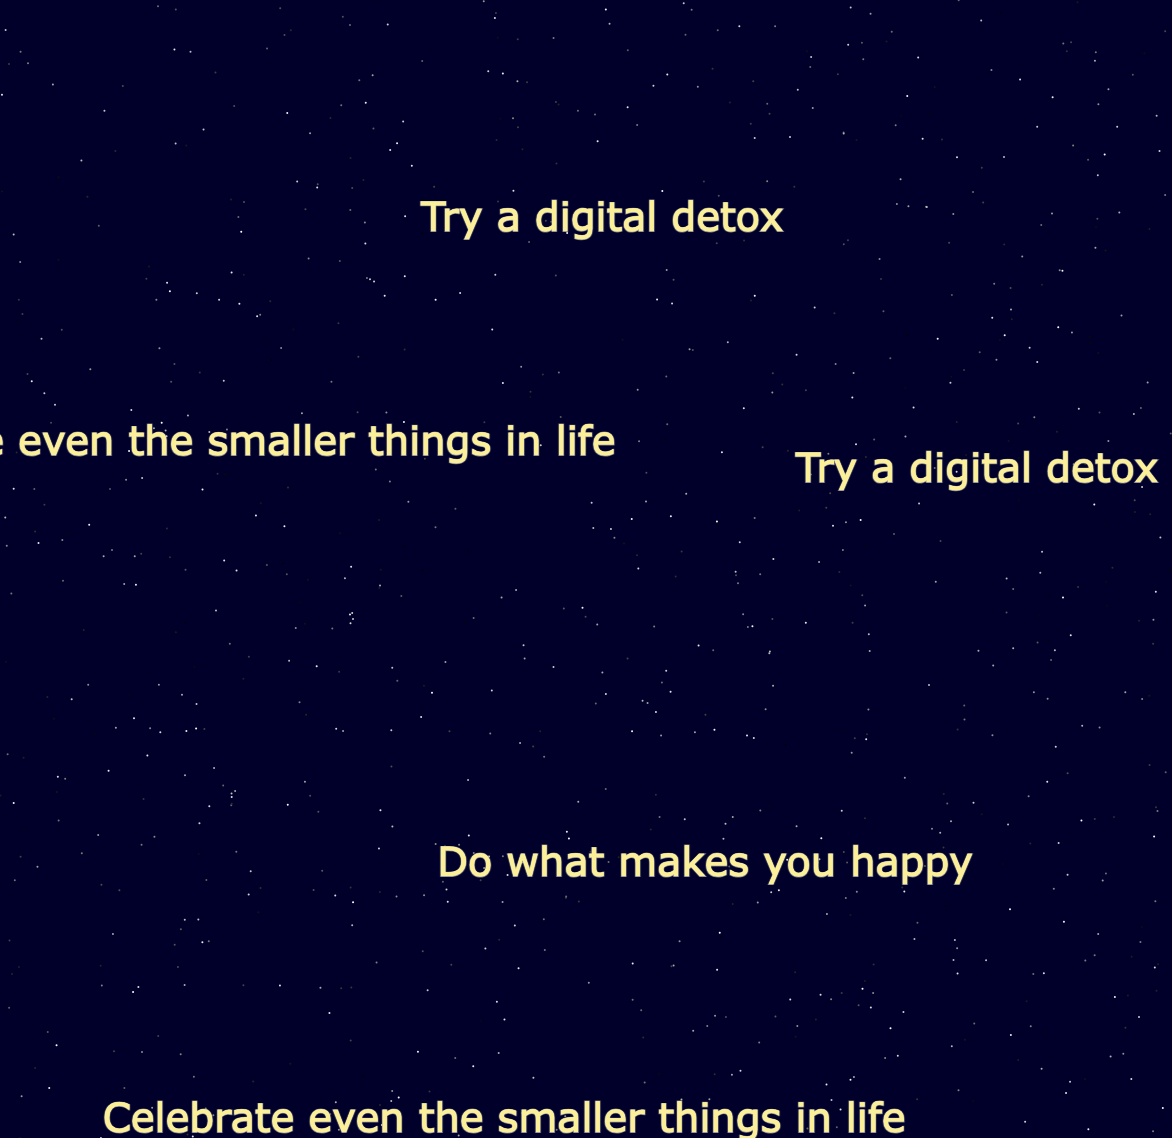
“Starry Self-Love” is a rather simple piece, whose purpose is to be more mindful and caring rather than jaw-dropping. An empty canvas of a starry night sky lies ahead of the audience. When their mouse is clicked, a little self-care tip/reminder pops on screen that floats around and bounces off the edges of the screen. To remove the most recent tip, simply press any keyboard key.
The Piece:
Highlight:
The code I was most proud of was one that can’t do much on its own in p5.js, but can make a big impact on those reading it. It’s the array of self-care tips that I programmed to randomly appear on screen when the mouse is clicked. Being such a huge advocate of self-care and well-being, I find that this piece of code is what carries the project, as the lack of this code would change the concept and overall point of this piece.
// Array of Self-Care Tips
let tipList = ["Why are you competing? Get some sleep in",
"Practice self-care and personal time",
"I've got to make peace with my body",
"Set realistic goals. Burn out is real",
"Set boundaries with yourself and others around you",
"Getting no sleep is not an achievement",
"Spend time doing something you enjoy",
"Stay connected with friends and family",
"Do what makes you happy",
"It's okay to have cheat days",
"Celebrate even the smaller things in life",
"Remember to eat a balanced and nutritious diet",
"Learn to say no",
"Do what makes you feel comfortable",
"Try a digital detox",
"Find a balance in all aspects of your life",
"Out of my mind and into my body"
];
In case I needed to show a piece of “code-code,” this basic code that we learned in class was what I was second most proud of because it allows for the interactivity of the night sky.
function mousePressed() {

  let randomTip = random(tipList); // Choose a random tip
  let interactiveTipMovement = new TipMovement(mouseX, mouseY, random(-2,2), random(-2,2), randomTip);
  movements.push(interactiveTipMovement);
}

  // Remove the last Self-Care tip when any key is pressed
function keyPressed() {
  movements.pop();
}
Reflection & Future Improvements:
This project took me a lot longer than I expected because I was trying so hard to make something cool and sophisticated. I ended up struggling a lot and having to come up with new project ideas. Eventually, I landed on this one because of a RealAD song stuck in my head. In the last project, I tried sitting there making something from scratch without looking back at the slides that much. For this project, I used the slides and what I learned from class, which made it a lot easier and faster to complete.
Something I didn’t get to resolve was the randomness of the tips popping up. A lot of the time, the same tip pops up twice or even three times in a row even though not a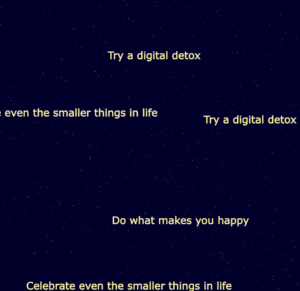 ll of the phrases have been used yet. I would like to expand the list and fix that issue so that there would be a very slim chance of the same tip coming up twice. Additionally, almost a third of the text would get cut off on the side of the canvas before it “bounced off” the edge. I would want to fix it so the very first or last word would immediately bounce off.
In the future, I would like to make it more colorful and interactive. I would want to add a lot of cute small features, like a moon, meteor, and a planet in the distance.


 Inspiration for my project