
CONCEPT:
For this art work, I’m going with a concept similar to my previous one and continuing the Velnor Molnar grid art. I was on the lookout for art pieces made with artists who used P5.js, and I found myself inspired by two standout visuals. I was really drawn to this vibrant 3D cube grid. It has so much depth and layers that it just stands out.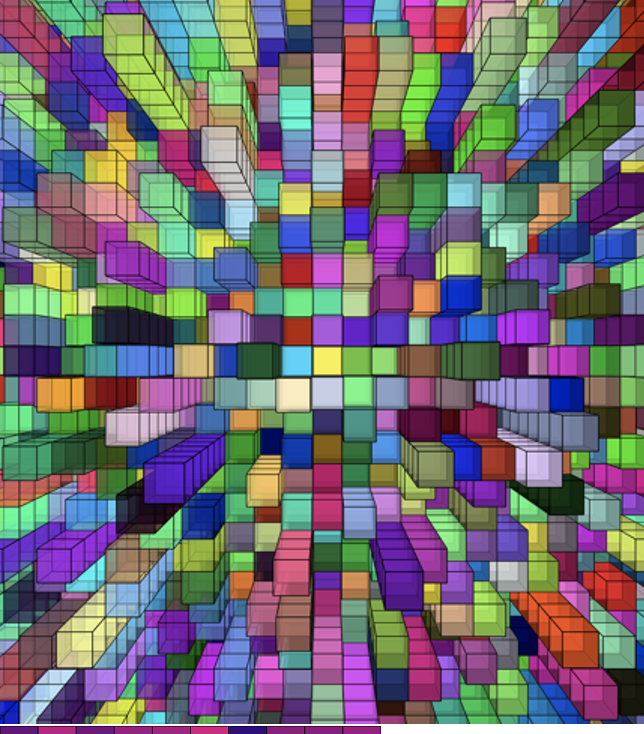
The next source of inspiration is a straightforward yet powerful idea known as the “Fading Grid.” The color changes are truly captivating, producing a gentle fading effect that evolves within the user interaction.
I’m thinking of combining both concepts. I’ll incorporate the 3D cube design and introduce some interactive color fading, drawing from both sources of inspiration. When you click on the mouse, the cubes shift, with the color changing within the user interaction to create movement in a way that feels interactive.I’m really looking forward to seeing how blending these two concepts will influence my final piece of art.
EMBEDDED SKETCH:
Click on the cubes!
HIGHLIGHT OF THE CODE:
One part of my piece where I’m really proud is how I changed the lighting of the cubes based on how the user moved their mouse. As the mouse moves toward a cube, it gets brighter. As the mouse moves away, it gets darker. This makes the background look smooth, which makes the cubes seem to be reacting to the user being there.
// Change the cube's brightness based on mouse distance
 adjustBrightness(mx, my) {
   // Calculate distance between the mouse and the cube
   let distance = dist(mx - width / 2, my - height / 2, this.x, this.y);

   // Map the distance to the brightness range (closer means brighter)
   this.brightness = map(distance, 0, width / 2, 255, 50);

   // Constrain the brightness to stay within a valid range (50-255)
   this.brightness = constrain(this.brightness, 50, 255);
 }
This technique uses the dist() function to calculate the distance between the cube and the mouse, therefore determining the mouse’s closeness to the cube. The gap gets smaller as the mouse gets closer. Once the distance is known, the map() method changes the cube’s brightness based on that number. The cube is brighter (closer to 255) when it is closer to you, and less bright (closer to 50) when it is farther away. The constrain() method keeps the value between 50 (dim) and 255 (bright) to make sure the brightness stays in the right range. This is how I did it because I wanted the cubes to react to the user’s movements, making the effect visual and lively.
New functions I added in my code:
Below I’ll be showing the functions that weren’t brought up in class but helped me into creating my piecework just from trying out new things, all ny including functions from this document.
document link: P5.js tutorials
This method is triggered when a cube is clicked. It moves the cube along the z-axis forward, which pops it out. If you click it again, it moves it back to where it was before. This is what I used to give the cubes a 3D effect that lets users interact with them in a moving way.
// Toggle the cube's "pull-out" effect along the z-axis
  togglePullOut() {
    // If the cube is not pushed out,it move it forward
    if (!this.pushedOut) {
      this.z += 100;
    } else {
      // If it’s already pushed out,it move it back to its original position
      this.z -= 100;
    }

    // Toggle the pushed-out state
    this.pushedOut = !this.pushedOut;
  }
}
Adjusting the Mouse Coordinates for WEBGL:
Since the coordinate system in WEBGL is centered, I had to adjust the mouse coordinates by subtracting half of the canvas width and height. This makes sure that the mouse clicks line up with the cubes’ locations in 3D space.
// Adjust the mouse coordinates for the 3D canvas
  let adjustedMouseX = mouseX - width / 2;
  let adjustedMouseY = mouseY - height / 2;
Brightness Adjustment:
This method changes how bright each cube is based on how far away the mouse is from it. The squares that are closer together get brighter, while the ones that are farther away get darker.
// Change the cube's brightness based on mouse distance
 adjustBrightness(mx, my) {
   // Calculate distance between the mouse and the cube
   let distance = dist(mx - width / 2, my - height / 2, this.x, this.y);

   // Map the distance to the brightness range (closer means brighter)
   this.brightness = map(distance, 0, width / 2, 255, 50);

   // Constrain the brightness to stay within a valid range (50-255)
   this.brightness = constrain(this.brightness, 50, 255);
 }
REFLECTION:
This project turned out great, and I’m especially proud of the 3D interaction I added that went beyond what we learned in class. The fact that the cubes could react and click made the art more interesting and vibrant. It was hard but satisfying to learn a lot about how to use WEBGL and make real-time interaction. I’d like to make a few changes to future projects. First, I want to work on making the changes smoother. Right now, the cubes come in and out very quickly. It would feel more natural to move if the images were smoother. I’d also like to look into more complicated interactions, like letting more than one cube be pulled out at once or making effects that keep happening. Finally, I would want to work on improving the visual feedback by making it simpler and more responsive by adding small changes in color or shape when a cube is clicked. Overall, this assignment helped me get better at creating digital artwork that is close to interactive.
REFRENCES:
easywebsify. (2020, November 17). Create 3D grid box using p5.js—Artwork. Level Up Coding. https://levelup.gitconnected.com/create-3d-grid-box-using-p5js-artwork-d040942cbb74
Workman, K. (n.d.). Fading grid—2D array in p5.js. Happy Coding. https://happycoding.io/tutorials/p5js/arrays/fading-grid
p5.js. (n.d.). WEBGL. https://p5js.org/tutorials/#webgl