
Concept:
For this final project, I envisioned entering a universe where art and technology collide to create something genuinely unique. I wanted to make it easy for people who have never drawn before to experience it for the first time.
Imagine an interactive space where art and technology merge, transforming bodily movements into a rainbow of colours on a digital canvas. My initiative encourages individuals to exhibit their ideas through motion. They use a paintbrush attached to an Arduino to navigate a symphony of colourful ellipses. This is more than simply an artwork; it’s an experience that captures the essence of movement and transforms it into a personalised digital masterpiece.
Arduino Part:
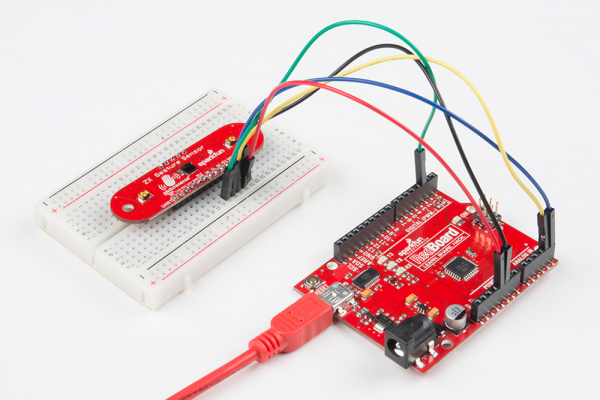
The foundation of the interaction is the Arduino Uno, on which I worked with a ZX Distance and Gesture Sensor. The sensor is adept at monitoring the paintbrush’s proximity as well as the artist’s minor hand gestures. To be honest, installation was rather simple, but the sensor itself was not as powerful as planned.
Input: Proximity data and gesture commands from the ZX Sensor.
Output: Serial communication to relay the sensor data to the computer running the p5.js sketch.
Data to p5.js: Real-time Z-axis data for proximity (distance of the hand or brush from the sensor) and X-axis data for lateral movement, along with gesture detections (swipes, taps).
From p5.js: Instructions may be sent back to calibrate gesture sensitivity or toggle the sensor’s active state.
P5.js Part:
On the digital front, p5.js will serve as the canvas and palette, with dynamic and malleable capabilities. It will translate the incoming data from the Arduino into a series of colours and movements on the screen.
Receiving Data: Interpreting proximity and gesture data from the Arduino.
Processing Movements: Real-time mapping of hand movements to colour strokes and splashes with varied intensity and spread on a digital canvas.
Visual Feedback: Dynamic visual changes that reflect the flow and dance of the user’s motions.
To Arduino: Signals for modifying the ZX Sensor parameters in response to real-time performance and user feedback.
Graphics Used:
Gesture: Swipe Left / Right, Tap
Visuals: Dynamic shapes, colors, and brush strokes based on movement data.
Development and User Testing
The ZX Distance and Gesture Sensor has now been integrated with Arduino, and the immediate goal is to ensure that data flows smoothly into the p5.js programme. By the time user testing begins next week, the system should respond to hand motions by presenting relevant visual modifications on the screen.
User Testing Objectives:
- Assess how natural and fulfilling it is to paint in midair.
- Ensure responsiveness and accuracy of gesture detection.
- Gather feedback from participants regarding the ease of use and satisfaction with the interactive art experience.
User Testing Techniques:
-
- Record interactions on video to analyze gesture accuracy and timing.
How it Works:
- Arduino Setup: Connect Arduino to the ZX Sensor and establish serial communication with p5.js.
- Gesture Detection: The Arduino reads gestures and proximity data and sends this information to the p5.js sketch.
- Canvas Response: p5.js interprets the data and creates a dynamic visual display that reflects the gestures and brush movements.
- Feedback Loop: p5.js sends calibration data back to Arduino to adjust the sensor settings if necessary.
Code
Arduino Code Example:
#include <Wire.h>
#include <ZX_Sensor.h>

// Constants
const int ZX_ADDR = 0x10;  // ZX Sensor I2C address

// Global Variables
ZX_Sensor zx_sensor = ZX_Sensor(ZX_ADDR);
uint8_t x_pos;
uint8_t z_pos;
uint8_t handPresent = false;

void setup() {

  Serial.begin(9600);

  zx_sensor.init();


   while (Serial.available() <= 0) {

    Serial.println("0,0,0"); // send a starting message

    delay(50);
  }
}

void loop() {

  // If there is position data available, read and print it
  if ( zx_sensor.positionAvailable() ) {
    uint8_t x = zx_sensor.readX();
    if ( x != ZX_ERROR ) {
      x_pos=x;
    }
    uint8_t z = zx_sensor.readZ();
    if ( z != ZX_ERROR ) {
      z_pos=z;
    }
    handPresent=true;
  } else {
    handPresent=false;
  }

   while (Serial.available()) {


    int  inbyte = Serial.parseInt();
    if (Serial.read() == '\n') {

      Serial.print(x_pos);
      Serial.print(',');
      Serial.print(z_pos);
      Serial.print(',');
      Serial.println(handPresent);
    }
  }

}
P5 Code:
// FINAL PROJECT BY STEFANIA PETRE
// FOR INTRO TO IM

let img;
let brushSize = 19;
let colorHue = 0;
let previousX = 0,
  previousY = 0;
let xPos = 0;
let zPos = 0;
let smoothedX = 0;
let handPresent = 0;
let showDrawing = false;
let startButton;
let mappedX = 0;
let mappedZ = 0;

function preload() {
  img = loadImage("start.webp");
}

function setup() {
  createCanvas(640, 480);
  colorMode(HSB, 360, 100, 100, 100);
  textSize(18);

  // Set up the start button
  startButton = createButton("Get Creative!");
  startButton.position(290, 175);
  startButton.mousePressed(startDrawing);


  let fullscreenButton = createButton("Fullscreen");
  fullscreenButton.position(10, 10);
  fullscreenButton.mousePressed(toggleFullScreen);

  // Set the initial hue
  colorHue = random(360);
}

function draw() {
  if (!showDrawing) {
    background(img);
  } else {
    if (!serialActive) {
      background(0);
      fill(255);
      //text("Press the 'Get Creative!' button to start drawing", 20, 30);
    } else {
      if (handPresent == 1) {
        // Adjust mapping ranges according to your actual data
        mappedX = map(xPos, 180, 40, 0, width);
        mappedZ = map(zPos, 240, 25, 0, height);

        mappedX = constrain(mappedX, 0, width);
        mappedZ = constrain(mappedZ, 0, height);

        let weight = 10; // Adjust as needed
        let strokeColor = color(colorHue % 360, 100, 100);

        stroke(strokeColor);
        strokeWeight(weight);
        ellipse(mappedX, mappedZ, weight * 2, weight * 2);

        previousX = mappedX;
        previousY = mappedZ;
      }

      colorHue += 2;

      noStroke();
      fill(0, 0, 0.000000000000005, 1);
      rect(0, 0, width, height);
    }
  }
}

function startDrawing() {
  showDrawing = true;
  startButton.hide();
  setUpSerial();
}

function toggleFullScreen() {
  let fs = fullscreen();
  fullscreen(!fs);
  resizeCanvas(windowWidth, windowHeight);
  startButton.position(windowWidth / 2 - 40, windowHeight / 2 - 30);
}

function readSerial(data) {
  if (data != null) {
    let fromArduino = split(trim(data), ",");
    if (fromArduino.length == 3) {
      xPos = int(fromArduino[0]);
      zPos = int(fromArduino[1]);
      handPresent = int(fromArduino[2]);
    }
    let sendToArduino = 0 + "\n";
    writeSerial(sendToArduino);
  }
}

function keyPressed() {
  if (key == " ") {
    setUpSerial();
  }
}

function windowResized() {
  resizeCanvas(windowWidth, windowHeight);
}
Final thoughts:
Even though the project was not exactly how I have pictured it at the beginning, it still worked out well. People at the showcase liked it and everything worked for 3 hours and I am happy that I have chosen this path.
Signing Off,
Stefania Petre