Concept
The project, “Defuse Dash,” is an interactive game where players must solve physical and digital puzzles to “defuse” a bomb. The game uses an Arduino setup with various sensors and inputs, including buttons, potentiometers, adafruit trellis, and an ultrasonic distance sensor, integrated with a p5.js visual and interaction interface. The game aims to teach principles of problem-solving under pressure, as players must complete various tasks within time limits to defuse a virtual bomb.
Images
Project Interaction
Visual and Physical Setup
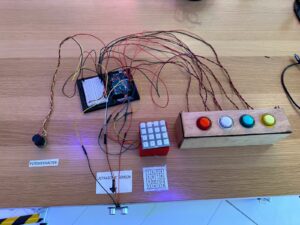
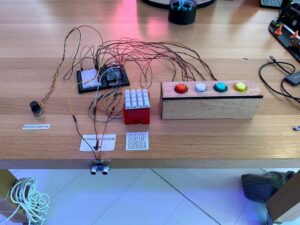
Players are presented with a physical board containing:
- A series of buttons connected to LEDs that light up when pressed.
- A potentiometer used to adjust resistance values.
- An ultrasonic distance sensor to measure and input distances.
- A keypad for code entry.
The p5.js interface displays:
- Task instructions and success criteria.
- A visual representation of the “bomb,” including a countdown timer.
- Feedback sections that show task outcomes and game progress.
Game Flow
The game progresses through a series of tasks such as adjusting distances, matching potentiometer values, entering sequences through buttons, and inputting codes on a keypad. Each task completion is visually indicated, moving the player closer to defusing the bomb.
Implementation
Hardware Components
- Buttons and LEDs: Create a direct interaction where pressing a button shows immediate visual feedback through an LED.
- Potentiometer: Adjusts to match a required voltage displayed on the p5.js interface.
- Ultrasonic Sensor: Measures how far away a player is from the sensor, requiring players to physically move to match the required distance.
- Adafruit Trellis Keypad: Create a direct interaction where pressing a button shows immediate visual feedback through an LED.
Software Components
- p5.js Visuals: Animates tasks, displays real-time data, and provides a graphical countdown timer and game status.
- Serial Communication: Handles data transmission between the Arduino and the p5.js interface, using serial commands to start tasks and send results.
Interaction Design
The interaction design focuses on integrating tactile and visual feedback to enhance engagement:
- Tactile: Feeling the buttons click and adjusting the potentiometer gives a hands-on experience.
- Visual: Immediate updates on the interface when tasks are completed successfully or fail.
Communication Between Arduino and p5.js
The communication protocol is straightforward:
- Sending Commands: p5.js sends numeric codes corresponding to different tasks.
- Receiving Data: Arduino sends back results as comma-separated strings that p5.js parses and uses to update the game state.
Arduino
The Arduino sketch controls every hardware-related action that’s essential to gameplay. this sketch is designed to track inputs from a variety of sensors, including buttons via digital pins, potentiometers, adafruit trellis, and ultrasonic distance sensors. In order to guarantee accurate input detection, it manages button debouncing. It also regulates outputs, such as button and keypad LEDs, to give the player real-time feedback depending on the logic and status of the game.
For each cycle of the loop() function, the sketch checks the status of connected devices, updates the game state based on player interactions, and sends crucial gameplay data to the p5.js application over serial communication. This includes values like distance measurements, potentiometer levels, button sequence inputs, and keypad inputs, which are vital for progressing through the game’s challenges.
Code
#include <string.h>

// Define task states using an enum
enum Task {
  TASK_DISTANCE_SENSING,
  TASK_POTENTIOMETER_ADJUSTMENT,
  TASK_BUTTON_SEQUENCE,
  TASK_ADAFRUIT_KEYPAD,
  TASK_DEFUSED_SOUND,
  TASK_EXPLODED_SOUND
};

// Variables to store the current task and sensor values
volatile Task currentTask = TASK_DISTANCE_SENSING;
const int buttonPins[] = { 2, 3, 4, 5 };  // Pins for buttons
const int LEDpins[] = {10, 11, 12, 13}; // Pins for LED buttons
const int potPin = A0;
const int trigPin = 6;
const int echoPin = 7;

// Variables to store sensor data
bool buttonStates[4] = { 0 };
int potValue = 0;
int distance = 0;

// Length of the button press sequence
const int sequenceLength = 5;
// Array to store the button sequence
int buttonSequence[sequenceLength];
// Index to keep track of the current position in the sequence
int sequenceIndex = 0;
bool lastButtonState[4] = { LOW, LOW, LOW, LOW };

String taskCommand = "0";
int taskNumber = 0;
// Initialize an empty string to hold the sequence
String sequenceString = "";

#include <Wire.h>
#include "Adafruit_Trellis.h"

#define MOMENTARY 0
#define LATCHING 1
// set the mode here
#define MODE MOMENTARY

Adafruit_Trellis matrix0 = Adafruit_Trellis();
Adafruit_TrellisSet trellis = Adafruit_TrellisSet(&matrix0);

#define NUMTRELLIS 1

#define numKeys (NUMTRELLIS * 16)

#define INTPIN A2

int passcode[5];
int passcodeIndex = 0;
// Initialize an empty string for the passcode
String passcodeString = "";

void setup() {
  Serial.begin(9600);
  pinMode(trigPin, OUTPUT);
  pinMode(echoPin, INPUT);
  for (int i = 0; i < 4; i++) {
    // Set button pins with internal pull-up resistors
    pinMode(buttonPins[i], INPUT_PULLUP);
    pinMode(LEDpins[i], OUTPUT);
  }
  pinMode(buzzerPin, OUTPUT);
  pinMode(INTPIN, INPUT);
  digitalWrite(INTPIN, HIGH);
  trellis.begin(0x70);
  // light up all the LEDs in order
  for (uint8_t i = 0; i < numKeys; i++) {
    trellis.setLED(i);
    trellis.writeDisplay();
    delay(50);
  }
  // then turn them off
  for (uint8_t i = 0; i < numKeys; i++) {
    trellis.clrLED(i);
    trellis.writeDisplay();
    delay(50);
  }
}


void loop() {
  if (Serial.available() > 0) {
    // Read the next command until a newline character
    taskCommand = Serial.readStringUntil('\n');
    if (taskCommand.length() > 0) {
      taskNumber = taskCommand.toInt();
      if (taskNumber == 0 || taskNumber == 1 || taskNumber == 2) {
        currentTask = TASK_DISTANCE_SENSING;
      } else if (taskNumber == 3 || taskNumber == 4 || taskNumber == 5) {
        currentTask = TASK_POTENTIOMETER_ADJUSTMENT;
      } else if (taskNumber == 6) {
        currentTask = TASK_BUTTON_SEQUENCE;
      } else if (taskNumber == 7) {
        currentTask = TASK_ADAFRUIT_KEYPAD;
      } else {
        currentTask = static_cast<Task>(taskNumber);
      }
      // Function to execute tasks
      executeTask(currentTask);
    }
  }
}

void executeTask(Task task) {
  switch (task) {
    case TASK_DISTANCE_SENSING:
      distance = measureDistance();
      Serial.println(distance);
      break;
    case TASK_POTENTIOMETER_ADJUSTMENT:
      potValue = analogRead(potPin);
      Serial.println(potValue);
      break;
    case TASK_BUTTON_SEQUENCE:
      readButtons();
      break;
    case TASK_ADAFRUIT_KEYPAD:
      readKeypad();
      break;
    default:
      break;
  }
}


// Function to measure distance using an ultrasonic sensor
int measureDistance() {
  digitalWrite(trigPin, LOW);
  delayMicroseconds(2);
  digitalWrite(trigPin, HIGH);
  delayMicroseconds(10);
  digitalWrite(trigPin, LOW);
  // 38ms timeout for a max distance
  long duration = pulseIn(echoPin, HIGH, 38000);
  // Calculate and return the distance
  return duration * 0.034 / 2;
}

// Function to read and report button states
void readButtons() {
  for (int i = 0; i < 4; i++) {
    // Invert because INPUT_PULLUP
    bool currentButtonState = !digitalRead(buttonPins[i]);

    digitalWrite(LEDpins[i], currentButtonState ? HIGH : LOW);

    // Check if there is a change and the button is pressed
    if (currentButtonState && currentButtonState != lastButtonState[i] && sequenceIndex < sequenceLength) {
      // Store button number (1-based index)
      buttonSequence[sequenceIndex] = i + 1;
      if (sequenceIndex > 0) {
        sequenceString += ",";
      }
      // Add the button number to the string
      sequenceString += String(buttonSequence[sequenceIndex]);
      sequenceIndex++;
    }

    // Update the last button state
    lastButtonState[i] = currentButtonState;
  }

  // Check if the sequence is complete
  if (sequenceIndex == sequenceLength) {
    // Send the complete sequence string
    Serial.println(sequenceString);
    sequenceString = "";
    // Reset the sequence index to start new sequence capture
    sequenceIndex = 0;
  }
}

void readKeypad() {
  // 30ms delay is required, don't remove me!
  delay(30);

  if (MODE == MOMENTARY) {
    // If a button was just pressed or released...
    if (trellis.readSwitches()) {

      // Go through every button
      for (uint8_t i = 0; i < numKeys; i++) {
        // If it was pressed, turn it on
        if (trellis.justPressed(i)) {
          trellis.setLED(i);
          trellis.writeDisplay();

          if (passcodeIndex < 5) {
            passcode[passcodeIndex] = i+1;
            if (passcodeIndex > 0) {
              passcodeString += ",";
            }
            // Add the key index to the string
            passcodeString += String(passcode[passcodeIndex]);
            passcodeIndex++;
          }

          // If it was released, turn it off
          if (trellis.justReleased(i)) {
            trellis.clrLED(i);
            trellis.writeDisplay();
          }
        }
      }

      // Check if the passcode is complete
      if (passcodeIndex == 5) {
        // Send the complete passcode string
        Serial.println(passcodeString);
        // Reset for next input
        passcodeString = "";
        passcodeIndex = 0;
      }
    }
  }
}
P5.js
The p5.js sketch is crafted to enrich the player’s experience with engaging visuals and responsive game dynamics. It visually represents the game state on a web interface, animating elements like timers, sensor data displays, and game status messages. This sketch plays a critical role in bridging the physical and digital aspects of the game by interpreting and displaying data received from the Arduino.
The sketch manages different game states, such as starting the game, transitioning between tasks, and handling win-or-lose conditions. Each state is visually distinct and designed to keep the player informed and engaged.
Code
Points of Pride
- One of the aspects I’m particularly proud of is the seamless integration and synchronization between the Arduino and p5.js environments, which facilitated a dynamic and interactive experience.
- The development of the narrative-driven game logic within p5.js, which utilized the sensor inputs from Arduino to unfold a storyline, is another high point. This narrative approach significantly enhanced user engagement, making the technical aspects of the project more relatable and enjoyable.
- The use of creative riddles that required players to interpret clues and respond with physical interactions, such as adjusting distances and entering sequences, added an educational layer that subtly introduced users to concepts of measurement, spatial awareness, and logical sequencing.
- Despite not initially being confident in my soldering skills, I successfully soldered numerous components, and they functioned perfectly. This experience not only enhanced my abilities but also boosted my confidence, affirming that I am now proficient in soldering.
Video(Before the Showcase)
Video(During the showcase)
Future Improvements
- Interactivity Enhancements: One exciting direction for future development is enhancing the game’s interactivity by introducing multiplayer features. This could involve allowing multiple players to interact with the same game setup simultaneously, adding a competitive element by having players complete tasks in sequence, against a timer, or against each other.
- Leaderboard/Scoreboard: Integrating score tracking could significantly extend the game’s appeal and replayability. A leaderboard system where players can register their scores and compare them with other players.


