
![]()
Pi’s moving Castle is a p5js + Arduino interactive game by Pi.
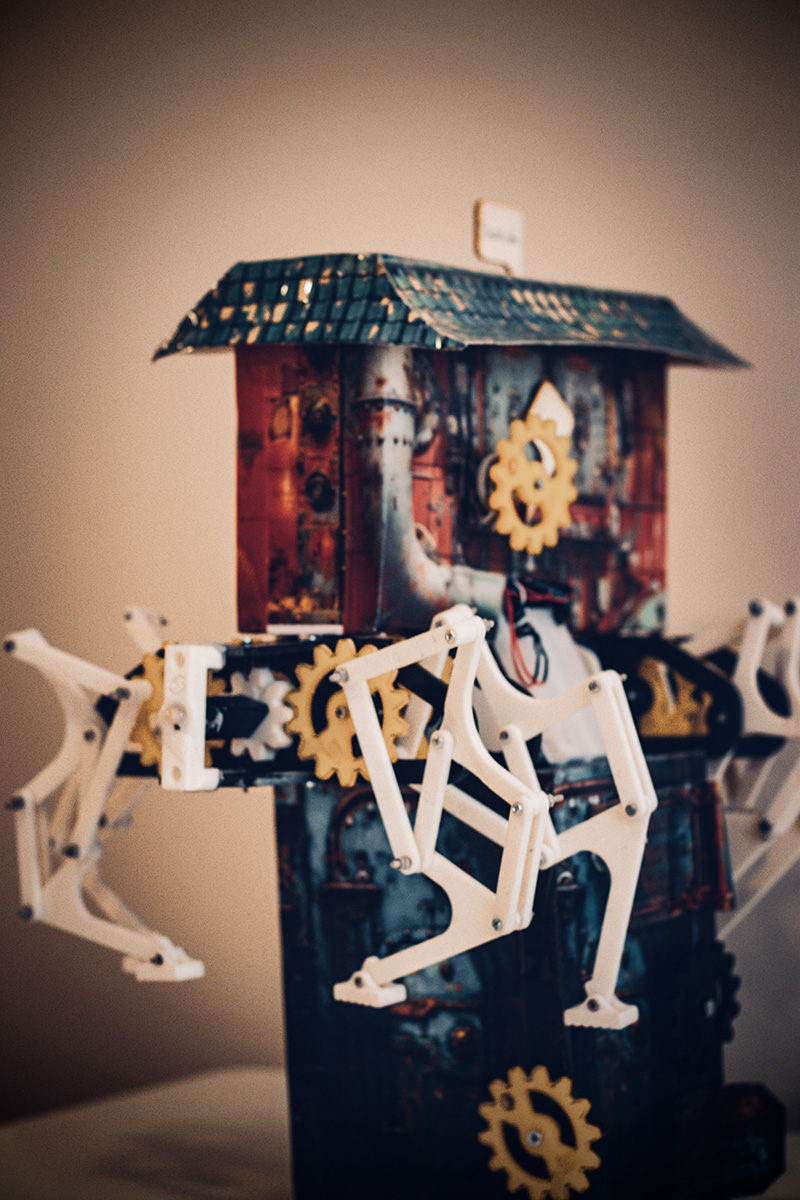
Pi has a moving castle, but it is broken down by the presence of rust gremelins in the machinery. You have to help Pi eliminate these gremelins so that the castle can walk again.
Here’s a more visually appealing version of the story.

Documentation Video
instagrammable goodies


DeMo & Concept
So the project consists of 2 parts. A p5js computer game, and a castle with walking legs and some user inputs (potentiometer and a switch). You control a cannon on the computer screen, using the potentiometer to rotate the cannon and shoot it with the switch. But there is a catch, Some of the gremelins, you cannot aim at them directly, so you need to make the cannonballs bounce off the walls to deliver justice to these monsters. Finally once you have cleared all the monsters, the castle can start walking and will physically walk. Below is a demo video of me playing the full experience.
Arduino Code
The arduino code is below. It always send back serial data with the potentiometer and switch readings back to the computer, and it will wait for a single serial int. If computer sends a 1, castle walks, and if computer sends a 0, it stops walking. Depending on the game state it changes.
#include   // Include the Servo library

Servo myServo;  // Create a servo object
Servo myServo2; // Create a servo object
float lastVoltage = -1; // Variable to store the last voltage
// Arduino code for button, which detects the counts
const int buttonPin = 2;  // the number of the pushbutton pin
const int ledPin = 3;    // the number of the LED pin

// variables will change:
int buttonState = 0;         // variable for reading the pushbutton status
int lastButtonState = HIGH;  // variable for reading the last pushbutton status
unsigned long lastDebounceTime = 0;  // the last time the output pin was toggled
unsigned long debounceDelay = 50;    // the debounce time; increase if the output flickers
int pressCount = 0;  // count of button presses


//Potentiometer
float floatMap(float x, float in_min, float in_max, float out_min, float out_max) {
  return (x - in_min) * (out_max - out_min) / (in_max - in_min) + out_min;
}


void setup() {
  pinMode(ledPin, OUTPUT);   // initialize the LED pin as an output
  pinMode(buttonPin, INPUT_PULLUP);  // initialize the pushbutton pin as an input with internal pull-up resistor
  myServo.attach(9);  // Attach the servo signal pin to digital pin 9
  myServo2.attach(10); // Attach the servo signal pin to digital pin 10
  Serial.begin(9600); // Initialize serial communication at 9600 bits per second
  stopRotation(); // Stop servos by default
}

void loop() {
   int reading = digitalRead(buttonPin);

  //Output potentiometer
  // Read the input on analog pin A0:
  int analogValue = analogRead(A0);
  // Rescale to potentiometer's voltage (from 0V to 5V):
  float voltage = floatMap(analogValue, 0, 1023, 0, 5);


  // check if the button state has changed from the last reading
  if (reading != lastButtonState) {
    // reset the debouncing timer
    lastDebounceTime = millis();
  }

  if ((millis() - lastDebounceTime) > debounceDelay) {
    // if the button state has changed:
    if (reading != buttonState) {
      buttonState = reading;

      // only toggle the LED if the new button state is LOW
      if (buttonState == LOW) {
        digitalWrite(ledPin, HIGH);
        pressCount++;  // increment the press count
      } else {
        digitalWrite(ledPin, LOW);
      }
    }
  }

  // save the reading. Next time through the loop, it will be the lastButtonState:
  lastButtonState = reading;

  Serial.print(pressCount);  // print the count to the serial monitor
  Serial.print(",");
  Serial.println(voltage);          // Print the distance to the Serial monitor
  delay(100);                        // Short delay before next measurement


  if (Serial.available() > 0) { // Check if data has been received
    int state = Serial.read() - '0'; // Read the first byte available and convert from ASCII
    if (state == 1) {
      rotate(); // Rotate servos
    } else if (state == 0) {
      stopRotation(); // Ensure servos are stopped
    }
  }
}

void rotate() {
  myServo.writeMicroseconds(4000); // Example value for rotation
  myServo2.writeMicroseconds(4000); // Adjust if necessary
}

void stopRotation() {
  myServo.writeMicroseconds(1500); // 1500 usually represents a stopped servo
  myServo2.writeMicroseconds(1500); // Adjust if necessary
}
p5js Sketch
In the game, players help Pi clear rust gremlins from a mechanical castle using a turret that shoots cannonballs, controlled by a physical potentiometer and switch. The game mechanics include obstacles where cannonballs need to be bounced off boundaries to hit some gremlins. The game features a visual and auditory loading sequence with gremlin and turret images, background music, and sound effects for actions like shooting and gremlin deaths. The Arduino setup facilitates interaction by receiving turret control signals from the potentiometer and switch, while sending back movement commands to make the castle walk when the game is completed.
The embedding of the p5js sketch is below (Note that you need the castle to play the game).
Communication between Arduino and p5js
As mentioned above, the communication between p5js and Arduino is serial data. Arduino sends 2 values (a float reading for potentiometer, and an int counting the number of times the button has been clicked). This controls the rotation of the cannon and firing of the cannon in the game.
From the computer (p5), Arduino only receives one number all the time that is either 1 or 0. This dictates whether or not to move the castle and make it walk (it walks when the game is complete.)
What I am proud of
I am particularly very proud of the visual design, the storyline and the walking mechanism. This looks almost unreal to me, I was not expecting that sticking the midjourney textures on an Amazon cardboard box would look sooo good.
Future Improvements
For future improvements, I will integrate what the users have told me during the user tests.