Team Members: Muhammed Hazza, Yaakulya Sabbani
Exercise 1: ARDUINO TO P5 COMMUNICATION
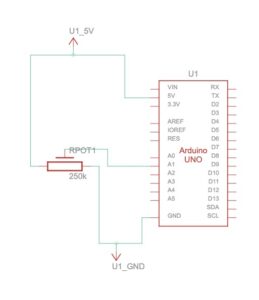
Something that uses only one sensor on arduino and makes the ellipse in p5 move on the horizontal axis, in the middle of the screen, and nothing on arduino is controlled by p5.
Arduino Code
void setup() {
  Serial.begin(9600);
  //pinMode(LED_BUILTIN, OUTPUT);

//start the handshake
  while (Serial.available() <= 0) {
    //digitalWrite(LED_BUILTIN, HIGH);
    Serial.println("0,0"); // send a starting message
    delay(300);
    //digitalWrite(LED_BUILTIN, LOW);
    delay(50);

  }
}

void loop() {
  // wait for data from p5 before doing something
  while (Serial.available()) {
     //digitalWrite(LED_BUILTIN, HIGH);
    int isMoving = Serial.parseInt();
    if (Serial.read() == '\n') {
      int photoVal = analogRead(A0);
      delay(5);
      Serial.println(photoVal);
   }
  }
  //digitalWrite(LED_BUILTIN, LOW);
}
P5 code
// Initialize variables to store values from Arduino
let rVal = 0; // Stores the received value from Arduino
let xPos = 0; // Stores the mapped x-position value
let rad = 50; // Radius of the ellipse to be drawn

// Setup function - runs once at the beginning
function setup() {
  // Create a canvas with dimensions 400x400
  createCanvas(400, 400);
  // Set text size to 18 pixels
  textSize(18);
}

// Draw function - runs continuously
function draw() {
  // Set background color to white
  background(255);

  // Check if serial communication is active
  if (!serialActive) {
    // Display message to prompt user to press Space Bar to select Serial Port
    text("Press Space Bar to select Serial Port", 20, 30);
  } else {
    // If serial communication is active, display "Connected" message
    text("Connected", 20, 30);

    // Map the received value (rVal) to the x-position within the canvas
    xPos = map(rVal, 0, 900, 0, 400);
    // Display the current received value (rVal)
    text('rVal = ' + str(rVal), 20, 50);
    // Draw an ellipse at the mapped x-position with fixed y-position (200) and radius (rad)
    ellipse(xPos, 200, rad, rad);
    // Display the mapped x-position (xPos)
    text('xPos = ' + str(xPos), 20, 70);
  }
}

// Function to handle key presses
function keyPressed() {
  // Check if Space Bar is pressed
  if (key == " ") {
    // Call setUpSerial() function to start serial connection
    setUpSerial();
  }
}

// Function to read data from Arduino
function readSerial(data) {
  // Check if data is not null
  if (data != null) {
    // Split the received data into an array using comma as delimiter
    let fromArduino = split(trim(data), ",");

    // Check if the array contains only one element
    if (fromArduino.length == 1) {
      // Update rVal with the received value from Arduino
      rVal = fromArduino[0];
    }

    // Send a handshake message to Arduino
    let sendToArduino = 1 + "\n";
    writeSerial(sendToArduino);
  }
}
Schematic
Video Demonstation
Exercise 2: P5 TO ARDUINO COMMUNICATION
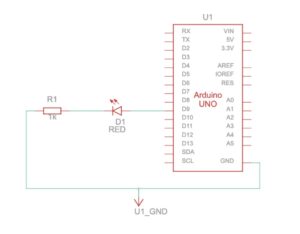
Something that controls the LED brightness from p5.
Arduino Code
//Exercise 2 Arduino Code

const int ledPin =9;
int brightness = 0;
void setup() {
  Serial.begin(9600); // This will start serial communication at 9600 bps

  pinMode(LED_BUILTIN, OUTPUT);
  pinMode(ledPin, OUTPUT);
// start the handshake
  while (Serial.available() <= 0) {
    digitalWrite(LED_BUILTIN, HIGH); // on blink when waiting for serial data
    Serial.println("0,0"); // sending a starting message
    delay(300);            // waiting for the delar
  }
}
void loop()
{
  // wait for data from p5 before doing something
    while (Serial.available())
    {
    digitalWrite(LED_BUILTIN, HIGH); // led on while receiving data
    int brightness = Serial.parseInt(); //get slider value from p5
    Serial.println(brightness); //just to view the value

     if (Serial.read() == '\n') {
       analogWrite(ledPin, brightness); // will set brightness of LED

      }else
      {
        digitalWrite(LED_BUILTIN, HIGH);
      }
    }
}
P5 Code
//Exercise 2 - P5js Code
let slider;
function setup() {
   createCanvas(400, 400); // Creating canvas of 400x400 pixels
  slider = createSlider("0, 255, 0");
  slider.position(100, height/2); // Set the position of the slider
  slider.style('width', '80px'); // Set the width of the slider


  noStroke(); // No stroke for the ellipse initially
}
function draw() {

  background(255); // Refresh background on each frame

  if (!serialActive) {
    text("Press Space Bar to select Serial Port", 20, 30);
  } else {
    text("Connected", 20, 30);}
}
function keyPressed() {
  if (key == " ") {
    // setting the serial connection!!
    setUpSerial();
  }
}
// this callback function
function readSerial(data) {
    ////////////////////////////////////
    //READ FROM ARDUINO HERE
    ////////////////////////////////////
    //////////////////////////////////
    //SEND TO ARDUINO HERE (handshake)
    //////////////////////////////////
    console.log(slider.value());
    let sendToArduino = slider.value() + "\n";
    writeSerial(sendToArduino);

}
Video Demonstration
Schematic
Exercise 3: BI-DIRECTIONAL COMMUNICATION
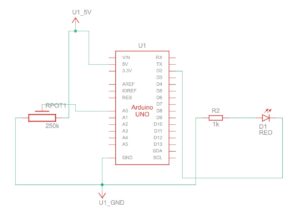
Every time the ball bounces one led lights up and then turns off, potentiometer is used as the analog sensor to control the wind.
Arduino Code
//Exercise 3 Arduino Code

const int poten_pin = A0;
const int ledPin = 2;
void setup() {
 Serial.begin(9600); // Start serial communication at 9600 bps
 pinMode(LED_BUILTIN, OUTPUT);
 pinMode(ledPin, OUTPUT);
 pinMode(poten_pin, INPUT);
 // start the handshake
 while (Serial.available() <= 0) {
   digitalWrite(LED_BUILTIN, HIGH); // on/blink while waiting for serial data
   Serial.println("0,0"); // send a starting message
   delay(300);            // wait 1/3 second
   digitalWrite(LED_BUILTIN, LOW);
   delay(50);
 }
}
void loop()
{
 // wait for data from p5 before doing something
   while (Serial.available())
   {
     digitalWrite(LED_BUILTIN, HIGH);
     digitalWrite(ledPin, LOW);
//read the position of ball from p5
     int position = Serial.parseInt();

     if (Serial.read() == '\n') {
       // Read potentiometer value
     int sensorValue = analogRead(poten_pin);
     //send value to p5
     Serial.println(sensorValue);
     }
//if ball is touching the ground i.e. height is zero, turn LED on
     if (position == 0)
     {
       digitalWrite(ledPin, HIGH);
     }
     else{
       digitalWrite(ledPin, LOW);
     }
   }
     digitalWrite(LED_BUILTIN, LOW);
   }
p5 Code
//Exercise 3 - P5js Code

let velocity;
let gravity;
let position;
let acceleration;
let breeze;
let drag = 0.99;
let mass = 50;
let heightOfBall = 0;
function setup() {
  createCanvas(640, 360); // Create a canvas of 800x400 pixels

  noFill();
  position = createVector(width/2, 0);
  velocity = createVector(0,0);
  acceleration = createVector(0,0);
  gravity = createVector(0, 0.5*mass);
  breeze = createVector(0,0);
}
function draw() {
  background(215);
  fill(0);

  if (!serialActive) {
    text("Press the space bar to select the serial Port", 20, 30);
  }
  else
  {
    text("Arduino is connected! Press b to jump.", 20, 30);

  applyForce(breeze);
  applyForce(gravity);
  velocity.add(acceleration);
  velocity.mult(drag);
  position.add(velocity);
  acceleration.mult(0);
  ellipse(position.x,position.y,mass,mass);

  if (position.y > height-mass/2) {
      velocity.y *= -0.9;  // A little dampening when hitting the bottom
      position.y = height-mass/2;

    heightOfBall = 0;

    }
    else {
      heightOfBall = 1;
    }
  }
}
function applyForce(force){
  // Newton's 2nd law: F = M * A
  // or A = F / M
  let f = p5.Vector.div(force, mass);
  acceleration.add(f);
}
function keyPressed() {
  if (key == " ") {
    // important to have in order to start the serial connection!!
    setUpSerial();
  }
  else if (key=='b'){
    mass=random(15,80);
    position.y=-mass;
    velocity.mult(0);
  }
}
// this callback function
function readSerial(data) {
    ////////////////////////////////////
    //READ FROM ARDUINO HERE
    ////////////////////////////////////

     if (data != null) {
    // make sure there is actually a message

    let fromArduino = split(trim(data), ",");

       // if the right length, then proceed
    if (fromArduino.length == 1) {
//sensor value is the input from potentiometer
      let sensorVal = int(fromArduino[0]);

//potentiometer value ranges from 0 - 1023
//for values less than 400,wind blows to right
      if (sensorVal < 400){
        breeze.x=1
      }
//if value between 400 and 500, wind stops so ball stops
      else if(sensorVal >= 400 && sensorVal < 500){
        breeze.x = 0
      }
//if value greater than 500, wind blows to left
      else {
        breeze.x = -1
      }
          //////////////////////////////////
          //SEND TO ARDUINO HERE (handshake)
          //////////////////////////////////
    }
//height of ball sent to arduino to check if ball on floor or not
    let sendToArduino = heightOfBall  + "\n";
    writeSerial(sendToArduino);
  }
}
Schematic
Video Demonstration


