
The concept:
For this week’s assignment Sarah and I created a DJ set! The set is built using two potentiometers, a digital switch, a piezo buzzer, servo motors, and two LEDs (for visual feedback). When connected to power, the set produces a melody that the player (DJ) can manipulate by using the first potentiometer (which controls the pitch) and the second potentiometer (which controls the tempo). The red LED blinks in sync with the tempo set by the second potentiometer. The yellow LED’s brightness is proportional to the pitch (the higher the pitch, the higher the brightness). The servo motor resembles the turntables on an actual DJ set. You can activate it by pressing the digital switch. Upon activation, the servo motor will rotate at a speed equivalent to the beat’s tempo.
Implementation
Effectively, the DJ set plays a sequence of notes in succession, stored in a global 2D array, whose pitch class and the tempo of the beat are controlled by the potentiometers. In switching successively between tempos and pitch classes, the player generates different tunes and overall musical moods. The player can also switch on the servo motor, whose position incrementally increases at the same rate set by the tempo the player chose. We utilize two Arduinos, one controlling the sound manipulation between different tempos and pitches using the potentiometers (as well as the LED) and the other controlling the servo motor via a switch. The first Arduino sender program sends the position of the servo motor at time intervals corresponding to the current rate set by the tempo, using the Inter-Integrated Circuit (I2C) Protocol, over to the second Arduino. The receiver program on the second Arduino receives the position and updates the location of the servo, conditional on the button state being on. As the first receiver program also needed to synchronize sound with the blinking of the LEDs, it was essential to extrapolate the concept of blinking without delay to the playing of tones by the buzzer.
Code Snippets
The sender Arduino program reads the two potentiometer values, using the first value to control the pitch (by mapping the value to the range 0-3, corresponding to the range of sequences in the global notes array ) and the second to control the tempo/rate of playing a note. The first value is used to index the 2D array, notes[][], which stores the sequence of notes in different pitches. It also sets the brightness of the yellow LED. The second is used to index the duration[] array, which specifies the rate at which notes are played. The notes in the array notes[potVal1] are played in succession, with the next note in the sequence playing if the specified duration has passed. The state of the red LED is updated to blink according to the rate of the current melody being played. Finally, the position of the servo motor is also updated and sent to the second Arduino program.
note++; // cycle through the sequence
if (note >= 5) {
note = 0; // Reset note index
}
// direction goes forward if position is at 0
if (position <= 0){
servoDir = 1;
}
// direction goes backward if position is at 160
else if (position >= 160){
servoDir = -1;
}
position = (position+servoDir*20)%180;
Wire.beginTransmission(8); // begin transmission to receiver
Wire.write(position); // send over the positon of the servo motor
Wire.endTransmission(); // stop transmitting
Wire.requestFrom(8, 6); // request 6 bytes from receiver device #8
delay(1);
}
}
The receiver Arduino program receives the position from the sender and updates the position if the switch state is set to 1 (the switch has been pressed to turn on the motor). Since the transmission occurs at a rate equivalent to the rate of the music, the motor will move according to the current tempo of the beat.
#include
#include
Servo servo; // initialize servo
int x = 0; // variable storing data transmission
int position = 0; // position of the servo motor
const int switchPin = 7; // switch pin
int buttonState = 0; // current button state
int prevButtonState=0; // previous button state
bool servoMove = false; // keeps track of the switch state
void setup() {
Serial.begin(9600);
pinMode(switchPin, INPUT);
servo.attach(9);
Wire.begin(8);
Wire.onReceive(receiveEvent); // initialize event triggered on receipt of data
Wire.onRequest(requestEvent); // initialize event on being requested data
}
void receiveEvent(int bytes) {
x = Wire.read();
// validate received data
if (x >= 0 && x <= 180) {
position = x; // x directly maps to servo position
}
}
void requestEvent()
{
Wire.write("Hello ");
}
void loop() {
buttonState = digitalRead(switchPin);
// maintain the state of the switch and use to determine if the motor should move
if (buttonState == HIGH && prevButtonState == LOW){
servoMove = !servoMove;
};
// smoothly move the servo towards the desired position
if (servoMove){
if (position != servo.read()) {
if (position > servo.read()) {
servo.write(servo.read() + 1);
} else {
servo.write(servo.read() - 1);
}
delay(1);
};
}
prevButtonState = buttonState;
}
Circuit Schematic
Here’s a schematic of our circuitry: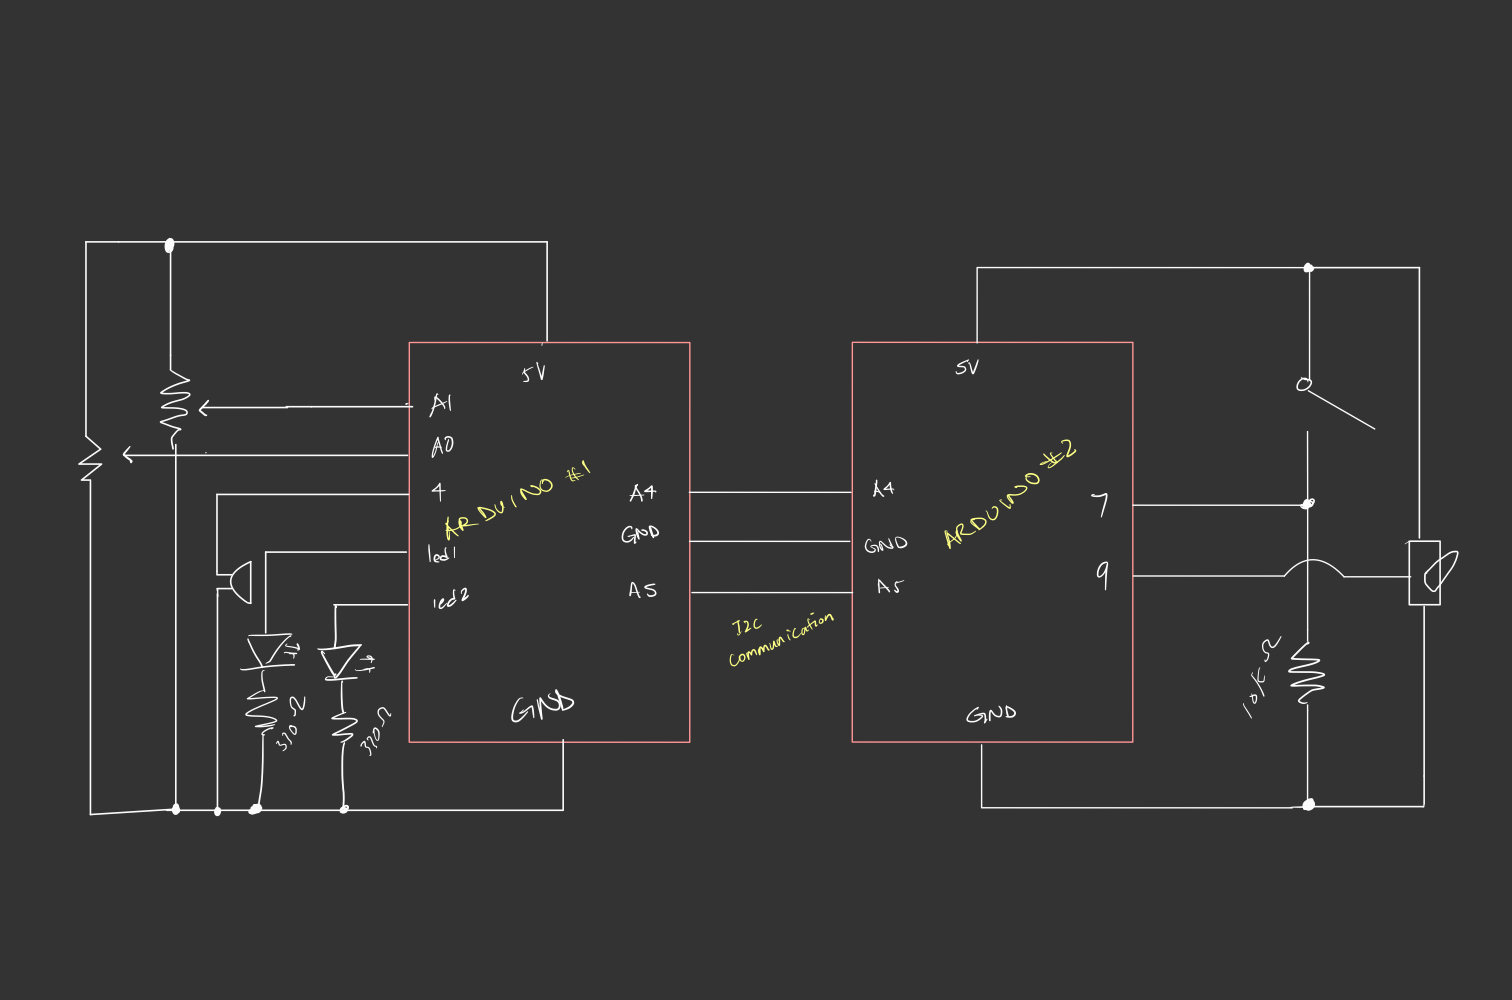
Have a look:
Reflections and Challenges
One of the things we struggled with, largely due to both of us lacking knowledge of musical compositions, is choosing the right sequence of tones that generate a coherent melody. With a combination of trial and error and some research, we found a suitable sequence. We also faced the challenge of one of our LED lights not turning on when we wired the servo motor to the same circuit. Instead of adding a second power source to connect the servo motor to, we opted to utilize I2C since we had an additional Arduino, which proved to be a useful exercise. Overall, we were happy with the final product, but I think it would be nice to extend this project further and give the player a little more creative control as the current setup is quite restrictive in terms of what final melodies the player can generate. For instance, we can have additional buzzers, each producing a different tone, controlled by switches that the users can use to make their own tunes from scratch over a set beat (something like a MIDI controller? ) .