
Introduction
For this project, Aneeka and I wished to create our own recreation of a music box (or musical box, for those from the Commonwealth). This was a popular toy/gramophone in the past (depending on how you viewed it) and we even remember having a small old one back at home in India. While they have taken many different forms, we based ours on a simple electronic one that played music when you opened the box.

Figure 1: A music box
Components
- 1 Arduino Uno R3 SMD
- 1 Photoresistor
- 1 Slideswitch
- 1 Arduino Piezo Buzzer
- 2 10 kΩ Resistor
- Jumper Wires
Circuit Schematic and Simulation
The first step was to prepare a circuit schematic on TinkerCAD. Basically, the digital input took the form of a slideswitch feeding into a digital input pin (pin 4) through a 10 kΩ pull-down resistor. Analog Input came from the photoresistor connected to pin A0. The buzzer output was from pin 8.
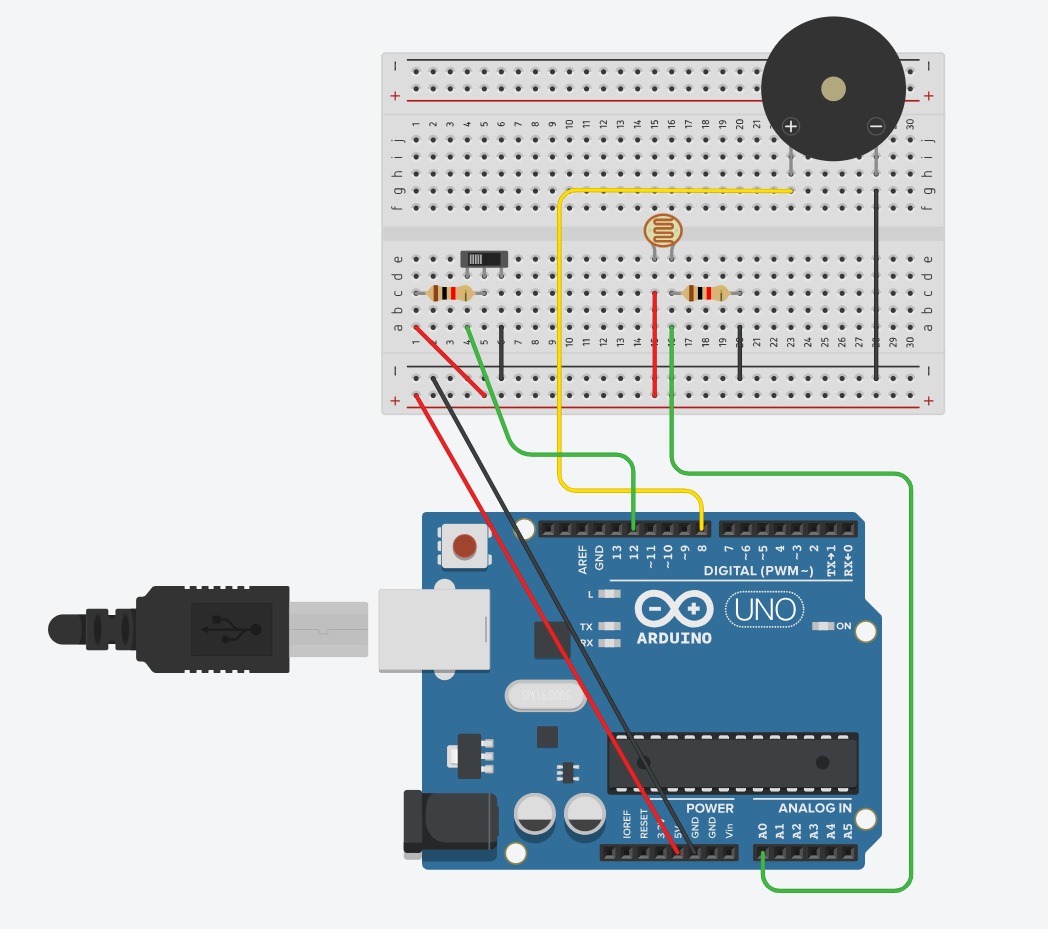
Figure 1: Component Simulation View
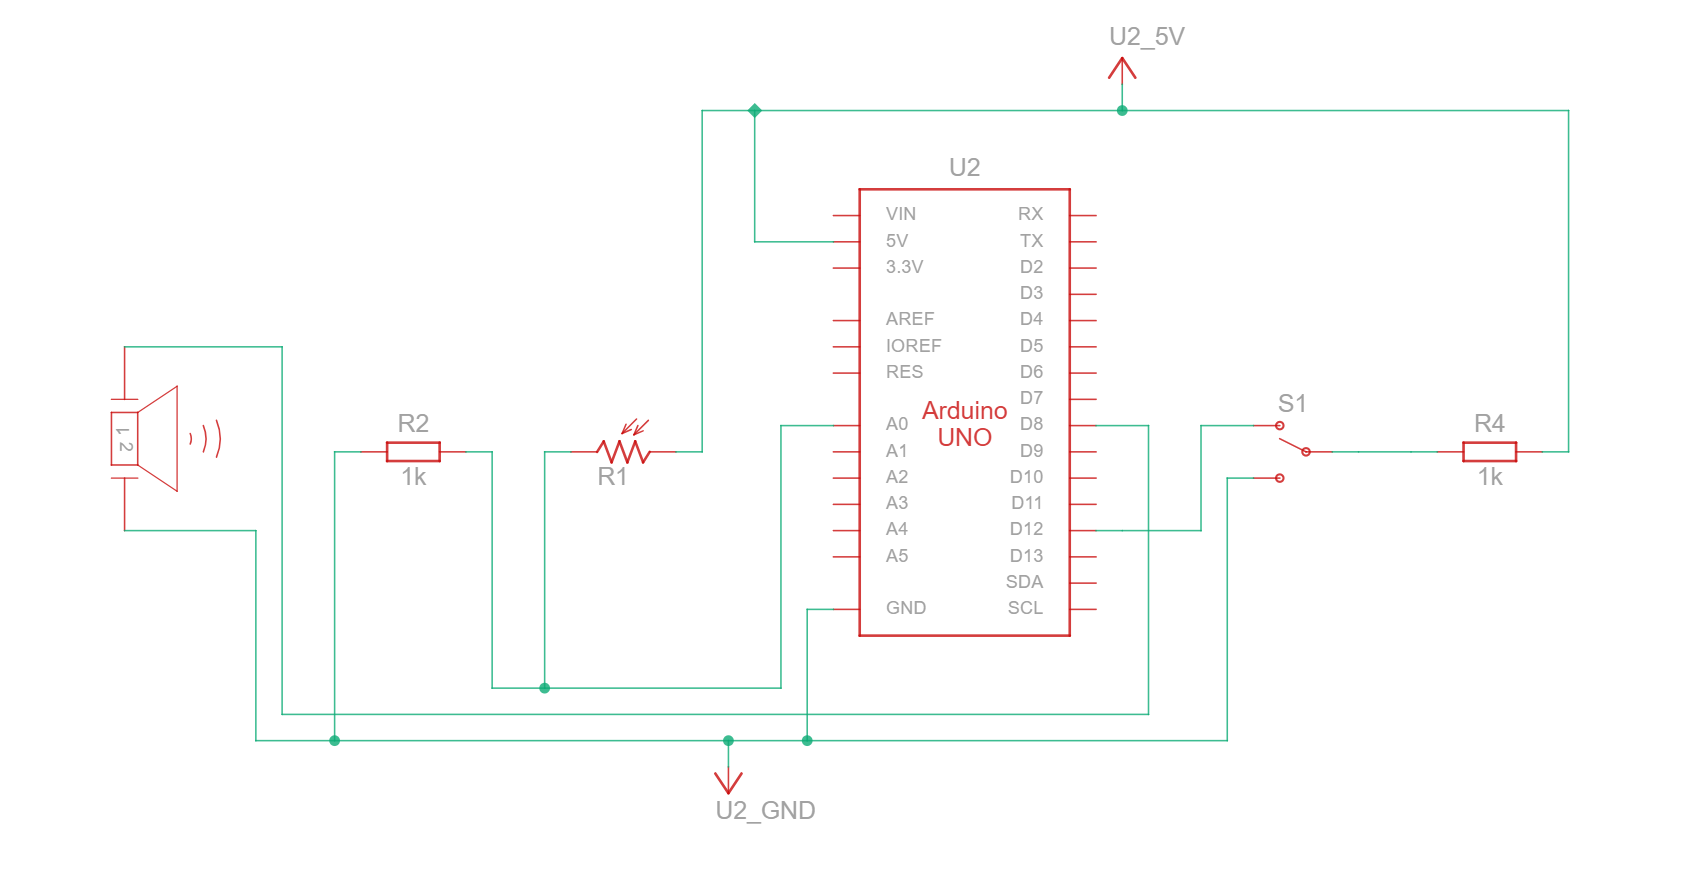
Figure 2: Schematic View
TinkerCAD also has a handy simulation functionality, that even allows to upload the Arduino code and test how the circuit would work under simulator conditions. This definitely helped in fixing bugs before even testing with the actual circuit, and also helped to individually simulate each component before assembling together.
Usage
Basically, there are two main control points: opening/closing the box, and sliding the switch between ON/OFF.
When the box is opened, light falling on the photoresistor exceeds the threshold and thus triggers the playSong() function, which iterates over the notes in the pre-assigned song and plays it using the buzzer. When the box is closed, the light intensity falls below the threshold and the for loop breaks / is not triggered again, causing the music to stop playing.
When the switch is ‘ON’, pin 4 detects a ‘HIGH’ voltage and thus the Arduino plays song 1, which for this example we chose to be Toby Fox’s Megalovania from the game Undertale.
When the switch is ‘OFF’, pin 4 detects a ‘LOW’ voltage and thus the Arduino plays song 2, which for this example we chose to be Mikkel Fabricus Smitt’s Subway Surfers Main Theme from the game Subway Surfers.
Code
#define LDR_PIN A0
#define SWITCH_PIN 4
#define BUZZER_PIN 8

#include "pitches.h"

int ldrThreshold = 500; // Adjust this value according to your LDR sensitivity
int song = 1;

void setup() {
  pinMode(LDR_PIN, INPUT);
  pinMode(SWITCH_PIN, INPUT);
  pinMode(BUZZER_PIN, OUTPUT);
  Serial.begin(9600);
}

void loop() {
  // Read the light level from the LDR
    int lightLevel = analogRead(LDR_PIN);
    Serial.println(lightLevel);
  // If the light level exceeds the threshold, play the first song
  if (lightLevel > ldrThreshold) {
      // Check if the switch is pressed to change to the second song
    if (digitalRead(SWITCH_PIN) == LOW) {
      playSong(2);
      // Add some delay or debounce to prevent rapid switching
      delay(10);
      int song = 1;}
    else {
      playSong(1);
      delay(10);
      int song = 2;    }
  }
  else {
    noTone(BUZZER_PIN);
  }
}

void playSong(int songNumber) {
  // Define the melody and duration for each song
  int melody1[] = { NOTE_D4, NOTE_D4, NOTE_D5, NOTE_A4, 0, NOTE_GS4, NOTE_G4, NOTE_F4, NOTE_D4, NOTE_F4, NOTE_G4,
  NOTE_C4, NOTE_C4, NOTE_D5, NOTE_A4, 0, NOTE_GS4, NOTE_G4, NOTE_F4, NOTE_D4, NOTE_F4, NOTE_G4,
  NOTE_B3, NOTE_B3, NOTE_D5, NOTE_A4, 0, NOTE_GS4, NOTE_G4, NOTE_F4, NOTE_D4, NOTE_F4, NOTE_G4,
  NOTE_AS3, NOTE_AS3, NOTE_D5, NOTE_A4, 0, NOTE_GS4, NOTE_G4, NOTE_F4, NOTE_D4, NOTE_F4, NOTE_G4
   };
  int noteDurations1[] = { 8, 8, 4, 4, 8, 4, 4, 4, 8, 8, 8,
   8, 8, 4, 4, 8, 4, 4, 4, 8, 8, 8,
   8, 8, 4, 4, 8, 4, 4, 4, 8, 8, 8,
    8, 8, 4, 4, 8, 4, 4, 4, 8, 8, 8
  };

  int melody2[] = {
  // NOTE_C4, 0, NOTE_G4, 0, NOTE_AS4, NOTE_C5, NOTE_AS4, 0, NOTE_F4, NOTE_DS4, 0,
  // NOTE_C4, 0, NOTE_G4, 0, NOTE_AS4, NOTE_C5, NOTE_AS4, 0, NOTE_F4, NOTE_DS4, 0,
  // NOTE_C4, 0, NOTE_G4, 0, NOTE_AS4, NOTE_C5, NOTE_AS4, 0, NOTE_F4, NOTE_DS4, 0,

  // NOTE_C4, 0, NOTE_E4, 0, NOTE_G4, NOTE_A4, NOTE_AS4,
  NOTE_C5, 0, NOTE_C5, 0, NOTE_AS4, 0, NOTE_A4, 0,
  NOTE_AS4, 0, NOTE_AS4, NOTE_C5, 0, NOTE_AS4, NOTE_A4, 0,
  0,
  NOTE_C5, 0, NOTE_AS4, 0, NOTE_A4, 0, NOTE_AS4, 0, NOTE_E5,
  0,

  NOTE_C5, 0, NOTE_C5, 0, NOTE_AS4, 0, NOTE_A4, 0,
  NOTE_AS4, 0, NOTE_AS4, NOTE_C5, 0, NOTE_AS4, NOTE_A4, 0,
  0,
  NOTE_C5, 0, NOTE_AS4, 0, NOTE_A4, 0, NOTE_AS4, 0, NOTE_E4,0
};

int noteDurations2[] = {
  // 4, 8, 4, 8, 4, 8, 8, 16, 8, 8, 16,
  // 4, 8, 4, 8, 4, 8, 8, 16, 8, 8, 16,
  // 4, 8, 4, 8, 4, 8, 8, 16, 8, 8, 16,

  // 4, 8, 4, 8, 4, 4, 4,
  8, 16, 8, 16, 8, 16, 8, 16,
  8, 16, 8, 8, 16, 8, 8, 16,
  4,
  8, 16, 8, 16, 8, 16, 8, 4, 8,
  4,

  8, 16, 8, 16, 8, 16, 8, 16,
  8, 16, 8, 8, 16, 8, 8, 16,
  4,
  8, 16, 8, 16, 8, 16,8,4,8,4
};

  // Select the melody and note durations based on the song number
  int *melody;
  int *noteDurations;
  int notes;

  if (songNumber == 1) {
    melody = melody1;
    noteDurations = noteDurations1;
    notes = sizeof(melody1) / sizeof(melody1[0]);
  } else {
    melody = melody2;
    noteDurations = noteDurations2;
    notes = sizeof(melody2) / sizeof(melody2[0]);
  }

  // Play the selected melody
  for (int i = 0; i < notes; i++) {
    //Read light level from LDR
    int lightLevel = analogRead(LDR_PIN);
    Serial.println(lightLevel);
    if((lightLevel > ldrThreshold) || (song == 1 && digitalRead(SWITCH_PIN) == HIGH) || (song == 2 && digitalRead(SWITCH_PIN) == LOW)){
      int duration = 1000 / noteDurations[i];
      tone(BUZZER_PIN, melody[i], duration);
      delay(duration * 1.3); // Add a slight delay between notes for better sound quality
      noTone(BUZZER_PIN);
    } else{
      break;
    }
  }
}
The notes refer to the pitches.h header file from the toneMelody example on Arduino IDE.
The code is not too different from the examples we did in class, which was a major advantage of this project. To switch between two different songs, we assigned the information about the songs to pointers.
Also, to ensure that the song switched off as soon as possible when the switch or photoresistor were toggled, we used an if statement that led to a statement to break the loop, which immediately stops playing.
The notes and durations were obtained from this Github repository: https://github.com/hibit-dev/buzzer/tree/master. Since the repository did not have the notes for Megalovania, that was manually transformed from its sheet music online.
Showcase
Reflections
We both really enjoyed working on this project. For something that was relatively simple, it was still quite impressive.
We were especially happy with the solution we found in using the break statement. Because earlier, the photoresistor was only taking an input after the ‘for’ loop was completed, and thus the song kept playing even when the box was closed, contrary to our expectations. Breaking the loop avoids that issue.