
Concept: For this project, I need to use both digital and analog sensors along with indicators like LEDs to get creative. After thinking about different ideas, I realized my inspiration is: I’ve always wanted to upgrade my Marvel’s Moon Knight action figure. Just like in the comics, I want his face and symbol on his chest to light up red when it’s dark, giving a warning to criminals. I also want some background lighting, like thunder effects. So, I thought of using some cool LEDs and sensors to recreate this scene. To achieve this, I’ll be using a photocell as the analog sensor and a push button as the digital sensor.
Materials I used:
1. Arduino Uno Board
2. Breadboard
3. Two Leds (Red and Green)
4. Three 220 Ohm Resistors
5. Push Button
6. Photo-resistor (Light Sensor)
7. Jumper Wires
So the final circuit include all of these items, as well as my Moon Knight Action Figure.
Implemented Code with comments:
int led = 11; // LED pin connected to an analog sensor
int buttonPin = 2; // Button pin, using pin 2 for example
int buttonState = 0; // Variable for reading the push button status
int secondLed = 12; // Second LED pin, using pin 12 for example
bool blinking = false; // State to control the blinking

void setup() {
  Serial.begin(9600); // Starts the serial communication
  pinMode(led, OUTPUT); // Sets the led as an output
  pinMode(buttonPin, INPUT_PULLUP); // Initialize the push button pin as an input with an internal pull-up resistor
  pinMode(secondLed, OUTPUT); // Sets the second led as an output
}

void loop() {
  int sensorValue = analogRead(A2); // Read the value from the analog sensor
  Serial.println(sensorValue); // Print the value to the serial monitor
  analogWrite(led, map(sensorValue, 0, 1023, 255, 0)); // Write the inverted analog value to the LED

  int currentButtonState = digitalRead(buttonPin); // Read the current state of the push button

  // Check if button state has changed from high to low (button press)
  if (currentButtonState != buttonState && currentButtonState == LOW) {
    blinking = !blinking; // Toggle blinking state
  }
  buttonState = currentButtonState; // Update the buttonState

  // If the button was pressed, start blinking
  if (blinking) {
    digitalWrite(secondLed, HIGH); // Turn on second LED
    delay(250); // Wait for 250ms
    digitalWrite(secondLed, LOW); // Turn off second LED
    delay(250); // Wait for 250ms
  } else {
    // Turn off second LED when sensor value reaches 200 or more
    if (sensorValue >= 200) {
      digitalWrite(led, LOW); // Turn off LED
    } else {
      digitalWrite(led, HIGH); // Turn on LED
    }
  }

}
Video Demonstation:
Images:
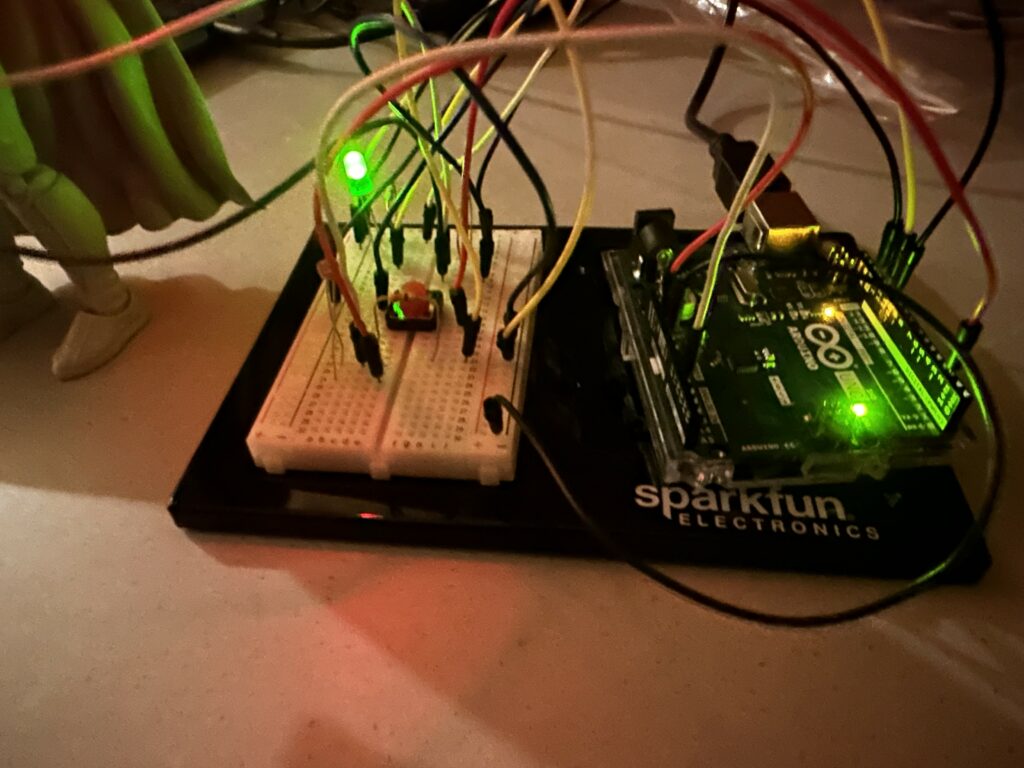 Figure 1.1: Closer View of the Circuit during Night time
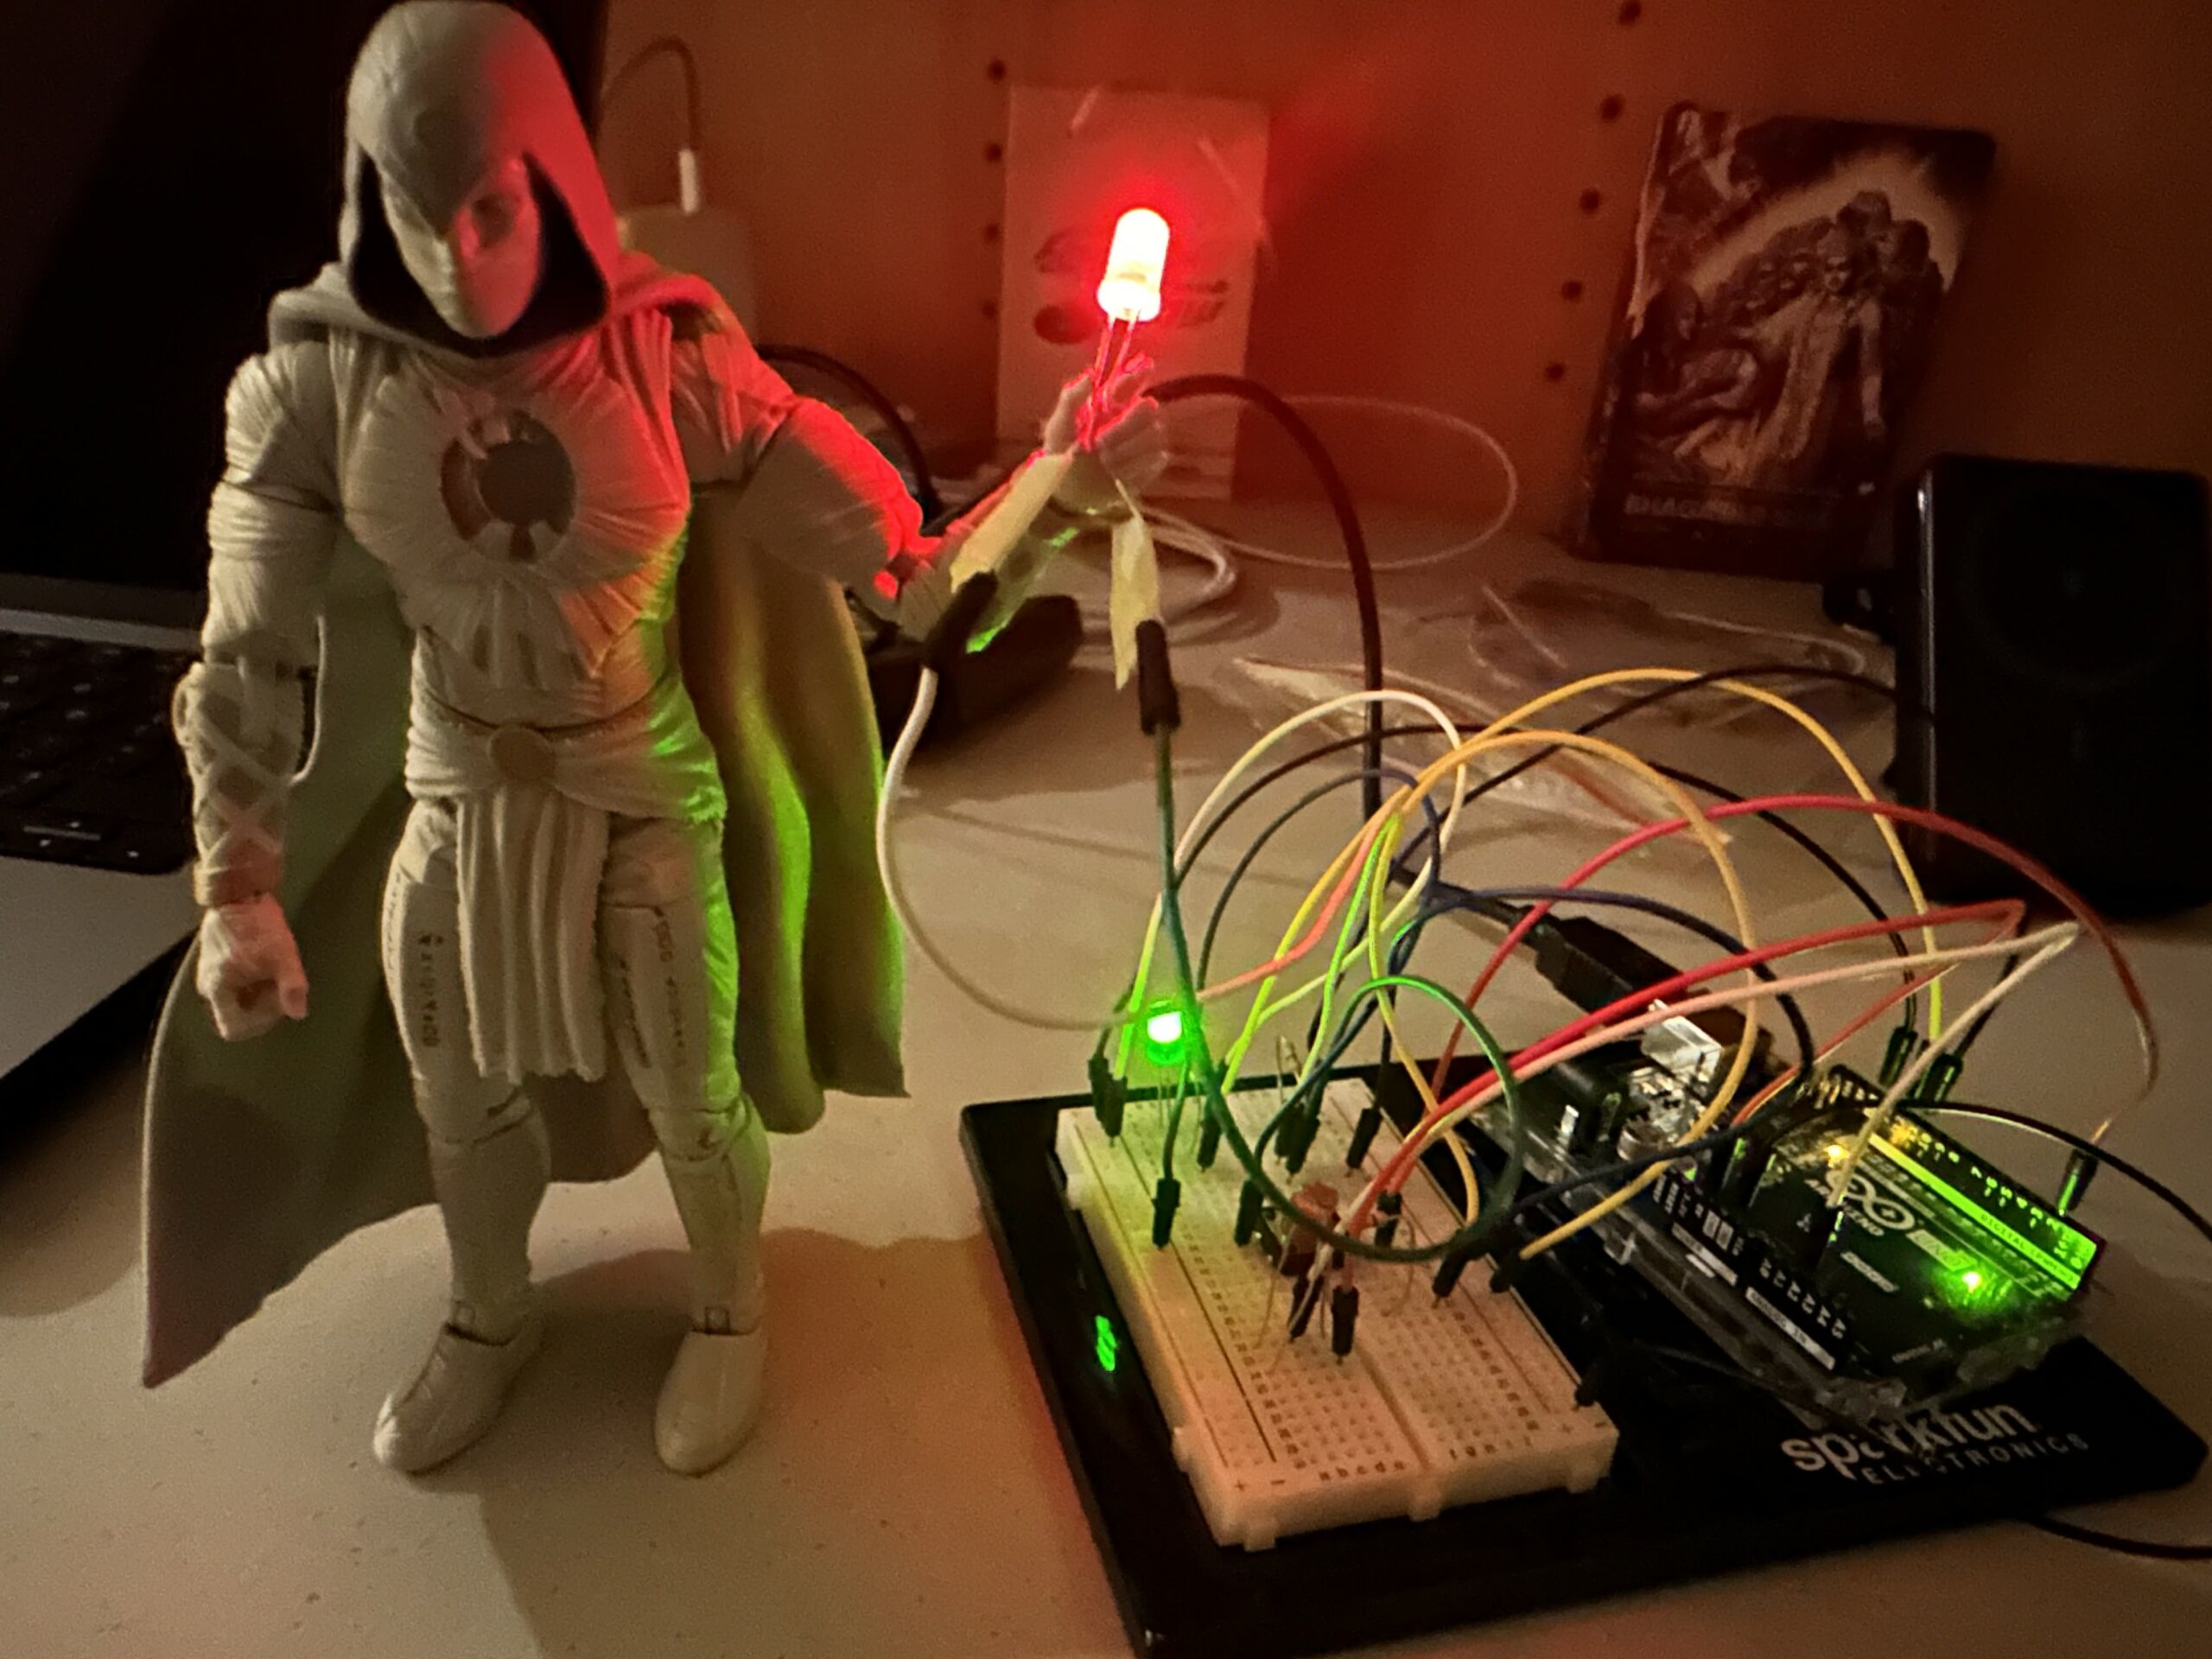 Figure 1.2: Complete View of the Circuit, Including with Action Figure. (Night Time)
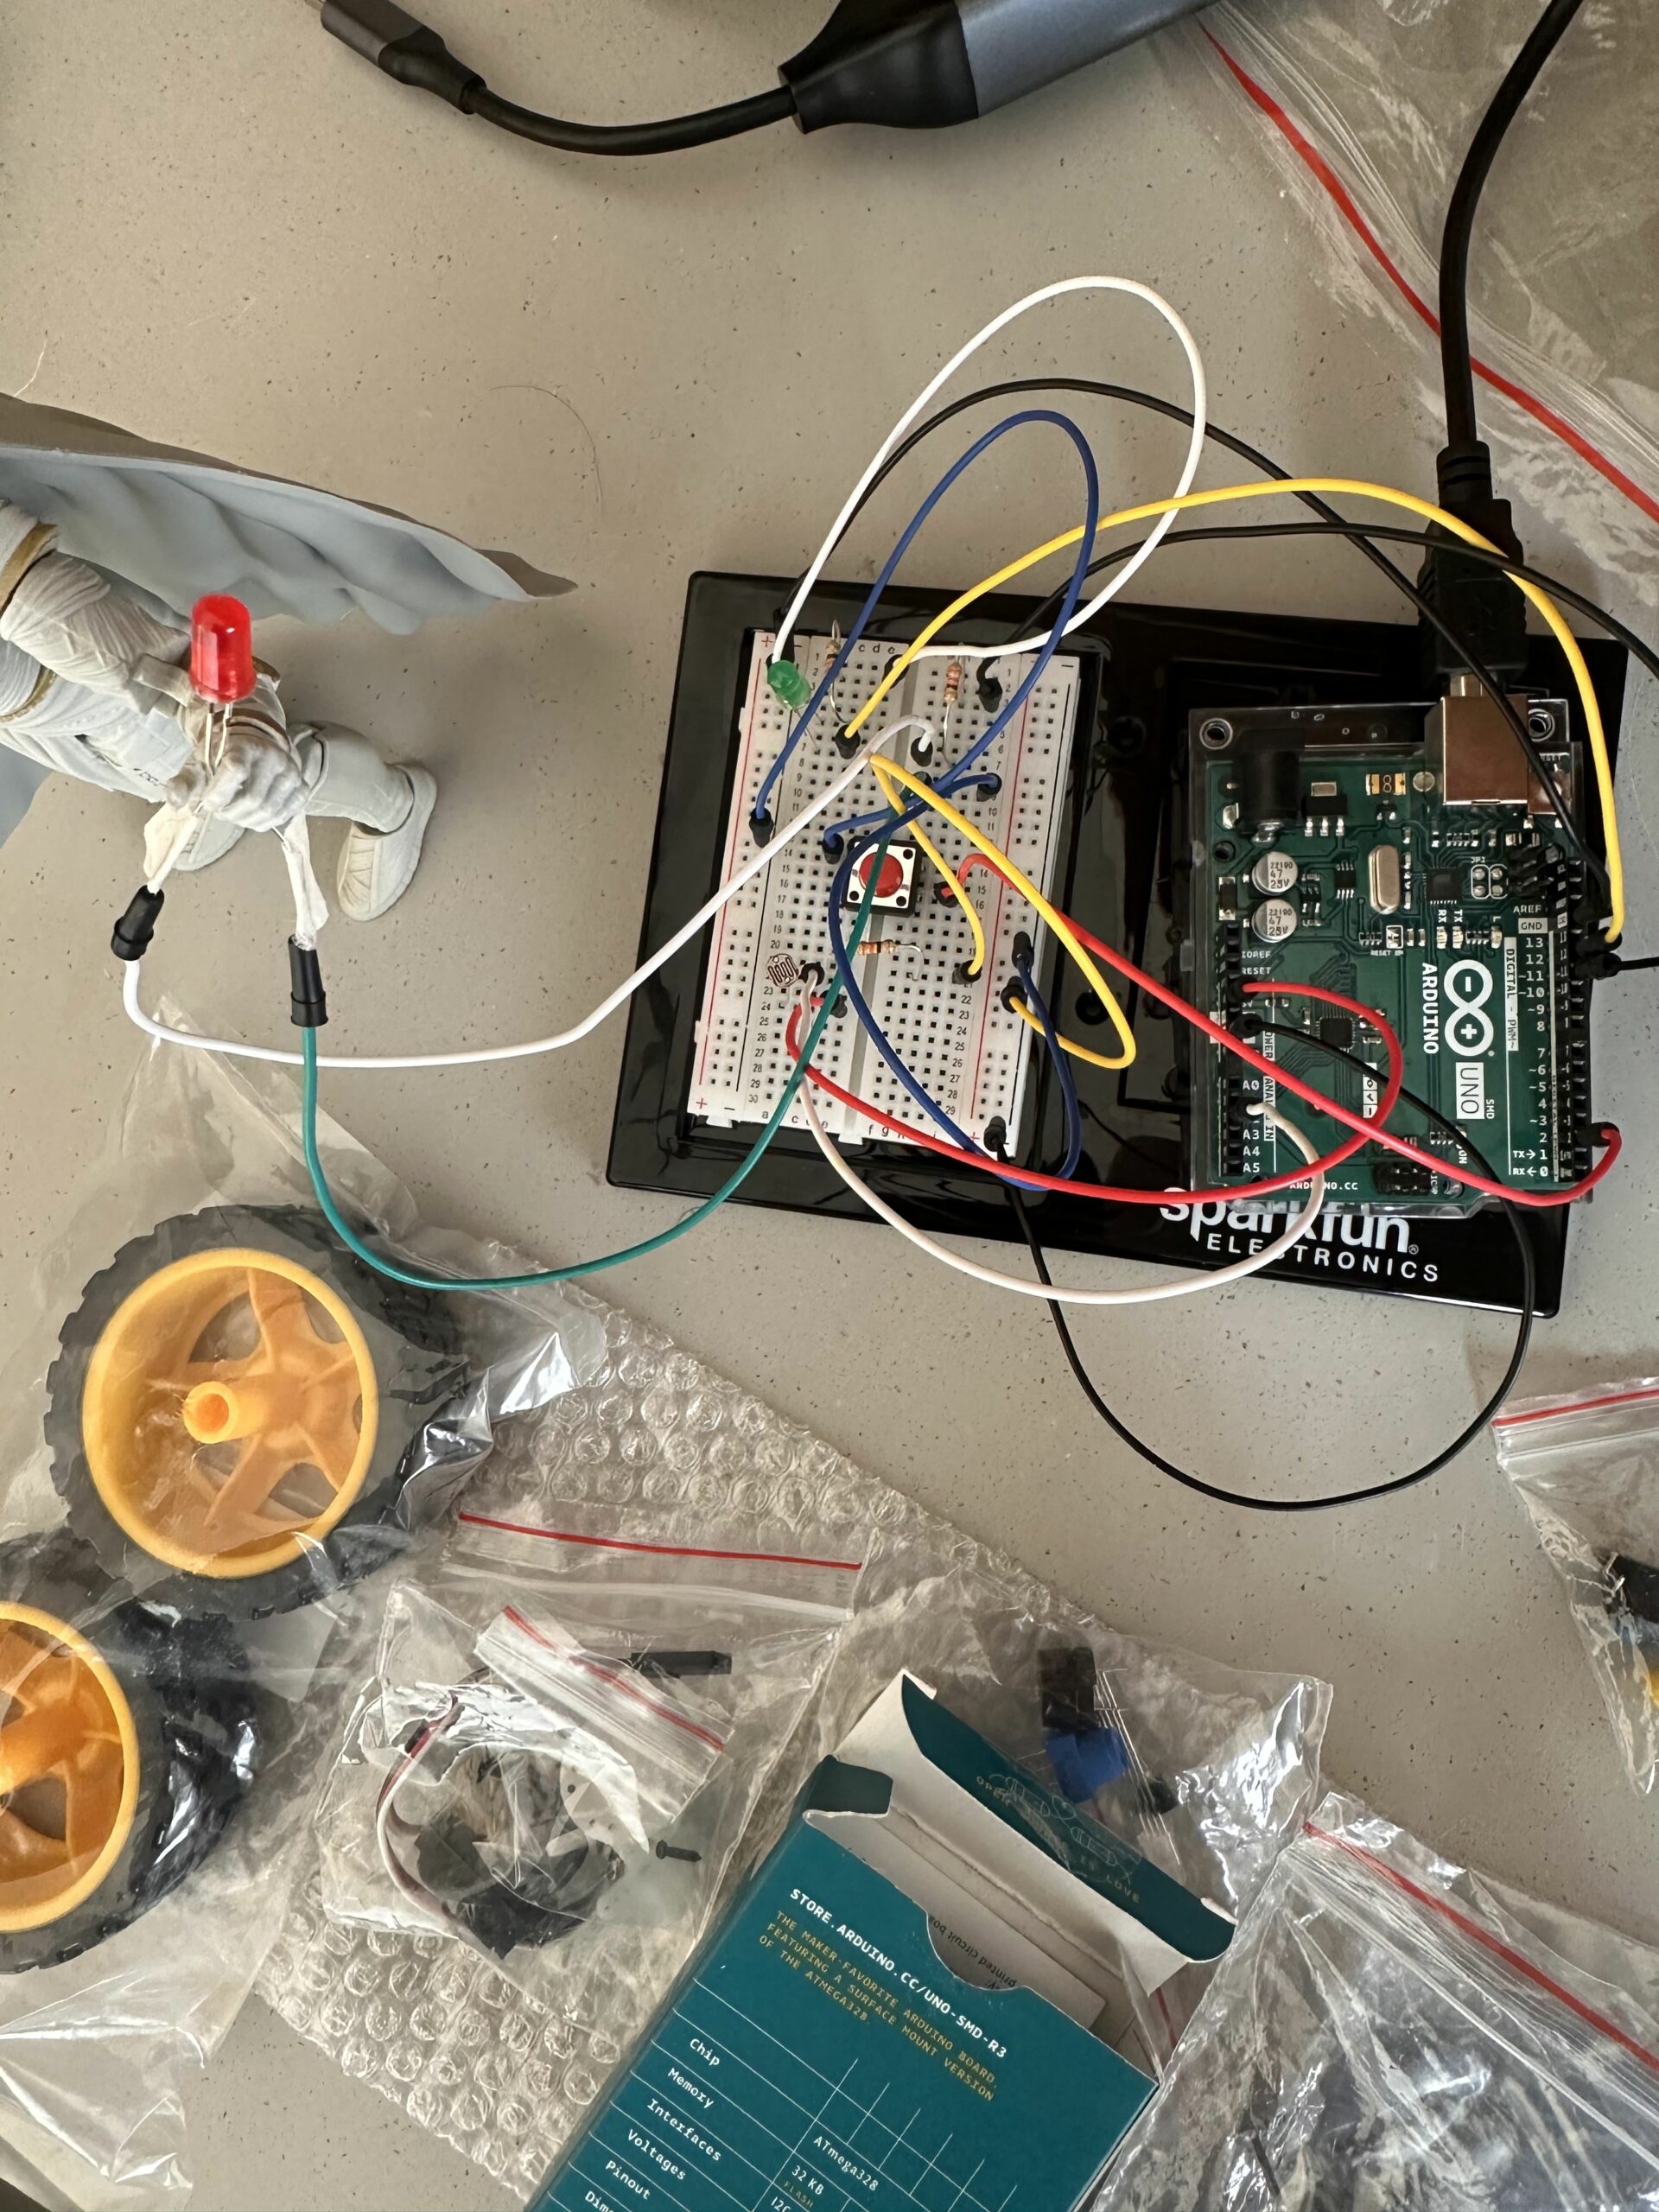 Figure 1.3: Top Angle View of the circuit during the Day time.
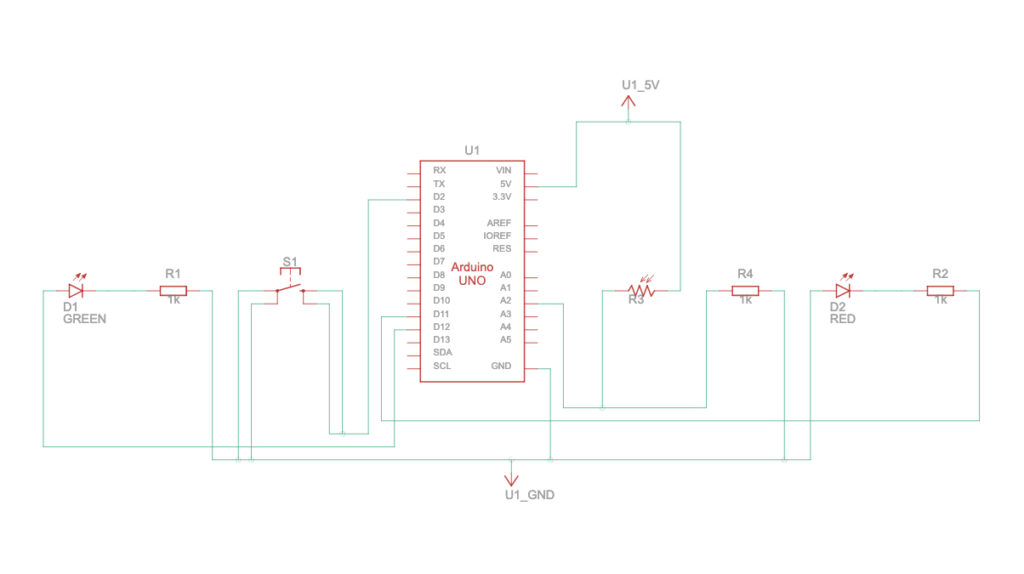
Sketch: Circuit Schematics

 How circuit works:
LEDs and Resistors: There are two LEDs, a green and a red one. Each LED is connected to a digital pin on the Arduino (green to pin 11 and red to pin 12) through a resistor. The resistors limit the current to the LEDs to prevent them from burning out due to excessive current. The longer leg (anode) of the LEDs is connected to the resistor, and the other side of the resistor is connected to the Arduino pins. The shorter leg (cathode) of the LEDs is connected to the ground (GND) on the Arduino to complete the circuit.
PushButton: The pushbutton has one side connected to 5V and the other side to both the ground (through a resistor) and to digital pin 2 of the Arduino. The resistor is a pull-down resistor that ensures the pin is at a known low signal when the button is not pressed. When the button is pressed, it connects the pin directly to 5V, giving a high signal. The internal pull-up resistor on the Arduino pin is activated in the code (INPUT_PULLUP), which means the pin is normally high, and pressing the button brings it to low. Moreover an analog sensor is connected to the analog pin A2 on the Arduino.
- For the Green LED: When the Arduino runs, it reads the value from the analog sensor connected to A2. This value is a measure of voltage that changes with the sensor’s readings. The Arduino then converts this reading to a corresponding brightness level for the green LED using
analogWrite(), which uses pulse-width modulation (PWM) to simulate varying levels of brightness by quickly turning the LED on and off. - For the Red LED: The Arduino continuously reads the state of the pushbutton. When the button is detected as pressed (the signal on pin 2 goes from high to low due to the
INPUT_PULLUPmode), it changes theblinkingvariable’s state. Whenblinkingis true, the program likely causes the red LED to turn on and off at certain intervals, simulating a blinking effect.Schematic Diagram Explanation: Ultimately, the LEDs are represented by the symbols labeled ‘D1 GREEN’ and ‘D2 RED’. The resistors, labeled ‘R1’ and ‘R2’, are in series with the LEDs and connected to the digital pins on the Arduino symbol ‘U1’. The Arduino is central to the schematic and is labeled ‘U1’. All components are connected to it. It is shown with connections to power (5V and GND), the digital pins, and the analog pins. Hence the current flows from the 5V pin through the pushbutton when it is closed, and through the LEDs when they are enabled by the Arduino. Lastly this manages the flow by turning the pins to HIGH (5V) or LOW (0V) states and reading the voltage level from the analog sensor to determine the sensor’s readings.
Challenges and Reflection:
1) Connections of Jumper Wires: Connecting the wires to the action figure was a challenge because plastic tape doesn’t conduct electricity well. I had to ensure the ends of the jumper wires stayed firmly connected to the anode and cathode ends of the red LED without any loose connections. After some effort, I managed to secure the ends firmly with three to four pieces of tape.
2) Push Button: The push button I used had a tendency to bounce (it has a loose connection with the bread board), causing unintended multiple presses. To solve this, first I implemented a delay in the code and they fixed the button with the help of screwdriver.
3) Photo-resistor Sensitivity and Range: The response of the photoresistor varied depending on the ambient light conditions. If the light levels fell outside the photo-resistor’s sensitive range, the LED wouldn’t respond as expected. To address this, initially I had to dim all the lights to make the room dark and I changed the range a bit limiting the sensor value from 400 to 250 then adjusted the code to accommodate my room lighting conditions, ensuring consistent LED performance.
Future Improvements:
a) I have an improvement in mind for the blinking green light in the background. Currently, it blinks manually with a delay of 250 ms. However, I want to integrate it with the background system so that when there’s a high pitch, the green background LED lights up brighter, and otherwise, it remains constantly low.
Overall, despite the hours spent on connections and coding, I’m satisfied with the outcome of the project. It feels completely worthwhile to recreate the scene of my favorite superhero from the comics! In the future, I’d love to enhance it further with more LEDs and sensors.